Integrate Cisco NSO

This chapter contains the following topics:

NSO Integration Workflow

This section explains the steps in integrating Cisco NSO with Crosswork Network Controller.

Please see the Release Notes for Crosswork Network Controller 7.1.0 to know the NSO version compatible with Crosswork Network Controller.

1. Install the compatible version of Cisco NSO

Ensure that you have installed the compatible version of Cisco NSO. For more information, follow the instructions in NSO documentation.

Additionally, for Cisco NSO LSA setup, see (Optional) Set up Cisco NSO Layered Service Architecture.

See the Compatibility Information section in the Release Notes for Crosswork Network Controller 7.1.0 for information on the compatible versions of NSO/NED.

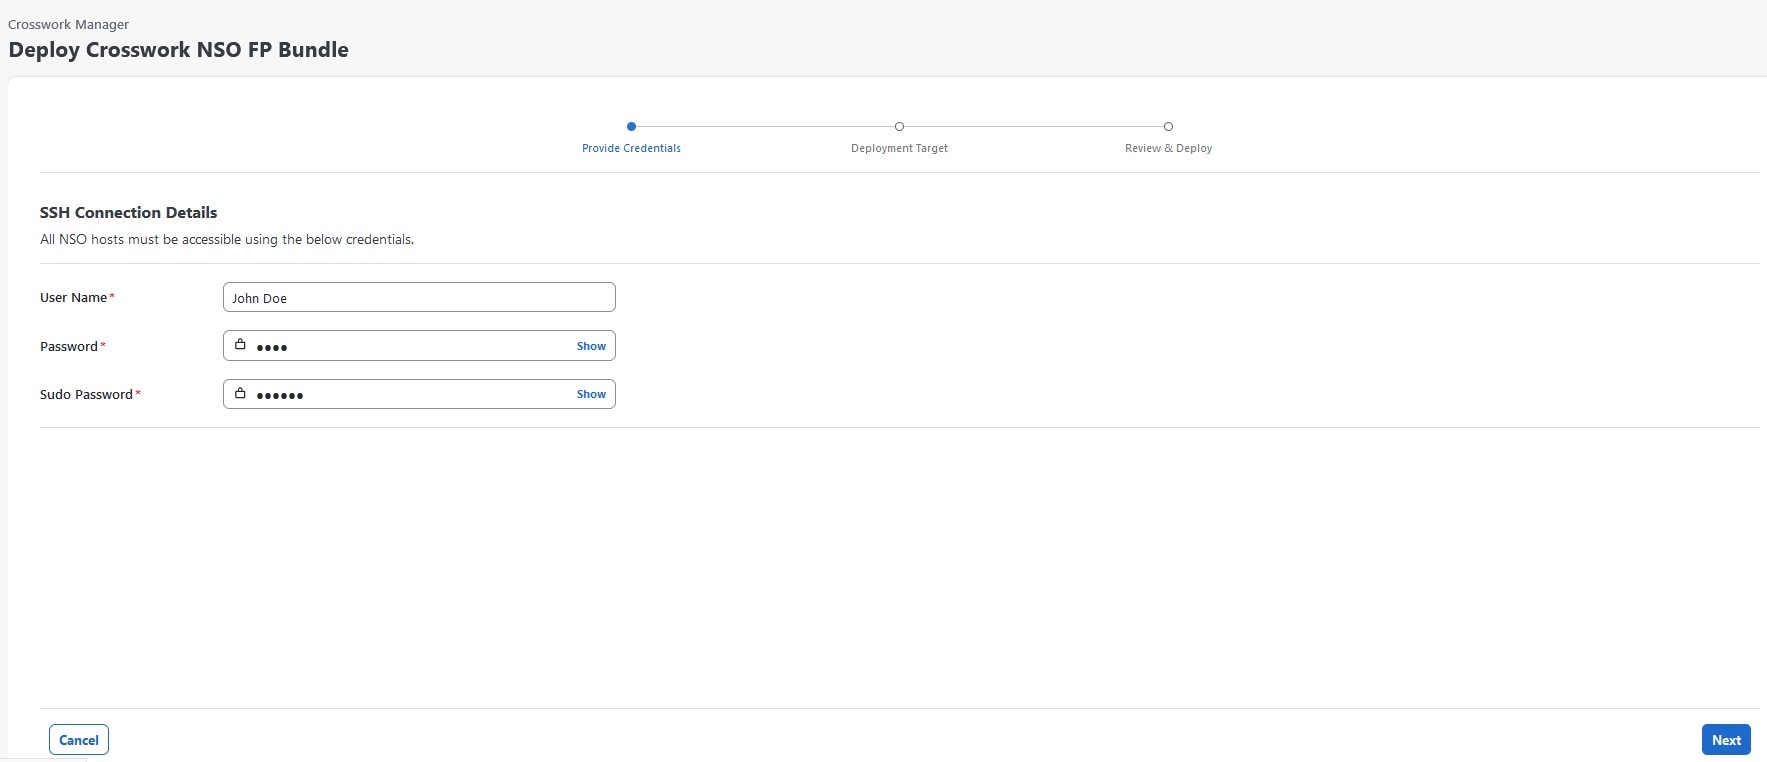
2. Add the NSO provider and verify connectivity

Follow the instructions in Add Cisco NSO Providers.

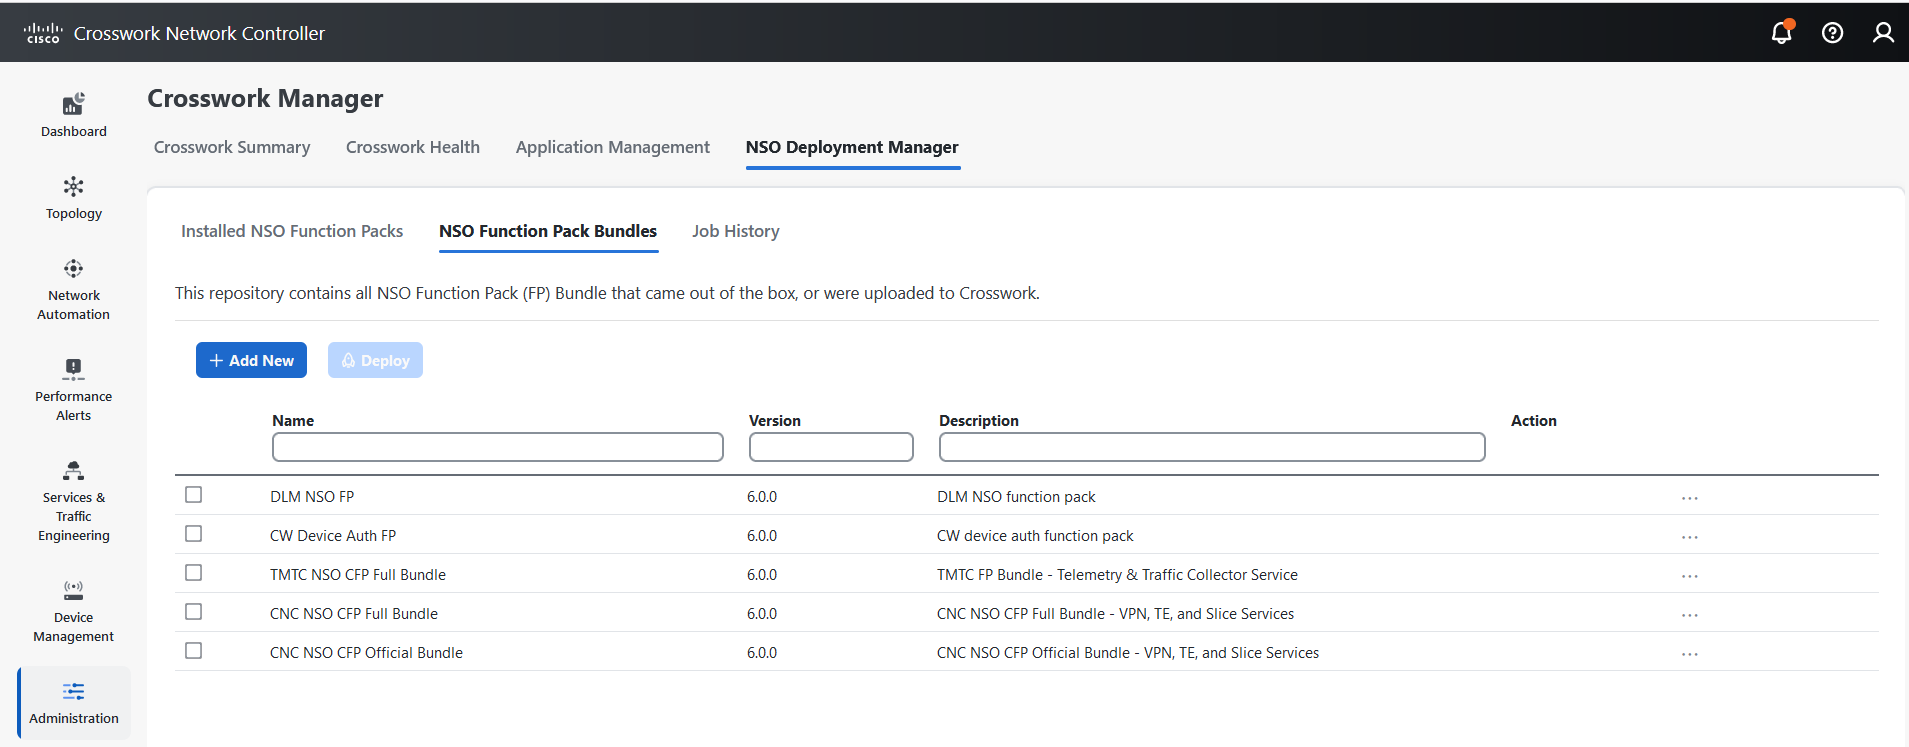
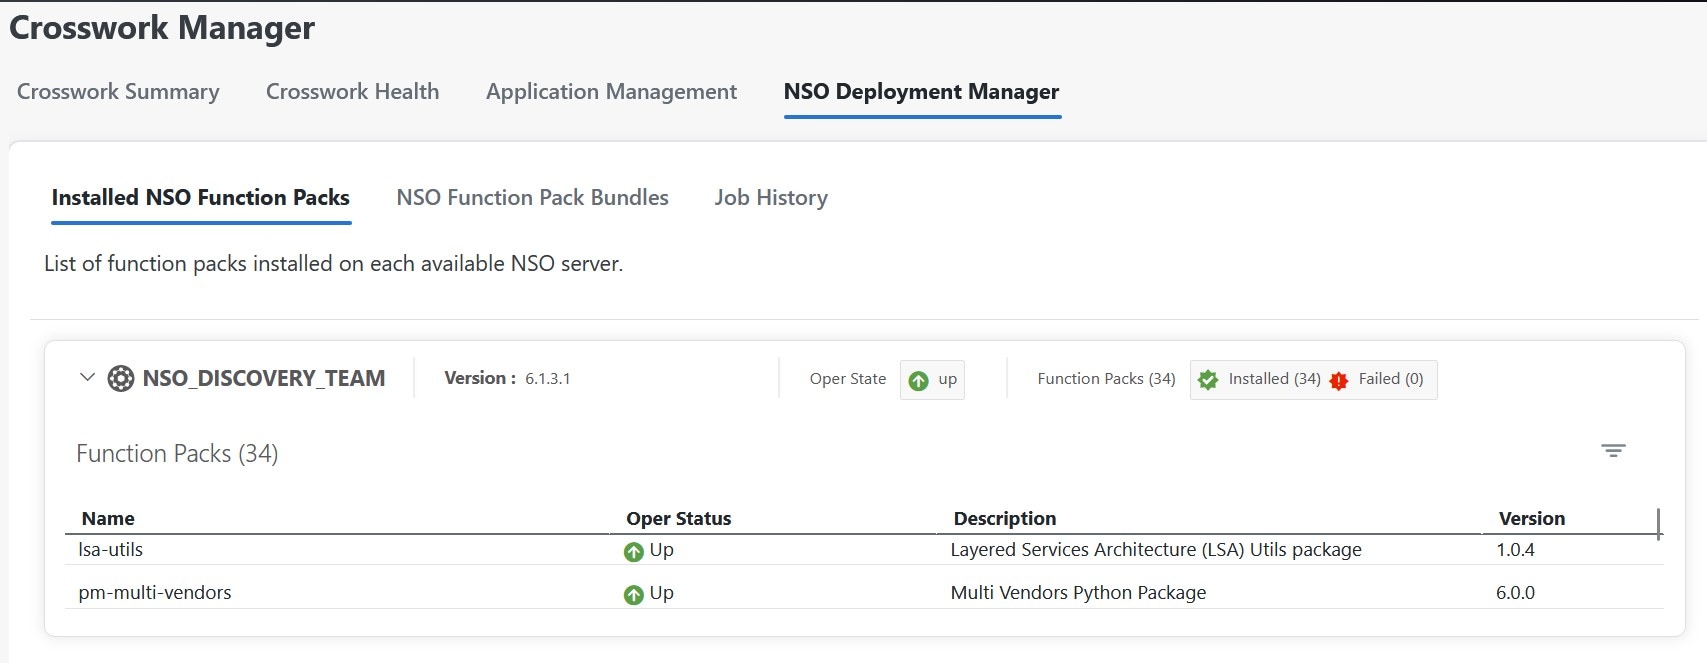
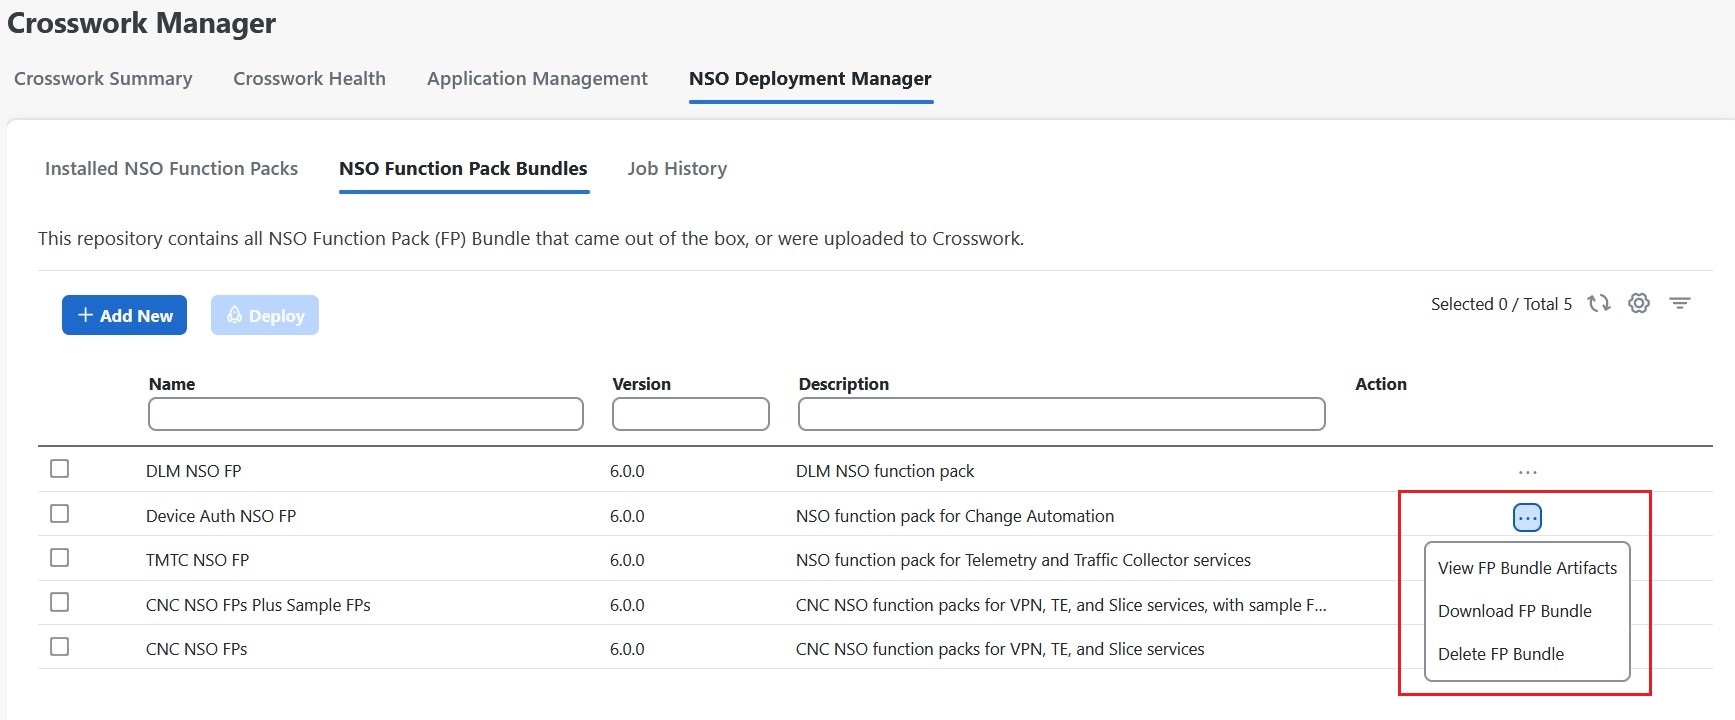
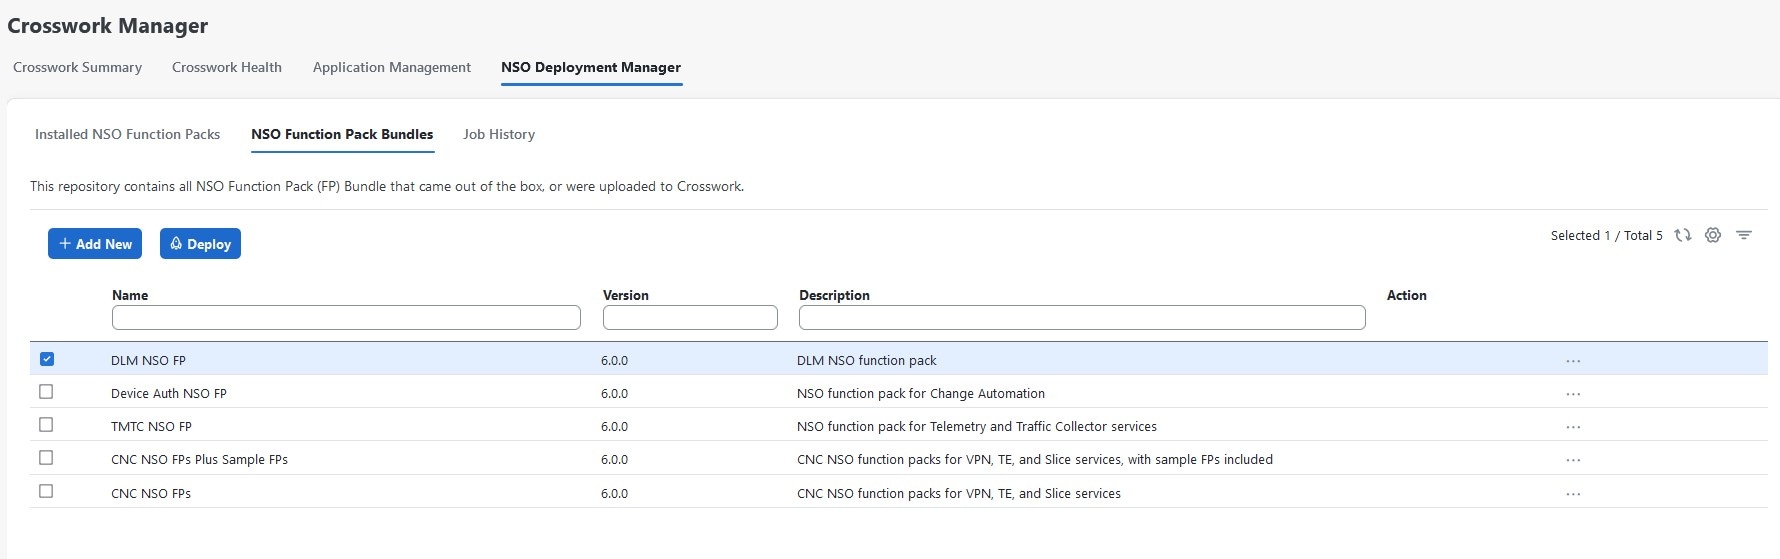
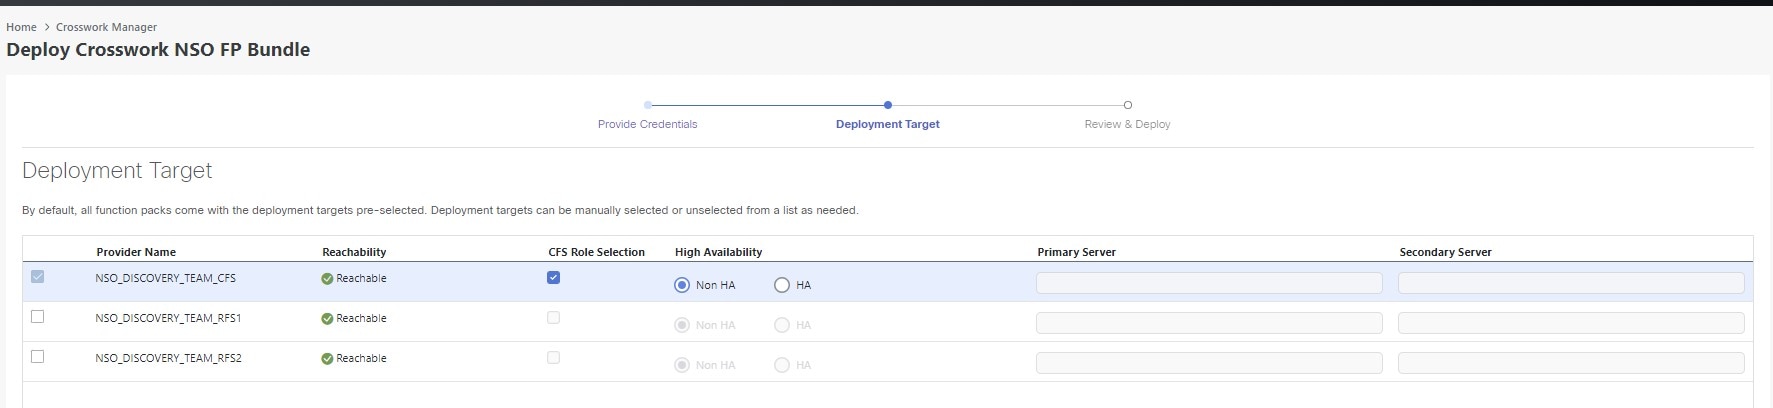
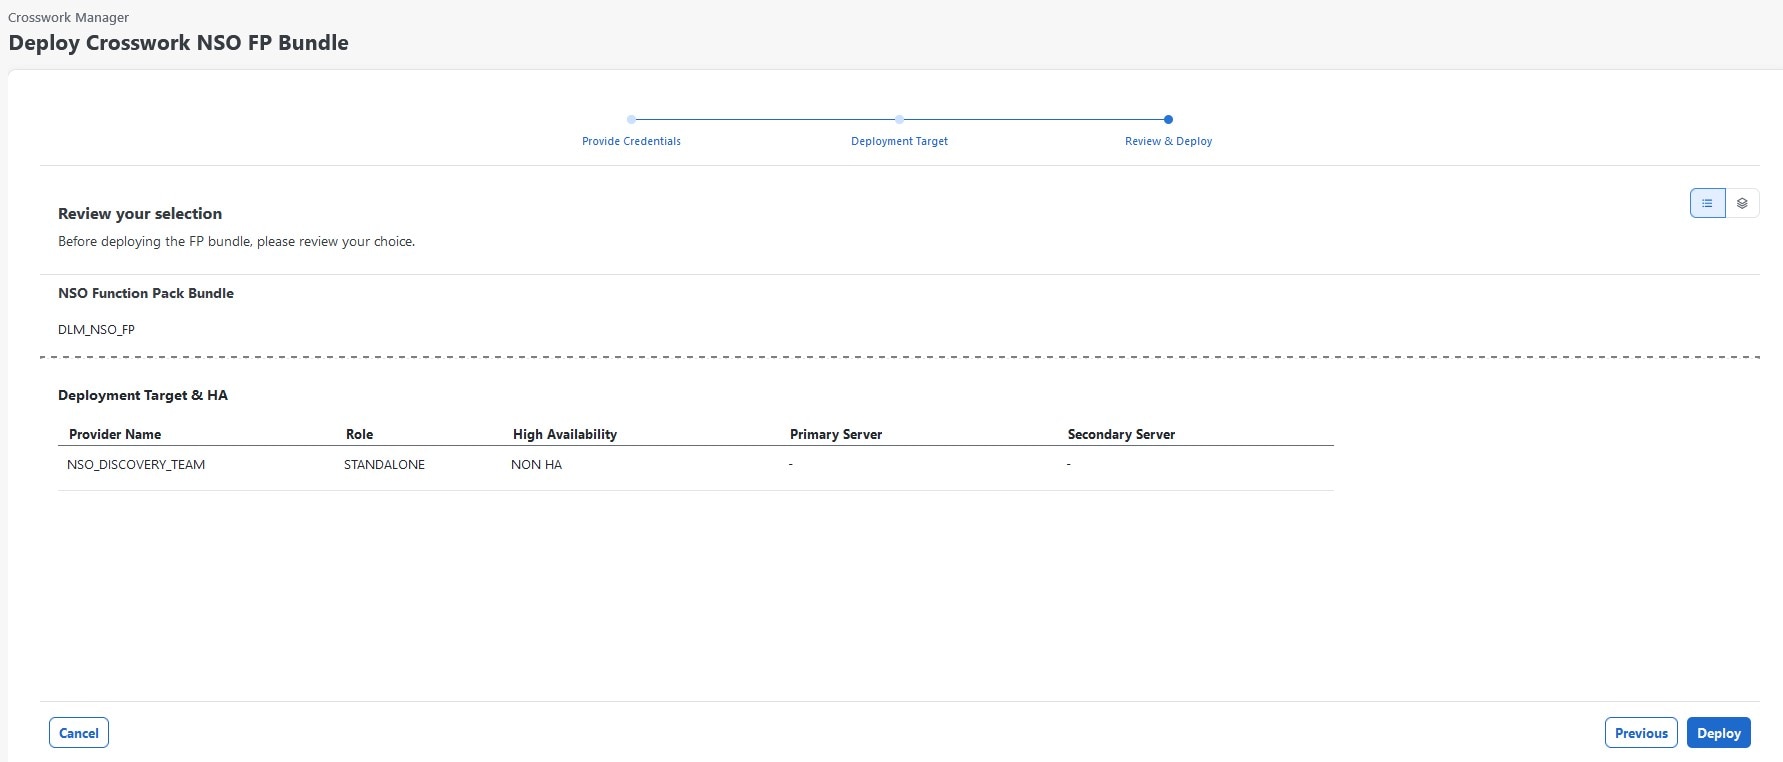
3. Install the mandatory NSO core function packs

Depending on the Cisco Crosswork application or solution that you are using, there are mandatory function packs that must be installed on Cisco NSO to make the products compatible.

The NSO core function packs are bundled in cisco.com in the cnc-function-packs-7.1.0.tar.gz file.

You can install the function packs using either of the following methods:


Note


The Cisco Crosswork Network Controller Function Pack SDK Application (cw-na-platform-7.1.0-signed-tsdn-sdk.tar.gz) is also available for download on cisco.com. The SDK provides tools and source-code examples you can use to develop, build, package and deploy the TSDN function pack on Crosswork Network Controller.


Add Cisco NSO Providers

The Cisco Network Services Orchestrator (Cisco NSO) provider supplies the following functionality:

  • Network services and device configuration services to Cisco Crosswork applications.

  • Device management and configuration maintenance services.


Note


Crosswork supports Cisco NSO Layered Service Architecture (LSA) deployment. The LSA deployment is constructed from multiple NSO providers, that function as the customer-facing service (CFS) NSO containing all the services, and the resource-facing service (RFS), which contains the devices. Crosswork automatically identifies the NSO provider as CFS or RFS. Only one CFS is allowed. On the Manager Provider Access page, the Type column identifies the NSO provider as CFS.


Follow the steps below to add a Cisco NSO provider through the UI. Note that you can import several providers at the same time by preparing a CSV file with the details of all the providers and importing it into Crosswork.

Before you begin

You will need to:
  • Create a credential profile for the Cisco NSO provider.

  • Know the name you want to assign to the Cisco NSO provider.

  • Know the Cisco NSO NED device models and driver versions used in your topology. You can find the Cisco NSO version using the version command. Please see the Release Notes for Crosswork Network Controller 7.1.0 to know the NSO version compatible with Crosswork Network Controller.

    admin@ncs# show ncs-state version 
    
  • Know the Cisco NSO server IP address or FQDN (Domain name and host name). When NSO is configured with HA, the IP address would be management VIP address.

  • Confirm Cisco NSO device configurations.

  • The NSO cross launch feature is not available for user roles with read-only permissions.

Procedure


Step 1

From the main menu, choose Administration > Manage Provider Access.

Step 2

Click Add icon.

Step 3

Enter the following values for the Cisco NSO provider fields:

  1. Required fields:

    • Provider Name: Enter a name for the provider.

    • Credential Profile: Select the previously created Cisco NSO credential profile.

    • Family: Select NSO.

    • Protocol: Select HTTPS and/or SSH.

      Note


      To use the Backup NSO option during backup, you must configure the SSH connectivity protocol in the NSO provider; otherwise, the backup will fail.

    • Server Details: Enter either the IP address (IPv4 or IPv6) or FQDN (Domain name and Host name) of the server.

    • Port: For HTTPS, enter the port that corresponds with what is configured on the NSO VM in etc/ncs/ncs.conf to access NSO using HTTPS. NSO uses 8888 as default port.

    • Model: Select the model (Cisco-IOS-XR, Cisco-NX-OS, or Cisco-IOS-XE). Add a model for each type of device that will be used in the topology. If you have more than one, add another supported model.

    • Version: Enter the NED software version installed for the device model in NSO.

    Note


    The site name can be configured for NSO from the NCS backend, and it will be displayed as a read-only value on the NSO provider in the Crosswork UI. To configure the NSO site name:

    1. Login into ncs_cli in config mode.

    2. Set hcc dns member master ip-address nso1-mgmt-IP location site1-location

    3. Set hcc dns member standby ip-address nso2-mgmt-IP location site2-location

    4. Commit

    Note


    If you set the Site location parameter in NSO, you can determine if geo-fencing is violated during testing when Crosswork and the active NSO are not in the same site location. Crosswork will also raise and clear alarms if a geo-fence violation is detected.

    Important


    When you modify or update the NSO provider IP address or FQDN, you need to detach devices from corresponding virtual data gateway, and reattach them. If you fail to do this, the provider changes will not be reflected in MDT collection jobs.

  2. Optional values:

    • Timeout: The amount of time (in seconds) to wait before timing out the connection to the Cisco NSO server. The default is 30 seconds.

  3. Provider Properties: Enter one of the following key/value pairs in the first set of fields:

    Property Key

    Value

    forward

    true

    This property is necessary when using the Cisco Crosswork Network Controller solution to allow provisioning operations within the UI and to enable the northbound interface to NSO via the Crosswork API gateway.

    Note


    The default value of forward is "false". If this is not changed, the devices added to Crosswork will not be added to NSO. This setting is used in conjuction with the Edit Policy option (step 5).

    nso_crosslaunch_url

    Note


    This property is used only for NSO standalone provider.

    Enter the URL for cross-launching NSO in the format: https://<NSO IP address/FQDN>: port number

    To enable cross-launch of the NSO application from the Crosswork UI. Requires a valid protocol (HTTP or HTTPS), and the provider must be reachable.

    The cross launch icon (Close Panel icon) is displayed in the Provider Name column. Alternately, you can cross launch the NSO application using the launch icon located at the top right corner of the window.

    input_url_prefix

    Note


    This property is used only for NSO LSA provider.

    Enter the RFS ID in the format: /rfc-x, where x refers to the number of the RFS node.

    Example (for RFS node 1): 
    input_url_prefix: /rfc-1

Step 4

When you have completed entries in all of the required fields, click Save to add Cisco NSO as a provider.

Step 5

To edit a NSO policy:

  1. On an NSO provider, click Actions > Edit policy details.

    The Edit policy details window for the selected NSO provider is displayed.

  2. Edit the configuration fields to match the requirements of your environment.

    Note


    Set Onboard from to TRUE) to trigger Crosswork to rescan NSO.

  3. Click Save to save your changes.

Step 6

To enable proxy forwarding: Replace the example subnet/mask with the specific subnet/mask applicable to your Crosswork Network Controller environment. If you have multiple subnets, repeat the <allowed-proxy-ip-prefix> blocks for each additional subnet.

Note


This configuration serves as a temporary workaround for use with the Crosswork Network Controller UI. It may become unnecessary once a permanent solution is implemented in future NSO releases. Additionally, this configuration is not required for NSO servers that are not integrated with Crosswork.

<webui>
...
  <use-forwarded-client-ip>
    <proxy-headers>X-Forwarded-For</proxy-headers>
    <proxy-headers>X-REAl-IP</proxy-headers>
    <allowed-proxy-ip-prefix>10.195.72.0/24</allowed-proxy-ip-prefix>
    <allowed-proxy-ip-prefix>2001:0db8:85a3:0000:0000:8a2e:0370::/112</allowed-proxy-ip-prefix>
  </use-forwarded-client-ip>
...
</webui>

What to do next

(Optional) Set up Cisco NSO Layered Service Architecture

This section is applicable only when you have opted for Cisco NSO Layered Service Architecture (LSA) deployment.

Cisco NSO LSA allows you to add arbitrarily many device nodes for improved memory and provisioning throughput. Large service providers or enterprises use Cisco NSO to manage services for millions of subscribers or users, ranging over several hundred thousand managed devices. To achieve this, you can design your services in the layered fashion called LSA.

To position Cisco Crosswork Network Controller for large customers, the solution is made compatible with the existing Cisco NSO LSA architecture.

Follow these steps to decide when to use Cisco NSO LSA:

  1. Check if the deployment is stand-alone or Cisco NSO LSA.

  2. If the deployment is stand-alone, check the maximum memory that may be utilised. If the maximum memory that may be utilised is more than the current memory state, Cisco NSO LSA needs to be deployed.


    Note


    Migration from stand-alone deployment to Cisco NSO LSA deployment is not currently supported.

To get a detailed information on Cisco NSO LSA and to set up Cisco NSO LSA, see NSO Layered Service Architecture.

Install Cisco NSO Function Pack Bundles from Crosswork UI

In the Cisco NSO function pack bundles, the NSO function pack files are bundled as tar.gz files. To ensure interoperability with Crosswork, Cisco NSO requires the installation of the essential function packs.

In the Crosswork UI, the NSO Deployment Manager tab lets you manage the function pack bundles using the following tabs:

  • Installed NSO Function Packs: Provides the list of NSO function packs deployed on the configured NSO server. See View NSO Function Pack Bundles for more information.

  • NSO Function Pack Bundles: Allows you to add and deploy the function pack bundles. Use this tab, to view the artifacts in the function pack bundle, download, and delete the function pack bundles. See Manage NSO Function Pack Bundles for more information.

  • Job History: The Job History tab displays a summary of the jobs, job ID, time when the job is started and completed, job description, and target. See View NSO Function Pack Job History for more information.

Figure 1. NSO Deployment Manager Window
NSO Deployment Manager Window

View NSO Function Pack Bundles

Operators can retrieve a list of all of the function pack bundles installed on each available NSO server via the Crosswork UI or using the API.


Attention


If any of the NSO service providers is unreachable, you cannot view the installed NSO function packs. An error "Server is temporarily unavailable, try to relogin" is displayed.


Follow the steps below to view the installed NSO function pack bundles through the UI.

Procedure


Step 1

From the main menu, choose Administration > Crosswork Manager, click the NSO Deployment Manager tab.

Step 2

Click the Installed NSO Function Packs tab.

Step 3

Select the NSO provider and expand the NSO server entry to view the list of function packs and their details (function pack name, operational state as Up or Down, description, and version).

Figure 2. Installed NSO Function Packs Window
Installed NSO Function Packs Window

Manage NSO Function Pack Bundles

You can add and deploy custom NSO function packs in addition to the function packs that are added by default to the Crosswork UI. The preinstalled bundles include the following packs:

Table 1. Default NSO Core Function Packs Bundles

Package Name

Contents

DLM NSO FP

Cisco NSO DLM Service Pack

Device Auth NSO FP

Cisco Crosswork Change Automation NSO Function Pack

TMTC NSO FP

Cisco NSO Telemetry Traffic Collector Function Pack

CNC NSO FPs Plus Sample FPs

Crosswork Network Controller NSO Function Packs for VPN, TE, and Slice services. It also contains the sample function packs.

CNC NSO FPs

Crosswork Network Controller NSO function packs for VPN, TE, and Slice services.

Before you begin

Each function pack bundle includes a metadata.yaml file detailing the prerequisites for installing the bundle on NSO. The following is a comprehensive list of the prerequisites for the supplied function packs:

  • Java version 17.0.0 or higher

  • Python version 3.8.0

  • NSO configured to allow 64,000 openFileDescriptors

Follow the steps below to manage the function pack bundles.

Procedure


Step 1

Ensure that your NSO setup meets all of the prerequisites.

Check the python and java versions using the --version command.

python --version

Python 3.8.10

java --version

openjdk 17.0.9 2023-10-17
OpenJDK Runtime Environment (build 17.0.9+9-Ubuntu-120.04)
OpenJDK 64-Bit Server VM (build 17.0.9+9-Ubuntu-120.04, mixed mode, sharing)

Step 2

From the main menu, choose Administration > Crosswork Manager, click the NSO Deployment Manager tab.

Step 3

Click the NSO Function Pack Bundles tab.

All the installed NSO function pack bundles get displayed with the bundle name, version, and description information.

To manage the bundles, select one or more bundles and click the Action menu to perform the following:

  • View FP Bundle Artifacts: View the hierarchy of the artifacts that are bundled in the selected package.

  • Download FP Bundle: Download the function pack bundle.

  • Delete FP Bundle: Delete the function pack bundle.

Figure 3. Action Menu

Step 4

Click Add New to install the new function pack bundle. The Add New NSO Function Pack Bundle page is displayed.

Note


The Add New button is disabled when Crosswork is in maintenance mode.

Step 5

In the Add New NSO Function Pack Bundle page, enter the following:

  • Host Name/IP address: Enter the IP address and subnet mask of the Cisco NSO server.

  • Port: For HTTPS, enter the port that corresponds with what is configured on the NSO VM in etc/ncs/ncs.conf to access NSO using HTTPS. NSO uses 8888 as the default port.

  • User Name: The username used to log in to the NSO server.

  • Password: The password credentials to authenticate into the NSO server.

  • Server Path/Location: The server path of the NSO server.

Figure 4. Add New NSO Function Packs Bundle Window
Add New NSO Function Packs Bundle Window

Step 6

Click Test SSH Connectivity again to validate SSH-based connectivity. If the connection is successful, a confirmation message indicating that the NSO bundle upload is in-progress appears. Click View Progress in Job History to view the upload status.

Step 7

Click Add.

Step 8

Check the Job History to monitor the addition of the package to Crosswork. Once the package has been added, the next step is to deploy the function pack.


What to do next

After the function pack is added, deploy the function pack on NSO. See Deploy NSO function pack bundles.

Deploy NSO function pack bundles

This topic explains the process to deploy the NSO function pack bundles.

The Cisco NSO sample function packs are provided as a starting point for VPN service provisioning functionality in Cisco Crosswork Network Controller. While the samples can be used “as is” in some limited network configurations, they are intended to demonstrate the extensible design of Cisco Crosswork Network Controller. Answers to common questions can be found on Cisco Devnet and Cisco Customer Experience representatives can provide answers to general questions about the samples. Support for customization of the samples for your specific use cases can be arranged through your Cisco account team.


Attention


NSO function packs cannot be deployed when Crosswork is in maintenance mode.


Before you begin

  • Ensure that the NSO function pack bundle is uploaded to the Crosswork UI. See Manage NSO Function Pack Bundles for more information.

  • If you plan to deploy the function pack bundle in an HA environment, you must have the primary and secondary server details readily available.

  • If your primary and secondary NSO servers and Crosswork servers are in different subnets, you must configure either an IP static route (Administration > Settings > Static Routes) or an IP rule policy (run ip rule add from all to 10.19.0.4 lookup cw_data on the Crosswork server) to enable connectivity between the servers.

Procedure


Step 1

From the main menu, choose Administration > Crosswork Manager, click the NSO Deployment Manager tab.

Step 2

Click the NSO Function Pack Bundles tab.

Step 3

Select the NSO function pack bundle and click Deploy .

Note


You can only select up to 3 Function Packs to be installed at a time. To install more, install the 3 function packs first and then repeat this process until you have installed all the Function Packs you will use.

Figure 5. NSO Function Pack Bundles Window

Step 4

In the Deploy Crosswork NSO FP Bundle page, enter the following SSH connection details:

  • User Name: The SSH username for server access.

  • Password: The SSH password for server access.

  • Sudo Password: The SSH sudo password.

Figure 6. SSH Connection Details Page
SSH Connection Details Page

Step 5

Click Next.

Step 6

In the Deployment Target section, review the target details:

  • Provider Name: Displays the name of the provider.

  • Reachability: Displays the reachability status of the provider.

  • CFS Role Selection: This column appears when a role is not assigned to a provider. Select the check box that corresponds to the provider row to assign the customer-facing service (CFS) role. The resource-facing service (RFS) role is automatically assigned to the other providers. For more information about CFS, RFS, and Cisco NSO Layered Service Architecture (LSA) deployment concepts, see the Prepare Infrastructure for Device Management chapter in the Cisco Crosswork Network Controller 7.1 Administration Guide.

  • High Availability: Depending on your deployment preferences for the function packs bundle on an NSO node, select either non-HA or HA. If you have selected HA, enter the server details in the Primary Server and Secondary Server fields.

Figure 7. Deployment Target Page
Deployment Target Page

Step 7

Click Next.

Step 8

In the Review & Deploy page, review the NSO bundle and deployment target details that you have configured. If you want to modify your selection, click Previous to view the earlier pages and modify it as required.

Note


If the provider is deployed on a standalone NSO node, the role is displayed as STANDALONE.

Figure 8. Review Selection Page
Review Selection Page

Step 9

Click Deploy.

Step 10

Check the Job History to monitor the installation.

Step 11

Repeat the process for any additional Function Packs that you need to install.


Troubleshoot the NSO Function Pack Installation

The following table lists common problems that might be experienced while installing or deploying a Cisco NSO function pack.

Table 2. Troubleshooting the Function Pack Installation Issues

Issue

Action

The function pack deployment failed with the following error:

Failed to open SSH connection to host coffee-nso1.cisco.com

In an HA configuration, the NSO engine assumes that the NSO primary and secondary servers, and the Crosswork server reside in the same subnet.

If the servers have different subnets, you must configure an IP route or an IP rule policy to ensure connectivity between the servers. When the routes are not configured, the engine cannot locate the subnet, and the function pack deployment fails.

Note


Static routes can only be configured when ZTP application is installed.

Use one of the following steps to resolve the issue:

  • To configure the static routes, from the main menu, select Administration > Settings > Static Routes. Click the Add icon icon, enter the destination subnet IP address and mask (in slash notation), then click Add.

  • To configure the IP rule, log in to the Crosswork server and use the following command:

    ip rule add from all to 10.19.0.4 lookup cw_data

View NSO Function Pack Job History

The Job History tab shows detailed information of when jobs were started and ended, job ID, status, and other vital information.

Follow the steps below to view the details of the jobs.

Procedure


Step 1

From the main menu, choose Administration > Crosswork Manager, click the NSO Deployment Manager tab.

Step 2

Click the Job History tab.

In the Job History tab, the Job Sets pane displays the state of the job, job ID, and the job description. You can show or hide the columns based on the job creation time, status, and description.

Step 3

In the Job Sets pane, select the job sets to view the associated job information in the Job Details pane. You can view the summary of the job tasks based on job task ID, task status, the task start and end time, and description.

To view the job configuration information in JSON format, click the icon next to Job Config. A config window opens that lets you view the configuration in the following modes:

  • View Mode

  • Text Mode

Figure 9. Job History Window
Job History Window

Install NSO function packs manually

If you need to install or configure the NSO function packs manually, follow the instructions in these links: