Install Crosswork Cluster on VMware vCenter

This chapter contains the following topics:

Installation Overview

The Crosswork Network Controller cluster can be installed using the following methods:

  • Docker installer tool: This day-0 tool used to deploy the Crosswork cluster with user specified parameters supplied via a template file. The tool is run from a Docker container which can be hosted on any Docker capable platform including a regular PC/laptop. The Docker container includes template files for each IP stack (IPv4, IPv6, and dual stack), which can be edited to provide deployment-specific data.

  • Manual installation (via the VMware UI): This option is available for deployments that cannot use the installer tool.

The installer tool method is the preferred option as it is faster and easier to use.

Installation parameters

This section explains the essential parameters that must be specified during the installation of the Crosswork cluster. Please ensure you have the relevant information for each parameter listed in the table and verify that your environment meets all prerequisite requirements.

The settings recommended in the table represent the least complex configuration. If you encounter network conflicts or wish to implement more advanced security settings (e.g., self-signed certificates), please work with the Cisco Customer Experience team to ensure you are prepared to make the necessary changes for your cluster.


Important


  • Please use the latest template file that comes with the Crosswork installer tool.

  • Secure ZTP and Secure Syslog require the Crosswork cluster to be deployed with FQDN.


Note


In case of dual stack deployment, you need to configure the IPv4 and IPv6 values for the Management, Data, and DNS parameters.

  • ManagementIPv4Address, ManagementIPv6Address

  • ManagementIPv4Netmask, ManagementIPv6Netmask

  • ManagementIPv4Gateway, ManagementIPv6Gateway

  • ManagementVIPv4, ManagementVIPv6

  • DataIPv4Address, DataIPv6Address

  • DataIPv4Netmask, DataIPv6Netmask

  • DataIPv4Gateway, DataIPv6Gateway

  • DataVIPv4, DataVIPv6

  • DNSv4, DNSv6


Table 1. General parameters

Parameter name

Description

ClusterName

Name of the cluster file.

ClusterIPStack

The IP stack protocol: IPv4, IPv6, or DUALSTACK.

ManagementIPAddress

The Management IP address of the VM (IPv4 and/or IPv6).

ManagementIPNetmask

The Management IP subnet in dotted decimal format (IPv4 and/or IPv6).

ManagementIPGateway

The Gateway IP on the Management Network (IPv4 and/or IPv6). The address must be reachable, otherwise the installation will fail.

ManagementVIP

The Management Virtual IP address (IPv4 and/or IPv6) for the cluster.

DataIPAddress

The Data IP address of the VM (IPv4 and/or IPv6).

DataIPNetmask

The Data IP subnet in dotted decimal format (IPv4 and/or IPv6).

DataIPGateway

The Gateway IP on the Data Network (IPv4 and/or IPv6). The address must be reachable, otherwise the installation will fail.

DataVIP

The Data Virtual IP address (IPv4 and/or IPv6) for the cluster.

DNS

The IP address of the DNS server (IPv4 and/or IPv6). The address must be reachable, otherwise the installation will fail.

NTP

NTP server address or name. The address must be reachable, otherwise the installation will fail.

DomainName

The domain name used for the cluster.

CWPassword

Password to log into Cisco Crosswork. When setting up a VM, ensure the password is strong and meets the following criteria:

  • It must be at least 8 characters long and include uppercase and lowercase letters, numbers, and at least one special character.

  • The following special characters are not allowed: backslash (\), single quote ('), or double quote (").

  • Avoid using passwords that resemble dictionary words (e.g., "Pa55w0rd!") or relatable words. While such passwords may meet the specified criteria, they are considered weak and will be rejected, resulting in a failure to set up the VM.

  • This parameter accepts a string value, so be sure to enclose the value in double quotes.

VMSize

Sets the VM size for the cluster. For cluster deployments, the only supported option is "Large".

Note

 
  • If you leave this field blank, the default value ("Large") is automatically selected.

  • This parameter accepts a string value, so be sure to enclose the value in double quotes.

VMName

Name of the VM. A unique VM name is required for each node on the cluster (Hybrid or Worker).

NodeType

Indicates the type of VM. Choose either "Hybrid" or "Worker". This parameter accepts a string value, so be sure to enclose the value in double quotes.

Note


The Crosswork cluster requires at least three VMs operating in a hybrid configuration.

BackupMinPercent

Minimum percentage of the data disk space to be used for the size of the backup partition. The default value is 35 (valid range is from 1 to 80).

Please use the default value unless recommended otherwise.

Note


The final backup partition size will be calculated dynamically. This parameter defines the minimum.

ThinProvisioned

Set to false for production deployments.

SchemaVersion

The configuration Manifest schema version. This indicates the version of the installer to use with this template.

Schema version should map to the version packaged with the sample template in the Docker installer tool on cisco.com. You should always build a new template from the default template provided with the release you are deploying, as template requirements may change from one release to the next.

LogFsSize

Log partition size (in Giga Bytes). Minimum value is 20 GB and Maximum value is 1000 GB. You are recommended to use the default value.

EnableSkipAutoInstallFeature

Pods marked as "skip auto install" will not be brought up unless explicitly requested by a dependent application or pod. By default, the value is set as "False".

The recommended value for cluster deployment is "False".

Note

 
  • If left blank, the default value is automatically selected.

  • This parameter accepts a string value, so be sure to enclose the value in double quotes.

EnforcePodReservations

Enforces minimum resource reservations for the pod. If left blank, the default value ("True") is selected.

This parameter accepts a string value, so be sure to enclose the value in double quotes.

K8sServiceNetwork

The network address for the kubernetes service network. By default, the CIDR range is fixed to '10.96.0.0/16 '. If you wish to change this default value, please work with the Cisco Customer Experience team.

K8sPodNetwork

The network address for the kubernetes pod network. By default, the CIDR range is fixed to '10.224.0.0/16 '. If you wish to change this default value, please work with the Cisco Customer Experience team.

IgnoreDiagnosticsCheckFailure

Used to set the system response in case of a diagnostic check failure.

If set to "False" (default value), the installation will terminate if the diagnostic check reports an error. If set to "True", the diagnostic check will be ignored, and the installation will continue.

You are recommended to select the default value. This parameter accepts a string value, so be sure to enclose the value in double quotes.

Note

 
  • The log files (diagnostic_stdout.log and diagnostic_stderr.log) can be found at /var/log. The result from each diagnostic execution is kept in a file at /home/cw-admin/diagnosis_report.txt.

  • Use diagnostic all command to invoke the diagnostic manually on day N.

  • Use diagnostic history command to view previous test report.

ManagementVIPName

Name of the Management Virtual IP for the Crosswork VM. This is an optional parameter used to reach Crosswork Management VIP via DNS name. If this parameter is used, the corresponding DNS record must exist in the DNS server.

DataVIPName

Name of the Data Virtual IP for the cluster. This is an optional parameter used to reach Crosswork cluster Data VIP via DNS name. If this parameter is used, the corresponding DNS record must exist in the DNS server.

IsSeed

Choose "True" if this is the first VM being built in a new cluster. Choose "False" for all other VMs, or when rebuilding a failed VM. This parameter accepts a string value, so be sure to enclose the value in double quotes.

This parameter is optional for installing using the Docker installer tool.

InitNodeCount

Total number of nodes in the cluster including Hybrid and Worker nodes. The default value is 3. Set this to match the number of VMs (nodes) you are going to deploy. For more information on VM count, see Table 1.

This parameter is optional for installing using the Docker installer tool.

InitMasterCount

Total number of Hybrid nodes in the cluster. The default value is 3.

This parameter is optional for installing using the Docker installer tool.

EnableHardReservations

Determines the enforcement of VM CPU and memory profile reservations. This is an optional parameter and the default value is "True", if not explicitly specified.

Note


This parameter accepts a string value, so be sure to enclose the value in double quotes.

If set as "True", the VM's resources are provided exclusively. In this state, the installation will fail if there are insufficient CPU cores, memory or CPU cycles.

If set as "False" (only set for lab installations), the VM's resources are provided on best efforts. In this state, insufficient CPU cores can impact performance or cause installation failure.

RamDiskSize

Size of the Ram disk.

This parameter is only used for lab installations (value must be at least 2). When a non-zero value is provided for RamDiskSize, the HSDatastore value is not used.

ManagerDataFsSize

This parameter is applicable only when installing with the Docker installer tool.

Refers to the data disk size for Hybrid nodes (in Giga Bytes). This is an optional parameter and the default value is 485 (valid range is from 485 to 8000), if not explicitly specified.

Please use the default value unless recommended otherwise.

WorkerDataFsSize

This parameter is applicable only when installing with the Docker installer tool.

Refers to the data disk size for Worker nodes (in Gigabytes). This is an optional parameter and the default value is 485 (valid range is from 485 to 8000), if not explicitly specified.

Please use the default value unless recommended otherwise.

Timezone

Enter the timezone. Input is a standard IANA time zone (for example, "America/Chicago"). If left blank, the default value (UTC) is selected. This parameter accepts a string value, so be sure to enclose the value in double quotes.

This is an optional parameter.

Note

 
The timestamp in Kafka log messages represents the NSO server time. To avoid any mismatch between the Crosswork server time and the NSO event time, ensure you update the NSO server time before changing the Timezone parameter in Crosswork.
Table 2. VMware template parameters

Parameter name

Description

VCenterAddress

The vCenter IP or host name.

VCenterUser

The username needed to log into vCenter.

VCenterPassword

The password needed to log into vCenter.

DCname

The name of the Data Center resource to use.

Example: DCname = "WW-DCN-Solutions"

MgmtNetworkName

The name of the vCenter network to attach to the VM's Management interface.

This network must already exist in VMware or the installation will fail.

DataNetworkName

The name of the vCenter network to attach to the VM's Data interface.

This network must already exist in VMware or the installation will fail.

Host

The ESXi host, or ONLY the vcenter cluster/resource group name where the VM is to be deployed.

The primary option is to use the host IP or name (all the hosts should be under the data center). If the hosts are under a cluster in the data center, only provide the cluster name (all hosts within the cluster will be picked up).

The subsequent option is to use a resource group. In this case, a full path should be provided.

Example: Host = "Main infrastructure/Resources/00_trial"

Datastore

The datastore name available to be used by this host or resource group.

The primary option is to use host IP or name. The subsequent option is to use a resource group.

Example: Datastore = "SDRS-DCNSOL-prodexsi/bru-netapp-01_FC_Prodesx_ds_15"

HSDatastore

The high speed datastore available for this host or resource group.

When not using a highspeed data store, set to same value as Datastore.

DCfolder

The resource folder name on vCenter. To be used if you do not have root access as a VMware user, or when you need to create VMs in separate folders for maintenance purposes. You must provide the complete path as value for the DCfolder.

Example: DCfolder = "/WW-DCN-Solutions/vm/00_trial"

Please contact your VMware administrator for any queries regarding the complete folder path.

Leave as empty if not used.

Cw_VM_Image

The name of Crosswork cluster VM image in vCenter.

This value is set as an option when running the Docker installer tool and does not need to be set in the template file.

HostedCwVMs

The IDs of the VMs to be hosted by the ESXi host or resource.

After you have decided the installation parameters values for Crosswork Network Controller, choose the method you prefer and begin your deployment:

Automate application installation

The auto-action functionality is an optional feature that allows you to automate the installation and activation of applications as needed. Auto-action is supported for both cluster and single VM deployments.

Day-0 deployment

The auto-action feature simplifies installation process and can be configured with the Docker installer, direct OVA installation, and the OVF tool.

To enable auto-action, you must configure a definition file (JSON format) that lists the tar bundles to be imported and activated. The JSON file is submitted alongside the day-0 installer and overrides the default file bundled in the OVA during installation.


Note


Please ensure that the file path specified in the auto-action file (the location on your local machine where the files are downloaded) is accessible from the Crosswork cluster.


The auto-action definition file customizes two actions:

  • add_to_repository_requests: The auto-action functionality supports HTTP, HTTPS, and SCP protocols with basic authentication (HTTP/HTTPS) to add the application file to the repository.

  • install_activate_requests: The application files to be installed and activated are identified using the version and id parameters.

Auto-action feature can be customized with various deployment methods:

  • Using Docker Installer: While installing via the docker installer, if the JSON file is successfully validated, the installation will proceed. If there are syntax errors in the file, you will be prompted with an error message, and the installation will be halted. Once the errors are corrected, you can retry the installation.

    Syntax to execute the auto-action file:

    ./cw-installer.sh install -p -m /data/<template file name> -a <path to json def file> -o /data/<.ova file>

    Example:

    ./cw-installer.sh install -m /data/deployment.tfvars -a https://example.com/path/to/crosswork_auto_action.json -o /data/cnc-platform-cluster-deployment-7.1.0-48.ova
  • Using vCenter UI or OVF tool: While installing via the vCenter UI, the CDATA JSON content is validated in the backend. If there are syntax errors in the data, the auto-action instructions are skipped and Crosswork Cluster is installed as per the regular installation workflow. vCenter and the OVF tool do not support the direct upload of JSON format files due to issues with handling special characters. To resolve this, you must compress the JSON file and enclose it in CDATA format.

    <![CDATA[{auto-action json compressed content}]]>

    Note


    The CDATA example has line breaks for the purpose of readability. During production deployment, kindly execute the CDATA without any line breaks.


    Example:

    <![CDATA[{"auto_action":{"add_to_repository_requests":[{"file_location":
    {"uri_location":{"uri":"<file path>/<filename.tar.gz>"}}}],
    "install_activate_requests":[{"package_identifier":{"id":"capp-coe","version":"7.1.0"}}]}}]]>

Product-specific definition

You can define any product-specific parameters in a JSON file and execute it with the auto-action file.

For example, the product-specific definition file is product.json, and it is executed along with the auto-action file.

{
  "product_image_id": "CNC",
  "attributes": {
    "is_arbiter": "true"
  }
}

Run file:

./cw-installer.sh install -m /data/<template file name> -o /data/<.ova file> -c /data/product.json -y 

##Note the "-c /data/product.json" option

Day-N deployment

Auto-action can be used on day-N to automate installation of Crosswork Network Controller components or application patches. For more information, see Add the auto-action file.

Sample templates

Refer to the example in Sample auto action templates

Install Cisco Crosswork on VMware vCenter using the Docker installer tool

This section explains the procedure to install Cisco Crosswork on VMware vCenter using the Docker installer tool.


Note


The time taken to create the cluster can vary based on the size of your deployment profile and the performance characteristics of your hardware.


Before you begin

Pointers to know when using the Docket installer tool:

  • Make sure that your environment meets all the vCenter requirements specified in Installation Prerequisites for VMware vCenter.

  • If you intend to use a dual stack configuration for your deployment, make sure that the host machine running the Docker installer meets the following requirements:

    • It must have an IPv6 address from the same prefix as the Crosswork Management IPv6 network, or be able to route to that network. To verify this, try pinging the Gateway IP of the Management IPv6 network from the host. To utilize the host's IPv6 network, use the parameter --network host when running the Docker installer.

    • Confirm that the provided IPv6 network CIDR and gateway are valid and reachable.

  • The edited template in the /data directory will contain sensitive information (VM passwords and the vCenter password). The operator needs to manage access to this content. Store the templates used for your install in a secure environment or edit them to remove the passwords after the install is complete.

  • The install.log, install_tf.log, and .tfstate files will be created during the install and stored in the /data directory. If you encounter any trouble with the installation, provide these files to the Cisco Customer Experience team when opening a case.

  • The install script is safe to run multiple times. Upon error, input parameters can be corrected and rerun. Running the Docker installer tool multiple times may result in the deletion and re-creation of VMs.

  • In case you are using the same Docker installer tool for multiple Crosswork cluster installations, it is important to run the tool from different local directories, allowing for the deployment state files to be independent. The simplest way for doing so is to create a local directory for each deployment on the host machine and map each one to the container accordingly.

  • Docker version 19 or higher is required while using the Docker installer tool option. For more information on Docker, see https://docs.docker.com/get-docker/

  • In order to change install parameters or to correct parameters following installation errors, it is important to distinguish whether the installation has managed to deploy the VMs or not. Deployed VMs are evidenced by the output of the installer similar to: vsphere_virtual_machine.crosswork-IPv4-vm["1"]: Creation complete after 2m50s [id=4214a520-c53f-f29c-80b3-25916e6c297f]

  • In case of deployed VMs, changes to the Crosswork VM settings or the Data Center host for a deployed VM are NOT supported. To change a setting using the installer when the deployed VMs are present, the clean operation needs to be run and the cluster redeployed. For more information, see Delete the VM using the Docker installer tool.

  • A VM redeployment will delete the VM's data, hence caution is advised. We recommend you perform VM parameter changes from the Crosswork UI, or alternatively one VM at a time.

  • Installation parameter changes that occur prior to any VM deployment, e.g. an incorrect vCenter parameter, can be performed by applying the change and simply re-running the install operation.

  • If you want to use the auto action functionality, the definition file (JSON format) must be specified while executing the OVA file. For more information, see Automate application installation.

Known limitations:

These following scenarios are the caveats for installing the Crosswork cluster using the Docker installer tool.

  • The vCenter host VMs defined must use the same network names (vSwitch) across all hosts in the data center.

  • The vCenter storage folders or datastores organized under a virtual folder structure, are not supported currently. Please ensure that the datastores referenced are not grouped under a folder.

  • Any VMs that are not created by the Day 0 installer (for example, manually brought up VMs), cannot be changed either by the Day 0 installer or via the Crosswork UI later. Similarly, VMs created via the Crosswork UI cannot be modified using the Day 0 installer. When making modifications after the initial deployment of the cluster, ensure that you capture the inventory information.

  • vCenter UI provides a service where a user accessing via IPv4 can upload images to the IPv6 ESXi host. Docker installer tool cannot use this service. Follow either of the following workarounds for IPv6 ESXi hosts:

    1. Install the OVA template image manually (for more information, see Manual Installation of Cisco Crosswork using vCenter vSphere UI).

    2. Run the Docker installer tool from an IPv6 enabled machine. To do this, configure the Docker daemon to map an IPv6 address into the docked container.


Note


The Docker installer tool will deploy the software and power on the virtual machines. If you wish to power on the virtual machines yourself, use the manual installation.


Procedure


Step 1

In your vCenter data center, go to Host > Configure > Networking > Virtual Switches and select the virtual switch. In the virtual switch, select Edit > Security, and configure the following DVS port group properties:

  • Set Promiscuous mode as Reject

  • Set MAC address changes as Reject

Confirm the settings and repeat the process for each virtual switch used in the cluster.

Step 2

In your Docker capable machine, create a directory where you will store everything you will use during this installation.

Note


If you are using a Mac, please ensure that the directory name is in lower case.

Step 3

Download the installer bundle (.tar.gz file) and the OVA file from cisco.com to the directory you created previously. For the purpose of these instructions, we will use the file names as cnc-platform-cluster-docker-deployment-7.1.0-48.tar.gz and cnc-platform-cluster-deployment-7.1.0-48.ova respectively.

Attention


The file names mentioned in this topic are sample names and may differ from the actual file names in cisco.com.

Step 4

Use the following command to unzip the installer bundle:

tar -xvf cnc-platform-cluster-docker-deployment-7.1.0-48-releasecnc710-250606.tar.gz

The contents of the installer bundle are unzipped to a new directory (e.g. ccnc-platform-cluster-docker-deployment-7.1.0-48). This new directory will contain the installer image (cw-na-platform-installer-7.1.0-48-releasecnc710-250606.tar.gz) and files necessary to validate the image.

Step 5

Change the directory to the directory created by opening the file and then review the contents of the README file in order to understand everything that is in the package and how it will be validated in the following steps.

Step 6

Use the following command to verify the signature of the installer image:

  1. Ensure you have python installed. If not, go to python.org and download the version of python that is appropriate for your work station.

  2. Use python --version to find out the version of python on your machine.

  3. Depending on the python version use one of these commands to validate the file.

    If you are using python 2.x, use the following command to validate the file:

    python cisco_x509_verify_release.py -e <.cer file> -i <.tar.gz file> -s <.tar.gz.signature file>
    -v dgst -sha512

    If you are using python 3.x, use the following command to validate the file:

    python cisco_x509_verify_release.py3 -e <.cer file> -i <.tar.gz file> -s <.tar.gz.signature file>
    -v dgst -sha512

Step 7

Use the following command to load the installer image file into your Docker environment.

docker load -i <.tar.gz file>

For example:

docker load -i cw-na-platform-installer-7.1.0-48-releasecnc710-250606.tar.gz

Step 8

Run Docker image list or Docker images command to get the "image ID" (which is needed in the next step).

For example:

docker images

The result will be similar to the following: (section we will need is underlined for clarity)

My Machine% docker images
REPOSITORY                        TAG                                                 IMAGE ID             CREATED        SIZE
dockerhub.cisco.com/cw-installer  cw-na-platform-installer-7.1.0-48-releasecnc710-250606   a4570324fad30  7 days ago     276MB

Note


Pay attention to the "CREATED" time stamp in the table presented when you run docker images, as you might have other images present from the installation of prior releases. If you wish to remove these, the docker image rm {image id} command can be used.

Step 9

Launch the Docker container using the following command:

docker run --rm -it -v `pwd`:/data {image id of the installer container}

To run the image loaded in our example, the command would be:

docker run --rm -it -v `pwd`:/data a4570324fad30

Note

 
  • You do not have to enter that full value. In this case, "docker run --rm -it -v `pwd`:/data a45" was adequate. Docker requires enough of the image ID to uniquely identify the image you want to use for the installation.

  • In the above command, we are using the backtick (`). Do not use the single quote or apostrophe (') as the meaning to the shell is very different. By using the backtick (recommended), the template file and OVA will be stored in the directory where you are on your local disk when you run the commands, instead of inside the container.

  • When deploying a IPv6 or dual stack cluster, the installer needs to run on an IPv6 enabled container/VM. This requires additionally configuring the Docker daemon before running the installer, using the following method:

    • Linux hosts (ONLY): Run the Docker container in host networking mode by adding the "–network host" flag to the Docker run command line.

      docker run --network host <remainder of docker run options>
  • Centos/RHEL hosts, by default, enforce a strict SELinux policy which does not allow the installer container to read from or write to the mounted data volume. On such hosts, run the Docker volume command with the Z option as shown below:

    docker run --rm -it -v `pwd`:/data:Z <remainder of docker options>

Step 10

Navigate to the directory with the VMware template.

cd /opt/installer/deployments/7.1.0/vcentre

Step 11

Copy the template file found under /opt/installer/deployments/7.1.0/vcentre/deployment_template_tfvars to the /data folder using a different name.

For example: cp deployment_template_tfvars /data/deployment.tfvars

For the rest of this procedure, we will use deployment.tfvars in all the examples.

Step 12

Edit the template file located in the /data directory in a text editor, to match your planned deployment. Refer to the Installation parameters table for details on the required and optional fields and their proper settings. The Crosswork Network Controller cluster deployment templates for VMware vCenter includes an example that you can reference for proper formatting. The example is more compact due to the removal of descriptive comments:

Step 13

From the /opt/installer directory, run the installer.

./cw-installer.sh install -p -m /data/<template file name> -o /data/<.ova file> -y

For example:

./cw-installer.sh install -p -m /data/deployment.tfvars -o /data/cnc-platform-cluster-deployment-7.1.0-48.ova -y

Important


If you want to use the auto action functionality, the definition file (JSON format) must be specified while executing the OVA file in the following format:

./cw-installer.sh install -p -m /data/<template file name> -a <path to json def file> -o /data/<.ova file>

Step 14

Read, and then enter "yes" if you accept the End User License Agreement (EULA). Otherwise, exit the installer and contact your Cisco representative.

Step 15

Enter "yes" when prompted to confirm the operation.

Note


It is not uncommon to see some warnings like the following during the install:

Warning: Line 119: No space left for device '8' on parent controller '3'.
Warning: Line 114: Unable to parse 'enableMPTSupport' for attribute 'key' on element 'Config'.

If the install process proceeds to a successful conclusion (see sample output below), these warnings can be ignored.

Sample output:

cw_cluster_vms = <sensitive>
INFO: Copying Day 0 state inventory to CW
INFO: Waiting for deployment status server to startup on 10.90.147.66. Elapsed time 0s, retrying in 30s
Crosswork deployment status available at http://{VIP}:30602/d/NK1bwVxGk/crosswork-deployment-readiness?orgId=1&refresh=10s&theme=dark 
Once deployment is complete login to Crosswork via: https://{VIP}:30603/#/logincontroller 
INFO: Cw Installer operation complete.

Note


If the installation fails due to a timeout, you should try rerunning the installation (step 13) without the -p option. This will deploy the VMs serially rather than in parallel.

If the installer fails for any other reason (for example, mistyped IP address), correct the error and rerun the install script.

If the installation fails (with or without the -p), open a case with Cisco and provide the .log files that were created in the /data directory (and the local directory where you launched the installer docker container), to Cisco for review. The two most common reasons for the install to fail are: (a) password that is not adequately complex, and (b) errors in the template file.


What to do next

Manual Installation of Cisco Crosswork using vCenter vSphere UI

This section explains how to build the cluster using the vCenter user interface. This same procedure can be used to add or replace nodes if necessary.

The manual installation workflow is broken into two parts. In the first part, you create a template. In the second part, you deploy the template as many times as needed to build the cluster of 3 Hybrid nodes (typically) along with any Worker nodes that your environment requires.

  1. Build the OVF template

  2. Deploy the template


Note


If the cluster has already been installed (no matter the method used) the template file will already exist unless it was deleted. In this case, you can directly go to deploying the template (the second part of this procedure).


The manual installation is preferred if you face any of the following reasons:

  • Owing to your data center configuration, you cannot deploy the cluster using the installer tool.

  • You need to add nodes to the existing cluster.

  • You need to replace a failed node.

  • You want to migrate a node to a new host machine.


Important


Anytime the configuration of the cluster is changed manually—whether to install the Crosswork cluster, add nodes, or move nodes to new hosts using the procedures detailed in this section—you must import the cluster inventory file (.tfvars file) to the Crosswork UI. You must set the parameter OP_Status = 2 to enable manual import of the inventory. For more information, see Import Cluster Inventory.


Build the OVF template

Before you begin

Procedure


Step 1

Download the latest available Cisco Crosswork platform image file (*.ova) to your system.

Step 2

With VMware ESXi running, log into the VMware vSphere Web Client. On the left navigation pane, choose the ESXi host or cluster where you want to deploy the VM.

Step 3

In the vSphere UI, go to Host > Configure > Networking > Virtual Switches and select the virtual switch. In the virtual switch, select Edit > Security, and configure the following DVS port group properties:

  • Set Promiscuous mode as Reject

  • Set MAC address changes as Reject

Confirm the settings and repeat the process for each virtual switch used in the cluster.

Step 4

Review and confirm that your network settings meet the requirements.

Ensure that the networks that you plan to use for Management network and Data network are connected to each host where VMs will be deployed.

Step 5

Choose Actions > Deploy OVF Template.

Caution


The default VMware vCenter deployment timeout is 15 minutes. If vCenter times out during deployment, the resulting VM will not be bootable. To prevent this, we recommend that you document the choices (such as IP address, gateway, DNS server, etc.) so that you can enter the information quickly and avoid any issues with the VMware configuration.

Step 6

The VMware Deploy OVF Template window appears, with the first step, 1 - Select an OVF template, highlighted. Click Choose Files to navigate to the location where you downloaded the OVA image file and select it. Once selected, the file name is displayed in the window.

Step 7

Click Next. The Deploy OVF Template window is refreshed, with 2 - Select a name and folder now highlighted. Enter a name and select the respective data center for the Cisco Crosswork VM you are creating.

We recommend that you include the Cisco Crosswork version and build number in the name, for example: Cisco Crosswork 7.1.0 Build 48.

Step 8

Click Next. The Deploy OVF Template window is refreshed, with 3 - Select a compute resource highlighted. Select the host or cluster for your Cisco Crosswork VM.

Step 9

Click Next. The VMware vCenter Server validates the OVA. Network speed will determine how long validation takes. After the validation is complete, the Deploy OVF Template window is refreshed, with 4 - Review details highlighted.

Step 10

Review the OVF template that you are deploying. Note that this information is gathered from the OVF, and cannot be modified.

Step 11

Click Next. The Deploy OVF Template window is refreshed, with 5 - License agreements highlighted. Review the End User License Agreement and if you agree, click the I accept all license agreements checkbox. Otherwise, contact your Cisco Experience team for assistance.

Step 12

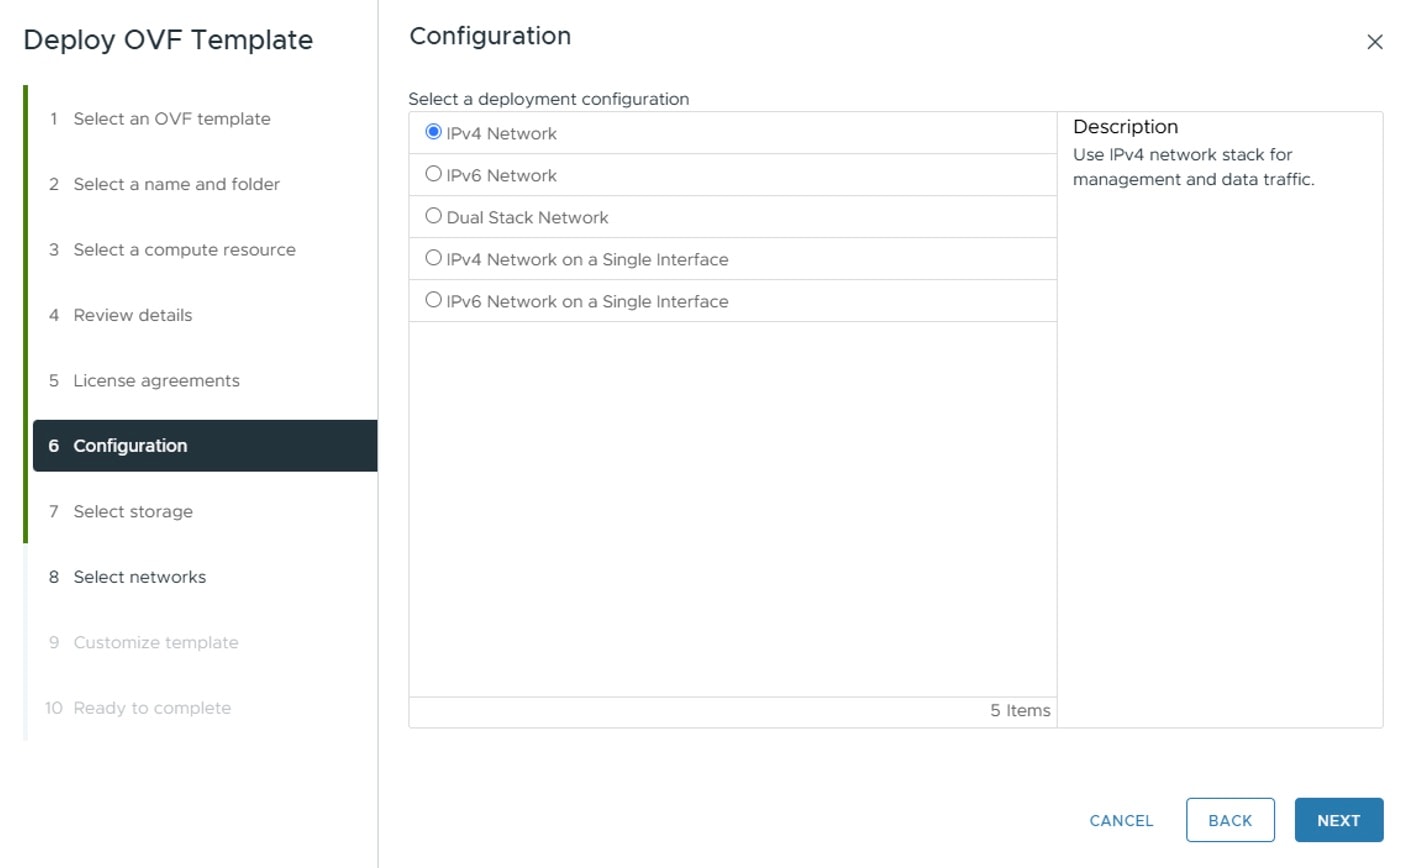
Click Next The Deploy OVF Template window is refreshed, with 6 - Configuration highlighted. Crosswork supports only the following deployment configurations: IPv4 Network, IPv6 Network, and Dual Stack Network. Please select your preferred deployment configuration.

Figure 1. Select a deployment configuration

Step 13

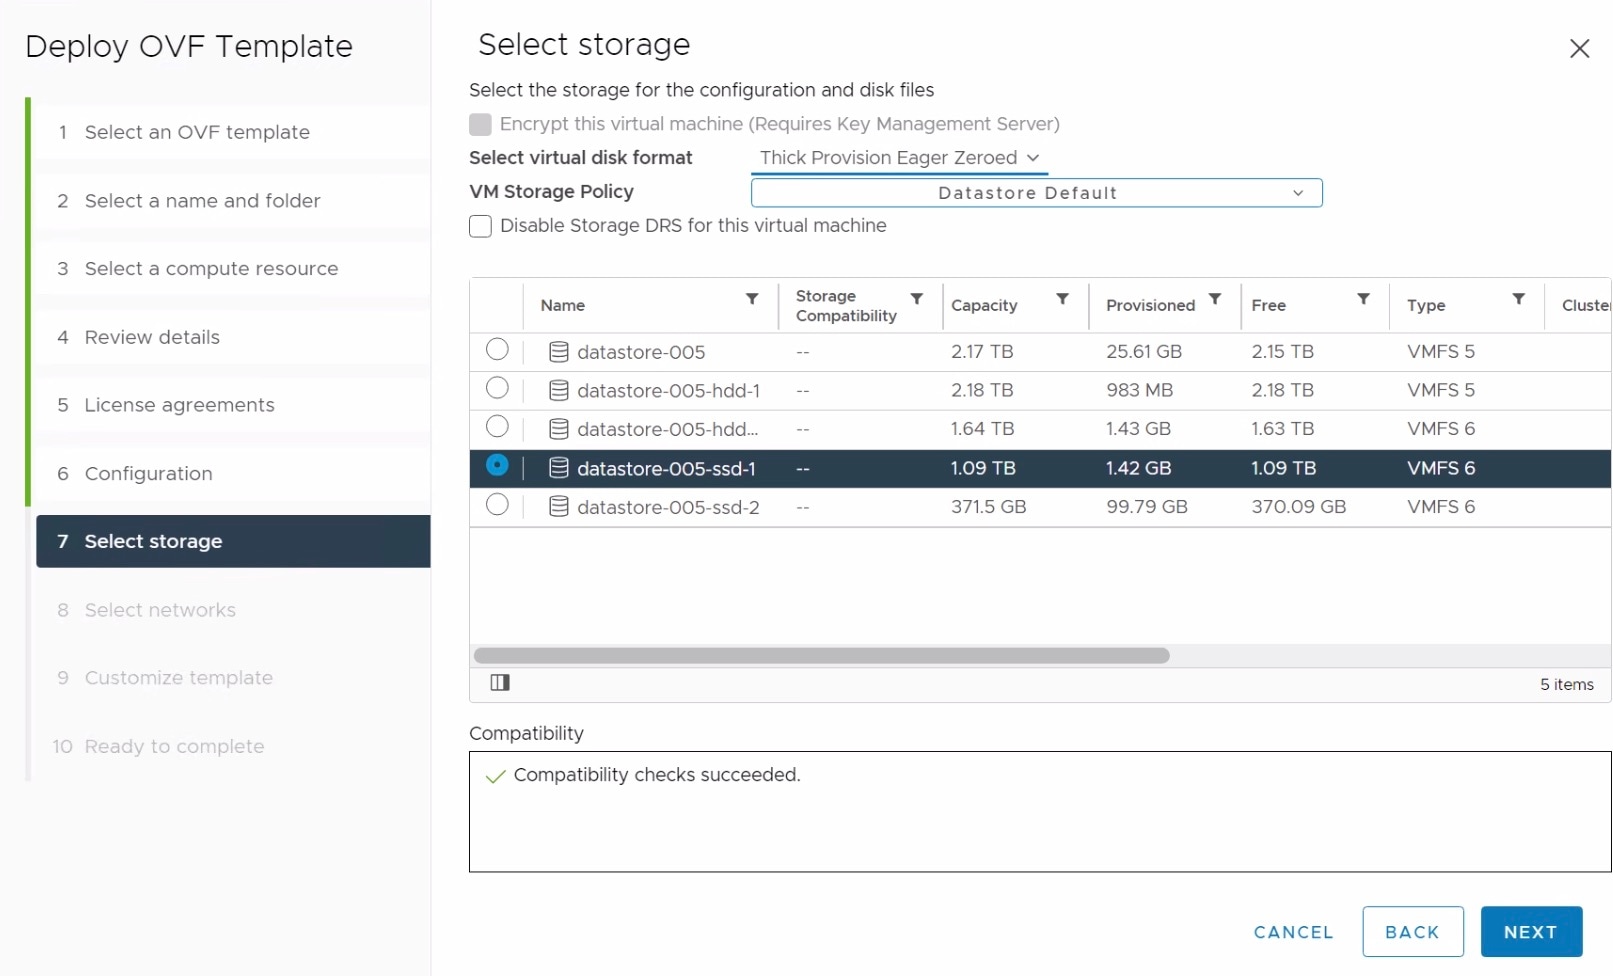
Click Next. The Deploy OVF Template window is refreshed, with 7 - Select Storage highlighted. Choose the relevant option from the Select virtual disk format drop-down list.

Note


For production deployment, choose the Thick Provision Eager Zeroed option because this will preallocate disk space and provide the best performance. For lab purposes, we recommend the Thin Provision option because it saves disk space.

From the table, choose the datastore you want to use, and review its properties to ensure there is enough available storage.

Figure 2. Select Storage

Step 14

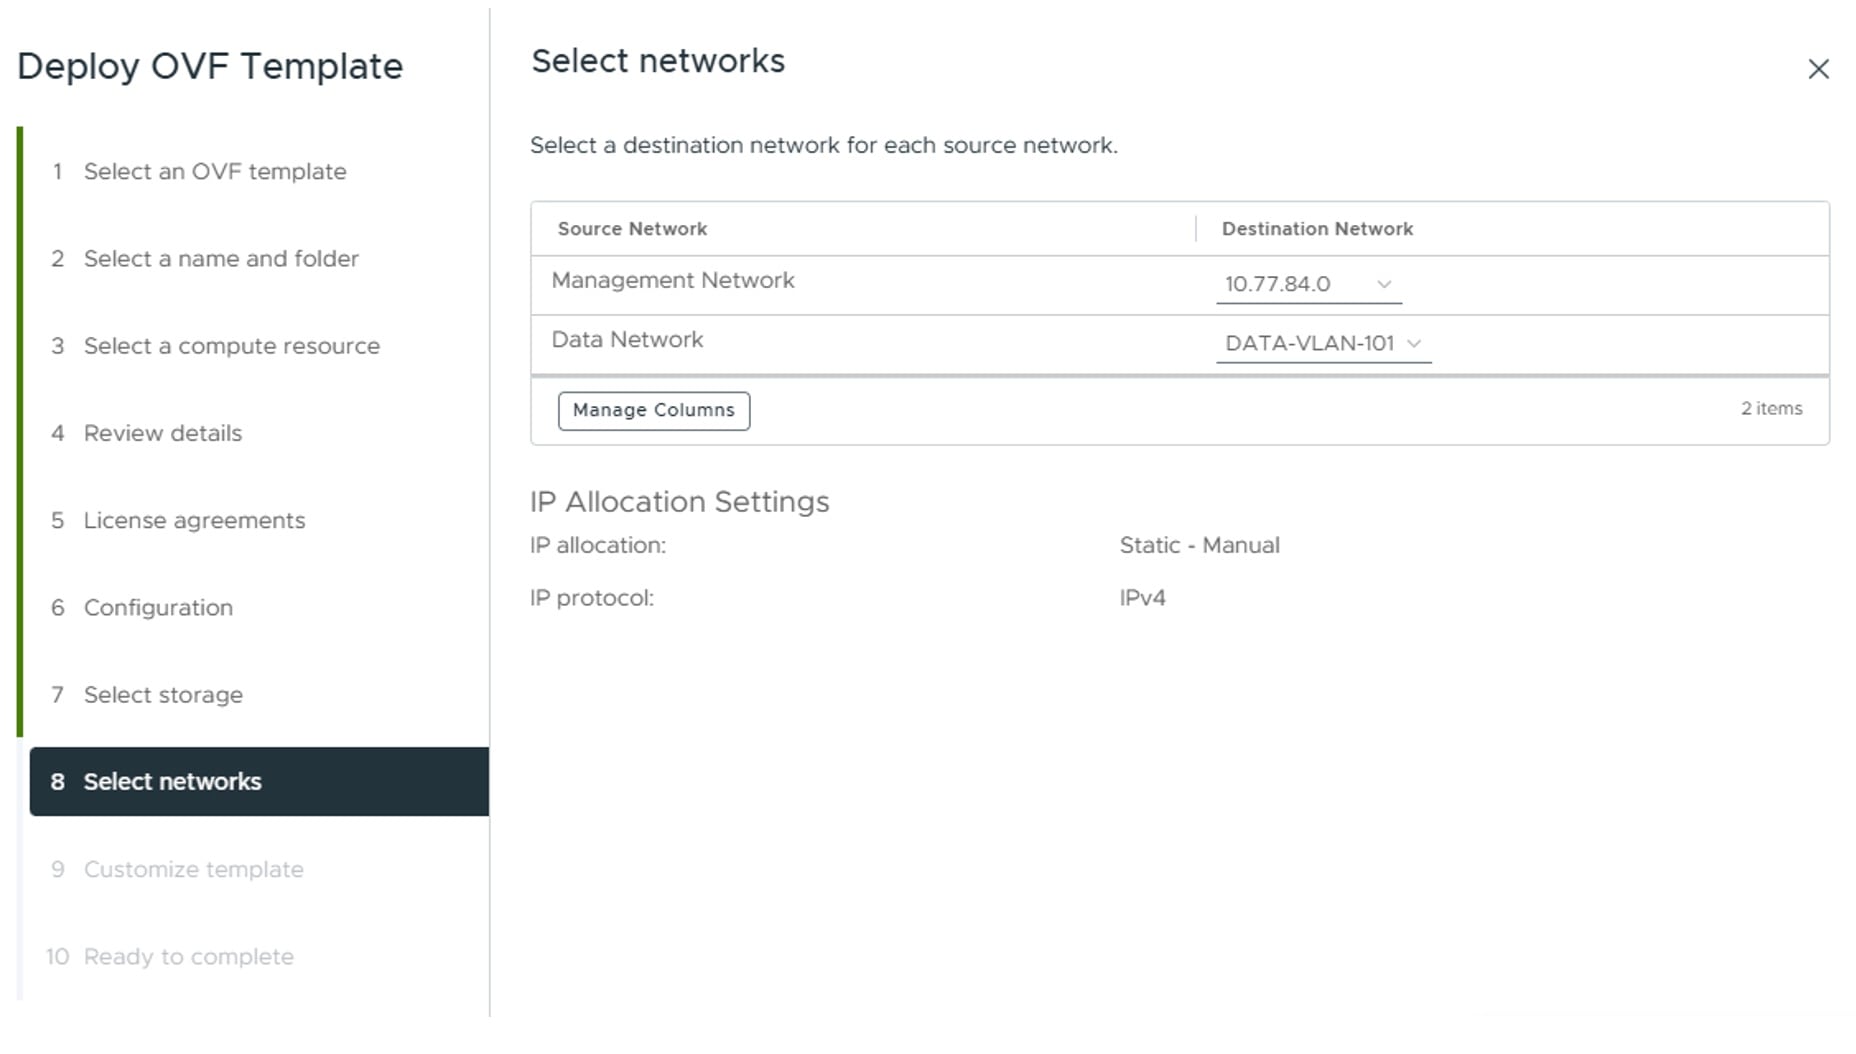
Click Next. The Deploy OVF Template window is refreshed, with 8 - Select networks highlighted. From the Destination Network drop-down list, select the proper networks for the Management Network and the Data Network.

Figure 3. Select networks

Step 15

Click Next. The Deploy OVF Template window is refreshed, with 9 - Customize template highlighted.

Note


As you are creating a template now, enter the IP information for the first node.

  1. Expand the Management Network settings. Provide information for the IPv4, IPv6 or dual stack deployment (as per your selection) such as IP address, IP netmask, IP gateway, and virtual IP address.

  2. Expand the Data Network settings. Provide information for the IPv4, IPv6 or dual stack deployment (as per your selection) such as IP address, IP netmask, IP gateway, and virtual IP address.

  3. Expand the DNS and NTP Servers settings. According to your deployment configuration (IPv4, IPv6 or dual stack), the fields that are displayed are different. Provide information in the following three fields:

    • DNS IP Address: The IP addresses of the DNS servers you want the Cisco Crosswork server to use. Separate multiple IP addresses with spaces.

    • DNS Search Domain: The name of the DNS search domain.

    • NTP Servers: The IP addresses or host names of the NTP servers you want to use. Separate multiple IPs or host names with spaces.

    Note


    The DNS and NTP servers must be reachable using the network interfaces you have mapped on the host. Otherwise, the configuration of the VM will fail.

  4. Expand Crosswork Cluster Configuration. Provide relevant values for the following fields:

    • VM Type:

      • Choose Hybrid if this is one of the 3 Hybrid nodes.

      • Choose Worker if this is a Worker node.

    • Cluster Seed node:

      • Choose True if this is the first VM being built in a new cluster.

      • Choose False for all other VMs, or when rebuilding a failed VM.

    • Initial hybrid node count: Set to the default value, which is 3.

    • Initial total node count: Set to the default value, which is 3.

  5. Expand the Deployment Credentials settings. Enter relevant values for the VM Username and Password.

    Note


    Use a strong VM Password (8 characters long, including upper & lower case letters, numbers, and at least one special character). Avoid using passwords similar to dictionary words (for example, "Pa55w0rd!") or relatable words. While they satisfy the criteria, such passwords are weak and will be rejected resulting in failure to setup the VM.

  6. The default Disk Configuration settings should work for most environments. Change the settings only if you are instructed to by the Cisco Customer Experience team.

  7. Expand Advanced Configuration. Provide relevant values for these fields:

    • Timezone: Enter the timezone details. Default value is UTC.

    • Disclaimer: Enter your legal disclaimer text (users will see this text if they log into the CLI).

    • Crosswork Management Cluster Virtual IP Name: Enter the Management Virtual IP DNS name.

    • Crosswork Data Cluster Virtual IP Name: Enter the Data Virtual IP DNS name.

    • Enable Skip Auto Install Feature: Any pods marked as skip auto install will not be brought up until a dependent application/pod explicitly asks for it. If left blank, the default value ("False") is selected.

    • Ignore Diagnostic Failure: Use the default value ("False").

    • Location of VM: Enter the location of VM.

    • K8 Orchestrator: Enforces minimum resource reservations for the pod. If left blank, the default value ("True") is selected.

    • Kubernetes Service Network: The network address for the kubernetes service network. By default, the CIDR range is fixed to '/16'.

    • Kubernetes Pod Network: The network address for the kubernetes pod network. By default, the CIDR range is fixed to '/16'.

    • Installation type:

      • For new cluster installation: Do not select the check box.

      • Replacing a failed VM: Select the check box.

      • Adding a new worker node to an existing cluster: Do not select the check box.

    • Auto Action Manifest Definition: Auto action functionality enables you to customize the installation of applications along with the cluster installation. For more information, see Automate application installation.

      • If you plan to use the auto action functionality, enter manifest definition details. You must compress or minimize the auto action JSON file and enclose it in CDATA format. The format is <![CDATA[{auto action json compressed content}]]>.

        Sample auto action CDATA:

        <![CDATA[{"auto_action":{"add_to_repository_requests":[{"file_location":
        {"uri_location":{"uri":"file:///example.com/path/to/cw-na-cncadvantage-7.1.0-46-releasecnc710-250606.tar.gz.signature"}}}],
        "install_activate_requests":[{"package_identifier":{"id":"capp-coe","version":"7.1.0"}}]}}]]>
      • If you do not plan to use this functionality, leave the field blank.

    • CA Private Key: Use the default value (Empty).

    • CA Public Key: Use the default value (Empty).

    • Use NonDefault Calico Bgp Port: Leave the checkbox unchecked.

Step 16

Click Next. The Deploy OVF Template window is refreshed, with 10 - Ready to Complete highlighted.

Step 17

Review your settings and then click Finish if you are ready to begin deployment. Wait for the deployment to finish before continuing. To check the deployment status:

  1. Open a VMware vCenter client.

  2. In the Recent Tasks tab of the host VM, view the status of the Deploy OVF template and Import OVF package jobs.

Step 18

To finalize the template creation, select the host and right-click on the newly installed VM and select Template > Convert to Template. A prompt confirming the action is displayed. Click Yes to confirm. The template is created under the VMs and Templates tab in the vSphere Client UI.

This is the end of the first part of the manual installation workflow. In the second part, use the newly created template to build the cluster VMs.


Deploy the template

Procedure


Step 1

To build a VM, right-click on the template and select New VM from This Template.

Note


If the template is no longer present, go back and create the template. For more information, see Build the OVF template.

Step 2

The VMware Deploy From Template window appears, with the first step, highlighting the 1 - Select a name and folder section. Enter a name and select the respective data center for the VM.

Note


If this is a new VM, the name must be unique and cannot be the same name as the template. If this VM is replacing an existing VM (for example, CW-VM-0) give the VM a unique temporary name (for example, CW-VM-0-New).

Step 3

Click Next. The Deploy From Template window will refresh, highlighting the 2 - Select a compute resource section. Select the host for your Cisco Crosswork VM.

Step 4

Click Next. The Deploy From Template window will refresh, highlighting the 3 - Select Storage section. Choose Same format as source option as the virtual disk format (recommended).

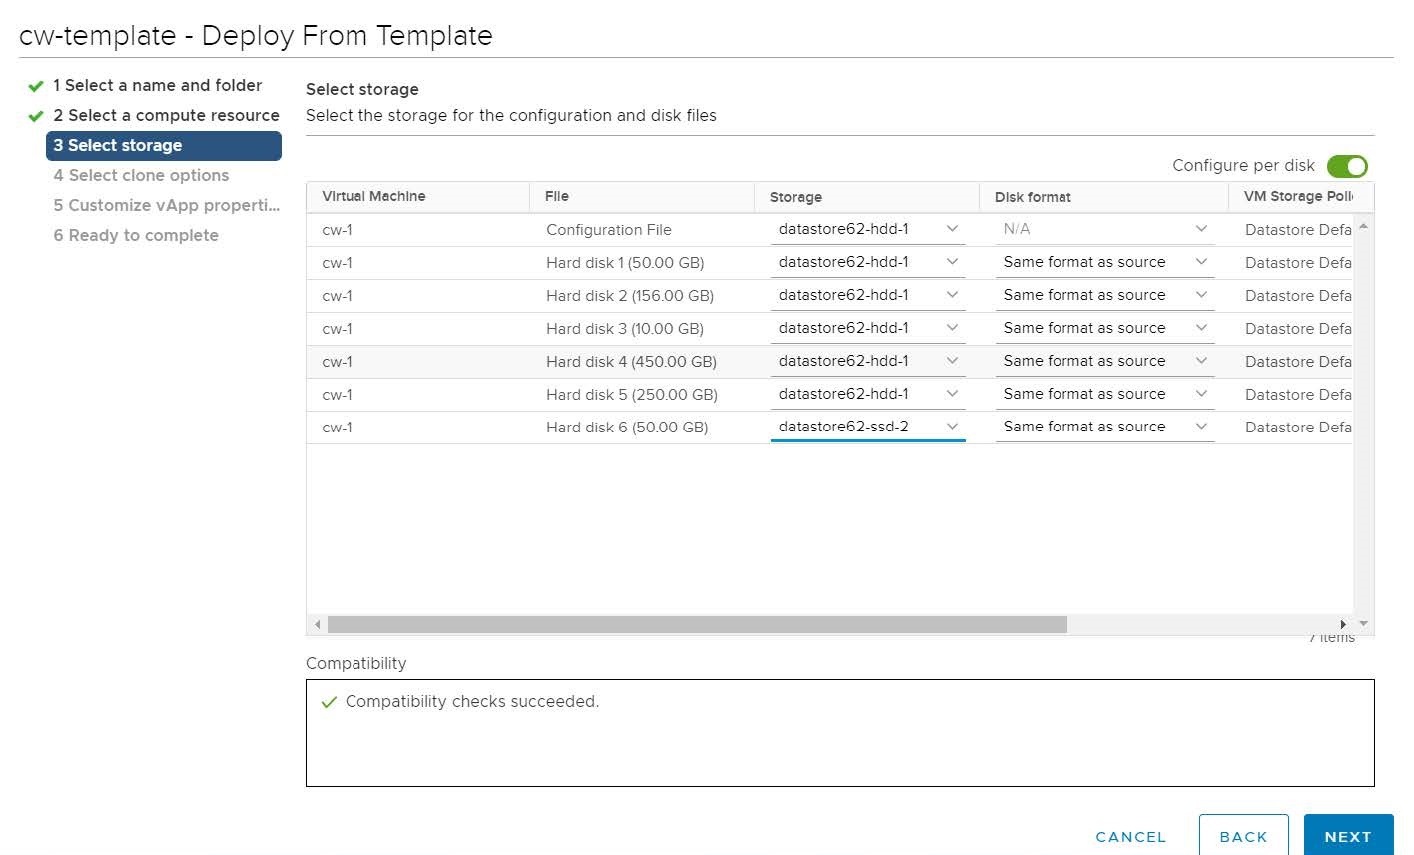
The recommended configuration for the nodes uses a combination of high-speed (typically SSD based) and normal (typical disks) storage. If you are following the recommended configuration follow the steps for two data stores. Otherwise, follow the steps for using a single data store.

  • If you are using two data stores (regular and high speed):

    • Enable Configure per disk option.

    • Select same data store (regular) as the Storage setting for disks 1 through 5. This data store must have 916 GB of space.

    • Select the host's high speed (ssd) data store as the Storage setting for disk 6. The high speed data store must have at least 50 GB of space.

    • Click Next.

      Figure 4. Select Storage - Configure per disk
  • If you are using a single data store: Select the data store you wish to use, and click Next.

  • If your data center uses shared storage: Configure all the drives to utilize the shared storage, and click Next.

Step 5

The Deploy From Template window will refresh, highlighting the 4 - Select clone options section with the following checkboxes visible on the screen. Unless you have been given specific instructions to make modifications, select Next.

  • Customize the operating system: Check this box if you want to customize the operating system to avoid conflicts when deploying the VM. This step is optional.

    • If you check this box, the Deploy From Template window will refresh, highlighting the Customize guest OS section. Make the necessary changes, and click Next.

  • Customize this virtual machine's hardware: Check this box if you want to modify the IP settings or resource settings of this VM. This step is optional.

    • If you check this box, the Deploy From Template window will refresh, highlighting the Customize hardware section. Make the necessary changes, and click Next.

  • Power on virtual machine after creation: Leave this checkbox unselected.

Step 6

Click Next. The Deploy From Template window will refresh, highlighting the 5 - Customize vApp properties section. The vApp properties are prepopulated with the values entered during the template creation. Some of the values will need to be updated with the appropriate values for each node being deployed.

Tip

 
  • It is recommended to change only the fields that are unique to each node. Leave all other fields at the default values.

  • If this VM is being deployed to replace a failed VM, or to migrate the VM to a new host, the IP and other settings must match the machine being replaced.

  • Set the node type (Hybrid/Worker).

  • Management Network settings: Enter correct IP values for each VM in the cluster.

  • Data Network settings: Enter correct IP values for each VM in the cluster.

  • Deployment Credentials: Enter same deployment credentials for each VM in the cluster.

  • DNS and NTP Servers: Enter correct values for the DNS and NTP servers.

  • Disk Configuration: Leave at the default settings unless directed otherwise by the Cisco Customer Experience team.

  • Crosswork Configuration: Enter the disclaimer message.

  • Crosswork Cluster Configuration:

    • VM Type: Select Hybrid or Worker

    • Cluster Seed node:

      • Choose True if this is the first VM being built in a new cluster.

      • Choose False for all other VMs, or when rebuilding a failed VM or moving the VM to a new host.

    • Crosswork Management Cluster Virtual IP: The Virtual IP will remain same for each cluster node.

    • Crosswork Data Cluster Virtual IP: The Virtual IP will remain same for each cluster node.

Step 7

Click Next. The Deploy From Template window will refresh, highlighting the 6 - Ready to complete section. Review your settings and then click Finish if you are ready to begin deployment.

Step 8

For the newly created VM, confirm that the resource settings allocated for the VM match those specified in Identify the resource footprint.

Step 9

Repeat from Step 1 to Step 8 to deploy the remaining VMs in the cluster.

Important


When deploying the cluster for the first time, make sure the IP addresses and Seed node settings are correct. When replacing or migrating a node make sure the settings match the original VM.

Step 10

Choose the relevant action:

  • If you are deploying a new VM, power on the VM selected as the cluster seed node. After a delay of few minutes, power on the remaining nodes. To power on, expand the host’s entry, click the Cisco Crosswork VM, and then choose Actions > Power > Power On.
  • If this VM is replacing an existing VM, perform the following:
    • Power down the existing VM.

    • Change the name of the original VM (for example, change to CW-VM-0-Old)

    • Change the name of the replacement VM (for example change to CW-VM-0-New) to match the name of the original VM (for example, CW-VM-0).

    • Power on the new VM. Monitor the health of the cluster using the Crosswork UI.

    • Once the cluster is healthy and stable, delete the original VM (now named as CW-VM-0-Old)

Step 11

The time taken to create the cluster can vary based on the size of your deployment profile and the performance characteristics of your hardware. See Monitor cluster activation to know how you can check the status of the installation.

Note


If you are running this procedure to replace a failed VM, then you can check the status from the Cisco Crosswork GUI (go to Administration > Crosswork Manager and click on the cluster tile to check the Crosswork Cluster status.

Note


If you are using the process to build a new Worker node, the node will automatically register itself with the existing Kubernetes cluster. For more information on how the resources are allocated to the Worker node, see the Rebalance Cluster Resources topic in the Cisco Crosswork Network Controller 7.0 Administration Guide.


What to do next

Return to the installation workflow: Install Cisco Crosswork Network Controller on VMware vCenter

Monitor cluster activation

This section explains how to monitor and verify if the installation has completed successfully. As the installer builds and configures the cluster it will report progress. The installer will prompt you to accept the license agreement and then ask if you want to continue the install. After you confirm, the installation will progress and any possible errors will be logged in either installer.log or installer_tf.log. If the VMs get built and are able to boot, the errors in applying the operator specified configuration will be logged on the VM in the /var/log/firstboot.log.


Note


During installation, Cisco Crosswork will create a special administrative ID (virtual machine (VM) administrator, cw-admin, with the password that you provided in the manifest template. In case the installer is unable to apply the password, it creates the administrative ID with the default password cw-admin). The first time you log in using this administrative ID, you will be prompted to change the password.

The administrative username is reserved and cannot be changed. Data center administrators use this ID to log into and troubleshoot the Crosswork application VM.


Steps to monitor deployment progress

Here are the critical steps to monitor to ensure progress is on track:

  1. The installer uploads the crosswork image file (.ova file) to the vCenter data center.


    Note


    On running, the installer will upload the .ova file into the vCenter if it is not already present, and convert it into a VM template. After the installation is completed successfully, you can delete the template file from the vCenter UI (located under VMs and Templates) if the image is no longer needed.


  2. The installer creates the VMs, and displays a success message (e.g. "Creation Complete") after each VM is created.


    Note


    For VMware deployments, this activity can also be monitored from the vSphere UI.


  3. After each VM is created, it is powered on (either automatically when the installer completes, or after you power on the VMs during the manual installation). The parameters specified in the template are applied to the VM, and it is rebooted. The VMs are then registed by Kubernetes to form the cluster.

  4. Once the cluster is created and becomes accessible, a success message (e.g. "Crosswork Installer operation complete") will be displayed and the installer script will exit and return you to a prompt on the screen.

After the Cisco Crosswork UI becomes accessible, you can also monitor the status from the UI. For more information, see Log into the Cisco Crosswork UI.

Monitor startup process

You can monitor startup progress using these methods.

Using browser accessible dashboard:

  1. While the cluster is being created, monitor the setup process from a browser accessible dashboard.

  2. The URL for this grafana dashboard (in the format http://{VIP}:30602/d/NK1bwVxGk/crosswork-deployment-readiness?orgId=1&refresh=10s&theme=dark) is displayed once the installer completes. This URL is temporary and will be available only for a limited time (around 30 minutes).

  3. At the end of the deployment, the grafana dashboard will report a "Ready" status. If the URL is inaccessible, use the SSH console described in this section to monitor the installation process.

    Figure 5. Crosswork Deployment Readiness

Using the console:

  1. Check the progress from the console of one of the hybrid VMs or by using SSH to the Virtual IP address.

  2. In the latter case, login using the cw-admin user name and the password you assigned to that account in the install template.

  3. Switch to super user using sudo su - command.

  4. Run kubectl get nodes (to see if the nodes are ready) and kubectl get pods (to see the list of active running pods) commands.

  5. Repeat the kubectl get pods command until you see robot-ui in the list of active pods.

  6. At this point, you can try to access the Cisco Crosswork UI.

Diagnostic assessment

During deployment, the system verifies VM datastore resource values, including disk latency, IOPS, and network bandwidth. If any value falls below the recommended threshold, the diagnostic assessment reports a failure, requiring user action to proceed with the installation. See Diagnostic assessment for more information.

Deployment failure

In the event of one of the failure scenarios listed below, contact the Cisco Customer Experience team and provide the installer.log, installer_tf.log, and firstBoot.log files (there will be one per VM) for review:

  • Installation is incomplete.

  • Installation is completed, but the VMs are not functional.

  • Installation is completed, but you are directed to check /var/log/firstBoot.log or /opt/robot/bin/firstBoot.log file.

What to do next:

Return to the installation workflow: Install Cisco Crosswork Network Controller on VMware vCenter

Diagnostic assessment

This topic explains the diagnostic checks performed during the Crosswork Network Controller deployment.

During deployment, the system checks the VM data store(s) for disk latency, IOPS, and network bandwidth (see m_cw-5-0-plan-your-deployment.html#identify-resource-reqs__ for the recommended values for each parameter). If a fetched value is lower than the recommended value for any parameter, the diagnostic assessment reports a failure. At this point, you can choose to either ignore the report and proceed with the installation—accepting the risk of failure—or update your VM resources to meet the required criteria and retry the installation.

The outcome of the diagnostic assessment depends on the value set for the IgnoreDiagnosticsCheckFailure parameter:

  • If set to "false" (default value), the installation will be blocked if the diagnostic check reports an error.

  • If set to "true", the diagnostic check result is ignored, and the installation will proceed.

Diagnostic failure scenario

This is a breakdown of the failure scenario for the diagnostic assessment when set to its default value (IgnoreDiagnosticsCheckFailure = false).

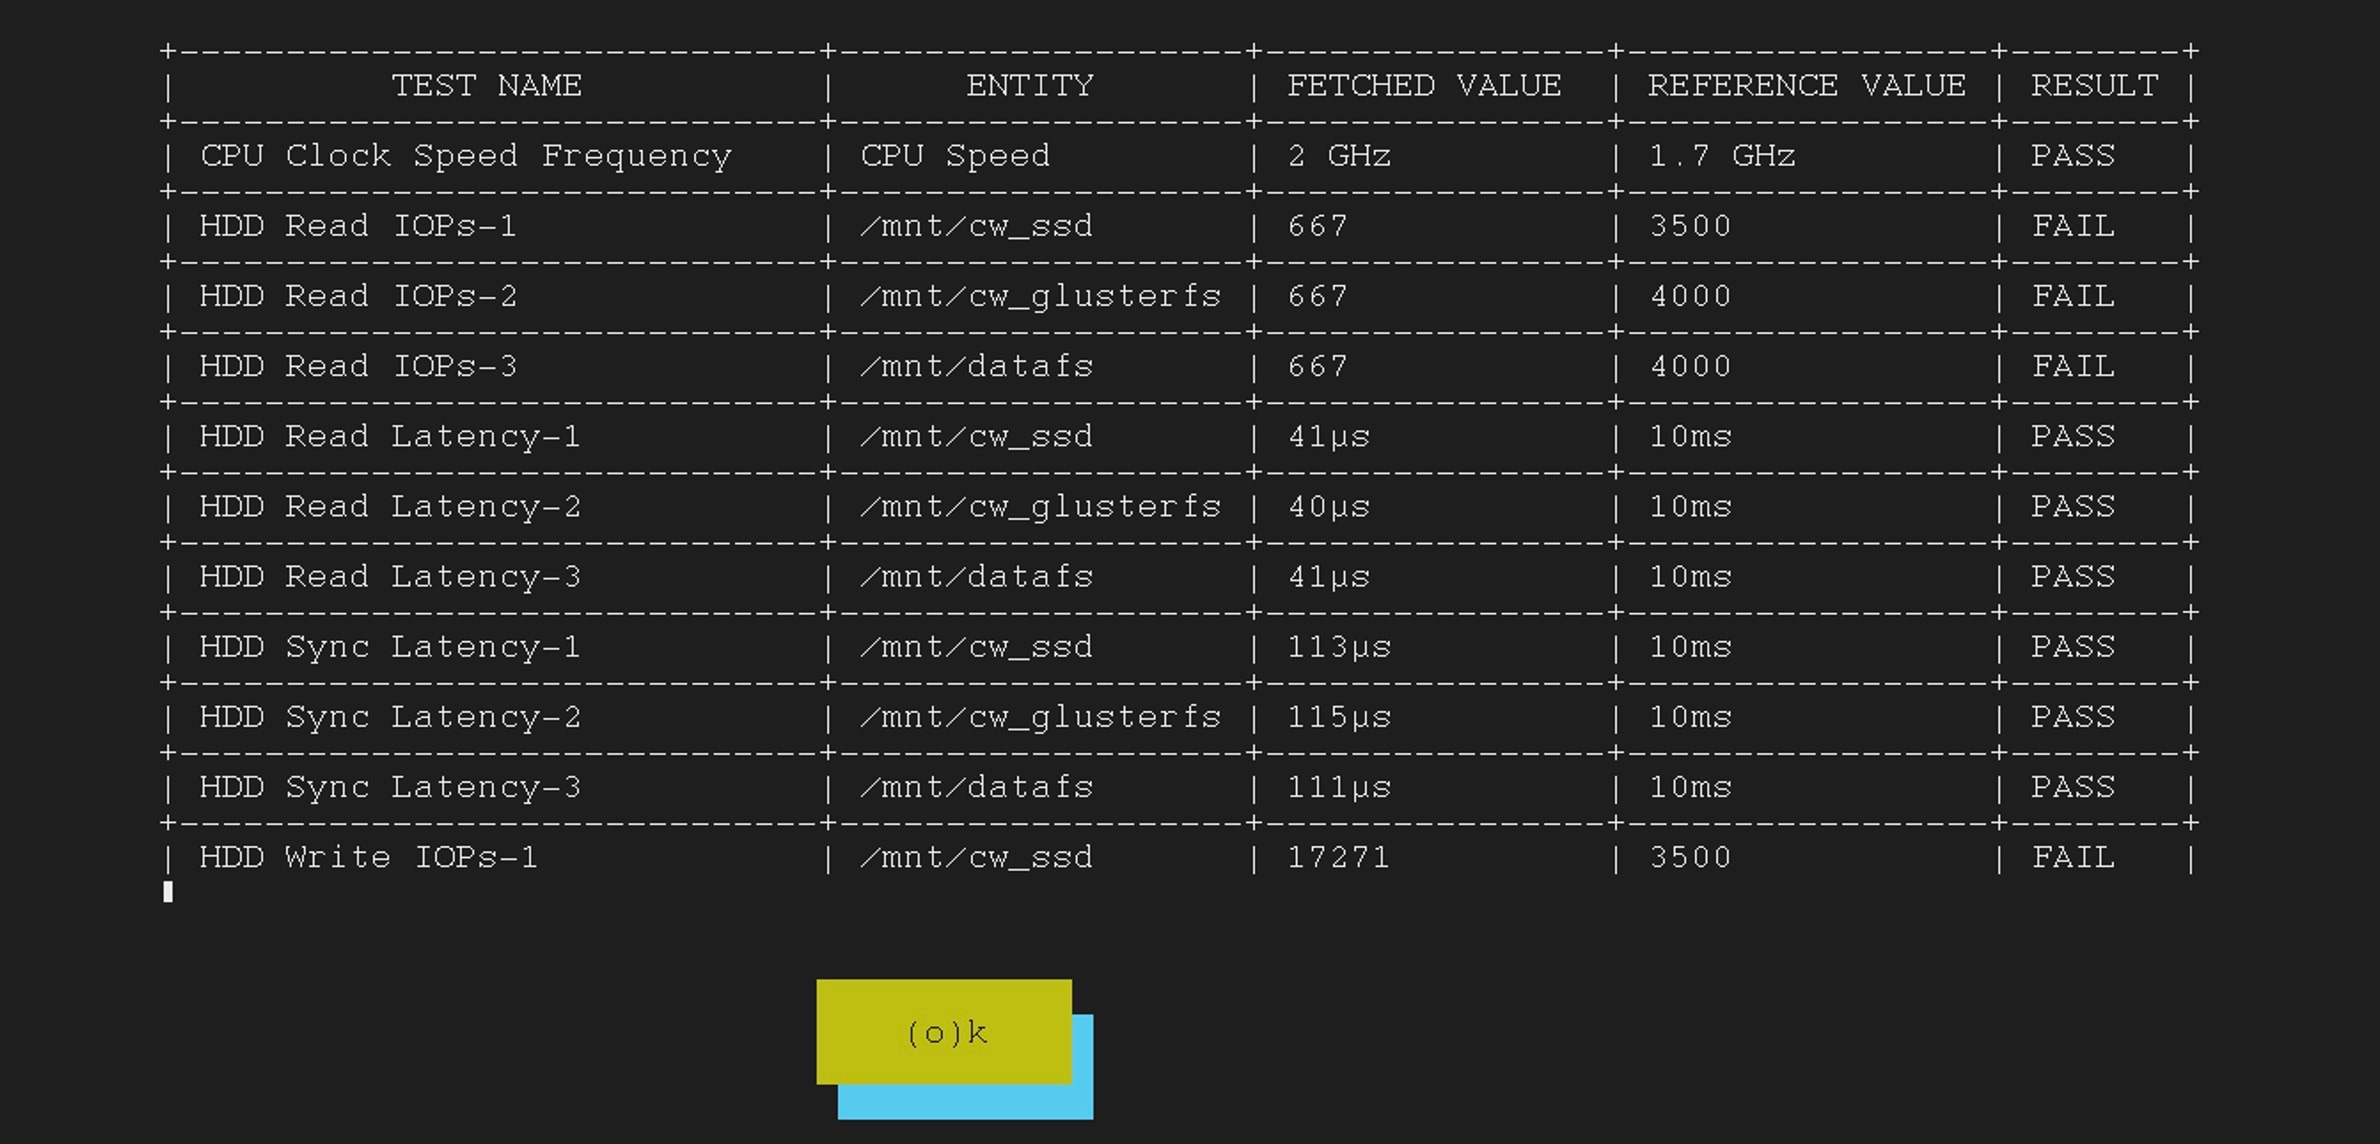
In this scenario, the fetched value is lower than the recommended value (such as IOPS < 4000 and/or network bandwidth < 8000 Mbps), resulting in a diagnostic assessment failure.

  1. A banner message is displayed to notify you about the failure.

    Figure 6. Sample diagnostic failure report
  2. You can use diagnostics all and diagnostics history commands to view the detailed diagnostic report.

    Figure 7. Diagnostic all output
  3. To ignore the failure report and proceed with the installation, you must change the value of the IgnoreDiagnosticsCheckFailure parameter.

    1. Log in to the vCenter UI.

    2. Power off the VM reporting the failure. Right-click on the VM, and click Power > Power Off. Click Yes in the confirmation popup window.

    3. Click on the Configure tab and click vApp Options in the Settings dropdown menu.

    4. Under Properties, select the IgnoreDiagnosticsCheckFailure parameter and click Set Value.

      Figure 8. Select parameter
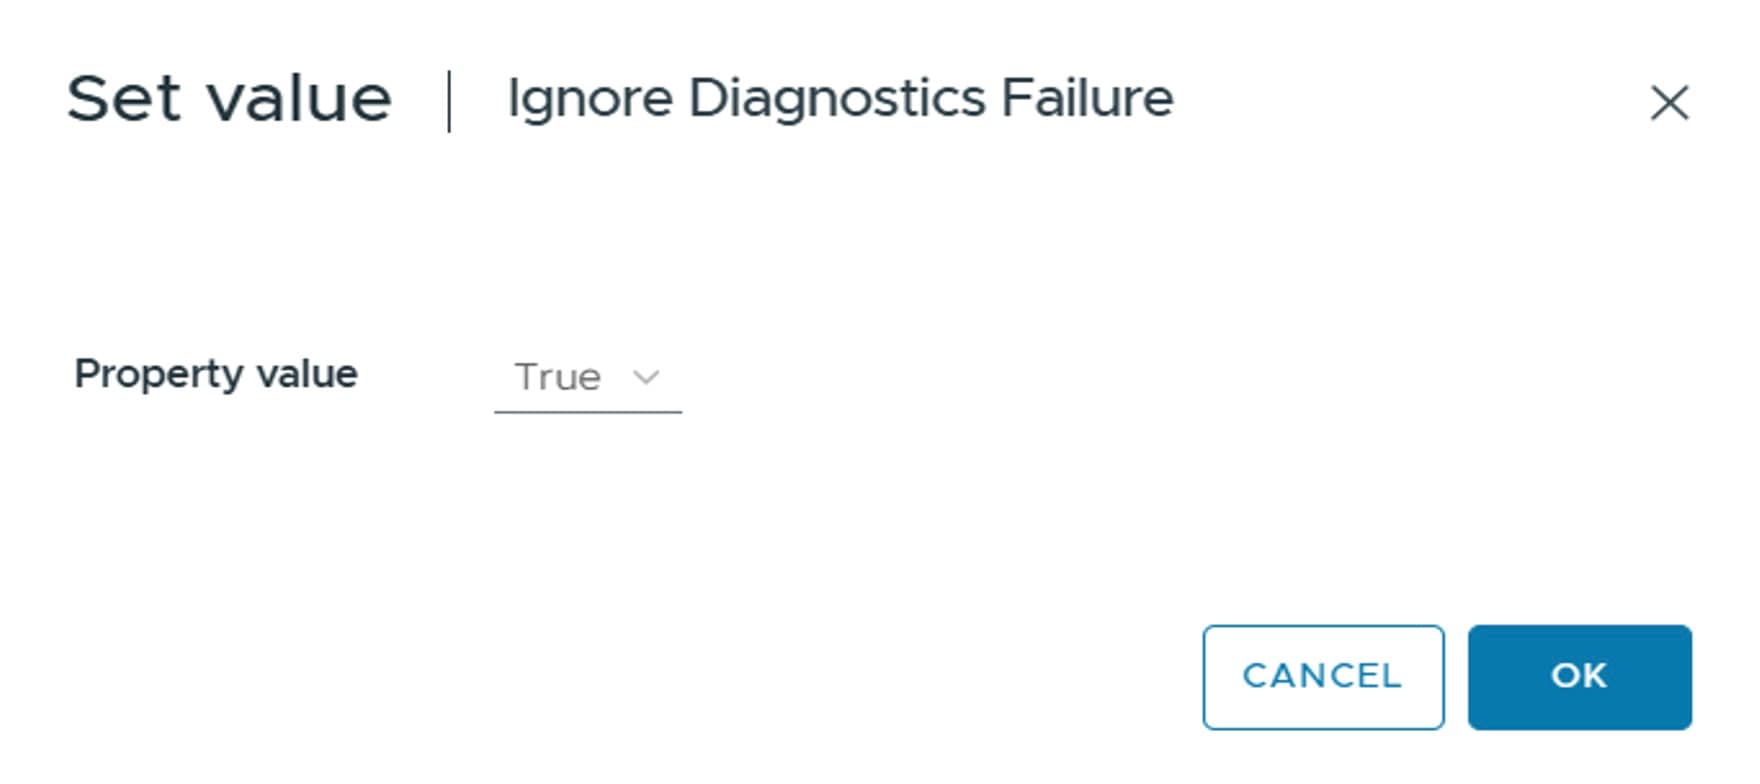
    5. Set the Property value as True. Click OK to confirm.

      Figure 9. Set value
    6. Power on the VM. Right-click on the VM, and click Power > Power On. Click Yes in the confirmation popup window.

  4. (Optional) If the diagnostic check reports failures for multiple nodes and the installation is blocked, you can also proceed with a full installation using the skip option (-s) command in the Docker installer.

    Example:

    ./cw-installer.sh install -p -m /data/<template file name> -o /data/<.ova file> -y -s
  5. After IgnoreDiagnosticsCheckFailure is set to True, a banner message informs you of the decision to skip the diagnostic check failure.

    Figure 10. Skip install check banner message

    Important


    If the parameter value is lower than suboptimal (IOPS < 1000 and/or network bandwidth < 1000 Mbps), the installation will fail irrespective of your choice to ignore the diagnostic check.


Diagnostic success scenario

The diagnostic check is successful, and the installation will proceed without requiring any user action.

Backend checks

These backend checks are used to verify the resource values of the VM:

  • Directory IOPS:

    fio --randrepeat=1  --fdatasync=1 --ioengine=sync --name=test --rw=rw 
    --filename=<DIR>/mytest --bs=8k --size=600M --runtime=10 --time_based=1
    

    Replace <DIR> with /mnt/cw_ssd/, /mnt/datafs, or /mnt/cw_glusterfs, as appropriate.

  • iPerf:

    iperf3 <IP Version> --client <VIP address> -t 5 -P 5 -p 31560 –json

    Replace <IP Version> with 4 (for IPv4) or 6 (for IPv6), and <VIP address> with the VM's VIP address.

    Ensure that the iPerf server is running on the seed node (on the VIP). To start the iPerf server on the seed node, execute systemctl start iperf3.service.


    Note


    The iPerf check is skipped for single VM deployments.


Log into the Cisco Crosswork UI

Once the cluster activation and startup have been completed, you can check if all the nodes are up and running in the cluster from the Cisco Crosswork UI.


Note


For the supported browser versions, see the Compatibility Information section in the Release Notes for Crosswork Network Controller 7.1.0.


Perform the following steps to log into the Cisco Crosswork UI and check the cluster health:


Note


If the Cisco Crosswork UI is not accessible, during installation, please access the host's console from the data center UI to confirm if there was any problem in setting up the VM. When logging in, if you are directed to review the firstboot.log file, please check the file to determine the problem. If you are able to identify the error, rectify it and restart the node(s). If you require assistance, please contact the Cisco Customer Experience team.


Procedure


Step 1

Launch one of the supported browsers.

Step 2

In the browser's address bar, enter:

https://<Crosswork Management Network Virtual IP (IPv4)>:30603/

or

https://[<Crosswork Management Network Virtual IP (IPv6)>]:30603/

Note


Please note that the IPv6 address in the URL must be enclosed with brackets.

Note


You can also log into the Crosswork UI using the Crosswork FQDN name.

The Log In window opens.

Note


When you access the Cisco Crosswork for the first time, some browsers display a warning that the site is untrusted. When this happens, follow the prompts to add a security exception and download the self-signed certificate from the Cisco Crosswork server. After you add a security exception, the browser accepts the server as a trusted site in all future login attempts. If you want to use a CA signed certificate, see the Manage Certificates topic in the Cisco Crosswork Network Controller 7.1 Administration Guide.

Step 3

Log into the Cisco Crosswork as follows:

  1. Enter the Cisco Crosswork administrator username admin and the default password admin.

  2. Click Log In.

  3. When prompted to change the administrator's default password, enter the new password in the fields provided and then click OK.

    Note


    Use a strong VM Password (minimum 8 characters long, including upper & lower case letters, numbers, and one special character). Avoid using passwords similar to dictionary words (for example, "Pa55w0rd!") or relatable words.

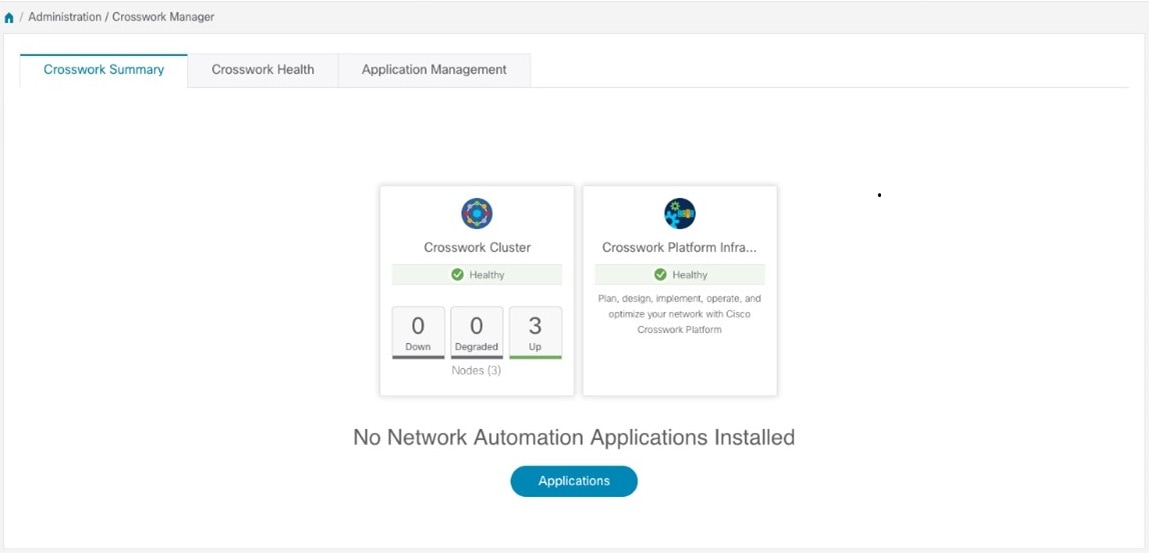
The Crosswork Manager window is displayed.

Step 4

Click on the Crosswork Health tab, and click the Crosswork Platform Infrastructure tab to view the health status of the microservices running on Cisco Crosswork.

Step 5

(Optional) Change the name assigned to the admin account (by default, it is "John Smith") to something more relevant.

Step 6

In case of manual installation: After logging into the Crosswork UI, ensure the cluster is healthy. Download the cluster inventory sample (.tfvars file) from the Crosswork UI and update it with information about the VMs in your cluster, along with the data center parameters. Then, import the file back into the Crosswork UI. For more information, see Import Cluster Inventory.


What to do next

Return to the installation workflow: Install Cisco Crosswork Network Controller on VMware vCenter

Import Cluster Inventory

If you have installed your cluster manually using the vCenter UI, you must import an inventory file (.tfvars file) to Cisco Crosswork to reflect the details of your cluster. A sample inventory file can be downloaded from the Crosswork UI.

Note


If the manual installation was performed to replace a failed VM, you must delete the original VM after importing the cluster inventory file.


Attention


Crosswork cannot deploy or remove VM nodes in your cluster until you complete this operation.


Note


Please uncomment or set the "OP_Status = 2" parameter while importing the cluster inventory file manually. If you fail to do this, the status of the VM will incorrectly appear as "Initializing" even after the VM becomes functional. 


Procedure


Step 1

From the main menu, choose Administration > Crosswork Manager.

Step 2

On the Crosswork Summary tab, click the System Summary tile to display the Cluster Management window. Ensure the cluster is healthy.

Step 3

Choose Actions > Import Cluster Inventory to display the Import Cluster Inventory dialog box.

Step 4

(Optional) Click Download sample template file to download the template. Update the file with information about the VMs in your cluster, along with the data center parameters. For more details on the installation parameters, see Installation parameters.

Step 5

Click Browse and select the cluster inventory file.

Step 6

Click Import to complete the operation.


Troubleshoot the Cluster

By default, the installer displays progress data on the command line. The install log is fundamental in identifying the problems, and it is written into the /data directory.

Table 3. General scenarios

Scenario

Possible Resolution

Certificate Error

The ESXi hosts that will run the Crosswork application and the Data Gateway VM must have NTP configured, or the initial handshake may fail with "certificate not valid" errors.

Image upload takes a long time or upload is interrupted.

The image upload duration depends on the link and datastore performance and can be expected to take around 10 minutes or more. If an upload is interrupted, the user needs to manually remove the partially uploaded image file from vCenter via the vSphere UI.

vCenter authorization

The vCenter user needs to have authorization to perform the actions as described in Installation Prerequisites for VMware vCenter.

Floating VIP address is not reachable

The VRRP protocol requires unique router_id advertisements to be present on the network segment. By default, Crosswork uses the ID 169 on the management and ID 170 on the data network segments. A symptom of conflict, if it arises, is that the VIP address is not reachable. Remove the conflicting VRRP router machines or use a different network.

Crosswork VM is not allowing the admin user to log in

OR

The following error is displayed:

Error: Invalid value for variable on cluster_vars.tf line 113:

├────────────────

This was checked by the validation rule at cluster_vars.tf:115,3-13. Error: expected length of name to be in the range (1 - 80), got with data.vsphere_virtual_machine.template_from_ovf, on main.tf line 32, in data "vsphere_virtual_machine" "template_from_ovf": 32: name = var.Cw_VM_Image Mon Aug 21 18:52:47 UTC 2023: ERROR: Installation failed. Check installer and the VMs' log by accessing via console and viewing /var/log/firstBoot.log

This happens when the password is not complex enough. Create a strong password, update the configuration manifest and redeploy.

Use a strong VM Password (8 characters long, including upper & lower case letters, numbers, and at least one special character). Avoid using passwords similar to dictionary words (for example, "Pa55w0rd!") or relatable words. While they satisfy the criteria, such passwords are weak and will be rejected resulting in failure to setup the VM.

Deployment fails with: Failed to validate Crosswork cluster initialization.

The clusters' seed VM is either unreachable or one or more of the cluster VMs have failed to get properly configured.

  1. Check whether the VM is reachable, and collect logs from /var/log/firstBoot.log and /var/log/vm_setup.log

  2. Check the status of the other cluster nodes.

The VMs are deployed but the Crosswork cluster is not being formed.

A successful deployment allows the operator logging in to the VIP or any cluster IP address to run the following command to get the status of the cluster:
sudo kubectl get nodes
A healthy output for a 3-node cluster is:
NAME                  STATUS   ROLES    AGE   VERSION
172-25-87-2-hybrid.cisco.com   Ready    master   41d   v1.16.4
172-25-87-3-hybrid.cisco.com   Ready    master   41d   v1.16.4
172-25-87-4-hybrid.cisco.com   Ready    master   41d   v1.16.4

In case of a different output, collect the following logs: /var/log/firstBoot.log and /var/log/vm_setup.log

In addition, for any cluster nodes not displaying the Ready state, collect:
sudo kubectl describe node <name of node>

The following error is displayed while uploading the image:

govc: The provided network mapping between OVF networks and the system network is not supported by any host.

The Dswitch on the vCenter is misconfigured. Please check whether it is operational and mapped to the ESXi hosts.

VMs deploy but install fails with Error: timeout waiting for an available IP address

Most likely cause would be an issue in the VM parameters provided or network reachability. Enter the VM host through the vCenter console. and review and collect the following logs: /var/log/firstBoot.log and /var/log/vm_setup.log

When deploying on a vCenter, the following error is displayed towards the end of the VM bringup:

Error processing disk changes post-clone: disk.0: ServerFaultCode: NoPermission: RESOURCE (vm-14501:2000), ACTION (queryAssociatedProfile): RESOURCE (vm-14501), ACTION (PolicyIDByVirtualDisk)

Enable Profile-driven storage. Query permissions for the vCenter user at the root level (i.e. for all resources) of the vCenter.

On running or cleaning, installer reports Error: cannot locate virtual machine with UUID "xxxxxxx": virtual machine with UUID "xxxxxxxx" not found

The installer uses the tfstate file stored as /data/crosswork-cluster.tfstate to maintain the state of the VMs it has operated upon. If a VM is removed outside of the installer, that is through the vCenter UI, this state is out of synchronization.

To resolve, remove the /data/crosswork-cluster.tfstate file.

Scenario

In a cluster with five or more nodes, the databases move to hybrid nodes during a node reload scenario. Users will see the following alarm:

“The robot-postgres/cw-timeseries-db pods are currently running on hybrid nodes. Please relocate them to worker nodes if they're available and health."

Resolution

To resolve the alarm, invoke the move API to move the databases to worker nodes.

Use the following script to place services. It returns a job ID that can be queried to ensure the job is completed.

[Place Services]

Request
curl --request POST --location 'https://<Vip>:30603/crosswork/platform/v2/placement/move_services_to_nodes' \
--header 'Content-Type: application/json' \
--header 'Authorization: <your-jwt-token>' \
--data '{
    "service_placements": [
        {
            "service": {
                "name": "robot-postgres",
                 "clean_data_folder": true
            },
            "nodes": [
                {
                    "name": "fded-1bc1-fc3e-96d0-192-168-5-114-worker.cisco.com"
                },
                {
                    "name": "fded-1bc1-fc3e-96d0-192-168-5-115-worker.cisco.com"
                }
            ]
        },
        {
            "service": {
                "name": "cw-timeseries-db",
                 "clean_data_folder": true
            },
            "nodes": [
                {
                    "name": "fded-1bc1-fc3e-96d0-192-168-5-114-worker.cisco.com"
                },
                {
                    "name": "fded-1bc1-fc3e-96d0-192-168-5-115-worker.cisco.com"
                }
            ]
        }
    ]
}'
 
 
Response
 
{
    "job_id": "PJ5",
    "result": {
        "request_result": "ACCEPTED",
        "error": null
    }
}

[GetJobs]

Request
curl --request POST --location 'https://<Vip>:30603/crosswork/platform/v2/placement/jobs/query' \
--header 'Content-Type: application/json' \
--header 'Authorization: <your-jwt-token>' \
--data '{"job_id":"PJ5"}'
 
Response
 
{
    "jobs": [
        {
            "job_id": "PJ1",
            "job_user": "admin",
            "start_time": "1714651535675",
            "completion_time": "1714652020311",
            "progress": 100,
            "job_status": "JOB_COMPLETED",
            "job_context": {},
            "job_type": "MOVE_SERVICES_TO_NODES",
            "error": {
                "message": ""
            },
            "job_description": "Move Services to Nodes"
        }
    ],
    "query_options": {
        "pagination": {
            "page_token": "1714650688679",
            "page_size": 200
        }
    },
    "result": {
        "request_result": "ACCEPTED",
        "error": null
    }
}

[GetEvents]

Request
 
curl --request POST --location 'https://<Vip>:30603/crosswork/platform/v2/placement/events/query' \
--header 'Content-Type: application/json' \
--header 'Authorization: <your-jwt-token>' \
--data '{}'

Response
 
{
    "events": [
        {
            "event_tags": [
                {
                    "tag_type": "JOB_ID_EVENT",
                    "tag_value": "PJ5"
                }
            ],
            "message": "Operation done",
            "event_time": "1714725461179"
        },
        {
            "event_tags": [
                {
                    "tag_type": "JOB_ID_EVENT",
                    "tag_value": "PJ5"
                }
            ],
            "message": "Moving replica pod , to targetNodes [fded-1bc1-fc3e-96d0-192-168-6-115-worker.cisco.com 
                    fded-1bc1-fc3e-96d0-192-168-6-116-worker.cisco.com]",
            "event_time": "1714725354163"
        },
        {
            "event_tags": [
                {
                    "tag_type": "JOB_ID_EVENT",
                    "tag_value": "PJ5"
                }
            ],
            "message": "robot-postgres - Cleaning up target nodes [fded-1bc1-fc3e-96d0-192-168-6-115-worker.cisco.com 
                       fded-1bc1-fc3e-96d0-192-168-6-116-worker.cisco.com] for stale data folder",
            "event_time": "1714725346515"
        },
        {
            "event_tags": [
                {
                    "tag_type": "JOB_ID_EVENT",
                    "tag_value": "PJ5"
                }
            ],
            "message": "Replica pod not found for service robot-postgres",
            "event_time": "1714725346507"
        },
        {
            "event_tags": [
                {
                    "tag_type": "JOB_ID_EVENT",
                    "tag_value": "PJ5"
                }
            ],
            "message": "Started moving leader and replica pods for service robot-postgres",
            "event_time": "1714725346504"
        },
        {
            "event_tags": [
                {
                    "tag_type": "JOB_ID_EVENT",
                    "tag_value": "PJ5"
                }
            ],
            "message": " robot-postgres - Source and target nodes are not subsets, source nodes 
                    [fded-1bc1-fc3e-96d0-192-168-6-115-worker.cisco.com] , 
            target nodes [fded-1bc1-fc3e-96d0-192-168-6-115-worker.cisco.com fded-1bc1-fc3e-96d0-192-168-6-116-worker.cisco.com]",
            "event_time": "1714725346293"
        },
        {
            "event_tags": [
                {
                    "tag_type": "JOB_ID_EVENT",
                    "tag_value": "PJ5"
                }
            ],
            "message": "Verified cw-timeseries-db location on target nodes",
            "event_time": "1714725345692"
        },
        {
            "event_tags": [
                {
                    "tag_type": "JOB_ID_EVENT",
                    "tag_value": "PJ5"
                }
            ],
            "message": "Moved leader pod cw-timeseries-db-0, to targetNodes [fded-1bc1-fc3e-96d0-192-168-6-115-worker.cisco.com 
                        fded-1bc1-fc3e-96d0-192-168-6-116-worker.cisco.com]",
            "event_time": "1714725345280"
        },
        {
            "event_tags": [
                {
                    "tag_type": "JOB_ID_EVENT",
                    "tag_value": "PJ5"
                }
            ],
            "message": "cw-timeseries-db-0 is ready",
            "event_time": "1714725345138"
        },
        {
            "event_tags": [
                {
                    "tag_type": "JOB_ID_EVENT",
                    "tag_value": "PJ5"
                }
            ],
            "message": "cw-timeseries-db-0 is ready",
            "event_time": "1714725241401"
        },
         
        {
            "event_tags": [
                {
                    "tag_type": "JOB_ID_EVENT",
                    "tag_value": "PJ5"
                }
            ],
            "message": "Checking for cw-timeseries-db-0 pod is ready",
            "event_time": "1714725211296"
        },
        {
            "event_tags": [
                {
                    "tag_type": "JOB_ID_EVENT",
                    "tag_value": "PJ5"
                }
            ],
            "message": "Moving leader pod cw-timeseries-db-0, to targetNodes [fded-1bc1-fc3e-96d0-192-168-6-115-worker.cisco.com 
                        fded-1bc1-fc3e-96d0-192-168-6-116-worker.cisco.com]",
            "event_time": "1714725211256"
        }
        {
            "event_tags": [
                {
                    "tag_type": "JOB_ID_EVENT",
                    "tag_value": "PJ5"
                }
            ],
            "message": "cw-timeseries-db-1 is ready",
            "event_time": "1714725132896"
        },
        {
            "event_tags": [
                {
                    "tag_type": "JOB_ID_EVENT",
                    "tag_value": "PJ5"
                }
            ],
            "message": "Checking for cw-timeseries-db-1 pod is ready",
            "event_time": "1714725131684"
        },
        {
            "event_tags": [
                {
                    "tag_type": "JOB_ID_EVENT",
                    "tag_value": "PJ5"
                }
            ],
            "message": "Moving replica pod cw-timeseries-db-1, to targetNodes [fded-1bc1-fc3e-96d0-192-168-6-115-worker.cisco.com 
                       fded-1bc1-fc3e-96d0-192-168-6-116-worker.cisco.com]",
            "event_time": "1714725128203"
        },
        {
            "event_tags": [
                {
                    "tag_type": "JOB_ID_EVENT",
                    "tag_value": "PJ5"
                }
            ],
            "message": "cw-timeseries-db - Cleaning up target nodes [fded-1bc1-fc3e-96d0-192-168-6-115-worker.cisco.com 
                        fded-1bc1-fc3e-96d0-192-168-6-116-worker.cisco.com] for stale data folder",
            "event_time": "1714725119505"
        },
        {
            "event_tags": [
                {
                    "tag_type": "JOB_ID_EVENT",
                    "tag_value": "PJ5"
                }
            ],
            "message": "Started moving leader and replica pods for service cw-timeseries-db",
            "event_time": "1714725117684"
        },
        {
            "event_tags": [
                {
                    "tag_type": "JOB_ID_EVENT",
                    "tag_value": "PJ5"
                }
            ],
            "message": "cw-timeseries-db - Source and target nodes are not subsets, source nodes 
                       [fded-1bc1-fc3e-96d0-192-168-6-111-hybrid.cisco.com fded-1bc1-fc3e-96d0-192-168-6-113-hybrid.cisco.com] , 
            target nodes [fded-1bc1-fc3e-96d0-192-168-6-115-worker.cisco.com fded-1bc1-fc3e-96d0-192-168-6-116-worker.cisco.com]",
            "event_time": "1714725115883"
        }
    ],
    "query_options": {
        "pagination": {
            "page_token": "1714725115883",
            "page_size": 200
        }
    },
    "result": {
        "request_result": "ACCEPTED",
        "error": null
    }
}
Table 4. Installer tool scenarios

Scenario

Possible Resolution

Missing or invalid parameters

The installer provides a clue as regards to the issue; however, in case of errors in the manfiest file HCL syntax, these can be misguiding. If you see "Type errors", check the formatting of the configuration manifest.

The manifest file can also be passed as a simple JSON file. Use the following converter to validate/convert: https://www.hcl2json.com/

Error conditions such as:

Error: Error locking state: Error acquiring the state lock: resource temporarily unavailable

Error: error fetching virtual machine: vm not found

Error: Invalid index

These errors are common when re-running the installer after an initial run is interrupted (Control C, or TCP timeout, etc). Remediation steps are:

  1. Run the clean operation (./cw-installer.sh clean -m <your manifest here>) OR remove the VM files manually from the vCenter.

  2. Remove the state file (rm /data/crosswork-cluster.tfstate).

  3. Retry the installation (./cw-installer.sh clean -m <your manifest here>).

The VMs take a long time to deploy

The time needed to clone the VMs during the installation will be determined by the workload on the disk drives used by the host machines. Running the install serially (without the [-p] flag) will lessen this load while increasing the time needed to deploy the VMs.

Installer reports plan to add more resources than the current number of VMs

Other than the Crosswork cluster VMs, the installer tracks other meta-resources. Thus, when doing an installation of, say a 3-VM cluster, the installer may report a "plan" to add more resources than the number of VMs.

On running or cleaning, installer reports Error: cannot locate virtual machine with UUID "xxxxxxx": virtual machine with UUID "xxxxxxxx" not found

To resolve, remove the /data/crosswork-cluster.tfstate file.

The installer uses the tfstate file stored as /data/crosswork-cluster.tfstate to maintain the state of the VMs it has operated upon. If a VM is removed outside of the installer, that is through the vCenter UI, this state is out of synchronization.

Encountered one of the following errors during execution:

Error 1:

% docker run --rm -it -v `pwd`:/data a45 docker: invalid reference format: repository name must be lowercase. See 'docker run --help'

Error 2:

docker: Error response from daemon: Mounts denied: approving /Users/Desktop: file does not exist ERRO[0000] error waiting for container: context canceled

Move the files to a directory where the path is in lowercase (all lowercase, no spaces or other special characters). Then navigate to that directory and rerun the installer.
Table 5. Dual stack scenarios

Scenario

Possible Resolution

During deployment, the following error message is displayed:

ERROR: No valid IPv6 address detected for IPv6 deployment.

If you intend to use a dual stack configuration for your deployment, make sure that the host machine running the Docker installer meets the following requirements:

  • It must have an IPv6 address from the same prefix as the Crosswork Management IPv6 network, or be able to route to that network. To verify this, try pinging the Gateway IP of the Management IPv6 network from the host. To utilize the host's IPv6 network, use the parameter --network host when running the Docker installer.

  • Confirm that the provided IPv6 network CIDR and gateway are valid and reachable.

During deployment, the following error message is displayed:

ERROR: seed v4 host empty

Ensure you use the approved version of Docker installer (19 or higher) to run the deployment.

During deployment, the following error message is displayed:

ERROR: Installation failed. Check installer and the VMs' log by accessing via console and viewing /var/log/firstBoot.log

Common reasons for failed installation are:

  • Incorrect IPv4 or IPv6 Gateway IP for either Management or Data interfaces.

  • Unreachable IPv4 or IPv6 Gateway IP for either Management or Data interfaces.

  • Errors in mapping the vCenter networks in MgmtNetworkName and DataNetworkName parameters in .tfvars file

Check the firstBoot.log file for more information, and contact Cisco Customer Experience team for any assistance.

What to do next:

Return to the installation workflow: Install Cisco Crosswork Network Controller on VMware vCenter