Secure Endpoint Best Practices Guide
Available Languages
Bias-Free Language
The documentation set for this product strives to use bias-free language. For the purposes of this documentation set, bias-free is defined as language that does not imply discrimination based on age, disability, gender, racial identity, ethnic identity, sexual orientation, socioeconomic status, and intersectionality. Exceptions may be present in the documentation due to language that is hardcoded in the user interfaces of the product software, language used based on RFP documentation, or language that is used by a referenced third-party product. Learn more about how Cisco is using Inclusive Language.
Cisco Secure Endpoint is a comprehensive Endpoint Security solution designed to function both as a stand-alone Endpoint Detection and Response (EDR) product, and as an important part of the Cisco XDR architecture. There are many considerations that customers and partners should be aware of prior to deploying and configuring Secure Endpoint in their environment. The objective of this document is to provide guidance on best practices for deployment methodology, setup and configuration.
Note: The Best practice Guide is designed as a supplemental document for existing product documentation and does not contain a comprehensive list of all Secure Endpoint configuration options. For more in-depth detailed product settings, please see other official Secure Endpoint documentation located at: https://docs.amp.cisco.com.
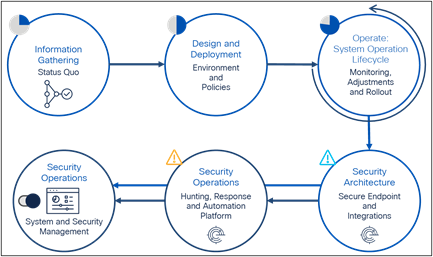
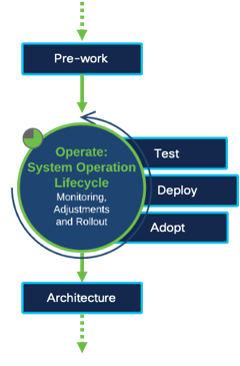
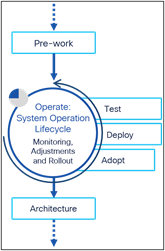
This document outlines the recommended stages for successful deploying Cisco Secure Endpoint. The flow chart here serves as a generalized framework for customers to use within their environment.
This includes:
● Information gathering: Necessary information about your environment
● Design and Deployment: Policy and Rollout planning
● Operation Lifecycle: Daily product operations, policy adoptions, endpoint updates and upgrades
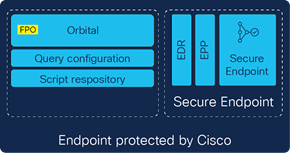
● Security Architecture: Secure Endpoint is a cornerstone of the Cisco XDR architecture. It also provides post infection tasks and live queries with Orbital (license needed). You can install Secure Endpoint as an individual product, but it is highly recommended to run Secure Endpoint is a module within Cisco Secure Client. Secure Client highly extends visibility into a Cisco protected endpoint.
● Security Operations: Activate orchestration workflows to automate security operations. Enhance existing security architecture and integrate into existing SOC environments.
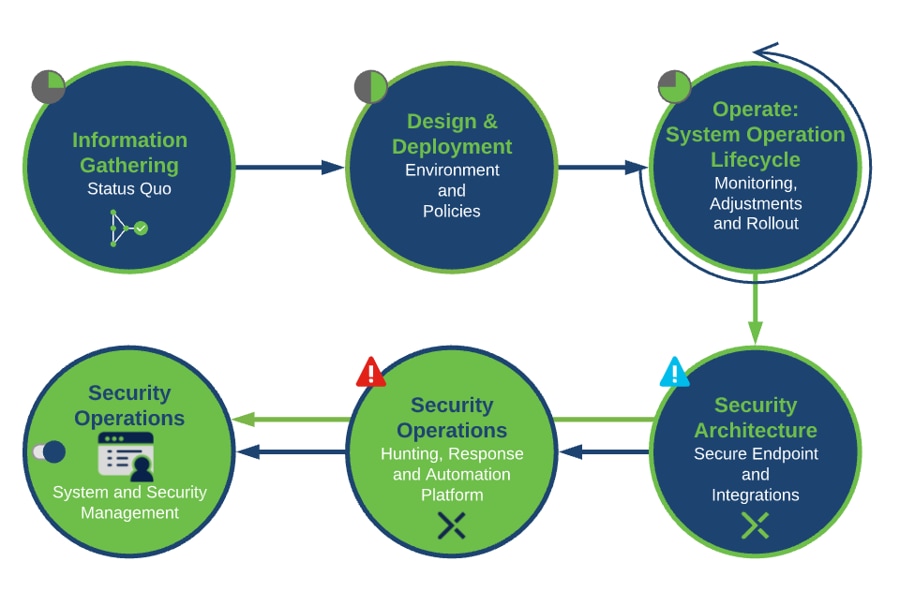
During any enterprise-wide deployment, it is recommended to follow these stages in a progressive manner, starting with information gathering and all the way up to integrations setup. Continuous review and improvements are also a part of any successful Secure Endpoint deployment.
They are necessary to ensure a smooth deployment experience, accurate configuration tuning, and timely resolution of any potential performance issues. Cisco recognizes that each customer environment is unique, and this framework should serve as a recommendation only as it may need to be adjusted according to the specifics of the customer use case.
Introduction
Information gathering is a necessary starting point that ensures the smoothest deployment experience and configuration of Secure Endpoint. This section outlines important considerations around environmental data, security product data, and compliance requirements gathering.
● Endpoint Operating Systems (Windows/Linux/macOS)
● Numbers of endpoints
● Existing security products and architecture
● Software deployment process
● Custom applications
● Proxy availability
● Endpoint connectivity information (proxies required, remote (VPN) or local firewalls
● Privacy requirements
Environment information
The first step is to understand and document the existing security posture. This includes collecting information on the existing environment. The following questions are a good place to start, though it is by no means comprehensive list:
● How many endpoints need to be protected?
● What Operating Systems and Architectures are included in deployment?
● Will Secure Endpoint be installed on endpoints that includes existing EDR software?
◦ If so, will it be removed before or after Secure Endpoint is installed?
◦ Or will it remain side by side with existing EDR software?
● What endpoints and software are mission critical?
● How is software delivered to endpoints?
● How do endpoints connect with applications/services?
● Do endpoints rely on the use of a proxy?
● Do endpoints roam or connect via VPN?
● Is there inventory of software used on endpoints?
● Is there a lab environment for testing including the necessary endpoints?
● Are there any customer defined bandwidth or port restrictions for LAN/WAN links?
The answers to these questions (along with other business process and policies) will provide information helpful for decisions related to deployment. Collecting any other information specific to customer endpoint management needs to be included during this information gathering step.
Security product information
Many companies already have sophisticated documentation for their endpoint security solution, including e.g. business critical software, necessary exclusions and defined deployment processes. This is already a great deal of information regarding what could potentially be transferred to Cisco Secure Endpoint policies. Rather than start from scratch, this information should be compiled, evaluated for current relevance, and used to inform the Secure Endpoint setup process.
The following list is a good place to start, though it is by no means comprehensive:
For the product administrative users:
● Who will need access to the console portal?
● What access should users be granted to the console portal?
What features are used in existing endpoint security? Such as:
● Blocking network activity
● Features that already exist in Secure Endpoint
● Other security features
What configurations exist in existing endpoint security? Such as:
● Exclusions
● Application Block lists
● Application Allow lists
● IP address block lists
While collecting this information, the policies and lists can be refined. A review and cleanup of existing policies, removing old or outdated settings, will strengthen the security on the endpoint.
Cisco Secure Endpoint is a lightweight connector. Optional, it can operate with other EPP/ EDR security products. The existing settings and features will need to be reviewed, in order to ensure that the respective products integrate properly without interfering with each other.
Auditing and compliance
Many organizations are subject to Auditing and Compliance requirements. These requirements force organizations to maintain data regarding who accessed and made changes, when those changes were made, and historical data related to endpoint security performance. Cisco Secure Endpoint provides detailed user auditing over years and endpoint historical telemetry data with a limit of 30 days. Additional historical event retention can be gained by utilizing the Event Streaming functionality.
To ensure that your new Secure Endpoint installation meets these requirements, it is advisable to obtain answers to the following:
● What are your organizational auditing requirements?
● What governmental compliance requirements is your organization subject to?
● PCI DSS, GDPR
● What is your organizational requirement for historical data storage?
| Info |
| Cisco Trust Center: Cisco Trust Center – Privacy Sheets |
| Use the search area on the left to search for “endpoint” topics. Select the document types below like Privacy Data Sheet or Privacy data map. The guides also include GDPR related information and
● Secure Endpoint/
Privacy Data Sheet.
|
Introduction
Deploy preparation is the next step in the process which includes deployment planning and policy setup. These steps will depend on the information gathered. While preparing for deployment, there might be some questions that need to be answered before a proper policy can be configured. In some cases, doing testing or engaging with pilot user groups can be used to identify answers that can only be answered in a live environment.
This section outlines background information about Secure Endpoint, which helps to build a well and functioning Cisco Secure Endpoint environment.
Design and deployment planning
Design and Deployment Planning stage is the next step in preparation. This stage leverages the data collected in the information gathering section to make deployment relevant decisions around the use of Secure Endpoint, configuration planning, and policy setup.
Cloud infrastructure - Features and services
Cisco XDR and Cisco Secure Endpoint follow a cloud first approach. The endpoint software communicates with the cloud infrastructure to receive new policy updates, product updates, file dispositions, live query requests, and so on. It uploads endpoint telemetry data, which is then processed by the Secure Endpoint cloud engines. The cloud architecture provides a wide range of features, services, and hunting tools.
With XDR and Secure Client, Cisco provides a sophisticated new concept for a protected endpoint. This guide will focus on the Secure Endpoint part. You may review other available documentation including details for all the capabilities Secure Client provides. Review the Secure Client vs. Secure Endpoint section to review a short summary explaining the differences between the two concepts.
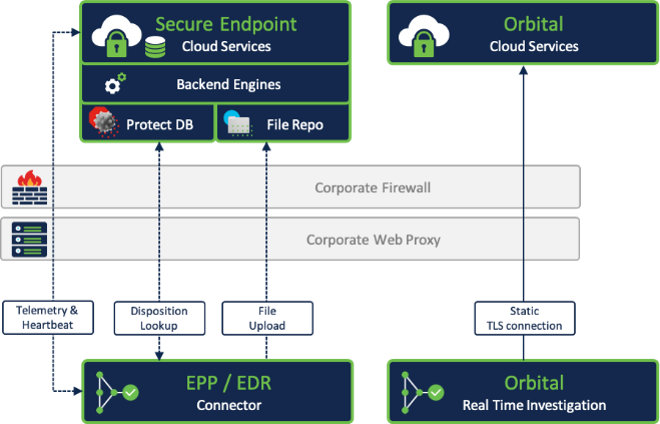
The drawing below shows Secure Endpoint and Secure Client modules and the corresponding cloud service they are communicating with. The Secure Endpoint cloud fully integrates into XDR, which is enabled/configured with just a few clicks.
Note: The graphics below shows a schematically view of the architecture focusing on Secure Endpoint. The XDR architecture includes much more capabilities than shown in the drawing. Cisco constantly improves and extends the security cloud architecture, where naming, features, or capabilities are changing. Please review latest Cisco XDR architecture guides and integration guides.

● Secure Endpoint Cloud: Provides all needed services for the endpoint. The Secure Endpoint cloud fully integrates into Cisco XDR. It acts as an intelligence for the architecture and pushes telemetry, events and incidents to Cisco XDR.
◦ Endpoint guides: https://docs.amp.cisco.com/, https://console.eu.amp.cisco.com/docs, https://console.apjc.amp.cisco.com/docs
◦ Required Server Addresses for Proper Cisco Secure Endpoint and Secure Malware Operations: https://www.cisco.com/c/en/us/support/docs/security/sourcefire-amp-appliances/118121-technote-sourcefire-00.html
◦ Cisco Secure Endpoint Support Documentation: https://www.cisco.com/c/en/us/support/security/fireamp-endpoints/series.html
● Secure Endpoint Connector: The software package installed to your endpoints providing protection and generating the telemetry information for the Cloud Detection Engines.
● Secure Endpoint Orbital: Provides real time investigation on the endpoint. Orbital abstracts the endpoint into high performance databases and allows to query endpoint information using simple SQL statements. For remediation tasks, Orbital provides remote scripts, which can be executed on the endpoint.
● Secure Client: the newest Cisco endpoint which extends endpoint security with different additional modules like the NVM module for Netflow information.
● XDR cloud architecture: It provides full XDR capabilities, the XDR analytics engine, a datastore for NetFlow information. It provides security automation with workflow management. As shown in the graphics above, XDR provides a long list of security tools and XDR guides a customer through the threat hunt.
● XDR Ribbon: The Ribbon is an overlay app, provided by XDR, and is available for XDR integrated Cisco products. The Ribbon includes other apps like the casebook app, incident app or Orbital app to start a real time investigation on the endpoint.
● XDR Pivot Menu: The Pivot Menu is a security tool, powered by XDR, that is available in the UIs of many Cisco Secure products. The Pivot Menu provides a very sophisticated and easy way to get immediate, cross-product reputation information on Observables, and take common research and response actions on them across your installed Cisco and 3rd party products.
● Malware Analytics: File analysis platform to detonate unknown and unique files to determine malicious behavior indicators.
● Security Architecture: Secure Endpoint is part of the XDR architecture including several Threat Hunt and Threat Investigation capabilities beside typical Endpoint Protection capabilities.
Note: For high privacy needs Cisco provides the Secure Endpoint Private Cloud Appliance. This on-premises installation provides highest privacy without integration into other Cloud products and services. Please review Appendix-A: Secure Endpoint Private Cloud for more details.
Cloud Infrastructure - Cloud Engines and Intelligence
The Secure Endpoint cloud engines are processing telemetry data provided by the connector. Based on the connector count, the cloud services are automatically sized. This data is processed in real time and additional retrospective for 7 days. During this period or time, the Secure Endpoint cloud receives latest threat information, which is correlated with all the telemetry data from the endpoints.
The outcome from Real Time Processing and Retrospective Analysis are Cloud IOC events. Cloud IOCs are generated by logic and intelligence to detect malicious behavior. This can include malicious files, but in many cases no malicious file is involved in a possible compromise of an endpoint. To raise the description and MITRE information. Some main considerations for Cloud IOCs.
Real time and retrospective IOC Events
● are used to automate post infection tasks (automated actions)
● are outlined in the Device Trajectory to show endpoint behavior around the compromise
● regular updates on these intelligences to provide sophisticated detection
● MITRE information directly shown in IOC events
When thinking about a security architecture, Cloud IOCs are a very important and useful information to start a Threat Hunt, starting a Threat Investigation or drive security automation.
Cloud Infrastructure - Endpoint connectivity
Secure Endpoint needs proper configured firewall/proxy systems to be able to communicate with the Public Cloud to query dispositions, send telemetry data for cloud processing, receive policy updates, and receive updated definitions. Secure Endpoint uses secure technologies to protect information between the endpoint and cloud. Any communication to the cloud is TLS secured.
Cloud Communication
Secure Endpoint Troubleshooting Technotes on cisco.com website:
Required Server Addresses for proper endpoint and malware analytics operations: http://cs.co/AMP4EP_Required_URLS
Cloud Communication: Proxy environments
For environments that use proxies, the proxies must be configured so there is no interception of the TLS communication, which would break communications to the Public Cloud. Policies also need to include proxy configuration that the endpoint can use. Secure Endpoint will only use system defined or policy defined proxies. This prevents communications from being tempered or blocked by sending communications to a malicious proxy.
Best practice: Disable TLS interception for Secure Endpoint communication, as it would break the communication.
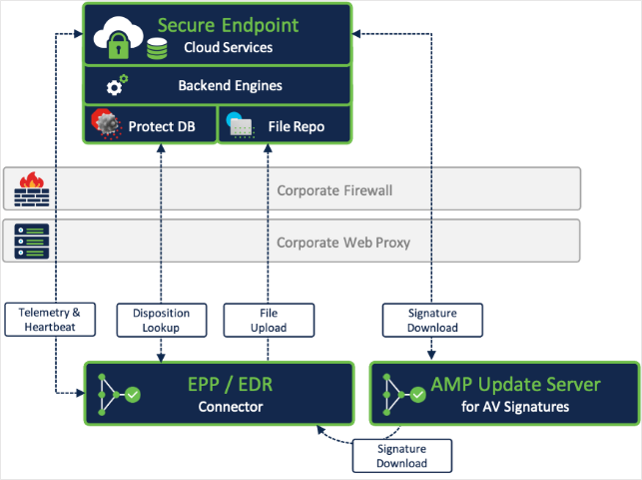
Cloud Communication: Bandwidth consumption
After Secure Endpoint is installed, the AV Signatures are updated. Secure Endpoint does incremental updates for the AV signature, but needs a full initial update after the deployment. For bandwidth saving, you may deploy AMPUpdate Servers as needed. During EDR operations, where the connector generates the telemetry data for cloud processing, low bandwidth is needed. See the table below for details.
| Size per update per end-point |
Signature update |
Normal Operations (Endpoint Telemetry) |
| ~250-300MB |
initial AV signature update |
n.a. |
| < 1MB to 8MB |
Incremental signature update (~ 4-8 times per day). If the endpoint misses more than 30 incremental updates, a full signature update is done. |
n.a. |
| ~540 bytes per lookup |
n.a. |
Expected average count per day ~54 queries/day All Engines enabled on the endpoint. |
Secure Client vs. Secure Endpoint
Some key facts to understand the differences between Secure Endpoint and Secure Client concept.
● Secure Endpoint can be installed as a single product or as a module running inside Secure Client. From a Secure Endpoint perspective, both installation types include the same product capabilities.
● Version 8.x is the minimum version of Secure Endpoint which can be run as a module within Secure Client.
● There is no change how to operate Secure Endpoint in the Secure Endpoint console if you are installing Secure Endpoint standalone or as a module in Secure Client.
● Secure Client includes several other modules and features, which enhance the security capabilities on a Cisco protected endpoint: This includes secure access, posture checks, web security or network visibility.
● Each Secure Client Module communicates with the proper management system, which can be Cisco ISE, Firewall or Umbrella DNS.
Installation Option 1: Standalone installation of Secure Endpoint with Orbital.
Installation Option 2: Secure Client installation where Secure Endpoint is running as a module within Secure Client. Several other available modules have been added to the installation.
Installation Option 3: Secure Client installation with Secure Endpoint, Orbital and Cloud management module. Even Secure Endpoint is used in the first phase of your security architecture, this installation option provides the following improvements.
● Generation of the UniqueID for your endpoint, which identifies your endpoint during an investigation even you reinstall the OS or the security software.
● Additional information shown in XDR (Assets)
● Additional Secure Client modules can be easily deployed with the cloud management module. E.g., the Network Visibility Module (NVM) to generate and analyze NetFlow information with XDR analytics.
Note: To avoid some confusion. Cisco renamed different products to Secure Client. Regardless which installation option you chose from the options above, the Tray Application on the endpoint and the corresponding guides show Secure Client. This provides the same user experience on an endpoint, regardless which installation option was chosen.
● Secure Endpoint version 8.x and higher (Standalone installation): Option 1 above.
● AnyConnect 5.x (was renamed to Secure Client)
● Secure Client (cloud managed with cloud management module): Option 2 and Option 3 above.
Analyzing network traffic
Secure Endpoint and Secure client are providing different features to analyze network traffic. It is important to understand the differences.
● Secure Endpoint - network engine: This local protection engine is designed to detect and block command and control traffic. It monitors specific traffic from new started processes for a specific amount of time or a specific number of connections (please review the Secure Endpoint docs for details). The engine consumes threat feeds from Talos and is capable to block malicious traffic. If there is a block, the proper Event is sent to the Secure Endpoint Cloud. Note: This engine is not designed to enforce operational guidelines, like blocking access to a website based on an IP.
● Secure Client – NVM (Network visibility Module): The Network visibility module sends NetFlow information to XDR analytics, which includes any network communication from the endpoint over time. The flow data includes a lot of data fields like the application, the protocol and port, the user account under which the application is running, bytes transferred and more. This data is stored and processed in XDR analytics. NVM does not provide blocking capabilities. Please review the Cisco Secure Client Configuration Guides for more details about this module.
Licensing: NVM is not included in any of the Secure Endpoint licenses and needs to be purchased separately.
On-Premises components
Secure endpoint update server
For environments that have constrained bandwidth requirements, an option to store AV definitions on premises can be made with an Endpoint update server. Using this update server is recommended only when Public Cloud with AV scanning is enabled, and bandwidth usage is a concern.
Secure Endpoint Update Server configuration steps: https://www.cisco.com/c/en/us/support/docs/security/amp-endpoints/213237-amp-tetra-on-prem-server-configuration-s.html

Best practice: It is recommended that an Secure Endpoint update server is not used with Public Cloud deployments in high network bandwidth environments or for endpoints that are connected on external networks.
Fundamental Endpoint connector design
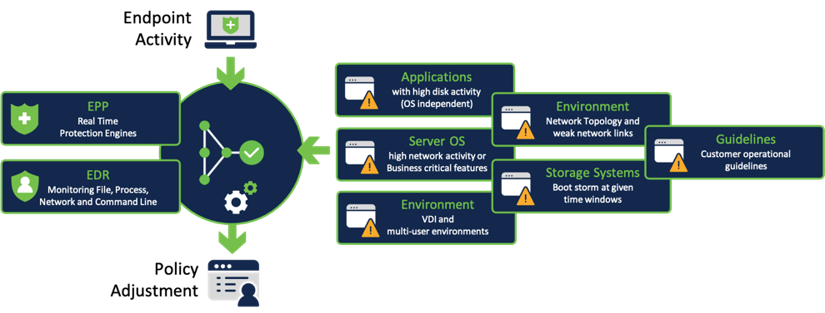
The Secure Endpoint Connector is a lightweight connector. The goal is to minimize the system load on the endpoint as much as possible. From an EPP/EDR perspective, the connector includes two main areas.
● Real Time Protection Engines (EPP)
● Endpoint Monitoring (EDR - telemetry data for cloud processing)
Understanding how the connector works is important and helpful for your Endpoint Security Design and helps to avoid poor usability. There are many circumstances which may have an impact on the connector performance and reliability. A proper configuration is essential for best performance.
As an example, EPP can have an impact on an Application with specific characteristics. On the other side, specific application characteristics can result into Secure Endpoint high CPU usage.
Best practice for application impact to connector performance:
There are some common situations which may cause high CPU load:
● High disk activity, where the connector must scan and hash a lot of files.
● Scanning archive files, as unpacking archive file consumes much CPU resources.
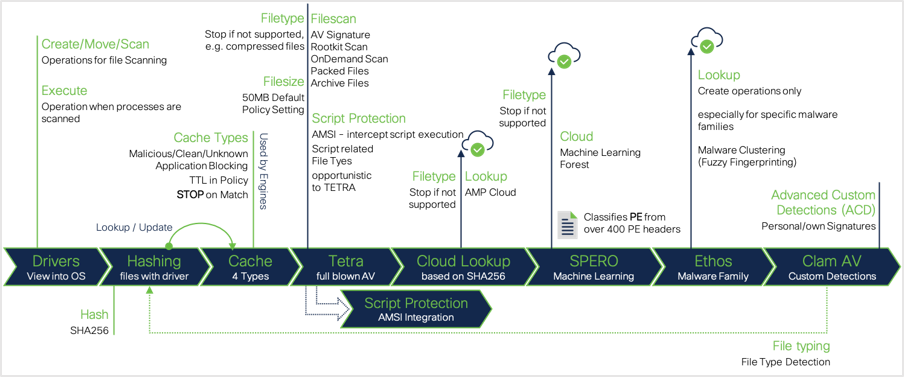
Scanning progression for file based threats
Scanning for file based threats is one of the most resource intensive processes on the endpoint. Secure Endpoint does a lot of steps to scan/detect/quarantine file-based threats in PE (portable executable) and script based files, or to scan inside compressed files.
The Secure Endpoint Connector uses the following progression to scan for file based threats on the disk (schematically view). Please keep in mind that many circumstances like file size, file type or policy settings can have an impact on the progression. In most scenarios, the whole progression is not processed. Engines like Script Protection, which integrates into Microsoft AMSI, Spero and Ethos are available on Windows Operating System only.
1. Drivers: The drivers are the view into the OS. The connector engines are scanning on Create/ Move/Scan/Execute operations.
2. Hashing: Files are hashed by the driver and added to the local cache. Some parts of Clam AV engine are used for real File Type detection. This is important for all other operations.
3. Cache: Secure Endpoint includes 4 different types of cache. To improve performance, the file scan process stops, if there is a cache hit. The TTL for all cache types can be changed in the policy.
4. AV-Scan: If there is no cache hit AV scanning is done. The AV Engine is used for OnAccess Scan, OnDemand Scan, Packet Files Scan, Archive File Scan and Rootkit Scan.
5. Script Protection: Secure Endpoint integrates into Microsoft Anti Malware Scanning Interface (AMSI) to scan script files processed by the Microsoft Script Interpreters.
6. Cloud Lookup: If there is no match so far, the endpoint does a cloud lookup to get threat information for a given hash.
7. SPERO: Machine Learning: Analyzing files with Machine Learning techniques.
8. Ethos, Malware Grouping: Malware Grouping Engine, which enables the endpoint to detect known malicious activity for unknown files.
9. ClamAV: ClamAV is used as an OEM engine on Linux and macOS system. The Windows connector does not use this engine for scanning. ClamAV is used to provide Custom Detection capabilities and file type detection.
Note: As long there is not hit/detection in one of the steps, the connector applies the next detection technique in the progression.
Examples:
● If AV engine does not detect a threat, the progression does not stop.
● If the disposition returned from the Cloud Lookup or a cached result is clean, the progression terminates early.
● If no detection engine on the endpoint detects a threat, the EDR part still monitors the activity around a file/process and the cloud engines are processing this information. This can result into a Cloud Indication of Compromise (IOC) even when no endpoint real time engine reported a detection.
Best practice: File scanning
Finally, for best performance take care about applications generating high disk activity. E.g., Database Servers, Web Servers, development environments, inventory software and so on. This guideline is independent if there is a server or workstation operating system installed. Threat Protection and Detection or Threat Risk Mitigation is not a linear process. The detection progression should give you an insight into the product for better understanding on how to tune the product as needed.
Note: Please keep in mind, Advanced Custom Detections only work on files of unknown disposition.
The Secure Endpoint connector is available for Windows, Linux and macOS Operating System. Secure Endpoint console also provides integration for iOS and Android devices, as they are in supervised mode.
The official supported versions are listed on the cisco.com website.
● Security Connector iOS compatibility: https://www.cisco.com/c/en/us/support/docs/security/security-connector/215337-cisco-security-connector-apple-ios-compa.html
Windows security center integration

Secure Endpoint integrates into the Windows Security Center for Virus and Threat Protection. Connector versions lower than 7.4.1 need a full signature update before registering to Windows Security Center (WSC) This may take some time until the registration process to WSC is finished. In this state, the connector provides protection including all other engines and cloud lookups.
With Version 7.4.1.20439 and later, the integration procedure into WSC has been changed, as the connector registers itself directly after the installation. Previous versions do a full signature update before registering to WSC.
Windows defender
Connector version 6.3.1 onwards Secure Endpoint includes a new service called Cisco Security Monitoring Service. The service is responsible to register Secure Endpoint to the Windows Security Center (WSC). Review details in the Secure Endpoint User guide.
Competitor products
● Removal: Secure Endpoint does not remove any competitor products during the installation process. To replace existing Security products, there are two possible ways to do so:
◦ Install Secure Endpoint, remove the competitor product. Afterwards reboot the endpoint. This ensures, that the endpoint is protected at any time.
◦ If there are any issues or product conflicts, you must remove the competitor product first, reboot the system and install Secure Endpoint after the reboot.
● Incompatibilities: There are some known incompatibilities with other security products, which are listed in the Deployment Strategy Guide: https://docs.amp.cisco.com/en/SecureEndpoint/Secure%20Endpoint%20Deployment%20Strategy.pdf.
Endpoint grouping
Groups are used to categorize the endpoints and the respective policy. It is recommended to define groups to apply a policy on similar endpoints. Attributes to group the endpoints can consist of items such as:
● Type (Server, Desktop, or Laptop)
● Location (Region, Branch or Remote access)
● Application set installed
● Services or opeerational functions utilized
● Enabled security features and options
● User groups (Early adopters, Developers, Power Users, or Regular users)
● Existing grouping
It is recommended that servers and desktops are associated with separate policies because the usage, features, and architectures are different.
Best practice: Anything related to the endpoint, including the whole policy, Feature Activation like Endpoint Isolation or Orbital Real Time Search are tied to the policy object. A recommended approach is to separate endpoints only if needed. This reduces the necessary administrative effort to manage the endpoints.
Beside endpoint grouping based on the info above, it is important to think about how to assign Policies to these groups. These policies can include different types of lists. Lists are assigned to Policies. Based on the List Type, a list can be assigned once to a policy object or multiple times. The settings inside the Policy Object and the assigned lists are generating the policy information for the endpoint. Any change triggers a new policy version. During the next heartbeat, an endpoint sorted into the group receives the new policy.

Secure Endpoint policies need to be configured so that the features selected provide the best endpoint security while users are not impacted by functional or performance problems. Policies are associated to groups of endpoints. From the information gathered and endpoint groups, policies can be configured for the desired features and exception lists.
Outbreak Control Lists as shown in the graphics, depending on the list type, it can be assigned once or multiple times to a Policy Object. Each list can be assigned to multiple Policy Objects.
Exclusion Lists Each List can be assigned multiple times to a policy object. Each List can be assigned to multiple Policy Objects.
Device Control: The Device control configuration is assigned to a policy object. One configuration can be assigned to all policy objects with a single step. The assigned device control configuration can also be reviewed and changed in the policy object.
Policy configuration planning - File scan
Scanning for file bases threats is one of the base features to protect the endpoint. This proven technique also needs the most updates (signature updates). The engine needs to be configured right to avoid high resource consumption on the endpoint. If configured right, the engine will generate a nominal increase in CPU and disk resource consumption. Endpoints with applications that require heavy file I/O might be impacted by the file scanning. In cases where an application performance is impacted, exclusions can be made on file scanning to reduce any I/O that interferes with the application.
It is recommended that file scanning is always enabled to protect the endpoint from file bases threats. The engine is also needed to provide the ability to retroactively remove file bases threats. Endpoints with applications that require heavy file I/O might be impacted by the file scanning. In cases where an application performance is impacted, exclusions can be made on file scanning to reduce any I/O that interferes with the application.
Policy configuration planning - File scan exclusions
Secure Endpoint provides two different types of exclusion lists. Custom Exclusions and Cisco Maintained Exclusions. Both can be assigned to a policy object multiple times.
Best practices guide for configuring exclusions: http://cs.co/AMP4EP_Best_Practices_Exclusions
Maintained exclusions history: https://www.cisco.com/c/en/us/support/docs/security/amp-endpoints/214809-cisco-maintained-exclusion-list-changes.html
Best practice: Keep your exclusions clean and organized. Defining multiple Exclusion lists with the right naming greatly simplifies Exclusion Management.
Policy configuration planning - Network engine
Network monitoring allows Secure Endpoint to collect addresses between the endpoint and other destinations. This information is used to identify and act on malicious destinations.
Network monitoring will generate a nominal increase in CPU and network requests to the cloud. Without network monitoring, the information needs to be correlated with external information and would only be visible for internal network resources.
It is recommended that network monitoring is enabled for endpoints that do not have a high network load required. This should be enabled for primarily workstations and some servers without a need for high volume of network traffic.
If network monitoring interferes with network operations of an endpoint, either the endpoint can be associated to a policy that doesn’t enable network monitoring or install the connector without the DFC component.
Best practice: Regardless of if there is a Workstation or Server Operating System installed, it is recommended to disable Network Monitoring for systems with high network load, network teaming or if there are many VLANs configured.
Policy configuration planning - Protection engines
Other protection engines (such as Offline engines, Malicious Activity Protection, etc.) provide protection against malicious behaviors. Enabling each engine will improve the efficacy of Secure Endpoint. Depending on the engine or configurations enabled, the efficacy is improved at the cost of performance. When enabling or changing settings on an engine, it is recommended to test changes before deploying them to production endpoints.
Note: When activating a new engine on a sensitive system which deviates from the recommended settings, a good option is to start in Audit Mode. In Audit Mode, the connector generates an event, but does not block in any way.
v1.91 Appendix-B: Non-Standard Environments (VDI) shows more information when activating File Scanning in VDI environments.
It is recommended that engines are enabled and tested.
Below are the choices and considerations on how the policy is configured for the engines.
| Engine Policy Setting |
Efficacy |
Performance costs |
Other Comments |
| Enabled |
Higher efficacy. This improvement depends on
● Engine options enabled
● Overzealous exclusions
|
Higher cost. This cost depends on:
● Application that run on the endpoint
● Missing exclusions
|
Events sent to Cisco XDR Architecture® for visibility and central investigation. |
| Disabled |
Lower efficacy |
Lower cost on performance. |
Only advised for instances such as:
● Another product provides equivalent functionality
● Performance cost is too high to enable
● Application incompatibility
|
| Configuration changes |
Efficacy change depends on configuration changes. |
Performance change depends on configuration changes. |
Other configurations such as exclusions can be configured to improve engine performance on the endpoint. |
Policy configuration planning - Cisco Advanced Search - Orbital
Cisco Advanced Search (Orbital) enables Real Time Investigations and threat remediation on your endpoint. The Orbital Client enables are static connection to the Orbital Cloud Service. It is recommended to enable this feature in the policy to enhance threat hunting or incident response. Testing needs to be done for endpoints that are sensitive to increase in CPU usage. Orbital needs a very small footprint on the endpoint, as information is generated on demand.
Getting more value from your endpoint with Orbital: https://blogs.cisco.com/security/getting-more-value-from-your-endpoint-security-tool-2-querying-tips-for-security-and-it-operations
Some considerations regarding Orbital
● Orbital is an additional endpoint component to provide Real-time Queries on an endpoint.
● You need the right license for Orbital: https://www.cisco.com/c/en/us/products/security/amp-for-endpoints/package-comparison.html
● After activated in the policy, Orbital is installed by Secure Endpoint fully automated.
● Orbital Endpoint holds a static TLS 1.2 connection to the Orbital cloud.
● Orbital allows generating a Forensic Snapshot, which can be generated manually or automated.
● Orbital uses SQL (Structured Query Language) to query the endpoint like a database.
Note : In future releases Orbital will run on the endpoint fully independent from Secure Endpoint.
Preparation checklist
Take a moment to review the summary for the Secure Endpoint preparation step.
● Secure Endpoint integrates into the Cisco XDR architecture. Keep in mind to enable all available feature and functions. Find the list of all Services in the Cloud Architecture Overview in this document.
● The cloud engines are processing the endpoint telemetry data in nearly real time and retrospective for 7 days back.
● Check Proxy/Firewall settings, so the connector can communicate with the Cloud services.
● There is some bandwidth required for the initial AV Signature update or if there are 30 incremental updates missing. You may deploy AMP Update Server as needed.
● Secure Endpoint may have an impact on Application performance and specific application characteristics may impact connector resource consumption.
● Secure Endpoint does not change any setting for Windows Defender and does not remove 3rd party security products.
● Endpoint Grouping, Policy generation and List Assignment should be well planned to simplify operational work and to raise security.
● Cisco Advanced Search provides a very simple way to query endpoint information using SQL.
Secure Endpoint - Console setup
Secure Endpoint Console Setup: This section will provide important information on how to configure User Accounts, create and configure Policies and Groups, set up Prevalence and Outbreak Controls, create Exclusions and activate Automated actions for post infection tasks.
This includes:
● User Account Setup
● Create and configure Policies and Groups
● Set up Prevalence and Outbreak controls
● Create Exclusions
● Activate Automated Actions
● Set up Secure Endpoint Update Server
After you received the activation e-mail for your Secure Endpoint account, click the provided link to do the initial setup of your Cisco Security Cloud account. Cisco Security Cloud acts as the IdP (identity provider) for Secure Endpoint, including 2FA configuration. This enables SSO for Cisco XDR integrated products.
Follow the provided links in the activation e-mail. Find more information in the Secure Endpoint Entitlement Guide.
If you want to use your existing IdP environment, please review the Cisco Security Cloud Sign OnIdentity Provider Integration Guide for details.
User account setup
User Management in Secure Endpoint Console is described in detail in the Secure Endpoint User Guide. To add new users, do the two following steps.
● Open the XDR console and navigate to Administration/users. Add a user account there and send out the invitation to the new user for the Security Cloud. A user account in the Cisco Security Cloud is mandatory.
● Review the Cisco XDR help center for further information.
● Add a user with the same e-mail address to the Secure Endpoint console. Review the Secure Endpoint User Guide for further information how to add users.
Console setup checklist
Take a moment to review the summary for the console setup.
● A Cisco Security cloud account is mandatory to login to Secure Endpoint Console.
● Two-factor-authentication enablement is mandatory during Security Cloud Account setup.
● Add additional users to Secure Endpoint console as outlined in the Secure Endpoint User Guide.
Policy design and management – Performance and security
Policy creation and management is the heart of Secure Endpoint. Policies control all configurable aspects of connector function. As such it is important to ensure that all newly created policies are created with the current and future organizational structure in mind. To maintain this flexibility, Cisco recommends creating as few policies as necessary to properly address organizational needs.
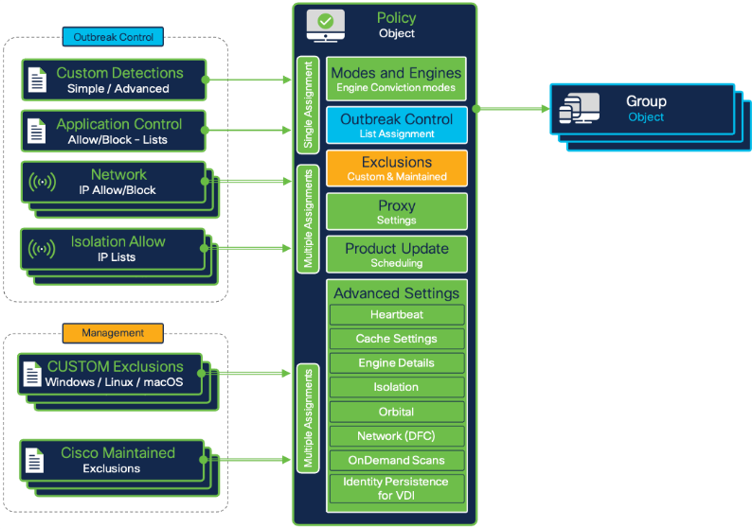
The figure shows the Secure Endpoint Policy architecture. This helps to understand the dependencies between the configurable objects and the Policy Object itself in the AMP console. This architecture helps you to avoid having multiple lists with duplicate entries. On the left side the Objects (Outbreak Control, Management) are listed which can be used directly in Policy Objects.
Outbreak control: Custom Detections (Disposition Change), Application Allow/Block Lists (Execution), Network IP Allow/Block and Isolation Allow Lists are assigned to policies. By default, the Secure Endpoint Console provides a number of policies for administrators to build on-top of. These policies are designed to provide a high level of security while minimizing potential performance impact to the endpoints. When determining policy settings for the various endpoint features, Cisco advises customers to follow the recommended settings provided on the policy page with minimal modification in order to meet organizational security needs.
There are two primary types of policies provided by default: Audit and Protect.
● Audit policies provide a means of deploying an Secure Endpoint connector while ensuring limited interference on an endpoint. Default Audit policies will not quarantine files or block network connections and as such, they are useful for gathering data for connector tuning during initial deployment and troubleshooting.
● Protect policies provide a higher degree of endpoint protection. Connectors utilizing these policies will quarantine known malicious files, block C2 network traffic, and perform other protective actions.
Best practice: Secure Endpoint best practice for policy creation is to create a set of base policies, then duplicate these policies to create the debug and update versions of the same policies. This allows for maintained consistency while gathering debug data and performing connector updates.
Info: By default, the Secure Endpoint Console provides a number of policies for administrators to build on-top of. For fast and easy product testing, you can directly use the predefined groups and policies.
The policy object
Secure Endpoint provides policies for Windows/Linux/MAC, Mobile Devices like Android and iOS and Network Devices. If no Network device is registered to the Secure Endpoint cloud, the tab is hidden. The policy Objects are available under Management → Policies.
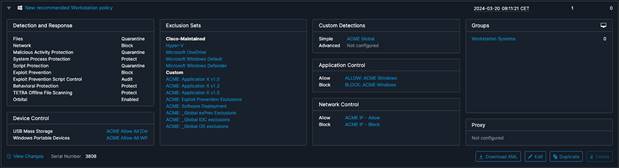
The policy view shows much information about the policy object.
● Configured mode of the Engines
● Assigned Exclusions
● Proxy Settings
● The groups where the policy is used
● Assigned Detection Lists
● Application Control Lists
● Network Lists (Block/Allow)
● Last modified date
● Serial Number of the Policy
● Device Control Policy
Button download XML: The downloaded file can be added to a broken connector locally in the Secure Endpoint installation directory. This can help, if the connector is not able to communicate with the Secure Endpoint Cloud anymore. To replace the policy.xml file on the connector, stop the connector service → replace policy.xml → start the connector service again.
When generating a new Policy object, the Cisco maintained exclusion list Microsoft Windows Default is added to the policy object only.
Policy settings: Best performance and security
The steps below outline best practice info for Secure Endpoint policy settings. There is no difference if you install Secure Endpoint on a Workstation or Server Operating System, it is the same code base. The previous chapter already gave you some understanding about fundamental Connector functionality. This section outlines important information and enables you to build a policy which fits your performance and security needs. The section outlines useful information to build your Workstation and Server policy.
Please refer to the Secure Endpoint product guide for any setting not explained in this guide: https://console.amp.cisco.com/docs. Read this information carefully.
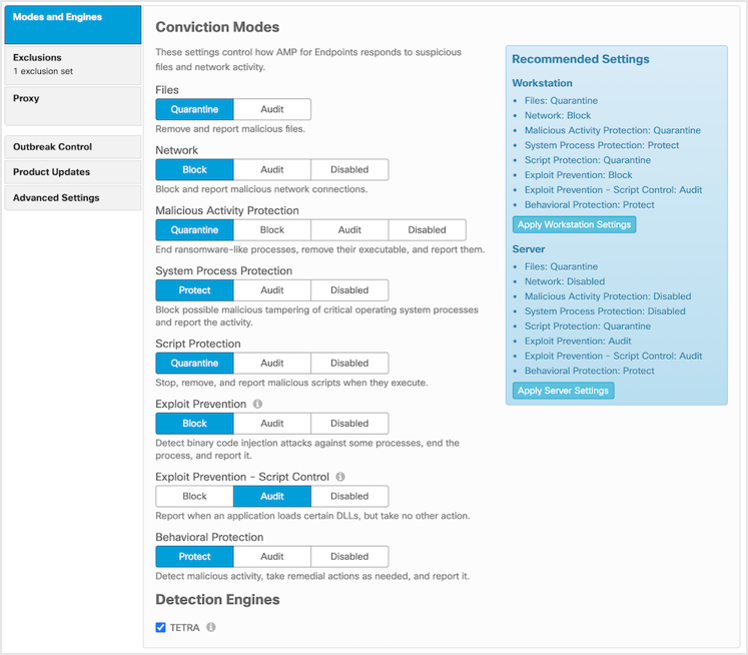
Policy setting: Modes and Engines
The Modes and Engines area gives you an overview about all available engines and its modes. It shows the recommended Settings for Servers and Workstations.
Note: Not all engines are available on all operating systems.
File scanning: Scanning for file based threats is done by several engines on the endpoint, using different techniques. Even the whole file scanning sequence is not static. Depending on file type, cache info and more, multiple mechanism get active to generate a file detection. Review the file scanning sequence info for details. By switching File Scanning vto Audit, the whole file scanning sequence does not remove a file from the disk.

Recommended Settings: the info box in the policy configuration window shows the recommended Engine Settings for Workstation and Server operating systems. These settings are a good choice to start a new policy. Some considerations for Engine Conviction modes.
● When disabling an engine in the policy, the driver is still available on the endpoint. So the engine can be activated easily at any time.
● When using the installation switches like /skipdfc or /skiptetra, the driver is not installed. This requires a re-install of Secure Endpoint to enable the feature again.
● Automated actions → move computer to group: This automated post infection task moves a computer to a configured group if malicious activity has been detected. This group should have all engines enabled, to ensure the highest possible detection rate. Therefore, all drivers should be available on the system.
● If the AV-Engine driver has not been installed, OnDemand Scans on the system are not available. Review v1.92 Appendic-C: add Tetra manually after /skiptetra was used to add AV- scanning to a system if the /skiptetra switch was used.
Best practice: When designing File scanning in your environment, review the steps below.
● If you plan to enable AV-scanning later, do not use the /skiptetra installation switch, as this prevents the driver installation. Enabling the policy does not add the driver files to your endpoint. To add drivers to the endpoint again, Secure Endpoint must be re-installed.
● File scanning in VDI environments needs some more granular considerations. Review v1.91 Appendix-B: Virtual Environments (VDI) for details.
● There is a workaround to manually add AV-Scanning to the Windows Endpoint later. Review v1.92 Appendix-C: add Tetra manually after/skiptetra was used for details.
Best practice security: Detection and Protection capabilities.
● If AV-scanning detection/quarantine events are missing, the cloud engine may generate additional Cloud IOCs. This can happen if the endpoint detects a malicious file, but there is no AV-Engine present to remove the file from the disk.
● You may use the automated action feature to clean up a system where AV-scanning was disabled in the policy. Review EDR/XDR/MDR Architecture for details to move computers to a configured group to enable highest detection capabilities.
● OnDemand Scans cannot be performed without the AV-scanning engine.
● Full detection policy: If there is an indication of compromise where you want to enable highest detection, AV engine should be enabled.
Policy setting: Define and manage exclusions
Over time there are often many different Exclusions List defined in the Secure Endpoint console. Exclusions not needed anymore should be removed. Enclosed some guidelines to help you simplifying Exclusion List management.
Cisco-maintained exclusions: These lists help you to exclude critical files and processes. The Cisco Maintaind Exclusion Lists hists is available here: https://www.cisco.com/c/en/us/support/docs/security/amp-endpoints/214809-cisco-maintained-exclusion-list-changes.html.
Custom exclusions: Some guidelines to make Exclusion management easy.
● Global exclusions: Exclusions for Applications which are needed on most of your systems. E.g. an application which is installed on most of your endpoints. Such exclusion lists are assigned to many policies. If you need a new exclusion for this specific application, you just need to update and maintain a single exclusion list.
● Exclusion list naming: This simplifies the Exclusion management. If there are many different versions of an application in place, splitting the exclusions and adding the software version to the exclusion list name helps to simplify exclusion clean up in the future. As seen in the screenshot, the Policy Object is easy to read.
Note: The Secure Endpoint connector includes some exclusions list limits, which cannot be changed (Connector version 6.0.5 and higher). All values are very high and should not be reached during normal operations.
● The limit of process exclusions is 500 across all the exclusions sets assigned to one policy object (Connector version 7.3.1 or higher needed)
● The maximum count of exclusions is 1000
● The maximum recommended number of exclusions is 300 (monitor connector performance when going beyond this value)
Best practice: Exclusions: Normally the exclusion list limits should not be reached. Take care if there are many exclusion lists assigned to a specific endpoint policy object. Your group design also helps to reduce the amount of assigned exclusion lists for a group of endpoints. Your group design also helps to reduce the amount of needed exclusion lists. Find additional information in the Best practices for Secure Endpoint Exclusions guide: https://www.cisco.com/c/en/us/support/docs/security/amp-endpoints/213681-best-practices-for-amp-for-endpoint-excl.html.
● name your exclusion lists right
● multiple exclusion lists help you to cleanup outdated exclusions
● Cisco maintained exclusions help to lower exclusion handling effort
Wildcard Exclusions need more system resources for evaluation than any other exclusion type. If possible, use Wildcard Exclusion as less as possible.
Policy setting: Exclusions and security
Exclusions are important for product functionality and reliability. Many customers exclude business critical applications to prevent any possible impact from endpoint security. There are many valid factors to define exclusions. Hashing consumes system resources even before scanning by an engine.
Scan Exclusions also stop the connector from scanning and monitoring. As a result, excluded areas have the following impact on your EPP/EDR security level.
● Files are not hashed, not available in the cache, not scanned and no cloud lookup is done.
● Activity is not monitored and sent to the Secure Endpoint cloud and therefore not analyzed by the Cloud Engines.
● Telemetry is missing for the cloud engines. Malicious activity in an excluded directory will not generate an output (e.g., Cloud IOCs).
● There is no information shown in the Device Trajectory.
● Files will not be uploaded for Advanced Analysis.
Any other activity before and after is monitored and analyzed by all available engines.
Best practice security: To reach the highest level of security and to maximize the effectives of Endpoint Engines and Cloud Engines, Cisco recommends adding Exclusions only if necessary.
Full detection policy: Remove as much as possible exclusions to enable scanning of most areas on the disk and to enable protection for running processes.
The protocol inside the TLS1.2 connection is not HTTP. If TLS is terminated at the proxy, the proxy will drop the packages, because it is not HTTP, and Secure Endpoint communication will stop. The connector still uses the Offline Engines, but all other features like Online Engines (Local connector engines which need cloud information for full protection coverage, e.g., Machine Learning), Cloud Lookups and Cloud Engines will not work anymore. Finally, there are some guidelines for Proxy Connection.
● Never inspect TLS Traffic on the proxy, it will break the cloud communication.
● When using Proxy authentication, there are some unsupported NTLM authentication scenarios (review the product documentation).
● If a proxy server is configured, any update is done through the proxy.
● The cloud communication is dynamic and switches to direct communication if the proxy is not available.
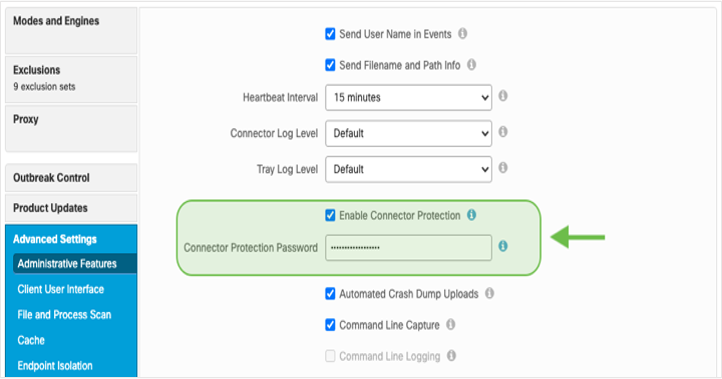
Policy setting: Connector password (Self-protection)
Always set a password, so the Connector is protected against deactivation and uninstall from unauthorized users or malware.
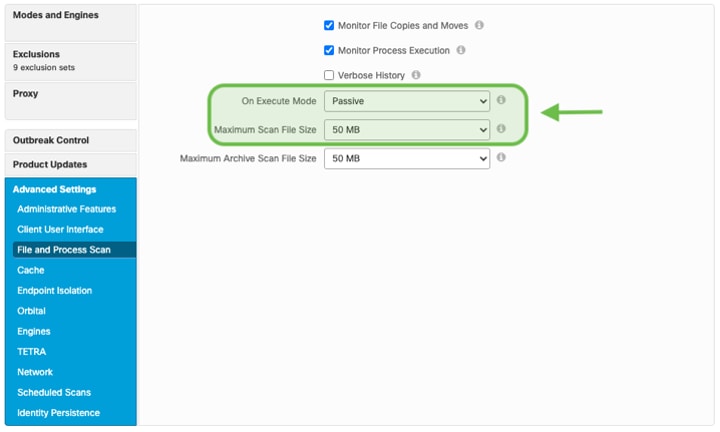
Policy setting: File and process scan
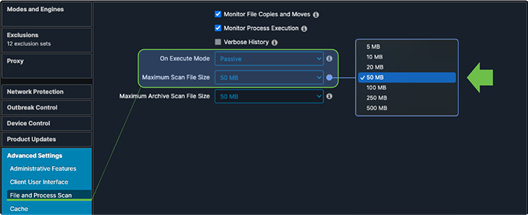
On Execute Mode: Cisco recommends keeping On Execute Mode settings as Passive. Keep this in mind when changing the On Execute Mode to Active:
● In Active mode, files and scripts are blocked from being executed until the connector processed the file with all file scanning relevant engines and until the connector received an answer from a cloud lookup.
● A cloud lookup does longer than the average access time on the fixed hard drive, what might cause lower application performance.
Maximum Scan File Size: The Default Value in the Policy is set to 50MB. This value can be lowered or raised up to 500MB. Any file bigger than this value will be ignored by the Connector for EPP/EDR functionality. This value is a good compromise between security and product functionality. Malware files typically are not bigger in size than 50MB, hashing files up to 50MB does not generate too much CPU load.
Best practice security: In case, where an infected or compromised endpoint is moved to a defined group using Automated Actions, you may use the following settings:
● Set the maximum scan file size to 500MB, to scan as much as possible files.
● If a file is bigger than 500MB, any activity around this file (parent process and child process) is still monitored, scanned, and processed by the Cloud Engines.
● In any case where security is more important than performance, set the On Execute Mode to Active.
Policy setting: Cache
The cache speeds up connector performance. If there is a hash already available in the Cache, the connector does not scan a file multiple times.
The cache can be cleared on a system as followed:
1. Stop the Secure Endpoint connector service.
2. Delete the Cache files local on the disk (located in the connector directory)
3. Start the Secure Endpoint connector Service again.
Review Removal of the Secure Endpoint Cache and History Files on Windows in the Troubleshooting Technotes.
Best practice security: Cache settings have an impact on performance and security
● Microsoft Office Applications x64 are nearly 50Mb in size. Lowering this value should only be done for endpoints where Microsoft Office is not installed. Microsoft is still a big attack vector on endpoints.
Full detection policy: Set all cache values to the lowest setting.
Policy setting: File scanning - Archive files vs. Packed files
It is important to understand the difference between these two configurable settings.
Archive files: The Secure Endpoint connector opens compressed files and scans their contents. Tetra uses the values from the File and Process Scan settings.
Default value for File Size is 50MB, and for Archive Files 5MB. Typical compressed files are 7zip, arj, jar (Java Archive), tar or zip files.
Archive Scan uses the following limits to prevent system overload. Enclosed some guidelines.
● Archive File scanning depends on the file sizes as listed above.
● Archive File scanning depends on supported file types.
● Batch of 1000 files, if compressed file includes e.g., 1mio. files.
There’s a maximum of 5 levels, however there is no limit for files inside of a zip on the same level unless you want to scan 1 million files at the same time from one compressed file meaning that would be done automatically by batches of 1000.
Packed files: Having the “Scan Packed Files” option enabled, Tetra Engine detects files which are an ASCII File, but can be executed. Example: a *.JS file is an ASCII File, but can be executed (*.JS files are considered a package in the sense, that the files are executable in that state but are made up of other files/code).
Best practice: Unpacking files needs a lot of system resources. Especially development environments working with much compiled and compressed code. So, it is highly recommended to group such endpoints and assigning a policy, where special exclusions are configured. Development endpoints are often different to typical endpoints and standard exclusions may not work. To avoid performance detraction, you may disable “Scan Archives” in the policy.
Best practice security: Some guidelines for best detection/protection.
- If you deactivate the “Scan Packed Files” Setting, Tetra will no longer detect malicious JS Files.
Full detection policy: Both settings should be enabled to provide highest detection/protection capabilities.
Generate a new default policy for Workstation Systems:
● Generate a new policy object under Management → policies by clicking the new policy button.
● Select the Operating System you want to generate the policy for and click new policy.
● Add a meaningful name, optional a description and click the Apply Workstation Settings Button on the right. This applies the Cisco recommended settings.
● Install the Secure Endpoint without any command line switches (default installation), so all engines get installed.
The generated policy object is a very good starting point:
● Files: Quarantine
● Network: Block
● Malicious Activity Protection: Quarantine
● System Process Protection: Protect
● Script Protection: Quarantine
● Exploit Prevention: Block
● Exploit Prevention - Script Control: Audit
● Behavioral Protection: Protect
Policy adoptions checklist:
● Exclusions: Add additional exclusions only if really needed to provide the best security. Review the Secure Endpoint Installation, Updates and Operational Lifecycle section how to figure out additional needed exclusions. Review Exclusions best practices for Performance and Security when defining additional exclusions.
● Lists: In Secure Endpoint console, under Outbreak control generate a list for custom detections simple, custom detections advanced, application control allowed, application control blocked and Network - IP Block and Allow lists. Assign them to your policy. These lists will also be available in the XDR Pivot Menu. Review the Policy Configuration Planning for best practice.
● Endpoint Isolation: Activate this feature as needed. It allows to disconnect your endpoint from the network manual or automated using Automated Actions. Review the EDR/XDR/MDR Architecture section for details.
● Orbital: Activate Orbital to enable Real Time investigation on the endpoint. Orbital is not available with the standard license. At least Secure Endpoint Advantage license is needed for Orbital.
● Engine Settings: Advanced Engine Settings: Under Engines → Common Engine Settings activate Enable Event Tracing for Windows. This enables Windows Event Log information for the Behavioral Protection Engine. This feature may conflict with existing Microsoft Group Policy Settings. Review the info field when enabling this feature and talk to responsible workplace/endpoint designers before activating this feature.
● Identity Persistence: This feature is not visible in the Secure Endpoint console per default. It helps to avoid duplicate computers in VDI environments, where endpoints get frequently re- installed using the same computer name. To enable the feature, please open a TAC case.
● Review the The Policy settings: Best Performance and Security section for all other detailed settings.
Generate a new default policy for Server Systems:
● Generate a new policy object under Management → Policies by clicking the new policy button.
● Select the Operating System you want to generate the policy for and click new policy.
● Add a meaningful name, optional a description and click the Apply Server Settings Button on the right. This applies the Cisco recommended settings.
● Install the Secure Endpoint without any command line switches (default installation), so all engines get installed.
The generated policy object is a very good starting point:
● Files: Quarantine
● Network: Disabled
● Malicious Activity Protection: Disabled
● System Process Protection: Disabled
● Script Protection: Quarantine
● Exploit Prevention: Audit
● Exploit Prevention - Script Control: Audit
● Behavioral Protection: Protect
Policy adoptions checklist:
● Exclusions: Add additional exclusions only if really needed to provide the best security. Review the Secure Endpoint Installation, Updates and Operational Lifecycle section how to figure out additional needed exclusions. Review Exclusions best practices for Performance and Security when defining additional exclusions.
● Lists: In Secure Endpoint console, under Outbreak control generate a list for custom detections simple, custom detections advanced, application control allowed, application control blocked and Network - IP Block and Allow lists. Assign them to your policy. These lists will also be available in the SecureX Pivot Menu. Review the Policy Design and Management – Performance and Security section for best practice.
● Network: On Server OS most time there is much more network load than Workstation OS. Therefore, some considerations should be done when Network protection should be set to enabled.
◦ Disabling the feature instead of installing the connector without network drivers should solve most network issues.
◦ Network protection may slow down network operations. If the server application needs high network performance or fastest response times, be carefully when enabling the engine. Detailed testing is highly recommended.
◦ Specific network configurations like Network Teaming or several configured VLANs on a Server network card must be tested carefully. Cisco recommends disabling network protection in such scenarios.
◦ If there are still network issues, Secure Endpoint should be re-installed using the/skipdfc installation switch to prohibit the network driver installation.
● System Process Protection: The engine is designed to protect against “Mimikatz” like attacks. If there are Group policy settings like disabling NTLMv1 or other possible NTLM Security settings configured, the Engine can be set to disabled. If the engine should be enabled, Cisco recommends to carefully test and to monitor server performance.
● Exploit Prevention: Exploit Prevention Engine triggers under the following conditions.
◦ A Process is listed on the protected processes list. Review the Secure Endpoint User Guide for details.
◦ Process was launched by another process in the Exploit Prevention protected list.
◦ The process was executed from a directory Exploit Prevention is monitoring. If Exploit Prevention triggers, the tiny DLL is loaded into the process and changes are done in the memory for this process. Only this process is aware of the updated memory locations. On Server systems, especially on Domain Controllers, a change in the memory may result into unexpected behavior. Cisco recommends to carefully test and to monitor server performance if this engine gets enabled.
● Review the The Policy settings: Best Performance and Security section for all other detailed settings.
● Activate Real Time Search Orbital on supported Server OS.
● Activate Endpoint Isolation to disconnect possible compromised Servers from the network.
Policy setup summary
Take a moment to review the summary for the Policy Setup.
● Applying the policy settings in the Quick Start section of the policy object is a good starting point.
● Review the sections above under which circumstances specific engines need to be tested carefully.
● Analyzing threats is not a linear process. Even there is one engine disabled for an endpoint, all other local connector engines protect the endpoint and telemetry information for the Cloud Engines is generated.
● Use the Cisco maintained exclusions lists to add basic exclusions for the Operating System itself.
● Define exclusions only if they are needed to provide the highest detection ratio. Review the Cisco guides how to defines exclusions.
The guidelines here should enable you to define a policy which works without any interruptions on the endpoint.
Secure Endpoint installation, updates and operational lifecycle
Secure Endpoint: Software rollout
As with any large-scale software deployment, it is always a good practice to deploy in a slow, methodical way. Staged deployments ensure that as we deploy to any environment, if we encounter issues, we are able to resolve them while only impacting a relatively small percentage of endpoints. These concerns are especially relevant with security software, which is why the Cisco Best practice is to deploy Secure Endpoint using the phased approach. There are some common approaches/examples as outlined in the table.
Note: These are just a few examples to show the different circumstances for a Security Product Rollout.
| Planned Rollout - Scenario 1 |
Planned Rollout - Scenario 2 |
|
| Meets the customers deployment strategy |
Mostly meets the customers deployment strategy |
Outside the Deployment Strategy |
| Much time for the whole Rollout Project |
Limited Time until the Rollout must be finished by a specific date |
Emergency, less time, or no time for Project Planning |
| Testing with the standard Software Images for Endpoints |
Testing with the Standard Software Images for Endpoints |
Less or no testing |
| Application Testing and Business critical Systems |
Most Application are tested. Some Business-critical Systems are out of scope |
Exclude business critical systems (Included in a Worst-Case Scenario) |
| Rollout: Starting with Standard Image and afterwards deploying sensitive Systems step-by-step. Focus is on a secure Rollout. |
Rollout: After Testing, the software is rolled out to most of the available systems. Focus is on Rollout End Date and Time. |
Rollout: Emergency Rollout where the actual Security Solution is not able to protect or missing EDR features during a Security incident. As Fast as possible Rollout is needed. |
| Each of these deployment scenarios (examples) is possible with Secure Endpoint. For each scenario think about the Best practices described in the previous chapters. |
||
| Relaxed and Planned Rollout. |
Rollout is mostly planned. There can be some noticeable performance impacts. Medium Risk for business impact. Possible interruptions are part of the whole Deployment strategy. |
As fast as possible Rollout. More Security or Visibility is needed. This is a scenario if environment got breached. The Risk of Data loss is much higher than any Risk caused by Software Deployment. This is a common Situation for Cisco Incident Response Services when EPP solutions only are in place at a customer. User interruptions are accepted. |
Prework - Quick summary
1. The Secure Endpoint Preparation section outlined much information around the Secure Endpoint architecture, how the connector communicates with the cloud, the fundamental architecture of the connector software and best practices to plan your Secure Endpoint environment. Secure Endpoint fully integrates into the Cisco security architecture outlined in the EDR/XDR/ MDR - Security Architecture section.
2. The Policy Design and Management – Performance and Security section outlined useful information to build your Workstation or Server Policy.
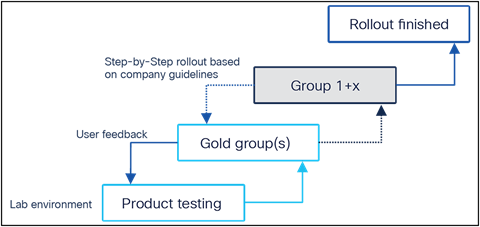
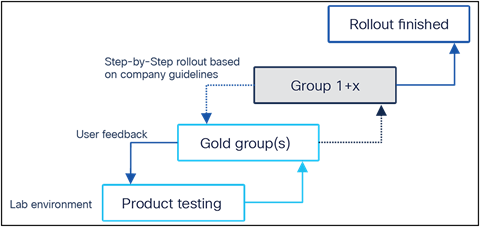
Best practices Secure Endpoint rollout
The following section should give you some insights and ideas for a successful Secure Endpoint rollout. As already outlined in previous chapters, Cisco recognizes that each customer environment is unique, and this framework should serve as a recommendation only as it may need to be adjusted according to the specifics of the customer use case.
Phase 1: LAB Environment - Testing and Rollout
Step 1: Download the Connector from Secure Endpoint console. Consider 2 things for Connector downloading:
● If you want to test with a specific Connector version, you have two options:
◦ Select the right version under Accounts → Organization Settings first (The Default Value is latest which is the latest connector version available).
◦ Set the connector version under the policy settings. If product upgrade is not set for a policy, then Organization Setting is used.
● During Download select the group the endpoint belongs to. The Group ID is included in the Connector Package. After installation, the Connector will register itself to this specific group.
Best practice: Set the defined connector version for your environment in the Secure Endpoint console under Accounts → Organization Settings, so everyone is installing the same version. Otherwise generate a download URL under Management → Download Connector for any admin which has no access rights to the Secure Endpoint console.
Review the Connector OS Compatibility for Windows, Linux and macOS.
● Windows: Document ID:214847
● Linux: Document ID:215163
● MacOS: Document ID:214849
● Other Secure Endpoint documents on cisco.com website.
Step 2: Install the Connector to the machines in your LAB. Start with your standard company image, so you are getting a test result for a high amount of company endpoints. If possible, try to install as much as possible software components.
Testing procedures:
● If any existing Security Product is to remain, confirm the respective product is functioning as expected.
● Login to your endpoint and confirm any login scripts execute.
● Open standard applications and confirm applications launch and are functional.
● When using a dedicated proxy or transparent proxy, talk to your Proxy Admin.
◦ If authentication is requested per company policy, use a dedicated user account for Secure Endpoint proxy authentication. Look into the Secure Endpoint help to see non supported NTLM authentication option.
◦ The Proxy Admin may exclude Secure Endpoint connections from Proxy Log, especially when they are uploaded to another tool (e.g., splunk), to save log data and costs.
● Open the Secure Endpoint console to check if the endpoint successfully connects to the Secure Endpoint cloud and if the right policy as active. Also check the appropriate Events in Secure Endpoint Console.
● Identify any issues in functionality or performance. Addressing these issues will be discussed in the Connector Diagnostic section below.
Best practices: Always test with your existing Deployment Architecture (e.g., Microsoft SCCM, Altiris and others). The Deployment Architecture already provides many Software Packages for testing.
● Review the Windows Installer Exit Codes if you expect an error or if there is any issue when installing Secure Endpoint with your deployment tool.
● If Secure Endpoint is installed, test software installation and upgrades, as there are many files changed on your system by the installer. These files are scanned by Secure Endpoint.
● Monitor the System Performance during the Software Installation and Upgrade Process.
Software deployment agents should be excluded from scanning by process. For best security also add the SHA-256 hash to the exclusion.
Phase 2: Gold user group
Step 3: Define the Gold User Group to test with business-critical applications. There can be situations, where specific application features are generating new files on the disk. Application testing cannot be done by IT.
● Gold Users are testing specific application features and performance.
● Make it easy for gold users to provide feedback.
● Think about a fast solution for the user, e.g., moving the Connector to a group where the Connector is set to Monitoring Mode.
Helpdesk: Instruct the Helpdesk about the software tests with Gold Users. It is always a good choice to involve the Helpdesk in software tests. Add Helpdesk users to the Gold Group as well.
IT department: Members of the IT department may be added to the Gold Group test, as they tend to have greater technical knowledge and can give qualified feedback.
System Owners: Think about the system owners of specific endpoints. Talk to them, inform them, and involve them in the system change. Show them how to handle the product, and in a worst case, how they can disable Secure Endpoint. Define a strategy how the endpoints should be upgraded, when this is possible and how needed exclusions are configured as fast as possible.
Best practice: Critical Software should be tested by the appropriate User. There can be situations, where a specific feature inside a software product needs a special configuration. Just starting a critical software may not show necessary product adjustments.
Phase 3: Deployment preparation
Step 4: Generate the deployment packages for the Deployment. Cisco recommends using an existing Deployment Architecture e.g., Microsoft SCCM, Altiris, or others.
● Define the deployment packages as needed.
● Define Removal Package.
● Test Deployment and Removal.
Best practice: Review available installer command line switches for the Secure Endpoint connector: http://cs.co/AMP4E_Connector_Install_Switches
Phase 4: Rollout
Step 5: Start the rollout in your environment based on your internal guidelines, policies and the defined step-by-step rollout plan. Add new exclusions as needed during the Rollout Phase.
● Business Critical System: You may start in Audit mode when deploying Secure Endpoint to Business-Critical Systems.
Best practice: There can always be an issue when installing new software to endpoints, regardless of if you are installing Secure Endpoint or any other software package. In a Worst- Case-Scenario a stepwise rollout helps you to lower the impact on your infrastructure.
Secure endpoint: Operational lifecycle
This section provides strategies to optimize features or functionality in Secure Endpoint. As new options, features and security fixes are released, it is recommended that a review is conducted of new connector versions to upgrade the endpoints for improved protection.
Basic test for a New connector installation
In this phase all network settings are already configured. In most cases when new features are added to Secure Endpoint, no additional network configuration are required.
● Search the computer name in the Secure Endpoint console if it has registered successfully. If yes, all should be fine.
● If there is a new cloud service needed, e.g., with the release of the Behavioral Protection Engine, the Secure Endpoint console shows the proper information as an announcement.
● Cisco often recommends using the latest version of the connector, what makes sense. But in any way, new software should always be tested before doing a global rollout.
● Do all other software tests you typically do with new software packages being deployed. Like install and removal of a software package using a 3rd Party deployment tool.
New engines and features
With new features released in Secure Endpoint, these features can include new engines or optional configuration settings for existing engines. While testing new releases, it is recommended to enable new features that might not exist in existing products or review the functionality provided in Secure Endpoint. When trying out new features, it can be helpful to enable an audit setting initially. Policy changes can be made, tested, and rolled out without any disruption to the endpoint.
Best practice: If Secure Endpoint causes high CPU load, a very easy and fast way is to disable engines step-by-step to identify the engine causing the high load. A specific Secure Endpoint group can be created to allow the engine to be disabled for the impacted endpoints.
Custom exclusions
Review of logging from Secure Endpoint or other performance tools can be used to identify custom exclusions.
The steps to identify exclusions from the Secure Endpoint Diagnostics Package takes the following steps. The Diagnostic package can be generated directly on the endpoint using the command line, or from the computer properties in the Secure Endpoint console.
Command line (Windows):
● Start the debug logging on the endpoint. Debug logging can be activated directly on the Endpoint UI (Windows) or in the policy under Advanced Settings → Administrative Features → Connector Log Level.
● Start the ipsupporttool.exe on the endpoint with the right command line parameter. Use the right time value, so you can replicate the issue. Details using the tool can be found in the Secure Endpoint Troubleshooting Technotes.
● The default location to store the output file is the user desktop.
Secure endpoint console:
● Navigate to the computer properties under Management → Computers
● Click the Diagnostic Diagnose Button.
● In the Popup window select the length of the Debug Session and click the Create Button.
● Open the Secure Endpoint Tray to pull a new policy. Debug logging will be automatically enabled on the endpoint.
● Replicate the issue on the endpoint.
● Download the Diagnostic package under Analysis → File Repository.
Analyze the diagnostic package(s)
● Download the Performance Tuning tool from http://cs.co/AMP4E_Tuning_Tool.
● Copy the Diagnostic Package(s) and the Tuning Tool into the same directory.
● Execute the Tuning Tool and review the result
Best practice: Review the Tuning Tool result and add new exclusions based on the guidelines from the previous chapters. If necessary, repeat the steps to figure out additional needed exclusions.
Secure endpoint: Troubleshooting
The Secure Endpoint Deployment Strategy Guide already includes useful information for troubleshooting This includes:
● Performance
● Outlook performance
● Cloud connectivity
● Missing information in Device Trajectory
● Missing network events in Device Trajectory
● Policy not updating
● Proxy
● Duplicate Connectors
● Simple Custom Detections
● Application Blocking
Health checker tool for windows connector
The tool provides a set of tools to investigate issues on the endpoint. It can be downloaded from https://github.com/CiscoSecurity/amp-05-health-checker-windows. The Live Debugging option can also be used to determine necessary scan exclusions.
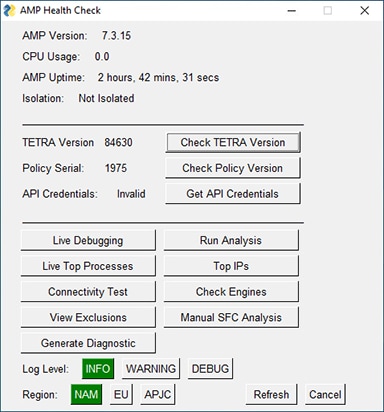
Note: Newer Secure Endpoint connector versions protect sensitive information in the policy. xml file. To decrypt this information, you need to add API credentials to the health checker tool. Read the manual on github for details.
Connectivity tool on windows endpoints
The tool provides several connection tests including policy pull, event upload, Orbital update check and checks for Behavioral Protection Engine
To show all possible options
1. Open a command prompt (cmd) window as administrator.
2. Navigate to %ProgramFiles%\Cisco\AMP\[Version]\ConnectivityTool.exe
3. Type ConnectivityTool.exe /? and press enter.
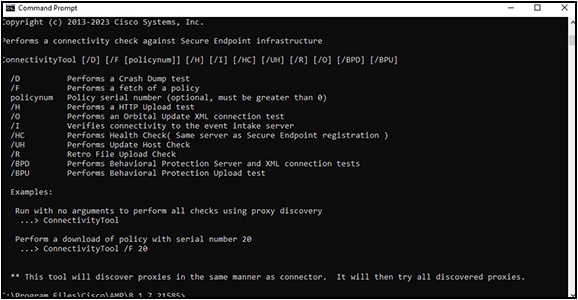
Analyze Secure Endpoint Diagnostic Bundle for High CPU on Windows and MacOS
Find a detailed description how to troubleshoot High CPU condition on the cisco.com website:
Processes secured by exploit prevention
In rare cases applications show unexpected behavior if Exploit prevention injected the tiny DLL for the memory changes. To list all running processes where Exploit Prevention tiny DLLs has been injected, you can use Orbital to query the endpoint.
● Open the Orbital console and start a new query
● Select the host you want to query using host:hostname as the search target
● Copy the following Custom SQL and click the Live Query button
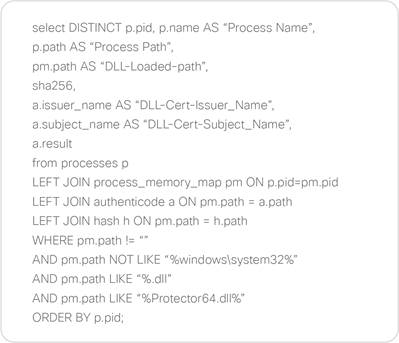
Note: If you have not licensed Orbital, you may download and install the command line version of osquery to execute the SQL statement above.
EDR/XDR/MDR - Security architecture
Secure Endpoint fully integrates into the Cisco XDR platform. Before reading this chapter, a short recap from the content in this guide.
● Secure Endpoint is the EDR part of the XDR architecture. The Secure Endpoint connector generates telemetry data which is then processed by the Secure Endpoint cloud engines.
● The Secure Endpoint cloud pushes telemetry, events and incidents to the XDR analytics engine.
● Orbital abstracts the operating system into high performance databases and allows advanced search capabilities on an endpoint using simple SQL statements.
● Orbital allows to execute scripts on the endpoint for remediation.
● Secure Endpoint version 8.x can be run as a module within Secure Client.
● Secure Client provides more security related features for a Cisco protected endpoint.
● The Secure Client Network Visibility Module (NVM) allows full network telemetry.
The Cisco Security architecture is an open platform and allows high flexibility, even with integrations. This includes different types of integrations:
● Native integration of Cisco products into Cisco XDR.
● Cisco XDR integration modules for 3rd Party vendors, which are maintained and provided by Cisco.
● Integrations with the provided APIs.
This allows customers to build a sophisticated security architecture with Cisco products or enhancing and extending an existing security architecture. Based on the security architecture, the way how incidents are visualized and handled will vary from customer to customer. This guide focuses on the capabilities with Secure Endpoint and intros to Cisco XDR.
Secure client incident vs. Cisco XDR incident
It is important to understand the difference between an Incident generated by Secure Endpoint vs. an incident generated by Cisco XDR.
● Secure Endpoint (EDR): the cloud engines are processing the telemetry from the secure endpoint connector only. Based on the threat severity an incident instance is raised within Secure Endpoint console.
● Cisco XDR: The XDR analytics engine retrieves information from endpoint and other sources. All this data is used to generate an incident including data from multiple sources. Please review the XDR integrations page for more details. Cisco XDR also processes the NetFlow information from Secure Client NVM module, which is a separated module and not part Secure Endpoint. Cisco XDR provides sophisticated features to simplify Security Operations.
The graphics below shows a fundamental overview how incidents are generated by Secure Endpoint and Cisco XDR.
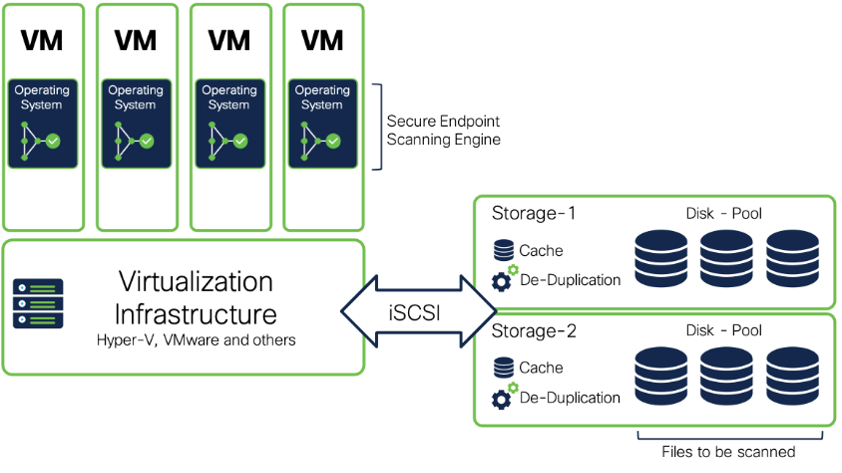
Note: The Secure Endpoint Legacy Incident Promotion feature pushes Incidents to XDR. This function (configured under Admin → Organization Settings) will be removed in 2024, as all relevant data will be fully ingested into the XDR analytics engine, where Endpoint telemetry along other sources will be correlated and analyzed. Secure Endpoint will still generate Secure Endpoint Incidents in the Secure Endpoint Console (visible under Inbox).
Note: The XDR part of the drawing above shows the fundamental approach of Incident creation in XDR. It shows an incomplete list for data telemetry, as this guide focuses on Secure Endpoint. Review available documentation for XDR data sources and the analytics engine.
Telemetry information
For better understanding, which telemetry information is processed in Secure Endpoint and Cisco XDR:
● Secure Endpoint: The endpoint sends telemetry information to the secure endpoint cloud. This includes process, file, command line and network activity. The engines on the Secure Endpoint connector are responsible for several things:
◦ They are protecting the endpoint against different types of threats in real time.
◦ They reduce the attack surface by changing the memory with Exploit prevention.
◦ Behavioral Protection can detect and block complex attack scenarios directly on the endpoint.
◦ Engines also giving us insights into different areas of the endpoint, including file activity, memory activity or specific behavior on the endpoint.
● Cisco XDR: the architecture is capable to process raw telemetry from various sources. This includes network information, public cloud information or NetFlow Information provided by the Secure Client NVM Module. A short incomplete list for better understanding
◦ Flow information from network devices and Secure Client.
◦ Event information from Cisco Defense Orchestrator.
◦ Flow Information from Public Cloud Environments.
◦ Secure Endpoint pushes Event information and Incidents to XDR.
◦ Telemetry and Incidents from 3rd Party vendors and products.
Activate Secure Endpoint EDR features
After you have configured the policies and Secure Endpoint is running probably, it is important to activate the following EDR features.
● Prevalence: Automatically analyze files with malware analytics which are unique for your environment, not known globally or where malicious behavior has been seen. If not enabled, the automated actions for file analysis are not working.
● Automated Actions: Enable different post infection tasks to generate more visibility for EDR, analyze files, isolate the endpoint from the network or generate a forensic snapshot with Orbital.
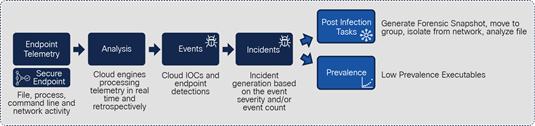
Prevalence (Low Prevalence Executables)
This feature ensures that files on an endpoint get stored and analyzed. The integration with Malware Analytics provides insights into the characteristics and behavior of files.
To enable the feature: Navigate to Analysis → Prevalence to activate the Low Prevalence Executables feature per group. After you have activated the feature, new files and files with specific behavior are available in the Secure Endpoint cloud. Some important considerations for Low Prevalence Executables:
● The Secure Endpoint cloud is requesting Low Prevalence Executables from the endpoint. The primary decision logic/intelligence which files are needed to be analyzed is in the Secure Endpoint cloud. Files are analyzed by Malware Analytics only if needed.
● If there is specific malicious activity seen around a file by the local Behavioral Protection Engine, it can trigger a file upload to the cloud.
● The files are stored in the file repository in the Secure Endpoint cloud. The Secure Endpoint cloud itself forwards files to malware analytics to be executed and analyzed there.
● Exclusions prevent a file upload to the cloud. If there is an exclusion hit, a file does not get scanned, hashed and no telemetry is sent to the cloud. Therefore, add exclusions only if really needed to provide the highest security level and detection rate.
Automated post infection tasks
The following Secure Endpoint Built-in features allow to automate security task if there is malicious activity on an endpoint seen. Secure Endpoint provides four different tasks.
● Isolate a Computer upon Compromise: Select the severity level of the event and the groups where endpoints should be automatically being disconnected from the network. Configure the rate limit to prevent false positives detections. Some considerations for the feature:
◦ Start with Severity Critical when using the feature.
◦ Be carefully when using a lower level and configure the rate limit. Monitor your environment carefully when working with lower severity levels.
◦ Secure Endpoint communication always works, even the endpoint got isolated from the network.
◦ Prepare IP-Allow lists and add them to the policy, so specific communication is possible, even the endpoint got isolated from the network.
● Submit to Secure Malware Analytics upon Detection: It is highly recommended to enable the feature for all groups, so files get stored in the Secure Endpoint file repository and are analyzed by Malware Analytics. Some considerations for this feature:
◦ Review the Secure Endpoint help to review which file types and sizes are automatically analyzed.
◦ Samples sent to Malware Analytics are set to private, so they are not shared. Change this value (full Malware Analytics license needed) to public if you want to share them.
◦ If files must not be uploaded to malware analytics, e.g., for privacy reasons, you may deactivate the feature for a group of computers or you prevent a file upload by adding scan exclusions for the connector.
● Move Computer to Group upon Compromise: This post infection task needs proper preparation. Best practice is to define a group with the right policy assigned, which provides the highest detection/protection capabilities. Some considerations for this policy:
◦ Enable all Engines and set them to Protect/Quarantine. Review the Policy settings: Best Performance and Security section for additional info.
◦ Reduce the cache setting to the lowest setting.
◦ Remove as much as possible exclusions.
◦ Activate On-Demand Scanning in the policy.
● Take a forensic snapshot upon compromise: The forensic snapshot is generated with Orbital. If the generation of a snapshot is triggered, Orbital does several endpoint queries and combines them together into a forensic snapshot. The information then is forwarded to the Secure Endpoint console. The forensic snapshot information is available in the computer object in the console and available in the Device Trajectory. The snapshot includes the following information:
◦ Autoexec items
◦ Bitlocker encryption monitoring
◦ DNS Cache table monitoring
◦ Hosts file data
◦ Installed programs on windows host
◦ Listening ports
◦ Loaded modules hashes
◦ Loaded modules processes
◦ Loaded modules vs. Processes
◦ Logon sessions
◦ Mapped drives
◦ Network connections – process
◦ Network interfaces
◦ Network profiles registry key
◦ OS version
◦ PowerShell history
◦ Prefetch directory
◦ Running files hashes
◦ Running services monitoring
◦ Scheduled tasks
◦ Shared resources
◦ Startup items
◦ System network state monitoring
◦ Temp directory file data
◦ Trusted root certificates
◦ USBSTOR registry keys
◦ User Groups
◦ UserAssist Monitoring
◦ Users
◦ Users Logged-in
◦ WMI event filters monitoring
◦ Windows AV products monitoring
◦ Windows BAM entries monitoring
◦ Windows environment variables monitoring
◦ Windows hotfixes
◦ Windows NT domains search
◦ Windows ShellBags monitoring
◦ Windows ShimCache Monitoring
◦ Chrome extensions monitoring
◦ Processes running without running a binary on the disk
◦ WMI script event consumers monitoring
Threat hunting with Secure Endpoint console
Secure Endpoint includes several tools to provide an analyst insight into detected malicious behavior on an endpoint. This guide provides you a guidance how to start an investigation. For better understanding review the user guide searching for these topics.
● Dashboard
● Inbox
● Observables
● Indicators
● Threat Severity
● Device Trajectory
● File Trajectory
● Heat Map
Note: Doing a Threat Hunt is not a linear process. The goal is to collect as much as possible information about a threat to be able to understand the threat, the impact and defining the proper remediation steps. Secure Endpoint provides several tools to provide in-depth information into threats and attacks.
If you are new to Secure Endpoint, Cisco provides demo data and described demo-use-cases where you can learn the fundamental functionality of the provided tools.
Navigate to Admin → Demo Data to enable the demo data. The Demo Data can be disabled at any time. Some considerations about the Demo Data.
● Demo Data are highly customized datasets to show the fundamental functionality of the product. There are Ransomware examples like CryptoWall, WannaCry, Command Line activity and more. Threats and attacks are highly dynamic, so please keep in mind that Secure Endpoint shows more and different data in real threat or attack scenarios.
● Demo Data events are not streamed out with the Streaming API.
● Demo Data can be disabled at any time and all the entries will be removed from your environment.
● Demo Data hosts are not synced to the XDR asset inventory.
Secure Endpoint dashboard
The Dashboard gives you a broad overview of the status of your environment. The so-called Heat Map gives you an easy-to-understand overview where Events and Compromises have been generated in your environment. The Heat Map tiles represent the groups defined in Secure Endpoint Console.
By clicking into the Heat Map the UI filters all other areas, so an analyst can easily review what happened in each group, which compromise observables have been discovered, which Threat Events occurred, Threat Event Types and more.
The example to the right shows the Cisco default groups, which have been moved under a new root group called Cisco-Root. The Group CiscoDefault Audit has been selected. 88,9% of the hosts in this group are compromised (Demo Data). By clicking the Inbox link, the Secure Endpoint UI navigates to the Inbox.
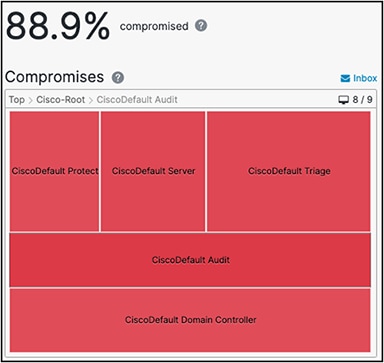
Secure Endpoint Inbox
Based on event type, threat severity and/or event count the Secure Endpoint Console raises a so-called Incident Instance. The inbox gives you a guidance which endpoints should be investigated first.
1. Review the information shown on the page including the system details, events, observables, Kenna risk score and the available actions. From this page, you can dig deeper into the details related to the outlined incident.
2. Set the incident status to Begin Work, so every analyst in your endpoint ORG knows that someone is working on the incident.
3. The goal is to collect information to understand the threat, the impact and defining necessary remediation steps.
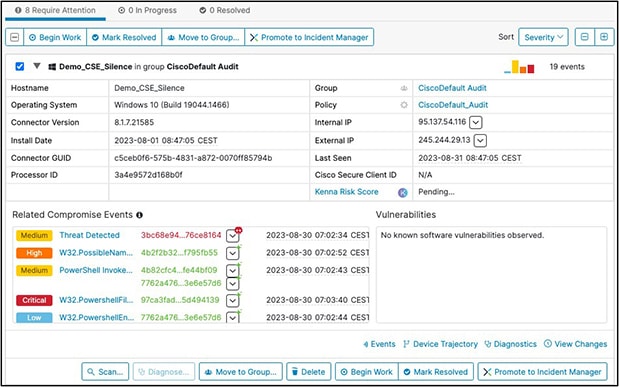
At any time, the Secure Endpoint shows observables in the UI, the XDR Pivot Menu can be used to get more information. The pivot menu provides information about the source(s) which have generated a judgement for an observable. It also provides many actions as outlined in the screenshot below. Based on the integrations you have configured, the XDR Pivot Menu shows more available actions.
● If you want to share information about an observable across the architecture, create a judgement in the Private Intelligence. The creation of an Indicator is needed to be done first, as a judgement needs to be linked to an indicator.
● The search function searches in all areas of the Secure Endpoint UI for the given observable. This includes all events, indicators, policy objects and list objects.
● The File Analysis feature provides information about behavior indicators if the file was analyzed by Malware Analytics.
● For detailed information about the file, click the File Trajectory action.
● If the file is not available in the File Repository, click the File Fetch action to request the file from the endpoint.
● If a file is not classified but should be removed from all endpoints, create a Simple Detection entry.
● If the execution of a file should be blocked, but it should not be removed from the file system, create a blocked application entry.
● In case of a false/positives or to avoid cloud lookups for an observable, create an allowed application entry. The Appendix-E: Exclusions in depth section provides more information about the impact of application list entries.
● If there are just Low Severity events where Secure Endpoint does not create an incident in XDR, you can manually raise the Inbox instance as an incident in XDR. Just click the Promote to Incident Manger button.
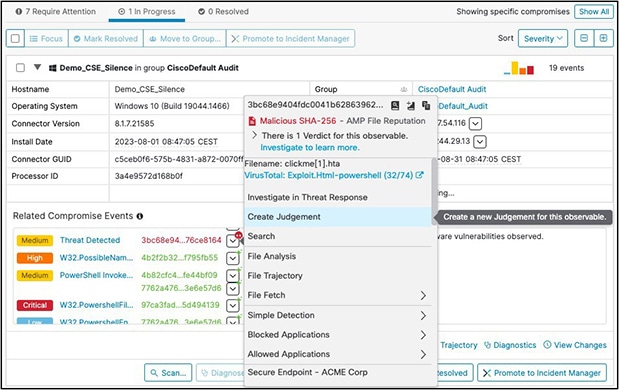
The XDR Ribbon is an overlay app provided by XDR and available in XDR integrated products. The Ribbon itself includes apps like the Casebook App. The Casebook app helps you to write down information during your threat hunt and to share this information across different UIs.
Some considerations when using the Casebook app.
● During an investigation you will figure out multiple observables with different observable types. Add them to the casebook, so you have a collection of the observables including latest Threat Information.
● Link the casebook to available XDR incidents. You can easily navigate to the incidents from the casebook.
● Add notes to the casebook to track your work with the incident.
● Some observables are detected directly, like SHA256, domain, IP-address, or e-mail address values. To add additional observables with a different type, you need to add observable type like the examples below:
◦ hostname:myhost
◦ user:attacker or user:mydomain\attacker
◦ domain:exampledomain.com
◦ url: https://www.exampledomain.com/index.html
◦ file_name:example.exe
◦ file_path:c:\example_foldername\example.exe
By clicking the Run Investigation button Cisco XDR queries all configured modules for information about observables included in the casebook.
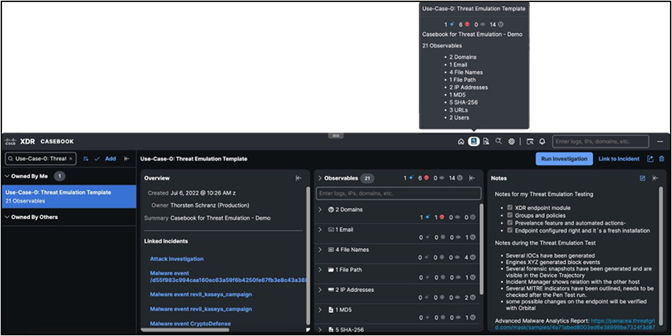
The Device Trajectory gives you insights into the activity on the endpoint. The Device Trajectory page displays information like the computer properties including the threat events, search and filter options, the relation graph and event details. Review the Demo Data section and the Secure Endpoint documentation to learn how to use the tool in detail. Some considerations for Device Trajectory:
● When opening the Device Trajectory from the event page, the event is directly selected.
● The investigation is always done for one endpoint. So, if there are multiple endpoints, investigate every endpoint and store your findings in the casebook.
● By clicking the Event in the computer properties area, the Device Trajectory directly jumps to event in the relations graph.
● The yellow area in the relations graph shows information what activity resulted into the IOC generation.
● By clicking an icon in the relations graph, the event details are shown on the right.
● Review activity before and after an IOC to get more information.
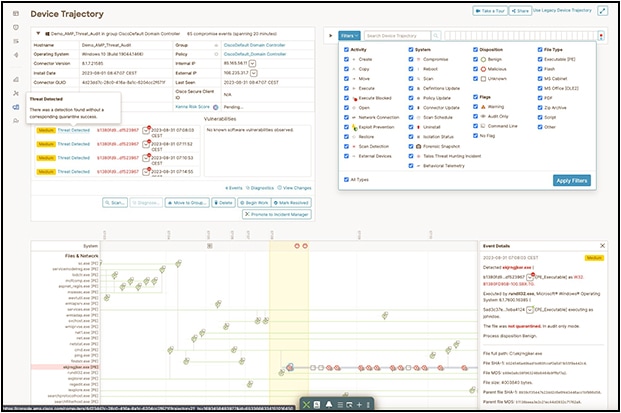
File Trajectory
The file trajectory gives you insights into files during your threat hunt. It supports the analyst how to handle a file. The included information may result into actions like adding the SHA256 to an application allow or block list, generating a judgement or fetching the file for analysis using the XDR pivot menu. The File Trajectory page shows the following information:
● when and where (Entry Point) the file has been seen the first time in the environment.
● related processes to the file.
● file details including the real file type, size, detection names, file names or signing certificate information.
● The network profile including ports, IPs, or URLs the file/process connected to.
● The trajectory area shows when the file has been seen where and when, how it was handles and what are the involved processes. A click on the computer name shows details about related processes.
● The event history area shows all related events for the file.

Threat hunting services (MDR)
Cisco provides several different services to support customers with Threat Hunt and Incident Response. Please contact your Cisco representative for details.
Appendix-A: Secure Endpoint Private Cloud
The major differences between the two are:
| Infrastructure |
Pro |
Con |
| Public Cloud |
● Endpoint features are deployed here first
● Roaming endpoints can remain connected to the cloud
|
● Internal network needs allowances to Public Cloud servers
|
| Private Cloud |
● Better data privacy for the endpoint with cloud servers on premises
● Dedicated resources are used to service endpoints
|
● Hardware limits the number of active endpoints supported
|
Consideration: Public Cloud vs. Private Cloud
Secure Endpoint Appliance provides two options for deployment: Public Cloud and Private Cloud. It is important to understand the differences between the two options to ensure that you choose the best fit for your organization.
Public Cloud:
● Secure Endpoint Public Cloud deployment is the most common option chosen by customers. This method of deployment ensures that new features are immediately available while requiring no server resources to manage endpoint deployments. As such, this method is more flexible and recommended by Cisco.
Private Cloud:
● The Secure Endpoint Private Cloud is hosted in your environment. This deployment option provides more privacy for your organization by keeping all endpoint telemetry data under your direct control.
● The Secure Endpoint Private Cloud Appliance comes in two forms, a virtual appliance and a physical UCS appliance. Each option has its own set of requirements which should be carefully evaluated before purchasing decisions are made.
● Both versions of Secure Endpoint Private Cloud appliance offer two primary modes of operation:
a. Proxy Mode: Connection to cloud using the company´s web proxy.
b. Standalone Connected: Cloud Lookups to cloud available, but telemetry is stored locally.
c. Air-Gap Mode: No connection to cloud in any way.
● Most Secure Endpoint Private Cloud customers run their appliance in Proxy Mode, as this is the recommended configuration for Private Cloud deployments.
● Air-Gap Mode is deprecated for virtual Private Cloud deployments (will be available for physical UCS) and is provided for customers with extreme privacy requirements or for customers who are unable to have external network connectivity.
Review the Secure Endpoint Private Cloud Documentation on the cisco.com website: https://www.cisco.com/c/en/us/support/security/fireamp-private-cloud-virtual-appliance/series.html#~tab-documents
Details: Public Cloud vs. Private Cloud
The table shows some main differentiators between Secure Endpoint Public Cloud and Secure Endpoint Private Cloud Appliance.
| Feature |
Public Cloud |
Private Cloud |
Info |
| Deployment |
|||
| Location |
Regional Cloud DC |
Virtual Appliance or Hardware Appliance |
|
| Privacy |
Managed Cloud Service |
Proxy Mode or Air-gaped Mode |
|
| Sizing |
Managed Cloud Service |
100.000 endpoints supported on HW appliance |
|
| High Availability |
Managed Cloud Service |
Cold Standby |
|
| Reliability |
Managed Cloud Service |
Backup/Restore Procedure |
|
| MSSP Portal |
Available |
n.a. |
|
| Policy and Features |
|||
| Connector Policy |
Latest available features |
Yes |
|
| Endpoint Engines |
Latest available features |
Yes |
|
| OS Support |
Win/Linux/macOS/iOS/Android |
Win/Linux/macOS/iOS/ |
See release notes |
| Identity Persistence |
Yes |
Yes |
|
| Device Control |
Yes |
Yes |
|
| Endpoint isolation |
Yes |
Yes |
|
| Automated actions |
Yes |
Yes |
|
| → move to group |
Yes |
Yes |
|
| → Isolate endpoint |
Yes |
Yes |
|
| → Submit file for analysis |
Yes |
Yes |
|
| → Forensic Snapshot |
Yes |
No |
Orbital needed *1 |
| Integrations into SecureX and Hunting Services |
|||
| Cisco XDR |
Yes |
No |
|
| Global Threat Alerts |
Yes |
No |
|
| Advanced Search (Orbital) |
Yes |
No |
|
| Secure Malware Analytics |
|||
| Cloud |
Yes |
No |
|
| On-Premises Appliance |
No |
Yes |
|
Appendix-B: Virtual Environments (VDI)
Introduction - VDI and Multi-User Environments
Virtual Desktop Infrastructure (VDI) and Multi-User Environments like Terminal Servers, Hyper-V, VMware and others need some granular planning, so Secure Endpoint can be installed without interruption or performance degradation of the virtualization platform. There are so many different virtualization options available on the market, so we cannot list them all here. The following section may give you a short insight into virtualization environments and why adding Endpoint must be planned carefully.
Note: Review the best practices guides provided by Virtualization vendors like Microsoft, VMware, Citrix, Open Stack and others.
Best practice: Virtual Environments OS Support
Secure Endpoint is VDI vendor agnostic if the Virtual Desktop operating system is supported. Virtual Environments need some special configuration so Secure Endpoint is working without interruptions to the VDI environment.
Endpoint virtualization vs. Application virtualization
Endpoint: Virtualization: The Virtualization platform provides a complete virtual desktop for a user. The benefit for an IT department is, that any desktop can be easily rebuilt. With a few steps an admin can re-deploy a whole virtual endpoint from a golden image.
The virtualization platform is often a part of the deployment strategy for a customer. If there is a new application needed, a new golden image with a new version number is created. IT department can test the new image, especially if there is any bad impact based on the recent changes. After testing, a rollout is started to re-deploy all end-user virtual systems. It there are any issues, the IT department can switch back to the previous image.
To prevent the loss of the user settings, stored in the user profile, and to provide all the settings regardless of where the user does a logon, features like roaming user profiles are used. These profiles include data like application settings, Browser favorites and cache, the desktop icons and much more. During Logon, the profile is copied from a network share to the local machine. During user logoff, the profile is copied back to the network share. The challenge with user profiles is the high number of files stored in the user directory. In many cases SMB protocol is used to access the network share where the roaming profile is stored.
End-users can access the virtual desktop using a proper configured Windows 10 endpoint (just used as the access device) without local installed applications. Another option is using a small Terminal, which is booting a small Linux image including a client to access the virtual desktop.
Summary: For the end-user it looks like e.g., a typical Windows 10 endpoint, but the backend architecture is completely different than a physical desktop or notebook.
● Application virtualization: This approach is divergent to Endpoint Virtualization because the application only is “virtual”. This means, the application is not installed on the user endpoint, it is “streamed” from the virtualization platform
As an example:
1. The user starts an application from the icon on the desktop.
2. In the virtualization backend, the user is logged on to another host. This can be e.g., a Windows Terminal server. This is completely transparent for the end-user starting the application.
3. After logon in the backend, the application is started and is streamed to the user desktop.
● Commonalities between both approaches: There are many different approaches available today. Just highlighting two considerations. Both scenarios are using a Storage System in the backend. Where during user Logon SMB protocol may be used, a common approach to connect Storage to a Virtualization host is iSCSI.
In any case, there is some Network layer communication. The average access time from a local disk and a network layer is quite different. Virtualization environments and Storage systems are providing different features to reduce problems with access time. Finally, in such a scenario, the goal of a proper Secure Endpoint configuration, is to avoid degrading the performance by scanning specific files.
Recommended guidance is to meet with the responsible IT-admins at a customer site to obtain a thorough understanding of their virtualization environment before starting the deployment. Note: It´s common that different teams at the Customer site handle the Virtual environment vs the team that administrate the Cisco Secure Endpoint solution.
Secure Endpoint Installed in VDI and multiuser environments
Today there are no known incompatibilities between Secure Endpoints and Virtualization products. As long the OS is supported, Secure Endpoint can be installed. For proper functionality Endpoint provides several features and options. The next section shows possible options, starting with the backend preparation.
Identity persistence
There is often the case where systems are frequently re-deployed. Even the system name is the same, the AMP connector GUID in the registry is generated new. Based on this new Connector GUID the Endpoint backend will generate a new Computer Object. This issue can be solved by activating the Identity persistence feature in Endpoint Backend. The feature must be enabled by TAC. After the feature is enabled, a new option is available in your Endpoint policy.
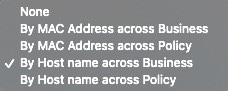
Identity persistence configuration
● Go to Management → Policies and select the appropriate policy.
● In your policy navigate to Advanced Settings → Identity Persistence to configure the proper settings
Best practice: Always take care when moving endpoints between groups where Identity Persistence is enabling in one group and disabled in the other group. This may result once again into duplicate computer accounts.
When using Automated Actions, where an Endpoint is automatically moved to different group, or Endpoints are frequently reinstalled, it is highly advised to enable Identity Persistence in all groups.
Best practice: Identity Persistence is not a VDI feature, it is most time used when Secure Endpoint is installed on virtual systems. Frequently re-imaging of endpoints commonly happens in VDI environments. This feature can be used at any time, where systems are frequently re- deployed. Take a few moments to think about what the better approach is for your environment, identifying systems by MAC Address or Hostname.
Golden image and Endpoint cloning
If there is a need to create a golden image use the /goldenimage command line switch for connector installation. Find details here: https://www.cisco.com/c/en/us/support/docs/security/amp-endpoints/214462-how-to-prepare-a-golden-image-with-amp-f.html.
Note: Secure Endpoint does an incremental signature update for 30 signatures. Afterwards the whole signature set is downloaded. A golden image is often used for a longer period, which exceeds the incremental update limit. In this case, at any time, a new VDI system gets deployed from that golden image, Secure Endpoint will download the whole signature set. For such scenarios a Tetra Update Server should be in place, to speed up the update process and to save bandwidth consumption to the cloud.
Endpoint Tray Icon
The Secure Endpoint process sfc.exe allows a limited count of Tray Icon connections. In a Multi-User Environment, e.g., Terminal Servers, disable the Tray Icon completely in the policy. If not, the Tray Icon will show wrong information, as the sfc.exe process cannot connect to the tray icon process if the limit of simultaneous tray app connections is reached.
Best practice: In any environment where multiple users are logging into a system, e.g., Terminalserver, the Tray Icon should be disabled by policy.
Exclusion and Feature deactivation
Exclude specific types of applications as listed below. As explained in the previous chapter, exclude any process with high disk activity to prevent any degratation of performance on the backend storage system. In addition, turn off Secure Endpoint features generating high disk activity as listed below.
● Startup intensive applications must be excluded.
● Profiling/Inventory tools must be whitelisted.
● No OnDemand Scans/disable flash scan on install.
● No Endpoint IOC Scans.
● Exclude all processes which are provided by the Virtualization Vendor. E.g., all Citrix processes for Application Virtualization.
Tetra Engine: Cisco recommends carefully using Tetra AV in virtual environments. If there is a need for AV Scanning, install Tetra Step-by-Step on systems. Monitor system and storage performance before installing on additional endpoints. Installing Secure Endpoint without AV drivers, using the command line argument /skiptetra 1 prevents the driver installation.
Automated Actions: When using Automated Actions, where an Endpoint is automatically moved to different group, or Endpoints are frequently reinstalled, it is highly advised to enable Identity Persistence in all groups.
Network (DFC): Systems providing Virtualization in any way are needing high network bandwidth. Install Secure Endpoint without Network DFC using the/skipdfc 1 command line.
Boot storm - Note: When installing Tetra AV on a Multiuser Environment, think about the Boot storm when endpoints are started, and the users are logging in.
Best practice: Disk Performance and Secure Endpoint Features
→ Best practice - Performance: Avoid any configuration which generates high disk activity caused by scanning many files.
→ Best practice - Network Performance and stability: Install the Secure Endpoint connector without the network drivers.
Native Hypervisor Integrations and Secure Endpoint
Native Virtualization Integration: Secure Endpoint can be installed in a virtual environment, as long the Guest OS is supported by Secure Endpoint. There are three common integrations/ approaches to scan files in virtual environments. Each system provides advantages/ disadvantages, based on the point of view.
● Option: Scanning directly on Hypervisor level (e.g., VMware NSX).
● Option: Virtual Scanning Appliance, scan process is moved to a scanning appliance by an agent inside the VM.
● Option: Endpoint Security running directly in the VM.
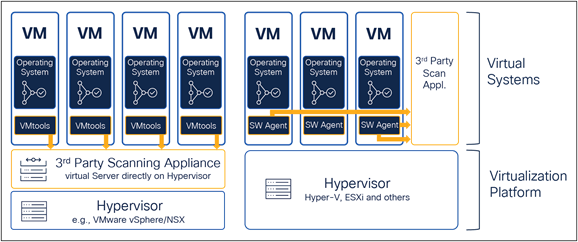
For many customers resource consumption for File Scanning is an important factor for implementation. In many cases, the goal is to move the scan process to a dedicated appliance. Such approach is for scanning only, but based on this design, EDR features, or behavior-based engines are missing. Therefore, many vendors, once again, are installing a software agent into the virtual machine.
Note: Secure Endpoint is always installed inside the virtual machine. Today Cisco does not provide file scanning directly on the Hypervisor level.
The tables below show some key differentiations between the virtualization scenarios. Cisco is not aware about the latest product changes/approaches of competitor products and features. The table should help you to understand key features. Always investigate latest product documentation and plan carefully with the customers IT Team. In addition, the following tables do not include Hybrid solutions where a Service Appliance and an additional endpoint is in place. It should give you a basic understanding about the differences of each approach.
|
|
Hypervisor Level Scanning |
Service Appliance Scanning |
Scanning inside the VM |
Info |
| Deployment |
||||
| Secure Endpoint Placement |
no |
no |
yes |
|
| Endpoint Software |
VMware Tools |
Software Agent |
Secure Endpoint |
|
| Scan Appliance Inst. Count |
1x per Hypervisor |
1x per x endpoints |
n.a. |
|
| Scan Engine Location |
Hypervisor (VM) |
Service Appliance (VM) |
Inside VM |
|
| Scan Count per file (worst-case) |
Once per hypervisor |
once per appliance |
once per host |
← Scanning the same file multiple times can cause high load and latencies on Storage Systems |
| Communication to Scan Service |
IP based |
IP based |
Drivers inside VM |
Communication between the VM and the Scan Service |
| High availability |
No |
Yes |
n.a. |
|
| Impact on Outage |
All VMs on Hypervisor |
All VMs connected to Appliance |
Single VM |
|
| Resource consumption |
100 – 200B per Hypervisor |
100-200MB per x endpoints |
100MB per endpoint |
Resource saving depends on the Architecture, e.g., how many endpoints are hosted by one Hypervisor. Effectiveness of resource savings is often important for customers. The resource consumption has an impact on the VM density per Hardware. |
| Example 1000 VMs (RAM consumption) |
1-2 GB RAM (100VMs per hypervisor) |
100-200 MB for appliance. 1GB (10 MB per endpoint) |
10 GB (100MB per VM) |
RAM consumption for File Scanning Resources over virtual infrastructure |
| Deployment |
||||
| File Scanning |
3rd Party |
3rd Party |
Yes |
|
| Process Information |
No |
Partial |
Yes |
|
| OnDemand Scan |
No |
No |
Yes |
|
| Machine Learning |
No |
No |
Yes |
|
| Behavior Engines |
No |
No |
Yes |
Needs endpoint behavior details |
| Post infection tasks |
No |
No |
Yes |
|
| High availability |
No |
Yes |
n.a |
|
| Real Time Forensic |
No |
No |
Yes |
|
| Resource consumption |
100 – 200B per Hypervisor |
100-200MB per x endpoints |
100MB per endpoint |
Resource saving depends on the Architecture, e.g., how many endpoints are hosted by one Hypervisor. Effectiveness of resource savings is often important for customers. The resource consumption has an impact on the VM density per Hardware. |
| Example 1000 VMs (RAM consumption) |
1-2 GB RAM (100VMs per hypervisor) |
100-200 MB for appliance. 1GB (10 MB per endpoint) |
10 GB (100MB per VM) |
RAM consumption for File Scanning Resources over virtual infrastructure |
Summary: Various Integrations into virtualization environments are useful for resource savings for RAM and CPU by moving Scanning Resources to a dedicated system. Without an additional endpoint component, such solutions are missing endpoint protection and EDR functionality and do not provide post infection task like
● Isolating the endpoint from the network
● Generating forensic snapshot
● Advanced file analysis triggered by endpoint behavior
Best practice: If a product for Agentless Scanning is already in place, you may install the Secure Endpoint connector without Tetra Engine using the/skiptetra 1 installation switch. Second option is using a policy where Tetra is disabled, so you can enable AV scanning in Secure Endpoint without re-installing the product.
Integration: Scanning per hypervisor (e.g., VMware)
Description: A 3rd Party Scanning appliance is installed on the Hypervisor. This Appliance is responsible for AV Scanning only.
AV Scanning done by Hypervisor insights:
● No Process information available for the Scanning Appliance.
● OnDemand Scans are not possible.
● Path Exclusions only are available, no process exclusions possible.
● Automated Deployment of a Scanning Appliance possible (vendor dependent).
● VMware Tools must be installed.
● Additional Software Component inside VM needed providing protection beyond AV scanning and EDR.
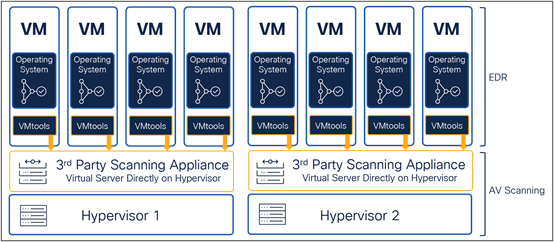
Secure Endpoint Deployment:
● Install Secure Endpoint without Tetra with the /skiptetra 1 installation switch.
◦ (Duplicate Scanning possible, but needs more system Resources, not recommended)
● All other engines can be installed based on the guidelines in the previous sections.
Info: VMware acquired Carbon Black and Lastline. New features provided by the acquisitions are not part of this document.
Integration: Scanning with dedicated scanning node (e.g., Hyper-V, Citrix, OpenStack)
Description: A dedicated Scanning Appliance is used to scan content for virtual systems across multiple Hypervisors. One appliance can also be used serving the scanning service for virtual endpoints hosted on different Hypervisors and versions.
AV scanning done by dedicated Appliance:
● Can handle many endpoints across Hypervisor Platforms.
● Distributed Cache (Vendor dependent).
● SW-Agent in VM sends file for scanning.
● Exclusions possible based on Process (vendor dependent).
● No OnDemand Scans.
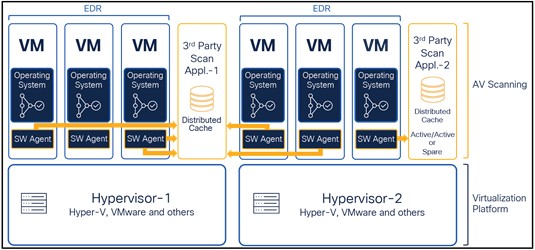
Secure Endpoint Deployment:
● Install Secure Endpoint without Tetra with the /skiptetra 1 installation switch.
◦ (duplicate Scanning possible, but needs more system Resources, not recommended)
● All other engines can be installed based on the guidelines in the previous sections.
● Configure Exclusions for the SW Agents, which forwards files to the Scanning Appliance.
OnDemand/IOC scanning in virtual environments
The drawing shows an easy example of a virtual environment. One or more storage systems are connected to the Hypervisor using iSCSI. Several virtual systems are hosted by the Hypervisor.
AV scanning done by dedicated Appliance:
● Secure Endpoint is running in the memory of the virtual machine.
● The Operating System files are located on the storage system.
To scan a file, it must be fully copied from the storage system to the virtual machine. If the same file is available on multiple virtual systems, the file must be copied several times.
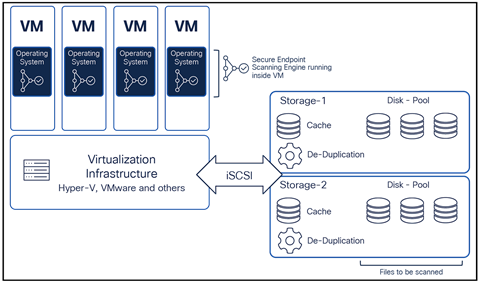
Best practice: OnDemand Scan:
Avoid OnDemand Scanning (File Scanning and IOC Scanning) in virtual environments. If a customer requests OD-Scans as part of the Security Guidelines, separate the endpoints in different groups, so not all endpoints start the scan at the same time.
Recommended Settings for Microsoft Windows Terminal Server
Microsoft Terminal Server have some special characteristics and therefore a proper Secure Endpoint configuration is important.
Characteristics:
● Multiple user sessions at once.
● Roaming Profiles are often used and stored on a remote network drive. This results into high network bandwidth usage during user logon and logoff. Roaming profiles include thousands of files, which are copied to the local drive.
● Login/Logout storms are generating high load on the Terminal Server system.
● A lot of running Applications in the memory.
● High disk activity generated by the running applications.
Recommended settings
● Define an own Group and Policy Template for Terminal Servers.
● Assign the Cisco Maintained Exclusion List for Microsoft Windows.
● Exclude Processes which are related to the virtualization system. Review the recommended Terminal Server AV exclusions from Microsoft website: https://social.technet.microsoft.com/wiki/contents/articles/18439.terminal-server-antivirus-exclusions.aspx
● Disable the Tray icon for Secure Endpoint in the policy as outlined above.
● Disable the Network Protection in the Policy. If there are still issues with the network performance, re-install the endpoint using the /skipdfc install switch. Review the Deployment Guide for details, outlines in the Secure Endpoint Preparation and operational Lifecycle section of this guide.
● Malicious Activity Protection Engine and Exploit-Protection Engine must be tested carefully, as changes to the memory may generate issues in a Terminal Server environment. Start in Audit Mode and switch to protection mode Step-by-Step.
● Do not use On-Demand Scans for Terminal Servers to avoid disk performance issues. If required by the customer, do the OnDemand scan during times where no users are logged on to the Terminal server. Use different smaller OnDemand scans, where parts of the disk are scanned, to speed up the scanning process.
Recommended Settings for Microsoft Hyper-V
Microsoft Hyper-V provides virtualization of other Operating Systems. Secure Endpoint is VDI vendor agnostic if the Virtual Desktop operating system is supported. For performance reason the Hyper-V Platform has no Endpoint Security installed, as the virtual VMs are already protected. In cases where protecting the Hypervisor platform is a customer requirement, Secure Endpoint needs a proper configuration.
Building a Policy for Microsoft Hyper-V.
● Define an own Group and Policy Template for Microsoft Hyper-V systems.
● Assign the Cisco Maintained Exclusion List for Microsoft Windows.
● Add additional necessary exclusions recommended by Microsoft: https://learn.microsoft.com/en-us/troubleshoot/windows-server/virtualization/antivirus-exclusions-for-hyper-v-hosts
● If the Hypervisor is clustered, add Microsoft Cluster Exclusions based on the Microsoft recommendations: https://docs.microsoft.com/en-us/microsoft-365/security/defender-endpoint/configure-server-exclusions-microsoft-defender-antivirus?view=o365-worldwide
◦ If there is a quorum disk configured, the whole path must be excluded from scanning. Review Microsoft Information for quorum disk: https://docs.microsoft.com/en-us/windows-server/failover-clustering/manage-cluster-quorum
● Disable Exploit Prevention and Malicious Activity Protection in the Policy.
● Disable/Remove any OnDemand Scan on the Hyper-V System.
● Network Performance is essential for a Hyper-V system. Install Secure Endpoint using the/skipdfc installation switch to stop the Secure Endpoint network driver installation.
◦ Disable Secure Endpoint product update in the policy. If the connector is updated using the internal feature, the standard installation command line is used.
Best practice: Always test carefully when installing Secure Endpoint on a Microsoft Hypervisor System.
Virtual Systems in Public Cloud Environments
Secure Endpoint can be installed on any virtualization platform if the OS in the virtual workload is supported. In public cloud environments like Amazon Web Services (AWS) and others, performance generates costs. A proper Secure Endpoint configuration helps to save costs.
● Review if the virtual OS in the public cloud environment is supported by Secure Endpoint. Review the Supported Operating Systems section of this document. Review the official supported OS information from the cisco.com website.
● Review the Policy Design and Management – Performance and Security section to build a Secure Endpoint policy with a low resource impact on the endpoint.
● Activate On-Demand scanning only if necessary or if you are expecting a compromise. In such cases you may activate Automated Actions feature to move a computer to the appropriate group, after a Cloud IOC was generated.
● Endpoint IOC scans are very resource and time intensive. Run Endpoint IOC scans only if needed. Review the integration of XDR into public cloud environments and the options with Orbital, as XDR provides much more outcome than an IOC scan.
In public cloud environments where system resources generate costs, check system performance in regular intervals. Review the Secure Endpoint: Troubleshooting section to figure out high CPU problems.
VDI checklist
Take a moment to review the summary to install Secure Endpoint in a VDI environment.
● Open a TAC case to enable Identity persistence.
● Verify the type of the virtualization platform.
● Use the /goldenimage command line switch to generate a golden image. Take care, that the image does not connect to Secure Endpoint backend before freezing.
● Incremental Updates are available for a max. count of 30 Signature updates, afterwards the whole Signature package will be downloaded. Deploy an AMP Update Server to store the Signature Files in the local network.
● The sfc.exe process supports a limited count Tray Icon connection. Disable the Tray Icon in the Policy for Multi-User deployments.
● If enabling Tetra, be carefully and enable step-by-step to prevent storage overload. Review the guidelines for Exclusion and Feature deactivation.
● Do not install the network driver on systems with high network load or if many VLANs are configured on the network interface.
● Secure Endpoint always runs inside the virtual OS.
● OnDemand Scan can degrade the Storage Performance. Avoid ODScanning/IOC Scans for daily operations.
● Review the recommendations for specific environments like Microsoft Terminal server, Hyper-V and public cloud infrastructure environments.
Appendix-C: Add Tetra Manually after/skiptetra was used
As this is a workaround, always test in a non-productive environment before doing a global rollout!
Adding Tetra Manually to an Endpoint tested with connector version 7.3.15 Perform the following steps to add Tetra again to your endpoint, if the /skiptetra 1 installation switch has been used.
1. Stop the Connector
2. Copy trufos.sys from C:\Program Files\Cisco\AMP\tetra to C:\Windows\System32\drivers
3. Create registry entries at location HKLM\System\ControlSet001\Services\Trufos. See Registry Key values below.
4. Ensure Tetra is enabled in the Policy on the portal:
a. Advanced Settings → TETRA → TETRA checkbox should be checked
b. Models and Engines → TETRA checkbox should be checked
5. Start the Connector
There is one side effect: - if after performing these steps, in the future if amp is uninstalled, then trufos.sys and registry entries created above will have to be manually removed. If you do not remove the files/registry keys, this does not have any impact on the endpoint.
Batch file to generate registry key values
Copy the following text into a .bat file to add all registry key at once.
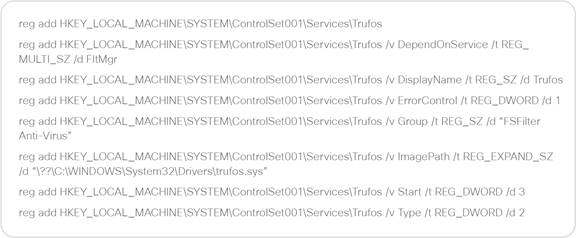
Appendix-D: 3rd Party integrations with Secure Endpoint
Several 3rd party security companies developed integrations with Secure Endpoint. The latest list can be found at: https://www.cisco.com/c/en/us/products/security/amp-for-endpoints/AMP-endpoints-partners-integrations.html#~third-party-solutions.
Integrate Secure Endpoint Using API Code Examples
Basic examples for API usage can be found at: https://developer.cisco.com/amp-for-endpoints
Cisco Security on GitHub – Sample Integration Code
Sample integration code at: https://github.com/CiscoSecurity?q=amp&type=&language=&sort=
Appendix-E: Exclusions in depth
The guide outlines a lot of useful information around exclusion management for Secure Endpoint.
● Policy Configuration Planning section showing how the policy object looks like and how list objects are assigned to policies.
● Known limits for exclusions in the Policy Setting: Define and manage Exclusions section. Best practices for List management and assignment.
● Troubleshooting the endpoint to determine necessary exclusions. Use the Device Trajectory to show which engine detected a threat.
● Clean-up exclusion on a regular basis to provide the highest security level.
● Use minimum possible exclusions to provide the highest security level.
File Analysis and other Endpoint Protection areas with Secure Endpoint are not a linear process. As an example, File scanning is using several stages based on the file type, cache status and more. Review the File Scan Sequence for details.
Insights into the drawing below.
● Scan Exclusions (Path/Wildcard/File Extension/Threat) are having an impact on AV-Scanning and the Script Protection Engine. The exclusion impacts the System Activity Monitor of Behavioral Protection Engine. Excluded files are not hashed and no telemetry for the backend engines is generated. Excluded processes are not visible in the Device Trajectory, except command line activity.
● Process exclusions are more related to single engines.
◦ Process → File Scan: The process is not scanned. Any file generated by this process is also not scanned.
◦ Process → Behavioral Protection: The process is excluded from the Attack Pattern Engine.
◦ Process → System Process Protection or Malicious Activity Protection: The process is excluded from the specific engine
● Application Allow Lists: Entries have an impact on the following areas of the endpoint connector.
◦ File Type: Entries are processed for Portable Executables and other file types, e.g., PDF files.
◦ SPERO (Machine Learning): Allowed hashes are excluded from machine learning detection.
◦ Cloud Lookups: Allowed hashes are excluded from cloud lookups. Cloud lookup detections are shown in Device Trajectory as SHA engine.
◦ Files from the quarantine folder are restored to the original location on the disk if a hash has been added to the application allow list.
● Cloud IOC exclusions are not available today. Exclusions are added to the backend by Cisco. Please open a TAC case to add necessary Cloud IOC detection exclusions.
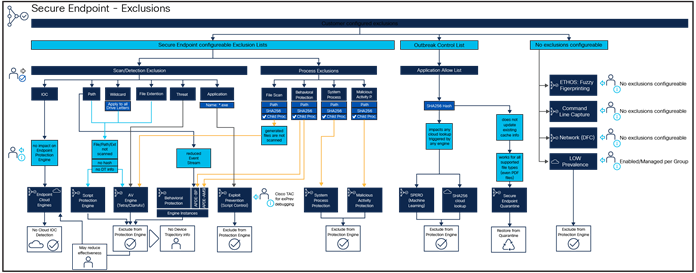
Best practice: Use minimum possible exclusions to provide the highest security level and to maximize the detection of the Backend Detection Engines. Review “Configure and Identify Secure Endpoint Exclusions” at the Configuration Exmples and Technotes website: https://www.cisco.com/c/en/us/support/docs/security/amp-endpoints/213681-best-practices-for-amp-for-endpoint-excl.html