-
Cisco MDS 9000 Family Fabric Manager Configuration Guide, Release 3.4(1a)
-
Index
-
New and Changed Information
-
Preface
- Getting Started
- Installation and Switch Management
- Switch Configuration
-
Fabric Configuration
-
Configuring and Managing VSANs
-
SAN Device Virtualization
-
Creating Dynamic VSANs
-
Configuring Inter-VSAN Routing
-
Configuring and Managing Zones
-
Distributing Device Alias Services
-
Configuring Fibre Channel Routing Services and Protocols
-
Dense Wavelength Division Multiplexing
-
Managing FLOGI, Name Server, FDMI, and RSCN Databases
-
Discovering SCSI Targets
-
Configuring FICON
-
Advanced Features and Concepts
-
-
Security
-
Configuring FIPS
-
Configuring Users and Common Roles
-
Configuring SNMP
-
Configuring RADIUS and TACACS+
-
Configuring IPv4 Access Control Lists
-
Configuring Certificate Authorities and Digital Certificates
-
Configuring IPsec Network Security
-
Configuring FC-SP and DHCHAP
-
Configuring Port Security
-
Configuring Fabric Binding
-
- IP Services
- Intelligent Storage Services
- Network and Switch Monitoring
- Traffic Management
- Troubleshooting
-
Launching Fabric Manager in Cisco SAN-OS Releases Prior to 3.2(1)
-
Cisco Fabric Manager Unsupported Feature List
-
Interface Nonoperational Reason Codes
-
Managing Cisco FabricWare
-
Configuration Limits for Cisco MDS SAN-OS Release 3.1(x) and 3.2(x)
-
 Feedback
Table Of Contents
Port Security Configuration Guidelines
Configuring Port Security with Auto-Learning and CFS Distribution
Configuring Port Security with Auto-Learning without CFS
Configuring Port Security with Manual Database Configuration
Configuring Port Security Using Wizard
Forcing Port Security Activation
Copying an Active Database to the Config Database
Displaying Activated Port Security Settings
Displaying Port Security Statistics
Displaying Port Security Violations
Displaying Port Security Violations
Auto-Learning Device Authorization
Port Security Manual Configuration
Deleting Port Security Setting
Port Security Configuration Distribution
Activation and Auto-learning Configuration Distribution
Port Security Database Deletion
Port Security Database Cleanup
Configuring Port Security
All switches in the Cisco MDS 9000 Family provide port security features that reject intrusion attempts and report these intrusions to the administrator.
Note
Port security is only supported for Fibre Channel ports.
This chapter includes the following sections:
•
•
•
•
•
About Port Security
Typically, any Fibre Channel device in a SAN can attach to any SAN switch port and access SAN services based on zone membership. Port security features prevent unauthorized access to a switch port in the Cisco MDS 9000 Family in the following ways:
•
•
•
•
This section includes the following topics:
Port Security Enforcement
To enforce port security, configure the devices and switch port interfaces through which each device or switch is connected, and activate the configuration.
•
•
Each Nx and xE port can be configured to restrict a single port or a range of ports.
Enforcement of port security policies are done on every activation and when the port tries to come up.
The port security feature uses two databases to accept and implement configuration changes.
•
•
About Auto-Learning
You can instruct the switch to automatically learn (auto-learn) the port security configurations over a specified period. This feature allows any switch in the Cisco MDS 9000 Family to automatically learn about devices and switches that connect to it. Use this feature when you activate the port security feature for the first time as it saves tedious manual configuration for each port. You must configure auto-learning on a per-VSAN basis. If enabled, devices and switches that are allowed to connect to the switch are automatically learned, even if you have not configured any port access.
When auto-learning is enabled, learning happens only for the devices or interfaces that were not already logged into the switch. Learned entries on a port are cleaned up after you shut down that port if auto-learning is still enabled.
Learning does not override the existing configured port security policies. So, for example, if an interface is configured to allow a specific pWWN, then auto-learning will not add a new entry to allow any other pWWN on that interface. All other pWWNs will be blocked even in auto-learning mode.
No entries are learned for a port in the shutdown state.
When you activate the port security feature, auto-learning is also automatically enabled.
Note
Port Security Activation
By default, the port security feature is not activated in any switch in the Cisco MDS 9000 Family.
By activating the port security feature, the following apply:
•
–
–
•
•
After the database is activated, subsequent device login is subject to the activated port bound WWN pairs, excluding the auto-learned entries. You must disable auto-learning before the auto-learned entries become activated.
When you activate the port security feature, auto-learning is also automatically enabled. You can choose to activate the port security feature and disable auto-learning.
Tip
Port Security Configuration Guidelines
The steps to configure port security depend on which features you are using. Auto-learning works differently if you are using CFS distribution.
This section includes the following topics:
•
•
•
Configuring Port Security with Auto-Learning and CFS Distribution
To configure port security, using auto-learning and CFS distribution, follow these steps:
Step 1
Step 2
Step 3
Step 4
Step 5
Step 6
Step 7
Step 8
Step 9
Step 10
Configuring Port Security with Auto-Learning without CFS
To configure port security using auto-learning without CFS, follow these steps:
Step 1
Step 2
Step 3
Step 4
Step 5
Step 6
Step 7
Configuring Port Security with Manual Database Configuration
To configure port security and manually configure the port security database, follow these steps:
Step 1
Step 2
Step 3
Step 4
Step 5
Step 6
Configuring Port Security Using Wizard
The Port Security Configuration wizard provides step-by-step procedures for setting up the Port Security Policy for a selected VSAN. The Port Security Configuration wizard also supports the central management through CFS,making it possible to complete the entire configuration at one place.
The wizard automatically conducts few essential operations. For example, if you want central management, the wizard conducts operations to check CFS capability, enable CFS, and issue CFS commit at the proper stages.
•
Prerequisites
The prerequisites for configuring Port Security are as follows:
•
•
•
•
•
•
To Configure Port Security follow these steps:
Step 1
Figure 37-1
Tools > Other> Port Security Menu
-OR-
Step 2
button on the toolbar.
Before launching the Port Security Setup Wizard, Fabric Manager checks the CFS capability of the switches in the VSAN.
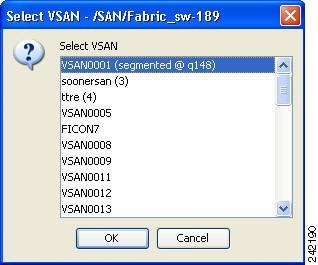
If VSAN context is not available, the wizard prompts to select VSAN as shown in Figure 37-2.
Figure 37-2 Select VSAN Window
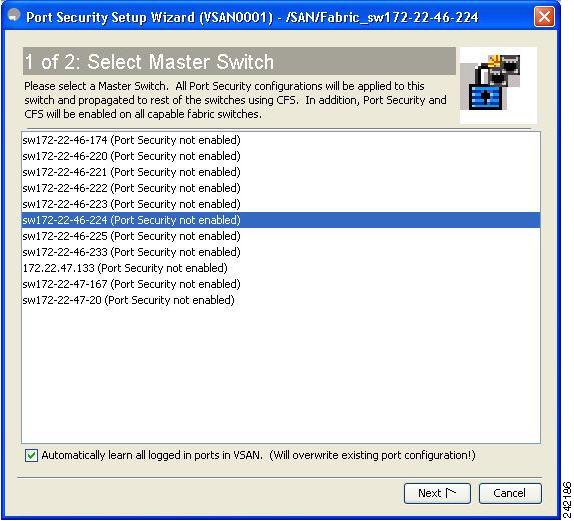
Step 3
You see the first page of the Port Security Setup Wizard as shown in Figure 37-3.
Figure 37-3 Select Master Switch Page
Step 4
•
•
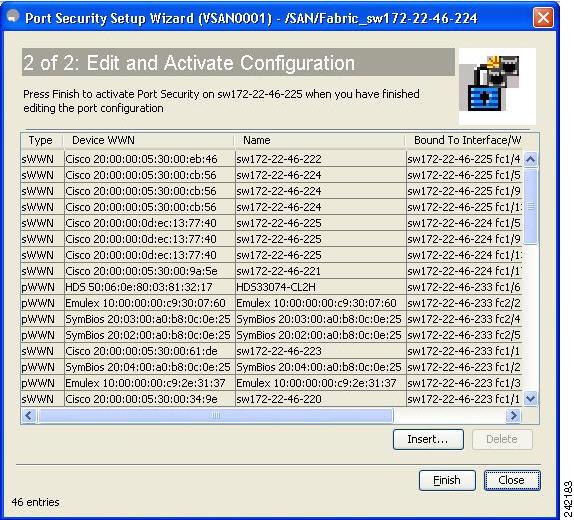
Step 5
You see Edit and Activate Configuration as shown in Figure 37-4.
Figure 37-4
Edit and Activate Configuration Page
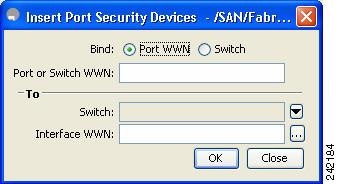
Step 6
You see the Insert Port Security Devices dialog box as shown in Figure 37-5.
Figure 37-5
Insert Port Security Devices Dialog Box
Step 7
•
•
Step 8
Step 9
Step 10
Note
Step 11
Enabling Port Security
By default, the port security feature is disabled in all switches in the Cisco MDS 9000 Family.
To enable port security using Fabric Manager, follow these steps:
Step 1
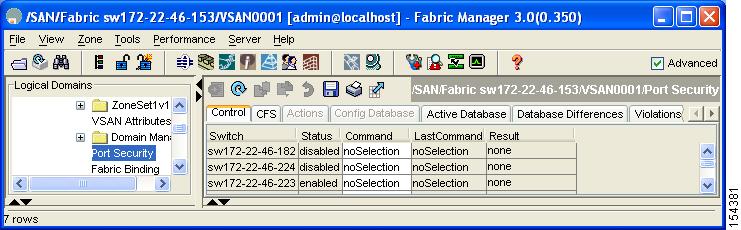
You see the port security configuration for that VSAN in the Information pane (see Figure 37-6).
To enable port security using Fabric Manager, follow these steps:
Step 1
You see the port security configuration for that VSAN in the Information pane (see Figure 37-6).
Figure 37-6 Port Security Configuration
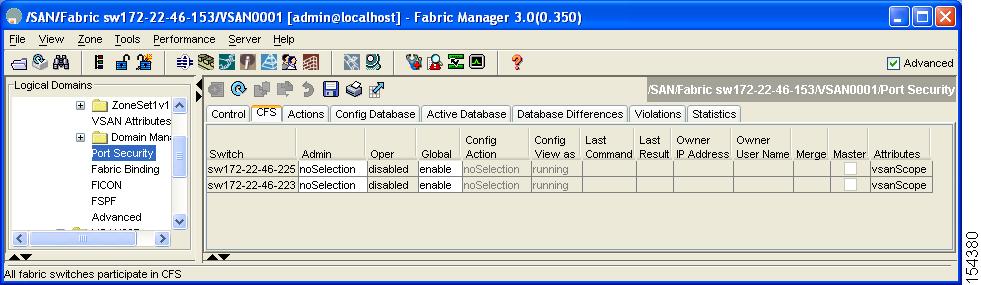
Step 2
You see the information show in Figure 37-7.
Figure 37-7 Port Security CFS
Step 3
Step 4
Step 5
You see the port security enable state for all switches in the selected VSAN (see Figure 37-8).
Figure 37-8 Port Security Configuration
Step 6
Step 7
Step 8
Port Security Activation
This section includes the following topics:
•
•
•
•
•
•
Activating Port Security
To activate port security using Fabric Manager, follow these steps: :
Step 1
You see the port security configuration for that VSAN in the Information pane.
Step 2
Step 3
•
•
•
•
•
•
Step 4
Step 5
Step 6
Step 7
Note
Database Activation Rejection
Database activation is rejected in the following cases:
•
•
•
•
If the database activation is rejected due to one or more conflicts listed in the previous section, you may decide to proceed by forcing the port security activation.
Forcing Port Security Activation
If the port security activation request is rejected, you can force the activation.
Note
To forcefully activate the port security database using Fabric Manager, follow these steps:
Step 1
You see the port security configuration for that VSAN in the Information pane.
Step 2
Step 3
Step 4
Step 5
Step 6
Database Reactivation
Tip
To reactivate the port security database using Fabric Manager, follow these steps:
Step 1
Step 2
Tip
Step 3
Step 4
Copying an Active Database to the Config Database
To copy the active database to the config database using Fabric Manager, follow these steps:
Step 1
You see the port security configuration for that VSAN in the Information pane.
Step 2
You see the switches for that VSAN.
Step 3
The active database is copied to the config database when the security setting is activated.
Step 4
Step 5
Step 6
Displaying Activated Port Security Settings
To display active port security settings using Fabric Manager, follow these steps:
Step 1
You see the port security configuration for that VSAN in the Information pane.
Step 2
You see the active port security settings for that VSAN.
Displaying Port Security Statistics
To display port security statistics using Fabric Manager, follow these steps:
Step 1
You see the port security configuration for that VSAN in the Information pane.
Step 2
You see the port security statistics for that VSAN.
Displaying Port Security Violations
Port violations are invalid login attempts (for example, login requests from unauthorized Fibre Channel devices). You can display a list of these attempts on a per-VSAN basis, using Fabric Manager.
To display port security violations, follow these steps:
Step 1
You see the port security configuration for that VSAN in the Information pane.
Step 2
Displaying Port Security Violations
Port violations are invalid login attempts (for example, login requests from unauthorized Fibre Channel devices). You can display a list of these attempts on a per-VSAN basis, using Fabric Manager.
Step 1
You see the port security configuration for that VSAN in the Information pane.
Step 2
Auto-learning
This section contains the following topics:
•
About Enabling Auto-learning
The state of the auto-learning configuration depends on the state of the port security feature:
•
•
Tip
Enabling Auto-learning
To enable auto-learning using Fabric Manager, follow these steps:
Step 1
You see the port security configuration for that VSAN in the Information pane (see Figure 37-9).
Figure 37-9 Port Security Configuration
Step 2
Step 3
•
•
•
•
•
•
Step 4
Step 5
Step 6
Disabling Auto-learning
To disable auto-learning using Fabric Manager, follow these steps:
Step 1
You see the port security configuration for that VSAN in the Information pane (see Figure 37-9).
Step 2
You see the switches for that VSAN.
Step 3
Step 4
Auto-Learning Device Authorization
Table 37-1 summarizes the authorized connection conditions for device requests.
Authorization Scenarios
Assume that the port security feature is activated and the following conditions are specified in the active database:
•
•
•
•
•
•
•
•
Table 37-2 summarizes the port security authorization results for this active database. The conditions listed refer to the conditions from Table 37-1.
Port Security Manual Configuration
To configure port security on any switch in the Cisco MDS 9000 Family, follow these steps:
Step 1
Step 2
Step 3
Step 4
This section includes the following topics:
•
About WWN Identification
If you decide to manually configure port security, be sure to adhere to the following guidelines:
•
•
•
•
•
•
•
•
•
Adding Authorized Port Pairs
After identifying the WWN pairs that need to be bound, add those pairs to the port security database.
Tip
To add authorized port pairs for port security using Fabric Manager, follow these steps:
Step 1
Step 2
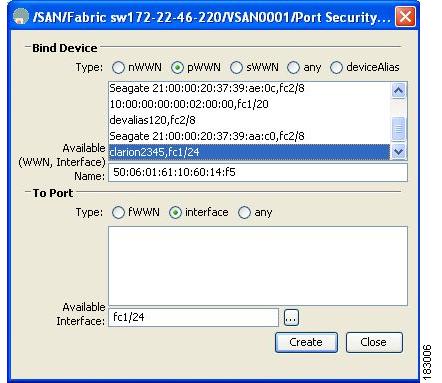
Step 3
You see the Create Port Security dialog box shown in Figure 37-10.
Figure 37-10 Create Port Security Dialog Box
Step 4
Step 5
Step 6
Step 7
Deleting Port Security Setting
To delete a port security setting from the configured database on a switch, follow these steps:
Step 1
Step 2
You see the configured port security settings for that VSAN.
Step 3
Step 4
You see the confirmation dialog box.
Step 5
Step 6
Port Security Configuration Distribution
The port security feature uses the Cisco Fabric Services (CFS) infrastructure to enable efficient database management, provide a single point of configuration for the entire fabric in the VSAN, and enforce the port security policies throughout the fabric (see Chapter 13, "Using the CFS Infrastructure").
This section includes the following topics:
•
Enabling Distribution
All the configurations performed in distributed mode are stored in a pending (temporary) database. If you modify the configuration, you need to commit or discard the pending database changes to the configurations. The fabric remains locked during this period. Changes to the pending database are not reflected in the configurations until you commit the changes.
Note
Tip
To enable distribution using Fabric Manager, follow these steps:
Step 1
You see the port security configuration for that VSAN in the Information pane (see Figure 37-9).
Step 2
You see the switches for that VSAN.
Step 3
Step 4
Locking The Fabric
The first action that modifies the existing configuration creates the pending database and locks the feature in the VSAN. Once you lock the fabric, the following situations apply:
•
•
Committing the Changes
If you commit the changes made to the configurations, the configurations in the pending database are distributed to other switches. On a successful commit, the configuration change is applied throughout the fabric and the lock is released.
Activation and Auto-learning Configuration Distribution
Activation and auto-learning configurations in distributed mode are remembered merely as actions to be performed when you commit the changes in the pending database.
Learned entries are temporary and do not have any role in determining if a login is authorized or not. As such, learned entries do not participate in distribution. When you disable learning and commit the changes in the pending database, the learned entries become static entries in the active database and are distributed to all switches in the fabric. After the commit, the active database on all switches are identical and learning can be disabled.
If the pending database contains more than one activation and auto-learning configuration when you commit the changes, then the activation and auto-learning changes are consolidated and the behavior may change (see Table 37-3).
Table 37-3 Scenarios for Activation and Auto-learning Configurations in Distributed Mode
A and B exist in the configuration database, activation is not done and devices C,D are logged in.
1.
configuration database = {A,B}
active database = {A,B, C1 , D*}
configuration database = {A,B}
active database = {null}
pending database = {A,B + activation to be enabled}
2.
configuration database = {A,B, E}
active database = {A,B, C*, D*}
configuration database = {A,B}
active database = {null}
pending database = {A,B, E + activation to be enabled}
3.
Not applicable
configuration database = {A,B, E}
active database = {A,B, E, C*, D*}
pending database = empty
A and B exist in the configuration database, activation is not done and devices C,D are logged in.
1.
configuration database = {A,B}
active database = {A,B, C*, D*}
configuration database = {A,B}
active database = {null}
pending database = {A,B + activation to be enabled}
2.
configuration database = {A,B}
active database = {A,B, C, D}
configuration database = {A,B}
active database = {null}
pending database = {A,B + activation to be enabled +
learning to be disabled}3.
Not applicable
configuration database = {A,B}
active database = {A,B} and devices C and D are logged out. This is equal to an activation with auto-learning disabled.
pending database = empty
1 The * (asterisk) indicates learned entries.
Tip
Database Merge Guidelines
A database merge refers to a union of the configuration database and static (unlearned) entries in the active database. See the CFS Merge Support, page 13-9 for detaileds concepts.
When merging the database between two fabrics, follow these guidelines:
•
•
Caution
Database Interaction
This section includes the following topics:
•
•
Database Scenarios
Figure 37-11 depicts various scenarios to depict the active database and the configuration database status based on port security configurations.
Figure 37-11 Port Security Database Scenarios
Port Security Database Copy
Tip
To copy the active database to the configuration database, using Fabric Manager, follow these steps:
Step 1
Step 2
Step 3
Step 4
To view the differences between the active database and the configuration database using Fabric Manager, follow these steps:
Step 1
You see the Port Security information in the Information pane.
Step 2
Step 3
Step 4
Port Security Database Deletion
Tip
To delete a port security database using Fabric Manager, follow these steps:
Step 1
You see the Port Security information in the Information pane.
Step 2
Step 3
Step 4
Port Security Database Cleanup
To clear all existing statistics from the port security database for a specified VSAN using Fabric Manager, follow the steps below:
Step 1
You see the Port Security information in the Information pane (see Figure 37-9).
Step 2
You see all the configuration databases.
Step 3
Step 4
To clear any learned entries in the active database for a specified interface within a VSAN using Fabric Manager, follow the steps below:
Step 1
You see the Port Security information in the Information pane.
Step 2
Step 3
Step 4
Note
Default Settings
Table 37-6 lists the default settings for all port security features in any switch.
Auto-learn
Enabled if port security is enabled.
Port security
Disabled.
Distribution
Disabled.
Note