-
Cisco MDS 9000 Family Fabric Manager Configuration Guide, Release 3.4(1a)
-
Index
-
New and Changed Information
-
Preface
- Getting Started
- Installation and Switch Management
- Switch Configuration
-
Fabric Configuration
-
Configuring and Managing VSANs
-
SAN Device Virtualization
-
Creating Dynamic VSANs
-
Configuring Inter-VSAN Routing
-
Configuring and Managing Zones
-
Distributing Device Alias Services
-
Configuring Fibre Channel Routing Services and Protocols
-
Dense Wavelength Division Multiplexing
-
Managing FLOGI, Name Server, FDMI, and RSCN Databases
-
Discovering SCSI Targets
-
Configuring FICON
-
Advanced Features and Concepts
-
-
Security
-
Configuring FIPS
-
Configuring Users and Common Roles
-
Configuring SNMP
-
Configuring RADIUS and TACACS+
-
Configuring IPv4 Access Control Lists
-
Configuring Certificate Authorities and Digital Certificates
-
Configuring IPsec Network Security
-
Configuring FC-SP and DHCHAP
-
Configuring Port Security
-
Configuring Fabric Binding
-
- IP Services
- Intelligent Storage Services
- Network and Switch Monitoring
- Traffic Management
- Troubleshooting
-
Launching Fabric Manager in Cisco SAN-OS Releases Prior to 3.2(1)
-
Cisco Fabric Manager Unsupported Feature List
-
Interface Nonoperational Reason Codes
-
Managing Cisco FabricWare
-
Configuration Limits for Cisco MDS SAN-OS Release 3.1(x) and 3.2(x)
-
 Feedback
Table Of Contents
Fabric Manager Server Overview
Fabric Manager Server Features
Installing and Configuring Fabric Manager Server
Installing Fabric Manager Server
Unlicensed Versus Licensed Fabric Manager Server
Installing Fabric Manager Web Server
Verifying Performance Manager Collections
Managing a Fabric Manager Server Fabric
Selecting a Fabric to Manage Continuously
Fabric Manager Server Properties File
Modifying Fabric Manager Server
Adding or Removing Fabric Manager Server Users
Changing the Fabric Manager Server User Name and Password
Changing the Polling Period and Fabric Rediscovery Time
Using Device Aliases or FC Aliases
Saving Device Aliases to the Switch
Fabric Manager Server
Fabric Manager Server is a platform for advanced MDS monitoring, troubleshooting, and configuration capabilities. No additional software needs to be installed. The server capabilities are an integral part of the Cisco Fabric Manager software.
This chapter contains the following sections:
•
Fabric Manager Server Overview
•
•
•
•
•
Fabric Manager Server Overview
Install Cisco Fabric Manager Server on a computer that you want to provide centralized MDS management services and performance monitoring. SNMP operations are used to efficiently collect fabric information. The Cisco Fabric Manager software, including the server components, requires about 60 MB of hard disk space on your workstation. Cisco Fabric Manager Server runs on Windows 2000, Windows 2003, Windows XP, Solaris 8 and 10, and Red Hat Enterprise Linux AS Release 4.
Each computer configured as a Cisco Fabric Manager Server can monitor multiple Fibre Channel SAN fabrics. Up to 16 clients (by default) can connect to a single Cisco Fabric Manager Server concurrently. The Cisco Fabric Manager Clients can also connect directly to an MDS switch in fabrics that are not monitored by a Cisco Fabric Manager Server, which ensures you can manage any of your MDS devices from a single console.
Fabric Manager Server Features
Cisco Fabric Manager Server has the following features:
•
Note
•
•
Note
Installing and Configuring Fabric Manager Server
Note
To install Fabric Manager Server and set the initial configuration, follow these steps:
Step 1
Step 2
Step 3
Step 4
Step 5
Step 6
Step 7
Installing Fabric Manager Server
When you install Fabric Manager, the basic version of the Fabric Manager Server (unlicensed) is installed with it. After you click the Fabric Manager icon, a dialog box opens and you can enter the IP address of a computer running the Fabric Manager Server component. If you do not see the Fabric Manager Server IP address text box, click Options to expand the list of configuration options. If the server component is running on your local machine, leave localhost in that field. If you try to run Fabric Manager without specifying a valid server, you are prompted to start the Fabric Manager Server locally.
On a Windows PC, you install the Fabric Manager Server as a service. This service can then be administered using Services in the Administrative Tools. The default setting for the Fabric Manager Server service is that the server is automatically started when the Windows PC is rebooted. You can change this behavior by modifying the properties in Services.
Unlicensed Versus Licensed Fabric Manager Server
When you install Fabric Manager, the basic unlicensed version of Fabric Manager Server is installed with it. To get the licensed features, such as Performance Manager, remote client support, and continuously monitored fabrics, you need to buy and install the Fabric Manager Server package.
However, trial versions of these licensed features are available. To enable the trial version of a feature, you run the feature as you would if you had purchased the license. You see a dialog box explaining that this is a demo version of the feature and that it is enabled for a limited time.
If you are evaluating one of these Fabric Manager Server features and want to stop the evaluation period for that feature, you can do that using Device Manager. See the "Fabric Manager Server Licensing" section on page 10-23.
Installing Fabric Manager Web Server
You must install Fabric Manager Web Server to view Performance Manager reports through a web browser. To install Fabric Manager Web Server from the CD-ROM, see the "Installing Fabric Manager Web Server" section on page 7-3.
Verifying Performance Manager Collections
Once Performance Manager collections have been running for five or more minutes, you can verify that the collections are gathering data by choosing Performance Manager > Reports in Fabric Manager. You see the first few data points gathered in the graphs and tables.
Note
Managing a Fabric Manager Server Fabric
You can continuously manage a Fabric Manager Server fabric, whether or not a client has that fabric open. A continuously managed fabric is automatically reloaded and managed by Fabric Manager Server whenever the server starts.
Selecting a Fabric to Manage Continuously
When you quit the Fabric Manager Client, you are prompted as to whether or not you would like to have Fabric Manager Server continuously manage that fabric. Alternatively, you can use Fabric Manager Client to select a fabric to manage.
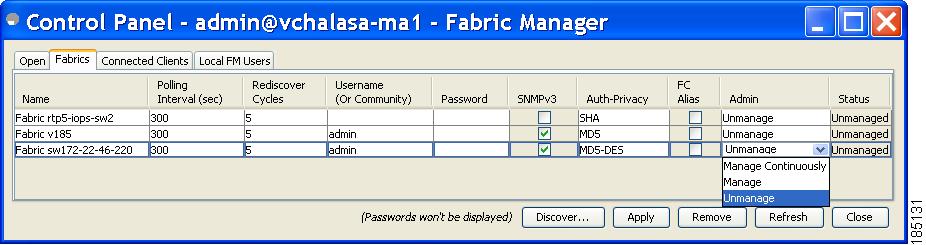
To continuously manage a fabric using Fabric Manager, follow these steps:
Step 1
You see the Control Panel dialog box with the Fabrics tab open (see Figure 3-1).
Note
Figure 3-1 Fabrics Tab in Control Panel Dialog Box
Step 2
a.
b.
c.
Step 3
Note
Fabric Manager Server Properties File
The Fabric Manager Server properties file (MDS 9000\server.properties) contains a list of properties that determine how the Fabric Manager Server will function. You can edit this file with a text editor, or you can set the properties through the Fabric Manager Web Services GUI, under the Admin tab.
Note
The server properties file contains these nine general sections:
•
•
•
•
•
•
•
•
•
The following are new or changed server properties for Fabric Manager Release 3.x:
SNMP Specific
•
Note
Performance Chart
•
EMC Call Home
•
•
•
•
•
•
•
•
•
•
Event Forwarding
•
•
•
•
•
For more information on setting the server properties, read the server.properties file or see the "Configuring Fabric Manager Server Preferences" section on page 7-45.
Modifying Fabric Manager Server
Fabric Manager Release 2.1(2) or later allows you to modify certain Fabric Manager Server settings without stopping and starting the server. These settings include:
•
•
Adding or Removing Fabric Manager Server Users
To add a Fabric Manager Server user or to change the password for an existing user using Fabric Manager, follow these steps:
Step 1
Note
Step 2
You see the FM User dialog box as shown in Figure 3-2.
Figure 3-2 FM User Dialog Box
Step 3
To remove a Fabric Manager Server user using Fabric Manager, follow these steps:
Step 1
Step 2
Step 3
Step 4
Changing the Fabric Manager Server User Name and Password
You can modify the user name or password used to access a fabric from Fabric Manager Client without restarting Fabric Manager Server.
To change the user name or password used by Fabric Manager Server, follow these steps:
Step 1
You see the Control Panel dialog box with the Fabrics tab open (see Figure 3-1).
Step 2
Step 3
Changing the Polling Period and Fabric Rediscovery Time
Fabric Manager Server periodically polls the monitored fabrics and periodically rediscovers the full fabric at a default interval of five cycles.You can modify these settings from Fabric Manager Client without restarting Fabric Manager Server.
To change the polling period or full fabric rediscovery setting used by Fabric Manager Server using Fabric Manager, follow these steps:
Step 1
You see the Control Panel dialog box with the Fabrics tab open (see Figure 3-1).
Step 2
Step 3
Step 4
Using Device Aliases or FC Aliases
You can change whether Fabric Manager uses FC aliases or global device aliases from Fabric Manager Client without restarting Fabric Manager Server.
To change whether Fabric Manager uses FC aliases or global device aliases using Fabric Manager, follow these steps:
Step 1
You see the Control Panel dialog box with the Fabrics tab open (see Figure 3-1).
Step 2
Step 3
Saving Device Aliases to the Switch
If you choose to use global device aliases on Fabric Manager Server, these changes are not reflected on the local switch. The switch continues to use FC aliases until you save the device aliases to the switch.
To save global device aliases on a switch using Fabric Manager, follow these steps:
Step 1
Step 2