FedRAMP Secure Configuration

This chapter provides an overview of Cisco Spaces FedRAMP requirements for secure configuration.

Manage Dashboard Administrators and Permissions

This chapter explains the different permission levels within the dashboard and how to manage administrative users. Administrative users can log in to the dashboard to view and/or administer apps, locations, devices, and role-based access within the account.
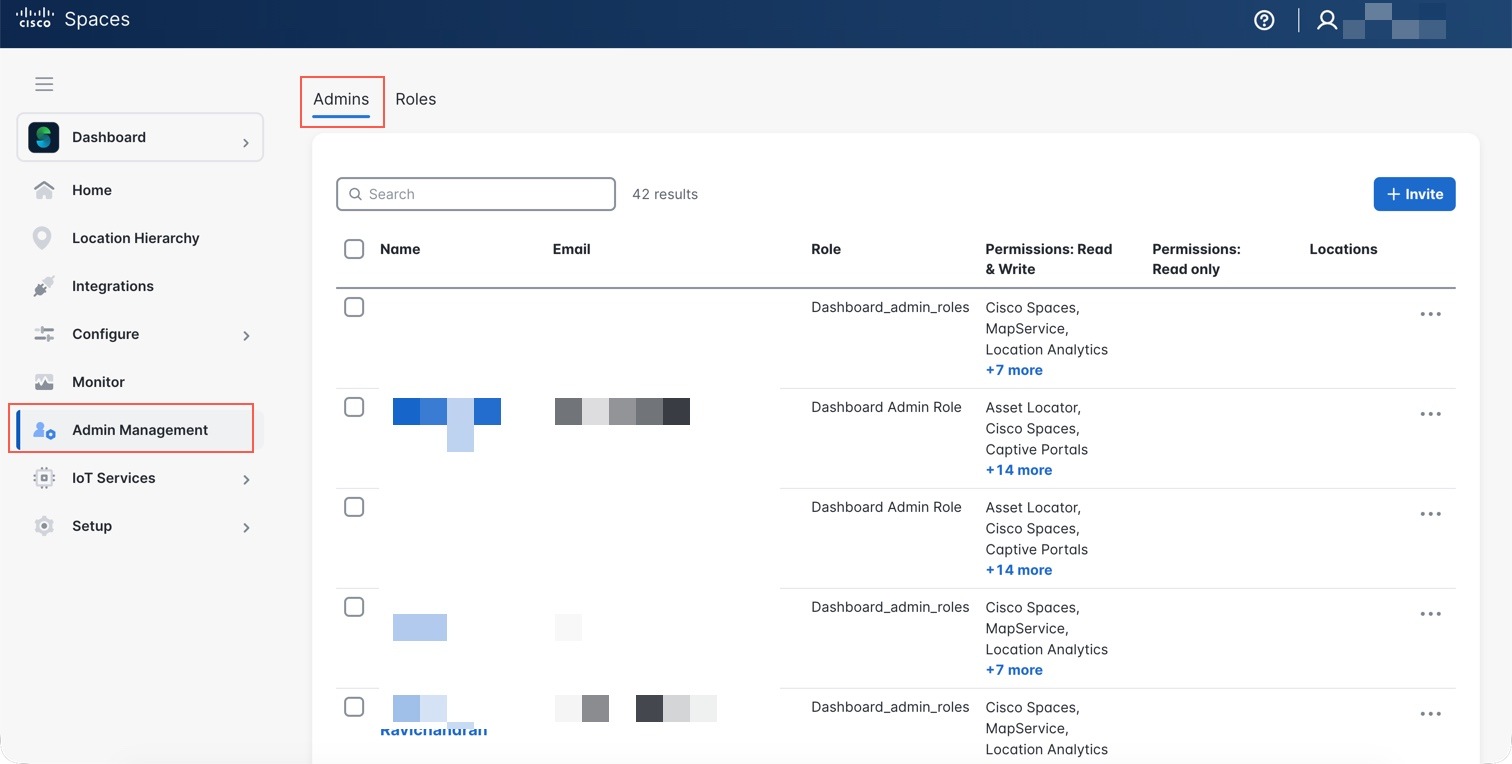
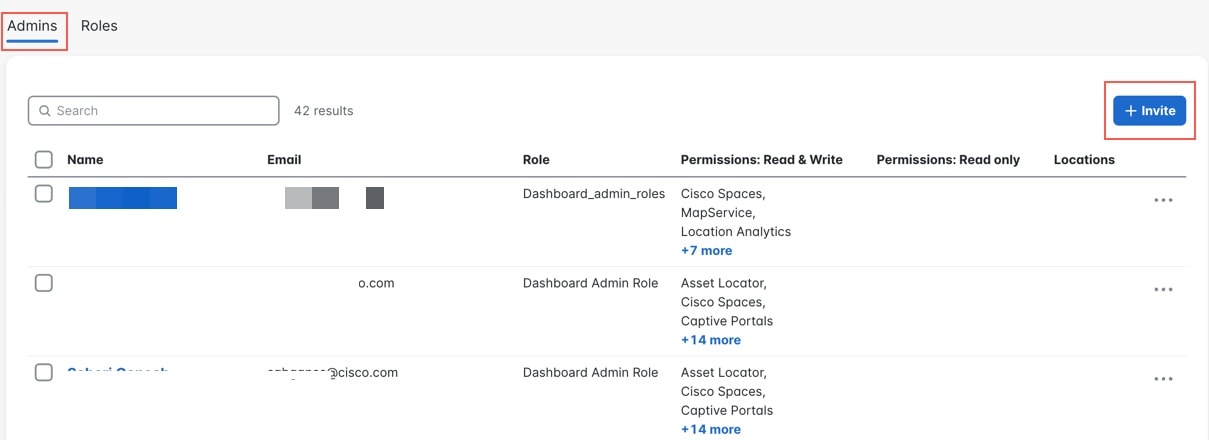
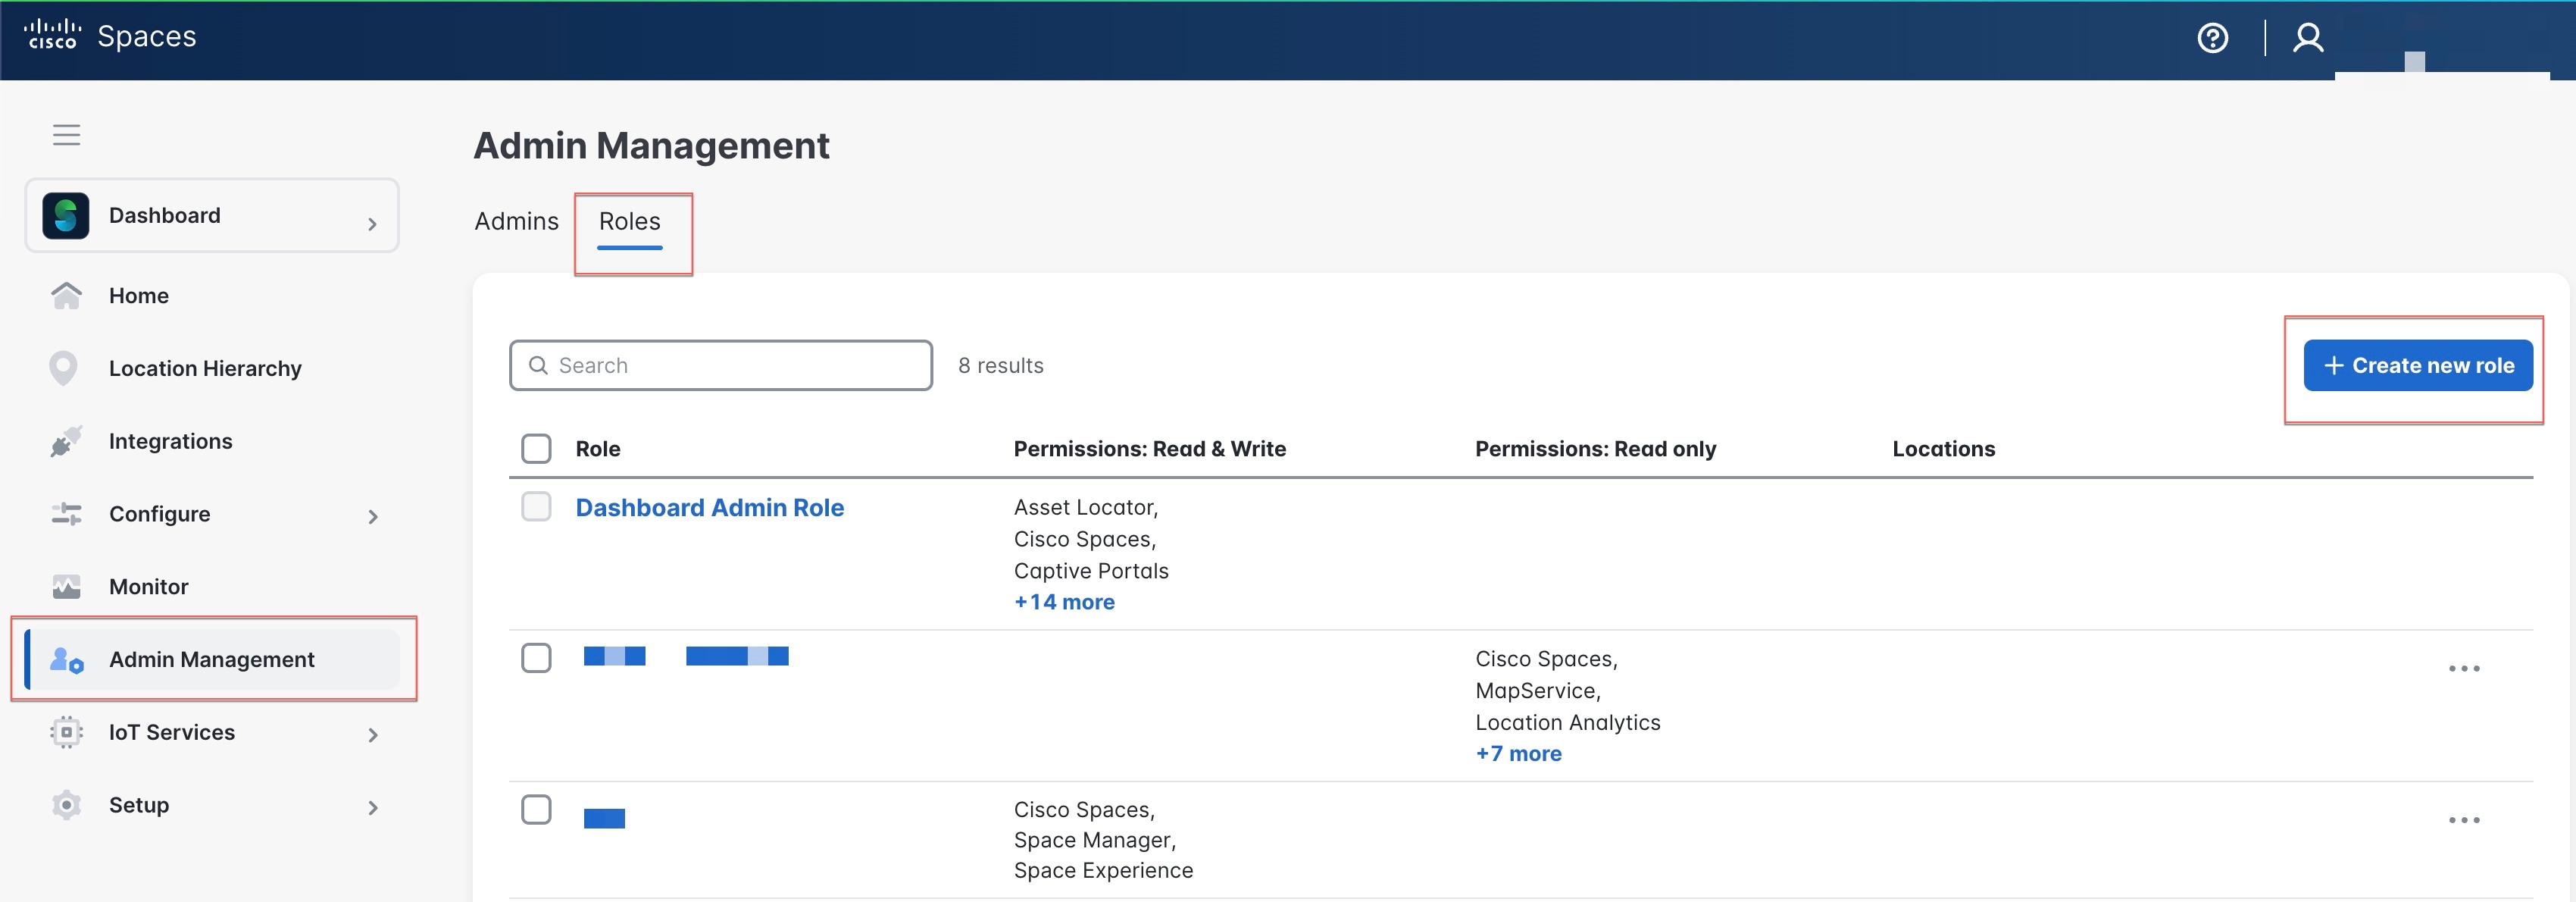
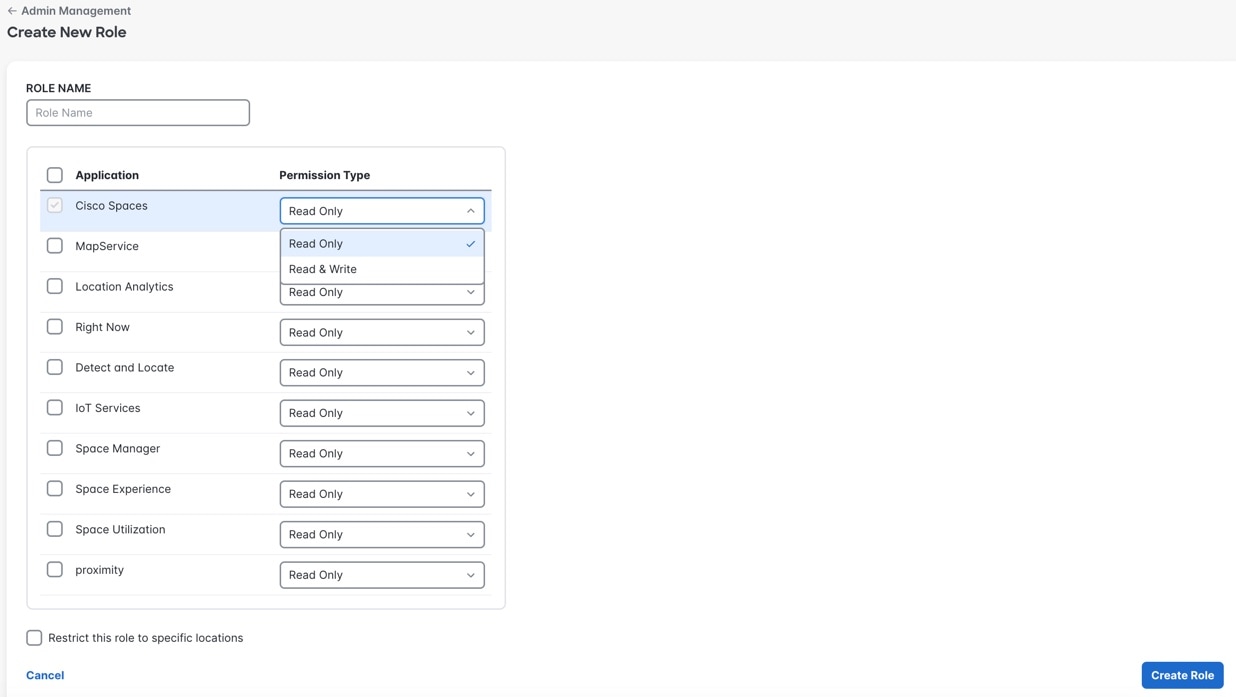
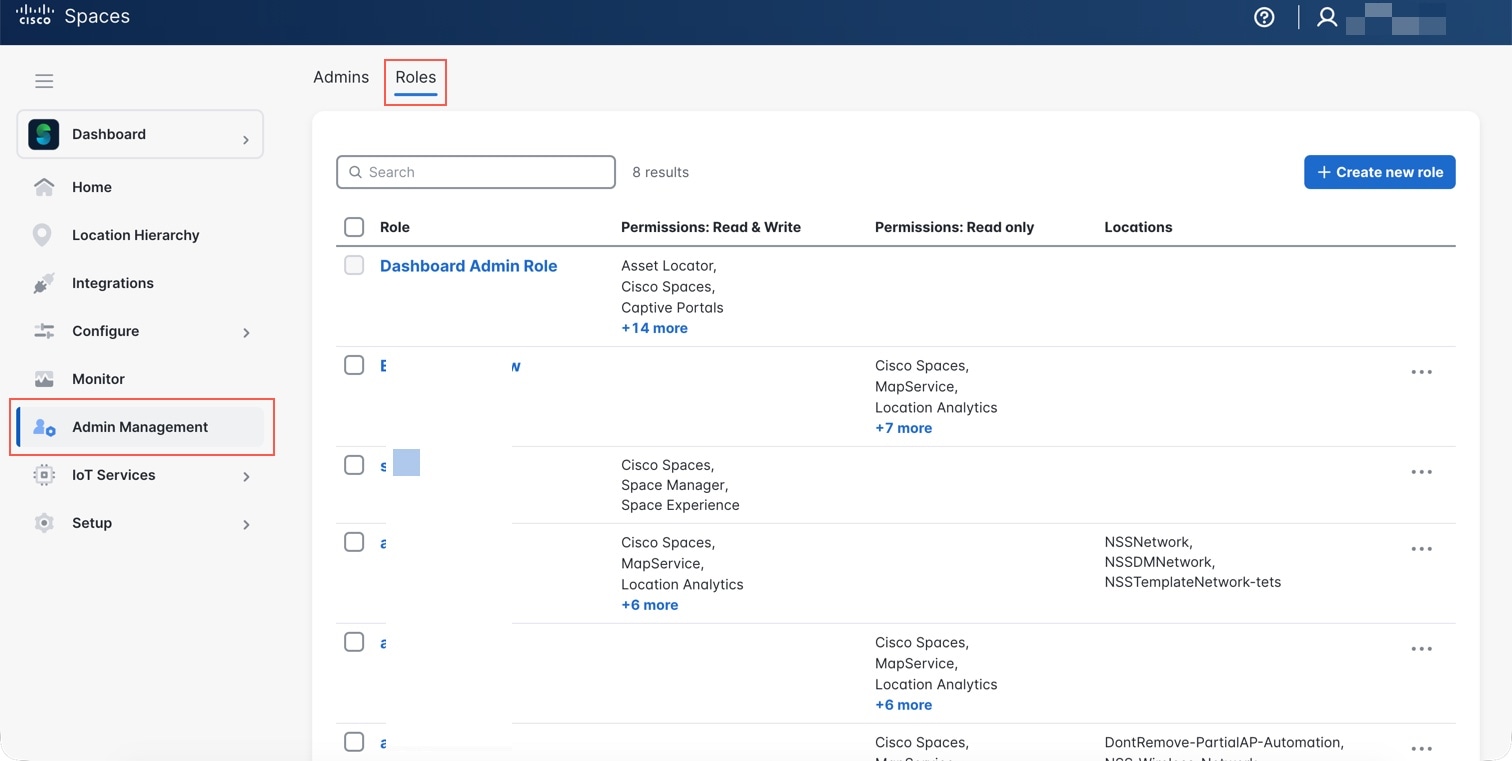
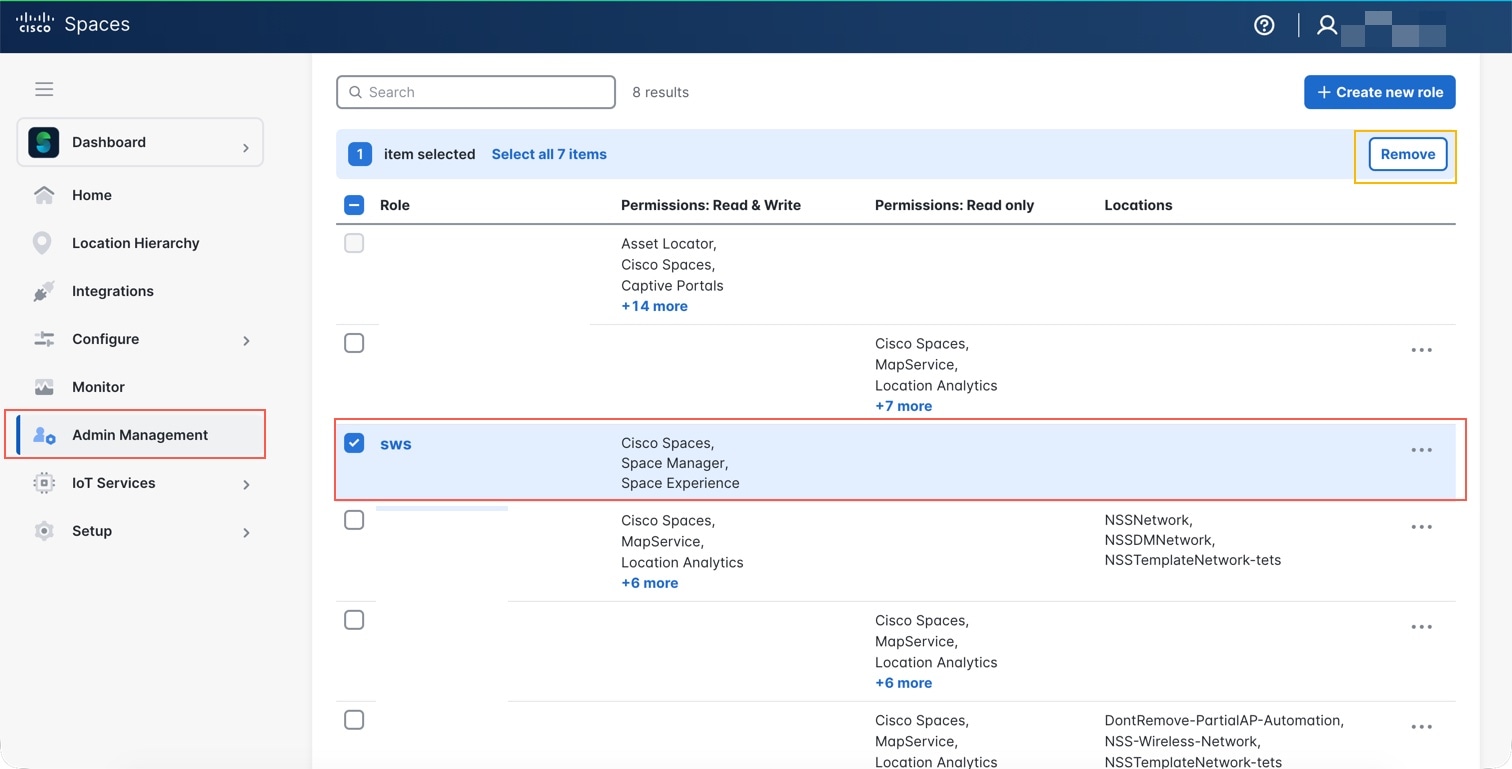
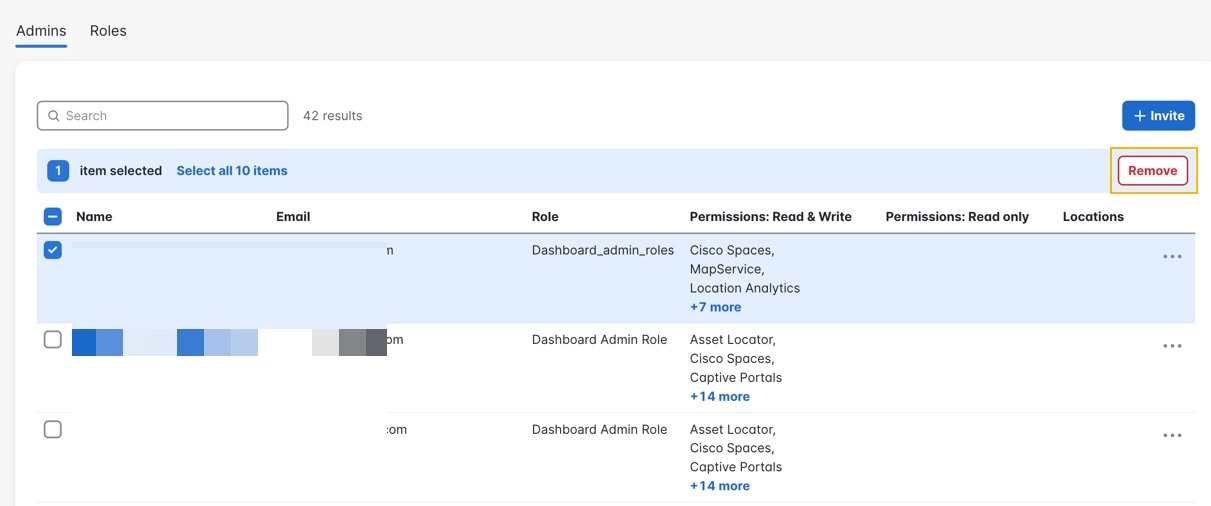
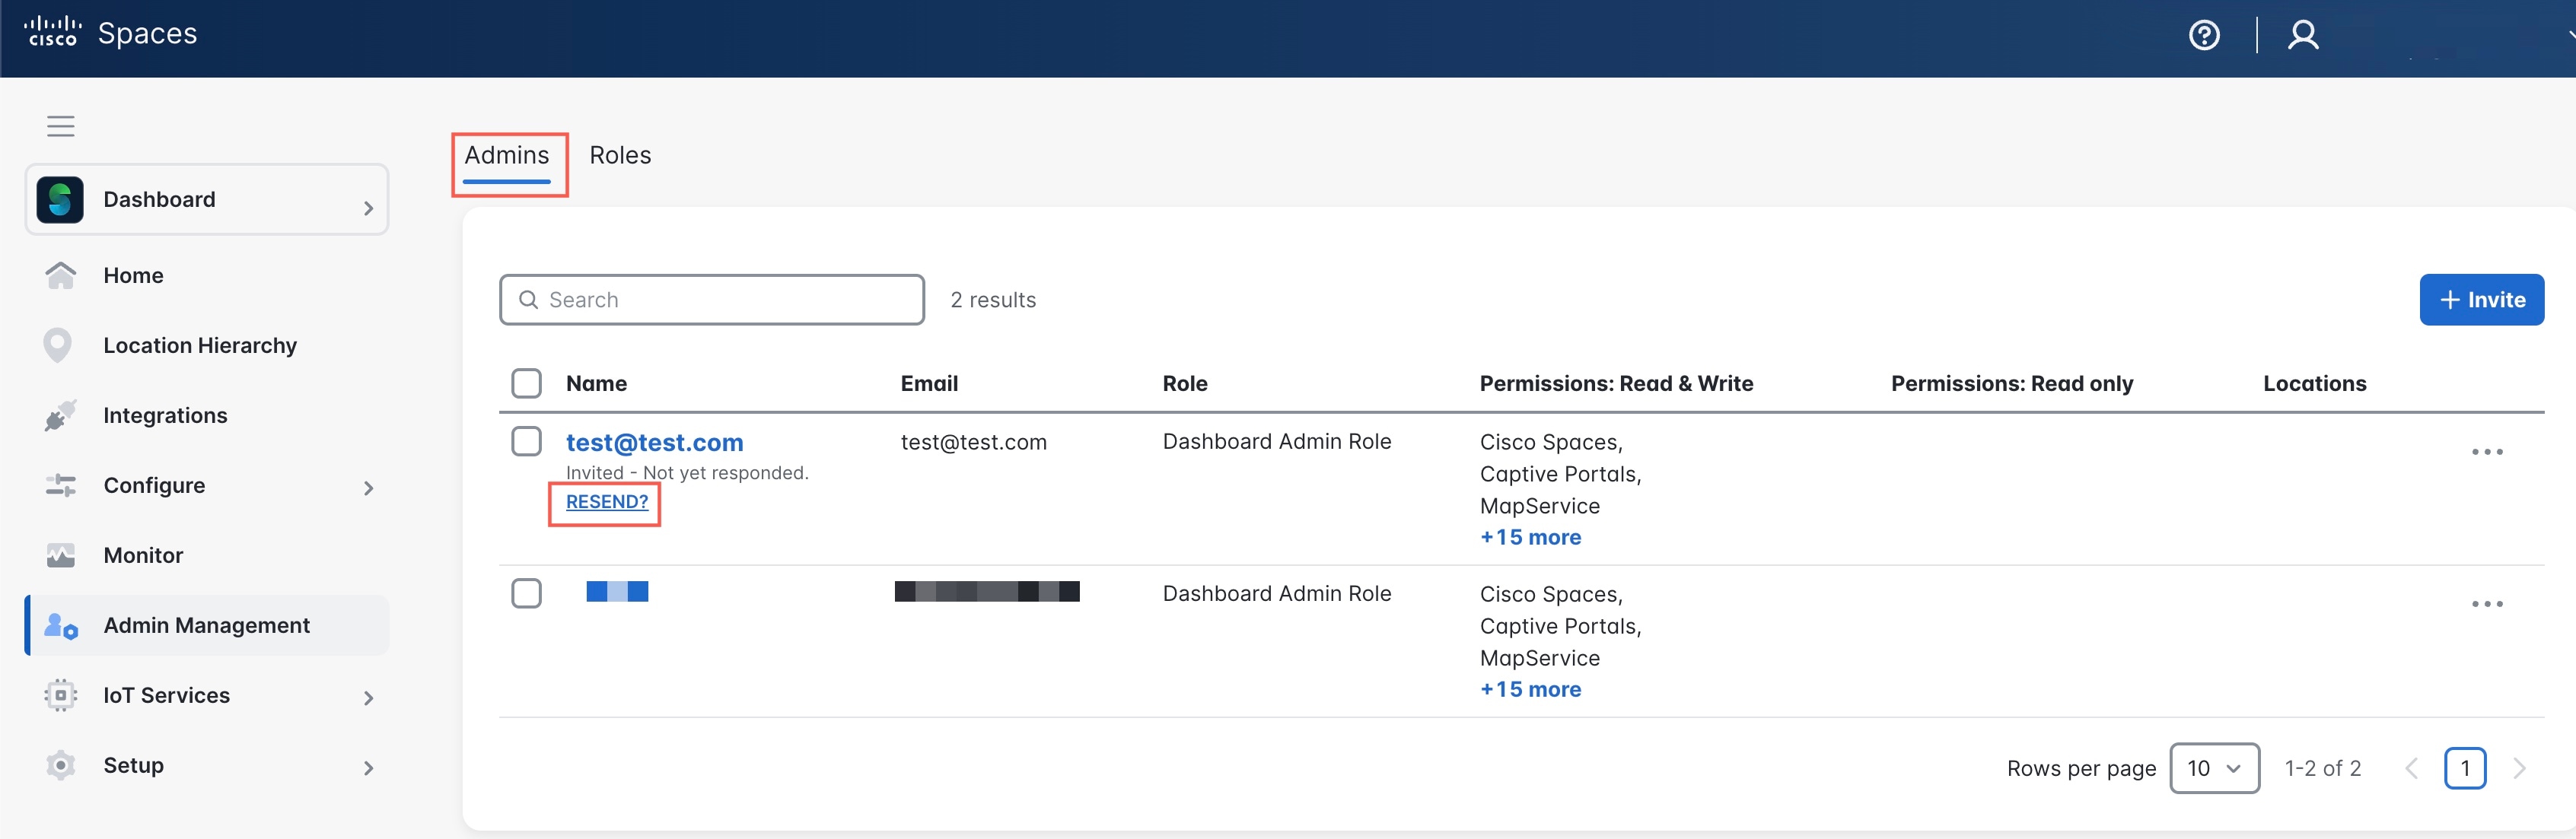
Admin Management

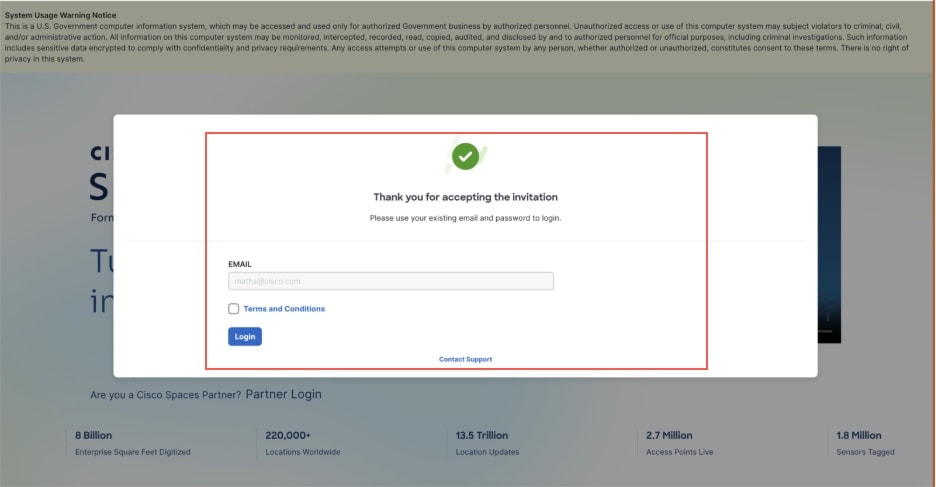
When you onboard to Cisco Spaces as a new user, the Cisco Spaces Support team will assist you in setting up your account details and fulfilling the initial-onboarding requirements. The Cisco Spaces Support team is responsible for creating the new account, generating the tenant ID, assigning the account number, and provisioning the appropriate license type.

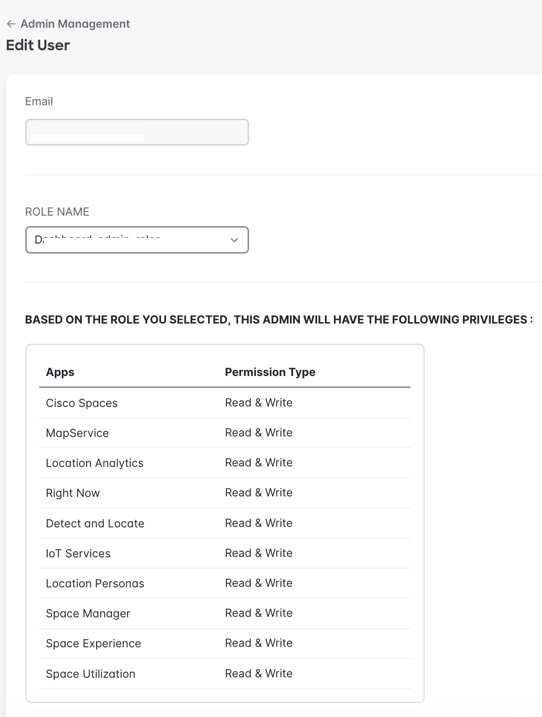
When a new account is created, a Default Admin Role (Dashboard Admin Role) is automatically provisioned.

This role is assigned to the user email configured during account creation. The Default Admin Role is the top-level admin role for user and role management.

Dashboard Admin Role

When a new account is created, the Default Admin Role (Dashboard Admin Role) is created and assigned to the user email used during account creation. This role acts as the top-level admin role for user/role management.

Default Admin Role: Capabilities

A user with this role can:

  • Invite new users with Default Admin Role and assign either Full Location or Restricted Location permissions.

  • Invite new users and assign them to custom roles with location-based restrictions.

  • Manage custom user roles, including changing user roles.

  • Remove other Default Admin or custom-role users from account access.

  • Create custom roles that either:

    • Mirror Default Admin Role access, or

    • Grant app-specific access and/or location-based restrictions.

  • Manage role assignments, including creating role mappings, changing app/location access, and removing custom roles.

  • Access all locations, devices, and Cisco Spaces apps entitled to the account license.


Note


Users invited through the admin management section are considered full admins in the Cisco Spaces account for managing users and roles, regardless of whether their access is limited to specific applications or locations. Additionally, admins with restricted access retain the ability to invite unrestricted full admins.


Default Admin Role: Limitations

A user with this role cannot:

  • Delete or edit the Default Admin Role definition.

  • Remove themselves from the account.

  • Change the account license or subscription.

App Role

App roles define what a user can do within the Cisco Spaces application, ranging from view-only access to full configuration and data management. A Read-Only app role allows users to access the app UI and view configurations, records, and details without making changes. A Read/Write app role enables users to access the app UI and add, edit, or delete app-related configurations and data, and also allows them to invite additional users (as Read-Only or Read/Write) using User Management option—restricted to the inviter’s permitted location boundary.

Read-Only app role

If the role grants Read-Only access to an app, you can:

  • Access the app UI.

  • View configurations, records, and details.


Note


You cannot add, edit, or delete configurations/data.


Read/Write app role

If the role grants Read/Write access to an app, you can:

  • Access the app UI.

  • Add, edit, and delete data/configurations associated with that app.

  • Invite other users using the User Management option as Read-Only or Read-Write, limited to the inviting user’s permitted location boundary.

Custom Location-Restricted Role

Users with location restrictions can:

  • View, configure, and manage only the assigned locations.

  • Perform data and operational actions limited to those locations.

Users with the custom location-restricted role cannot access locations outside their assigned scope.

Admin Management Workflows

In Cisco Spaces, Admin Management Workflows are processes and procedures for managing administrative users and their roles. The range of these workflow tasks includes the addition of new admin users, the management of custom roles, the modification of user roles, the deletion of roles, and the revocation of user access.

These workflows aim to increase the security, organization, and efficiency of administration by defining the required steps to manage users and roles in your Cisco Spaces account.

This approach helps in ensuring that the access control of your Cisco Spaces account is appropriate, and the role permissions are followed, along with the management of location restrictions if necessary. By following these workflows, the administrators are able to control who has administrative access, manage roles according to the needs of the organization, and ensure the integrity and security of the administrative process.

Invite a New Admin User

To enable administrators to securely add new users with appropriate permissions and access scope to the system, ensuring controlled and role-based access management.

This task guides administrators through the process of inviting a new admin user by specifying their email, assigning a role, and optionally setting location restrictions.

Follow these steps to invite a new admin user to Cisco Spaces:

Procedure


Step 1

From the left pane, click Admin Management.

The Admin Management window is displayed.

Step 2

Click the Admins tab.

Step 3

To invite a new admin user, click Invite.

The Invite User window is displayed.

Step 4

In the Email field, enter the new admin user’s email address.

Step 5

From the Role Name drop-down list, choose the role as Default Admin Role or custom role.

Step 6

(Optional) Check the check box to enable location restriction and select the applicable locations.

Step 7

Click Invite to send the invitation.

The invitation email is sent to the new user.

Create a Custom Role

To allow administrators to define tailored roles that fit organizational needs, providing granular control over admin permissions and enhancing security through role customization.

This task explains how to create a custom admin role by naming it and selecting specific app permissions such as Read-Only or Read/Write.

Follow these steps to create a custom admin role:

Procedure


Step 1

From the left pane, click Admin Management.

The Admin Management window is displayed.

Step 2

Click the Roles tab.

The Roles tab is displayed.

Step 3

To create a new custom admin role, click Create new role.

Step 4

In the Role Name field, enter a name for the new role.

Step 5

From the Permission Type drop-down list, choose the permission type as either Read Only or Read & Write access.

Step 6

(Optional) Check the check box to enable location restriction and select the applicable locations.

Step 7

Click Create Role to create the role.

The new custom role is created successfully.

Edit User Role Assignment

To maintain accurate and up-to-date role assignments, ensuring that admin users have the correct permissions and access aligned with their responsibilities.

This task details the steps to modify an existing admin user’s role and/or location scope.

Follow these steps to edit the role assignment of an existing admin user:

Procedure


Step 1

From the left pane, click Admin Management.

The Admin Management window is displayed.

Step 2

Click the Admins tab.

Step 3

Select the user whose role you want to edit and click Edit.

Step 4

Update the user’s role and/or location scope as needed.

Step 5

Click Update to apply the changes.


Delete Custom Role

To manage and clean up admin roles by removing obsolete or unnecessary roles while ensuring no user is left without appropriate access, maintaining system integrity.

This task describes how to delete a custom admin role and the importance of reassigning impacted users if necessary.

Follow these steps to delete a custom admin role:

Procedure


Step 1

From the left pane, click Admin Management.

The Admin Management window is displayed.

Step 2

Click the Roles tab.

Step 3

Select the custom role you want to delete.

Step 4

Click Remove and confirm the deletion.

Step 5

Ensure that any users impacted by this deletion are reassigned to other roles if required.


Remove User Access

To securely revoke access for users who no longer require admin privileges, protecting the system from unauthorized access and potential security risks.

This task outlines the procedure to remove an admin user’s access from the system.

Follow these steps to remove an admin user’s access:

Procedure


Step 1

From the left pane, click Admin Management.

The Admin Management window is displayed.

Step 2

Click the Admins tab.

Step 3

Select the target user whose access you want to remove.

Step 4

Click Remove and confirm the action.


User Management Workflows

User Management Workflows are a set of structured processes that enable administrators to manage user access and roles within an application. These workflows encompass inviting new users, managing their activation status, resending invitations, and handling invitation expiry to maintain secure and controlled access.

The purpose of User Management Workflows is to provide administrators with clear, repeatable procedures to onboard users efficiently while ensuring appropriate permissions and security measures, such as role assignment and location restrictions, are applied. These workflows also ensure that invitations are valid for a limited time and can be refreshed as needed.

Key attributes

  • Invitation Process: Administrators invite new users by specifying their email, role (e.g., Read Write User or Read Only User), and optional location restrictions.

  • Invitation Resend: If a user does not respond to an invitation, administrators can resend it, which generates a new token and restarts the invitation validity period.

  • Invitation Expiry: Invitations expire after a fixed period (5 days), after which the token becomes invalid unless a new invitation is sent.

  • User Status Tracking: Users remain in an "Invited - Not yet responded" state until they accept the invitation, ensuring clear visibility of pending user activations.

User Management Workflows are critical for maintaining secure and organized access control within an application. They help administrators ensure that only authorized users gain access with the correct permissions and that expired or unaccepted invitations do not pose security risks. These workflows also facilitate operational efficiency by providing mechanisms to manage and refresh user invitations systematically.

  • Inviting a new user by entering their email and selecting their role.

  • Resending an invitation to a user who has not yet accepted, which invalidates the previous token and issues a new one with a fresh expiry.

  • Automatically expiring invitations after 5 days to enforce timely user activation.

Invite a New App User

To enable administrators to add new users to the application by sending them an invitation email with appropriate access roles and optional location restrictions.

Inviting new users is a fundamental part of user management, allowing controlled access to the application. This process ensures that users receive the correct permissions and any necessary location-based restrictions before they start using the system.

Before you begin

Before starting this task, ensure you have administrative access to the User Management section and the email address of the user you intend to invite.

Follow these steps to invite a new app user to Cisco Spaces:

Procedure


Step 1

In the Cisco Spaces: Space Manager app, from the left pane, click User Management.

The User Management window is displayed.

Step 2

Click the Users tab.

Step 3

To invite a new app user, click Invite User.

The Invite User window is displayed.

Step 4

In the Email field, enter the new app user’s email address.

Step 5

From the Role drop-down list, choose the role as Read Write User or Read Only User.

Step 6

(Optional) Check the check box to enable location restriction and select the applicable locations.

Step 7

Click Send Invitation to send the invitation.

The invitation email is sent to the new user. The user status is set to "Invited - Not yet responded" until they accept.

A welcome email is sent to the user and you must click Accept Invitation to set up password for your account.

What to do next

Use your email and password to login and choose the account from the Select Customer drop-down list.

Resend Invitation

To allow administrators to resend an invitation to users who have not yet responded, ensuring they have a valid invitation token and extending the invitation validity period.

Sometimes users may not respond to the initial invitation within the validity period. Resending the invitation generates a new token and restarts the 5-day validity window, helping to maintain secure and up-to-date access control.

Before starting this task, you must have administrative access to the Dashboard, and the user’s status must be "Invited - Not yet responded."

Follow these steps to resend the invitation:

Procedure


Step 1

From the left pane, click Admin Management.

The Admin Management window is displayed.

Step 2

Click the Admins tab.

Step 3

Choose the user to be invited again and click RESEND?.

Step 4

In the confirmation popup, click Resend.


When an invitation is resent, a new invitation token is generated while the old token is invalidated and becomes unusable. The invitation expiry is reset to five days from the time of the resend, and the user remains in the invited state until they accept the invitation.

What to do next

For more information about invitation expiry rules, see Invitation Expiry Rules.

Invitation Expiry Rules

Understanding invitation expiry is critical for administrators to manage user access effectively, as tokens have a limited validity period to enhance security. Resending invitations refreshes this period by generating a new token, thereby maintaining control over user access and ensuring that only valid invitations are active. The purpose is to clarify the rules and behavior governing the expiration and validity of invitation tokens used in the user invitation process. Two key attributes related to the invitation tokens in the user invitation process are:

  • Token Expiry: The invitation token has a validity period of 5 days from the time it is sent. The token is valid while the current time is less than the expiry time and becomes expired when the current time is equal to or greater than the expiry time.

  • Token Invalidation on Resend: When an invitation is resent, a new invitation token is generated, and the old token is invalidated and no longer usable. This action resets the invitation expiry to 5 days from the resend time, while the user remains in the invited state until they accept the invitation.

Rules

  • Expiry time = invitation sent time + 5 days (432,000 seconds).

  • Token is valid while current time < expiry time.

  • Token is expired when current time ≥ expiry time.

Behavior on Resend

  • Resending generates a new token with a new issued-at time (iat) and expiry time (exp).

  • The old token is invalidated.

  • The invitation validity window restarts for 5 days from the resend time.

Governance and Best Practices

Follow these governance guidelines and best practices to ensure secure, compliant, and uninterrupted administration of your Cisco Spaces account.

  • Maintain at least two active Default Admin users for operational continuity.

  • Apply the principle of least privilege; avoid unnecessary broad write access.

  • Use least privilege by default; avoid unnecessary broad write access.

  • Use location restriction where business boundaries require it.

  • Perform periodic access reviews (monthly/quarterly).

  • Immediately remove access during offboarding.

  • Maintain audit records for role creation, assignment changes, and user removals.