Get Started with Cisco Spaces

This chapter provides an overview of Cisco Spaces, its features, the process flow, license packages, and system requirements for Cisco Spaces.

This chapter contains the following sections:

Overview of Cisco Spaces

Cisco Spaces is a multichannel engagement platform that enables you to connect, know, and engage with visitors at their physical business locations.

Cisco Spaces is the industry's most scalable end-to-end indoor location services cloud platform that empowers customers to achieve business outcomes at scale. With its comprehensive suite of services, it offers a robust solution for all your location-based needs.

Cisco Spaces provides solutions for monitoring and managing the assets in your premises.

It covers various verticals of business such as

  • retail

  • manufacturing

  • hospitality

  • healthcare

  • education

  • financial services

  • enterprise workspaces, and so on.

With Cisco Spaces, users gain centralized access to all location technology and intelligence via a unified dashboard interface. Designed for compatibility with existing Cisco Aironet, Cisco Catalyst, and Cisco Meraki infrastructure, Cisco Spaces stands out as a versatile solution for location-based service needs.
Log In

As a Cisco Spaces user, you can log in to Cisco Spaces using the existing account login credentials. The domain specific URL to log in to Cisco Spaces is https://spaces-gov.cisco/.

Single Sign-On for Cisco Spaces

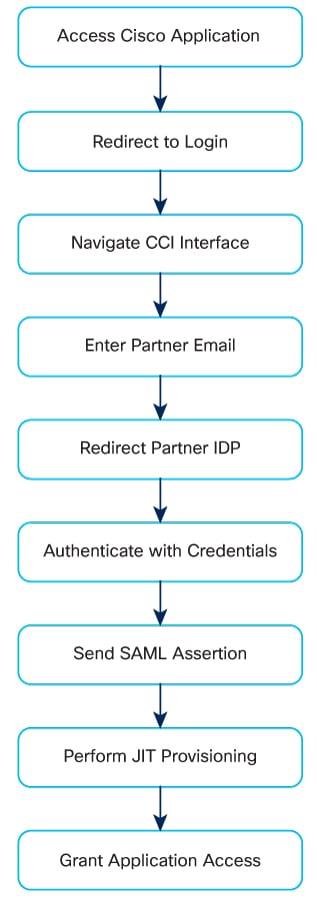
Cisco Spaces supports Single Sign-On (SSO) so that users can login to Cisco Spaces using their SSO credentials. For example, if the Cisco domain is SSO-enabled, Cisco employees, who have a Cisco Spaces account, can access Cisco Spaces using their Cisco e-mail address and password. Additionally, if a Cisco employee is already logged in to the Cisco domain through any other Cisco website or application, that Cisco employee can access Cisco Spaces by simply specifying the Cisco e-mail address.

When you click the Login button, only the e-mail ID field will appear in the Login window along with a Continue button. If the user is already logged into the SSO-enabled domain, then the user will be directly taken to the Cisco Spaces Dashboard after clicking the Continue button. If the Cisco Spaces account supports multiple customer names, then the Select Customer window will be displayed. If the user has not logged into the domain, then the user will be redirected to the IDP page for login authentication, and user can login by specifying the SSO credentials.

To enable SSO for your Cisco Spaces account, contact the Cisco Spaces support team and provide the following information:

  • Account name

  • Domain name (for which SSO needs to be enabled)

  • Application Name

  • SSO type: Currently, only SAML is supported.

  • If only authentication is needed or both authentication and authorization needs to be enabled. This is done by setting the authenticateOnly flag to True or False.

    • True: Only authentication is enabled for the user.

    • False: Both authentication and authorization is enabled for the user.


      Note


      • If you set authenticateOnly to False:

        • You need to pass additional information from the IDP while sending the user details. For example, role=dnaspaces:174923535949:Dashboard_Admin.

        • The value for role is mandatory and must be available in the IDP while sending the user details.

        • You need not invite individual users from the Cisco Spaces dashboard > Admin Management. User invitation and activation is based on both authentication and authorization process by the specific customer IDP & Cisco Spaces.

          You can use the Cisco Spaces dashboard existing default roles or create a new role in the Cisco Spaces dashboard and use that specific role name. The Cisco Spaces dashboard default roles are:

          • Dashboard Admin Role: Provides full admin permission to the user for the selected account

          • Dashboard Admin Read: Provides read permission to the user for the selected account

          If you use the Cisco Spaces dashboard default roles, you must pass the role string value in the specified format:

          role": "dnaspaces:<account number>:Dashboard Admin Role",

          role": "dnaspaces:<account number>:Dashboard Admin Read",

          If you use custom roles, create these custom roles in Cisco Spaces > Admin Management > Roles and pass the role name as the role string value in the IDP response.


  • The following information from the metadata.xml file:

    • SSO Details

    • Entity

    • Entry point

Once you provide the above details, the Cisco Spaces support team will send you the following so that you can configure your application:

You need to configure your IDP metadata to return the firstName, lastName and email fields as below:

nameid-format:"emailAddress","firstName":"Jane","lastName":"Doe","phone":"9876543210","level":"info","

Start Working with Cisco Spaces

Before starting working with Cisco Spaces ensure that you have the prerequisites mentioned in System Requirements.


Note


Initially, you must contact the Cisco Spaces support team for creating a Cisco Spaces account. You will get an invite to activate your Cisco Spaces account through e-mail. Click the Accept Activate button, and in the window that displays configure the log in credentials, and click Activate Account. You are now logged into Cisco Spaces. If you are a Dashboard Admin, you can now invite other Cisco Spaces users.

To start working with Cisco Spaces, perform the following steps:

Procedure


Step 1

Log in to Cisco Spaces.

Note


You can enable Single Sign-On for Cisco Spaces.

Step 2

Connect to your wireless network and configure the wireless network for Cisco Spaces referring to the instructions in the Setup section of the Cisco Spaces dashboard.

The setup instructions are also available in the following sections of this guide:

Note

 
Cisco Spaces provides a universal account so that you can connect Cisco Spaces to multiple wireless networks.

Step 3

Add your team members, and assign them roles and permissions. For more information about adding Cisco Spaces users, see Managing Cisco Spaces Users.

Step 4

Import the location hierarchy defined in your wireless network to Cisco Spaces. For more information on configuring the location hierarchy, see Location Hierarchy in Cisco Spaces and Overview of Location Hierarchy 2.0.

Step 5

Monitor the Cisco Spaces domain and apps using the Monitor section.

Profile Information

Cisco Spaces supports adding the profile information such as first name, last name, and mobile number of the Cisco Spaces dashboard user.

  • A tab, My Profile, is available in the Account Preferences window to add the profile information. You can specify the first name, last name, and mobile number in this window, where mobile number and its verification are optional. When you specify the mobile number, a Verify Mobile Number link appears, which allows you to verify the mobile number using One Time Password. Once the mobile number is verified, the status Verified is shown. The Verify Mobile Number link will appear again when you change your mobile number.

  • The Login workflow for Cisco Spaces displays the Update Profile Information dialog box as part of the login process if the Profile Information is not available for the particular Cisco Spaces user. You can skip this step, and can proceed to log in. You can then add the profile details through the Account Preferences window any time later. However, the Profile Information dialog box is shown as part of the Login workflow till the time information is provided.

    Note


    The SSO users will not be able to edit the profile information or verify the mobile number. Also, the Update Profile Information dialog box will not be shown to SSO users during login.

Support to Change Password after Expiry Date

Cisco Spaces allows you to change your password even after your password is expired. After entering your credentials when you click the Continue button, a pop-up window to change the password appears.


Onboard Workflow

Follow these steps to log in to Cisco Spaces.

Before you begin

We recommend that you completed FRMOD onboarding process and have the FRMOD credentials available. For a successful onboarding experience, use your organization specific Identity Provider (IDP) by configuring the domain.

Procedure


Step 1

Complete the FRMOD onboarding process.

Step 2

Use your IDP and configure the domain.

For example, Cisco uses the frmod-cisco domain for Production onboarding and fedmod-cisco domain for staging environmemt.

Step 3

Use your organization's email address to request invite for Cisco Spaces Dashboard and Administrator Management access.

Step 4

Use the frmod-company.com email address and proceed with the activation instructions.

Step 5

Use the same frmod-company.com credentials to log in to Cisco Spaces.


What to do next

Verticals overview

Cisco Spaces apps supports various verticals to provide tailored solutions for different industries.

Currently, Space Utilization App supports verticals.

These are the four verticals supported:

  • Generic: Provides insights into behavior patterns, monitors and locates assets in real-time to optimize operations.

  • Workspaces: Utilizes Wi-Fi-associated devices and room sensors to provide accurate occupancy data. Campus-level computation is implemented for the Workspaces vertical.

  • Retail: Uses Wi-Fi probing to gather data.

  • Education: Smart campus solutions, attendance tracking, and wayfinding.

Verticals for apps are defined at the backend level. Currently, Cisco Spaces does not support a GUI to select verticals for apps.

Cisco Spaces supports associating verticals to the Cisco Spaces account. Verticals are added with the Cisco Spaces account when the account is onboarded to Cisco for the first time.

If you want to update the vertical for your account, contact Cisco Spaces support team.


Note


By default, for workspaces and education vertical accounts, Wi-Fi metrics data will be displayed.

For more information, see Cisco Spaces: Space Utilization App Guide.


Idle Timeout for Cisco Spaces

A user who is logged in to the Cisco Spaces dashboard can remain idle only for a specific time period. If inactive for 20 minutes, the user is automatically logged out of the dashboard. A notification is displayed 5 minutes before the idle timeout and the title of the browser window where the Cisco Spaces application is open changes to INACTIVE: You will be logged out in 5 mins. Any action performed on the corresponding window extends the user's session.

Contact Cisco Spaces Support

The process for requesting support for Cisco Spaces is enhanced. To contact Cisco Spaces support, you now need to raise a case using the Support Case Manager, based on the account types: Paid and Non-Paid.


Note


All the support contact email addresses are decommissioned.


Follow these steps to raise a support case.

Procedure


Step 1

Log in to Cisco Spaces.

Step 2

In the Cisco Spaces Dashboard, click the (Support) icon displayed at the top-right.

Step 3

Click Support. The Support slide-in pane displays.

Step 4

Depending on the account types, the following support options are available:

  • Paid: There are two different SCM links for Paid accounts.

    Figure 1. Paid Account Support Options
  • Non-Paid: Use the General Support link to raise both general support and onboarding/use case deployment assistance cases.

    Figure 2. Non-Paid Account Support Options

Step 5

Click Open a Case to raise a case using SCM.


Cisco Spaces Documentation

You can access the documentation for Cisco Spaces including Configuration Guides and Release Notes using the Cisco Spaces Support icon () displayed at the top-right of the Cisco Spaces dashboard.

You can also view the documentation, announcements, deployment guides, use cases and support information from the Spaces LaunchPad section. To do this, click the Spaces LaunchPad icon that is available at the bottom-right in Cisco Spaces UI.