- Preface
- Overview
- Installing the Server Operating System or Hypervisor
- Managing the Server
- Managing Storage Using RAID
- Viewing Server Properties
- Viewing Server Sensors
- Managing Remote Presence
- Managing User Accounts
- Configuring Network-Related Settings
- Configuring Communication Services
- Managing Certificates
- Configuring Platform Event Filters
- Firmware Management
- Viewing Faults and Logs
- Server Utilities
- Diagnostic Tests
- Index
Overview
This chapter includes the following sections:
- Cisco UCS E-Series Servers and the Cisco UCS E-Series Network Compute Engine Overview
- Server Software
- CIMC Overview
- CIMC GUI
Cisco UCS E-Series Servers and the Cisco UCS E-Series Network Compute Engine Overview
The Cisco UCS E-Series Servers (E-Series Servers) and Cisco UCS E-Series Network Compute Engine (NCE) are a family of size-, weight-, and power-efficient blade servers that are housed within the Generation 2 Cisco Integrated Services Routers (Cisco ISR G2) and the Cisco ISR 4000 series. These servers provide a general purpose compute platform for branch-office applications deployed either as bare-metal on operating systems, such as Microsoft Windows or Linux, or as virtual machines on hypervisors, such as VMware vSphere Hypervisor, Microsoft Hyper-V, or Citrix XenServer.
The E-Series Servers are purpose-built with powerful Intel Xeon processors for general purpose compute. They come in two form factors: single-wide and double-wide. The single-wide E-Series Server fits into one service module (SM) slot, and the double-wide E-Series Server fits into two SM slots.
The NCEs are price-to-power optimized modules that are built to host Cisco network applications and other lightweight general-purpose applications. They come in three form factors: SM, NIM, and EHWIC. The SM E-Series NCE fits into one SM slot, the NIM E-Series NCE fits into one NIM slot, and the EHWIC E-Series NCE fits into two EHWIC slots.
 Note | For information about the supported E-Series Servers and NCE, and the maximum number of servers that can be installed per router, see the "Hardware Requirements" section in the Hardware Installation Guide for Cisco UCS E-Series Servers and the Cisco UCS E-Series Network Compute Engine. |
Server Software
E-Series Servers and NCE require three major software systems:
CIMC Firmware
Cisco Integrated Management Controller (CIMC) is a separate management module built into the motherboard of the E-Series Server or NCE. A dedicated ARM-based processor, separate from the main server CPU, runs the CIMC firmware. The system ships with a running version of the CIMC firmware. You can update the CIMC firmware, but no initial installation is needed.
CIMC is the management service for the E-Series Servers and NCE. You can use a web-based GUI or SSH-based CLI to access, configure, administer, and monitor the server.
BIOS Firmware
BIOS initializes the hardware in the system, discovers bootable devices, and boots them in the provided sequence. It boots the operating system and configures the hardware for the operating system to use. BIOS manageability features allow you to interact with the hardware and use it. In addition, BIOS provides options to configure the system, manage firmware, and create BIOS error reports.
The system ships with a running version of the BIOS firmware. You can update the BIOS firmware, but no initial installation is needed.
Operating System or Hypervisor
The main server CPU runs on an operating system, such as Microsoft Windows or Linux; or on a hypervisor. You can purchase an E-Series Server or NCE with a preinstalled Microsoft Windows Server or VMware vSphere Hypervisor, or you can install your own platform.
Note | For information about the platforms that have been tested on the E-Series Servers or NCE, see the "Software Requirements" section in the Release Notes for Cisco UCS E-Series Servers and the Cisco UCS E-Series Network Compute Engine. |
CIMC Overview
The Cisco Integrated Management Controller (CIMC) is the management service for the E-Series Servers and the NCE. CIMC runs within the server. You can use a web-based GUI or the SSH-based CLI to access, configure, administer, and monitor the server.
You can use CIMC to perform the following server management tasks:
-
Power on, power off, power cycle, reset, and shut down the server
-
Configure the server boot order
-
Manage RAID levels
Note
The RAID feature is applicable to E-Series Servers and the SM E-Series NCE. The RAID feature is not applicable to the EHWIC E-Series NCE and the NIM E-Series NCE.
-
View server properties and sensors
-
Manage remote presence
-
Create and manage local user accounts, and enable remote user authentication through the Active Directory
-
Configure network-related settings, including NIC properties, IPv4, VLANs, and network security
-
Configure communication services, including HTTP, SSH, IPMI over LAN, and SNMP
-
Manage certificates
-
Configure platform event filters
-
Update CIMC firmware
-
Update BIOS firmware
-
Install the host image from an internal repository
-
Monitor faults, alarms, and server status
-
Collect technical support data in the event of server failure
Almost all tasks can be performed in either the GUI interface or CLI interface, and the results of tasks performed in one interface are displayed in another. However, you cannot:
CIMC GUI
The CIMC GUI is a web-based management interface for E-Series Servers and the NCE. You can launch the CIMC GUI and manage the server from any remote host that meets the following minimum requirements:
Logging In to the CIMC GUI
| Step 1 | In your web browser, enter the IP address that you configured to access CIMC during initial setup. | ||
| Step 2 | If a security dialog box displays, do the following: | ||
| Step 3 | In the log in window, enter your username and password.
| ||
| Step 4 | Click Log In. The Change Password dialog box appears.
| ||
| Step 5 | In the New Password field, enter your new password. | ||
| Step 6 | In the Confirm Password field, enter the password again to confirm it. | ||
| Step 7 | Click Save Changes. The Server Summary page appears, which is the CIMC home page. See CIMC Home Page. |
CIMC Home Page
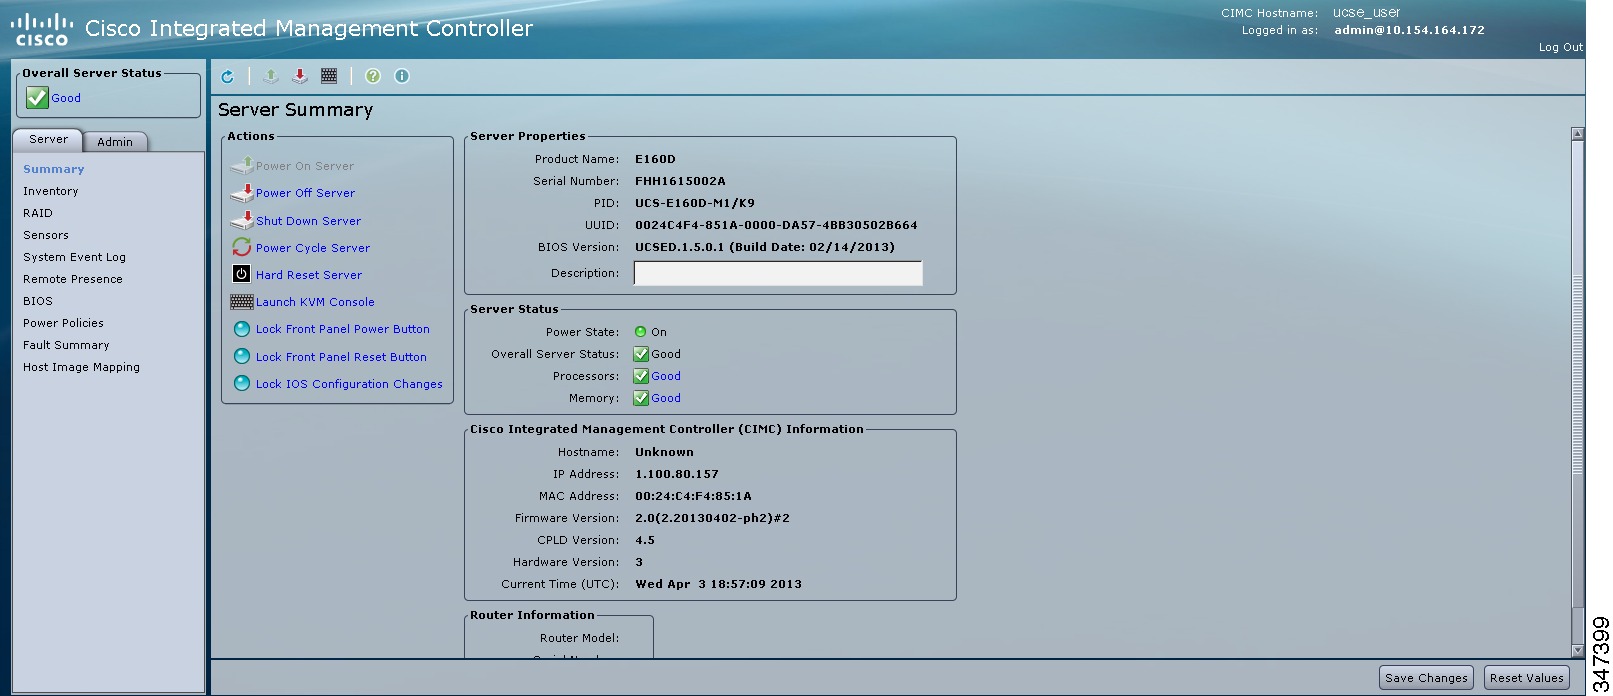
Navigation and Work Panes
The Navigation pane displays on the left side of the CIMC GUI. Clicking links on the Server or Admin tabs in the Navigation pane displays the associated tabs in the Work pane on the right.
The Navigation pane has the following areas:
Server Tab
Each node in the Server tab leads to one or more tabs that display in the Work pane. These tabs provides access to the following information:
| Server Tab Node Name | Work Pane Tabs Provide Information About... |
|---|---|
Summary |
Server properties, status, BIOS version, CIMC firmware version, IP address, and MAC address. |
Inventory |
Installed CPUs, memory cards, power supplies, and PCI adapters. |
RAID |
Storage adapters and cards. |
Sensors |
Temperature, voltage, LEDs, and storage sensor readings. |
System Event Log |
System event messages. |
Remote Presence |
KVM, virtual media, and Serial over LAN settings. |
BIOS |
The installed BIOS firmware version and the server boot order. |
Power Policies |
Power policy settings. |
Fault Summary |
Fault sensor readings. |
Host Image Mapping |
Host image mapping status and image information. |
Admin Tab
Each node in the Admin tab leads to one or more tabs that display in the Work pane. These tabs provides access to the following information:
| Admin Tab Node Name | Work Pane Tabs Provide Information About... |
|---|---|
User Management |
Locally-defined user accounts, Active Directory settings, and current user session information. |
Network |
NIC, IPv4, VLAN, and LOM properties, along with network security settings. |
Communication Services |
HTTP, SSH, XML API, IPMI over LAN properties. |
Certificate Management |
Security certificate information and management. |
CIMC Log |
CIMC log messages. |
Event Management |
Platform event filters. |
Firmware Management |
CIMC firmware information and management. |
Utilities |
Technical support data collection and system configuration import and export options. |
Toolbar
The toolbar displays above the Work pane.
|
Element Name |
Description |
| Refresh |
Refreshes the current page. |
| Power On Server |
Powers on the server. |
| Power Off Server |
Powers off the server. |
| Launch KVM Console |
Launches the KVM console. |
| Help |
Launches help. |
| Info |
Displays CIMC information. |
CIMC Online Help
The CIMC user interface is divided into two main sections: a Navigation pane on the left and a Work pane on the right. To access online help for a page, do the following:
 Feedback