-
- Administration User Interface Reference
- Guest Access User Interface Reference
- Web Portals Customization Reference
- Policy User Interface Reference
- Operations User Interface Reference
- Network Access Flows
- Switch and Wireless LAN Controller Configuration Required to Support Cisco ISE Functions
- Supported Management Information Bases in Cisco ISE
- Portal Pages Titles, Content and Labels Character Limits
- Portal Customization
- HTML Support for a Portal Language File
- HTML Support for the Blacklist Portal Language File
- HTML Support for Bring Your Own Device Portals Language Files
- HTML Support for Client Provisioning Portals Language Files
- HTML Support for Credential Guest Portals Language Files
- HTML Support for Hotspot Guest Portals Language Files
- HTML Support for Mobile Device Management Portals Language Files
- HTML Support for My Devices Portals Language Files
- HTML Support for Sponsor Portals Language Files
- Custom Guest Notifications
Web Portals Customization Reference
- Portal Pages Titles, Content and Labels Character Limits
- Portal Customization
- HTML Support for a Portal Language File
- Custom Guest Notifications
Portal Pages Titles, Content and Labels Character Limits
There is a maximum and minimum range of characters you can enter in the titles, text boxes, instructions, field and button labels, and other visual elements on the Portal Page Customization tab.
Character Limits for Portal Pages Titles, Content and Labels
| Note |
Whether you enter single-byte or multi-byte characters, you can only enter the maximum number of characters identified for a field. Multi-byte characters do not affect the character limit. |
Common page elements
Banner title
256
Footer elements
0
2000
Browser Page Title
0
256
Instructional Text
0
2000
Content Title
0
256
Optional Content 1
0
2000
Optional Content 2
0
2000
Button labels
0
64
Check box labels
0
64
Tab labels
0
64
Link labels
0
256
AUP
AUP Text
0
50,000
Message text
Message text (displayed on page)
0
2000
Message text (displayed in pop-up window)
0
256
Field labels
All fields labels
0
256
Field input (general)
Field input in general (see special cases below)
0
256
Field input (special cases)
Access Code field
1
20
Registration Code field
1
20
Username fields
1
64
Password fields
1
256
Phone Number field
0
64
Device ID field
12
17
Portal Customization
You can customize the appearance of the end-user web portals and the guest experience. If you have experience with the cascading style sheet (CSS) language and with Javascript, you can use the jQuery Mobile ThemeRoller application to customize portal themes by changing the portal page layout.
You can view all the fields by exporting the CSS theme or language properties from the required portal page. Refer to the Export a Portal's Default Theme CSS File for more information.
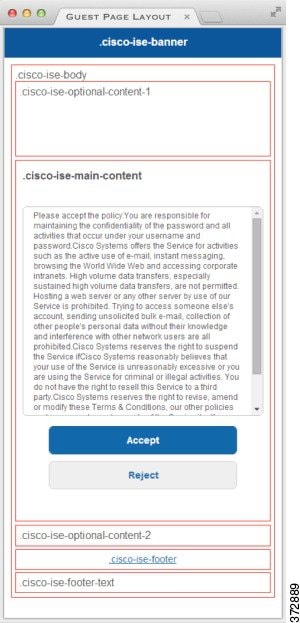
CSS Classes and Descriptions for End-User Portals Page Layout
| CSS Class Name | Description |
|---|---|
|
cisco-ise-banner |
Includes logos, banner image, and banner text. On the Sponsor and My Devices portals, this class also contains buttons that can activate a context menu. For example, the menu can bring up a pop-up window with options to Log Out, Change Password, and so on. |
|
cisco-ise-body |
Contains all page elements that are not part of the banner. |
|
cisco-ise-optional-content-1 |
Empty by default. You can add text, links, and HTML and Javascript code. |
|
cisco-ise-main-content |
Includes the main contents of the portal page, such as instructional text, action buttons, and the cisco-ise-footer container. |
|
cisco-ise-optional-content-2 |
Empty by default. You can add text, links, and HTML and Javascript code. |
|
cisco-ise-footer |
Part of the footer, it is a placeholder for links such as Contact Support and online Help. |
|
cisco-ise-footer-text |
Empty by default. It is a placeholder for anything that you want to display at the bottom of the portal page, such as a copyright notice or a disclaimer. |
HTML Support for a Portal Language File
The zipped language file for each portal includes the default language properties files for that portal. Each properties file includes dictionary keys that define the content that displays on the portal.
You can customize the text that displays on a portal, including the content in the Instructional Text, Content, Optional Content 1, and Optional Content 2 text boxes. Some of these text boxes have default content and some are empty.
Only some of these dictionary keys associated with these text boxes support HTML in their values (text).
- HTML Support for the Blacklist Portal Language File
- HTML Support for Bring Your Own Device Portals Language Files
- HTML Support for Client Provisioning Portals Language Files
- HTML Support for Credential Guest Portals Language Files
- HTML Support for Hotspot Guest Portals Language Files
- HTML Support for Mobile Device Management Portals Language Files
- HTML Support for My Devices Portals Language Files
- HTML Support for Sponsor Portals Language Files
HTML Support for the Blacklist Portal Language File
The navigation path to this portal's Instructional Text , Content,Optional Content 1, and Optional Content 2 text boxes is . You can use the View HTML Source icon in the mini-editor of the text boxes and add HTML code in your content.
 Note | This is not a complete list of the dictionary keys in the files. |
HTML Support for Bring Your Own Device Portals Language Files
The navigation path to this portal's Instructional Text , Content,Optional Content 1, and Optional Content 2 text boxes is . You can use the View HTML Source icon in the mini-editor of the text boxes and add HTML code in your content.
Note | This is not a complete list of the dictionary keys in the files. |
-
key.guest.ui_contact_instruction_message
-
key.guest.ui_byod_welcome_optional_content_1
-
key.guest.ui_byod_welcome_optional_content_2
-
key.guest.ui_byod_reg_limit_message
-
key.guest.ui_byod_reg_content_message
-
key.guest.ui_byod_success_manual_reconnect_message
-
key.guest.ui_byod_install_winmac_instruction_message
-
key.guest.ui_byod_install_optional_content_1
-
key.guest.ui_byod_reg_optional_content_2
-
key.guest.ui_byod_install_optional_content_2
-
key.guest.ui_byod_reg_optional_content_1
-
key.guest.ui_byod_reg_instruction_message
-
key.guest.ui_byod_welcome_aup_text
-
key.guest.ui_contact_optional_content_2
-
key.guest.ui_contact_optional_content_1
-
key.guest.ui_byod_install_ios_instruction_message
-
key.guest.ui_byod_welcome_instruction_message
-
key.guest.ui_error_optional_content_2
-
key.guest.ui_error_optional_content_1
-
key.guest.ui_byod_welcome_renew_cert_message
-
key.guest.ui_byod_install_android_instruction_message
-
key.guest.ui_byod_install_instruction_message
-
key.guest.ui_byod_welcome_config_device_message
-
key.guest.ui_byod_success_message
-
key.guest.ui_byod_success_unsupported_device_message
-
key.guest.ui_byod_success_optional_content_1
-
key.guest.ui_byod_success_optional_content_2
-
key.guest.ui_error_instruction_message
HTML Support for Client Provisioning Portals Language Files
The navigation path to this portal's Instructional Text , Content,Optional Content 1, and Optional Content 2 text boxes is . You can use the View HTML Source icon in the mini-editor of the text boxes and add HTML code in your content.
Note | This is not a complete list of the dictionary keys in the files. |
-
key.guest.ui_client_provision_agent_installed_instructions_without_java_message
-
key.guest.ui_contact_instruction_message
-
key.guest.ui_success_message
-
key.guest.ui_client_provision_unable_to_detect_message
-
key.guest.ui_client_provision_instruction_message
-
key.guest.ui_client_provision_agent_installation_message
-
key.guest.ui_client_provision_posture_agent_check_message
-
key.guest.ui_vlan_instruction_message
-
key.guest.ui_client_provision_agent_installation_instructions_with_no_java_message
-
key.guest.ui_success_instruction_message
-
key.guest.ui_vlan_optional_content_1
-
key.guest.ui_vlan_optional_content_2
-
key.guest.ui_contact_optional_content_2
-
key.guest.ui_contact_optional_content_1
-
key.guest.ui_contact_optional_content_1
-
key.guest.ui_client_provision_posture_check_compliant_message
-
key.guest.ui_client_provision_optional_content_2
-
key.guest.ui_client_provision_optional_content_1
-
key.guest.ui_error_optional_content_2
-
key.guest.ui_error_optional_content_1
-
key.guest.ui_client_provision_posture_check_non_compliant_message
-
key.guest.ui_vlan_install_message
-
key.guest.ui_success_optional_content_1
-
key.guest.ui_success_optional_content_2
-
key.guest.ui_client_provision_posture_agent_scan_message
HTML Support for Credential Guest Portals Language Files
The navigation path to this portal's Instructional Text , Content,Optional Content 1, and Optional Content 2 text boxes is . You can use the View HTML Source icon in the mini-editor of the text boxes and add HTML code in your content.
Note | This is not a complete list of the dictionary keys in the files. |
-
key.guest.ui_contact_instruction_message
-
key.guest.ui_login_optional_content_1
-
key.guest.ui_login_optional_content_2
-
key.guest.ui_client_provision_unable_to_detect_message
-
key.guest.ui_client_provision_instruction_message
-
key.guest.ui_device_reg_optional_content_2
-
key.guest.ui_device_reg_optional_content_1
-
key.guest.ui_byod_success_manual_reconnect_message
-
key.guest.ui_byod_reg_optional_content_2
-
key.guest.ui_byod_reg_optional_content_1
-
key.guest.ui_client_provision_agent_installation_instructions_with_no_java_message
-
key.guest.ui_success_instruction_message
-
key.guest.ui_max_devices_instruction_message
-
key.guest.ui_max_devices_optional_content_1
-
key.guest.ui_self_reg_results_instruction_message
-
key.guest.notification_credentials_email_body
-
key.guest.ui_max_devices_optional_content_2
-
key.guest.ui_contact_optional_content_2
-
key.guest.ui_contact_optional_content_1
-
key.guest.ui_byod_install_ios_instruction_message
-
key.guest.ui_changepwd_instruction_message
-
key.guest.ui_client_provision_posture_check_compliant_message
-
key.guest.ui_aup_instruction_message
-
key.guest.ui_changepwd_optional_content_2
-
key.guest.ui_changepwd_optional_content_1
-
key.guest.ui_self_reg_results_optional_content_2
-
key.guest.ui_self_reg_results_optional_content_1
-
key.guest.ui_device_reg_instruction_message
-
key.guest.ui_byod_welcome_renew_cert_message
-
key.guest.ui_vlan_execute_message
-
key.guest.ui_byod_install_android_instruction_message
-
key.guest.ui_client_provision_posture_check_non_compliant_message
-
key.guest.ui_byod_install_instruction_message
-
key.guest.ui_device_reg_max_reached_message
-
key.guest.ui_byod_success_message
-
key.guest.ui_byod_success_unsupported_device_message
-
key.guest.ui_byod_success_optional_content_1
-
key.guest.ui_byod_success_optional_content_2
-
key.guest.ui_aup_employee_text
-
key.guest.ui_client_provision_agent_installed_instructions_without_java_message
-
key.guest.ui_success_message
-
key.guest.ui_byod_welcome_optional_content_1
-
key.guest.ui_byod_welcome_optional_content_2
-
key.guest.ui_self_reg_optional_content_2
-
key.guest.ui_self_reg_optional_content_1
-
key.guest.ui_byod_reg_limit_message
-
key.guest.notification_credentials_print_body
-
key.guest.ui_byod_reg_content_message
-
key.guest.ui_client_provision_agent_installation_message
-
key.guest.ui_post_access_message
-
key.guest.ui_vlan_instruction_message
-
key.guest.ui_byod_install_winmac_instruction_message
-
key.guest.ui_aup_guest_text
-
key.guest.ui_byod_install_optional_content_1
-
key.guest.ui_byod_install_optional_content_2
-
key.guest.ui_byod_reg_instruction_message
-
key.guest.ui_aup_optional_content_1
-
key.guest.ui_aup_optional_content_2
-
key.guest.ui_self_reg_aup_text
-
key.guest.ui_login_instruction_message
-
key.guest.ui_vlan_optional_content_1
-
key.guest.ui_vlan_optional_content_2
-
key.guest.ui_self_reg_results_aup_text
-
key.guest.ui_device_reg_register_message
-
key.guest.ui_byod_welcome_instruction_message
-
key.guest.ui_client_provision_optional_content_2
-
key.guest.ui_self_reg_instruction_message
-
key.guest.ui_vlan_install_message
-
key.guest.ui_success_optional_content_1
-
key.guest.ui_success_optional_content_2
-
key.guest.ui_post_access_instruction_message
-
key.guest.ui_post_access_optional_content_2
-
key.guest.ui_post_access_optional_content_1
-
key.guest.ui_byod_welcome_config_device_message
-
key.guest.ui_client_provision_posture_agent_scan_message
HTML Support for Hotspot Guest Portals Language Files
The navigation path to this portal's Instructional Text , Content,Optional Content 1, and Optional Content 2 text boxes is . You can use the View HTML Source icon in the mini-editor of the text boxes and add HTML code in your content.
Note | This is not a complete list of the dictionary keys in the files. |
-
key.guest.ui_contact_instruction_message
-
key.guest.ui_success_message
-
key.guest.ui_post_access_message
-
key.guest.ui_vlan_instruction_message
-
key.guest.ui_success_instruction_message
-
key.guest.ui_aup_optional_content_1
-
key.guest.ui_aup_optional_content_2
-
key.guest.ui_vlan_unsupported_error_message
-
key.guest.ui_vlan_optional_content_1
-
key.guest.ui_vlan_optional_content_2
-
key.guest.ui_contact_optional_content_2
-
key.guest.ui_contact_optional_content_1
-
key.guest.ui_aup_instruction_message
-
key.guest.ui_aup_hotspot_text
-
key.guest.ui_vlan_execute_message
-
key.guest.ui_vlan_install_message
-
key.guest.ui_success_optional_content_1
-
key.guest.ui_success_optional_content_2
-
key.guest.ui_post_access_instruction_message
-
key.guest.ui_post_access_optional_content_2
-
key.guest.ui_post_access_optional_content_1
HTML Support for Mobile Device Management Portals Language Files
The navigation path to this portal's Instructional Text , Content,Optional Content 1, and Optional Content 2 text boxes is . You can use the View HTML Source icon in the mini-editor of the text boxes and add HTML code in your content.
Note | This is not a complete list of the dictionary keys in the files. |
-
key.mdm.ui_contact_instruction_message
-
key.mdm.ui_mdm_enrollment_after_message
-
key.mdm.ui_error_optional_content_2
-
key.mdm.ui_error_optional_content_1
-
key.mdm.ui_mdm_enroll_optional_content_1
-
key.mdm.ui_mdm_enroll_optional_content_1
-
key.mdm.ui_mdm_enroll_optional_content_2
-
key.mdm.ui_mdm_enroll_instruction_message
-
key.mdm.ui_error_instruction_message
-
key.mdm.ui_mdm_enrollment_link_message
-
key.mdm.ui_mdm_not_reachable_message
-
key.mdm.ui_contact_optional_content_2
-
key.mdm.ui_mdm_continue_message
-
key.mdm.ui_contact_optional_content_1
HTML Support for My Devices Portals Language Files
The navigation path to this portal's Instructional Text , Content,Optional Content 1, and Optional Content 2 text boxes is . You can use the View HTML Source icon in the mini-editor of the text boxes and add HTML code in your content.
Note | This is not a complete list of the dictionary keys in the files. |
-
key.mydevices.ui_add_optional_content_1
-
key.mydevices.ui_add_optional_content_2
-
key.mydevices.ui_post_access_instruction_message
-
key.mydevices.ui_edit_instruction_message
-
key.mydevices.ui_contact_optional_content_2
-
key.mydevices.ui_contact_optional_content_1
-
key.mydevices.ui_changepwd_optional_content_1
-
key.mydevices.ui_changepwd_optional_content_2
-
key.mydevices.ui_post_access_message
-
key.mydevices.ui_home_instruction_message
-
key.mydevices.ui_edit_optional_content_1
-
key.mydevices.ui_edit_optional_content_2
-
key.mydevices.ui_add_instruction_message
-
key.mydevices.ui_post_access_optional_content_2
-
key.mydevices.ui_post_access_optional_content_1
-
key.mydevices.ui_error_instruction_message
-
key.mydevices.ui_actions_instruction_message
-
key.mydevices.ui_home_optional_content_2
-
key.mydevices.ui_aup_optional_content_1
-
key.mydevices.ui_aup_optional_content_2
-
key.mydevices.ui_home_optional_content_1
-
key.mydevices.ui_changepwd_instruction_message
-
key.mydevices.ui_contact_instruction_message
-
key.mydevices.ui_aup_employee_text
-
key.mydevices.ui_login_optional_content_2
-
key.mydevices.ui_login_optional_content_1
-
key.mydevices.ui_login_instruction_message
-
key.mydevices.ui_error_optional_content_1
-
key.mydevices.ui_error_optional_content_2
-
key.mydevices.ui_aup_instruction_message
HTML Support for Sponsor Portals Language Files
The navigation path to this portal's Instructional Text , Content,Optional Content 1, and Optional Content 2 text boxes is . You can use the View HTML Source icon in the mini-editor of the text boxes and add HTML code in your content.
Note | This is not a complete list of the dictionary keys in the files. |
-
key.sponsor.ui_aup_instruction_message
-
key.sponsor.ui_create_random_instruction_message
-
key.sponsor.ui_home_instruction_message
-
key.sponsor.ui_post_access_instruction_message
-
key.sponsor.notification_credentials_print_body
-
key.sponsor.ui_aup_sponsor_text
-
key.sponsor.ui_create_accounts_access_info_instruction_message
-
key.sponsor.ui_login_instruction_message
-
key.sponsor.notification_credentials_email_body
-
key.sponsor.ui_create_known_instruction_message
-
key.sponsor.ui_create_import_instruction_message
-
key.sponsor.ui_suspend_account_instruction_message
-
key.sponsor.ui_post_access_message
-
key.sponsor.ui_login_optional_content_2
-
key.sponsor.ui_login_optional_content_1
-
key.sponsor.notification_credentials_email_password_body
-
key.sponsor.ui_contact_optional_content_2
-
key.sponsor.ui_contact_optional_content_1
-
key.sponsor.ui_login_aup_text
-
key.sponsor.ui_changepwd_instruction_message
-
key.sponsor.ui_create_accounts_guest_type_instruction_message
-
key.sponsor.ui_changepwd_optional_content_1
-
key.sponsor.ui_changepwd_optional_content_2
-
key.sponsor.notification_credentials_email_username_body
-
key.sponsor.ui_aup_optional_content_1
-
key.sponsor.ui_aup_optional_content_2
-
key.sponsor.ui_post_access_optional_content_1
-
key.sponsor.ui_post_access_optional_content_2
-
key.sponsor.ui_contact_instruction_message
Custom Guest Notifications
Within in each portal, you can customize the email, SMS text messages, or printed notifications that guests receive.
List of Variables for Portal Pages Customization
| Display Name | Substitute with Variable Name |
|---|---|
|
Access code Use to provide an access code to guests using either email, text or print notifications. |
ui_access_code |
|
BYOD IOS SSID Use to specify the network that a device should connect to after on-boarding in a dual SSID flow. |
ui_byod_success_ios_ssid |
|
Client Provisioning Agent Type Use to specify the currently configured agent in the client provisioning policy, such as the AnyConnect agent or the NAC agent. |
ui_client_provision_agent_type |
|
Client Provisioning Agent URL Use to specify the download URL for the posture agent. |
ui_client_provision_agent_url |
|
Client Provisioning agent install minutes Use to notify guests the amount of time (set by the remediation timer) in which they must complete the installation instructions on the Client Provisioning page. If guests do not complete the installation instructions before the timer expires, they must refresh the browser page and go through the login process again. |
ui_client_provision_install_agent_mins |
|
Company |
ui_company |
|
Email address |
ui_email_address |
|
End date and time |
ui_end_date_time |
|
First name |
ui_first_name |
|
Last name |
ui_last_name |
|
Location name |
ui_location_name |
|
Maximum registered devices |
ui_max_reg_devices |
|
Maximum simultaneous logins |
ui_max_siml_login |
|
Password |
ui_password |
|
Person being visited (email) |
ui_person_visited |
|
Phone number |
ui_phone_number |
|
Reason for visit |
ui_reason_visit |
|
SMS Provider |
ui_sms_provider |
|
SSID Use to specify the wireless network that a guest can use to connect to the network. |
ui_ssid |
|
Start date and time |
ui_start_date_time |
|
Time left |
ui_time_left |
|
Username |
ui_user_name |
| Display Name | Substitute with Variable Name |
|---|---|
|
Guest - Company |
ui_guest_company |
|
Guest - Email address |
ui_guest_email_address |
|
Guest - End date and time |
ui_guest_end_date_time |
|
Guest - First name |
ui_guest_first_name |
|
Guest - Last name |
ui_guest_last_name |
|
Guest - Location name |
ui_guest_location_name |
|
Guest - Maximum registered devices |
ui_guest_max_reg_devices |
|
Guest - Maximum simultaneous logins |
ui_guest_max_siml_login |
|
Guest - Password |
ui_guest_password |
|
Guest - Person being visited (email) |
ui_guest_person_visited |
|
Guest - Phone number |
ui_guest_phone_number |
|
Guest - Reason for visit |
ui_guest_reason_visit |
|
Guest - SMS Provider |
ui_guest_sms_provider |
|
Guest - SSID Use to specify the wireless network that a guest can use to connect to the network. |
ui_guest_ssid |
|
Guest - Start date and time |
ui_guest_start_date_time |
|
Guest - Time left |
ui_guest_time_left |
|
Guest - Username |
ui_guest_user_name |
|
Username Use to specify the username of the user logged into the portal. |
ui_sponsor_user_name |
|
Use to display "From" in the Guest Access Information page. |
ui_from_label |
|
Use to display "First Login" in the Guest Access Information page. |
ui_first_login_text |
|
Use to display guest account notification message if the access time starts at First Login. |
ui_notification_first_login_text |
|
Dynamic variable that represents the account duration in email notifications. |
ui_access_duration |
|
Dynamic variable to display an account that is no longer available. For Start-End accounts, the date is the End date and for From-First-Login account, the date is the account creation date plus the purge duration days. |
ui_account_purge_date |
|
Use to restrict the sponsor from changing the guest type from From First Login to Start-End or vice versa, if the guest user has logged in at least once in the past. Displayed in the General Sponsor Portal Messages. |
ui_guest_type_change_ffl_startend_not_allowed_error ui_guest_type_change_ startend_ffl_not_allowed_error |
| Display Name | Substitute with Variable Name |
|---|---|
|
MDM - Vendor Name |
ui_mdm_vendor_name |
| Display Name | Substitute with Variable Name |
|---|---|
|
MyDevices - Login Failure Rate Limit |
$user_login_failure_rate_limit$ |
|
MyDevices - Max Devices to Register |
ui_max_register_devices |
|
MyDevices - User Name Use to specify the username of the user logged into the portal. |
$session_username$ |
 Feedback