-
- Administration User Interface Reference
- Guest Access User Interface Reference
- Web Portals Customization Reference
- Policy User Interface Reference
- Operations User Interface Reference
- Network Access Flows
- Switch and Wireless LAN Controller Configuration Required to Support Cisco ISE Functions
- Supported Management Information Bases in Cisco ISE
- Enable Your Switch to Support Standard Web Authentication
- Local Username and Password Definition for Synthetic RADIUS Transactions
- NTP Server Configuration to Ensure Accurate Log and Accounting Timestamps
- Command to Enable AAA Functions
- RADIUS Server Configuration on the Switch
- Configure the Switch to Send RADIUS Accounting Start/Stop to Inline Posture Nodes
- Command to Enable RADIUS Change of Authorization (CoA)
- Command to Enable Device Tracking and DHCP Snooping
- Command to Enable 802.1X Port-Based Authentication
- Command to Enable EAP for Critical Authentications
- Command to Throttle AAA Requests Using Recovery Delay
- VLAN Definitions Based on Enforcement States
- Local (Default) ACLs Definition on the Switch
- Enable Cisco Trustsec Switch Ports
- Command to Enable EPM Logging
- Command to Enable SNMP Traps
- Command to Enable SNMP v3 Query for Profiling
- Command to Enable MAC Notification Traps for Profiler to Collect
- RADIUS Idle-Timeout Configuration on the Switch
- Wireless LAN Controller Configuration for iOS Supplicant Provisioning
- Wireless LAN Controller Support for Apple Devices
- Configuring ACLs on the Wireless LAN Controller for MDM Interoperability
Switch and Wireless LAN Controller Configuration Required to Support Cisco ISE Functions
To ensure Cisco ISE is able to interoperate with network switches and functions from Cisco ISE are successful across the network segment, you need to configure network switches with the necessary NTP, RADIUS/AAA, 802.1X, MAB, and other settings for communication with Cisco ISE.
- Enable Your Switch to Support Standard Web Authentication
- Local Username and Password Definition for Synthetic RADIUS Transactions
- NTP Server Configuration to Ensure Accurate Log and Accounting Timestamps
- Command to Enable AAA Functions
- RADIUS Server Configuration on the Switch
- Configure the Switch to Send RADIUS Accounting Start/Stop to Inline Posture Nodes
- Command to Enable RADIUS Change of Authorization (CoA)
- Command to Enable Device Tracking and DHCP Snooping
- Command to Enable 802.1X Port-Based Authentication
- Command to Enable EAP for Critical Authentications
- Command to Throttle AAA Requests Using Recovery Delay
- VLAN Definitions Based on Enforcement States
- Local (Default) ACLs Definition on the Switch
- Enable Cisco Trustsec Switch Ports
- Command to Enable EPM Logging
- Command to Enable SNMP Traps
- Command to Enable SNMP v3 Query for Profiling
- Command to Enable MAC Notification Traps for Profiler to Collect
- RADIUS Idle-Timeout Configuration on the Switch
- Wireless LAN Controller Configuration for iOS Supplicant Provisioning
- Wireless LAN Controller Support for Apple Devices
- Configuring ACLs on the Wireless LAN Controller for MDM Interoperability
Enable Your Switch to Support Standard Web Authentication
Ensure that you include the following commands in your switch configuration to enable standard Web Authenticating functions for Cisco ISE, including provisions for URL redirection upon authentication:
ip classless


ip route 0.0.0.0 0.0.0.0 10.1.2.3


ip http server

! Must enable HTTP/HTTPS for URL-redirection on port 80/443

ip http secure-server
Local Username and Password Definition for Synthetic RADIUS Transactions
Enter the following command to enable the switch to talk to the Cisco ISE node as though it is the RADIUS server for this network segment:
username test-radius password 0 abcde123
NTP Server Configuration to Ensure Accurate Log and Accounting Timestamps
Ensure that you specify the same NTP server as you have set in Cisco ISE at by entering the following command:
ntp server <IP_address>|<domain_name>
Command to Enable AAA Functions
Enter the following commands to enable the various AAA functions between the switch and Cisco ISE, including 802.1X and MAB authentication functions:
aaa new-model

! Creates an 802.1X port-based authentication method list

aaa authentication dot1x default group radius

! Required for VLAN/ACL assignment

aaa authorization network default group radius

! Authentication & authorization for webauth transactions

aaa authorization auth-proxy default group radius

! Enables accounting for 802.1X and MAB authentications

aaa accounting dot1x default start-stop group radius

!

aaa session-id common

!

aaa accounting update periodic 5


! Update AAA accounting information periodically every 5 minutes


aaa accounting system default start-stop group radius

!

aaa server radius dynamic-author <cr>


client 10.0.56.17 server-key cisco

! Enables Cisco ISE to act as a AAA server when interacting with the client at IP address 10.0.56.17
RADIUS Server Configuration on the Switch
Configure the switch to interoperate with Cisco ISE acting as the RADIUS source server by entering the following commands:
!
radius-server attribute 6 on-for-login-auth

! Include RADIUS attribute 8 in every Access-Request

radius-server attribute 8 include-in-access-req

! Include RADIUS attribute 25 in every Access-Request

radius-server attribute 25 access-request include

! Wait 3 x 30 seconds before marking RADIUS server as dead

radius-server dead-criteria time 30 tries 3


! Use RFC-standard ports (1812/1813)
radius-server host <Cisco_ISE_IP_address> auth-port 1812 acct-port 1813 test usernametest-radius key 0 <RADIUS-KEY>

!
radius-server vsa send accounting
!
radius-server vsa send authentication
!
! send RADIUS requests from the MANAGEMENT VLAN

ip radius source-interface <VLAN_number>
 Note | We recommend that you configure a dead-criteria time of 30 seconds with 3 retries to provide longer response times for RADIUS requests that use Active Directory for authentication. |
Configure the Switch to Send RADIUS Accounting Start/Stop to Inline Posture Nodes
The network access device should be configured to send RADIUS accounting “Start” and “Stop” messages at the beginning and end of a session, respectively, with the remote device’s IP address in those messages to the Inline Posture nodes. The Inline Posture node associates the device IP address to any relevant authorization profiles downloaded over the life of a session. For example, a remote device may have an “unknown-compliance-state” authorization profile at initial login, then switch to a “compliant” authorization profile following CoA (assuming successful device posture assessment).
Command to Enable RADIUS Change of Authorization (CoA)
Specify the settings to ensure the switch is able to appropriately handle RADIUS Change of Authorization behavior supporting Posture functions from Cisco ISE by entering the following commands:
aaa server radius dynamic-author


client <ISE-IP> server-key 0 abcde123
Command to Enable Device Tracking and DHCP Snooping
! Optional

ip dhcp snooping

! Required!

ip device tracking
In RADIUS Accounting, the DHCP attributes are not sent by IOS sensor to Cisco ISE even when dhcp snooping is enabled. In such cases, the dhcp snooping should be enabled on the VLAN to make the DHCP active.
Use the following commands to enable dhcp snooping on VLAN:
ip dhcp snooping
ip dhcp snooping vlan 1-100
(VLAN range should include used for data and vlan)
Command to Enable 802.1X Port-Based Authentication
Enter the following commands to turn 802.1X authentication on for switch ports, globally:
dot1x system-auth-control
Command to Enable EAP for Critical Authentications
To support supplicant authentication requests over the LAN, enable EAP for critical authentications (Inaccessible Authentication Bypass) by entering the following command:
dot1x critical eapol
Command to Throttle AAA Requests Using Recovery Delay
When a critical authentication recovery event takes place, you can configure the switch to automatically introduce a delay (in seconds) to ensure Cisco ISE is able to launch services again following recovery by entering the following command:
authentication critical recovery delay 1000
VLAN Definitions Based on Enforcement States
Enter the following commands to define the VLAN names, numbers, and SVIs based on known enforcement states in your network. Create the respective VLAN interfaces to enable routing between networks. This can be especially helpful to handle multiple sources of traffic passing over the same network segments—traffic from both PCs and the IP phone through which the PC is connected to the network, for example.
Note | The first IP helper goes to the DHCP server and the second IP helper sends a copy of the DHCP request to the inline posture node for profiling. |
vlan <VLAN_number>

name ACCESS!

vlan <VLAN_number>

name VOICE

!

interface <VLAN_number>

description ACCESS

ip address 10.1.2.3 255.255.255.0

ip helper-address <DHCP_Server_IP_address>

ip helper-address <Cisco_ISE_IP_address>

!

interface <VLAN_number>

description VOICE

ip address 10.2.3.4 255.255.255.0

ip helper-address <DHCP_Server_IP_address>
Local (Default) ACLs Definition on the Switch
Enable these functions on older switches (with Cisco IOS software releases earlier than 12.2(55)SE) to ensure Cisco ISE is able to perform the dynamic ACL updates required for authentication and authorization by entering the following commands:
ip access-list extended ACL-ALLOW

 permit ip any any

!

ip access-list extended ACL-DEFAULT

  remark DHCP

  permit udp any eq bootpc any eq bootps

  remark DNS

  permit udp any any eq domain

  remark Ping

  permit icmp any any

  remark Ping

  permit icmp any any

  remark PXE / TFTP

  permit udp any any eq tftp

  remark Allow HTTP/S to ISE and WebAuth portal


permit tcp any host <Cisco_ISE_IP_address> eq www


permit tcp any host <Cisco_ISE_IP_address> eq 443


permit tcp any host <Cisco_ISE_IP_address> eq 8443


permit tcp any host <Cisco_ISE_IP_address> eq 8905


permit udp any host <Cisco_ISE_IP_address> eq 8905


permit udp any host <Cisco_ISE_IP_address> eq 8906


permit tcp any host <Cisco_ISE_IP_address> eq 8080


permit udp any host <Cisco_ISE_IP_address> eq 9996


remark Drop all the rest

  deny ip any any log


!

! The ACL to allow URL-redirection for WebAuth

ip access-list extended ACL-WEBAUTH-REDIRECT

 permit tcp any any eq www

 permit tcp any any eq 443
Note | This configuration on the WLC my increase CPU utilization and raises the risk of system instability. This is an IOS issue and does not adversely affect Cisco ISE. |
Enable Cisco Trustsec Switch Ports
To ensure Cisco ISE is able to interoperate with an existing Cisco Trustsec deployment, use the following procedure to ensure that you have enabled all of the functions necessary on the switch.
Command to Enable EPM Logging
Set up standard logging functions on the switch to support possible troubleshooting/recording for Cisco ISE functions:
epm logging
Command to Enable SNMP Traps
Ensure the switch is able to receive SNMP trap transmissions from Cisco ISE over the appropriate VLAN in this network segment:
snmp-server community public RO


snmp-server trap-source <VLAN_number>
Command to Enable SNMP v3 Query for Profiling
Configure the switch to ensure SNMP v3 polling takes place as intended to support Cisco ISE profiling services. First, configure the SNMP settings in Cisco ISE by choosing .
Snmp-server user <name> <group> v3 auth md5 <string> priv des <string>


snmp-server group  <group> v3 priv


snmp-server group <group> v3 priv context vlan-1
Note | The snmp-server group <group> v3 priv context vlan-1 command must be configured for each context. The snmp show context command lists all the context information. |
If the SNMP Request times out and there is no connectivity issue, then you can increase the Timeout value.
Command to Enable MAC Notification Traps for Profiler to Collect
Configure your switch to transmit the appropriate MAC notification traps so that the Cisco ISE Profiler function is able to collect information on network endpoints:
mac address-table notification change


mac address-table notification mac-move


snmp trap mac-notification change added


snmp trap mac-notification change removed
RADIUS Idle-Timeout Configuration on the Switch
To configure the RADIUS Idle-timeout on a switch, use the following command:
Switch(config-if)# authentication timer inactivity
where inactivity is interval of inactivity in seconds, after which client activity is considered unauthorized.
In Cisco ISE, you can enable this option for any Authorization Policies to which such a session inactivity timer should apply from .
Wireless LAN Controller Configuration for iOS Supplicant Provisioning
To support Apple iOS-based devices (iPhone/iPad) switching from one SSID to another on the same wireless access point, be sure to configure the Wireless LAN Controller (WLC) to enable the “FAST SSID change” function. This function helps ensure iOS-based devices are able to more quickly switch between SSIDs.
WLC (config)# FAST SSID change
You might see the following error message while trying to connect to a wireless network for some of the Apple iOS-based devices:
Could not scan for Wireless Networks.You can ignore this error message because this does not affect the authentication of the device.
Wireless LAN Controller Support for Apple Devices
Apple devices include the Apple Captive Network Assistant (CNA) feature, which detects captive networks (like the Cisco ISE WebAuth page), but it interferes with the portal redirection required to support guests and personal devices.
You can bypass this feature by enabling the web-auth captive-bypass command on the Wireless LAN Controller (WLC):
WLC > config network web-auth captive-bypass enable

Web-auth support for Captive-Bypass will be enabled.

You must reset system for this setting to take effect.

WLC > save config

Are you sure you want to save? (y/n) y

Configuration Saved!

WLC >
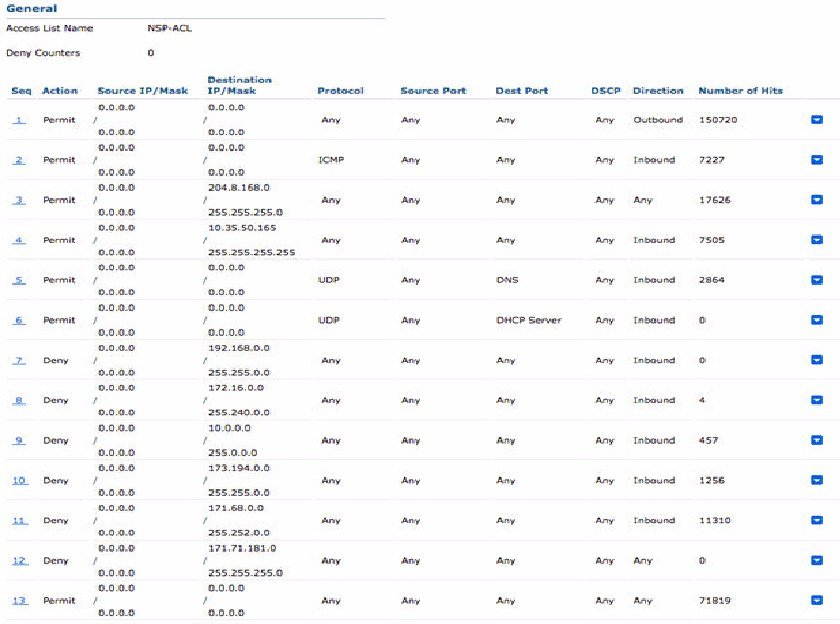
Configuring ACLs on the Wireless LAN Controller for MDM Interoperability
You must configure ACLs on the wireless LAN controller for use in authorization policy to redirect nonregistered devices and certificate provisioning. Your ACLs should be in the following sequence.
| Step 1 | Allow all outbound traffic from server to client. |
| Step 2 | (Optional) Allow ICMP inbound traffic from client to server for troubleshooting. |
| Step 3 | Allow access to MDM server for unregistered and noncompliant devices to download the MDM agent and proceed with compliance checks. |
| Step 4 | Allow all inbound traffic from client to server to ISE for Web Portal and supplicant, and certificate provisioning flows. |
| Step 5 | Allow inbound DNS traffic from client to server for name resolution. |
| Step 6 | Allow inbound DHCP traffic from client to server for IP addresses. |
| Step 7 | Deny all inbound traffic from client to server to corporate resources for redirection to ISE (as per your company policy). |
| Step 8 | (Optional) Permit the rest of the traffic. |
The following example shows the ACLs for redirecting a nonregistered device to the BYOD flow. In this example, the Cisco ISE ip address is 10.35.50.165, the internal corporate network ip address is 192.168.0.0 and 172.16.0.0 (to redirect), and the MDM server subnet is 204.8.168.0.
 Feedback