-
- Administration User Interface Reference
- Guest Access User Interface Reference
- Web Portals Customization Reference
- Policy User Interface Reference
- Operations User Interface Reference
- Network Access Flows
- Switch and Wireless LAN Controller Configuration Required to Support Cisco ISE Functions
- Supported Management Information Bases in Cisco ISE
- Certificate Management in Cisco ISE
- Certificates Enable Cisco ISE to Provide Secure Access
- Certificate Usage
- Certificate Matching in Cisco ISE
- Validity of X.509 Certificates
- Enable PKI in Cisco ISE
- Wildcard Certificates
- System Certificates
- Trusted Certificates Store
- Certificates in Trusted Certificates Store
- Trusted Certificate Naming Constraint
- View Trusted Store Certificates
- Change the Status of a Certificate in Trusted Certificates Store
- Add a Certificate to Trusted Certificates Store
- Edit a Trusted Certificate
- Delete Trusted Certificates
- Export a Certificate from the Trusted Certificates Store
- Import the Root Certificates to the Trusted Certificate Store
- Certificate Chain Import
- Certificate Signing Requests
- Install Trusted Certificates for Cisco ISE Inter-node Communication
- Set Up Certificates for Portal Use
- User and Endpoint Certificate Renewal
- Dictionary Attributes Used in Policy Conditions for Certificate Renewal
- Authorization Policy Condition for Certificate Renewal
- CWA Redirect to Renew Certificates
- Configure Cisco ISE to Allow Users to Renew Certificates
- Update the Allowed Protocol Configuration
- Create an Authorization Policy Profile for CWA Redirection
- Create an Authorization Policy Rule to Renew Certificates
- Certificate Renewal Fails for Apple iOS Devices
- Certificates Provisioned on Primary Administration Node and Policy Service Nodes
- Simple Certificate Enrollment Protocol Profiles
- Endpoint Certificates
- Backup and Restore of Cisco ISE CA Certificates and Keys
- Generate Root CA and Subordinate CAs on the PAN and PSN
- Configure Cisco ISE Root CA as Subordinate CA of an External PKI
- Configure Cisco ISE to Use Certificates for Authenticating Personal Devices
- Add Users to the Employee User Group
- Create a Certificate Authentication Profile for TLS-Based Authentication
- Create an Identity Source Sequence for TLS-Based Authentication
- Configure Certificate Authority Settings
- Create a CA Template
- Create a Native Supplicant Profile to be Used in Client Provisioning Policy
- Download Agent Resources from Cisco Site for Windows and MAC OS X Operating Systems
- Create Client Provisioning Policy Rules for Apple iOS, Android, and MACOSX Devices
- Configure the Dot1X Authentication Policy Rule for TLS-Based Authentication
- Create Authorization Profiles for Central Web Authentication and Supplicant Provisioning Flows
- Create Authorization Policy Rules
- CA Service Policy Reference
- Client Provisioning Policy Rules for Certificate Services
- Authorization Profiles for Certificate Services
- Authorization Policy Rules for Certificate Services
- Revoke an Endpoint Certificate
Manage Certificates
Certificate Management in Cisco ISE
A certificate is an electronic document that identifies an individual, a server, a company, or other entity and associates that entity with a public key. A self-signed certificate is signed by its own creator. Certificates can be self-signed or digitally signed by an external Certificate Authority (CA). A CA-signed digital certificate is considered industry standard and more secure.
Certificates are used in a network to provide secure access. Cisco ISE uses certificates for internode communication, and for communicating with external servers such as the syslog server, feed server, and all the end-user portals (guest, sponsor, and personal devices portals). Certificates identify a Cisco ISE node to an endpoint and secures the communication between that endpoint and the Cisco ISE node.
You can use the Admin portal to manage certificates for all the nodes in your deployment.
- Certificates Enable Cisco ISE to Provide Secure Access
- Certificate Usage
- Certificate Matching in Cisco ISE
- Validity of X.509 Certificates
- Enable PKI in Cisco ISE
- Wildcard Certificates
- System Certificates
- Trusted Certificates Store
- Certificate Signing Requests
- Install Trusted Certificates for Cisco ISE Inter-node Communication
- Set Up Certificates for Portal Use
- User and Endpoint Certificate Renewal
Certificates Enable Cisco ISE to Provide Secure Access
The Cisco Identity Services Engine (ISE) relies on public key infrastructure (PKI) to provide secure communication with both endpoints and administrators, as well as between Cisco ISE nodes in a multinode deployment. PKI relies on X.509 digital certificates to transfer public keys for encryption and decryption of messages, and to verify the authenticity of other certificates representing users and devices. Cisco ISE provides the Admin Portal to manage the following two categories of X.509 certificates:
-
System certificates—These are server certificates that identify a Cisco ISE node to client applications. Every Cisco ISE node has its own system certificates, each of which are stored on the node along with the corresponding private key.
-
Trusted certificates—These are certificate authority (CA) certificates used to establish trust for the public keys received from users and devices. The Trusted Certificates Store also contains certificates that are distributed by the Simple Certificate Enrollment Protocol (SCEP), which enables registration of mobile devices into the enterprise network. Certificates in the Trusted Certificates Store are managed on the Primary Administration Node (PAN), and are automatically replicated to all other nodes in an Cisco ISE deployment.
In a distributed deployment, you must import the certificate only in to the certificate trust list (CTL) of the PAN. The certificate gets replicated to the secondary nodes.
In general, to ensure certificate authentication in Cisco ISE is not impacted by minor differences in certificate-driven verification functions, use lower case hostnames for all Cisco ISE nodes deployed in a network.
Certificate Usage
When you add or import a certificate in to Cisco ISE, you should specify the purpose for which the certificate is to be used:
-
Admin: For internode communication and authenticating the Admin portal
-
EAP: For TLS-based EAP authentication
-
Portal: For communicating with all Cisco ISE end-user portals
-
xGrid: For communicating with the pxGrid controller
You can associate different certificates from each node for communicating with the Admin portal (Admin), the pxGrid controller (xGrid), and for TLS-based EAP authentication (EAP). However, you can associate only one certificate from each node for each of these purposes.
With multiple Policy Service nodes (PSNs) in a deployment that can service a web portal request, Cisco ISE needs a unique identifier to identify the certificate that has to be used for portal communication. When you add or import certificates that are designated for portal use, you must define a certificate group tag and associate it with the corresponding certificate on each node in your deployment. You must associate this certificate group tag to the corresponding end-user portals (guest, sponsor, and personal devices portals). This certificate group tag is the unique identifier that helps Cisco ISE identify the certificate that has to be used when communicating with each of these portals. You can designate one certificate from each node for each of the portals.
Certificate Matching in Cisco ISE
Cisco ISE checks for a matching subject name as follows:
-
Cisco ISE looks at the subject alternative name (SAN) extension of the certificate. If the SAN contains one or more DNS names, then one of the DNS names must match the FQDN of the Cisco ISE node. If a wildcard certificate is used, then the wildcard domain name must match the domain in the Cisco ISE node’s FQDN.
-
If there are no DNS names in the SAN, or if the SAN is missing entirely, then the Common Name (CN) in the Subject field of the certificate or the wildcard domain in the Subject field of the certificate must match the FQDN of the node.
-
If no match is found, the certificate is rejected.
Validity of X.509 Certificates
X.509 certificates are only valid until a specific date. When a system certificate expires, the Cisco ISE functionality that depends on the certificate is impacted. Cisco ISE notifies you about the pending expiration of a system certificate when the expiration date is within 90 days. This notification appears in several ways:
-
Colored expiration status icons appear in the System Certificates page.
-
Expiration messages appear in the Cisco ISE System Diagnostic report.
-
Expiration alarms are generated at 90 days, 60 days, and every day in the final 30 days before expiration.
If the expiring certificate is a self-signed certificate, you can extend its expiration date by editing the certificate. For a CA-signed certificate, you must allow sufficient time to acquire replacement certificate from your CA.
Enable PKI in Cisco ISE
Public Key Infrastructure (PKI) is a cryptographic technique that enables secure communication and verifies the identity of a user using digital signatures.
Wildcard Certificates
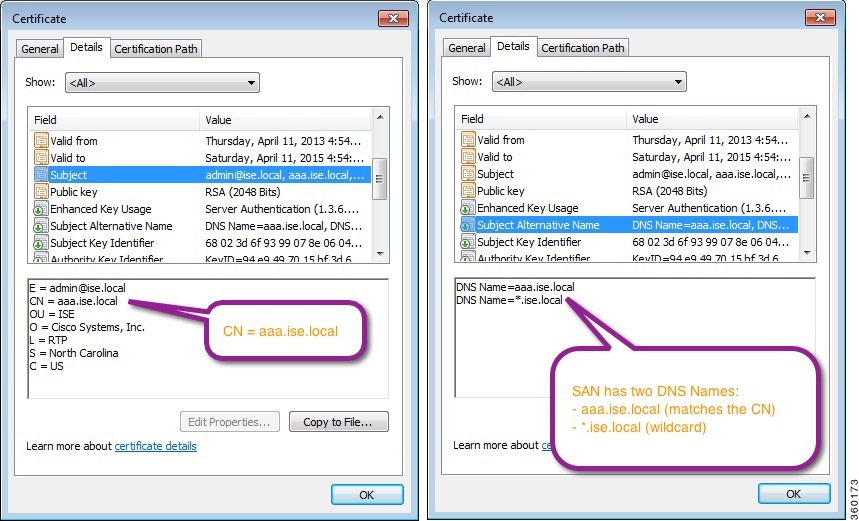
A wildcard certificate uses a wildcard notation (an asterisk and period before the domain name) and allows the certificate to be shared across multiple hosts in an organization. For example, the CN value for the Certificate Subject would be some generic hostname such as aaa.ise.local and the SAN field would include the same generic hostname and the wildcard notation such as DNS.1=aaa.ise.local and DNS.2=*.ise.local.
If you configure a wildcard certificate to use *.ise.local, you can use the same certificate to secure any other host whose DNS name ends with “.ise.local,” such as:
Wildcard certificates secure communication in the same way as a regular certificate, and requests are processed using the same validation methods.
The following figure shows an example of a wildcard certificate that is used to secure a web site.
- Wildcard Certificate Support in Cisco ISE
- Wildcard Certificates for HTTPS and EAP Communication
- Fully Qualified Domain Name in URL Redirection
- Advantages of Using Wildcard Certificates
- Disadvantages of Using Wildcard Certificates
- Wildcard Certificate Compatibility
Wildcard Certificate Support in Cisco ISE
In earlier releases, Cisco ISE used that CN value to replace the variable in the url-redirect A-V pair string. For all Centralized Web Authentication (CWA), onboarding, posture redirection, and so on, the CN value was used.
Cisco ISE uses the hostname of the ISE node as the CN.
Wildcard Certificates for HTTPS and EAP Communication
You can use wildcard server certificates in Cisco ISE for Admin (web-based service) and EAP protocols that use SSL/TLS tunneling. With the use of wildcard certificates, you no longer have to generate a unique certificate for each Cisco ISE node. Also, you no longer have to populate the SAN field with multiple FQDN values to prevent certificate warnings. Using an asterisk (*) in the SAN field allows you to share a single certificate across multiple nodes in a deployment and helps prevent certificate name mismatch warnings. However, use of wildcard certificates is considered less secure than assigning a unique server certificate for each Cisco ISE node.
 Note | If you use wildcard certificates, we strongly recommend that you partition your domain space for greater security. For example, instead of *.example.com, you can partition it as *.amer.example.com. If you do not partition your domain, it can lead to serious security issues. |
Wildcard certificate uses an asterisk (*) and a period before the domain name. For example, the CN value for a certificate’s Subject Name would be a generic host name such as aaa.ise.local and the SAN field would have the wildcard character such as *.ise.local. Cisco ISE supports wildcard certifications in which the wildcard character (*) is the left most character in the presented identifier. For example, *.example.com or *.ind.example.com. Cisco ISE does not support certificates in which the presented identifier contains additional characters along with the wildcard character. For example, abc*.example.com or a*b.example.com or *abc.example.com.
Fully Qualified Domain Name in URL Redirection
url-redirect=https://ip:port/guestportal/gateway?sessionId=SessionIdValue&action=cwa
When processing this request, Cisco ISE substitutes actual values for some keywords in this string. For example, SessionIdValue is replaced with the actual session ID of the request. For eth0 interface, Cisco ISE replaces the IP in the URL with the FQDN of the Cisco ISE node. For non-eth0 interfaces, Cisco ISE uses the IP address in the URL. You can assign a host alias(name) for interfaces eth1 through eth3, which Cisco ISE can then substitute in place of IP address during URL redirection.
To do this, you can use the ip host command in the configuration mode from the Cisco ISE CLI ISE /admin(config)# prompt:
ip host IP_address host-alias FQDN-string
where IP_address is the IP address of the network interface (eth1 or eth2 or eth3) and host-alias is the name that you assign to the network interface. FQDN-string is the fully qualified domain name of the network interface. Using this command, you can assign a host-alias or an FQDN-string or both to a network interface.
Here is an example using the ip host command: ip host a.b.c.d sales sales.amerxyz.comAfter you assign a host alias to the non-eth0 interface, you must restart the application services on Cisco ISE using the application start ise command.
Use the no form of this command to remove the association of the host alias with the network interface.
no ip host IP_address host-alias FQDN-string
Use the show running-config command to view the host alias definitions.
If you provide the FQDN-string, Cisco ISE replaces the IP address in the URL with the FQDN. If you provide only the host alias, Cisco ISE combines the host alias with the configured IP domain name to form a complete FQDN, and replaces the IP address in the URL with the FQDN. If you do not map a network interface to a host alias, then Cisco ISE uses the IP address of the network interface in the URL.
When you make use of non-eth0 interfaces for client provisioning or native supplicant or guest flows, you have to make sure that the IP address or host alias for non-eth0 interfaces should be configured appropriately in the Policy Service node certificate's SAN fields.
Advantages of Using Wildcard Certificates
Cost savings. Certificates signed by a third party Certificate Authority is expensive, especially as the number of servers increase. Wildcard certificates may be used on multiple nodes in the Cisco ISE deployment.
Operational efficiency. Wildcard certificates allow all Policy Service Node (PSN) EAP and web services to share the same certificate. In addition to significant cost savings, certificate administration is also simplified by creating the certificate once and applying it on all the PSNs.
Reduced authentication errors. Wildcard certificates address issues seen with Apple iOS devices where the client stores trusted certificates within the profile, and does not follow the iOS keychain where the signing root is trusted. When an iOS client first communicates with a PSN, it does not explicitly trust the PSN certificate, even though a trusted Certificate Authority has signed the certificate. Using a wildcard certificate, the certificate will be the same across all PSNs, so the user only has to accept the certificate once and successive authentications to different PSNs proceed without error or prompting.
Simplified supplicant configuration. For example, Microsoft Windows supplicant with PEAP-MSCHAPv2 and server certificate trust enabled requires that you specify each of the server certificate to trust, or the user may be prompted to trust each PSN certificate when the client connects using a different PSN. With wildcard certificates, a single server certificate can be trusted rather than individual certificates from each PSN.
Wildcard certificates result in an improved user experience with less prompting and more seamless connectivity.
Disadvantages of Using Wildcard Certificates
Loss of auditability and nonrepudiation
Increased exposure of the private key
Not common or understood by administrators
Wildcard certificates are considered less secure than a unique server certificate per ISE node. But, cost and other operational factors outweigh the security risk.
Security devices such as ASA also support wildcard certificates.
You must be careful when deploying wildcard certificates. For example, if you create a certificate with *.company.local and an attacker is able to recover the private key, that attacker can spoof any server in the company.local domain. Therefore, it is considered a best practice to partition the domain space to avoid this type of compromise.
To address this possible issue and to limit the scope of use, wildcard certificates may also be used to secure a specific subdomain of your organization. Add an asterisk (*) in the subdomain area of the common name where you want to specify the wildcard.
For example, if you configure a wildcard certificate for *.ise.company.local, that certificate may be used to secure any host whose DNS name ends in “.ise.company.local”, such as:
Wildcard Certificate Compatibility
Wildcard certificates are usually created with the wildcard listed as the Common Name (CN) of the Certificate Subject. Cisco ISE supports this type of construction. However, not all endpoint supplicants support the wildcard character in the Certificate Subject.
All Microsoft native supplicants tested (including Windows Mobile) do not support wildcard character in the Certificate Subject.
You can use another supplicant, such as Cisco AnyConnect Network Access Manager (NAM) that might allow the use of wildcard character in the Subject field.
You can also use special wildcard certificates such as DigiCert's Wildcard Plus that is designed to work with incompatible devices by including specific subdomains in the Subject Alternative Name of the certificate.
Although the Microsoft supplicant limitation appears to be a deterrent to using wildcard certificates, there are alternative ways to create the wildcard certificate that allow it to work with all devices tested for secure access, including the Microsoft native supplicants.
To do this, instead of using the wildcard character in the Subject, you must use the wildcard character in the Subject Alterative Name (SAN) field instead. The SAN field maintains an extension designed for checking the domain name (DNS name). See RFCs 6125 and 2128 for more information.
System Certificates
Cisco ISE system certificates are server certificates that identify a Cisco ISE node to other nodes in the deployment and to client applications. System certificates are:
-
Used for inter-node communication in a Cisco ISE deployment. Choose the Admin option in the Usage field for these certificates.
-
Used by browser and REST clients who connect to Cisco ISE web portals. Choose the Portal option in the Usage field for these certificates.
-
Used to form the outer TLS tunnel with PEAP and EAP-FAST. Choose the EAP option in the Usage field for mutual authentication with EAP-TLS, PEAP, and EAP-FAST.
-
Used to communicate with the pxGrid controller. Choose the pxGrid option in the Usage field for these certificates.
You must install valid system certificates on each node in your Cisco ISE deployment. By default, a self-signed certificate is created on a Cisco ISE node during installation time, and this certificate is designated for EAP, Admin, Portal, and pxGrid use (it has a key length of 1024 and is valid for one year).
Note | When you export a wildcard system certificate to be imported in to the other nodes (for inter-node communication), ensure that you export the certificate and private key, and specify an encryption password. During import, you will need the certificate, private key, and encryption password. |
Cisco recommends that you replace the self-signed certificate with a CA-signed certificates for greater security. To obtain a CA-signed certificate, you must:
- View System Certificates
- Import a System Certificate
- Generate a Self-Signed Certificate
- Edit a System Certificate
- Delete System Certificate
- Export a System Certificate
View System Certificates
The System Certificate page lists all the system certificates added to Cisco ISE.
To perform the following task, you must be a Super Admin or System Admin.
| Step 1 | Choose
>
System
Certificates.
The System Certificates page appears and provides the following information for the local certificates:
|
| Step 2 | Select a certificate and choose to display the certificate details. |
Import a System Certificate
You can import a system certificate for any Cisco ISE node from the Admin portal.
-
Ensure that you have the system certificate and the private key file on the system that is running the client browser.
-
If the system certificate that you import is signed by an external CA, import the relevant root CA and intermediate CA certificates in to the Trusted Certificates Store (Administration > System > Certificates > Trusted Certificates).
-
Cisco ISE does not support certificates that are signed with a hash algorithm greater than SHA-256. Hence, you must not import a server certificate that is signed with a hash algorithm greater than SHA-256.
-
If the system certificate that you import contains the basic constraints extension with the CA flag set to true, ensure that the key usage extension is present, and the keyEncipherment bit or the keyAgreement bit or both are set.
-
To perform the following task, you must be a Super Admin or System Admin.
Generate a Self-Signed Certificate
Note | If you are using a self-signed certificate and you must change the hostname of your Cisco ISE node, you must log in to the Admin portal of the Cisco ISE node, delete the self-signed certificate that has the old hostname, and generate a new self-signed certificate. Otherwise, Cisco ISE will continue to use the self-signed certificate with the old hostname. |
To perform the following task, you must be a Super Admin or System Admin.
| Step 1 | Choose
>
System
Certificates.
To generate a self-signed certificate from a secondary node, choose . |
| Step 2 | Click Generate Self Signed Certificate and enter the details in the Generate Self Signed Certificate page. |
| Step 3 | Check the Allow Wildcard Certificates check box if you want to generate a self-signed wildcard certificate (a certificate that contains an asterisk (*) in any Common Name in the Subject and/or the DNS name in the Subject Alternative Name. For example, DNS name assigned to the SAN can be *.amer.cisco.com. |
| Step 4 | Check the check boxes in the Usage area based on the service for which you want to use this certificate. |
| Step 5 | Click
Submit to
generate the certificate.
To restart the secondary nodes, from the CLI, enter the following commands in the given order: |
Edit a System Certificate
You can use this page to edit a system certificate and to renew a self-signed certificate. When you edit a wildcard certificate, the changes are replicated to all the nodes in the deployment. If you delete a wildcard certificate, that wildcard certificate is removed from all the nodes in the deployment.
To perform the following task, you must be a Super Admin or System Admin.
| Step 1 | Choose . |
| Step 2 | Check the check box next to the certificate that you want to edit, and click Edit. |
| Step 3 | To renew a self-signed certificate, check the Renew Self Signed Certificate check box and enter the Expiration TTL (Time to Live) in days, weeks, months, or years. |
| Step 4 | Click
Save to save your
changes.
If the Admin check box is checked, then the application server on the Cisco ISE node will be restarted. In addition, if the Cisco ISE node is the PAN in a deployment, then the application server on all other nodes in the deployment will also be restarted. The system restarts one node at a time, after the Primary Administration Node (PAN) restart has completed. |
Delete System Certificate
You can delete system certificates that you no longer use.
Even though you can delete multiple certificates from the System Certificates store at a time, you must have at least one certificate that can be used for Admin and EAP authentication. Also, you cannot delete any certificate that is used for Admin, EAP Authentication, Portals, or pxGrid service. However, you can delete the pxGrid certificate when the service is disabled.
If you choose to delete a wildcard certificate, the certificate is removed from all the nodes in the deployment.
Export a System Certificate
You can export a selected system certificate or a certificate and its associated private key. If you export a certificate and its private key for backup purposes, you can reimport them later if needed.
To perform the following task, you must be a Super Admin or System Admin.
| Step 1 | Choose > System Certificates. | ||
| Step 2 | Check the check box next to the certificate that you want to export and then click Export. | ||
| Step 3 | Choose whether to export only
the certificate, or the certificate and its associated private key.
| ||
| Step 4 | Enter the password if you have chosen to export the private key. The password should be at least 8 characters long. | ||
| Step 5 | Click
Export to save
the certificate to the file system that is running your client browser.
If you export only the certificate, the certificate is stored in the privacy-enhanced mail format. If you export both the certificate and private key, the certificate is exported as a .zip file that contains the certificate in the privacy-enhanced mail format and the encrypted private key file. |
Trusted Certificates Store
The Trusted Certificates Store contains X.509 certificates that are used for trust and for Simple Certificate Enrollment Protocol (SCEP). The certificates in the Trusted Certificate Store are managed on the PAN, and are replicated to every node in the Cisco ISE deployment. Cisco ISE supports wildcard certificates.
Cisco ISE uses the trusted certificates for the following purposes:
-
To verify client certificates used for authentication by endpoints, and by Cisco ISE administrators accessing the Admin Portal using certificate-based administrator authentication.
-
To enable secure communication between Cisco ISE nodes in a deployment. The Trusted Certificates Store must contain the chain of CA certificates needed to establish trust with the system certificate on each node in a deployment.
-
If a self-signed certificate is used for the system certificate, the self-signed certificate from each node must be placed in the Trusted Certificates Store of the PAN.
-
If a CA-signed certificate is used for the system certificate, the CA root certificate, as well as any intermediate certificates in the trust chain, must be placed in the Trusted Certificates Store of the PAN.
-
-
To enable secure LDAP authentication. A certificate from the Certificate Store must be selected when defining an LDAP identity source that will be accessed over SSL.
-
To distribute to personal devices preparing to register in the network using the personal devices portals. Cisco ISE implements the SCEP on Policy Service Nodes (PSN) to support personal device registration. A registering device uses the SCEP protocol to request a client certificate from a PSN. The PSN contains a registration authority (RA) that acts as an intermediary; it receives and validates the request from the registering device, and then forwards the request to an external CA or the internal Cisco ISE CA, which issues the client certificate. The CA sends the certificate back to the RA, which returns it to the device.
Each SCEP CA used by Cisco ISE is defined by a SCEP RA Profile. When a SCEP RA Profile is created, two certificates are automatically added to the Trusted Certificates Store: The SCEP protocol requires that these two certificates be provided by the RA to a registering device. By placing these two certificates in the Trusted Certificates Store, they are replicated to all PSN nodes for use by the RA on those nodes.
Note
X.509 certificates imported to Cisco ISE must be in Privacy-Enhanced Mail (PEM) or Distinguished Encoding Rule (DER) format. Files containing a certificate chain, that is, a system certificate along with the sequence of trust certificates that sign it, can be imported, subject to certain restrictions.
- Certificates in Trusted Certificates Store
- Trusted Certificate Naming Constraint
- View Trusted Store Certificates
- Change the Status of a Certificate in Trusted Certificates Store
- Add a Certificate to Trusted Certificates Store
- Edit a Trusted Certificate
- Delete Trusted Certificates
- Export a Certificate from the Trusted Certificates Store
- Import the Root Certificates to the Trusted Certificate Store
- Certificate Chain Import
Certificates in Trusted Certificates Store
The Trusted Certificate Store is prepopulated with trusted certificates: Manufacturing certificate, Root certificate, Endpoint CA, Endpoint RA, and other trusted certificates. The Root certificate (Cisco Root CA) signs the Manufacturing (Cisco CA Manufacturing) certificate. These certificates are disabled by default. If you have Cisco IP phones as endpoints in your deployment, you should enable these two certificates so the Cisco-signed client certificates for the phones can be authenticated.
Trusted Certificate Naming Constraint
A trusted certificate in CTL may contain a name constraint extension. This extension defines a namespace for values of all subject name and subject alternative name fields of subsequent certificates in a certificate chain. Cisco ISE does not check constraints specified in a root certificate.
The following name constraints are supported:
-
The Directory name constraint should be a prefix of the directory name in subject/SAN. For example,
-
URI (The URI constraint must start with a URI prefix such as http://, https://, ftp://, or ldap://).
The following name constraints are not supported:
When a trusted certificate contains a constraint that is not supported and certificate that is being verified does not contain the appropriate field, it is rejected because Cisco ISE cannot verify unsupported constraints.
The following is an example of the name constraints definition within the trusted certificate:
X509v3 Name Constraints: critical
                Permitted:
                  othername:<unsupported>
                  email:.abcde.at
                  email:.abcde.be
                  email:.abcde.bg
                  email:.abcde.by
                  DNS:.dir
                  DirName: DC = dir, DC = emea
                  DirName: C = AT, ST = EMEA, L = AT, O = ABCDE Group, OU = Domestic
                  DirName: C = BG, ST = EMEA, L = BG, O = ABCDE Group, OU = Domestic
                  DirName: C = BE, ST = EMEA, L = BN, O = ABCDE Group, OU = Domestic
                  DirName: C = CH, ST = EMEA, L = CH, O = ABCDE Group, OU = Service Z100
                  URI:.dir
                  IP:172.23.0.171/255.255.255.255
                Excluded:
                  DNS:.dir
                  URI:.dir
An acceptable client certificate subject that matches the above definition is as follows:
Subject: DC=dir, DC=emea, OU=+DE, OU=OU-Administration, OU=Users, OU=X1, CN=cwinwell
View Trusted Store Certificates
The Trusted Certificates page lists all the trusted certificates that have been added to Cisco ISE. To view the trusted certificates, you must be a Super Admin or System Admin.
To view all the certificates, choose . The Trusted Certificates page appears, listing all the trusted certificates.
Change the Status of a Certificate in Trusted Certificates Store
The status of a certificate must be enabled so that Cisco ISE can use the certificate for establishing trust. When a certificate is imported into the Trusted Certificates Store, it is automatically enabled.
Add a Certificate to Trusted Certificates Store
The Certificate Store page allows you to add CA certificates to Cisco ISE.
-
To perform the following task, you must be a Super Admin or System Admin.
-
Ensure that the certificate store certificate resides on the file system of the computer where your browser is running. The certificate must be in PEM or DER format.
-
If you plan to use the certificate for Admin or EAP authentication, ensure that the basic constraints are defined in the certificate and the CA flag is set to true.
| Step 1 | Choose > Trusted Certificates. |
| Step 2 | Click Import. |
| Step 3 | Configure the field values as
necessary.
If you plan to use any sub-CA certificate in the certificate chain for EAP authentication, ensure that you check the Trust for client authentication and Syslog check box while importing all the certificates in the certificate chain up until the Root CA. When you change the authentication type from password-based authentication to certificate-based authentication, Cisco ISE restarts the application server on each node in your deployment, starting with the application server on the PAN and followed, one-by-one, by each additional node. |
Edit a Trusted Certificate
After you add a certificate to the Trusted Certificates Store, you can further edit it by using the edit settings.
To perform the following task, you must be a Super Admin or System Admin.
Delete Trusted Certificates
You can delete trusted certificates that you no longer need. However, ensure that you do not delete the ISE Internal CA (Certificate Authority) certificates. The ISE Internal CA certificates can be deleted only when you replace the ISE Root Certificate Chain for the entire deployment.
| Step 1 | Choose . |
| Step 2 | Check the check boxes next to
the certificates that you want to delete, and click
Delete.
A warning message appears. If you have chosen to delete the ISE Internal CA certificates, click:
|
| Step 3 | Click Yes to delete the certificate. |
Export a Certificate from the Trusted Certificates Store
To perform the following task, you must be a Super Admin or System Admin.
Import the Root Certificates to the Trusted Certificate Store
While importing the root CA and intermediate CA certificates, you can specify the service(s) for which the Trusted CA certificates are to be used.
You must have the root certificate and other intermediate certificates from the Certificate Authority that signed your CSRs and returned the digitally signed CA certificates.
| Step 1 | Choose . |
| Step 2 | Click Import. |
| Step 3 | Click Browse to select the root CA certificate. |
| Step 4 | Enter a Friendly Name. If you do not enter a Friendly Name, Cisco ISE autopopulates this field with a Friendly Name of the format common-name#issuer#nnnnn, where nnnnn is a unique number. You can edit the certificate again to change the Friendly Name. |
| Step 5 | Choose the root certificate returned by your CA. |
| Step 6 | Check the check boxes next to the services for which you want to use this trusted certificate for. |
| Step 7 | Enter a description. |
| Step 8 | Click Submit. |
What to Do Next
Import the intermediate CA certificates in to the Trusted Certificates store (if applicable).
Certificate Chain Import
You can import multiple certificates from a single file that contains a certificate chain received from a Certificate store. All certificates in the file must be in Privacy-Enhanced Mail (PEM) format, and the certificates must be arranged in the following order:
-
The last certificate in the file must be the client or server certificate being issued by the CA.
-
All preceding certificates must be the root CA certificate plus any intermediate CA certificates in the signing chain for the issued certificate.
Importing a certificate chain is a two-step process:
-
Import the certificate chain file into the Trusted Certificate Store in the Admin portal. This operation imports all certificates from the file except the last one into the Trusted Certificates Store.
-
Import the certificate chain file using the Bind a CA-Signed Certificate operation. This operation imports the last certificate from the file as a local certificate.
Certificate Signing Requests
For a certificate authority (CA) to issue a signed certificate, you must create a certificate signing request (CSR) and submit it to the CA.
The list of Certificate Signing Requests (CSRs) that you have created is available in the Certificate Signing Requests page. To obtain signatures from a Certificate Authority (CA), you must export the CSRs and then send the certificates to the CA. The CA signs and returns your certificates.
You can manage the certificates centrally from the Admin portal. You can create CSRs for all nodes in the deployment and export them. Then you should submit the CSRs to a CA, obtain the CA-signed certificates from the CA, import the root and intermediary CA certificates returned by the CA in to the Trusted Certificates Store, and bind the CA-signed certificates to the CSRs.
- Create a Certificate Signing Request and Submit the CSR to a Certificate Authority
- Bind the CA-Signed Certificate to the CSR
- Export a Certificate Signing Request
Create a Certificate Signing Request and Submit the CSR to a Certificate Authority
You can generate a certificate signing request (CSR) to obtain a CA-signed certificate for the nodes in your deployment. You can generate the CSR for select nodes in the deployment or for all the nodes in your deployment.
| Step 1 | Choose Administration > . |
| Step 2 | Enter the values for generating a CSR. See Certificate Signing Request Settings for information on each of the fields. |
| Step 3 | Click
Generate to generate the CSR.
The CSR is generated. |
| Step 4 | Click Export to open the CSR in a Notepad. |
| Step 5 | Copy all the text from “-----BEGIN CERTIFICATE REQUEST-----” through “-----END CERTIFICATE REQUEST-----.” |
| Step 6 | Paste the contents of the CSR in to the certificate request of a chosen CA. |
| Step 7 | Download the
signed certificate.
Some CAs might email the signed certificate to you. The signed certificate is in the form of a zip file that contains the newly issued certificate and the public signing certificates of the CA that you must add to the Cisco ISE trusted certificates store. The digitally-signed CA certificate, root CA certificate, and other intermediate CA certificate (if applicable) are downloaded to the local system running your client browser. |
Bind the CA-Signed Certificate to the CSR
After you have the digitally signed certificate returned by the CA, you must bind it to the certificate signing request (CSR). You can perform the bind operation for all the nodes in your deployment from the Admin portal.
| Step 1 | Choose
>
Certificate Signing
Requests.
Check the check box next to the node for which you are binding the CSR with the CA-signed certificate. |
| Step 2 | Click Bind. |
| Step 3 | Click Browse to choose the CA-signed certificate. |
| Step 4 | Specify a Friendly Name for the certificate. |
| Step 5 | Check the Allow Wildcard Certificates check box to bind a certificate that contains the wildcard character, asterisk (*) in any CN in the Subject or DNS in the Subject Alternative Name. |
| Step 6 | Check the
Enable
Validation of Certificate Extensions check box if you want Cisco
ISE to validate certificate extensions.
If you enable the Enable Validation of Certificate Extensions option, and the certificate that you are importing contains a basic constraints extension with the CA flag set to true, ensure that the key usage extension is present, and that the keyEncipherment bit or the keyAgreement bit, or both, are also set. |
| Step 7 | Check the service for which this certificate will be used in the Usage area. This information is autopopulated, if you have enabled the Usage option while generating the CSR. If you do not want to specify the usage at the time of binding the certificate, uncheck the Usage option. You can edit the certificate later and specify the usage. |
| Step 8 | Click
Submit to bind
the CA-signed certificate.
If you have chosen to use this certificate for Cisco ISE internode communication, the application server on the Cisco ISE node is restarted. Repeat this process to bind the CSR with the CA-signed certificate on the other nodes. |
What to Do Next
Import the Root Certificates to the Trusted Certificate Store
Export a Certificate Signing Request
You can use this page to export certificate signing requests.
To perform the following task, you must be a Super Admin or System Admin.
Install Trusted Certificates for Cisco ISE Inter-node Communication
When you set up the deployment, before you register a secondary node, you must populate the PAN's Certificate Trust List (CTL) with appropriate CA certificates that are used to validate the Admin certificate of the secondary node. The procedure to populate the CTL of the PAN is different for different scenarios:
-
If the secondary node is using a CA-signed certificate to communicate with the Admin portal, you must import the CA-signed certificate of the secondary node, the relevant intermediate certificates(if any), and the root CA certificate (of the CA that signed the secondary node's certificate) in to the CTL of the PAN.
-
If the secondary node is using a self-signed certificate to communicate with the Admin portal, you can import the self-signed certificate of the secondary node in to the CTL of the PAN.
Note
-
If you change the Admin certificate on a registered secondary node, you must obtain appropriate CA certificates that can be used to validate the secondary node’s Admin certificate and import it in to the CTL of the PAN.
-
If you use self-signed certificates to secure communication between a client and PSN in a deployment, when BYOD users move from one location to another, EAP-TLS user authentication fails. For such authentication requests that have to be serviced between a few PSNs, you must secure communication between the client and PSN with an externally-signed CA certificate or use wildcard certificates signed by an external CA.
-
Ensure that the certificate issued by the external CA has basic constraints defined and the CA flag set to true. To install CA-signed certificates for inter-node communication:
Set Up Certificates for Portal Use
With multiple Policy Service nodes (PSNs) in a deployment that can service a web portal request, Cisco ISE needs a unique identifier to identify the certificate that has to be used for portal communication. When you add or import certificates that are designated for portal use, you must define a certificate group tag and associate it with the corresponding certificate on each node in your deployment. You must associate this certificate group tag to the corresponding end-user portals (guest, sponsor, and personal devices portals). This certificate group tag is the unique identifier that helps Cisco ISE identify the certificate that has to be used when communicating with each of these portals. You can designate one certificate from each node for each of the portals.
| Step 1 | Create a Certificate Signing Request and Submit the CSR to a Certificate Authority.
You must choose a Certificate Group Tag that you have already defined or create a new one for the portal. For example, mydevicesportal. |
| Step 2 | Import the Root Certificates to the Trusted Certificate Store. |
| Step 3 | Bind the CA-Signed Certificate to the CSR. |
Reassign Default Portal Certificate Group Tag to CA-Signed Certificate
By default, all Cisco ISE portals use the self-signed certificate. If you want to use a CA-signed certificate for portals, you can assign the default portal certificate group tag to a CA-signed certificate. You can use an existing CA-signed certificate or generate a CSR and obtain a new CA-signed certificate for portal use. You can reassign any portal group tag from one certificate to another.
Note | When you edit an existing certificate, if the portal tag (guest) that is associated with the certificate is already in use by any of the portals, then you cannot reassign the default portal certificate group tag or any other portal group tag to this certificate. The system displays the list of portals that use the "guest" portal tag. |
The following procedure describes how to reassign the default portal certificate group tag to a CA-signed certificate.
| Step 1 | Choose
.
Hover the mouse over the i icon next to the Default Portal Certificate Group tag to view the list of portals that use this tag. You can also view the ISE nodes in the deployment that have portal certificates which are assigned this tag. |
| Step 2 | Check the check
box next to the CA-signed certificate that you want to use for portals, and
click
Edit.
Be sure to choose a CA-signed certificate that is not in use by any of the portals. |
| Step 3 | Under the Usage area, check the Portal check box and choose the Default Portal Certificate Group Tag. |
| Step 4 | Click
Save.
A warning message appears. |
| Step 5 | Click Yes to reassign the default portal certificate group tag to the CA-signed certificate. |
Associate the Portal Certificate Tag Before You Register a Node
If you use the "Default Portal Certificate Group" tag for all the portals in your deployment, before you register a new ISE node, ensure that you import the relevant CA-signed certificate, choose "Portal" as a service, and associate the "Default Portal Certificate Group" tag with this certificate.
When you add a new node to a deployment, the default self-signed certificate is associated with the "Default Portal Certificate Group" tag and the portals are configured to use this tag.
After you register a new node, you cannot change the Certificate Group tag association. Therefore, before you register the node to the deployment, you must do the following:
| Step 1 | Create a self-signed certificate, choose "Portal" as a service, and assign a different certificate group tag (for example, tempportaltag). | ||||||||
| Step 2 | Change the portal configuration to use the newly created certificate group tag (tempportaltag). | ||||||||
| Step 3 | Edit the default
self-signed certificate and remove the Portal role.
This option removes the Default Portal Certificate Group tag association with the default self-signed certificate. | ||||||||
| Step 4 | Do one of the
following:
| ||||||||
| Step 5 | Register the ISE node to the deployment. The portal configuration in the deployment is configured to the "Default Portal Certificate Group" tag and the portals are configured to use the CA-signed certificate associated with the "Default Portal Certificate Group" tag on the new node. |
User and Endpoint Certificate Renewal
By default, Cisco ISE rejects a request that comes from a device whose certificate has expired. However, you can change this default behavior and configure ISE to process such requests and prompt the user to renew the certificate.
If you choose to allow the user to renew the certificate, Cisco recommends that you configure an authorization policy rule which checks if the certificate has been renewed before processing the request any further. Processing a request from a device whose certificate has expired may pose a potential security threat. Hence, you must configure appropriate authorization profiles and rules to ensure that your organization’s security is not compromised.
Some devices allow you to renew the certificates before and after their expiry. But on Windows devices, you can renew the certificates only before it expires. Apple iOS, Mac OSX, and Android devices allow you to renew the certificates before or after their expiry.
- Dictionary Attributes Used in Policy Conditions for Certificate Renewal
- Authorization Policy Condition for Certificate Renewal
- CWA Redirect to Renew Certificates
- Configure Cisco ISE to Allow Users to Renew Certificates
- Update the Allowed Protocol Configuration
- Create an Authorization Policy Profile for CWA Redirection
- Create an Authorization Policy Rule to Renew Certificates
- Certificate Renewal Fails for Apple iOS Devices
Dictionary Attributes Used in Policy Conditions for Certificate Renewal
Cisco ISE certificate dictionary contains the following attributes that are used in policy conditions to allow a user to renew the certificate:
-
Days to Expiry: This attribute provides the number of days for which the certificate is valid. You can use this attribute to create a condition that can be used in authorization policy. This attribute can take a value from 0 to 15. A value of 0 indicates that the certificate has already expired. A value of 1 indicates that the certificate has less than 1 day before it expires.
-
Is Expired: This Boolean attribute indicates whether a certificate has expired or not. If you want to allow certificate renewal only when the certificate is near expiry and not after it has expired, use this attribute in authorization policy condition.
Authorization Policy Condition for Certificate Renewal
You can use the CertRenewalRequired simple condition (available by default) in authorization policy to ensure that a certificate (expired or about to expire) is renewed before Cisco ISE processes the request further.
CWA Redirect to Renew Certificates
If a user certificate is revoked before its expiry, Cisco ISE checks the CRL published by the CA and rejects the authentication request. In case, if a revoked certificate has expired, the CA may not publish this certificate in its CRL. In this scenario, it is possible for Cisco ISE to renew a certificate that has been revoked. To avoid this, before you renew a certificate, ensure that the request gets redirected to Central Web Authentication (CWA) for a full authentication. You must create an authorization profile to redirect the user for CWA.
Configure Cisco ISE to Allow Users to Renew Certificates
You must complete the tasks listed in this procedure to configure Cisco ISE to allow users to renew certificates.
Configure a limited access ACL on the WLC to redirect a CWA request.
Update the Allowed Protocol Configuration
| Step 1 | Choose . |
| Step 2 | Check the
Allow Authentication of expired certificates to allow
certificate renewal in Authorization Policy check box under the
EAP-TLS protocol and EAP-TLS inner methods for PEAP and EAP-FAST protocols.
Requests that use the EAP-TLS protocol will go through the NSP flow. For PEAP and EAP-FAST protocols, you must manually configure Cisco AnyConnect for Cisco ISE to process the request. |
| Step 3 | Click Submit. |
What to Do Next
Create an Authorization Policy Profile for CWA Redirection
Ensure that you have configured a limited access ACL on the WLC.
| Step 1 | Choose . |
| Step 2 | Click Add. |
| Step 3 | Enter a name for the authorization profile. For example, CertRenewal_CWA. |
| Step 4 | Check the Web Redirection (CWA, DRW, MDM, NSP, CPP) check box in the Common Tasks area. |
| Step 5 | Choose Centralized Web Auth from the drop-down list and the limited access ACL. |
| Step 6 | Check the
Display
Certificates Renewal Message check box.
The URL-redirect attribute value changes and includes the number of days for which the certificate is valid. |
| Step 7 | Click Submit. |
Note | If you have configured the following Device Registration WebAuth (DRW) policies for wireless devices in Cisco ISE 1.2:
After upgrading to ISE 1.3 or above version, you must update the DRW-Allow policy condition as follows:
|
Create an Authorization Policy Rule to Renew Certificates
Ensure that you have created an authorization profile for central web authentication redirection.
Enable Policy Sets on .
What to Do Next
When you access the corporate network with a device whose certificate has expired, click Renew to reconfigure your device.
Certificate Renewal Fails for Apple iOS Devices
When you use ISE to renew the endpoint certificates on Apple iOS devices, you might see a “Profiled Failed to Install” error message. This error message appears if the expiring or expired network profiles were signed by a different Admin HTTPS certificate than the one that is used in processing the renewal, either on the same Policy Service Node (PSN) or on another PSN.
As a workaround, use a multi-domain SSL certificate, which is commonly referred to as Unified Communications Certificate (UCC), or a wildcard certificate for Admin HTTPS on all PSNs in the deployment.
Cisco ISE CA Service
The Cisco ISE Internal Certificate Authority (ISE CA) issues and manages digital certificates for endpoints from a centralized console to allow employees to use their personal devices on the company's network. The ISE CA offers the following functionalities:
-
Certificate Issuance: Validates and signs Certificate Signing Requests (CSRs) for endpoints that connect to your network.
-
Key Management: Generates and securely stores keys and certificates on both PAN and PSN nodes.
-
Certificate Storage: Stores certificates issued to users and devices.
-
Online Certificate Status Protocol (OCSP) Support: Provides an OCSP responder to check for the validity of certificates.
- Certificates Provisioned on Primary Administration Node and Policy Service Nodes
- Simple Certificate Enrollment Protocol Profiles
- Endpoint Certificates
- Backup and Restore of Cisco ISE CA Certificates and Keys
- Generate Root CA and Subordinate CAs on the PAN and PSN
- Configure Cisco ISE Root CA as Subordinate CA of an External PKI
- Configure Cisco ISE to Use Certificates for Authenticating Personal Devices
- Revoke an Endpoint Certificate
Certificates Provisioned on Primary Administration Node and Policy Service Nodes
After installation, a Cisco ISE node is provisioned with self-signed CA and subordinate CA (sub CA) certificates for the Cisco ISE node to issue and manage certificates for endpoints. Any PSN that you register with your PAN is provisioned with a sub CA certificate that is signed by the PAN. When you use the Cisco ISE internal CA service and endpoints access your network, then the sub CA on the PSN node issues certificates to endpoints.

Simple Certificate Enrollment Protocol Profiles
To help enable certificate provisioning functions for the variety of mobile devices that users can register on the network, Cisco ISE enables you to configure one or more Simple Certificate Enrollment Protocol (SCEP) Certificate Authority (CA) profiles (called as Cisco ISE External CA Settings) to point Cisco ISE to multiple CA locations. The benefit of allowing for multiple profiles is to help ensure high availability and perform load balancing across the CA locations that you specify. If a request to a particular SCEP CA goes unanswered three consecutive times, Cisco ISE declares that particular server unavailable and automatically moves to the CA with the next lowest known load and response times, then it begins periodic polling until the server comes back online.
For details on how to set up your Microsoft SCEP server to interoperate with Cisco ISE, see
http://www.cisco.com/en/US/solutions/collateral/ns340/ns414/ns742/ns744/docs/howto_60_byod_certificates.pdf.
Endpoint Certificates
The Admin portal lists all the certificates issued by the internal ISE CA to endpoints (Administration > System > Certificates > Endpoint Certificates). The Endpoint Certificates page provides you an at-a-glance view of the certificate status. You can mouse over the Status column to find out the reason for revocation if a certificate has been revoked. You can mouse over the Certificate Template column to view additional details such as , Subject, Subject Alternative Name (SAN), and Validity of the certificate. You can click on the endpoint certificate to view the certificate.
For example, if you want to view the certificates issued to user7, enter user7 in the text box that appears below the Friendly Name field. All the certificates issued by Cisco ISE to this user appear. Remove the search term from the text box to cancel the filter. You can also use the Advanced Filter option to view records based on various search criteria.
This Endpoint Certificates page also provides you the option to revoke an endpoint certificate, if necessary.
The Certificate Management Overview page displays the total number of endpoint certificates issued by each PSN node in your deployment. You can also view the total number of revoked certificates per node and the total number of certificates that have failed. You can filter the data on this page based on any of the attributes.
Backup and Restore of Cisco ISE CA Certificates and Keys
You must back up the Cisco ISE CA certificates and keys securely to be able to restore them back on a Secondary Administration Node in case of a PAN failure and you want to promote the Secondary Administration Node to function as the root CA or intermediate CA of an external PKI. The Cisco ISE configuration backup does not include the CA certificates and keys. Instead, you should use the Command Line Interface (CLI) to export the CA certificates and keys to a repository and to import them. The application configure ise command now includes export and import options to backup and restore CA certificates and keys.
The following certificates from the Trusted Certificates Store are restored on the Secondary Administration Node:
-
Cisco ISE Root CA certificate
-
Cisco ISE Sub CA certificate
-
Cisco ISE Endpoint RA certificate
-
Cisco ISE OCSP Responder certificate
You must back up and restore Cisco ISE CA certificates and keys when you:
-
Have a Secondary Administration Node in the deployment
-
Replace the entire Cisco ISE CA root chain
-
Configure Cisco ISE root CA to act as a subordinate CA of an external PKI
-
Upgrade from Release 1.2 to a later release
-
Restore data from a configuration backup. In this case, you must first regenerate the Cisco ISE CA root chain and then back up and restore the ISE CA certificates and keys.
Export Cisco ISE CA Certificates and Keys
You must export the CA certificates and keys from the PAN to import them on the Secondary Administration Node. This option enables the Secondary Administration Node to issue and manage certificates for endpoints when the PAN is down and you promote the Secondary Administration Node to be the PAN.
Ensure that you have created a repository to store the CA certificates and keys.
| Step 1 | Enter application configure ise command from the Cisco ISE CLI. |
| Step 2 | Enter 7 to export the certificates and keys. |
| Step 3 | Enter the repository name. |
| Step 4 | Enter an
encryption key.
A success message appears with the list of certificates that were exported, along with the subject, issuer, and serial number. Example: The following 4 CA key pairs were exported to repository 'sftp' at 'ise_ca_key_pairs_of_ise-vm1':
Subject:CN=Cisco ISE Self-Signed CA of ise-vm1
Issuer:CN=Cisco ISE Self-Signed CA of ise-vm1
Serial#:0x621867df-568341cd-944cc77f-c9820765
Subject:CN=Cisco ISE Endpoint CA of ise-vm1
Issuer:CN=Cisco ISE Self-Signed CA of ise-vm1
Serial#:0x7027269d-d80a406d-831d5c26-f5e105fa
Subject:CN=Cisco ISE Endpoint RA of ise-vm1
Issuer:CN=Cisco ISE Endpoint CA of ise-vm1
Serial#:0x1a65ec14-4f284da7-9532f0a0-8ae0e5c2
Subject:CN=Cisco ISE OCSP Responder Certificate of ise-vm1
Issuer:CN=Cisco ISE Self-Signed CA of ise-vm1
Serial#:0x6f6d4097-21f74c4d-8832ba95-4c320fb1
ISE CA keys export completed successfully
|
Import Cisco ISE CA Certificates and Keys
After you register the Secondary Administration Node, you must export the CA certificates and keys from the PAN and import them in to the Secondary Administration Node.
| Step 1 | Enter application configure ise command from the Cisco ISE CLI. |
| Step 2 | Enter 8 to import the CA certificates and keys. |
| Step 3 | Enter the repository name. |
| Step 4 | Enter the name of the file that you want to import. |
| Step 5 | Enter the
encryption key to decrypt the file.
A success message appears. Example: The following 4 CA key pairs were imported:
Subject:CN=Cisco ISE Self-Signed CA of ise-vm1
Issuer:CN=Cisco ISE Self-Signed CA of ise-vm1
Serial#:0x21ce1000-8008472c-a6bc4fd9-272c8da4
Subject:CN=Cisco ISE Endpoint CA of ise-vm1
Issuer:CN=Cisco ISE Self-Signed CA of ise-vm1
Serial#:0x05fa86d0-092542b4-8ff68ed4-f1964a56
Subject:CN=Cisco ISE Endpoint RA of ise-vm1
Issuer:CN=Cisco ISE Endpoint CA of ise-vm1
Serial#:0x77932e02-e8c84b3d-b27e2f1c-e9f246ca
Subject:CN=Cisco ISE OCSP Responder Certificate of ise-vm1
Issuer:CN=Cisco ISE Self-Signed CA of ise-vm1
Serial#:0x5082017f-330e412f-8d63305d-e13fd2a5
Stopping ISE Certificate Authority Service...
Starting ISE Certificate Authority Service...
ISE CA keys import completed successfully
|
Generate Root CA and Subordinate CAs on the PAN and PSN
When you set up the deployment, Cisco ISE generates a root CA on the Primary Administration Node (PAN) and subordinate CA certificates on the Policy Service Nodes (PSNs) for the Cisco ISE CA service. However, when you change the domain name or the hostname of the PAN or PSN, you must regenerate root CA on the PAN and sub CAs on the PSNs respectively.
If you want to change the hostname on a PSN, instead of regenerating the root CA and subordinate CAs on the PAN and PSNs respectively, you can deregister the PSN before changing the hostname, and register it back. A new subordinate certificate gets provisioned automatically on the PSN.
| Step 1 | Choose . |
| Step 2 | Click Generate Certificate Signing Requests (CSR). |
| Step 3 | Choose ISE Root CA from the Certificate(s) will be used for drop-down list. |
| Step 4 | Click
Replace
ISE Root CA Certificate chain.
The root CA and subordinate CA certificates get generated for all the nodes in your deployment. |
What to Do Next
If you have a secondary Administration node in the deployment, obtain a backup of the Cisco ISE CA certificates and keys from the PAN and restore it on the secondary Administration node. This ensures that the secondary Administration node can function as the root CA in case of a PAN failure and you promote the secondary Administration node to be the PAN.
Configure Cisco ISE Root CA as Subordinate CA of an External PKI
If you want the root CA on the PAN to act as a subordinate CA of an external PKI, generate an ISE intermediate CA certificate signing request, send it to the external CA, obtain the root and CA-signed certificates, import the root CA certificate in to the Trusted Certificates Store, and bind the CA-signed certificate to the CSR. In this case, the external CA is the root CA, the PAN is a subordinate CA of the external CA, and the PSNs are subordinate CAs of the PAN.
| Step 1 | Choose . |
| Step 2 | Click Generate Certificate Signing Requests (CSR). |
| Step 3 | Choose ISE Intermediate CA from the Certificate(s) will be used for drop-down list. |
| Step 4 | Click Generate. |
| Step 5 | Export the CSR, send it to the external CA, and obtain the CA-signed certificate. |
| Step 6 | Import the root CA certificate from the external CA in to the Trusted Certificates store. |
| Step 7 | Bind the CA-signed certificate with the CSR. |
What to Do Next
If you have a secondary Administration node in the deployment, obtain a backup of the Cisco ISE CA certificates and keys from the PAN and restore it on the secondary Administration node. This ensures that the secondary Administration node can function as subordinate CA of the external PKI in case of a PAN failure and you promote the secondary Administration node to be the PAN.
Configure Cisco ISE to Use Certificates for Authenticating Personal Devices
You can configure Cisco ISE to issue and manage certificates for endpoints (personal devices) that connect to your network. You can use the internal Cisco ISE Certificate Authority (CA) service to sign the certificate signing request (CSR) from endpoints or forward the CSR to an external CA.
-
Obtain a backup of the Cisco ISE CA certificates and keys from the PAN and store them in a secure location for disaster recovery purposes.
-
If you have a secondary Administration node in the deployment, back up the Cisco ISE CA certificates and keys from the PAN and restore them on the secondary Administration node.
| Step 1 | Add Users to the Employee User Group
You can add users to the internal identity store or to an external identity store such as Active Directory. |
| Step 2 | Create a Certificate Authentication Profile for TLS-Based Authentication
|
| Step 3 | Create an Identity Source Sequence for TLS-Based Authentication
|
| Step 4 | Creating a
client provisioning policy.
|
| Step 5 | Configure the Dot1X Authentication Policy Rule for TLS-Based Authentication
|
| Step 6 | Configure authorization policy rules for TLS-based authentications. |
Add Users to the Employee User Group
The following procedure describes how to add users to the Employee user group in the Cisco ISE identity store. If you are using an external identity store, make sure that you have an Employee user group to which you can add users.
What to Do Next
Create a Certificate Authentication Profile for TLS-Based Authentication
Create a Certificate Authentication Profile for TLS-Based Authentication
To use certificates for authenticating endpoints that connect to your network, you must define a certificate authentication profile in Cisco ISE or edit the default Preloaded_Certificate_Profile. The certificate authentication profile includes the certificate field that should be used as the principal username. For example, if the username is in the Common Name field, then you can define a certificate authentication profile with the Principal Username being the Subject - Common Name, which can be verified against the identity store.
What to Do Next
Create an Identity Source Sequence for TLS-Based Authentication
Create an Identity Source Sequence for TLS-Based Authentication
After you create a certificate authentication profile, you must add it to the identity source sequence so that Cisco ISE can obtain the attribute from the certificate and match it against the identity sources that you have defined in the identity source sequence.
Ensure that you have completed the following tasks:
| Step 1 | Choose . |
| Step 2 | Click Add. |
| Step 3 | Enter a name for the identity source sequence. For example, Dot1X. |
| Step 4 | Check the Select Certificate Authentication Profile check box and select the certificate authentication profile that you created earlier, namely CAP. |
| Step 5 | Move the identity source that contains your user information to the Selected list box in the Authentication Search List area. You can add additional identity sources and Cisco ISE searches these data stores sequentially until a match is found. |
| Step 6 | Click the Treat as if the user was not found and proceed to the next store in the sequence radio button. |
| Step 7 | Click Submit. |
What to Do Next
Configure Certificate Authority Settings
You must configure the external CA settings if you are going to use an external CA for signing the CSRs. The external CA settings was known as the SCEP RA profile in previous releases of Cisco ISE. If you are using the Cisco ISE CA, then you do not have to explicitly configure the CA settings. You can review the Internal CA settings at Administration > System > Certificates > Internal CA Settings.
Once users’ devices receive their validated certificate, they reside on the device as described in the following table.
|
||||
|
Launch mmc.exe from the /cmd prompt or view in the certificate snap-in. |
||||
If you are going to use an external Certificate Authority (CA) for signing the certificate signing request (CSR), then you must have the URL of the external CA.
| Step 1 | Choose . |
| Step 2 | Click Add. |
| Step 3 | Enter a name for the external CA setting. For example, EXTERNAL_SCEP. |
| Step 4 | Enter the external CA server URL in the URL text box. Click Test Connection to check if the external CA is reachable. Click the + button to enter additional CA server URLs. |
| Step 5 | Click Submit. |
What to Do Next
Create a CA Template
The certificate template defines the SCEP RA profile that must be used (for the internal or external CA), , Subject, Subject Alternative Name (SAN), validity period of the certificate, and the Extended Key Usage. This example assumes that you are going to use the internal Cisco ISE CA. For an external CA template, the validity period is determined by the external CA and you cannot specify it.
You can create a new CA template or edit the default certificate template, EAP_Authentication_Certificate_Template.
Ensure that you have configured the CA settings.
| Step 1 | Choose . |
| Step 2 | Enter a name for the internal CA template. For example, Internal_CA_Template. |
| Step 3 | (Optional)
Enter values for the Organizational Unit, Organization, City, State, and
Country fields.
We do not support UTF-8 characters in the certificate template fields (Organizational Unit, Organization, City, State, and Country). Certificate provisioning fails if UTF-8 characters are used in the certificate template. The username of the internal user generating the certificate is used as the Common Name of the certificate. Cisco ISE Internal CA does not support "+" or "*" characters in the Common Name field. Ensure that your username does not include "+" or "*" special characters. |
| Step 4 | Specify the Subject Alternative Name (SAN) and the validity period of the certificate. |
| Step 5 | Specify a key size. You must choose 1024 or a higher key size. |
| Step 6 | Specify the Extended Key Usage. Check the Client Authentication check box if you want the certificate to be used for client authentication. Check the Server Authentication check box if you want the certificate to be used for server authentication. |
| Step 7 | Click Submit. |
The internal CA certificate template is created and will be used by the client provisioning policy.
What to Do Next
Create a Native Supplicant Profile to be Used in Client Provisioning Policy
Create a Native Supplicant Profile to be Used in Client Provisioning Policy
You can create native supplicant profiles to enable users to bring personal devices to your Corporate network. Cisco ISE uses different policy rules for different operating systems. Each client provisioning policy rule contains a native supplicant profile, which specifies which provisioning wizard is to be used for which operating system.
-
Configure the CA certificate template in Cisco ISE.
-
Open up TCP port 8909 and UDP port 8909 to enable Cisco NAC Agent, Cisco NAC Web Agent, and supplicant provisioning wizard installation. For more information on port usage, see the "Cisco ISE Appliance Ports Reference" appendix in the Cisco Identity Services Engine Hardware Installation Guide.
| Step 1 | Choose . |
| Step 2 | Choose . |
| Step 3 | Enter a name for the native supplicant profile. For example, EAP_TLS_INTERNAL. |
| Step 4 | Choose ALL from the Operating System drop-down list. |
| Step 5 | Check the Wired or Wireless check box. |
| Step 6 | Choose TLS from the Allowed Protocol drop-down list. |
| Step 7 | Choose the CA certificate template that you created earlier. |
| Step 8 | Click Submit. |
What to Do Next
Download Agent Resources from Cisco Site for Windows and MAC OS X Operating Systems
Download Agent Resources from Cisco Site for Windows and MAC OS X Operating Systems
For Windows and MAC OS X operating systems, you must download the remote resources from the Cisco site.
Ensure that you are able to access the appropriate remote location to download client provisioning resources to Cisco ISE, by verifying that the proxy settings for your network are correctly configured.
What to Do Next
Create Client Provisioning Policy Rules for Apple iOS, Android, and MACOSX Devices
Create Client Provisioning Policy Rules for Apple iOS, Android, and MACOSX Devices
Client provisioning resource policies determine which users receive which version (or versions) of resources (agents, agent compliance modules, and/or agent customization packages/profiles) from Cisco ISE upon login and user session initiation.
When you download the agent compliance module, it always overwrites the existing one, if any, available in the system.
To enable employees to bring iOS, Android, MACOSX devices, you must create policy rules for each of these devices in the Client Provisioning Policy page.
You must have configured the required native supplicant profiles and downloaded the required agents from the Client Provisioning Policy pages.
What to Do Next
Configure the Dot1X Authentication Policy Rule for TLS-Based Authentication
Configure the Dot1X Authentication Policy Rule for TLS-Based Authentication
You must update the Dot1X authentication policy rule for TLS-based authentications.
Ensure that you have the certificate authentication profile created for TLS-based authentication.
| Step 1 | Choose . |
| Step 2 | Click the Rule-Based radio button. The default rule-based authentication policy includes a rule for Dot1X authentication. |
| Step 3 | Edit the Dot1X authentication policy rule. |
| Step 4 | Choose from the Dot1X policy rule. |
| Step 5 | Enter a name for the rule. For example, eap-tls. |
| Step 6 | Use the Expression Builder to create the following policy condition: If Network Access:EapAuthentication Equals EAP-TLS, then use the certificate authentication profile that you created earlier. |
| Step 7 | Leave the default rule as is. |
| Step 8 | Click Save. |
What to Do Next
Create Authorization Profiles for Central Web Authentication and Supplicant Provisioning Flows
Create Authorization Profiles for Central Web Authentication and Supplicant Provisioning Flows
You must define authorization profiles to determine the access that must be granted to the user after the certificate-based authentication is successful.
Ensure that you have configured the required access control lists (ACLs) on the wireless LAN controller (WLC). Refer to the TrustSec How-To Guide: Using Certificates for Differentiated Access for information on how to create the ACLs on the WLC.
This example assumes that you have created the following ACLs on the WLC.
| Step 1 | Choose . |
| Step 2 | Click Add to create a new authorization profile. |
| Step 3 | Enter a name for the authorization profile. |
| Step 4 | From the Access Type drop-down list, choose ACCESS_ACCEPT. |
| Step 5 | Click Add to add the authorization profiles for central web authentication, central web authentication for Google Play, native supplicant provisioning, and native supplicant provisioning for Google. |
| Step 6 | Click Save. |
What to Do Next
Create Authorization Policy Rules
Cisco ISE evaluates the authorization policy rules and grants the user access to the network resources based on the authorization profile specified in the policy rule.
Ensure that you have created the required authorization profiles.
CA Service Policy Reference
This section provides reference information for the authorization and client provisioning policy rules that you must create before you can enable the Cisco ISE CA service.
Client Provisioning Policy Rules for Certificate Services
This section lists the client provisioning policy rules that you must create while using the Cisco ISE certificate services. The following table provides the details.
| Rule Name | Identity Groups | Operating Systems | Other Conditions | Results |
|---|---|---|---|---|
| iOS | Any | Apple iOS All | Condition(s) | EAP_TLS_INTERNAL (the native supplicant profile that you created earlier). If you are using an external CA, select the native supplicant profile that you have created for the external CA. |
| Android | Any | Android | Condition(s) | EAP_TLS_INTERNAL (the native supplicant profile that you created earlier). If you are using an external CA, select the native supplicant profile that you have created for the external CA. |
| MACOSX | Any | MACOSX | Condition(s) | Under the Native Supplicant
Configuration, specify the following:
|
Authorization Profiles for Certificate Services
This section lists the authorization profiles that you must create for enabling certificate-based authentication in Cisco ISE. You must have already created the ACLs (NSP-ACL and NSP-ACL-Google) on the wireless LAN controller (WLC).
-
CWA - This profile is for devices that go through the central web authentication flow. Check the Web Authentication check box, choose Centralized from the drop-down list, and enter NSP-ACL in the ACL text box.
-
CWA_GooglePlay - This profile is for Android devices that go through the central web authentication flow. This profile enables Android devices to access Google Play Store and download the Cisco Network Setup Assistant. Check the Web Authentication check box, choose Centralized from the drop-down list, and enter NSP-ACL-Google in the ACL text box.
-
NSP - This profile is for non-Android devices that go through the supplicant provisioning flow. Check the Web Authentication check box, choose Supplicant Provisioning from the drop-down list, and enter NSP-ACL in the ACL text box.
-
NSP-Google - This profile is for Android devices that go through the supplicant provisioning flow. Check the Web Authentication check box, choose Supplicant Provisioning from the drop-down list, and enter NSP-ACL-Google in the ACL text box.
Authorization Policy Rules for Certificate Services
This section lists the authorization policy rules that you must create while enabling the Cisco ISE CA service.
- Corporate Assets-This rule is for corporate devices that connect to the corporate wireless SSID using 802.1X and MSCHAPV2 protocol.
- Android_SingleSSID-This rule is for Android devices that access the Google Play Store to download the Cisco Network Setup Assistant for provisioning. This rule is specific to single SSID setup.
- Android_DualSSID-This rule is for Android devices that access the Google Play Store to download the Cisco Network Setup Assistant for provisioning. This rule is specific to dual SSID setup.
- CWA-This rule is for devices that go through the central web authentication flow.
- NSP-This rule is for devices that go through the native supplicant provisioning flow using a certificate for EAP-TLS authentication.
- EAP-TLS-This rule is for devices that have completed the supplicant provisioning flow and are provisioned with a certificate. They will be given access to the network.
The following table lists the attributes and values that you must choose while configuring authorization policy rules for the Cisco ISE CA service. This example assumes that you have the corresponding authorization profiles configured in Cisco ISE as well.
| Rule Name | Conditions | Permissions (authorization profiles to be applied) |
|---|---|---|
| Corporate Assets | Corp_Assets AND (Wireless 802.1X AND Network Access:AuthenticationMethod EQUALS MSCHAPV2) | PermitAccess |
| Android_SingleSSID | (Wireless 802.1X AND Network Access:AuthenticationMethod EQUALS MSCHAPV2 AND Session:Device-OS EQUALS Android) | NSP_Google |
| Android_DualSSID | (Wireless_MAB AND Session:Device-OS EQUALS Android) | CWA_GooglePlay |
| CWA | Wireless_MAB | CWA |
| NSP | (Wireless 802.1X AND Network Access:AuthenticationMethod EQUALS MSCHAPV2) | NSP |
| EAP-TLS | (Wireless 802.1X AND Network Access:AuthenticationMethod EQUALS x509_PKI | PermitAccess |
Revoke an Endpoint Certificate
If you need to revoke a certificate issued to an employee's personal device, you can revoke it from the Endpoint Certificates page. For example, if an employee's device has been stolen or lost, you can log in to the Cisco ISE Admin portal and revoke the certificate issued to that device from the Endpoint Certificates page. You can filter the data on this page based on the Friendly Name, Device Unique Id, or Serial Number. If a PSN (sub CA) is compromised, you can revoke all certificates issued by that PSN by filtering on the Issued By field from the Endpoint Certificates page.
OCSP Services
The Online Certificate Status Protocol (OCSP) is a protocol that is used for checking the status of x.509 digital certificates. This protocol is an alternative to the Certificate Revocation List (CRL) and addresses issues that result in handling CRLs.
Cisco ISE has the capability to communicate with OCSP servers over HTTP to validate the status of certificates in authentications. The OCSP configuration is configured in a reusable configuration object that can be referenced from any certificate authority (CA) certificate that is configured in Cisco ISE.
You can configure CRL and/or OCSP verification per CA. If both are selected, then Cisco ISE first performs verification over OCSP. If a communication problem is detected with both the primary and secondary OCSP servers, or if an unknown status is returned for a given certificate, Cisco ISE switches to checking the CRL.
- Cisco ISE CA Service Online Certificate Status Protocol Responder
- OCSP Certificate Status Values
- OCSP High Availability
- OCSP Failures
- Add OCSP Client Profiles
- OCSP Statistics Counters
Cisco ISE CA Service Online Certificate Status Protocol Responder
The Cisco ISE CA OCSP responder is a server that communicates with OCSP clients. The OCSP clients for the Cisco ISE CA include the internal Cisco ISE OCSP client and OCSP clients on the Adaptive Security Appliance (ASA). The OCSP clients should communicate with the OCSP responder using the OCSP request/response structure defined in RFC 2560, 5019.
The Cisco ISE CA issues a certificate to the OCSP responder. The OCSP responder listens on port 2560 for any incoming requests. This port is configured to allow only OCSP traffic.
The OCSP responder accepts a request that follows the structure defined in RFC 2560, 5019. Nonce extension is supported in the OCSP request. The OCSP responder obtains the status of the certificate and creates an OCSP response and signs it. The OCSP response is not cached on the OCSP responder, although you can cache the OCSP response on the client for a maximum period of 24 hours. The OCSP client should validate the signature in the OCSP response.
The self-signed CA certificate (or the intermediate CA certificate if ISE acts as an intermediate CA of an external CA) on the PAN issues the OCSP responder certificate. This CA certificate on the PAN issues the OCSP certificates on the PAN and PSNs. This self-signed CA certificate is also the root certificate for the entire deployment. All the OCSP certificates across the deployment are placed in the Trusted Certificates Store for ISE to validate any response signed using these certificates.
OCSP Certificate Status Values
OCSP services return the following values for a given certificate request:
-
Good—Indicates a positive response to the status inquiry. It means that the certificate is not revoked, and the state is good only until the next time interval (time to live) value.
-
Unknown—The certificate status is unknown. OCSP service returns this value if the certificate was not issued by the CA of this OCSP responder.
OCSP High Availability
Cisco ISE has the capability to configure up to two OCSP servers per CA, and they are called primary and secondary OCSP servers. Each OCSP server configuration contains the following parameters:
-
Nonce—A random number that is sent in the request. This option ensures that old communications cannot be reused in replay attacks.
-
Validate response—Cisco ISE validates the response signature that is received from the OCSP server.
In case of timeout (which is 5 seconds), when Cisco ISE communicates with the primary OCSP server, it switches to the secondary OCSP server.
Cisco ISE uses the secondary OCSP server for a configurable amount of time before attempting to use the primary server again.
OCSP Failures
The three general OCSP failure scenarios are as follows:
-
Failed OCSP responder scenarios, for example:
The first primary OCSP responder not responding, and the secondary OCSP responder responding to the Cisco ISE OCSP request.
Errors or responses not received from Cisco ISE OCSP requests.
An OCSP responder may not provide a response to the Cisco ISE OCSP request or it may return an OCSP Response Status as not successful. OCSP Response Status values can be as follows:
Add OCSP Client Profiles
You can use the OCSP Client Profile page to add new OCSP client profiles to Cisco ISE.
If the Certificate Authority (CA) is running the OCSP service on a nonstandard port (other than 80 or 443), you must configure ACLs on the switch to allow for communication between Cisco ISE and the CA on that port. For example:
permit tcp <source ip> <destination ip> eq <OCSP port number>
OCSP Statistics Counters
Cisco ISE uses OCSP counters to log and monitor the data and health of the OCSP servers. Logging occurs every five minutes. Cisco ISE sends a syslog message to the Monitoring node and it is preserved in the local store. The local store contains data from the previous five minutes. After Cisco ISE sends the syslog message, the counters are recalculated for the next interval. This means, after five minutes, a new five-minute window interval starts again.
The following table lists the OCSP syslog messages and their descriptions.
|
The number of ‘good’ certificates that are returned for a given CA using the primary OCSP server |
|
|
The number of ‘good’ statuses that are returned for a given CA using the primary OCSP server |
|
|
The number of ‘revoked’ statuses that are returned for a given CA using the primary OCSP server |
|
|
The number of ‘revoked’ statuses that are returned for a given CA using the secondary OCSP server |
|
|
The number of ‘Unknown’ statuses that are returned for a given CA using the primary OCSP server |
|
|
The number of ‘Unknown’ statuses that are returned for a given CA using the secondary OCSP server |
|
|
The number of certificates that were found in cache from a primary origin |
|
|
The number of certificates that were found in cache from a secondary origin |
|
 Feedback