-
null
- Cisco ISE Guest Services
- Guest and Sponsor Accounts
- Guest Accounts
- Manage Guest Accounts on the Sponsor Portal
- Guest Types and User Identity Groups
- Create or Edit Guest Types
- Disable Guest Types
- Changing Guest Account Attributes
- Configure Maximum Simultaneous Logins for Endpoint Users
- Schedule When to Purge Expired Guest Accounts
- Add Custom Fields for Guest Account Creation
- Specify Email Addresses and SMTP Servers for Email Notifications
- Assign Guest Locations and SSIDs
- Rules for Guest Password Policies
- Set the Guest Password Policy and Expiration
- Rules for Guest Username Policies
- Set the Guest Username Policy
- SMS Providers and Services
- Guest Accounts
- Managing Sponsor Accounts
- Credentials for Guest Portals
- Guest Access with Hotspot Guest Portals
- Guest Access with Credentialed Guest Portals
- Employee Access with Credentialed Guest Portals
- Configure Periodic AUP Acceptance
- Guest Device Compliance
- Guest Portals Configuration Tasks
- Enable Policy Services
- Add Certificates for Guest Portals
- Create External Identity Sources
- Create Identity Source Sequences
- Create Endpoint Identity Groups
- Create a Hotspot Guest Portal
- Create a Sponsored-Guest Portal
- Create a Self-Registered Guest Portal
- Authorize Portals
- Customize Guest Portals
Configure Guest Access
- Cisco ISE Guest Services
- Guest and Sponsor Accounts
- Guest Portals
- Sponsor Portals
- Monitor Guest and Sponsor Activity
- Guest Access Deployment Scenarios
Cisco ISE Guest Services
Cisco Identity Services Engine (ISE) guest services enable you to provide secure network access to guests such as visitors, contractors, consultants, and customers. You can support guests with base Cisco ISE licenses, and you can choose from several deployment options depending on your company’s infrastructure and feature requirements.
Cisco ISE provides web-based and mobile portals to provide on-boarding for guests (and even employees) to your company’s network and internal resources and services.
From the Admin portal, you can create and edit guest and sponsor portals, configure guest access privileges by defining their guest type, and assign sponsor privileges for creating and managing guest accounts.
Guest Services are configured on the following pages:
End-User Guest and Sponsor Portals in Distributed Environment
Cisco ISE end-user web portals depend on the Administration, Policy Services, and Monitoring personas to provide configuration, session support, and reporting functionality.
Administration Node
Any configuration changes you make to users or devices on the end-user portals are written to the Administration node.
Policy Services Node
You must run the end-user portals on a Policy Services Node, which handles all session traffic, including: network access, client provisioning, guest services, posture, and profiling. If the Policy Service Node is part of a node group, and the node fails, the other nodes detect the failure and reset any pending sessions.
Monitoring Node
The Monitoring node collects, aggregates, and reports data about the end user and device activity on the My Devices, Sponsor, and Guest portals. If the primary Monitoring node fails, the secondary Monitoring node automatically becomes the primary Monitoring node.
Guest and Sponsor Accounts
Guest services support various types of users—guests, sponsors, and employees. From the Admin portal, you must define the access privileges and feature support for sponsors. Sponsors then access the Sponsor portal to create and manage guest accounts.
Once their guest accounts are created, guests can use the Sponsored-Guest portal to log in and gain access to the network. Guests can also create their own accounts by registering themselves using the Self-Registered Guest portal and then logging in to the network. Based on the portal configuration, these self-registering guests may need sponsor approval before they can receive their login credentials. Guests can also choose to access the network using the Hotspot Guest portal, which does not require the creation of guest accounts and login credentials such as username and password.
Employees who are included in identity stores (such as Active Directory, LDAP, Internal Users) can also gain access through the credentialed Guest portals (Sponsored-Guest and Self-Registered Guest portals), if configured.
Guest Accounts
Guests typically represent authorized visitors, contractors, customers, or other temporary users who require access to your network. However, you can also use guest accounts for employees if you prefer to use one of the guest deployment scenarios to allow employees to access the network. You can access the Sponsor portal to view guest accounts created by a sponsor and by self-registering guests.
Sponsor Accounts
Use the Sponsor portal to create temporary accounts for authorized visitors to securely access your corporate network or the Internet. After creating the guest accounts, you also can use the Sponsor portal to manage these accounts and provide account details to the guests.
Guest Accounts
Guests typically represent authorized visitors, contractors, customers, or other temporary users who require access to your network. However, you can also use guest accounts for employees if you prefer to use one of the guest deployment scenarios to allow employees to access the network. You can access the Sponsor portal to view guest accounts created by a sponsor and by self-registering guests.
- Manage Guest Accounts on the Sponsor Portal
- Guest Types and User Identity Groups
- Create or Edit Guest Types
- Disable Guest Types
- Changing Guest Account Attributes
- Configure Maximum Simultaneous Logins for Endpoint Users
- Schedule When to Purge Expired Guest Accounts
- Add Custom Fields for Guest Account Creation
- Specify Email Addresses and SMTP Servers for Email Notifications
- Assign Guest Locations and SSIDs
- Rules for Guest Password Policies
- Set the Guest Password Policy and Expiration
- Rules for Guest Username Policies
- Set the Guest Username Policy
- SMS Providers and Services
Manage Guest Accounts on the Sponsor Portal
Use the Sponsor portal to create temporary accounts for authorized visitors to securely access your corporate network or the Internet. After creating the guest accounts, you also can use the Sponsor portal to manage these accounts and provide account details to the guests.
As an ISE administrator, you can access the Sponsor portal through any one of the following ways:
-
From the Guest Access menu using the Manage Accounts link—Full access to the default Sponsor portal.
-
From the Sponsor portal using a valid Sponsor account—Permissions and restrictions based on the sponsor group to which the sponsor belongs.
 Note | An ISE administrator from an external identity store such as Active Directory can be part of a Sponsor group. However, internal administrator accounts (for example, the default "admin" account) cannot be part of a Sponsor group. |
What to Do Next
Refer to the Sponsor Portal User Guide for Cisco Identity Services Engine http://www.cisco.com/c/en/us/td/docs/security/ise/2-1/sponsor_guide/b_spons_SponsorPortalUserGuide_21.htmlfor information on how to use the Sponsor portal.
Guest Types and User Identity Groups
Guest accounts must be associated with a guest type. Guest types allow a sponsor to assign different levels of access and different network connection times to a guest account. These guest types are associated with particular network access policies. Cisco ISE includes these default guest types:
-
Contractor—Users who need access to the network for an extended amount of time, up to a year.
-
Daily—Guests who need access to the resources on the network for just 1 to 5 days.
-
Weekly—Users who need access to the network for a couple of weeks.
When creating guest accounts, certain sponsor groups can be restricted to using specific guest types. Members of such a group can create guests with only the features specified for their guest type. For instance, the sponsor group, ALL_ACCOUNTS, can be set up to use only the Contractor guest type, and the sponsor groups, OWN_ACCOUNTS and GROUP_ACCOUNTS, can be set up to use Daily and Weekly guest types. Also, since self-registering guests using the Self-Registered Guest portal typically need access for just a day, you can assign them the Daily guest type.
The guest type defines the user identity group for a guest. User identity groups are configured in . You can delete a user identity group for a guest only by deleting the specific guest type.
For more information, see:
Create or Edit Guest Types
You can edit the default Guest Types and their default access privileges and settings, or you can create new Guest Types. Changes you make will be applied to existing Guest accounts that were created using this Guest Type. Guest users who are logged on will not see these changes until they log off and back on. You can also duplicate a Guest Type to create additional Guest Types with the same access privileges.
Each Guest Type has a name, description, and a list of sponsor groups that can create guest accounts with this guest type. You can designate some guest types as follows: use just for self-registering guests, or do not use to create Guest accounts (by any sponsor group).
|
Disable Guest Types
You cannot delete the last remaining guest type or guest types that are being used by guest accounts. If you want to delete a guest type that is in use, first ensure that it is no longer available for use. Disabling a guest type does not affect guest accounts that were created with that guest type.
Changing Guest Account Attributes
When a guest account is created, attributes are configured for that account by the Guest Type.
If you make changes to a Guest Type, active Guest accounts will take on all the attributes of the updated Guest Type, including the default access times, dates, and duration, which can then be edited. In addition, the custom fields from the original Guest Type are copied to the updated Guest Type.
A Sponsor can also extend the account duration before the time period has expired.
Configure Maximum Simultaneous Logins for Endpoint Users
You can configure the maximum number of simultaneous logins that are allowed for Guest users.
When the user logs into the Guest portal, and is successfully authenticated, that user's number of existing logins is checked to see if the user has already reached the maximum number of logins. If so, then the Guest user is redirected to an error page. After a configurable period of time, so the user can read the error page, the session is terminated. If the user tries to access the internet again, that user is redirected to the Guest portal's login page.
In an authorization policy, check for a value of true for the attribute Network Access.SessionLimitExceeded, and configure the action to take when the maximum number of sessions is reached.
Make sure that the authorization profile that you are using in the authorization policy for this portal has Access Type set to Access_Accept. If Access Type is set to Access_Reject, then maximum logins will not work.
What to Do Next
You can customize the text of the error page on the Portal Page Customization tab, in the tab Messages Error Messages by changing the text of the error message key ui_max_login_sessions_exceeded_error.
Schedule When to Purge Expired Guest Accounts
When an active or suspended guest account reaches the end of its account duration (as defined by the sponsor when creating the account), the account expires. When guest accounts expire, the affected guests cannot access the network. Sponsors can extend expired accounts before they are purged. However, after an account is purged, sponsors must create new accounts.
When expired guest accounts are purged, the associated endpoints and reporting and logging information are retained.
-
Schedule a purge to occur every X days. The first purge will occur in X days at Time of Purge, then purges occur every X days.
-
Schedule a purge on a given day of the week every X weeks. The first purge occurs on the next Day of Week at Time of Purge, then purges occur every configured number of weeks on that day and time. For example, on Monday you set purges to occur on Thursday every 5 weeks. The next purge will be the Thursday of this week, not the Thursday 5 weeks from now.
-
Force a purge to happen immediately by clicking Purge Now.
If the Cisco ISE server is down when the purge is scheduled to run, the purge is not executed. The purge process will run again at the next scheduled purge time, assuming the server is operational at that time.
Add Custom Fields for Guest Account Creation
When providing guest access, you may want to collect information from your guests beyond just their names, email addresses, and phone numbers. Cisco ISE provides custom fields that you can use to collect additional information about guests that is specific to your company’s needs. You can associate the custom fields with guest types and with the Self-Registered Guest and Sponsor portals. Cisco ISE does not provide any default custom fields.
What to Do Next
You can include the desired custom fields:
-
When defining a guest type so that accounts created with that guest type will include this information. See Create or Edit Guest Types.
- When configuring the Sponsor portal for sponsors to use when creating guest accounts. See Customize Sponsor Portals.
- When requesting information from self-registering guests using a Self-Registered Guest portal. See Create a Self-Registered Guest Portal.
Specify Email Addresses and SMTP Servers for Email Notifications
Cisco ISE allows you to send emails to sponsors and guests, notifying them of information and instructions. You can configure SMTP servers to deliver these email notifications. You can also specify the email address from which the notifications will be sent to guests.
Sponsors can manually send email notifications to guests to deliver their login credentials and password reset instructions. Sponsors can also receive email notifications requiring their approval for self-registering guests.
During the portal configuration, you can choose to automatically send guests email notifications with their login credentials after they successfully register themselves.
| Step 1 | To specify email settings and configure SMTP servers for all Guest and Sponsor portals, choose . |
| Step 2 | Choose
if you want to add more SMTP servers.
Configure the SMTP server to enable notifications. Enable email notifications to guests is checked by default. If you disable this setting, guests will not receive email notifications regardless of any other settings you may have enabled while configuring Guest and Sponsor portals. |
| Step 3 | Enter the Default “From” email address that is designated for sending email notifications to guests. For example, donotreply@ yourcompany.com. |
| Step 4 | Do one of the
following:
|
| Step 5 | Click Save. If you do not want to save any updates you made to the settings, click Reset to revert to the last saved values. |
Assign Guest Locations and SSIDs
A Guest Location defines a name for a time zone, and is used by ISE to enforce time-related settings of logged on Guests. Guest Locations are assigned to Guest accounts by Sponsors creating a Guest account, and by self-registering Guests. The default Guest Location is San Jose. If no other Guest Locations are added, all accounts are assigned this Guest Location. You can't delete the San Jose Guest Location unless you create one or more new Locations. Unless all your Guests will be in the same time-zone as San Jose, create at least one Guest Location with the required time-zone.
Note | Guest access times are based on the Guest Location's time zone. A Guest user may not be able to login if the Guest Location's time zone doesn't match the system time zone. In this case, the Guest user may get an "Authentication Failed" error. You might see the "Guest active time period not yet started" error message in the debug report. As a workaround, you can adjust the Guest access start time to match the local time zone of the Guest user by using the Manage Accounts option. |
The SSIDs you add here are available to Sponsor Portals, so Sponsors can tell the Guest which SSID to connect to.
You can't delete a Guest Location or a SSID if it is configured in a Sponsor portal or assigned to a Guest account.
What to Do Next
If you added a new Guest Location or SSID, you can:
-
Provide the SSIDs for Sponsors to use when creating Guest accounts. See Portal Settings for Sponsor Portals.
-
Add the Guest Locations to Sponsor Groups, so Sponsors assigned to that group can use them when creating guest accounts. See Configure Sponsor Groups.
-
Assign the Guest Locations available to self-registering guests using a Self-Registered Guest portal. See Create a Self-Registered Guest Portal.
Rules for Guest Password Policies
-
Changes to the guest password policy do not affect existing accounts, until the guests passwords have expired and need to be changed.
-
Passwords are case sensitive.
-
The special characters <, >, /, and % cannot be used.
-
Minimum length and minimum required characters apply to all passwords.
-
Passwords cannot match usernames.
-
New passwords cannot match current passwords.
-
Guests do not receive notifications prior to password expiration, unlike guest account expiration. When guest passwords expire, either sponsors can reset the password to a random password or guests can log in using their current login credentials and then change their password.
Set the Guest Password Policy and Expiration
You can define a password policy for all Guest portals. A Guest password policy determines how the password is generated for all guest accounts. A password can be a mixture of alphabetic, numeric, or special characters. You can also set the number of days after which guest passwords will expire, requiring guests to reset their passwords.
| Step 1 | Choose > . |
| Step 2 | Enter the Minimum password length (in characters) for the guest passwords. |
| Step 3 | Specify the characters from each character set that can be used by guests to create passwords. Choose one of the following options under Allowed Characters and Minimums to specify the password policy for guests: |
| Step 4 | Enter the minimum number of characters to use from each set. The total number of required characters across the four character sets should not exceed the overall Minimum password length. |
| Step 5 | Choose one of the following
options under
Password
Expiration:
|
| Step 6 | Click Save. If you do not want to save any updates you made to the settings, click Reset to revert to the last saved values. |
What to Do Next
You should customize the error messages that are related to the password policy to provide the password requirements.
Rules for Guest Username Policies
-
Changes to the guest username policy do not affect existing accounts, until the guest accounts have expired and need to be changed.
-
The special characters <, >, /, and % cannot be used.
-
Minimum length and minimum required characters apply to all system-generated usernames, including usernames based on email addresses.
-
Passwords cannot match usernames.
Set the Guest Username Policy
You can configure rules for how guest usernames are created. A generated username can be created based on the email address, or based on the first name and last name of the guest. The Sponsor can also create a random number of guest accounts to save time when creating multiple guests, or when guest names and email addresses are not available. Randomly generated guest usernames consist of a mixture of alphabetic, numeric, and special characters. These settings affect all guests.
| Step 1 | To define the guest username policies for all Guest and Sponsor portals, choose . |
| Step 2 | Enter the Minimum username length (in characters) for the guest usernames. |
| Step 3 | Choose one of the options under Username Criteria for Known Guests to specify the policy for creating usernames for known guests. |
| Step 4 | Choose one of the following options under Characters Allowed in Randomly-Generated Usernames to specify the policy for creating random usernames for guests: |
| Step 5 | Enter the minimum number of characters to use from each set. The total number of characters from the three character sets should not exceed the number specified in Minimum username length. |
| Step 6 | Click Save. If you do not want to save any updates you made to the settings, click Reset to revert to the last saved values. |
What to Do Next
You should customize the error messages that are related to the username policy to provide the username requirements.
SMS Providers and Services
SMS services are required when you and sponsors want to send SMS notifications to guests that are using credentialed Guest portals. Whenever possible, configure and provide free SMS service providers to lower your company's expenses.
Cisco ISE supports a variety of cellular service providers that provide free SMS services to their own subscribers. You can use these providers without a service contract and without configuring their account credentials in Cisco ISE. These include ATT, Orange, Sprint, TMobile, and Verizon.
You can also add other cellular service providers that offer free SMS services or a global SMS service provider, such as a Click-A-Tell. The default global SMS service provider requires a service contract and you must configure their account credentials in Cisco ISE.
-
If self-registering guests pick their free SMS service provider on the Self-Registration form, SMS notifications with their login credentials are sent to them free of cost. If they do not pick their SMS service provider, then the default global SMS service provider contracted by your company is used to send the SMS notifications.
-
If you allow sponsors to send SMS notifications to guests whose accounts they have created, you should also customize the sponsor portal and select all the appropriate SMS service providers that can be used by these sponsors. If you do not select any SMS service providers for the Sponsor portal, the default global SMS service provider contracted by your company will provide the SMS services.
SMS providers are configured as SMS Gateways in ISE. Email from ISE is converted to SMS by the SMS gateway.
Configure SMS Gateways to Send SMS Notifications to Guests
- Sponsors to manually send SMS notifications to guests with their login credentials and password reset instructions.
- Guests to automatically receive SMS notifications with their login credentials after they successfully register themselves.
- Guests to automatically receive SMS notifications with actions to take before their guest accounts expire.
When entering information in the fields, you should update all text within [ ], such as [USERNAME], [PASSWORD], [PROVIDER_ID], etc., with information specific to your SMS provider's account.
Configure a default SMTP server to use for the SMS Email Gateway option.
| Step 1 | Choose . |
| Step 2 | Click Add. |
| Step 3 | Enter an SMS Gateway Provider Name. |
| Step 4 | Select a
Provider
Interface Type and enter the required information:
For information about configuring an SMS Email Gateway and an SMS HTTP API gateway, see SMS Gateway Settings. |
| Step 5 | Check Break up long message into multiple parts to enable Cisco ISE to divide messages that exceed 140 bytes into multiple messages. Most SMS providers divide long SMS messages into multiple parts automatically. MMS messages can be longer than SMS messages. |
| Step 6 | Click Submit. |
What to Do Next
If you configured a new SMS gateway, you can:
-
Select the SMS service provider to use when sending SMS notifications about expiring accounts to guests. See Create or Edit Guest Types.
-
Specify which of the configured SMS providers should display on the Self-Registration form for self-registering guests to pick from. See Create a Self-Registered Guest Portal.
-
Provide the SMS service providers for sponsors to use when creating guest accounts for guests whose information is available. See Configure Sponsor Groups.
Managing Sponsor Accounts
Sponsors are a special type of internal user who can create guest accounts using the Sponsor portal. Like other internal users, Cisco ISE authenticates sponsors through a local database, or through external Lightweight Directory Access Protocol (LDAP), Microsoft Active Directory, or SAML identity stores. If you are not using an external source, you must create internal user accounts for sponsors in Cisco ISE.
Sponsor Groups
Each sponsor belongs to a sponsor group. The sponsor group configuration defines the permissions and settings for sponsors that are part of that group. Cisco ISE includes these default sponsor groups:
-
GROUP_ACCOUNTS—Sponsors can manage the guest accounts created by sponsors from the same Sponsor Group.
-
OWN_ACCOUNTS—Sponsors can manage only the Guest accounts that they created.
You can customize the features available to particular sponsor groups, thereby limiting or expanding functionality of the Sponsor portal. For example:
-
You can allow sponsors to create multiple guest accounts in one operation.
-
You can restrict sponsors from managing guest accounts created by other sponsors.
-
You can grant sponsors the authority to approve or deny requests from self-registering guests.
-
You can allow sponsors to delete, suspend, and reinstate guest accounts.
-
You can disable a sponsor group to prevent its members from logging in to the Sponsor portal.
Sponsor Groups
Sponsor groups control the permissions given to a sponsor when using any Sponsor portal. If a sponsor is a member of a sponsor group, then the sponsor receives the permissions defined in the group.
A sponsor is considered to be a member of a sponsor group if the sponsor belongs to at least one of the Member Groups defined in the sponsor group. A Member Group can be a User Identity Group, or a group selected from an external identity source, such as Active Directory.
A sponsor can be a member of more than one sponsor group. If so, the sponsor receives the combined permissions from all of those groups, as follows:
-
An individual permission such as "Delete guests' accounts" is granted if it is enabled in any of the groups.
-
The sponsor can create guests using the Guest Types in any of the groups.
-
The sponsor can create guests at the locations in any of the groups.
-
For a numeric value such as a batch size limit, the largest value from the groups is used.
If a sponsor is not a member of any sponsor group, then the sponsor is not permitted to log into any sponsor portal.
-
GROUP_ACCOUNTS—Sponsors can manage the guest accounts created by sponsors from the same Sponsor Group.
-
OWN_ACCOUNTS—Sponsors can manage only the Guest accounts that they created.
You can customize the features available to particular sponsor groups, thereby limiting or expanding functionality of the Sponsor portal. For example:
-
You can allow sponsors to create multiple guest accounts in one operation.
-
You can restrict sponsors from managing guest accounts created by other sponsors.
-
You can grant sponsors the authority to approve or deny requests from self-registering guests.
-
You can allow sponsors to delete, suspend, and reinstate guest accounts.
If a sponsor is not a member of any sponsor group, then that sponsor is not permitted to log in to any sponsor portal.
Create Sponsor Accounts and Assign to Sponsor Groups
To create internal sponsor user accounts and specify the sponsors who can use the Sponsor portals:
What to Do Next
You can also create additional user identity groups specific to your organization to use with sponsors. Choose .
Configure Sponsor Groups
Cisco provides default sponsor groups. If you do not want to use the default options, you can either create new sponsor groups or edit the default sponsor groups and change the settings. You can also duplicate a sponsor group to create more sponsor groups with the same settings and privileges.
You can disable a sponsor group, which prevents the members of the sponsor group from logging in to the Sponsor portal. You can delete any of the sponsor groups, except the default sponsor groups provided by Cisco ISE.
| Step 1 | Enter the Sponsor group name and Description. | ||
| Step 2 | Click Members to select user (identity) groups and add them as group members of this sponsor group. | ||
| Step 3 | To specify which
guest types can be created by sponsors which are based on this sponsor group,
click inside the box under
This
sponsor group can create accounts using these guest types, and
select one or more guest types.
You can create more guest types to assign to this sponsor group by clicking the link under Create Guest Types at. After you create a new guest type, you must save, close, and reopen the sponsor group before you can select that new guest type. | ||
| Step 4 | Use
Select
the locations that guests will be visiting to specify the locations
(used to set the guest time zones) that sponsors in this sponsor group can
choose from when creating guest accounts.
You can add more locations to choose from by clicking the link under Configure guest locations at and adding guest locations. After you create a new guest location, you must save, close and reopen the sponsor group before you can select that new guest location. This will not restrict guests from logging in from other locations. | ||
| Step 5 | Under Automatic guest notification, check Automatically email guests upon account creation if email address is available if you want to save the your sponsors the step of clicking Notify after creating a user. A window will pop up saying that an email was sent. Checking this also adds a header to the sponsor portal that says Guest notifications are sent automatically. | ||
| Step 6 | Under Sponsor Can Create configure options that sponsors in this group have for creating guest accounts.
| ||
| Step 7 | Under
Sponsor
Can Manage you can restrict which guests accounts the members of
this sponsor group can view and manage.
| ||
| Step 8 | Under
Sponsor
Can you can provide additional privileges related to guest
passwords and accounts to the members of this sponsor group.
| ||
| Step 9 | Click Save and then Close. |
Guest Portals
When people visiting your company wish to use your company’s network to access the Internet or resources and services on your network, you can provide them network access through a Guest portal. Employees can use these Guest portals to access your company’s network, if configured.
There are three default Guest portals:
-
Hotspot Guest portal—Network access is granted without requiring any credentials. Usually, an Acceptance of User Policy (AUP) must be accepted before network access is granted.
-
Sponsored-Guest portal—Network access is granted by a sponsor who creates accounts for guests, and provides the Guest with login credentials.
-
Self-Registered Guest portal—Guests can also create their own accounts and credentials, and may need sponsor approval before they are granted network access.
Cisco ISE can host multiple Guest portals, including a predefined set of default portals. The default portal themes have standard Cisco branding that you can customize through the Admin portal. You can also choose to further customize a portal by uploading images, logos, and cascading style sheets (CSS) files that are specific to your organization.
- Credentials for Guest Portals
- Guest Access with Hotspot Guest Portals
- Guest Access with Credentialed Guest Portals
- Employee Access with Credentialed Guest Portals
- Configure Periodic AUP Acceptance
- Guest Device Compliance
- Guest Portals Configuration Tasks
- Enable Policy Services
- Add Certificates for Guest Portals
- Create External Identity Sources
- Create Identity Source Sequences
- Create Endpoint Identity Groups
- Create a Hotspot Guest Portal
- Create a Sponsored-Guest Portal
- Create a Self-Registered Guest Portal
- Authorize Portals
- Customize Guest Portals
Credentials for Guest Portals
Cisco ISE provides secured network access by requiring guests to log in using various types of credentials. You can require that guests log in using one or a combination of these credentials.
-
Username—Required. Applies to all guests using end-user portals (except Hotspot Guest portals) and is derived from the username policy. The username policy applies only to system-generated usernames and not to usernames specified using the Guest API programming interface or the self-registering process. You can configure the policy settings that apply to usernames at . Guests can be notified of their username in an email, SMS, or in printed form.
-
Password—Required. Applies to all guests using end-user portals (except Hotspot Guest portals) and is derived from the password policy. You can configure the policy settings that apply to passwords at . Guests can be notified of their password in an email, SMS, or in printed form.
-
Access code—Optional. Applies to guests using the Hotspot Guest and Credentialed Guest portals. An access code is primarily a locally known code that is given to physically present guests (either visually via a whiteboard or verbally by a lobby ambassador). It would not be known and used by someone outside the premises to gain access to the network. If the Access code setting is enabled:
-
Registration code—Optional. Applies to self-registering guests and is similar to an access code in how it is provided to the self-registering guests. If the Registration code setting is enabled, self-registering guests are prompted to enter it on the Self-Registration form.
The username and password can be provided by a sponsor at your company (for sponsored guests), or a Credentialed Guest portal can be configured to allow guests to register themselves to obtain these credentials.
Guest Access with Hotspot Guest Portals
Cisco ISE provides network access functionality that includes “hotspots,” which are access points that guests can use to access the Internet without requiring credentials to log in. When guests connect to the hotspot network with a computer or any device with a web browser and attempt to connect to a website, they are automatically redirected to a Hotspot Guest portal. Both wired and wireless (Wi-Fi) connections are supported with this functionality.
The Hotspot Guest portal is an alternative Guest portal that allows you to provide network access without requiring guests to have usernames and passwords and alleviates the need to manage guest accounts. Instead, Cisco ISE works together with the network access device (NAD) and Device Registration Web Authentication (Device Registration WebAuth) to grant network access directly to the guest devices. Sometimes, guests may be required to log in with an access code. Typically, this is a code that is locally provided to guests who are physically present on a company’s premises.
Guest Access with Credentialed Guest Portals
You can use a credentialed Guest portal to identify and authorize temporary access for external users to internal networks and services, as well as to the Internet. Sponsors can create temporary usernames and passwords for authorized visitors who can access the network by entering these credentials in the portal's Login page.
You can set up a credentialed Guest portal so that guests can log in using a username and password that is obtained:
-
From a sponsor. In this guest flow, guests are greeted by a sponsor, such as a lobby ambassador, when they enter company premises and are set up with individual guest accounts.
-
After they register themselves, using an optional registration code or access code. In this guest flow, guests are able to access the Internet without any human interaction and Cisco ISE ensures that these guests have unique identifiers that can be used for compliance.
-
After they register themselves, using an optional registration code or access code, but only after the request for a guest account is approved by a sponsor. In this guest flow, guests are provided access to the network, but only after an additional level of screening is done.
You can also force the user to enter a new password when logging in.
Cisco ISE enables you to create multiple credentialed Guest portals, which you can use to allow guest access based on different criteria. For example, you might have a portal for monthly contractors that is separate from the portal used for daily visitors.
Employee Access with Credentialed Guest Portals
Employees can also access the network using Credentialed Guest Portals by signing in using their employee credentials, as long as their credentials can be accessed by the identity source sequence configured for that portal.
Configure Periodic AUP Acceptance
To verify that the endpoint has received the AUP settings:
Guest Device Compliance
When guests and non-guests access the network through credentialed Guest portals, you can check their devices for compliance before they are allowed to gain access. You can route them to a Client Provisioning page and require them to first download the posture agent that checks their posture profile and verifies if their device is compliant. You can do this by enabling the option in the Guest Device Compliance Settings in a credentialed Guest portal, which displays the Client Provisioning page as part of the guest flow.
The Client Provisioning service provides posture assessments and remediations for guests. The Client Provisioning portal is available only with a Central Web Authorization (CWA) guest deployment. The guest login flow performs a CWA, and the credentialed Guest portal is redirected to the Client Provisioning portal after performing acceptable-use-policy and change-password checks. The posture subsystem performs a Change of Authorization (CoA) on the network access device to reauthenticate the client connection once the posture has been assessed.
Guest Portals Configuration Tasks
You can use a default portal and its default settings such as certificates, endpoint identity group, identity source sequence, portal themes, images, and other details provided by Cisco ISE. If you do not want to use the default settings, you should create a new portal or edit an existing one to meet your needs. You can duplicate a portal if you want to create multiple portals with the same settings.
After creating a new portal or editing a default one, you must authorize the portal for use. Once you authorize a portal for use, any subsequent configuration changes you make are effective immediately.
If you choose to delete a portal, you must first delete any authorization policy rules and authorization profiles associated with it or modify them to use another portal.
| Task | Hotspot Guest Portal | Sponsored-Guest Portal | Self-Registered Guest Portal |
|---|---|---|---|
|
Required |
Required |
Required |
|
|
Required |
Required |
Required |
|
|
Not applicable |
Required |
Required |
|
|
Not applicable |
Required |
Required |
|
|
Required |
Not required (defined by guest type) |
Not required (defined by guest type) |
|
|
Required |
Not applicable |
Not applicable |
|
|
Not applicable |
Required |
Not applicable |
|
|
Not applicable |
Not applicable |
Required |
|
|
Required |
Required |
Required |
|
|
Optional |
Optional |
Optional |
Enable Policy Services
To support the Cisco ISE end-user web portals, you must enable portal-policy services on the node on which you want to host them.
Add Certificates for Guest Portals
If you do not want to use the default certificates, you can add a valid certificate and assign it to a certificate group tag. The default certificate group tag used for all end-user web portals is Default Portal Certificate Group.
| Step 1 | Chose . |
| Step 2 | Add a system certificate and assign it to a certificate group tag that you want to use for the portal. This certificate group tag will be available to select during portal creation or editing. |
| Step 3 | Choose . |
| Step 4 | Select the specific certificate group tag from the Certificate group tag drop-down list that is associated with the newly added certificate. |
Create External Identity Sources
Cisco ISE can connect with external identity sources such as Active Directory, LDAP, RADIUS Token, and RSA SecurID servers to obtain user information for authentication and authorization. External identity sources also includes certificate authentication profiles that you need for certificate-based authentications.
| Step 1 | Choose . |
| Step 2 | Choose one of
these options:
|
Create Identity Source Sequences
Ensure that you have configured your external identity sources in Cisco ISE.
To perform the following task, you must be a Super Admin or System Admin.
For allowing guest users to authenticate through Local WebAuth, you must configure both the Guest Portal authentication source and the identity source sequence to contain the same identity stores.
| Step 1 | Choose . |
| Step 2 | Enter a name for the identity source sequence. You can also enter an optional description. |
| Step 3 | Check the Select Certificate Authentication Profile check box and choose a certificate authentication profile for certificate-based authentication. |
| Step 4 | Choose the database or databases that you want to include in the identity source sequence in the Selected List box. |
| Step 5 | Rearrange the databases in the Selected list in the order in which you want Cisco ISE to search the databases. |
| Step 6 | Choose one of the following
options in the
Advanced
Search List area:
|
| Step 7 | Click Submit to create the identity source sequence that you can then use in policies. |
Create Endpoint Identity Groups
Cisco ISE groups endpoints that it discovers in to the corresponding endpoint identity groups. Cisco ISE comes with several system-defined endpoint identity groups. You can also create additional endpoint identity groups from the Endpoint Identity Groups page. You can edit or delete the endpoint identity groups that you have created. You can only edit the description of the system-defined endpoint identity groups; you cannot edit the name of these groups or delete them.
| Step 1 | Choose . |
| Step 2 | Click Add. |
| Step 3 | Enter the name for the endpoint identity group that you want to create (do not include spaces in the name of the endpoint identity group). |
| Step 4 | Enter the description for the endpoint identity group that you want to create. |
| Step 5 | Click the Parent Group drop-down list to choose an endpoint identity group to which you want to associate the newly created endpoint identity group. |
| Step 6 | Click Submit. |
Create a Hotspot Guest Portal
You can provide a Hotspot Guest portal to enable guests to connect to your network without requiring a username and password to log in. An access code can be required to log in.
You can create a new Hotspot Guest portal, or you can edit or duplicate an existing one. You can delete any Hotspot Guest portal, including the default portal provided by Cisco ISE.
Any changes that you make to the Page Settings on the Portal Behavior and Flow Settings tab are reflected in the graphical flow in the Guest Flow diagram. If you enable a page, such as the AUP page, it appears in the flow and the guest will experience it in the portal. If you disable it, it is removed from the flow and the next enabled page displays for the guest.
All the Page Settings, except the Authentication Success Settings, are optional.
Ensure that you have the required certificates and endpoint identity groups configured for use with this portal.
Ensure that the WLC that guests will connect to for the Hotspot portal is supported by ISE. See the Cisco Identity Services Engine Network Component Compatibility guide for your release, for example, http://www.cisco.com/c/en/us/td/docs/security/ise/2-1/compatibility/ise_sdt.html.
| Step 1 | Choose . |
| Step 2 | If creating a new portal, in the Create Guest Portal dialog box, select Hotspot Guest Portal as the portal type and click Continue. |
| Step 3 | Provide a unique Portal Name and a Description for the portal. Ensure that the portal name that you use here is not used for any other end-user portals. |
| Step 4 | Use the Language File drop-down menu to export and import language files to use with the portal. |
| Step 5 | Update the default values for ports, Ethernet interfaces, certificate group tags, endpoint identity groups, and so on in Portal Settings, and define behavior that applies to the overall portal. |
| Step 6 | Update the
following settings, which apply to each of the specific pages:
|
| Step 7 | Click Save. A system-generated URL displays as the Portal test URL, which you can use to access the portal and test it. |
What to Do Next
You must authorize the portal in order to use it. You can also customize your portal either before or after you authorize it for use.
Create a Sponsored-Guest Portal
You can provide a Sponsored-Guest portal to enable designated sponsors to grant access to guests.
You can create a new Sponsored-Guest portal, or you can edit or duplicate an existing one. You can delete any Sponsored-Guest portal, including the default portal provided by Cisco ISE.
Any changes that you make to the Page Settings on the Portal Behavior and Flow Settings tab are reflected in the graphical flow in the Guest Flow diagram. If you enable a page, such as the AUP page, it appears in the flow and the guest will experience it in the portal. If you disable it, it is removed from the flow and the next enabled page displays for the guest.
All these page settings enable you to display an Acceptable Use Policy (AUP) for a guest and require its acceptance:
Ensure that you have the required certificates, external identity sources, and identity source sequences configured for use with this portal.
| Step 1 | Choose . | ||
| Step 2 | If creating a new portal, in the Create Guest Portal dialog box, select Sponsored-Guest Portal as the portal type and click Continue. | ||
| Step 3 | Provide a unique Portal Name and a Description for the portal. Ensure that the portal name that you use here is not used for any other end-user portals. | ||
| Step 4 | Use the Language File drop-down menu to export and import language files to use with the portal. | ||
| Step 5 | Update the default values for ports, Ethernet interfaces, certificate group tags, identity source sequences, authentication method, and so on in Portal Settings, and define behavior that applies to the overall portal. | ||
| Step 6 | Update the
following settings, which apply to each of the specific pages:
| ||
| Step 7 | Click Save. A system-generated URL displays as the Portal test URL, which you can use to access the portal and test it. |
What to Do Next
Note | The test portal does not support RADIUS sessions, so you won't see the entire portal flow for all portals. BYOD and Client Provisioning are examples of portals that depend on RADIUS sessions. For example, a redirect to an external URL will not work. |
You must authorize the portal in order to use it. You can also customize your portal either before or after you authorize it for use.
Create a Self-Registered Guest Portal
You can provide a Self-Registered Guest portal to enable guests to register themselves and create their own accounts so they can access the network. You can still require that these accounts be approved by a sponsor before access is granted.
You can create a new Self-Registered Guest portal, or you can edit or duplicate an existing one. You can delete any Self-Registered Guest portal, including the default portal provided by Cisco ISE.
Any changes that you make to the Page Settings on the Portal Behavior and Flow Settings tab are reflected in the graphical flow in the Guest Flow diagram. If you enable a page, such as the AUP page, it appears in the flow and the guest will experience it in the portal. If you disable it, it is removed from the flow and the next enabled page displays for the guest.
All these page settings enable you to display an Acceptable Use Policy (AUP) for a guest and require its acceptance:
Ensure that you have configured the required certificates, external identity sources, and identity source sequences for this portal.
| Step 1 | Choose . |
| Step 2 | If creating a new portal, in the Create Guest Portal dialog box, select Self-Registered Guest Portal as the portal type and click Continue. |
| Step 3 | Provide a unique Portal Name and a Description for the portal. Ensure that the portal name that you use here is not used for any other end-user portals. |
| Step 4 | Use the Language File drop-down menu to export and import language files to use with the portal. |
| Step 5 | In Portal Settings, update the default values for ports, Ethernet interfaces, certificate group tags, identity source sequences, authentication method,, and other settings that define behavior of this portal. For more information about Portal Settings fields, see Portal Settings for Credentialed Guest Portals. |
| Step 6 | Update the
following settings, which apply to each of the specific pages:
|
| Step 7 | Click Save. A system-generated URL displays as the Portal test URL, which you can use to access the portal and test it. |
What to Do Next
Note | The test portal does not support RADIUS sessions, so you won't see the entire portal flow for all portals. BYOD and Client Provisioning are examples of portals that depend on RADIUS sessions. For example, a redirect to an external URL will not work. |
You must authorize the portal in order to use it. You can also customize your portal either before or after you authorize it for use.
Authorize Portals
You must create a portal before you can authorize it.
Create Authorization Profiles
Each portal requires that you set up a special authorization profile for it.
If you do not plan to use a default portal, you must first create the portal so you can associate the portal name with the authorization profile.
What to Do Next
You should create a portal authorization policy rule that uses the newly created authorization profile.
Create Authorization Policy Rules for Hotspot and MDM Portals
To configure the redirection URL for a portal to use when responding to the users' (guests, sponsors, employees) access requests, define an authorization policy rule for that portal.
The url-redirect takes the following form based on the portal type, where:
ip:port = the IP address and port number
PortalID = the unique portal name
For a Hotspot Guest portal: https://ip:port/guestportal/gateway?sessionID=SessionIdValue&portal=PortalID&action=cwa&type=drw
For a Mobile Device Management (MDM) portal: https://ip:port/mdmportal/gateway?sessionID=SessionIdValue&portal=PortalID&action=mdm
| Step 1 | Choose
to create a new authorization policy
rule under
Standard policies.
If you enabled Policy Sets, choose , pick the Policy Set you plan to use for this portal, expand Authorization Policy, and add a new rule. | ||
| Step 2 | For
Conditions, select an endpoint identity group that
you want to use for the portal validation. For example, for the Hotspot Guest
portal, select the default
GuestEndpoints
endpoint identity group and, for the MDM portal, select the default
RegisteredDevices endpoint identity group.
| ||
| Step 3 | For Permissions, select the portal authorization profile that you created. |
Customize Guest Portals
You can customize the portal appearance and user (guests, sponsors, or employees as applicable) experience by customizing the portal themes, changing UI elements on the portal pages, and editing error messages and notifications that display to the users.
Sponsor Portals
The Sponsor portal is one of the primary components of Cisco ISE guest services. Using the Sponsor portal, sponsors can create and manage temporary accounts for authorized visitors to securely access the corporate network or the Internet. After creating a guest account, sponsors also can use the Sponsor portal to provide account details to the guest by printing, emailing, or texting. Before providing self-registering guests access to the company network, sponsors may be requested via email to approve their guests’ accounts.
Configure a Sponsor Portal
You can use a default portal and its default settings such as certificates, endpoint identity group, identity source sequence, portal themes, images, and other details provided by Cisco ISE. If you do not want to use the default settings, you should create a new portal or edit an existing one to meet your needs. You can duplicate a portal if you want to create multiple portals with the same settings.
You may want to create multiple sponsor portals if your company has different branding for your corporate office and its retail locations, or if your company has different product brands, or if a city’s offices want different themed portals for the fire, police, and other departments.
These are the tasks related to configuring a Sponsor portal.
| Step 1 | Enable Policy Services. |
| Step 2 | Add Certificates for Guest Services. |
| Step 3 | Create External Identity Sources. |
| Step 4 | Create Identity Source Sequences. |
| Step 5 | Create a Sponsor Portal. |
| Step 6 | (Optional)Customize Sponsor Portals.
You can customize the portal if you want to change its appearance. |
Enable Policy Services
To support the Cisco ISE end-user web portals, you must enable portal-policy services on the node on which you want to host them.
Add Certificates for Guest Services
If you do not want to use the default certificates, you can add a valid certificate and assign it to a certificate group tag. The default certificate group tag used for all end-user web portals is Default Portal Certificate Group.
| Step 1 | Chose . |
| Step 2 | Add a system certificate and assign it to a certificate group tag that you want to use for the portal. This certificate group tag will be available to select during portal creation or editing. |
| Step 3 | Choose . |
| Step 4 | Select the specific certificate group tag from the Certificate Group Tag drop-down list that is associated with the newly added certificate. |
Create External Identity Sources
Cisco ISE can connect with external identity sources such as Active Directory, LDAP, RADIUS Token, and RSA SecurID servers to obtain user information for authentication and authorization. External identity sources also includes certificate authentication profiles that you need for certificate-based authentications.
| Step 1 | Choose . |
| Step 2 | Choose one of
these options:
|
Create Identity Source Sequences
Ensure that you have configured your external identity sources in Cisco ISE.
To perform the following task, you must be a Super Admin or System Admin.
For allowing guest users to authenticate through Local WebAuth, you must configure both the Guest Portal authentication source and the identity source sequence to contain the same identity stores.
| Step 1 | Choose . |
| Step 2 | Enter a name for the identity source sequence. You can also enter an optional description. |
| Step 3 | Check the Select Certificate Authentication Profile check box and choose a certificate authentication profile for certificate-based authentication. |
| Step 4 | Choose the database or databases that you want to include in the identity source sequence in the Selected List box. |
| Step 5 | Rearrange the databases in the Selected list in the order in which you want Cisco ISE to search the databases. |
| Step 6 | Choose one of the following
options in the
Advanced
Search List area:
|
| Step 7 | Click Submit to create the identity source sequence that you can then use in policies. |
Create a Sponsor Portal
You can provide a Sponsor portal to enable sponsors to create, manage, and approve accounts for guests who want to connect to your network to access the internet and internal resources and services.
Cisco ISE provides you with a default Sponsor portal that you can use without having to create another one. However, you can create a new Sponsor portal, or you can edit or duplicate an existing one. You can delete any of these portals, except the default Sponsor portal.
Any changes that you make to the Page Settings on the Portal Behavior and Flow Settings tab are reflected in the graphical flow in the Sponsor Flow diagram. If you enable a page, such as the AUP page, it appears in the flow and the sponsor will experience it in the portal. If you disable it, it is removed from the flow and the next enabled page displays for the sponsor.
Ensure that you have the required certificates, external identity sources, and identity source sequences configured for use with this portal.
| Step 1 | Configure the Portal Settings page, as described in Portal Settings for Sponsor Portals. Ensure that the portal name that you use here is not used for any other end-user portals. |
| Step 2 | Configure the Login Settings page , as described in Login Settings for Sponsor Portals. |
| Step 3 | Configure the Acceptable Use Policy (AUP) Page Settings page, as described in Acceptable Use Policy (AUP) Settings for Sponsor Portals . |
| Step 4 | Configure the Sponsor Change Password Settings page, as described in Set the Guest Password Policy and Expiration and in Rules for Guest Password Policies. |
| Step 5 | Configure the Post-Login Banner Page Settings page, as described in Post-Login Banner Settings for Sponsor Portals. |
| Step 6 | Sponsor Portal Application Settings refers you to the Portal Customization tab if you with to customize the portal. |
| Step 7 | Click Save. |
Customize Sponsor Portals
You can customize the portal appearance and user (guests, sponsors, or employees as applicable) experience by customizing the portal themes, changing UI elements on the portal pages, and editing error messages and notifications that display to the users.
Sponsors Cannot Log In to the Sponsor Portal
Problem
“Invalid username or password. Please try again.”
Causes
-
The sponsor has entered invalid credentials.
-
The sponsor is not valid because the user record is not present in the database (Internal Users or Active Directory).
-
The sponsor group to which the sponsor belongs is disabled.
-
The Sponsor's user account is not a member of an active/enabled Sponsor Group, which means the Sponsor user's Identity Group is not a member of any Sponsor Group.
-
The sponsor’s internal user account is disabled (suspended).
Solution
Monitor Guest and Sponsor Activity
Cisco ISE provides various reports and logs that allow you to view endpoint and user management information and guest and sponsor activity. Some of the Cisco ISE 1.2 reports have been deprecated, but the information can be viewed in other reports.
You can run these reports either on demand or on a scheduled basis.
| Step 1 | Choose . |
| Step 2 | Under the Report Selector, expand the Guest Access Reports and Endpoints and Users selections to view the various guest, sponsor, and endpoint related reports. |
| Step 3 | Select the
report and choose the data with which you want to search using the
Filters drop-down list.
You can use filters on username, portal name, device name, endpoint identity group and other such data. |
| Step 4 | Select the Time Range during which you want to view the data. |
| Step 5 | Click Run. |
Metrics Dashboard
Cisco ISE provides an at-a-glance view of Authenticated Guests and Active Endpointsin the network in a metrics dashboard that appears on the Cisco ISE Home page.
AUP Acceptance Status Report
The AUP Acceptance Status report displays the acceptance status of the Acceptable Use Policy (AUP) by guests from all the Guest portals. This report is available at: .
You can use the report to track all the accepted and denied AUP connections for a given period of time.
Guest Accounting Report
The Guest Accounting report displays the guest login history for an indicated time period. This report is available at: .
Master Guest Report
The Master Guest report combines data from various reports into a single view enabling you to export data from different reporting sources. You can add more data columns and remove the ones you do not want to view or export. This report is available at . It now includes information that used to be in the deprecated Guest Activity Report.
This report collects all guest activity and provides details about the websites that guest users visit. You can use this report for security auditing purposes to see when guest users accessed the network and what they did on it. To view the guests’ Internet activity, such as the URLs of the websites that they visited, you must first:
Sponsor Login and Audit Report
The Sponsor Login and Audit report is a combined report that tracks:
-
Login activity by the sponsors at the Sponsor portal.
-
Guest-related operations performed by the sponsors in the Sponsor portal.
This report is available at .
Audit Logging for Guest and Sponsor Portals
During specific actions within the Guest and Sponsor portals, audit log messages are sent to the underlying audit system. By default, these messages appear in the /opt/CSCOcpm/logs/localStore/iseLocalStore.log file.
You can configure these messages to be sent by syslog to the monitoring and troubleshooting system and log collector. The monitoring subsystem presents this information in the appropriate sponsor and device audit logs and guest activity logs.
Guest login flow is logged in the audit logs regardless of whether the guest login has passed or failed.
Guest Access Deployment Scenarios
Cisco ISE supports several deployment options to enable secure guest access through Cisco ISE Guest and Web Authentication Services. You can provide wired or wireless guest connectivity using Local or Central Web Authentication and Device Registration Web Authentication.
-
Central Web Authentication (Central WebAuth)—Applies to all Guest portals. Web authentication is done by a central Cisco ISE RADIUS server for both wired and wireless connection requests. Authentication of the guest device is done after an optional access code is entered by the guest at the Hotspot Guest portals and a username and password are entered by the guest at the Credentialed Guest portals.
-
Local Web Authentication (Local WebAuth)—Applies to the Credentialed Guest portals. Serving of the web pages to the guest is done locally either on a network access device (NAD) such as a switch for a wired connection or by the wireless LAN controller (WLC) for a wireless connection. Authentication of the guest device is done after a username and password are entered by the guest at the Credentialed Guest portals.
-
Device Registration Web Authentication (Device Registration WebAuth)—Applies only to the Hotspot Guest portal. Web authentication is done after the guest device is registered and authorized for use by Cisco ISE. Guests are directed to the Hotspot Guest portal where they can gain access to the network through either a wired or wireless connection (without entering a username or password).
- NAD with Central WebAuth Process
- Wireless LAN Controller with Local WebAuth Process
- Wired NAD with Local WebAuth Process
- Device Registration WebAuth Process
NAD with Central WebAuth Process
In this scenario, the network access device (NAD) makes a new authorization request to the Cisco ISE RADIUS server from an unknown endpoint connection. The endpoint then receives a url-redirect to Cisco ISE.
Note | webauth-vrf-aware command is supported only in IOS XE 3.7E, IOS 15.2(4)E or later versions. Other switches do not support WebAuth URL redirect in virtual routing and forwarding (VRF) environment. In such cases, as a workaround, you can add a route in the global routing table to leak the traffic back into the VRF. |
If the guest device is connected to a NAD, the guest service interaction takes the form of a MAC Authentication Bypass (MAB) request that leads to a Guest portal Central WebAuth login. The following is an outline of the subsequent Central Web Authentication (Central WebAuth) process, which applies to both wireless and wired network access devices.
-
The guest device connects to the NAD through a hard-wired connection. There is no 802.1X supplicant on the guest device.
-
An authentication policy with a service type for MAB allows a MAB failure to continue and return a restricted network profile containing a url-redirect for the Central WebAuth user interface.
-
The NAD is configured to authenticate MAB requests to the Cisco ISE RADIUS server.
-
The Cisco ISE RADIUS server processes the MAB request and does not find an endpoint for the guest device.
This MAB failure resolves to the restricted network profile and returns the url-redirect value in the profile to the NAD in an access-accept. To support this function, ensure that an authorization policy exists and features the appropriate wired or wireless MAB (under compound conditions) and, optionally, “Session:Posture Status=Unknown” conditions. The NAD uses this value to redirect all guest HTTPS traffic on the default port 8443 to the url-redirect value.
The standard URL value in this case is: https://ip:port/guestportal/gateway?sessionId=NetworkSessionId&portal=<PortalID>&action=cwa.
-
The guest device initiates an HTTP request to redirect URL via a web browser.
-
The NAD redirects the request to the url-redirect value returned from the initial access-accept.
-
The gateway URL value with action CWA redirects to the Guest portal login page.
-
The guest enters their login credentials and submits the login form.
-
The guest server authenticates the login credentials.
-
Depending on the type of flow, the following occurs:
-
If it is a non-posture flow (authentication without further validation), where the Guest portal is not configured to perform client provisioning, the guest server sends a CoA to the NAD. This CoA causes the NAD to reauthenticate the guest device using the Cisco ISE RADIUS server. A new access-accept is returned to the NAD with the configured network access. If client provisioning is not configured and the VLAN needs to be changed, the Guest portal performs VLAN IP renew. The guest does not have to re-enter login credentials. The username and password entered for the initial login are used automatically.
-
If it is a posture flow, where the Guest portal is configured to perform client provisioning, the guest device web browser displays the Client Provisioning page for posture agent installation and compliance. (You can also optionally configure the client provisioning resource policy to feature a “NetworkAccess:UseCase=GuestFlow” condition.)
-
Because there is no client provisioning or posture agent for Linux, the Guest portal redirects to the Client Provisioning portal, which in turn redirects back to a guest authentication servlet to perform optional IP release/renew and then CoA.
With redirection to the Client Provisioning portal, the Client Provisioning service downloads a non-persistent web agent to the guest device and performs a posture check of the device. (You can optionally configure the posture policy with a “NetworkAccess:UseCase=GuestFlow” condition.)
If the guest device is non-compliant, ensure that you have configured an authorization policy that features “NetworkAccess:UseCase=GuestFlow” and “Session:Posture Status=NonCompliant” conditions.
When the guest device is compliant, ensure that you have an authorization policy configured with the conditions “NetworkAccess:UseCase=GuestFlow” and “Session:Posture Status=Compliant.” From here, the Client Provisioning service issues a CoA to the NAD. This CoA causes the NAD to reauthenticate the guest using the Cisco ISE RADIUS server. A new access-accept is returned to the NAD with the configured network access.
Note | “NetworkAccess:UseCase=GuestFlow” can also apply for Active Directory (AD) and LDAP users who log in as guests. |
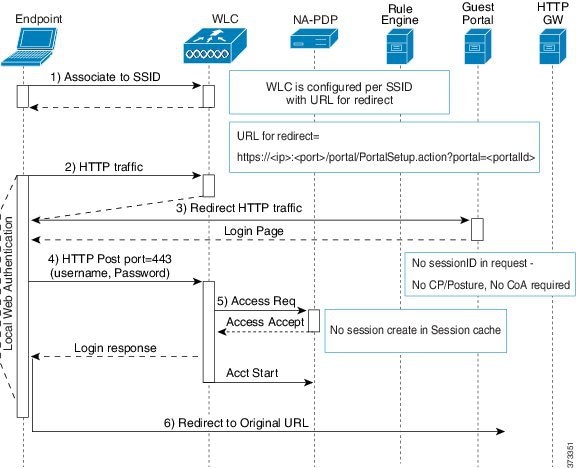
Wireless LAN Controller with Local WebAuth Process
In this scenario, the guest logs in and is directed to the wireless LAN controller (WLC). The WLC then redirects the guest to a Guest portal, where they are prompted to enter their login credentials, accept an optional Acceptable Use Policy (AUP), and perform an optional password change. When this is complete, the guest device’s browser is redirected back to the WLC to provide login credentials via a POST.
The WLC can now log the guest in via the Cisco ISE RADIUS server. When this is complete, the WLC redirects the guest device's browser to the original URL destination. The Wireless LAN Controller (WLC) and the network access devices (NAD) requirements to support the original URL redirect for guest portals are WLC 5760 and Cisco Catalyst 3850, 3650, 2000, 3000, and 4000 Series Access Switches running releases IOS-XE 3.6.0.E and 15.2(2)E.
Wired NAD with Local WebAuth Process
In this scenario, the Guest portal redirects the guest login request to the switch (wired NAD). The login request is in the form of an HTTPS URL posted to the switch and contains the login credentials. The switch receives the guest login request and authenticates the guest using the configured Cisco ISE RADIUS server.
-
Cisco ISE requires a login.html file with the HTML redirect to be uploaded to the NAD. This login.html file is returned to the browser of the guest device for any HTTPS request made.
-
The browser of the guest device is redirected to the Guest portal where the guest’s login credentials are entered.
-
After the Acceptable Use Policy (AUP) and change password are processed, both of which are optional, the Guest portal redirects the browser of the guest device to post the login credentials on the NAD.
-
The NAD makes a RADIUS request to the Cisco ISE RADIUS server to authenticate and authorize the guest.
- IP Address and Port Values Required for the Login.html Page
- HTTPS Server Enabled on the NAD
- Support for Customized Authentication Proxy Web Pages on the NAD
- Configure Web Authentication on the NAD
IP Address and Port Values Required for the Login.html Page
The IP address and port values must be changed in the following HTML code for the login.html page to those values being used by the Cisco ISE Policy Services nodes. The default port is 8443, but you can change this value, so ensure that the value you assign to the switch matches the setting in Cisco ISE.
<!DOCTYPE HTML PUBLIC "-//W3C//DTD HTML 4.0 Transitional//EN">
<HTML>
<head>
<title>ISE Guest Portal</title>
<meta Http-Equiv="Cache-Control" Content="no-cache">
<meta Http-Equiv="Pragma" Content="no-cache">
<meta Http-Equiv="Expires" Content="0">
<meta http-equiv="content-type" content="text/html; charset=ISO-8859-1">

<meta http-equiv="REFRESH" content="0;url=https://ip:port/portal/PortalSetup.action?switch_url=wired">

</HEAD>
<BODY>

<center>
Redirecting ... Login
<br>
<br>
<a href="https://ip:port/portal/PortalSetup.action?switch_url=wired">ISE Guest Portal</a>
</center>

</BODY>
</HTML>
Because the custom login page is a public web form, consider these guidelines:
HTTPS Server Enabled on the NAD
To use web-based authentication, you must enable the HTTPS server within the switch using the ip http secure-server command.
Support for Customized Authentication Proxy Web Pages on the NAD
You can upload custom pages for success, expiry, and failure to the NAD. Cisco ISE does not require any specific customization, so you can create these pages using the standard configuration instructions included with the NAD.
Configure Web Authentication on the NAD
You need to complete the web authentication on the NAD by replacing the default HTML pages with your custom files.
During web-based authentication, create four substitute HTML pages to use instead of the switch default HTML pages.
| Step 1 | To specify the use of your custom authentication proxy web pages, first store your custom HTML files on the switch flash memory. To copy your HTML files to the switch flash memory, run the following command on the switch: | ||||||||||||
| Step 2 | After copying your HTML files
to the switch, perform the following commands in global configuration mode:
| ||||||||||||
| Step 3 | Configure the customized authentication proxy web pages following the guidelines provided by the switch. | ||||||||||||
| Step 4 | Verify the configuration of a
custom authentication proxy web page, as shown in the following example:
Switch# show ip admission configuration Authentication proxy webpage Login page : flash:login.htm Success page : flash:success.htm Fail Page : flash:fail.htm Login expired Page : flash:expired.htm Authentication global cache time is 60 minutes Authentication global absolute time is 0 minutes Authentication global init state time is 2 minutes Authentication Proxy Session ratelimit is 100 Authentication Proxy Watch-list is disabled Authentication Proxy Auditing is disabled Max Login attempts per user is 5 |
Device Registration WebAuth Process
Using Device Registration Web Authentication (Device Registration WebAuth) and the Hotspot Guest portal, you can allow guest devices to connect to a private network without requiring usernames and passwords.
In this scenario, the guest connects to the network with a wireless connection. See Figure 16-1 for an example of the Device Registration WebAuth process flow. The following is an outline of the subsequent Device Registration WebAuth process, which is similar for both wireless and wired connections:
-
The network access device (NAD) sends a redirect to the Hotspot Guest portal.
-
If the MAC address of the guest device is not in any endpoint identity group or is not marked with an Acceptable Use Policy (AUP) accepted attribute set to true, Cisco ISE responds with a URL redirection specified in an authorization profile.
-
The URL redirection presents the guest with an AUP page (if enabled) when the guest attempts to access any URL.
-
If the guest accepts the AUP, the endpoint associated with their device MAC address is assigned to the configured endpoint identity group. This endpoint is now marked with an AUP accepted attribute set to true, to track the guest acceptance of the AUP.
-
If the guest does not accept the AUP or if an error occurs, for instance, while creating or updating the endpoint, an error message displays.
-
-
Based on the Hotspot Guest portal configuration, a post-access banner page (if enabled) with additional information may appear.
-
After the endpoint is created or updated, a Change of Authorization (CoA) termination is sent to the NAD.
-
After the CoA, the NAD re-authenticates the guest connection with a new MAC Auth Bypass (MAB) request. The new authentication finds the endpoint with its associated endpoint identity group, and returns the configured access to the NAD.
-
Based on the Hotspot Guest portal configuration, the guest is directed to the URL to which they requested access, or to a custom URL specified by the administrator, or to an Authentication Success Page.
The CoA type for both wired and wireless is Termination CoA. You can configure the Hotspot Guest portal to perform VLAN DHCP Release (and renew), thereby re-authorizing the CoA type for both wired and wireless to Change of Auth.
VLAN DHCP Release support is available for Mac OS and Windows on desktop devices only. It is not available for mobile devices. If the device being registered is mobile and the VLAN DHCP Release option is enabled, the guest is requested to manually renew their IP address. For mobile device users, we recommend using Access Control Lists (ACLs) on the WLC, rather than using VLANs.
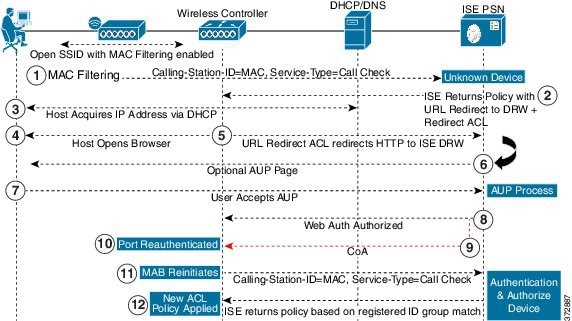
 Feedback