-
- Administration User Interface Reference
- Guest Access User Interface Reference
- Web Portals Customization Reference
- Policy User Interface Reference
- Operations User Interface Reference
- Network Access Flows
- Switch and Wireless LAN Controller Configuration Required to Support Cisco ISE Functions
- Supported Management Information Bases in Cisco ISE
- End-User Portals
- Customization of End-User Web Portals
- Portal Themes, Images, and Banners
- Portal Page Titles, Content, and Labels
- Basic Customization of Portals
- Advanced Customization of Portals
- Configure Portal Customization
- Portal Theme and Structure CSS Files
- About Changing Theme Colors with jQuery Mobile
- Location Based Customization
- User Device Type Based Customization
- Export a Portal’s Default Theme CSS File
- Create a Custom Portal Theme CSS File
- Embed Links in Portal Content
- Insert Variables for Dynamic Text Updates
- Use Source Code to Format Text and Include Links
- Add an Image as an Advertisement
- Set Up Carousel Advertising
- Customize Greetings Based on Guest Location
- Customize Greetings Based on User Device Type
- Modify the Portal Page Layout
- Import the Custom Portal Theme CSS File
- Delete a Custom Portal Theme
- View Your Customization
- Customization of a Portal Language File
- Customization of Guest Notifications, Approvals, and Error Messages
Customize End-User Web Portals
- End-User Portals
- Customization of End-User Web Portals
- Portal Themes, Images, and Banners
- Portal Page Titles, Content, and Labels
- Basic Customization of Portals
- Advanced Customization of Portals
- Customization of a Portal Language File
- Customization of Guest Notifications, Approvals, and Error Messages
End-User Portals
Cisco ISE provides web-based portals for three primary sets of end users:
-
Guests who need to temporarily access your enterprise network using the Guest portals (Hotspot and credentialed Guest portals)
-
Employees who are designated as sponsors who can create and manage guest accounts using the Sponsor portal.
-
Employees who are using their personal devices on the enterprise network using the various non-guest portals such as the Bring Your Own Device (BYOD), Mobile Device Management (MDM), and My Devices portals.
Customization of End-User Web Portals
Cisco provides a number of default portals, and lets you edit, duplicate, and create additional portals. You can also fully customize the portal appearance and, therefore, the portal experience. You can customize each individual portal without affecting other portals.
You can customize various aspects of the portal interface that apply to the entire portal or to specific pages of the portal, such as:
-
Themes, images, colors, banners, and footers
-
Languages used for displaying portal text, error messages, and notifications
-
Titles, content, instructions, and field and button labels
-
Notifications sent to guests via email, SMS, and printer (applies only to the Self-Registered Guest and Sponsor portals)
-
Error and informational messages displayed to users
-
Custom fields to gather guest information specific to your needs (applies only to the Self-Registered Guest and Sponsor portals)
For more information about customizing web portals, see http://www.cisco.com/c/dam/en/us/td/docs/security/ise/how_to/HowTo-43_ISE_Web_Portal_Customization_Options.pdf.
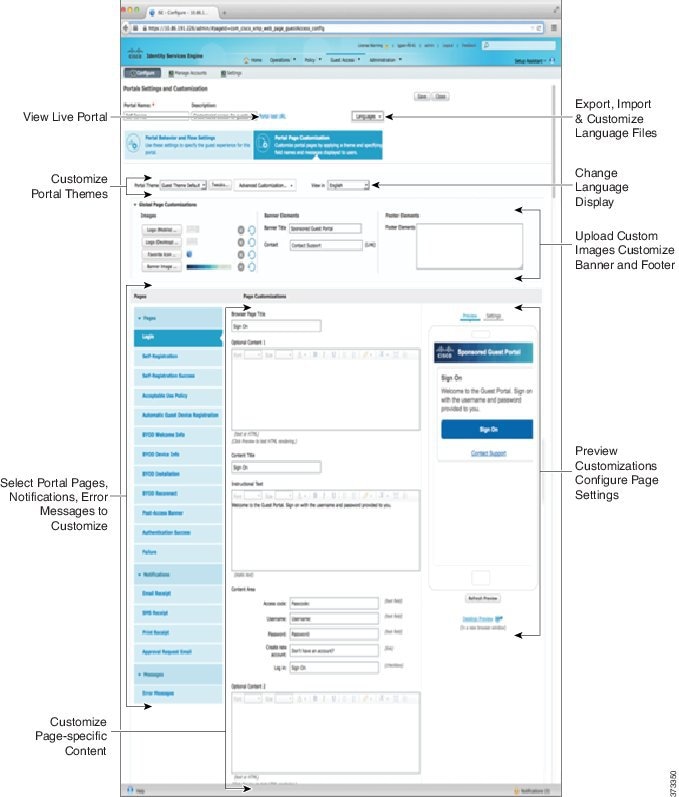
Customization Methods
There are several different ways to customize the end-user portals pages, which require different levels of knowledge.
- Basic: All modifications are done on the portal Customization page, where you can:
- Intermediate
- Advanced
After you customize your portal, you can create multiple portals (of the same type) by duplicating it. For example, if you customized your Hotspot Guest portal for one business entity, you can duplicate it and make minor changes to create custom Hotspot Guest portals for other business entities.
Tips for Customizing Portals with the Mini Editors
- Long words in a mini-editor
box may scroll off the screen area of the portal. To prevent this, us e the
HTML paragraph attribute style="word-wrap: break-word". For example:
 <p style="word-wrap:break-word">
 thisisaverylonglineoftextthatwillexceedthewidthoftheplacethatyouwanttoputitsousethisstructure
 </p>
- When you use HTML or javascript to customize portal pages, make sure you use valid syntax. The tags and code that you enter into a mini-editor is not validated by ISE. Invalid sytax may cause problems during the portal flow.
Portal Themes, Images, and Banners
Cisco ISE provides a default set of portal themes that you can use “as is” or customize by using the existing CSS files as models to create new custom files. However, you can alter the appearance of the portals without using customized CSS files.
For instance, if you want to use unique corporate logos and banner images, you can simply upload and use these new image files. You can customize the default color scheme by changing the color of the different elements and areas of the portals. You can even choose the language in which you want to view the custom changes as you make them.
When you design images to replace the logos and banner, make the images as close to the following pixel size as you can:
| Banner | 1724 X 133 |
| Desktop Logo | 86 X 45 |
| Mobile Logo | 80 X 35 |
Note that ISE will resize the images to fit the portal, but images that are too small may not look right after resizing.
If you want to perform advanced customization, such as change the page layout or add video clips or advertisements to your portal pages, you can use your own custom CSS files.
These types of changes within a specific portal are applied globally to all the pages of that portal. Changes to the page layout can be applied either globally or to just one specific page in the portal.
Portal Page Titles, Content, and Labels
You can customize the titles, text boxes, instructions, field and button labels, and other visual elements that the guest views on the end-user web portal pages. While you are customizing the page, you can even edit the page settings on the fly.
These changes are applied only to the specific page that you are customizing.
Basic Customization of Portals
Select a predefined theme that best suits your needs, and use most of its default settings. You can then do some basic customization, such as:
 Tip | You can View Your Customization as you make the updates. |
- Modify the Portal Theme Colors
- Change the Portal Display Language
- Change the Portal Icons, Images, and Logos
- Update the Portal Banner and Footer Elements
- Change the Titles, Instructions, Buttons, and Label Text
- Format and Style Text Box Content
- View Your Customization
- Custom File Upload
Modify the Portal Theme Colors
You can customize the default color scheme in the default portal themes and change the color of the different elements and areas of the portals. These changes apply to the entire portal that you are customizing.
If you plan to change the portal colors, be aware of the following:
-
You cannot use this option to change the color scheme in any of the custom portal themes that you may have imported for use with this portal. You must edit the custom theme CSS file to change its color settings.
-
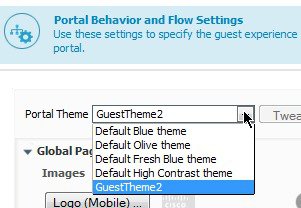
After changing the colors in a portal theme, if you select another portal theme from the Portal Theme drop-down menu, the changes are lost in the original portal theme and it reverts to its default colors.
-
If you tweak the colors of a portal theme with an already modified color scheme and then reset its colors before saving it, the color scheme reverts to its default colors and any previous modifications are lost.
Change the Portal Display Language
You can choose the language in which you want to view the custom changes as you make them. This change applies to the entire portal that you are customizing.
What to Do Next
Make sure that you update any changes made in the selected language while customizing the portal page into all the supported language properties files.
Change the Portal Icons, Images, and Logos
If you want to use unique corporate logos, icons, and banner images, you can simply replace the existing images by uploading your custom images. Supported image formats include .gif, .jpg, .jpeg, and .png. These changes apply to the entire portal that you are customizing.
To include images in the footer of the portal, for instance in an advertisement, you should be able to access an external server that has these images.
Update the Portal Banner and Footer Elements
You can customize the information that appears in the banner and footer sections of every page in the portal. These changes apply to the entire portal that you are customizing.
Change the Titles, Instructions, Buttons, and Label Text
You can update all the text that is displayed in the portal. Each UI element on the page that you are customizing has a minimum and maximum range for the number of characters that you can enter. When available in some of the text blocks, you can use a mini-editor to apply visual styling to the text. These changes apply only to the specific portal page you are customizing. These page elements are different for email, SMS, and print notifications.
Format and Style Text Box Content
Use the mini-editor that is available in the Instructional Text, Optional Content 1, and Optional Content 2 text boxes to do basic formatting of the text. These changes apply only to the specific portal pages that you are customizing.
Use the Toggle Full Screen button to increase and decrease the size of the text boxes as you work in them.
View Your Customization
You can view how your customization will display to the portal users (guests, sponsors, or employees).
Click Portal test URL to view your changes.

Note
The test portal does not support Radius sessions, so you won't see the entire portal flow for all portals. BYOD and Client Provisioning are examples of portals that depend on Radius sessions.
Click Preview to dynamically view how your changes appear on various devices:
- Mobile devices––View your changes under Preview.
-
Desktop devices—Click Preview and then Desktop Preview. A new tab opens, and all the changes that you make are displayed on this tab.
If the changes are not displayed, click Refresh Preview. The portal displayed is only meant for viewing your changes; you cannot click buttons or enter data.
Custom File Upload
The custom file upload menu lets you upload your own files to the ISE server, which you can use to customize Guest and BYOD portals. The files you upload will be stored on the PSN, and synchronized on all PSNs.
Supported file types are:
-
.png, .gif, .jpg, .jpeg - For backgrounds, announcements, advertisements
-
.htm, .html, .js, .json - For advanced customization, for example, the portal builder
File sizes are limited to:
-
20 MB per file
-
200 MB total of all files
Uploaded files can be referenced by all portal types, except the admin portal, in the mini-editors under portal page customization. Toggle to the HTML Source view, and create an href to an uploaded file. The path column displays the link to the file, which you can paste into the mini-editor. If the file is an image, when you click the link, it opens a new window that displays the image.
Advanced Customization of Portals
If you do not want to use one of the default portal themes provided by Cisco ISE, you can customize the portal to suit your needs. To do so, you should have experience working with CSS and Javascript files and the jQuery Mobile ThemeRoller application.
You are not allowed to alter the default portal themes, but you can:
-
Export a Portal’s Default Theme CSS File, and use it as a base for creating a custom portal theme.
-
Create a Custom Portal Theme CSS File, by editing the default portal theme and saving it as a new file.
-
Import the Custom Portal Theme CSS File, and apply it to the portal.
Based on the extent of your expertise and requirements, you can perform various types of advanced customization, such as use predefined variables to enable consistency in displayed information, add advertisements to your portal pages, use HTML, CSS and Javascript code to customize your content, and modify the portal page layout.
- Configure Portal Customization
- Portal Theme and Structure CSS Files
- About Changing Theme Colors with jQuery Mobile
- Location Based Customization
- User Device Type Based Customization
- Export a Portal’s Default Theme CSS File
- Create a Custom Portal Theme CSS File
- Embed Links in Portal Content
- Insert Variables for Dynamic Text Updates
- Use Source Code to Format Text and Include Links
- Add an Image as an Advertisement
- Set Up Carousel Advertising
- Customize Greetings Based on Guest Location
- Customize Greetings Based on User Device Type
- Modify the Portal Page Layout
- Import the Custom Portal Theme CSS File
- Delete a Custom Portal Theme
- View Your Customization
Configure Portal Customization
Cisco ISE offers you the ability to customize the content that displays on your end-user portals using HTML and Javascript code in the text boxes on the different pages listed under Portal Page Customization.
What to Do Next
You can then access the various portals and enter HTML and Javascript code in the text boxes based on the option you enabled here.
Portal Theme and Structure CSS Files
If you have experience with working with CSS files, you can customize the default portal theme CSS files to alter the portal presentation and manipulate elements such as the page layout, colors, and fonts. Customizing the CSS files provides you with flexibility and control in specifying the presentation characteristics, it enables you to share formatting across multiple pages, and it reduces the complexity and repetition in the structural content.
Cisco ISE end-user portals use two distinct types of CSS files: structure.css and theme.css. Every portal theme has its own theme.css file, but there is only one structure.css file per portal type; for example guest.structure.css for Guest portals, sponsor.structure.css for Sponsor Portals, and mydevices.structure.css for My Devices portals.
The structure.css provides the styling for the page layout and structure. It defines the positioning of elements on each page and also includes jQuery Mobile structure styles. You can only view the structure.css file, but you cannot edit it. However, when you change the page layout within theme.css files, import these files into the portal, and apply them, the most recent changes take priority over the structure.css styles.
The theme.css files specify styles such as fonts, button colors, and header background. You can export the theme.css files, change the theme settings, and import them to use as custom themes for your portal. Any page layout style changes made to the theme.css files take priority over the styles that are defined in the structure.css file.
You cannot alter any of the Cisco provided default portal theme.css files. However, you can edit the settings in the files and save them to a new custom theme.csstheme.css file. You can make further edits to the custom theme.css file, but when you import it back into Cisco ISE, remember to use the same theme name you originally used for it. You cannot use two different theme names for the same theme.css file.
For example, you can use a default green theme.css file to create a new custom blue theme.css file and name it as Blue. You can then edit the blue theme.css file, but when you import it again, you must reuse the same Blue theme name. You cannot call it Red, since Cisco ISE checks for the relationship between a filename and its name and the uniqueness of the theme’s name. You can however edit the blue theme.css file, save it as red theme.css, import the new file, and name it as Red.
About Changing Theme Colors with jQuery Mobile
The color scheme of Cisco's end-user portals is compatible with jQuery ThemeRoller. You can easily edit the colors for an entire portal using the ThemeRoller web site.
ThemeRoller color “swatches” each contain a unique color scheme, which defines the colors, textures, and font settings for the primary UI elements, such as toolbars, content blocks, buttons, list items, and font text-shadow. A color scheme also defines the settings for various interaction states of the buttons: normal, hover, and pressed.
Cisco uses three swatches:
-
Swatch A—The default swatch.
-
Swatch B—Defines emphasized elements, such as an Accept button.
-
Swatch C—Defines critical elements such as alerts, error messages, invalid input fields, and delete buttons.
You cannot apply additional swatches, unless you add HTML code (to the Optional Content, for example) with elements that use the newly added swatches.
To edit the default Cisco-provided CSS files or create new files based on the CSS classes and structures defined in the default themes, use the required version of jQuery Mobile ThemeRoller (Release 1.3.2).
For additional information on swatches and themes in jQuery Mobile ThemeRoller, see "Theming Overview" in Creating a Custom Theme with ThemeRoller. Use the online help in jQuery Mobile ThemeRoller to learn how to download, import, and share your custom themes.
For tutorials on how to use HTML, CSS, and Javascript code to customize the text and content that appears on your portal pages, visit Code Academy.
Example of a Theme That Shows Cisco Swatches
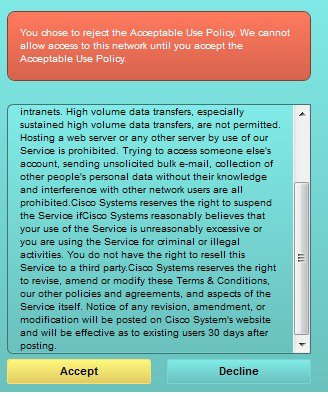
To demonstrate how swatches are used, the default theme for the Guest Portal was edited in ThemeRoller to show the differences in color.
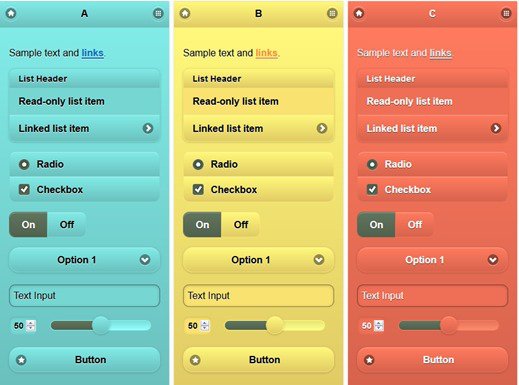
The following screen shows a guest portal logon error (swatch C) along with a button that takes an action from the user (swatch B), and the rest of the screen is Swatch A.
Change Theme Colors with jQuery Mobile
Make sure you are using version 1.3.2 of jQuery Mobile ThemeRoller. The version you are using is displayed in the top-left corner of the screen, as shown below.

Location Based Customization
When guest accounts are created, you can associate them with a location and specify a Service Set Identifier (SSID) attribute. Both the location and SSID are available as CSS classes that you can use to apply different CSS styles to portal pages, based on the guest's location and SSID.
 Note | This information applies only to the credentialed Guest portals after the guests log in. |
For example:
-
Guest location—When guests with accounts that have San Jose or Boston as their locations log into a credentialed Guest portal, one of these classes is available on every portal page: guest-location-san-jose or guest-location-boston.
-
Guest SSID—For an SSID named Coffee Shop Wireless, the following CSS class is available on every portal page: guest-ssid-coffee-shop-wireless. This SSID is the one you specified on the guest account and not the SSID that the guests connected to when they logged in.
You can also specify locations when you add devices such as switches and Wireless LAN Controllers (WLCs) to a network. This location is also available as a CSS class that you can use to apply different CSS styles to portal pages depending on the network device's location.
For example, if a WLC is assigned to Seattle and guests are redirected to Cisco ISE from the Seattle-WLC, the following CSS class is available on every portal page: device-location-my-locations-usa-seattle.
User Device Type Based Customization
Cisco ISE detects the type of client device used by users (guest, sponsor, or employee) to access your company’s network or end-user web portals (Guest, Sponsor, and Device). It is detected either as a mobile device (Android, iOS and so on) or a desktop device (Windows, MacOS and so on). The device type is available as a CSS class that you can use to apply different CSS styles to portal pages based on the user’s device type.
When a user logs into any of the Cisco ISE end-user web portals, the following class is available on their portal pages: cisco-ise-mobile or cisco-ise-desktop.
Export a Portal’s Default Theme CSS File
You can download a default portal theme provided by Cisco and customize it to suit your needs. You can use it as a base for performing advanced customization.
Create a Custom Portal Theme CSS File
You can create a custom portal theme by customizing an existing default portal theme and saving the changes in a new portal theme.css file. You can modify the default theme settings and the swatches to make global changes to the selected portal.
| Step 1 | Import the
downloaded portal
theme.css file contents into the jQuery Mobile
ThemeRoller tool.
| ||
| Step 2 | (Optional)Embed Links in Portal Content
| ||
| Step 3 | (Optional)Insert Variables for Dynamic Text Updates
| ||
| Step 4 | (Optional)Use Source Code to Format Text and Include Links
| ||
| Step 5 | (Optional)Add an Image as an Advertisement
| ||
| Step 6 | (Optional)Customize Greetings Based on Guest Location
| ||
| Step 7 | (Optional)Customize Greetings Based on User Device Type
| ||
| Step 8 | (Optional)Set Up Carousel Advertising
| ||
| Step 9 | (Optional)Modify the Portal Page Layout
| ||
| Step 10 | Save the
customized file as a new
theme.css file.
| ||
| Step 11 | When your new theme.css file is ready, you can import it into Cisco ISE. |
Embed Links in Portal Content
You can add links to enable guests to access various websites from the portal pages. These changes apply only to the specific portal page that you are customizing.
Use the Toggle Full Screen button to increase and decrease the size of the text boxes as you work in them.
Insert Variables for Dynamic Text Updates
You can also create templates for text displayed on the portal by substituting predefined variables ($variable$) that dynamically update the content. This enables consistency in the text and information that you display to guests. These changes apply only to the specific portal pages that you are customizing.
Use the Toggle Full Screen button to increase and decrease the size of the text boxes as you work in them.
Use Source Code to Format Text and Include Links
Besides using the mini-editor’s formatting and link icons with plain text, you can also use HTML, CSS and Javascript code to customize text that displays on the portal pages. These changes apply only to the specific portal pages that you are customizing.
Use the Toggle Full Screen button to increase and decrease the size of the text boxes as you work in them.
Ensure that Enable portal customization with HTML is enabled by default in .
Add an Image as an Advertisement
You can include images and advertisements to appear in specific areas of the portal pages.
Use the Toggle Full Screen button to increase and decrease the size of the text boxes as you work in them.
Ensure that Enable portal customization with HTML is enabled in .
Set Up Carousel Advertising
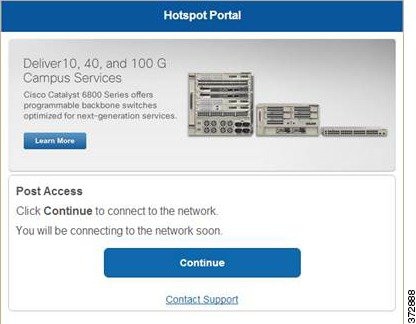
Carousel advertising is an advertisement format in which several product images or text descriptions are displayed and rotate in a repeating loop within a banner. Use carousel advertising on your guest portals to promote several related products or a variety of different products offered by your company.
Use the Toggle Full Screen button to increase and decrease the size of the text boxes as you work in them.
Choose and check Enable portal customization with HTML and Javascript.
| Step 1 | Navigate to these portals: | ||
| Step 2 | Under Pages, choose the page that you want to update. | ||
| Step 3 | Under Page Customizations, use the mini-editor provided with the Instructional Text, Optional Content 1, and Optional Content 2 text boxes to enter and view source code. | ||
| Step 4 | Click the Toggle HTML Source button. | ||
| Step 5 | Enter your
source code.
<script>
var currentIndex = 0;
setInterval(changeBanner, 5000);

function changeBanner(){
var bannersArray = ["<img src='http://www.cisco.com/c/en/us/products/routers/index/_jcr_content/
content_parsys/overview/layout-overview/gd12v2/gd12v2-left/n21v1_cq/
n21v1DrawerContainer.img.jpg/1379452035953.jpg' width='100%'/>",
"<img src='http://www.cisco.com/c/en/us/products/routers/index/_jcr_content/
content_parsys/overview/layout-overview/gd12v2/gd12v2-left/n21v1_cq_0/
n21v1DrawerContainer.img.jpg/1400748629549.jpg' width='100%' />",
"<img src='http://www.cisco.com/c/en/us/products/routers/index/_jcr_content/
content_parsys/overview/layout-overview/gd12v2/gd12v2-left/n21v1_cq_1/
n21v1DrawerContainer.img.jpg/1376556883237.jpg' width='100%'/>"

];
  var div = document.getElementById("image-ads");
  if(div){
     currentIndex = (currentIndex<2) ? (currentIndex+1) : 0;
      div.innerHTML = bannersArray[currentIndex];
   }
}
</script>
<style>
.grey{
color: black;
background-color: lightgrey;
}
</style>
<div class="grey" id="image-ads">
<img src='http://www.cisco.com/c/en/us/products/routers/index/_jcr_content/
content_parsys/overview/layout- overview/gd12v2/gd12v2-left/n21v1_cq/
n21v1DrawerContainer.img.jpg/1379452035953.jpg'/>
</div>
<script>
var currentIndex = 0;
setInterval(changeBanner, 2000);

function changeBanner(){
var bannersArray = ["Optimize branch services on a single platform while delivering an optimal
application experience across branch and WAN infrastructure", "Transform your Network Edge to
deliver high-performance, highly secure, and reliable services to unite campus, data center,
and branch networks",  "Differentiate your service portfolio and increase revenues by delivering
end-to-end scalable solutions and subscriber-aware services"];

var colorsArray = ["grey", "blue",  "green"];
  var div = document.getElementById("text-ads");
  if(div){
     currentIndex = (currentIndex<2) ? (currentIndex+1) : 0;
      div.innerHTML = bannersArray[currentIndex];
               div.className = colorsArray[currentIndex];
   }
}
</script>
<style>
.grey{
color: black;
background-color: lightgrey;
}
.blue{
color: black;
background-color: lightblue;
}
.green{
color: black;
background-color: lightgreen;
}
</style>
<div class="grey" id="text-ads">
Optimize branch services on a single platform while delivering an optimal application
experience across branch and WAN infrastructure
</div>
| ||
| Step 6 | Click Save. |
Customize Greetings Based on Guest Location
This example shows how to customize the successful login message that your guests see after they log into a credentialed Guest portal (not Hotspot), based on the locations configured in their guest type.
Use the Toggle Full Screen button to increase and decrease the size of the text boxes as you work in them.
| Step 1 | Navigate to one of these portals: |
| Step 2 | Under Pages, choose the Authentication Success page. |
| Step 3 | Under Page Customizations, use the mini-editor provided with the Optional Content 1 text box to enter and view HTML source code. |
| Step 4 | Click the Toggle HTML Source button. |
| Step 5 | Enter your
source code.
For example, to
include a location-based greeting, enter this code in the
Optional
Content 1:
<style>
    .custom-greeting {
        display: none;
    }
    .guest-location-san-jose .custom-san-jose-greeting {
        display: block;
    }
    .guest-location-boston .custom-boston-greeting {
        display: block;
    }
</style>
<div class="custom-greeting custom-san-jose-greeting">
    Welcome to The Golden State!
</div>
<div class="custom-greeting custom-boston-greeting">
    Welcome to The Bay State!
</div>
Guests
will see a different message after successful logon, depending on their
specific location.
|
Customize Greetings Based on User Device Type
You can customize the greetings that you send to your users (guest, sponsor, or employee) after they log into any of the Cisco ISE end-user web portals (Guest, Sponsor and Device), based on their client device type (mobile or desktop).
Use the Toggle Full Screen button to increase and decrease the size of the text boxes as you work in them.
| Step 1 | Navigate to these portals: |
| Step 2 | Under Pages, choose the page that you want to update. |
| Step 3 | Under Page Customizations, use the mini-editor provided with the Optional Content 1 text box to enter and view HTML source code. |
| Step 4 | Click the Toggle HTML Source button. |
| Step 5 | Enter your
source code.
For example, to
include a device type-based greeting on the AUP page, enter this code in the
Optional
Content 1 text box on the AUP page:
<style>
    .custom-greeting {
        display: none;
    }
    .cisco-ise-desktop .custom-desktop-greeting {
        display: block;
    }
    .cisco-ise-mobile .custom-mobile-greeting {
        display: block;
    }
</style>
<div class="custom-greeting custom-mobile-greeting">
    Try our New Dark French Roast! Perfect on the Go!
</div>
<div class="custom-greeting custom-desktop-greeting">
    We brough back our Triple Chocolate Muffin!
    Grab a seat and dig in!
</div>
Users
will see a different greeting on the AUP page depending on the type of device
they used to gain access to the network or portal.
|
Modify the Portal Page Layout
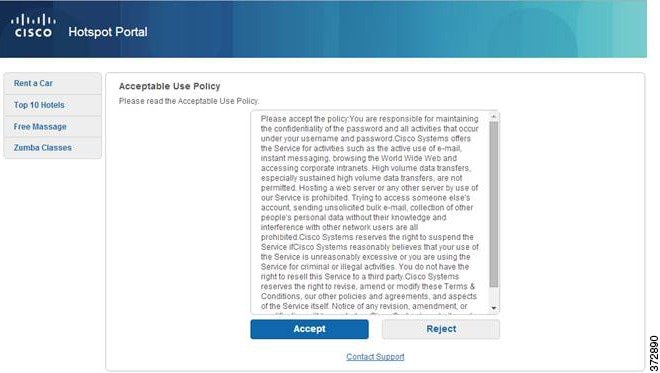
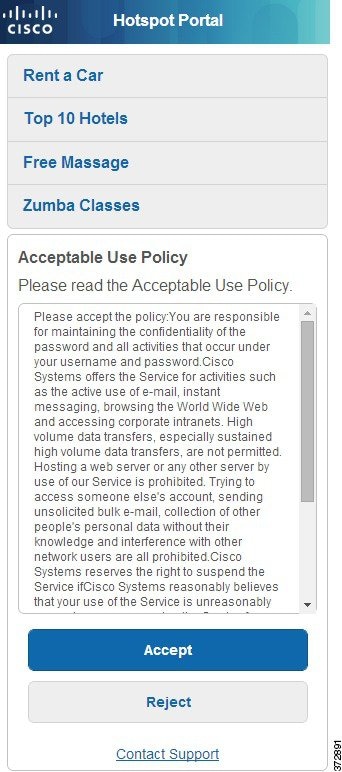
You can manipulate the overall layout of the pages; for example, you can add a sidebar to an AUP page that provides additional information or links to information.
| Step 1 | Add the
following CSS code to the bottom of the custom
theme.css file that you create and plan to apply to
your portal. This changes the AUP page layout so that the
Optional Content 1 text box appears as:
#page-aup .cisco-ise-optional-content-1 {
        margin-bottom: 5px;
}
@media all and ( min-width: 60em ) {
        #page-aup .cisco-ise-optional-content-1 {
                float: left;
                margin-right: 5px;
                width: 150px;
        }
        #page-aup .cisco-ise-main-content {
                float: left;
                width: 800px;
        }
        #page-aup .cisco-ise-main-content h1,
        #page-aup .cisco-ise-main-content p {
                margin-right: auto;
                margin-left: -200px;
        }
}
You can then add links using HTML code in the Optional Content 1 text box for the AUP page for that portal. |
| Step 2 | Navigate to these portals: |
| Step 3 | Under Pages, choose the page for which you want to include a side bar. |
| Step 4 | Under Page Customizations, use the mini-editor provided with the Optional Content 1 text box to enter and view source code. |
| Step 5 | Click the Toggle HTML Source button. |
| Step 6 | Enter your
source code.
For example, to include a side bar for the AUP page, enter this code in the Optional Content 1 text box on the AUP page: <ul data-role="listview">
<li>Rent a Car</li>
<li>Top 10 Hotels</li>
<li>Free Massage</li>
<li>Zumba Classes</li>
</ul>
  |
| Step 7 | Click Save. |
What to Do Next
You can customize other pages by entering different text or HTML code in the Optional Content text boxes.
Import the Custom Portal Theme CSS File
You can upload any custom theme.css file that you have created and apply it to any of your end-user portals. These changes apply to the entire portal that you are customizing.
Any time you edit a custom theme.css file and import it back into Cisco ISE, remember to use the same theme name you originally used for it. You cannot use two different theme names for the same theme.css file.
What to Do Next
You can apply this custom portal theme to the portal that you want to customize.
Delete a Custom Portal Theme
You can delete any custom portal theme that you have imported into Cisco ISE, unless it is being used by one of your portals. You cannot delete any of the default themes provided by Cisco ISE.
The portal theme that you want to delete should not be used by any of the portals.
View Your Customization
You can view how your customization will display to the portal users (guests, sponsors, or employees).
Click Portal test URL to view your changes.

Note
The test portal does not support Radius sessions, so you won't see the entire portal flow for all portals. BYOD and Client Provisioning are examples of portals that depend on Radius sessions.
Click Preview to dynamically view how your changes appear on various devices:
- Mobile devices––View your changes under Preview.
-
Desktop devices—Click Preview and then Desktop Preview. A new tab opens, and all the changes that you make are displayed on this tab.
If the changes are not displayed, click Refresh Preview. The portal displayed is only meant for viewing your changes; you cannot click buttons or enter data.
Customization of a Portal Language File
By default, each portal type supports 15 languages that you can use to display text to guests using the portal. These languages are available as individual property files bundled together in a single zipped language file. Including all the supported languages in a single language file lets you easily use it for customization, translation, and localization purposes.
The language file also contains the mapping to the particular browser locale setting (for example, for French: fr, fr-fr, fr-ca) along with all of the string settings for the entire portal in that language. If you change the browser locale setting for one language, the change is applied to all the other end-user web portals. For example, if you change the French.properties browser locale from fr,fr-fr,fr-ca to fr,fr-fr in the Hotspot Guest portal, the change is applied to the My Devices portal also.
You can export the zipped language file and make updates to it, including adding new languages or deleting existing ones you do not need.
- Export the Language File
- Add or Delete Languages from the Language File
- Import the Updated Language File
Export the Language File
 Note | Only some of the dictionary keys in the language properties files support HTML in their values (text). |
Add or Delete Languages from the Language File
If a language you want to use for your portal type is missing from the language file, you can create a new language properties file and add it to the zipped language file. If there are languages you do not need, you can delete their language properties files.
You must export the zipped language file available with each portal type in order to add or delete language properties files.
| Step 1 | Use any editor
that displays UTF-8 (such as Notepad ++) to open the predefined language file
for the portal type to which you want to add or delete languages.
If you want to add or delete languages for more than one portal type, you should use all the appropriate portal properties files. | ||
| Step 2 | To add a new language, save an existing language properties file as the new language properties file using the same naming convention of the other files in the zipped language file. For example, to create a new Japanese language properties file, save the file as Japanese.properties (LanguageName.properties). | ||
| Step 3 | Associate the new language with its browser locale by specifying the browser local value in the first line of the new language properties file. For example, LocaleKeys= ja,ja-jp (LocaleKeys=browser locale value) should be the first line in the Japanese.properties file. | ||
| Step 4 | Update all the
values (text) of the dictionary keys in the new language properties file.
You cannot change the dictionary keys; just their values.
|
What to Do Next
Import the Updated Language File
You can import an edited language file that you have customized by adding or deleting language properties files or by updating text in existing properties files.
What to Do Next
To display the changed text or the new language you added, select the specific language from the View In drop-down list.
Customization of Guest Notifications, Approvals, and Error Messages
Within in each portal, you can customize how guests receive notifications via email, SMS text messages, and print. Use these notifications to email, text, or print the login credentials:
-
When guests use the Self-Registration Guest portal and successfully register themselves.
-
When sponsors create guest accounts and want to provide the details to guests. When you create sponsor groups, you can determine whether to authorize sponsors to use SMS notifications. They can always use email and print notifications, if these facilities are available.
You can also customize email notifications to sponsors requesting that they approve a self-registering guest trying to gain access to the network. Additionally, you can customize the default error messages that display to guests and sponsors.
- Customize Email Notifications
- Customize SMS Text Message Notifications
- Customize Print Notifications
- Customize Approval Request Email Notifications
- Edit Error Messages
Customize Email Notifications
You can customize the information that is sent via email to guests.
| Step 1 | For Self-Registered Sponsor portals, choose . |
| Step 2 | You can change the default Logo (Email) that was specified under Global Page Customizations. |
| Step 3 | Specify the Subject and Email body. Use predefined variables to specify the guest account information to be included in the email message. Use the mini-editor and HTML tags to customize the text. |
| Step 4 | Under
Settings, you can:
|
| Step 5 | Click Save and then Close. |
Customize SMS Text Message Notifications
You can customize the information that is sent via SMS text messages to guests.
-
Configure the SMTP server, which is used to send emails to the SMS gateway to deliver the SMS text message. Choose .
-
Configure the sponsor groups to support the SMS text notification.
-
Set up an account with a third-party SMS gateway. Choose . Cisco ISE sends the text messages as email messages to the gateway, which forwards the messages via the SMS provider to the specified user.
-
Ensure that Enable portal customization with HTML is enabled by default in .
| Step 1 | For Self-Registered Guest or Sponsor portals, choose . |
| Step 2 | Use the mini-editor and HTML tags to customize the Message Text. Use predefined variables to specify the guest account information to be included in the SMS text message. |
| Step 3 | Under
Settings, you can:
|
| Step 4 | Click Save and then Close. |
Customize Print Notifications
You can customize the information that is printed for guests.
 Note | Within each portal, the print notification logo is inherited from the email notification logo setting. |
Ensure that Enable portal customization with HTML is enabled by default in .
| Step 1 | For Self-Registered Guest and Sponsor portals, choose . |
| Step 2 | Specify the Print Introduction Text. Use predefined variables to specify the guest account information to be included in the email message. Use the mini-editor and HTML tags to customize the text. |
| Step 3 | Preview your customization in the thumbnail or click Print Preview. You cannot view any HTML customization in the thumbnail. If you select the Print Preview option, a window appears from which you can print the account details to ensure that the information appears as it should. |
| Step 4 | Click Save and then Close. |
Customize Approval Request Email Notifications
You can require sponsors to approve self-registering guests before their accounts are created and before they can obtain their login credentials. You can customize the information that is sent via email to sponsors requesting their approval. This notification only displays if you have specified that self-registering guests using the Self-Registered Guest portals require approval before they are granted network access.
-
Configure the SMTP server to enable email notifications. Choose .
-
Configure support for email notifications to guests. Choose . Check Enable email notifications to guests.
-
If you want a Sponsor to approve self-registered account requests, check Require self-registered guests to be approved under Self-Registration Page Settings on the Portal Behavior and Flow Settings tab. That enables the Approval Request Email tab under Notifications in Portal Page Customization, where you can customize the email that goes to the Sponsor.
| Step 1 | Choose
. Here you can:
|
| Step 2 | Customize the content of the approval email sent by the Sponsor. Choose , choose Portal Page Customization, and then the Email Notification tab. |
Edit Error Messages
You can fully customize the error messages that appear on the Failure pages displayed for guests, sponsors and employees. Failure pages are available with all end-user web portals, except the Blacklist portal.
| Step 1 | Do one of the following: |
| Step 2 | From the View In drop-down list, choose the language in which you want to view the text while customizing the messages. The drop-down list includes all the languages in the language file associated with a specific portal. Make sure that you update any changes made while customizing the portal page into the supported languages properties files. |
| Step 3 | Update the error message text. You can search for specific error messages by typing in keywords such as aup to find AUP related error messages. |
| Step 4 | Click Save and Close. |
 Feedback