-
- Administration User Interface Reference
- Guest Access User Interface Reference
- Web Portals Customization Reference
- Policy User Interface Reference
- Operations User Interface Reference
- Network Access Flows
- Switch and Wireless LAN Controller Configuration Required to Support Cisco ISE Functions
- Supported Management Information Bases in Cisco ISE
- Network Devices Definitions in Cisco ISE
- Default Network Device Definition in Cisco ISE
- Create a Network Device Definition in Cisco ISE
- Import Network Devices into Cisco ISE
- Export Network Devices from Cisco ISE
- Network Device Groups
- Import Network Device Groups in to Cisco ISE
- Export Network Device Groups from Cisco ISE
- Import Templates in Cisco ISE
- Mobile Device Manager Interoperability with Cisco ISE
- Set Up MDM Servers With Cisco ISE
- Import MDM Server Certificate into Cisco ISE
- Set Permissions When AD User in the Domain Admin Group
- Required Permissions When AD User Not in Domain Admin Group
- Permissions to Use DCOM on the Domain Controller
- Set Permissions for Access to WMI Root/CIMv2 Name Space
- Open Firewall Ports for WMI Access
- Configure an Authorization Profile for Redirecting Nonregistered Devices
- Configure Authorization Policy Rules for the MDM Use Cases
- Wipe or Lock a Device
- View Mobile Device Manager Reports
- View Mobile Device Manager Logs
Manage Network Devices
- Network Devices Definitions in Cisco ISE
- Default Network Device Definition in Cisco ISE
- Create a Network Device Definition in Cisco ISE
- Import Network Devices into Cisco ISE
- Export Network Devices from Cisco ISE
- Network Device Groups
- Import Network Device Groups in to Cisco ISE
- Export Network Device Groups from Cisco ISE
- Import Templates in Cisco ISE
- Mobile Device Manager Interoperability with Cisco ISE
- Set Up MDM Servers With Cisco ISE
Network Devices Definitions in Cisco ISE
A network device such as a switch or a router is an authentication, authorization, and accounting (AAA) client through which AAA service requests are sent to Cisco ISE. You must define network devices for Cisco ISE to interact with the network devices. You can configure network devices for RADIUS AAA, Simple Network Management Protocol (SNMP) for the Profiling service to collect Cisco Discovery Protocol and Link Layer Discovery Protocol attributes for profiling endpoints, and Trustsec attributes for Trustsec devices. A network device that is not defined in Cisco ISE cannot receive AAA services from Cisco ISE.
In the network device definition:
-
You can configure the RADIUS protocol for RADIUS authentications. When Cisco ISE receives a RADIUS request from a network device, it looks for the corresponding device definition to retrieve the shared secret that is configured. If it finds the device definition, it obtains the shared secret that is configured on the device and matches it against the shared secret in the request to authenticate access. If the shared secrets match, the RADIUS server will process the request further based upon the policy and configuration. If they do not match, a reject response is sent to the network device. A failed authentication report is generated, which provides the failure reason.
-
You can configure the Simple Network Management Protocol (SNMP) in the network device definition for the Profiling service to communicate with the network devices and profile endpoints that are connected to the network devices.
-
You must define Trustsec-enabled devices in Cisco ISE to process requests from Trustsec-enabled devices that can be part of the Cisco Trustsec solution. Any switch that supports the Trustsec solution is an Trustsec-enabled device.
Trustsec devices do not use the IP address. Instead, you must define other settings so that Trustsec devices can communicate with Cisco ISE.
Trustsec-enabled devices use the Trustsec attributes to communicate with Cisco ISE. Trustsec-enabled devices, such as the Nexus 7000 series switches, Catalyst 6000 series switches, Catalyst 4000 series switches, and Catalyst 3000 series switches are authenticated using the Trustsec attributes that you define while adding Trustsec devices.
Default Network Device Definition in Cisco ISE
 Note | We recommend that you add the default device definition only for basic RADIUS authentications. For advanced flows, you must add separate device definition for each network device. |
Cisco ISE looks for the corresponding device definition to retrieve the shared secret that is configured in the network device definition when it receives a RADIUS request from a network device.
Cisco ISE performs the following procedure when a RADIUS request is received:
-
Looks for a specific IP address that matches the one in the request.
-
Looks up the ranges to see if the IP address in the request falls within the range that is specified.
-
If both step 1 and 2 fail, it uses the default device definition (if defined) to process the request.
Cisco ISE obtains the shared secret that is configured in the device definition for that device and matches it against the shared secret in the RADIUS request to authenticate access. If no device definitions are found, Cisco ISE obtains the shared secret from the default network device definition and processes the RADIUS request.
Create a Network Device Definition in Cisco ISE
You can create a network device definition in Cisco ISE and use the default network device definition when there is no network device definition in Cisco ISE.
Import Network Devices into Cisco ISE
You can import a list of device definitions into a Cisco ISE node using a comma-separated value (CSV) file. You must first update the imported template before you can import network devices into Cisco ISE. You cannot run an import of the same resource type at the same time. For example, you cannot concurrently import network devices from two different import files.
You can download the CSV template from the Admin portal, enter your device definition details in the template, and save it as a CSV file, which you can then import this back in to Cisco ISE.
While importing devices, you can create new records or update existing records. Cisco ISE displays the summary of the number of devices that are imported and also reports any errors that were found during the import process. When you import devices, you can also define whether you want Cisco ISE to overwrite the existing device definitions with the new definitions or stop the import process when Cisco ISE encounters the first error.
You cannot import network devices that are exported in previous releases of Cisco ISE, as the import template for these releases are different.
Export Network Devices from Cisco ISE
You can export network devices configured in Cisco ISE in the form of a CSV file that you can use to import these network devices into another Cisco ISE node.
Network Device Groups
Cisco ISE allows you to create hierarchical Network Device Groups (NDGs) that contain network devices. NDGs logically group network devices based on various criteria such as geographic location, device type, and the relative place in the network (like “Access Layer” or “Data Center,” for example).
For example, to organize your network devices by geographic location, you can group them by continent, region, and country:
You can also group network devices by device type:
Network devices can be assigned to one or more hierarchical NDGs. Thus, when Cisco ISE passes through the ordered list of configured NDGs to determine the appropriate group to assign to a particular device, it may find that the same device profile applies to multiple Device Groups, and will apply the first Device Group matched.
Root Network Device Groups
Cisco ISE includes two predefined root NDGs: All Device Types and All Locations. You cannot edit, duplicate, or delete these predefined NDGs, but you can add new device groups under them.
You can also create a root Network Device Group (NDG), and then create child NDGs under the root group in the Network Device Groups page. When you create a new root NDG, you must provide the name and type of the NDG. This information is not required when you create a child under the root NDG.
Network Device Attributes Used By Cisco ISE in Policy Evaluation
When you create a new network device group, a new network device attribute is added to the Device dictionary defined in the system, which you can use in policy definitions. Cisco ISE allows you to configure authentication and authorization policies based on Device dictionary attributes, such as device type, location, model name, and software version that is running on the network device.
Import Network Device Groups in to Cisco ISE
You can import network device groups in to a Cisco ISE node using a comma-separated value (CSV) file. You cannot run import of the same resource type at the same time. For example, you cannot concurrently import network device groups from two different import files.
You can download the CSV template from the Admin portal, enter your device group details in the template, and save the template as a CSV file, which you can then import back into Cisco ISE.
While importing device groups, you can create new records or update existing records. When you import device groups, you can also define whether you want Cisco ISE to overwrite the existing device groups with the new groups or stop the import process when Cisco ISE encounters the first error.
Export Network Device Groups from Cisco ISE
You can export network device groups configured in Cisco ISE in the form of a CSV file that you can use to import these network device groups into another Cisco ISE node.
Import Templates in Cisco ISE
Cisco ISE allows you to import a large number of network devices and network device groups using comma-separated value (CSV) files. The template contains a header row that defines the format of the fields. The header row should not be edited, and should be used as is.
By default, you can use the Generate a Template link to download a CSV file in the Microsoft Office Excel application and save the file format locally on your system. When you click the Generate a Template link, the Cisco ISE server displays the Opening template.csv dialog. This dialog allows you to open the template.csv file and save the template.csv file locally on your system with an appropriate name for network devices and network device groups. If you choose to open the template.csv file from the dialog, the file opens in the Microsoft Office Excel application by default.
Network Devices Import Template Format
The following table lists the fields in the template header and provides a description of the fields in the Network Device CSV file.
Network Device Groups Import Template Format
The following table lists the fields in the template header and provides a description of the fields in the Network Device Group CSV file.
Mobile Device Manager Interoperability with Cisco ISE
Mobile Device Management (MDM) servers secure, monitor, manage, and support mobile devices deployed across mobile operators, service providers, and enterprises. MDM servers act as a policy server that controls the use of some applications on a mobile device (for example, an e-mail application) in the deployed environment. However, the network is the only entity that can provide granular access to endpoints based on ACLs. Cisco ISE queries the MDM servers for the necessary device attributes to create ACLs that provide network access control for those devices.
You can run multiple active MDM servers on your network, including ones from different vendors. This allows you to route different endpoints to different MDM servers based on device factors such as location or device type.
Cisco ISE also integrates with MDM servers using Cisco's MDM API version 2 to allow devices access the network over VPN via AnyConnect 4.1 and Cisco ASA 9.3.2 or later.
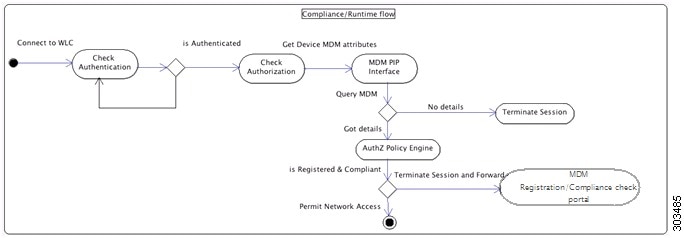
In this illustration, Cisco ISE is the enforcement point and the MDM policy server is the policy information point. Cisco ISE obtains data from the MDM server to provide a complete solution.

The following table lists the components that are used in the MDM setup.
You can configure Cisco ISE to interoperate with an external Mobile Device Manager (MDM) server. By setting up this type of third-party connection, you can leverage the detailed information available in the MDM database. Cisco ISE uses REST API calls over HTTPS to pull the various pieces of information from the external MDM server. Cisco ISE applies appropriate access control policies to switches, access routers, wireless access points, and other network access points to achieve greater control of remote device access to your Cisco ISE network.
You can configure Cisco ISE to interoperate with one or more external Mobile Device Manager (MDM) servers. By setting up this type of third-party connection, you can leverage the detailed information available in the MDM database. Cisco ISE uses REST API calls to retrieve information from the external MDM server. Cisco ISE applies appropriate access control policies to switches, access routers, wireless access points, and other network access points to achieve greater control of remote device access to your Cisco ISE network.
The supported MDM vendors are listed here: Supported MDM Servers.
- Supported MDM Use Cases
- Supported MDM Servers
- Ports Used by the MDM Server
- MDM Dictionary Attributes
- MDM Integration Process Flow
Supported MDM Use Cases
The functions Cisco ISE performs in conjunction with the external MDM server are as follows:
-
Facilitating device registration—Unregistered endpoints accessing the network are redirected to a registration page hosted on the MDM server for registration based on user role, device type, and so on.
-
Handling device remediation—Endpoints are granted only restricted access.
-
Augmenting endpoint data—Update the endpoint database with information from the MDM server that you cannot gather using the Cisco ISE Profiler. Cisco ISE uses six device attributes you can view using the page if an endpoint is a MDM monitored device. For example:
-
Cisco ISE polls the MDM server once every four hours for device compliance data. This is configurable by the administrator.
-
Issuing device instructions through the MDM server—Issues remote actions for users’ devices through the MDM server. Administrators initiate remote actions from the ISE console.
Cisco ISE allows you to configure MDM policy based on the following attributes:
Supported MDM Servers
Supported MDM servers include products from the following vendors:
Ports Used by the MDM Server
The following table lists the ports that must be open between the Cisco ISE and the MDM server to enable them to communicate with each other. Refer to the MDM Server Documentation for a list of ports that must be open on the MDM agent and server.
|
Meraki |
443 |
|
Microsoft Intune |
80 and 443 |
|
Microsoft SCCM |
80 and 443 |
MDM Dictionary Attributes
After you add the MDM server definition in Cisco ISE, the MDM dictionary attributes are available in Cisco ISE that you can use in authorization policies. You can view the dictionary attributes that are available for use in authorization policies.
When you are using these MDM dictionary attributes in policies, you cannot delete the MDM server configuration from Cisco ISE. To remove the MDM server configuration, you must first remove the MDM dictionary attributes from policies, and then remove the MDM server from Cisco ISE.
MDM Integration Process Flow
This section describes the MDM integration process:
-
This API call returns a list of devices for this user and the posture status for the devices.
Note
The input parameter is the MAC address of the endpoint device. For off-premise Apple iOS devices, this is the UDID.
-
If the user’s device is not in this list, it means the device is not registered. Cisco ISE sends an authorization request to the NAD to redirect to Cisco ISE. The user is presented the MDM server page.
Note
A device that was enrolled on the MDM server outside of a Cisco ISE network will be automatically registered with Cisco ISE if it is compliant with the posture policies.
-
Cisco ISE uses MDM to provision the device and presents an appropriate page for the user to register the device.
-
The user registers the device in the MDM server, and the MDM server redirects the request to Cisco ISE (through automatic redirection or manual browser refresh).
-
Cisco ISE queries the MDM server again for the posture status.
-
If the user’s device is not compliant to the posture (compliance) policies configured on the MDM server, the user is notified that the device is out of compliance and must be compliant.
-
After the user’s device becomes compliant, the MDM server updates the device state in its internal tables.
-
If the user refreshes the browser now, the control is transferred back to Cisco ISE.
-
Cisco ISE polls the MDM server once every four hours to get compliance information and issues Change of Authorization (CoA) appropriately. This can be configured by the administrator. Cisco ISE also checks the MDM server every 5 minutes to make sure that it is available.
The following figure illustrates the MDM process flow.
Note | A device can only be enrolled to a single MDM server at a time. If you want to enroll the same device to an MDM service from another vendor, the previous vendor's profiles must be removed from the device. The MDM service usually offers a "corporate wipe", which only deletes the vendor's configuration from the device (not the whole device). The user can also remove the files. For example, on an IOS device, the user can go to Settings > General >Device management, and click remove management. Or the user can go to the MyDevices portal in ISE, and click corporate wipe. |
Set Up MDM Servers With Cisco ISE
To set up MDM servers with Cisco ISE, you must perform the following high-level tasks:
Import MDM Server Certificate into Cisco ISE
For Cisco ISE to connect with the MDM server, you must import the MDM server certificate into the Cisco ISE Certificate Store. If your MDM server has a CA-signed certificate, you must import the root CA into the Cisco ISE Certificate Store.
Set Permissions When AD User in the Domain Admin Group
For Windows 2008 R2,Windows 2012, and Windows 2012 R2, the Domain Admin group does not have full control on certain registry keys in the Windows operating system by default. The Active Directory admin must give the Active Directory user Full Control permissions on the following registry keys:
-
HKEY_CLASSES_ROOT\CLSID\{76A64158-CB41-11D1-8B02-00600806D9B6}
-
HKLM\Software\Classes\Wow6432Node\CLSID\{76A64158-CB41-11D1-8B02-00600806D9B6}
No registry changes are required for the following Active Directory versions:
To grant full control, the Active Directory admin must first take ownership of the key, as shown below.
Required Permissions When AD User Not in Domain Admin Group
For Windows 2012 R2, give the Active Directory user Full Control permissions on the following registry keys:
-
HKEY_CLASSES_ROOT\CLSID\{76A64158-CB41-11D1-8B02-00600806D9B6}
-
HKLM\Software\Classes\Wow6432Node\CLSID\{76A64158-CB41-11D1-8B02-00600806D9B6}
The following permissions also are required when an Active Directory user is not in the Domain Admin group, but is in the Domain Users group:
-
Add Registry Keys to Allow ISE to Connect to the Domain Controller (see below)
- Permissions to Use DCOM on the Domain Controller
- Set Permissions for Access to WMI Root/CIMv2 Name Space
- Grant Access to the Security Event Log on the AD Domain Controller
These permissions are only required for the following Active Directory versions:
Add Registry Keys to Allow ISE to Connect to the Domain Controller
You must manually add some registry keys to the domain controller to allow ISE to connect as a Domain User, and retrieve login authentication events. An agent is not required on the domain controllers or on any machine in the domain.
The following registry script shows the keys to add. You can copy and paste this into a text file, save the file with a .reg extension, and double click the file to make the registry changes. To add registry keys, the user must be an owner of the root key.
Windows Registry Editor Version 5.00

[HKEY_CLASSES_ROOT\CLSID\{76A64158-CB41-11D1-8B02-00600806D9B6}]
"AppID"="{76A64158-CB41-11D1-8B02-00600806D9B6}"

[HKEY_CLASSES_ROOT\AppID\{76A64158-CB41-11D1-8B02-00600806D9B6}]
"DllSurrogate"="  "

[HKEY_CLASSES_ROOT\Wow6432Node\AppID\{76A64158-CB41-11D1-8B02-00600806D9B6}]
"DllSurrogate"="  "
Make sure that you include two spaces in the value of the key DllSurrogate.
Keep the empty lines as shown in the script above, including an empty line at the end of the file.
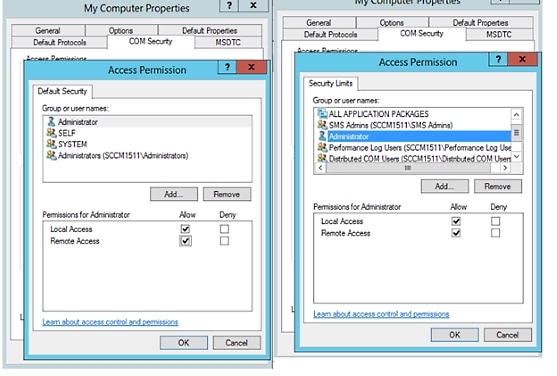
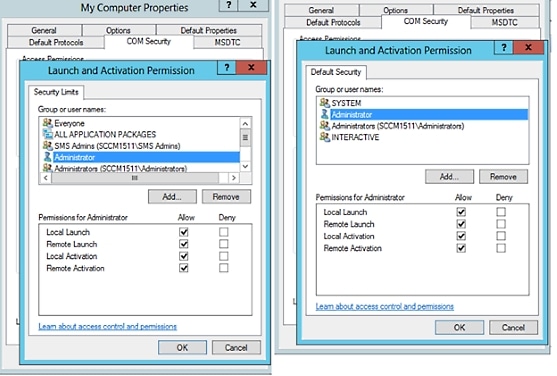
Permissions to Use DCOM on the Domain Controller
The Active Directory user used for ISE ID Mapping must have permissions to use DCOM (remote COM) on the Domain Controller. You can configure permissions with the dcomcnfg command line tool.
Set Permissions for Access to WMI Root/CIMv2 Name Space
By default, Active Directory users do not have permissions for the Execute Methods and Remote Enable. You can grant access using the wmimgmt.msc MMC console.

Open Firewall Ports for WMI Access
The firewall software on the Active Directory Domain Controller may block access to WMI. You can either turn the firewall off, or allow access on a specific IP (ISE IP address) to the following ports:
TCP 135: General RPC Port. When doing asynchronous RPC calls, the service listening on this port tells the client which port the component servicing this request is using.
-
UDP 138: Netbios Datagram Service
-
TCP 139: Netbios Session Service
-
TCP 445: SMB
Higher ports are assigned dynamically or you can configure them manually. We recommend that you add %SystemRoot%\System32\dllhost.exe as a target. This program manages ports dynamically.
All firewall rules can be assigned to specific IP (ISE IP).
Configure an Authorization Profile for Redirecting Nonregistered Devices
You must configure an authorization profile in Cisco ISE to redirect nonregistered devices.
You must configure an authorization profile in Cisco ISE to redirect nonregistered devices for each external MDM server.
- Ensure that you have created an MDM server definition in Cisco ISE. Only after you successfully integrate ISE with the MDM server does the MDM dictionary gets populated and you can create authorization policy using the MDM dictionary attributes.
- Configure ACLs on the Wireless LAN Controller for redirecting unregistered devices.
-
If you are using a proxy for the internet connection and MDM server is part of internal network then you have to put the MDM server name or its IP address in the Proxy-Bypass list. Choose to perform this action.
What to Do Next
Configure Authorization Policy Rules for the MDM Use Cases
You must configure authorization policy rules in Cisco ISE to complete the MDM configuration.
-
Add the MDM server certificate to the Cisco ISE certificate store.
-
Ensure that you have created the MDM server definition in Cisco ISE. Only after you successfully integrate ISE with the MDM server, the MDM dictionary gets populated and you can create authorization policy using the MDM dictionary attributes.
-
Configure ACLs on the Wireless LAN Controller for redirecting unregistered or noncompliant devices.

Wipe or Lock a Device
Cisco ISE allows you to wipe or turn on pin lock for a device that is lost. You can do this from the Endpoints page.
View Mobile Device Manager Reports
Cisco ISE records all additions, updates, and deletions of MDM server definitions. You can view these event in the “Change Configuration Audit” report, which provides all the configuration changes from any system administrator for a selected time period.
Choose , and specify the period of time to display in the resulting report.
View Mobile Device Manager Logs
You can use the Message Catalog page to view Mobile Device Manager log messages. Choose . The default reporting level for MDM log entries is "INFO." You can change the reporting level to "DEBUB" or "TRACE."
 Feedback