-
- Administration User Interface Reference
- Guest Access User Interface Reference
- Web Portals Customization Reference
- Policy User Interface Reference
- Operations User Interface Reference
- Network Access Flows
- Switch and Wireless LAN Controller Configuration Required to Support Cisco ISE Functions
- Supported Management Information Bases in Cisco ISE
- Cisco ISE Users
- Internal and External Identity Sources
- Certificate Authentication Profiles
- Active Directory as an External Identity Source
- Active Directory Supported Authentication Protocols and Features
- Active Directory Attribute and Group Retrieval for Use in Authorization Policies
- Active Directory Certificate Retrieval for Certificate-Based Authentication
- Active Directory User Authentication Process Flow
- Support for Active Directory Multidomain Forests
- Prerequisites for Integrating Active Directory and Cisco ISE
- Configure Active Directory as an External Identity Source
- Add an Active Directory Join Point and Join Cisco ISE Node to the Join Point
- Leave the Active Directory Domain
- Configure Authentication Domains
- Configure Active Directory User Groups
- Configure Active Directory User and Machine Attributes
- Modify Password Changes, Machine Authentications, and Machine Access Restriction Settings
- Support for Active Directory Multi-Join Configuration
- Identity Rewrite
- Identity Resolution Settings
- Test Users for Active Directory Authentication
- Delete Active Directory Configurations
- View Active Directory Joins for a Node
- Diagnose Active Directory Problems
- Enable Active Directory Debug Logs
- Obtain the Active Directory Log File for Troubleshooting
- Active Directory Alarms and Reports
- Active Directory Advanced Tuning
- Supplemental Information for Setting Up Cisco ISE with Active Directory
- Configure Identity Mapping
- Filter Identity Mapping
- Active Directory Requirements to Support Identity Mapping
- Configure Active Directory for Identity Mapping
- Set the Windows Audit Policy
- Set Permissions When AD User in the Domain Admin Group
- Required Permissions When AD User Not in Domain Admin Group
- Permissions to Use DCOM on the Domain Controller
- Set Permissions for Access to WMI Root/CIMv2 Name Space
- Grant Access to the Security Event Log on the AD Domain Controller
- LDAP Directory Service
- Multiple LDAP Instances
- LDAP Failover
- LDAP Connection Management
- LDAP User Authentication
- LDAP Group and Attribute Retrieval for Use in Authorization Policies
- Errors Returned by the LDAP Server
- LDAP User Lookup
- LDAP MAC Address Lookup
- Add LDAP Identity Sources
- Enable Secure Authentication with LDAP Identity Source
- RADIUS Token Server Supported Authentication Protocols
- Ports Used By the RADIUS Token Servers for Communication
- RADIUS Shared Secret
- Failover in RADIUS Token Servers
- Configurable Password Prompt in RADIUS Token Servers
- RADIUS Token Server User Authentication
- User Attribute Cache in RADIUS Token Servers
- RADIUS Identity Source in Identity Sequence
- RADIUS Server Returns the Same Message for All Errors
- Safeword Server Supports Special Username Format
- Authentication Request and Response in RADIUS Token Servers
- Add a RADIUS Token Server
- Delete a RADIUS Token Server
Manage Users and External Identity Sources
Cisco ISE Users
In this chapter, the term user refers to employees and contractors who access the network regularly as well as sponsor and guest users. A sponsor user is an employee or contractor of the organization who creates and manages guest-user accounts through the sponsor portal. A guest user is an external visitor who needs access to the organization’s network resources for a limited period of time.
You must create an account for any user to gain access to resources and services on the Cisco ISE network. Employees, contractors, and sponsor users are created from the Admin portal.
- User Identity
- User Groups
- User Identity Groups
- User Role
- User Account Custom Attributes and Password Policies
- Add Users
- Export Cisco ISE User Data
- Import Cisco ISE User Data
- Create a User Identity Group
- Export User Identity Groups
- Import User Identity Groups
User Identity
User identity is like a container that holds information about a user and forms their network access credentials. Each user’s identity is defined by data and includes: a username, e-mail address, password, account description, associated administrative group, user group, and role.
User Groups
User groups are a collection of individual users who share a common set of privileges that allow them to access a specific set of Cisco ISE services and functions.
User Identity Groups
A user’s group identity is composed of elements that identify and describe a specific group of users that belong to the same group. A group name is a description of the functional role that the members of this group have. A group is a listing of the users that belong to this group.
Default User Identity Groups
Cisco ISE comes with the following predefined user identity groups:
-
Employee—Employees of your organization belong to this group.
-
SponsorAllAccount—Sponsor users who can suspend or reinstate all guest accounts in the Cisco ISE network.
-
SponsorGroupAccounts—Sponsor users who can suspend guest accounts created by sponsor users from the same sponsor user group.
-
SponsorOwnAccounts—Sponsor users who can only suspend the guest accounts that they have created.
-
Guest—A visitor who needs temporary access to resources in the network.
-
ActivatedGuest—A guest user whose account is enabled and active.
User Role
A user role is a set of permissions that determine what tasks a user can perform and what services they can access on the Cisco ISE network. A user role is associated with a user group. For example, a network access user.
User Account Custom Attributes and Password Policies
Cisco ISE allows you to restrict a user’s network access based on user attributes. Cisco ISE comes with a set of predefined user attributes and also allows you to create custom attributes. Both types of attributes can be used in conditions that define the authentication policy. You can also define a password policy for user accounts so that passwords meet specified criteria.
Custom User Attributes
On the User Custom Attributes Setting page, you can use the Custom Attributes pane to define additional user-account attributes. Cisco ISE provides a list of predefined attributes that are not configurable. However, you can define custom attributes by configuring the following:
User Password Policy Settings
You can define the criteria that user-account passwords must meet in the User Password Policy page. Choose .
The following table describes the fields in the User Password Policy page.
Add Users
Cisco ISE allows you to view, create, modify, duplicate, delete, change the status, import, export, or search for attributes of Cisco ISE users.
If you are using a Cisco ISE internal database, you must create an account for any new user who needs access to resources or services on a Cisco ISE network.
Export Cisco ISE User Data
You might have to export user data from the Cisco ISE internal database. Cisco ISE allows you to export user data in the form of a password-protected csv file.
Import Cisco ISE User Data
Instead of entering user accounts manually into Cisco ISE, you can import them. Cisco ISE allows you to import user data in the form of a csv file into its internal database.
 Note | We recommend that you do not delete all the network access users at a time, because this may lead to CPU spike and the services to crash, especially if you are using a very large database. |
Create a User Identity Group
You must create a user identity group before you can assign a user to it.
Export User Identity Groups
Cisco ISE allows you to export locally configured user identity groups in the form of a csv file.
Import User Identity Groups
Cisco ISE allows you to import user identity groups in the form of a csv file.
Internal and External Identity Sources
Identity sources contain user information that Cisco ISE uses to validate credentials during user authentication, and to retrieve group information and other attributes that are associated with the user for use in authorization policies. They are databases that store user information in the form of records. You can add, edit, and delete user information from identity sources.
Cisco ISE supports internal and external identity sources. Both sources can be used as an authentication source for sponsor-user and guest-user authentication.
Internal Identity Sources
Cisco ISE has an internal user database that you can use to store user information. Users in the internal user database are called internal users. Cisco ISE also has an internal endpoint database that stores information about all the devices and endpoints that connect to it.
External Identity Sources
Cisco ISE allows you to configure the external identity source that contains user information. Cisco ISE connects to an external identity source to obtain user information for authentication. External identity sources also include certificate information for the Cisco ISE server and certificate authentication profiles. Cisco ISE uses authentication protocols to communicate with external identity sources. The following table lists authentication protocols and the external identity sources that they support.
Create an External Identity Source
Cisco ISE can connect with external identity sources such as Active Directory, LDAP, RADIUS Token, and RSA SecurID servers to obtain user information for authentication and authorization. External identity sources also includes certificate authentication profiles that you need for certificate-based authentications.
| Step 1 | Choose . |
| Step 2 | Choose one of
these options:
|
Certificate Authentication Profiles
For each profile, you must specify the certificate field that should be used as the principal username and whether you want a binary comparison of the certificates.
Add a Certificate Authentication Profile
You must create a certificate authentication profile if you want to use the Extensible Authentication Protocol-Transport Layer Security (EAP-TLS) certificate-based authentication method. Instead of authenticating via the traditional username and password method, Cisco ISE compares a certificate received from a client with one in the server to verify the authenticity of a user.
| Step 1 | Choose > . |
| Step 2 | Enter the name and an optional description for the certificate authentication profile. |
| Step 3 | Select an identity store from
the drop-down list.
Basic certificate checking does not require an identity source. If you want binary comparison checking for the certificates, you must select an identity source. If you select Active Directory as an identity source, subject and common name and subject alternative name (all values) can be used to look up a user. |
| Step 4 | Select the use of identity
from Certificate
Attribute orAny Subject or Alternative Name Attributes in the
Certificate. This will be used in logs and for lookups.
If you chooseAny Subject or Alternative Name Attributes in the Certificate, Active Directory UPN will be used as the username for logs and all subject names and alternative names in a certificate will be tried to look up a user. This option is available only if you choose Active Directory as the identity source. |
| Step 5 | Choose when you want to
Match
Client Certificate Against Certificate In Identity Store. For this
you must select an identity source (LDAP or Active Directory.) If you select
Active Directory, you can choose to match certificates only to resolve identity
ambiguity.
|
| Step 6 | Click Submit to add the certificate authentication profile or save the changes. |
Active Directory as an External Identity Source
Cisco ISE uses Microsoft Active Directory as an external identity source to access resources such as users, machines, groups, and attributes. User and machine authentication in Active Directory allows network access only to users and devices that are listed in Active Directory.
- Active Directory Supported Authentication Protocols and Features
- Active Directory Attribute and Group Retrieval for Use in Authorization Policies
- Active Directory Certificate Retrieval for Certificate-Based Authentication
- Active Directory User Authentication Process Flow
- Support for Active Directory Multidomain Forests
- Prerequisites for Integrating Active Directory and Cisco ISE
- Configure Active Directory as an External Identity Source
- Support for Active Directory Multi-Join Configuration
- Identity Rewrite
- Identity Resolution Settings
- Test Users for Active Directory Authentication
- Delete Active Directory Configurations
- View Active Directory Joins for a Node
- Diagnose Active Directory Problems
- Enable Active Directory Debug Logs
- Obtain the Active Directory Log File for Troubleshooting
- Active Directory Alarms and Reports
- Active Directory Advanced Tuning
- Supplemental Information for Setting Up Cisco ISE with Active Directory
Active Directory Supported Authentication Protocols and Features
Active Directory supports features such as user and machine authentications, changing Active Directory user passwords with some protocols. The following table lists the authentication protocols and the respective features that are supported by Active Directory.
|
EAP-FAST and password based Protected Extensible Authentication Protocol (PEAP) |
User and machine authentication with the ability to change passwords using EAP-FAST and PEAP with an inner method of MS-CHAPv2 and EAP-GTC |
|
User and machine authentication |
|
|
Microsoft Challenge Handshake Authentication Protocol Version 1 (MS-CHAPv1) |
|
|
Microsoft Challenge Handshake Authentication Protocol Version 2 (MS-CHAPv2) |
|
|
Extensible Authentication Protocol-Generic Token Card (EAP-GTC) |
|
|
Extensible Authentication Protocol-Transport Layer Security (EAP-TLS) |
|
|
Extensible Authentication Protocol- Flexible Authentication via Secure Tunneling-Transport Layer Security (EAP-FAST-TLS) |
|
|
Protected Extensible Authentication Protocol-Transport Layer Security (PEAP-TLS) |
|
Active Directory Attribute and Group Retrieval for Use in Authorization Policies
Cisco ISE retrieves user or machine attributes and groups from Active Directory for use in authorization policy rules. These attributes can be used in Cisco ISE policies and determine the authorization level for a user or machine. Cisco ISE retrieves user and machine Active Directory attributes after successful authentication and can also retrieve attributes for an authorization that is independent of authentication.
Cisco ISE may use groups in external identity stores to assign permissions to users or computers; for example, to map users to sponsor groups. You should note the following restrictions on group memberships in Active Directory:
-
Policy rule conditions may reference any of the following: a user’s or computer’s primary group, the groups of which a user or computer is a direct member, or indirect (nested) groups.
-
Domain local groups outside a user’s or computer’s account domain are not supported.
Attributes and groups are retrieved and managed per join point. They are used in authorization policy (by selecting first the join point and then the attribute). You cannot define attributes or groups per scope for authorization, but you can use scopes for authentication policy. When you use a scope in authentication policy, it is possible that a user is authenticated via one join point, but attributes and/or groups are retrieved via another join point that has a trust path to the user's account domain. You can use authentication domains to ensure that no two join points in one scope have any overlap in authentication domains.
Note | See Microsoft-imposed limits on the maximum number of usable Active Directory groups: http://technet.microsoft.com/en-us/library/active-directory-maximum-limits-scalability(v=WS.10).aspx |
An authorization policy fails if the rule contains an Active Directory group name with special characters such as /, !, @, \, #, $, %, ^, &, *, (, ), _, +, or ~.
Active Directory Certificate Retrieval for Certificate-Based Authentication
Cisco ISE supports certificate retrieval for user and machine authentication that uses the EAP-TLS protocol. The user or machine record on Active Directory includes a certificate attribute of the binary data type. This certificate attribute can contain one or more certificates. Cisco ISE identifies this attribute as userCertificate and does not allow you to configure any other name for this attribute. Cisco ISE retrieves this certificate and uses it to perform binary comparison.
The certificate authentication profile determines the field where the username is taken from in order to lookup the user in Active Directory to be used for retrieving certificates, for example, Subject Alternative Name (SAN) or Common Name. After Cisco ISE retrieves the certificate, it performs a binary comparison of this certificate with the client certificate. When multiple certificates are received, Cisco ISE compares the certificates to check for one that matches. When a match is found, the user or machine authentication is passed.
Active Directory User Authentication Process Flow
When authenticating or querying a user, Cisco ISE checks the following:
-
MS-CHAP and PAP authentications check if the user is disabled, locked out, expired or out of logon hours and the authentication fails if some of these conditions are true.
-
EAP-TLS authentications checks if the user is disabled or locked out and the authentication fails if some of these conditions is met.
Additionally, you can can set the IdentityAccessRestricted attribute if conditions mentioned above (for example, user disabled) are met. IdentityAccessRestricted attribute is set in order to support legacy policies and is not required in Cisco ISE 1.31.4 because authentication fails if such conditions (for example, user disabled) are met.
Support for Active Directory Multidomain Forests
Cisco ISE supports Active Directory with multidomain forests. Within each forest, Cisco ISE connects to a single domain, but can access resources from the other domains in the Active Directory forest if trust relationships are established between the domain to which Cisco ISE is connected and the other domains.
Refer to Release Notes for Cisco Identity Services Engine for a list of Windows Server Operating Systems that support Active Directory services.
Note | Cisco ISE does not support Microsoft Active Directory servers that reside behind a network address translator and have a Network Address Translation (NAT) address. |
Prerequisites for Integrating Active Directory and Cisco ISE
-
Use the Network Time Protocol (NTP) server settings to synchronize the time between the Cisco ISE server and Active Directory. You can configure NTP settings from Cisco ISE CLI.
-
If your Active Directory structure has multidomain forest or is divided into multiple forests, ensure that trust relationships exist between the domain to which Cisco ISE is connected and the other domains that have user and machine information to which you need access. For more information on establishing trust relationships, refer to Microsoft Active Directory documentation.
-
You must have at least one global catalog server operational and accessible by Cisco ISE, in the domain to which you are joining Cisco ISE.
- Active Directory Account Permissions Required for Performing Various Operations
- Network Ports That Must Be Open for Communication
- DNS Server
Active Directory Account Permissions Required for Performing Various Operations
| Join Operations | Leave Operations | Cisco ISE Machine Accounts |
|---|---|---|
|
For the account that is used to perform the join operation, the following permissions are required:
It is not mandatory to be a domain administrator to perform a join operation. |
For the account that is used to perform the leave operation, the following permissions are required:
If you perform a force leave (leave without the password), it will not remove the machine account from the domain. |
For the newly created Cisco ISE machine account that is used to communicate to the Active Directory connection, the following permissions are required:
You can precreate the machine account in Active Directory, and if the SAM name matches the Cisco ISE appliance hostname, it should be located during the join operation and re-used. If multiple join operations are performed, multiple machine accounts are maintained inside Cisco ISE, one for each join. |
Note | The credentials used for the join or leave operation are not stored in Cisco ISE. Only the newly created Cisco ISE machine account credentials are stored. |
Network Ports That Must Be Open for Communication
|
Protocol |
Port (remote-local) |
Target |
Authenticated |
Notes |
|---|---|---|---|---|
|
DNS (TCP/UDP) |
Random number greater than or equal to 49152 |
DNS Servers/AD Domain Controllers |
No |
— |
|
MSRPC |
445 |
Domain Controllers |
Yes |
— |
|
Kerberos (TCP/UDP) |
88 |
Domain Controllers |
Yes (Kerberos) |
MS AD/KDC |
|
LDAP (TCP/UDP) |
389 |
Domain Controllers |
Yes |
— |
|
LDAP (GC) |
3268 |
Global Catalog Servers |
Yes |
— |
|
NTP |
123 |
NTP Servers/Domain Controllers |
No |
— |
|
IPC |
80 |
Other ISE Nodes in the Deployment |
Yes (Using RBAC credentials) |
— |
DNS Server
While configuring your DNS server, make sure that you take care of the following:
-
All DNS servers configured in Cisco ISE must be able to resolve all forward and reverse DNS queries for all domains you wish to use.
-
All DNS server must be able to answer SRV queries for DCs, GCs, and KDCs with or without additional Site information.
-
We recommend that you add the server IP addresses to SRV responses to improve performance.
-
Avoid using DNS serversthat query the public Internet. They can cause delays and leak information about your network when an unknown name has to be resolved
Configure Active Directory as an External Identity Source
Before you configure Active Directory as an External Identity Source, make sure that:
-
Cisco ISE hostnames are 15 characters or less in length. Active Directory does not allow hostnames larger than 15 characters.
-
The Microsoft Active Directory server does not reside behind a network address translator and does not have a Network Address Translation (NAT) address.
-
The Microsoft Active Directory account intended for the join operation is valid and is not configured with the Change Password on Next Login.
-
You have the privileges of a Super Admin or System Admin in ISE.
Note | If you see operational issues when Cisco ISE is connected to Active Directory, see the AD Connector Report under . |
You must perform the following tasks to configure Active Directory as an external identity source.
- Add an Active Directory Join Point and Join Cisco ISE Node to the Join Point
- Leave the Active Directory Domain
- Configure Authentication Domains
- Configure Active Directory User Groups
- Configure Active Directory User and Machine Attributes
- Modify Password Changes, Machine Authentications, and Machine Access Restriction Settings
Add an Active Directory Join Point and Join Cisco ISE Node to the Join Point
| Step 1 | Choose . | ||||
| Step 2 | Click Add and enter the domain name and identity store name. | ||||
| Step 3 | Click
Submit.
A pop-up appears asking if you want to join the newly created join point to the domain. Click Yes if you want to join immediately. Saving the configuration saves the Active Directory domain configuration globally (in the primary and secondary policy service nodes), but none of the Cisco ISE nodes are joined to the domain yet. | ||||
| Step 4 | Check the check box next to the new Active Directory join point that you created and click Edit, or click on the new Active Directory join point from the navigation pane on the left. The deployment join/leave table is displayed with all the Cisco ISE nodes, the node roles, and their status. | ||||
| Step 5 | Check the check box next to
the relevant Cisco ISE nodes and click
Join to join the Cisco ISE node to the Active
Directory domain.
You must do this explicitly even though you saved the configuration. To join multiple Cisco ISE nodes to a domain in a single operation, the username and password of the account to be used must be the same for all join operations. If different username and passwords are required to join each Cisco ISE node, the join operation should be performed individually for each Cisco ISE node. | ||||
| Step 6 | Enter the Active Directory
username and password.
The user used for the join operation should exist in the domain itself. If it exists in a different domain or subdomain, the username should be noted in a UPN notation, such as jdoe@acme.com. | ||||
| Step 7 | (Optional)Check the
Specify
Organizational Unit check box.
You should check this check box in case the Cisco ISE node machine account is to be located in a specific Organizational Unit other than CN=Computers,DC=someDomain,DC=someTLD. Cisco ISE creates the machine account under the specified organizational unit or moves it to this location if the machine account already exists. If the organizational unit is not specified, Cisco ISE uses the default location. The value should be specified in ful distinguished name (DN) format. The syntax must conform to the Microsoft guidelines. Special reserved characters, such as /'+,;=<> line feed, space, and carriage return must be escaped by a backslash (\). For example, OU=Cisco ISE\,US,OU=IT Servers,OU=Servers\, and Workstations,DC=someDomain,DC=someTLD. If the machine account is already created, you need not check this check box. You can also change the location of the machine account after you join to the Active Directory domain. | ||||
| Step 8 | Click
OK.
You can select more than one node to join to the Active Directory domain. If the join operation is not successful, a failure message appears. Click the failure message for each node to view detailed logs for that node.
|
What to Do Next
Leave the Active Directory Domain
If you no longer need to authenticate users or machines from an Active Directory domain or from this join point, you can leave the Active Directory domain.
When you reset the Cisco ISE application configuration from the command-line interface or restore configuration after a backup or upgrade, it performs a leave operation, disconnecting the Cisco ISE node from the Active Directory domain, if it is already joined. However, the Cisco ISE node account is not removed from the Active Directory domain. We recommend that you perform a leave operation from the Admin portal with the Active Directory credentials because it also removes the node account from the Active Directory domain. This is also recommended when you change the Cisco ISE hostname.
If you leave the Active Directory domain, but still use Active Directory as an identity source for authentication (either directly or as part of an identity source sequence), authentications may fail.
| Step 1 | Choose . | ||
| Step 2 | Check the check box next to the Cisco ISE node and click Leave. | ||
| Step 3 | Enter the Active Directory
username and password, and click
OK to leave the
domain and remove the machine account from the Cisco ISE database.
If you enter the Active Directory credentials, the Cisco ISE node leaves the Active Directory domain and deletes the Cisco ISE machine account from the Active Directory database.
| ||
| Step 4 | If you do not have the Active
Directory credentials, check the
No Credentials
Available check box, and click
OK.
If you check the Leave domain without credentials check box, the primary Cisco ISE node leaves the Active Directory domain. The Active Directory administrator must manually remove the machine account that was created in Active Directory during the time of the join. |
Configure Authentication Domains
The domain to which Cisco ISE is joined to has visibility to other domains with which it has a trust relationship. By default, Cisco ISE is set to permit authentication against all those trusted domains. You can restrict interaction with the Active Directory deployment to a subset of authentication domains. Configuring authentication domains enables you to select specific domains for each join point so that the authentications are performed against the selected domains only. Authentication domains improves security because they instruct Cisco ISE to authenticate users only from selected domains and not from all domains trusted from join point. Authentication domains also improve performance and latency of authentication request processing because authentication domains limit the search area (that is, where accounts matching to incoming username or identity will be searched). It is especially important when incoming username or identity does not contain domain markup (prefix or suffix). Due to these reasons, configuring authentication domains is a best practice, and we highly recommended it.
| Step 1 | Choose . |
| Step 2 | Click the
Authentication Domains tab.
A table appears with a list of your trusted domains. By default, Cisco ISE permits authentication against all trusted domains. |
| Step 3 | To allow only specified domains, uncheck Use all Active Directory domains for authentication check box. |
| Step 4 | Check the check
box next to the domains for which you want to allow authentication, and click
Enable
Selected. In the Authenticate column, the status of this domain
changes to Yes.
You can also disable selected domains. |
| Step 5 | Click Show Unusable Domains to view a list of domains that cannot be used. Unusable domains are domains that Cisco ISE cannot use for authentication due to reasons such as one-way trust, selective authentication and so on. |
What to Do Next
Configure Active Directory user groups.
Configure Active Directory User Groups
You must configure Active Directory user groups for them to be available for use in authorization policies. Internally, Cisco ISE uses security identifiers (SIDs) to help resolve group name ambiguity issues and to enhance group mappings. SID provides accurate group assignment matching.
| Step 1 | Choose . | ||
| Step 2 | Click the Groups tab. | ||
| Step 3 | Do one of the following: Do not use double quotes (”) in the group name for the user interface login. | ||
| Step 4 | If you are manually selecting a group, you can search for them using a filter. For example, enter admin* as the filter criteria and click Retrieve Groups to view user groups that begin with admin. You can also enter the asterisk (*) wildcard character to filter the results. You can retrieve only 500 groups at a time. | ||
| Step 5 | Check the check boxes next to the groups that you want to be available for use in authorization policies and click OK. | ||
| Step 6 | If you choose to manually add a group, enter a name and SID for the new group. | ||
| Step 7 | Click OK. | ||
| Step 8 | Click
Save.
|
What to Do Next
Configure Active Directory User and Machine Attributes
You must configure Active Directory user and machine attributes to be able to use them in conditions in authorization policies.
| Step 1 | Choose > Active Directory. | ||
| Step 2 | Click the Attributes tab. | ||
| Step 3 | Choose to manually add a attribute, or choose to choose a list of attributes from the directory. | ||
| Step 4 | If you choose to
add attributes from the directory, enter the name of a user in the
Sample
User or Machine Account
field, and click
Retrieve Attributes to
obtain a list of attributes for users. For example, enter
administrator
to obtain a list of administrator attributes. You can
also enter the asterisk (*) wildcard character to filter the results.
| ||
| Step 5 | Check the check boxes next to the attributes from Active Directory that you want to select, and click OK. | ||
| Step 6 | If you choose to manually add an attribute, enter a name for the new attribute. | ||
| Step 7 | Click Save. |
Modify Password Changes, Machine Authentications, and Machine Access Restriction Settings
| Step 1 | Choose . |
| Step 2 | Click the Advanced Settings tab. |
| Step 3 | Modify as required, the
Password Change, Machine Authentication, and Machine Access Restrictions (MARs)
settings.
These option are enabled by default. |
| Step 4 | Check the Use Kerberos for Plain Text Authentications check box if you want to use Kerberos for plain-text authentications. The default and recommended option is MS-RPC. Kerberos is used in ISE 1.2. |
Support for Active Directory Multi-Join Configuration
Cisco ISE supports multiple joins to Active Directory domains. Cisco ISE supports up to 50 Active Directory joins. Cisco ISE can connect with multiple Active Directory domains that do not have a two-way trust or have zero trust between them. Active Directory multi-domain join comprises a set of distinct Active Directory domains with their own groups, attributes, and authorization policies for each join.
You can join the same forest more than once, that is, you can join more than one domain in the same forest, if necessary.
Cisco ISE now allows to join domains with one-way trust. This option helps bypass the permission issues caused by a one-way trust. You can join either of the trusted domains and hence be able to see both domains.
-
Join Point—In Cisco ISE, each independent join to an Active Directory domain is called a join point. The Active Directory join point is an Cisco ISE identity store and can be used in authentication policy. It has an associated dictionary for attributes and groups, which can be used in authorization conditions.
-
Scope—A subset of Active Directory join points grouped together is called a scope. You can use scopes in authentication policy in place of a single join point and as authentication results. Scopes are used to authenticate users against multiple join points. Instead of having multiple rules for each join point, if you use a scope, you can create the same policy with a single rule and save the time that Cisco ISE takes to process a request and help improve performance. A join point can be present in multiple scopes. A scope can be included in an identity source sequence. You cannot use scopes in an authorization policy condition because scopes do not have any associated dictionaries.
When you perform a fresh Cisco ISE install, by default no scopes exist. This is called the no scope mode. When you add a scope, Cisco ISE enters multi-scope mode. If you want, you can return to no scope mode. All the join points will be moved to the Active Directory folder. -
Initial_Scope is an implicit scope that is used to store the Active Directory join points that were added in no scope mode. When multi-scope mode is enabled, all the Active Directory join points move into the automatically created Initial_Scope. You can rename the Initial_Scope.
-
All_AD_Instances is a built-in pseudo scope that is not shown in the Active Directory configuration. It is only visible as an authentication result in policy and identity sequences. You can select this scope if you want to select all Active Directory join points configured in Cisco ISE.
-
Create a New Scope to Add Active Directory Join Points
Identity Rewrite
Identity rewrite is an advanced feature that directs Cisco ISE to manipulate the identity before it is passed to the external Active Directory system. You can create rules to change the identity to a desired format that includes or excludes a domain prefix and/or suffix or other additional markup of your choice.
Identity rewrite rules are applied on the username or hostname received from the client, before being passed to Active Directory, for operations such as subject searches, authentication, and authorization queries. Cisco ISE will match the condition tokens and when the first one matches, Cisco ISE stops processing the policy and rewrites the identity string according to the result.
During the rewrite, everything enclosed in square bracket [ ] (such as [IDENTITY]) is a variable that is not evaluated on the evaluation side but instead added with the string that matches that location in the string. Everything without the brackets is evaluated as a fixed string on both the evaluation side and the rewrite side of the rule.
The following are some examples of identity rewrite, considering that the identity entered by the user is ACME\jdoe:
-
If identity matches ACME\[IDENTITY], rewrite as [IDENTITY].
The result would be jdoe. This rule instructs Cisco ISE to strip all usernames with the ACME prefix.
-
If the identity matches ACME\[IDENTITY], rewrite as [IDENTITY]@ACME.com.
The result would be jdoe@ACME.com. This rule instructs Cisco ISE to change the format from prefix for suffix notation or from NetBIOS format to UPN formats.
-
If the identity matches ACME\[IDENTITY], rewrite as ACME2\[IDENTITY].
The result would be ACME2\jdoe. This rule instructs Cisco ISE to change all usernames with a certain prefix to an alternate prefix.
-
If the identity matches [ACME]\jdoe.USA, rewrite as [IDENTITY]@[ACME].com.
The result would be jdoe\ACME.com. This rule instructs Cisco ISE to strip the realm after the dot, in this case the country and replace it with the correct domain.
-
If the identity matches E=[IDENTITY], rewrite as [IDENTITY].
The result would be jdoe. This is an example rule that can be created when an identity is from a certificate, the field is an email address, and Active Directory is configured to search by Subject. This rule instructs Cisco ISE to remove ‘E=’.
-
If the identity matches E=[EMAIL],[DN], rewrite as [DN].
This rule will convert certificate subject from E=jdoe@acme.com, CN=jdoe, DC=acme, DC=com to pure DN, CN=jdoe, DC=acme, DC=com. This is an example rule that can be created when identity is taken from a certificate subject and Active Directory is configured to search user by DN . This rule instructs Cisco ISE to strip email prefix and generate DN.
The following are some common mistakes while writing the identity rewrite rules:
-
If the identity matches [DOMAIN]\[IDENTITY], rewrite as [IDENTITY]@DOMAIN.com.
The result would be jdoe@DOMAIN.com. This rule does not have [DOMAIN] in square brackets [ ] on the rewrite side of the rule.
-
If the identity matches DOMAIN\[IDENTITY], rewrite as [IDENTITY]@[DOMAIN].com.
Here again, the result would be jdoe@DOMAIN.com. This rule does not have [DOMAIN] in square brackets [ ] on the evaluation side of the rule.
Identity rewrite rules are always applied within the context of an Active Directory join point. Even if a scope is selected as the result of an authentication policy, the rewrite rules are applied for each Active Directory join point. These rewrite rules also applies for identities taken from certificates if EAP-TLS is being used.
Enable Identity Rewrite
Note | This configuration task is optional. You can perform it to reduce authentication failures that can arise because of various reasons such as ambiguous identity errors. |
You must join Cisco ISE to the Active Directory domain.
| Step 1 | Choose . |
| Step 2 | Click the Advanced Settings tab. |
| Step 3 | Under the Identity Rewrite section, choose whether you want to apply the rewrite rules to modify usernames. |
| Step 4 | Enter the match conditions and the rewrite results. You can remove the default rule that appears and enter the rule according to your requirement. Cisco ISE processes the policy in order, and the first condition that matches the request username is applied. You can use the matching tokens (text contained in square brackets) to transfer elements of the original username to the result. If none of the rules match, the identity name remains unchanged. You can click the Launch Test button to preview the rewrite processing. |
Identity Resolution Settings
Some type of identities include a domain markup, such as a prefix or a suffix. For example, in a NetBIOS identity such as ACME\jdoe, “ACME” is the domain markup prefix, similarly in a UPN identity such as jdoe@acme.com, “acme.com” is the domain markup suffix. Domain prefix should match to the NetBIOS (NTLM) name of the Active Directory domain in your organization and domain suffix should match to the DNS name of Active Directory domain or to the alternative UPN suffix in your organization. For example jdoe@gmail.com is treated as without domain markup because gmail.com is not a DNS name of Active Directory domain.
The identity resolution settings allows you to configure important settings to tune the security and performance balance to match your Active Directory deployment. You can use these settings to tune authentications for usernames and hostnames without domain markup. In cases when Cisco ISE is not aware of the user's domain, it can be configured to search the user in all the authentication domains. Even if the user is found in one domain, Cisco ISE will wait for all responses in order to ensure that there is no identity ambiguity. This might be a lengthy process, subject to the number of domains, latency in the network, load, and so on.
Avoid Identity Resolution Issues
It is highly recommended to use fully qualified names (that is, names with domain markup) for users and hosts during authentication. For example, UPNs and NetBIOS names for users and FQDN SPNs for hosts. This is especially important if you hit ambiguity errors frequently, such as, several Active Directory accounts match to the incoming username; for example, jdoe matches to jdoe@emea.acme.com and jdoe@amer.acme.com. In some cases, using fully qualified names is the only way to resolve issue. In others, it may be sufficient to guarantee that the users have unique passwords. So, it is more efficient and leads to less password lockout issues if unique identities are used initially.
Configure Identity Resolution Settings
Note | This configuration task is optional. You can perform it to reduce authentication failures that can arise because of various reasons such as ambiguous identity errors. |
You must join Cisco ISE to the Active Directory domain.
| Step 1 | Choose . |
| Step 2 | Click the Advanced Settings tab. |
| Step 3 | Define the following settings
for identity resolution for usernames or machine names under the
Identity Resolution section. This setting provides you advanced
control for user search and authentication.
The first setting is for the identities without a markup. In such cases, you can select any of the following options:
The selection is made based on how the authentication domains are configured in Cisco ISE. If only specific authentication domains are selected, only those domains will be searched (for both “joined forest” or “all forests” selections). The second setting is used if Cisco ISE cannot communicate with all Global Catalogs (GCs) that it needs to in order to comply with the configuration specified in the “Authentication Domains” section. In such cases, you can select any of the following options: |
Test Users for Active Directory Authentication
Test User tool can be used to verify user authentication. You can also fetch groups and attributes and examine them. You can run the test for a single join point or for scopes.
| Step 1 | Choose. |
| Step 2 | Choose one of the following options: |
| Step 3 | Enter the username and password of the user (or host) in Active Directory. |
| Step 4 | Choose the authentication type. Password entry in Step 3 is not required if you choose the Lookup option. |
| Step 5 | Select the Cisco ISE node on which you want to run this test, if you are running this test for all join points. |
| Step 6 | Check the Retrieve Groups and Attributes check boxes if you want to retrieve the groups and attributes from Active Directory. |
| Step 7 | Click Test. The result and steps of the test operation are displayed. The steps can help to identify the failure reason and troubleshoot. |
Delete Active Directory Configurations
You should delete Active Directory configurations if you are not going to use Active Directory as an external identity source. Do not delete the configuration if you want to join another Active Directory domain. You can leave the domain to which you are currently joined and join a new domain.
| Step 1 | Choose . |
| Step 2 | Check the check box next to the configured Active Directory. |
| Step 3 | Check and ensure that the Local Node status is listed as Not Joined. |
| Step 4 | Click
Delete.
You have removed the configuration from the Active Directory database. If you want to use Active Directory at a later point in time, you can resubmit a valid Active Directory configuration. |
View Active Directory Joins for a Node
You can use the Node View button on the Active Directory page to view the status of all Active Directory join points for a given Cisco ISE node or a list of all join points on all Cisco ISE nodes.
| Step 1 | Choose . |
| Step 2 | Click Node View. |
| Step 3 | Select a node from the ISE Node drop-down list. The table lists the status of Active Directory by node. If there are multiple join points and multiple Cisco ISE nodes in a deployment, this table may take several minutes to update. |
| Step 4 | Click the join point Name link to go to that Active Directory join point page and perform other specific actions. |
| Step 5 | Click the Diagnostic Summary link to go to the Diagnostic Tools page to troubleshoot specific issues. The diagnostic tool displays the latest diagnostics results for each join point per node. |
Diagnose Active Directory Problems
The Diagnostic Tool is a service that runs on every Cisco ISE node. It allows you to automatically test and diagnose the Active Directory deployment and execute a set of tests to detect issues that may cause functionality or performance failures when Cisco ISE uses Active Directory.
There are multiple reasons for which Cisco ISE might be unable to join or authenticate against Active Directory. This tool helps ensure that the prerequisites for connecting Cisco ISE to Active Directory are configured correctly. It helps detect problems with networking, firewall configurations, clock sync, user authentication, and so on. This tool works as a step-by-step guide and helps you fix problems with every layer in the middle, if needed .
| Step 1 | Choose . |
| Step 2 | Click the Advanced Tools drop-down and choose Diagnostic Tools. |
| Step 3 | Select a Cisco
ISE node to run the diagnosis on.
If you do not select a Cisco ISE node then the test is run on all the nodes. |
| Step 4 | Select a
specific Active Directory join point.
If you do not select an Active Directory join point then the test is run on all the join points. |
| Step 5 | Click Run All Tests on Node to start the test. |
| Step 6 | Click View Test Details to view the details for tests with Warning or Failed status. This table allows you to rerun specific tests, stop running tests, and view a report of specific tests. |
Enable Active Directory Debug Logs
Active Directory debug logs are not logged by default. You must enable this option on the Cisco ISE node that has assumed the Policy Service persona in your deployment. Enabling Active Directory debug logs may affect ISE performance.
| Step 1 | Choose . |
| Step 2 | Click the radio button next to the Cisco ISE Policy Service node from which you want to obtain Active Directory debug information, and click Edit. |
| Step 3 | Click the Active Directory radio button, and click Edit. |
| Step 4 | Choose DEBUG from the drop-down list next to Active Directory. This will include errors, warnings, and verbose logs. To get full logs, choose TRACE. |
| Step 5 | Click Save. |
Obtain the Active Directory Log File for Troubleshooting
Download and view the Active Directory debug logs to troubleshoot issues you may have.
Active Directory debug logging must be enabled.
Active Directory Alarms and Reports
Alarms
Cisco ISE provides various alarms and reports to monitor and troubleshoot Active Directory related activities.
Reports
-
RADIUS Authentications Report—This report shows detailed steps of the Active Directory authentication and authorization. You can find this report here: .
-
AD Connector Operations Report—The AD Connector Operations report provides a log of background operations performed by AD connector, such as Cisco ISE server password refresh, Kerberos ticket management, DNS queries, DC discovery, LDAP, and RPC connections management. If you encounter any Active Directory failures, you can review the details in this report to identify the possible causes. You can find this report here: .
Active Directory Advanced Tuning
The advanced tuning feature provides node-specific settings used for support action under the supervision of Cisco support personnel, to adjust the parameters deeper in the system. These settings are not intended for normal administration flow, and should be used only under guidance.
Supplemental Information for Setting Up Cisco ISE with Active Directory
For configuirng Cisco ISE with Active Directory, you must configure group policies, and configure a supplicant for machine authentication.
- Configure Group Policies in Active Directory
- Configure Odyssey 5.X Supplicant for EAP-TLS Machine Authentications Against Active Directory
- AnyConnect Agent for Machine Authentication
Configure Group Policies in Active Directory
For more information about how to access the Group Policy management editor, refer to the Microsoft Active Directory documentation.
| Step 1 | Open the Group Policy
management editor as shown in the following illustration.
 |
| Step 2 | Create a new policy and enter
a descriptive name for it or add to an existing domain policy.
Example:In example below, we used Wired Autoconfiguration for the policy name. |
| Step 3 | Check the Define this policy setting check box, and click the
Automatic radio
button for the service startup mode as shown in the following illustration.
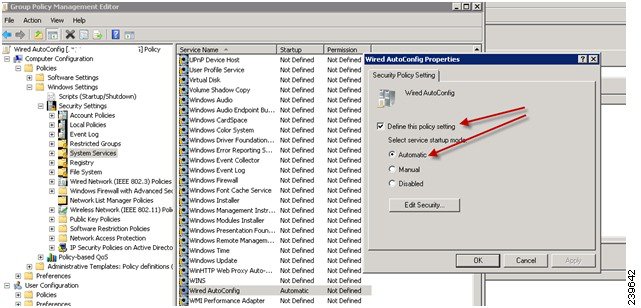 |
| Step 4 | Apply the policy at the
desired organizational unit or domain Active Directory level.
The computers will receive the policy when they reboot and this service will be turned on. |
Configure Odyssey 5.X Supplicant for EAP-TLS Machine Authentications Against Active Directory
If you are using the Odyssey 5.x supplicant for EAP-TLS machine authentications against Active Directory, you must configure the following in the supplicant.
AnyConnect Agent for Machine Authentication
When you configure AnyConnect Agent for machine authentication, you can do one of the following:
ISE pxGrid Identity Mapping
Identity Mapping enables you to monitor users that are authenticated by a Domain Controller (DC) and not by Cisco ISE. In networks where Cisco ISE does not actively authenticate users for network access, it is possible to use Identity Mapping to collect user authentication information from the active directory (AD) Domain Controller. The Identity Mapping connects to Windows system using the MS WMI interface and queries logs from the Windows event messaging. Once a user logs into the network and is authenticated with an Active Directory, the Domain Controller generates an event log that includes the user name and IP address allocated for the user.
Identity mapping can also be activated even if Cisco ISE plays an active role for authentication. In such cases, the same session may be identified twice. The operational data has a session attribute that indicates the source. You can go to Operations > Authentications and click Show Live Sessions to check the Session Source.
The Identity Mapping component retrieves the user logins from the Domain Controller and imports them into the Cisco ISE session directory. So users authenticated with Active Directory (AD) are shown in the Cisco ISE live sessions view, and can be queried from the session directory using Cisco pxGrid interface by third-party applications. The known information is the user name, IP address, and the AD DC host name and the AD DC NetBios name.
The Cisco ISE plays only a passive role and does not perform the authentication. When Identity Mapping is active, Cisco ISE collects the login information from the AD and includes the data into the session directory.
Key Features
- Identity Mapping is
configured from the Cisco ISE administration console. The configuration
includes the following settings:
- Definition of all the DCs from which Identity Mapping is to collect user authentication information. This also includes import and export of the DC list using *.csv files
- DC connection characteristics such as authentication security protocol (NTLMv1 or NTLMv2) and user session aging time
- Connection testing, to verify the DC is set correctly to initialize valid connection with Identity Mapping
- Identity Mapping report. This report provides information about the Identity Mapping component for troubleshooting
- Identity Mapping debug logs
- Cisco ISE session directory maintains the collected user information, so that customers can view it from the Live Sessions and query it from the pxGrid interface
- Using the CLI command show application status provides the health status of nodes that use Identity Mapping
- Supports High Availability
Configuring Identity Mapping
ID Mapping requires configuration in ISE, and the Active Directory Domain Server must have the right patches and configuration. For information about configuring the Active Directory domain controller for ISE, see Active Directory Requirements to Support Identity Mapping
- Configure Identity Mapping
- Filter Identity Mapping
- Active Directory Requirements to Support Identity Mapping
Configure Identity Mapping
ISE must be able to establish a connection with an AD Domain Controller (DC).
Enable pxGrid services to configure Identity Mapping. Choose to enable pxGrid services.
To add a new Domain Controller (DC) for Identity Mapping, you need the login credentials of that DC.
Make sure the Domain Controller is properly configured for ISE Identity Mapping, as described in Active Directory Requirements to Support Identity Mapping.
| Step 1 | Choose . | ||
| Step 2 | Click General Settings. | ||
| Step 3 | The Active
Directory General Settings pop-up is displayed. Set the required values and
click
Save.
| ||
| Step 4 | Click Add. | ||
| Step 5 | In the General Settings section, enter the Display Name, Domain FQDN, and Host FQDN of the DC. | ||
| Step 6 | In the Credentials section, enter the Username and Password of the DC. | ||
| Step 7 | (Optional)Test the connection to the specified domain by clicking Verify DC Connection Settings. This test ensures that the connection to the DC is healthy. However it does not check whether Cisco ISE can fetch the user information upon login. | ||
| Step 8 | Click
Submit. An
updated table is displayed with the newly-defined DC included in the list of
DCs. The status column indicates the different states of DC.
You can also Import or Export the DC list.
|
Filter Identity Mapping
Active Directory Requirements to Support Identity Mapping
Identity Mapping uses Active Directory login audit events generated by the Active Directory domain controller to gather user login information. The Active Directory server must be configured properly so the ISE user can connect and fetch the user logins information. The following sections show how configure the Active Directory domain controller to support ISE Identity Mapping .
- Configure Active Directory for Identity Mapping
- Set the Windows Audit Policy
- Set Permissions When AD User in the Domain Admin Group
- Required Permissions When AD User Not in Domain Admin Group
- Permissions to Use DCOM on the Domain Controller
- Set Permissions for Access to WMI Root/CIMv2 Name Space
- Grant Access to the Security Event Log on the AD Domain Controller
Configure Active Directory for Identity Mapping
ISE Identity Mapping uses Active Directory login audit events generated by the Active Directory domain controller to gather user login information. ISE connects to Active Directory and fetches the user login information.
The following steps should be performed from the Active Directory domain controller:
| Step 1 | Make sure
relevant Microsoft patches are installed on the Active Directory domain
controllers.
| |||||||||||||||||||||
| Step 2 | Make sure the
Active Directory logs the user login events in the Windows Security Log.
Verify that the settings of the “Audit Policy” (part of the “Group Policy Management” settings) allows successful logons to generate the necessary events in the Windows Security Log (this is the default Windows setting, but you must explicitly ensure that this setting is correct). See Setting the Windows Audit Policy. | |||||||||||||||||||||
| Step 3 | You must have an Active Directory user with sufficient permissions for ISE to connect to the Active Directory. The following instructions show how to define permissions either for admin domain group user or none admin domain group user: | |||||||||||||||||||||
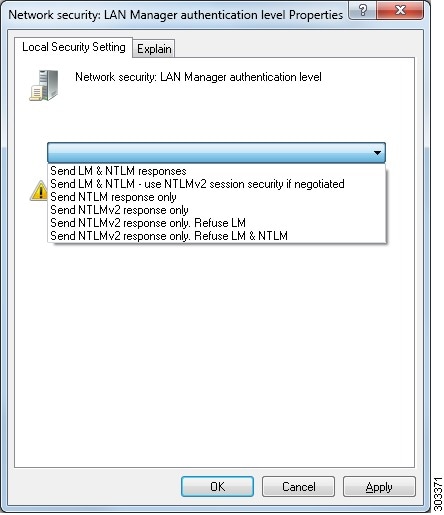
| Step 4 | The Active
Directory user used by ISE can be authenticated either by NT Lan Manager (NTLM)
v1 or v2. You need to verify that the Active Directory NTLM settings are
aligned with ISE NTLM settings to ensure successful authenticated connection
between ISE and the Active Directory Domain Controller. The following table
shows all Microsoft NTLM options, and which ISE NTLM actions are supported. If
ISE is set to NTLMv2, all six options described in are supported. If ISE is set
to support NTLMv1, only the first five options are supported.
 | |||||||||||||||||||||
| Step 5 | Make sure that you have created a firewall rule to allow traffic to dllhost.exe on Active Directory domain controllers.
You can either turn the firewall off, or allow access on a specific IP (ISE IP address) to the following ports:
Higher ports are assigned dynamically or you can configure them manually. We recommend that you add %SystemRoot%\System32\dllhost.exe as a target. This program manages ports dynamically. All firewall rules can be assigned to specific IP (ISE IP). |
Set the Windows Audit Policy
Ensure that the Audit Policy (part of the Group Policy Management settings) allows successful logons. This is required to generate the necessary events in the Windows Security Log of the AD domain controller machine. This is the default Windows setting, but you must verify that this setting is correct.
| Step 1 | Choose . |
| Step 2 | Navigate under Domains to the relevant domain and expand the navigation tree. |
| Step 3 | Choose
Default
Domain Controller Policy, right click and choose
Edit.
The Group Policy Management Editor appears. |
| Step 4 | Choose
.
|
| Step 5 | If any Audit Policy item settings have been changed, you should then run gpupdate /force to force the new settings to take effect. |
Set Permissions When AD User in the Domain Admin Group
For Windows 2008 R2,Windows 2012, and Windows 2012 R2, the Domain Admin group does not have full control on certain registry keys in the Windows operating system by default. The Active Directory admin must give the Active Directory user Full Control permissions on the following registry keys:
-
HKEY_CLASSES_ROOT\CLSID\{76A64158-CB41-11D1-8B02-00600806D9B6}
-
HKLM\Software\Classes\Wow6432Node\CLSID\{76A64158-CB41-11D1-8B02-00600806D9B6}
No registry changes are required for the following Active Directory versions:
To grant full control, the Active Directory admin must first take ownership of the key, as shown below.
Required Permissions When AD User Not in Domain Admin Group
For Windows 2012 R2, give the Active Directory user Full Control permissions on the following registry keys:
-
HKEY_CLASSES_ROOT\CLSID\{76A64158-CB41-11D1-8B02-00600806D9B6}
-
HKLM\Software\Classes\Wow6432Node\CLSID\{76A64158-CB41-11D1-8B02-00600806D9B6}
The following permissions also are required when an Active Directory user is not in the Domain Admin group, but is in the Domain Users group:
-
Add Registry Keys to Allow ISE to Connect to the Domain Controller (see below)
- Permissions to Use DCOM on the Domain Controller
- Set Permissions for Access to WMI Root/CIMv2 Name Space
- Grant Access to the Security Event Log on the AD Domain Controller
These permissions are only required for the following Active Directory versions:
Add Registry Keys to Allow ISE to Connect to the Domain Controller
You must manually add some registry keys to the domain controller to allow ISE to connect as a Domain User, and retrieve login authentication events. An agent is not required on the domain controllers or on any machine in the domain.
The following registry script shows the keys to add. You can copy and paste this into a text file, save the file with a .reg extension, and double click the file to make the registry changes. To add registry keys, the user must be an owner of the root key.
Windows Registry Editor Version 5.00

[HKEY_CLASSES_ROOT\CLSID\{76A64158-CB41-11D1-8B02-00600806D9B6}]
"AppID"="{76A64158-CB41-11D1-8B02-00600806D9B6}"

[HKEY_CLASSES_ROOT\AppID\{76A64158-CB41-11D1-8B02-00600806D9B6}]
"DllSurrogate"="  "

[HKEY_CLASSES_ROOT\Wow6432Node\AppID\{76A64158-CB41-11D1-8B02-00600806D9B6}]
"DllSurrogate"="  "
Make sure that you include two spaces in the value of the key DllSurrogate.
Keep the empty lines as shown in the script above, including an empty line at the end of the file.
Permissions to Use DCOM on the Domain Controller
The Active Directory user used for ISE ID Mapping must have permissions to use DCOM (remote COM) on the Domain Controller. You can configure permissions with the dcomcnfg command line tool.
| Step 1 | Run the dcomcnfg tool from the command line. |
| Step 2 | Expand Component Services. |
| Step 3 | Expand . |
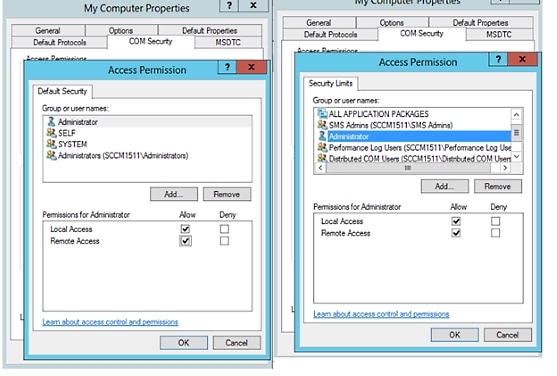
| Step 4 | Select Action from the menu bar, click properties, and click COM Security. |
| Step 5 | Make sure that the account that ISE will use for both Access and Launch has Allow permissions. That Active Directory user should be added to all the four options (Edit Limits and Edit Default for both Access Permissions and Launch and Activation Permissions). |
| Step 6 | Allow all Local
and Remote access for both Access Permissions and Launch and Activation
Permissions.
 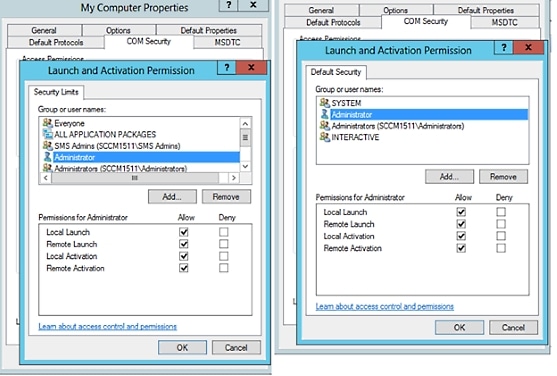 |
Set Permissions for Access to WMI Root/CIMv2 Name Space
By default, Active Directory users do not have permissions for the Execute Methods and Remote Enable. You can grant access using the wmimgmt.msc MMC console.
| Step 1 | Click Start > Run and type wmimgmt.msc. |
| Step 2 | Right-click WMI Control and click Properties. |
| Step 3 | Under the Security tab, expand Root and choose CIMV2. |
| Step 4 | Click Security. |
| Step 5 | Add the Active
Directory user, and configure the required permissions as shown below.
 |
Grant Access to the Security Event Log on the AD Domain Controller
On Windows 2008 and later, you can grant access to the AD Domain controller logs by adding the ISE ID Mapping user to a group called Event Log Readers.
On all older versions of Windows, you must edit a registry key, as shown below.
| Step 1 | To delegate access to the Security event logs, find the SID for the account . |
| Step 2 | Use the
following command from the command line, also shown in the diagram below, to
list all the SID accounts.
wmic useraccount get name,sid You can also use the following command for a specific username and domain: wmic useraccount where name=“cdaUser” get domain,name,sid  |
| Step 3 | Find the SID,
open the Registry Editor, and browse to the following location:
HKEY_LOCAL_MACHINE/SYSTEM/CurrentControlSet/Services/Eventlog |
| Step 4 | Click on
Security, and double click
CustomSD. See Figure 2-7
For example, to allow read access to the cda_agent account (SID - S-1-5-21-1742827456-3351963980-3809373604-1107), enter (A;;0x1;;;S-1-5-21-1742827456-3351963980-3809373604-1107). 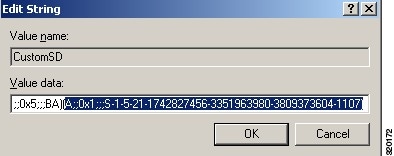 |
| Step 5 | Restart the WMI
service on the Domain Controller. You can restart the WMI services in the
following two ways:
|
LDAP
Lightweight Directory Access Protocol (LDAP) is a networking protocol defined by RFC 2251 for querying and modifying directory services that run on TCP/IP. LDAP is a lightweight mechanism for accessing an X.500-based directory server.
Cisco ISE integrates with an LDAP external database, which is also called an identity source, by using the LDAP protocol.
- LDAP Directory Service
- Multiple LDAP Instances
- LDAP Failover
- LDAP Connection Management
- LDAP User Authentication
- LDAP Group and Attribute Retrieval for Use in Authorization Policies
- Errors Returned by the LDAP Server
- LDAP User Lookup
- LDAP MAC Address Lookup
- Add LDAP Identity Sources
- Enable Secure Authentication with LDAP Identity Source
LDAP Directory Service
LDAP directory service is based on a client-server model. A client starts an LDAP session by connecting to an LDAP server and sending operation requests to the server. The server then sends its responses. One or more LDAP servers contain data from the LDAP directory tree or the LDAP backend database.
The directory service manages a directory, which is a database that holds information. Directory services use a distributed model for storing information, and that information is usually replicated between directory servers.
An LDAP directory is organized in a simple tree hierarchy and can be distributed among many servers. Each server can have a replicated version of the total directory, which is synchronized periodically.
An entry in the tree contains a set of attributes, where each attribute has a name (an attribute type or attribute description) and one or more values. The attributes are defined in a schema.
Each entry has a unique identifier: its distinguished name (DN). This name contains the relative distinguished name (RDN), which is constructed from attributes in the entry, followed by the DN of the parent entry. You can think of the DN as a full filename, and the RDN as a relative filename in a folder.
Multiple LDAP Instances
By creating more than one LDAP instance with different IP addresses or port settings, you can configure Cisco ISE to authenticate using different LDAP servers or different databases on the same LDAP server. Each primary server IP address and port configuration, along with the secondary server IP address and port configuration, forms an LDAP instance that corresponds to one Cisco ISE LDAP identity source instance.
Cisco ISE does not require that each LDAP instance correspond to a unique LDAP database. You can have more than one LDAP instance set to access the same database. This method is useful when your LDAP database contains more than one subtree for users or groups. Because each LDAP instance supports only one subtree directory for users and one subtree directory for groups, you must configure separate LDAP instances for each user directory and group directory subtree combination for which Cisco ISE submits authentication requests.
LDAP Failover
Cisco ISE supports failover between a primary LDAP server and a secondary LDAP server. A failover occurs when an authentication request fails because Cisco ISE could not connect to an LDAP server because it is down or is otherwise unreachable.
If you establish failover settings and the first LDAP server that Cisco ISE attempts to contact cannot be reached, Cisco ISE always attempts to contact a second LDAP server. If you want Cisco ISE to use the first LDAP server again, you must enter a value in the Failback Retry Delay text box.
Note | Cisco ISE always uses the primary LDAP server to obtain groups and attributes for use in authorization policies from the Admin portal, so the primary LDAP server must be accessible when you configure these items. Cisco ISE uses the secondary LDAP server only for authentications and authorizations at run time, according to the failover configuration. |
LDAP Connection Management
Cisco ISE supports multiple concurrent LDAP connections. Connections are opened on demand at the time of the first LDAP authentication. The maximum number of connections is configured for each LDAP server. Opening connections in advance shortens the authentication time. You can set the maximum number of connections to use for concurrent binding connections. The number of open connections can be different for each LDAP server (primary or secondary) and is determined based on the maximum number of administration connections configured for each server.
Cisco ISE retains a list of open LDAP connections (including the binding information) for each LDAP server that is configured in Cisco ISE. During the authentication process, the connection manager attempts to find an open connection from the pool. If an open connection does not exist, a new one is opened.
If the LDAP server closed the connection, the connection manager reports an error during the first call to search the directory, and tries to renew the connection. After the authentication process is complete, the connection manager releases the connection.
LDAP User Authentication
LDAP can be used as an external database for Cisco ISE user authentication. Cisco ISE supports plain password authentication. User authentication includes:
-
Searching the LDAP server for an entry that matches the username in the request
-
Checking the user password with the one that is found in the LDAP server
-
Retrieving a group’s membership information for use in policies
-
Retrieving values for specified attributes for use in policies and authorization profiles
To authenticate a user, Cisco ISE sends a bind request to the LDAP server. The bind request contains the DN and password of the user in clear text. A user is authenticated when the DN and password of the user match the username and password in the LDAP directory.
We recommend that you protect the connection to the LDAP server using Secure Sockets Layer (SSL).
LDAP Group and Attribute Retrieval for Use in Authorization Policies
Cisco ISE can authenticate a subject (user or host) against an LDAP identity source by performing a bind operation on the directory server to find and authenticate the subject. After successful authentication, Cisco ISE can retrieve groups and attributes that belong to the subject whenever they are required. You can configure the attributes to be retrieved in the Cisco ISE Admin portal by choosing . These groups and attributes can be used by Cisco ISE to authorize the subject.
To authenticate a user or query the LDAP identity source, Cisco ISE connects to the LDAP server and maintains a connection pool.
LDAP Group Membership Information Retrieval
For user authentication, user lookup, and MAC address lookup, Cisco ISE must retrieve group membership information from LDAP databases. LDAP servers represent the association between a subject (a user or a host) and a group in one of the following ways:
Groups Refer to Subjects—The group objects contain an attribute that specifies the subject. Identifiers for subjects can be sourced in the group as the following:
Subjects Refer to Groups—The subject objects contain an attribute that specifies the group to which they belong.
LDAP identity sources contain the following parameters for group membership information retrieval:
Reference direction—This parameter specifies the method to use when determining group membership (either groups to subjects or subjects to groups).
Group map attribute—This parameter indicates the attribute that contains group membership information.
Group object class—This parameter determines that certain objects are recognized as groups.
Group search subtree—This parameter indicates the search base for group searches.
Member type option—This parameter specifies how members are stored in the group member attribute (either as DNs or plain usernames).
LDAP Attributes Retrieval
For user authentication, user lookup, and MAC address lookup, Cisco ISE must retrieve the subject attributes from LDAP databases. For each instance of an LDAP identity source, an identity source dictionary is created. These dictionaries support attributes of the following data types:
For unsigned integers and IPv4 attributes, Cisco ISE converts the strings that it has retrieved to the corresponding data types. If conversion fails or if no values are retrieved for the attributes, Cisco ISE logs a debug message, but the authentication or lookup process does not fail.
You can optionally configure default values for the attributes that Cisco ISE can use when the conversion fails or when Cisco ISE does not retrieve any values for the attributes.
LDAP Certificate Retrieval
If you have configured certificate retrieval as part of user lookup, then Cisco ISE must retrieve the value of the certificate attribute from LDAP. To retrieve the value of the certificate attribute from LDAP, you must have previously configured the certificate attribute in the list of attributes to be accessed while configuring an LDAP identity source.
Errors Returned by the LDAP Server
The following errors can occur during the authentication process:
Authentication Errors—Cisco ISE logs authentication errors in the Cisco ISE log files.
Possible reasons for an LDAP server to return binding (authentication) errors include the following:
User account is restricted (disabled, locked out, expired, password expired, and so on)
Initialization Errors—Use the LDAP server timeout settings to configure the number of seconds that Cisco ISE should wait for a response from an LDAP server before determining that the connection or authentication on that server has failed.
Possible reasons for an LDAP server to return an initialization error are:
The following errors are logged as external resource errors, indicating a possible problem with the LDAP server:
The following error is logged as an Unknown User error:
The following error is logged as an Invalid Password error, where the user exists, but the password sent is invalid:
LDAP User Lookup
Cisco ISE supports the user lookup feature with an LDAP server. This feature allows you to search for a user in the LDAP database and retrieve information without authentication. The user lookup process includes the following actions:
LDAP MAC Address Lookup
Cisco ISE supports the MAC address lookup feature. This feature allows you to search for a MAC address in the LDAP database and retrieve information without authentication. The MAC address lookup process includes the following actions:
Add LDAP Identity Sources
Configure Primary and Secondary LDAP Servers
After you create an LDAP instance, you must configure the connection settings for the primary LDAP server. Configuring a secondary LDAP server is optional.
| Step 1 | Choose . |
| Step 2 | Check the check box next to the LDAP instance that you want to edit and click Edit. |
| Step 3 | Click the Connection tab to configure the primary and secondary servers. |
| Step 4 | Enter the values as described in LDAP Identity Source Settings. |
| Step 5 | Click Submit to save the connection parameters. |
Enable Cisco ISE to Obtain Attributes from the LDAP Server
For Cisco ISE to obtain user and group data from an LDAP server, you must configure LDAP directory details in Cisco ISE. For LDAP identity source, the following three searches are applicable:
Retrieve Group Membership Details from the LDAP Server
You can add new groups or select groups from the LDAP directory.
| Step 1 | Choose . |
| Step 2 | Check the check box next to the LDAP instance that you want to edit and click Edit. |
| Step 3 | Click the Groups tab. |
| Step 4 | Choose to add a new group or choose to select the groups from the LDAP directory. |
| Step 5 | Check the check boxes next to
the groups that you want to select and click
OK.
The groups that you have selected will appear in the Groups page. |
| Step 6 | Click Submit to save the group selection. |
Note | Active Directory built-in groups are not supported when Active Directory is configured as LDAP Identity Store in Cisco ISE. |
Retrieve User Attributes From the LDAP Server
You can obtain user attributes from the LDAP server for use in authorization policies.
| Step 1 | Choose . |
| Step 2 | Check the check box next to the LDAP instance that you want to edit and click Edit. |
| Step 3 | Click the Attributes tab. |
| Step 4 | Choose to add a new attribute or choose to select attributes from the LDAP server. |
| Step 5 | Check the check boxes next to the attributes that you want to select, then click OK. |
| Step 6 | Click Submit to save the attribute selections. |
Enable Secure Authentication with LDAP Identity Source
When you choose the Secure Authentication option in the LDAP configuration page, Cisco ISE uses SSL to secure communication with the LDAP identity source. Secure connection to LDAP identity source is established using:
-
SSL tunnel—Using SSL v3 or TLS v1 (the strongest version supported by the LDAP server)
-
Server authentication (authentication of LDAP server)—Certificate based
-
Client authentication (authentication of Cisco ISE)—None (Administrator bind is used inside the SSL tunnel)
-
Cipher suites—All cipher suites supported by Cisco ISE
We recommend that you use TLS v1 with the strongest encryption and ciphers that Cisco ISE supports.
To enable Cisco ISE to communicate securely with the LDAP identity source:
| Step 1 | Import the full
Certificate Authority (CA) chain of the CA that issued the server certificate
to the LDAP server in to Cisco ISE ().
The full CA chain refers to the root CA and intermediate CA certificates; not the LDAP server certificate. |
| Step 2 | Configure Cisco ISE to use secure authentication when communicating with the LDAP identity source (; be sure to check the Secure Authentication check box in the Connection Settings tab). |
| Step 3 | Select the root CA certificate in the LDAP identity store. |
RADIUS Token Identity Sources
A server that supports the RADIUS protocol and provides authentication, authorization, and accounting (AAA) services to users and devices is called a RADIUS server. A RADIUS identity source is simply an external identity source that contains a collection of subjects and their credentials and uses the RADIUS protocol for communication. For example, the Safeword token server is an identity source that can contain several users and their credentials as one-time passwords that provides an interface that you can query using the RADIUS protocol.
Cisco ISE supports any RADIUS RFC 2865-compliant server as an external identity source. Cisco ISE supports multiple RADIUS token server identities, for example the RSA SecurID server and the SafeWord server. RADIUS identity sources can work with any RADIUS token server that is used to authenticate a user. RADIUS identity sources use the User Datagram Protocol (UDP) port for authentication sessions. The same UDP port is used for all RADIUS communication.
- RADIUS Token Server Supported Authentication Protocols
- Ports Used By the RADIUS Token Servers for Communication
- RADIUS Shared Secret
- Failover in RADIUS Token Servers
- Configurable Password Prompt in RADIUS Token Servers
- RADIUS Token Server User Authentication
- User Attribute Cache in RADIUS Token Servers
- RADIUS Identity Source in Identity Sequence
- RADIUS Server Returns the Same Message for All Errors
- Safeword Server Supports Special Username Format
- Authentication Request and Response in RADIUS Token Servers
- Add a RADIUS Token Server
- Delete a RADIUS Token Server
RADIUS Token Server Supported Authentication Protocols
Cisco ISE supports the following authentication protocols for RADIUS identity sources:
Ports Used By the RADIUS Token Servers for Communication
RADIUS token servers use the UDP port for authentication sessions. This port is used for all RADIUS communication. For Cisco ISE to send RADIUS one-time password (OTP) messages to a RADIUS-enabled token server, you must ensure that the gateway devices between Cisco ISE and the RADIUS-enabled token server allow communication over the UDP port. You can configure the UDP port through the Admin portal.
RADIUS Shared Secret
You must provide a shared secret while configuring RADIUS identity sources in Cisco ISE. This shared secret should be the same as the shared secret that is configured on the RADIUS token server.
Failover in RADIUS Token Servers
Cisco ISE allows you to configure multiple RADIUS identity sources. Each RADIUS identity source can have primary and secondary RADIUS servers. When Cisco ISE is unable to connect to the primary server, it uses the secondary server.
Configurable Password Prompt in RADIUS Token Servers
RADIUS identity sources allow you to configure the password prompt. You can configure the password prompt through the Admin portal.
RADIUS Token Server User Authentication
Cisco ISE obtains the user credentials (username and passcode) and passes them to the RADIUS token server. Cisco ISE also relays the results of the RADIUS token server authentication processing to the user.
User Attribute Cache in RADIUS Token Servers
RADIUS token servers, by default, do not support user lookups. However, the user lookup functionality is essential for the following Cisco ISE features:
PEAP session resume—This feature allows the PEAP session to resume after successful authentication during EAP session establishment.
EAP/FAST fast reconnect—This feature allows fast reconnection after successful authentication during EAP session establishment.
Cisco ISE caches the results of successful authentications to process user lookup requests for these features. For every successful authentication, the name of the authenticated user and the retrieved attributes are cached. Failed authentications are not written to the cache.
The cache is available in the memory at runtime and is not replicated between Cisco ISE nodes in a distributed deployment. You can configure the Time to Live (TTL) limit for the cache through the Admin portal. You must enable the identity caching option and set the aging time in minutes. The cache is available in the memory for the specified amount of time.
RADIUS Identity Source in Identity Sequence
You can add the RADIUS identity source for authentication sequence in an identity source sequence. However, you cannot add the RADIUS identity source for attribute retrieval sequence because you cannot query the RADIUS identity source without authentication. Cisco ISE cannot distinguish among different errors while authenticating with a RADIUS server. RADIUS servers return an Access-Reject message for all errors. For example, when a user is not found in the RADIUS server, instead of returning a User Unknown status, the RADIUS server returns an Access-Reject message.
RADIUS Server Returns the Same Message for All Errors
When a user is not found in the RADIUS server, the RADIUS server returns an Access-Reject message. Cisco ISE provides an option to configure this message through the Admin portal as either an Authentication Failed or a User Not Found message. However, this option returns a User Not Found message not only for cases where the user is not known, but for all failure cases.
The following table lists the different failure cases that are possible with RADIUS identity servers.
Authentication failed and the Fail on Reject option is set to false. |
Safeword Server Supports Special Username Format
The Safeword token server supports authentication with the following username format:
As soon as Cisco ISE receives the authentication request, it parses the username and converts it to the following username:
The SafeWord token servers support both of these formats. Cisco ISE works with various token servers. While configuring a SafeWord server, you must check the SafeWord Server check box in the Admin portal for Cisco ISE to parse the username and convert it to the specified format. This conversion is done in the RADIUS token server identity source before the request is sent to the RADIUS token server.
Authentication Request and Response in RADIUS Token Servers
When Cisco ISE forwards an authentication request to a RADIUS-enabled token server, the RADIUS authentication request contains the following attributes:
Cisco ISE expects to receive any one of the following responses:
Add a RADIUS Token Server
To perform the following task, you must be a Super Admin or System Admin.
| Step 1 | Choose . |
| Step 2 | Enter the values in the General and Connection tabs. |
| Step 3 | Click the
Authentication
tab.
This tab allows you to control the responses to an Access-Reject message from the RADIUS token server. This response could either mean that the credentials are invalid or that the user is not known. Cisco ISE accepts one of the following responses: Failed authentication or User not found. This tab also allows you to enable identity caching and to set the aging time for the cache. You can also configure a prompt to request the password.
|
| Step 4 | Click the
Authorization
tab.
This tab allows you to configure a name that will appear for this single attribute that is returned by the RADIUS token server while sending an Access-Accept response to Cisco ISE. This attribute can be used in authorization policy conditions. Enter a name for this attribute in the Attribute Name ACS field. The default value is CiscoSecure-Group-Id. |
| Step 5 | Click Submit to save the RADIUS Token identity source. |
Delete a RADIUS Token Server
| Step 1 | Choose . |
| Step 2 | Check the check box next to the RADIUS token server or servers that you want to delete, then click Delete. |
| Step 3 | Click
OK to delete the
RADIUS token server or servers that you have selected.
If you select multiple RADIUS token servers for deleting, and one of them is used in an identity source sequence, the delete operation fails and none of the RADIUS token servers are deleted. |
RSA Identity Sources
Cisco ISE supports the RSA SecurID server as an external database. RSA SecurID two-factor authentication consists of the PIN of the user and an individually registered RSA SecurID token that generates single-use token codes based on a time code algorithm. A different token code is generated at fixed intervals (usually each at 30 or 60 seconds). The RSA SecurID server validates this dynamic authentication code. Each RSA SecurID token is unique, and it is not possible to predict the value of a future token based on past tokens. Thus, when a correct token code is supplied together with a PIN, there is a high degree of certainty that the person is a valid user. Therefore, RSA SecurID servers provide a more reliable authentication mechanism than conventional reusable passwords.
Cisco ISE supports the following RSA identity sources:
You can integrate with RSA SecurID authentication technology in any one of the following ways:
-
Using the RSA SecurID agent—Users are authenticated with their username and passcode through the RSA native protocol.
-
Using the RADIUS protocol—Users are authenticated with their username and passcode through the RADIUS protocol.
The RSA SecurID token server in Cisco ISE connects with the RSA SecurID authentication technology by using the RSA SecurID Agent.
Cisco ISE and RSA SecurID Server Integration
These are the two administrative roles involved in connecting Cisco ISE with an RSA SecurID server:
RSA Server Administrator—Configures and maintains RSA systems and integration
Cisco ISE Administrator—Configures Cisco ISE to connect to the RSA SecurID server and maintains the configuration
This section describes the processes that are involved in connecting Cisco ISE with the RSA SecurID server as an external identity source. For more information on RSA servers, please refer to the RSA documentation.
- RSA Configuration in Cisco ISE
- RSA Agent Authentication Against the RSA SecurID Server
- RSA Identity Sources in a Distributed Cisco ISE Environment
- RSA Server Updates in a Cisco ISE Deployment
- Override Automatic RSA Routing
- RSA Node Secret Reset
- RSA Automatic Availability Reset
RSA Configuration in Cisco ISE
The RSA administrative system generates an sdconf.rec file, which the RSA system administrator will provide to you. This file allows you to add Cisco ISE servers as RSA SecurID agents in the realm. You have to browse and add this file to Cisco ISE. By the process of replication, the primary Cisco ISE server distributes this file to all the secondary servers.
RSA Agent Authentication Against the RSA SecurID Server
After the sdconf.rec file is installed on all Cisco ISE servers, the RSA agent module initializes, and authentication with RSA-generated credentials proceeds on each of the Cisco ISE servers. After the agent on each of the Cisco ISE servers in a deployment has successfully authenticated, the RSA server and the agent module together download the securid file. This file resides in the Cisco ISE file system and is in a well-known place defined by the RSA agent.
RSA Identity Sources in a Distributed Cisco ISE Environment
Managing RSA identity sources in a distributed Cisco ISE environment involves the following:
RSA Server Updates in a Cisco ISE Deployment
After you have added the sdconf.rec file in Cisco ISE, the RSA SecurID administrator might update the sdconf.rec file in case of decommissioning an RSA server or adding a new RSA secondary server. The RSA SecurID administrator will provide you with an updated file. You can then reconfigure Cisco ISE with the updated file. The replication process in Cisco ISE distributes the updated file to the secondary Cisco ISE servers in the deployment. Cisco ISE first updates the file in the file system and coordinates with the RSA agent module to phase the restart process appropriately. When the sdconf.rec file is updated, the sdstatus.12 and securid files are reset (deleted).
Override Automatic RSA Routing
You can have more than one RSA server in a realm. The sdopts.rec file performs the role of a load balancer. Cisco ISE servers and RSA SecurID servers operate through the agent module. The agent module that resides on Cisco ISE maintains a cost-based routing table to make the best use of the RSA servers in the realm. You can, however, choose to override this routing with a manual configuration for each Cisco ISE server for the realm using a text file called sdopts.rec through the Admin portal. Refer to the RSA documentation for information on how to create this file.
RSA Node Secret Reset
The securid file is a secret node key file. When RSA is initially set up, it uses a secret to validate the agents. When the RSA agent that resides in Cisco ISE successfully authenticates against the RSA server for the first time, it creates a file on the client machine called securid and uses it to ensure that the data exchanged between the machines is valid. At times, you may have to delete the securid file from a specific Cisco ISE server or a group of servers in your deployment (for example, after a key reset on the RSA server). You can use the Cisco ISE Admin portal to delete this file from a Cisco ISE server for the realm. When the RSA agent in Cisco ISE authenticates successfully the next time, it creates a new securid file.
Note | If authentications fail after upgrading to a latest release of Cisco ISE, reset the RSA secret. |
RSA Automatic Availability Reset
The sdstatus.12 file provides information about the availability of RSA servers in the realm. For example, it provides information on which servers are active and which are down. The agent module works with the RSA servers in the realm to maintain this availability status. This information is serially listed in the sdstatus.12 file, which is sourced in a well-known location in the Cisco ISE file system. Sometimes this file becomes old and the current status is not reflected in this file. You must remove this file so that the current status can be recreated. You can use the Admin portal to delete the file from a specific Cisco ISE server for a specific realm. Cisco ISE coordinates with the RSA agent and ensures correct restart phasing.
The availability file sdstatus.12 is deleted whenever the securid file is reset, or the sdconf.rec or sdopts.rec files are updated.
Add RSA Identity Sources
To create an RSA identity source, you must import the RSA configuration file (sdconf.rec). You must obtain the sdconf.rec file from your RSA administrator. To perform this task, you must be a Super Admin or System Admin.
Adding an RSA identity source involves the following tasks:Import the RSA Configuration File
You must import the RSA configuration file to add an RSA identity source in Cisco ISE.
| Step 1 | Choose . |
| Step 2 | Click
Browse to choose
the new or updated sdconf.rec file from the system that is running your client
browser.
When you create the RSA identity source for the first time, the Import new sdconf.rec file field will be a mandatory field. From then on, you can replace the existing sdconf.rec file with an updated one, but replacing the existing file is optional. |
| Step 3 | Enter the server timeout value in seconds. Cisco ISE will wait for a response from the RSA server for the amount of time specified before it times out. This value can be any integer from 1 to 199. The default value is 30 seconds. |
| Step 4 | Check the Reauthenticate on Change PIN check box to force a reauthentication when the PIN is changed. |
| Step 5 | Click Save. Cisco ISE also supports the following scenarios: |
Configure the Options File for a Cisco ISE Server and Resetting SecurID and sdstatus.12 Files
| Step 1 | Log into the Cisco ISE server. |
| Step 2 | Choose . |
| Step 3 | Click the
RSA Instance
Files tab.
This page lists the sdopts.rec files for all the Cisco ISE servers in your deployment. |
| Step 4 | Click the radio button next to the sdopts.rec file for a particular Cisco ISE server, and click Update Options File. |
| Step 5 | Choose one of the following:
|
| Step 6 | Click OK. |
| Step 7 | Click the row that
corresponds to the Cisco ISE server to reset the securid and sdstatus.12 files
for that server:
|
| Step 8 | Click Save. |
Configure Authentication Control Options for RSA Identity Source
You can specify how Cisco ISE defines authentication failures and enable identity caching. The RSA identity source does not differentiate between “Authentication failed” and “User not found” errors and sends an Access-Reject response.
You can define how Cisco ISE should handle such failures while processing requests and reporting failures. Identity caching enables Cisco ISE to process requests that fail to authenticate against the Cisco ISE server a second time. The results and the attributes retrieved from the previous authentication are available in the cache.
Configure RSA Prompts
Cisco ISE allows you to configure RSA prompts that are presented to the user while processing requests sent to the RSA SecurID server.
To perform the following task, you must be a Super Admin or System Admin.
Configure RSA Messages
Cisco ISE allows you to configure messages that are presented to the user while processing requests sent to the RSA SecurID server.
To perform the following task, you must be a Super Admin or System Admin.
SAMLv2 Identity Provider as an External Identity Source
Security Assertion Markup Language (SAML) is an XML-based open standard data format that enables administrators to access a defined set of applications seamlessly after signing into one of those applications. SAML describes the exchange of security related information between trusted business partners. SAML enables exchange of security authentication information between an Identity Provider (IdP) and a service provider (in this case, ISE).
SAML Single Sign On (SSO) establishes a Circle of Trust (CoT) by exchanging metadata and certificates as part of the provisioning process between the IdP and the Service Provider. The Service Provider trusts the IdP's user information to provide access to the various services or applications.
-
It reduces password fatigue by removing the need for entering different user name and password combinations.
-
It improves productivity because you spend less time re-entering credentials for the same identity.
-
It transfers the authentication from your system that hosts the applications to a third party system.
-
It protects and secures authentication information. It provides encryption functions to protect authentication information passed between the IdP, service provider, and user. SAML SSO can also hide authentication messages passed between the IdP and the service provider from any external user.
-
It reduces costs as fewer help desk calls are made for password reset, thereby leading to more savings.
The IdP is an authentication module that creates, maintains, and manages identity information for users, systems, or services. The IdP stores and validates the user credentials and generates a SAML response that allows the user to access the service provider protected resources.
Note | You must be familiar with your IdP service, and ensure that it is currently installed and operational. |
You cannot select IdP as external identity source for BYOD portal, but you can select an IdP for a guest portal and enable BYOD flow.
Note | SAML SSO feature is supported only for Oracle Access Manager (OAM) and Oracle Identity Federation (OIF). |
The IdP cannot be added to an identity source sequence (see Identity Source Sequences).
The SSO session will be terminated and Session Timeout error message will be displayed if there is no activity for the specified time (default is 5 minutes).
If you want to add the Sign On Again button in the Error page of the portal, add the following JavaScript in the Optional Content field in the Portal Error page:
<button class="cisco-ise" data-inline="true" data-mini="true" data-theme="b" id="ui_aup_accept_button" onclick="location.href='PortalSetup.action?portal=<Portal ID>'" type="button">SignOn Again</button>
Add a SAML Identity Provider
To perform the following task, you must be a Super Admin or System Admin.
| Step 1 | Import the Certificate Authority (CA) certificate in to the Trusted Certificate Store, if the certificate is not self-signed by the IdP. Choose Administration > System > Certificates > Trusted Certificates > Import to import the CA certificate. | ||||||||
| Step 2 | Choose Administration > Identity Management > External Identity Sources . | ||||||||
| Step 3 | Click SAML Id Providers. | ||||||||
| Step 4 | Click Add. | ||||||||
| Step 5 | In the
SAML Identity
Provider page, enter the following details:
| ||||||||
| Step 6 | Click Submit. | ||||||||
| Step 7 | Go to the Portal
Settings page (Guest, Sponsor,
or My Devices portal) and select
the IdP that you want to link to that portal in the
Authentication
Method field.
| ||||||||
| Step 8 | Click Save. | ||||||||
| Step 9 | Choose Administration > Identity Management > External Identity Sources > SAML Id Providers . Select the IdP that is linked to that portal and click Edit. | ||||||||
| Step 10 | In the
Service Provider
Info tab, click
Export to
export the service provider metadata file.
| ||||||||
| Step 11 | Click Browse in the dialog box and save the compressed files locally. Unzip the metadata file folder. When you unzip the folder, you will get a metadata file with the name of the portal. The metadata file includes the Provider ID and Binding URI. | ||||||||
| Step 12 | Login as Admin
user in IdP and import the service provider metadata file. Refer to the
Identity Provider user documentation for information on how to import the
service provider metadata file.
| ||||||||
| Step 13 | Click Portal Test URL in the ISE portal to confirm whether the IdP is configured properly. |
Delete an Identity Provider
To perform the following task, you must be a Super Admin or System Admin.
Ensure that the IdP that you want to delete is not linked to any portal. If the IdP is linked to any portal, the delete operation fails.
Authentication Failure Log
When authentication against SAML ID Store fails and the IdP redirects the user back to ISE portal (through SAML response), ISE will report a failure reason in the authentication log.
Authentication can fail due to the following reasons:
-
SAML Response parse errors
-
SAML Response validation errors (for example, Wrong Issuer)
-
SAML Assertion validation errors (for example, Wrong Audience)
-
SAML Response signature validation errors (for example, Wrong Signature)
-
IdP signing certificate errors (for example, Certificate Revoked)
If the authentication fails, we recommend that you check the "DetailedInfo" attribute in the authentication log. This attribute provides additional information regarding the cause of failure.
Identity Source Sequences
Identity source sequences define the order in which Cisco ISE looks for user credentials in the different databases. Cisco ISE supports the following identity sources:
If you have user information in more than one of the databases that are connected to Cisco ISE, you can define the order in which you want Cisco ISE to look for information in these identity sources. Once a match is found, Cisco ISE does not look any further, but evaluates the credentials, and returns the result to the user. This policy is the first match policy.
Create Identity Source Sequences
Ensure that you have configured your external identity sources in Cisco ISE.
To perform the following task, you must be a Super Admin or System Admin.
For allowing guest users to authenticate through Local WebAuth, you must configure both the Guest Portal authentication source and the identity source sequence to contain the same identity stores.
| Step 1 | Choose . |
| Step 2 | Enter a name for the identity source sequence. You can also enter an optional description. |
| Step 3 | Check the Select Certificate Authentication Profile check box and choose a certificate authentication profile for certificate-based authentication. |
| Step 4 | Choose the database or databases that you want to include in the identity source sequence in the Selected List box. |
| Step 5 | Rearrange the databases in the Selected list in the order in which you want Cisco ISE to search the databases. |
| Step 6 | Choose one of the following
options in the
Advanced
Search List area:
|
| Step 7 | Click Submit to create the identity source sequence that you can then use in policies. |
Delete Identity Source Sequences
You can delete identity source sequences that you no longer use in policies.
Identity Source Details in Reports
Cisco ISE provides information about the identity sources through the Authentications dashlet and Identity Source reports.
Authentications Dashlet
From the Authentications dashlet, you can drill down to find more information including failure reasons.
Choose Operations > Authentications to view real-time authentication summary. For more information, see Recent RADIUS Authentications.
Identity Source Reports
Cisco ISE provides various reports that include information about identity sources. See the Available Reports section for a description of these reports.
 Feedback