Dynamic Access Policies

Dynamic access policies (DAP) enable you to configure authorization that addresses the dynamics of VPN environments. You create a dynamic access policy by setting a collection of access control attributes that you associate with a specific user tunnel or session. These attributes address issues of multiple group membership and endpoint security.

About Secure Firewall Threat Defense Dynamic Access Policy

VPN gateways operate in dynamic environments. Multiple variables can affect each VPN connection. For example, intranet configurations that frequently change, the various roles each user inhabits within an organization, and log in attempts from remote access sites with different configurations and levels of security. The task of authorizing users is much more complicated in a VPN environment than it is in a network with a static configuration.

You can create a dynamic access policy by setting a collection of access control attributes that you associate with a specific user tunnel or session. These attributes address issues of multiple group memberships and endpoint security. The Firewall Threat Defense grants access to a particular user for a particular session according to the policies you define. The Firewall Threat Defense device generates a DAP during user authentication by selecting or aggregating attributes from one or more DAP records. The device then selects these DAP records based on the endpoint security information of the remote device and AAA authorization information for the authenticated user. Then the device applies the DAP record to the user tunnel or session.

Hierarchy of Policy Enforcement of Permissions and Attributes in Firewall Threat Defense

The Firewall Threat Defense device supports applying user authorization attributes, also called user entitlements or permissions, to VPN connections. The attributes are applied from a DAP on the Firewall Threat Defense, external authentication server and/or authorization AAA server (RADIUS) or from a group policy on the Firewall Threat Defense device.

If the Firewall Threat Defense device receives attributes from all sources, the device evaluates, merges, and applies the attributes to the user policy. If there are conflicts between attributes coming from the DAP, the AAA server, or the group policy, the attributes from the DAP always take precedence.

The Firewall Threat Defense device applies attributes in the following order:

Figure 1. Policy Enforcement Flow
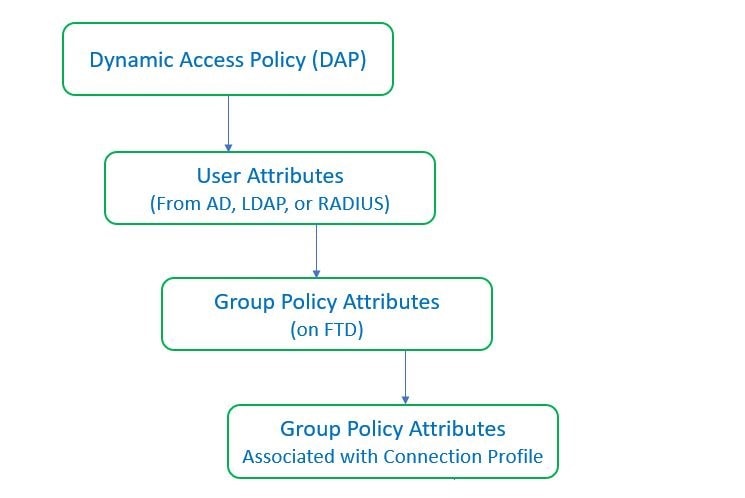
  1. DAP attributes on the FTD—The DAP attributes take precedence over all others.

  2. User attributes on the external AAA server—The server returns these attributes after successful user authentication and/or authorization.

  3. Group policy configured on the FTD —If a RADIUS server returns the value of the RADIUS Class attribute IETF-Class-25 (OU= group-policy) for the user, the Firewall Threat Defense device places the user in the group policy of the same name and enforces any attributes in the group policy that are not returned by the server.

  4. Group policy assigned by the Connection Profile (also known as Tunnel Group)—The Connection Profile has the preliminary settings for the connection, and includes a default group policy that is applied to the user before authentication.


Note


The Firewall Threat Defense device does not support inheriting system default attributes from the default group policy, DfltGrpPolicy. For the user session, the device uses the attributes on the group policy that you assign to the connection profile, unless the user attributes or the group policy from the AAA server overrides them.

Prerequisites for Dynamic Access Policy

Licensing:

  • Firewall Threat Defense must have at least one of the following Secure Client licenses:

    • Secure Client Premier

    • Secure Client Advantage

    • Secure Client VPN Only

  • The Firewall Threat Defense Essentials license must allow export-controlled functionality.

Guidelines and Limitations for Dynamic Access Policies

  • Matching of AAA attributes in a DAP will work only if a AAA server is configured to return the correct attributes when authenticating or authorizing a remote access VPN session.

  • Minimum Secure Client and Secure Firewall Posture package version supported for DAP is 4.6. But it is highly recommended to use the latest version of Secure Client.

  • DAP does not support clustering or multi-instance mode.

  • DAP condition with an assigned IPv4 or IPv6 address does not work for local authentication.

Configure a Dynamic Access Policy (DAP)

Create a Dynamic Access Policy

Before you begin

Ensure that you have the Secure Firewall Posture package before you configure the dynamic access policy. You can add the Secure Firewall Posture file at Objects > Object Management > VPN > Secure Client File.

Procedure


Step 1

Choose Devices > VPN > Dynamic Access Policy, and click Create Dynamic Access Policy.

Step 2

Specify the Name for the DAP policy and an optional Description.

Step 3

Choose the HostScan Package from the drop-down list.

Step 4

Click Save.


What to do next

To configure DAP record, see Create Dynamic Access Policy Record

Create a Dynamic Access Policy Record

A dynamic access policy (DAP) can contain multiple DAP records, where you configure user and endpoint attributes. You can prioritize the DAP records within a DAP so that the Firewall Threat Defense can select and sequence the required criteria when a user attempts VPN connection.

Procedure


Step 1

Choose Devices > Dynamic Access Policy.

Step 2

Edit an existing dynamic access policy or click Create Dynamic Access Policy to create a new one and then edit the policy.

Step 3

Click Create DAP Record.

Step 4

Click the General tab.

Step 5

Specify the Name for the DAP record.

Step 6

Enter the Priority for the DAP record.

The lower the number, the higher the priority.

Step 7

Select one of the following actions to take when a DAP record matches:

  • Continue—Applies access policy attributes to the session. If any, the next DAP record (next policy line with less priority) is then evaluated.

  • Terminate—Terminates the session.

  • Quarantine—Quarantines the connection.

Step 8

Check the Display User Message on Criterion Match check-box and add the user message.

The Firewall Threat Defense displays this message to the user when the DAP record matches.

Step 9

Check the Apply a Network ACL on Traffic check box and select the access control list from the drop-down.

Step 10

Check the Apply one or more Secure Client Custom Attributes check box and select the custom attributes object from the drop-down.

Step 11

Click Save.


Configure Posture Assessment Criteria

For a DAP policy, you can configure file, process, or registry endpoint attributes with unique endpoint IDs. These IDs can be used as endpoint criteria in Lua scripts to configure a DAP record.

Procedure


Step 1

Choose Devices > VPN > Dynamic Access Policy.

Step 2

Click Create Dynamic Access Policy to create a new DAP policy. and then edit the policy.

Step 3

Click the edit icon adjacent to the DAP policy.

Step 4

Click Add Posture Assessment Criteria.

Step 5

Do one of the following:

  • Configure a file endpoint attribute:

    1. Click the File radio button.

    2. In the Endpoint ID field, enter a unique ID for the file. It can be a string or a number.

    3. In the File Path field, specify the file path.

  • Configure a registry endpoint attribute:

    1. Click the Registry radio button.

    2. In the Endpoint ID field, enter a unique ID for the registry. It can be a string or a number.

    3. In the Entry Path field, specify the file path.

  • Configure a process endpoint attribute:

    1. Click the Process radio button.

    2. In the Endpoint ID field, enter a unique ID for the process. It can be a string or a number.

    3. In the Process Name field, specify the process name.

Note


You cannot edit an Endpoint ID once it is saved.

Step 6

Click Save.


What to do next

You can use the endpoint IDs to configure advanced posture assessment criteria using Lua scripts. For more information, see Configure Advanced Settings for DAP.

Configure AAA Criteria Settings for DAP

DAP complements AAA services by providing a limited set of authorization attributes that can override the attributes that AAA provides. The Firewall Threat Defense select DAP records based on the AAA authorization information for the user and posture assessment information for the session. The Firewall Threat Defense can choose multiple DAP records depending on this information, which it then aggregates to create DAP authorization attributes.

Procedure


Step 1

Choose Devices > VPN > Dynamic Access Policy.

Step 2

Edit an existing DAP policy or create a new one and then edit the policy.

Step 3

Select a DAP record or create a new one, and edit the DAP record.

Step 4

Click AAA Criteria.

Step 5

Select one of the Match criteria between sections.

  • Any—Matches any of the criteria.

  • All—Matches all the criteria.

  • None—Matches none of the set criteria.

Step 6

Click Add to add the required Cisco VPN Criteria.

Cisco VPN criteria include attributes for group policy, assigned IPv4 address, assigned IPv6 address, connection profile, username, username 2, and SCEP required.

  1. Select an attribute and specify the Value.

  2. Click Add another criteria to add more criteria.

  3. Click Save.

SCEP Required

Step 7

Select LDAP Criteria, RADIUS Criteria, or SAML Criteria and specify the Attribute ID and Value.

Step 8

Click Save.


Configure Endpoint Attribute Selection Criteria in DAP

Endpoint attributes contain information about the endpoint system environment, posture assessment results, and applications. The Firewall Threat Defense dynamically generates a collection of endpoint attributes during session establishment and stores these attributes in a database that is associated with the session. Each DAP record specifies the endpoint selection attributes that must be satisfied for the Firewall Threat Defense to choose it for a session. The Firewall Threat Defense selects only DAP records that satisfy every condition configured.

Procedure


Step 1

Choose Devices > VPN > Dynamic Access Policy, and click Create Dynamic Access Policy.

Step 2

Edit a DAP policy and then DAP record.

Note


Create a DAP policy and DAP record if not done already.

Step 3

Click Endpoint Criteria and configure the following endpoint criteria attributes:

Note


You can create multiple instances of each type of endpoint attribute. There is no limit for the number of endpoint attributes for each DAP record.

Step 4

Click Save.


Add an Anti-Malware Endpoint Attribute to a DAP

Procedure


Step 1

Edit a DAP record and select Endpoint Criteria > Anti-Malware.

Step 2

Select the Match Criteria All or Any.

Step 3

Click Add to add anti-malware attributes.

Step 4

Click Installed to indicate whether the selected endpoint attribute and its accompanying qualifiers are installed or not installed.

Step 5

Choose Enabled or Disabled to activate or deactivate real-time malware scanning.

Step 6

Select the name of the anti-malware Vendor from the list.

Step 7

Select the anti-malware Product Description.

Step 8

Choose the Version of the anti-malware product.

Step 9

Specify the number of days since the Last Update.

You can indicate that an anti-malware update must occur in less than (<) or more than (>) the number of days you specify.

Step 10

Click Save.


Add a Device Endpoint Attribute to a DAP

Procedure


Step 1

Edit a DAP record and choose Endpoint Criteria > Device.

Step 2

Select the Match Criteria All or Any.

Step 3

Click Add and select the = or operator to check the attribute to be equal to or not equal to the value you enter for the following attributes:

  • Host Name—Hostname of the device you are testing for. Use the computer’s host name only, not the fully qualified domain name (FQDN).

  • MAC Address—MAC address of the network interface card you are testing for. The address must be in the format xxxx.xxxx.xxxx where x is a hexadecimal character.

  • BIOS Serial Number—BIOS serial number value of the device you are testing for. The number format is manufacturer-specific.

  • Port Number—Listening port number of the device.

  • Secure Desktop Version—Version of the Host Scan image running on the endpoint.

  • OPSWAT Version—The OPSWAT client version.

  • Privacy Protection—None, Cache cleaner, Secure Desktop.

  • TCP/UDP Port Number—TCP or UDP port in the listening state that you are testing for.

Step 4

Click Save.


Add Secure Client Endpoint Attributes to a DAP

Procedure


Step 1

Edit a DAP record and select Endpoint Criteria > Secure Client.

Step 2

Select the Match Criteria All or Any.

Step 3

Click Add and select the = or operator to check the attribute to be equal to or not equal to the value you enter.

Step 4

Select the Client Version and Platform.

Step 5

Select the Platform Version, and specify the Device Type and Device Unique ID.

Step 6

Add the MAC Addresses the MAC Address Pool.

Note


The MAC Address must be in the format XX-XX-XX-XX-XX-XX, where each X is a hexadecimal character. You can click Add another MAC Address to add more addresses.

Step 7

Click Save.


Add NAC Endpoint Attributes to a DAP

Procedure


Step 1

Edit a DAP record and select Endpoint Criteria > NAC.

Step 2

Select the Match Criteria All or Any.

Step 3

Click Add to add NAC attributes.

Step 4

Set the operator to be equal to = or not equal to the posture token string. Enter the posture token string in the Posture Status box.

Step 5

Click Save.


Add an Application Attribute to a DAP

Procedure


Step 1

Edit a DAP record and select Endpoint Criteria > Application.

Step 2

Select the Match Criteria All or Any.

Step 3

Click Add to add application attributes.

Step 4

Choose equals ( = ) or does not equal () and specify the Client Type to indicate the type of remote access connection.

Step 5

Click Save.


Add a Personal Firewall Endpoint Attribute to a DAP

Procedure


Step 1

Edit a DAP record and select Endpoint Criteria > Personal Firewall.

Step 2

Select the Match Criteria All or Any.

Step 3

Click Add to add personal firewall attributes.

Step 4

Click Installed to indicate whether the personal firewall endpoint attribute and its accompanying qualifiers (fields below the Name/Operation/Value column) are installed or not installed.

Step 5

Choose Enabled or Disabled to activate or deactivate firewall protection.

Step 6

Select the name of the firewall Vendor from the list.

Step 7

Select the firewall Product Description.

Step 8

Select the equals ( = ) or does not equal () operator and choose the Version of the personal firewall product.

Step 9

Click Save.


Add an Operating System Endpoint Attribute to a DAP

Procedure


Step 1

Edit a DAP record and select Endpoint Criteria > Operating System .

Step 2

Select the Match Criteria All or Any.

Step 3

Click Add to add endpoint attributes.

Step 4

Select the equals ( = ) or does not equal () operator and then select the Operating System.

Step 5

Select the equals ( = ) or does not equal () operator and then specify the operating system Version.

Step 6

Click Save.


Add a Process Endpoint Attribute to a DAP

Procedure


Step 1

Edit a DAP record.

Step 2

Click the Endpoint Criteria tab.

Step 3

Click Process.

Step 4

Select the Match Criteria as All or Any.

Step 5

Click + to add the process attributes.

Step 6

Select Exists or Does not exist.

Step 7

Specify the Process Name.

Step 8

From the Endpoint ID drop-down list, choose the ID for the process or click + to configure a posture assessment criteria for the process. For more information, see Configure Posture Assessment Criteria.

Step 9

Click Exists or Does not exist.

Step 10

Click Save.


Add a Registry Endpoint Attribute to a DAP

Scanning for registry endpoint attributes applies to Windows operating systems only.

Before you begin

Before configuring a Registry endpoint attribute, define the registry key for which you want to scan in the Host Scan window for Cisco Secure Desktop.

Procedure


Step 1

Edit a DAP record.

Step 2

Click the Endpoint Criteria tab.

Step 3

Click Registry.

Step 4

Select the Match Criteria as All or Any.

Step 5

Click + to add registry attributes.

Step 6

Select the Entry Path for the registry and specify the path.

Step 7

From the Endpoint ID drop-down list, choose the ID for the registry or click + to configure a posture assessment criteria for the registry. For more information, see Configure Posture Assessment Criteria.

Step 8

Choose the existence of the registry, Exists or Does not exist.

Step 9

Select the registry Type from the list.

Step 10

Select the equals (=) or does not equal () operator and enter the Value of the registry key.

Step 11

Select Case insensitive to disregard the case of the registry entry while scanning.

Step 12

Click Save.


Add a File Endpoint Attribute to a DAP

Procedure


Step 1

Edit a DAP record.

Step 2

Click the Endpoint Criteria tab.

Step 3

Click File.

Step 4

Select the Match Criteria All or Any.

Step 5

Click + to add file attributes.

Step 6

Specify the File Path.

Step 7

From the Endpoint ID drop-down list, choose the ID for the file or click + to configure a posture assessment criteria for the file. For more information, see Configure Posture Assessment Criteria.

Step 8

Choose Exists or Does not exist to indicate the presence of the file.

Step 9

Select less than (<) or greater than (>) and specify the Last Modified days for the file.

Step 10

Select the equal to ( = ) or not equal to operator and enter the Checksum.

Step 11

Click Save.


Add Certificate Authentication Attributes to a DAP

You can index each certificate to allow referencing to any of the received certificates, by the configured rules. Based on these certificate fields, you can configure DAP rules to allow or disallow connection attempts.

Procedure


Step 1

Edit a DAP record and select Endpoint Criteria > Certificate.

Step 2

Select the Match Criteria All or Any.

Step 3

Click Add to add certificate attributes.

Step 4

Select the certificate Cert1 or Cert2.

Step 5

Select the Subject and specify the subject value.

Step 6

Select the Issuer and specify the issuer value.

Step 7

Select the Subject Alternate Name and specify the subject value.

Step 8

Specify the Serial Number.

Step 9

Choose the Certificate Store: None, Machine, or User.

The VPN client sends the certificate store information.

Step 10

Click Save.


Configure Advanced Settings for DAP

You can use the Advanced tab for adding selection criteria other than what is possible in the AAA and endpoint attribute areas. For example, while you can configure the Firewall Threat Defense to use AAA attributes that satisfy any, all, or none of the specified criteria, the endpoint attributes are cumulative, and must satisfy all. To let the security appliance employ one endpoint attribute or another, you must create appropriate logical expressions in Lua and enter them here.

Procedure


Step 1

Choose Devices > VPN > Dynamic Access Policy.

Step 2

Edit a DAP policy and then edit a DAP record.

Note


Create a DAP policy and DAP record if not done already.

Step 3

Click the Advanced tab.

Step 4

Select AND or OR as the match criteria to use in the DAP configuration.

Step 5

Add the Lua script in the Lua script for advanced attribute matching field.

Step 6

To use the endpoint criteria ID in your Lua script:

  1. Place the cursor at the point where you want to insert the endpoint criteria ID.

  2. From the Endpoint Criteria drop-down list, choose the criteria a

  3. Choose the corresponding ID from the adjacent drop-down list.

Example:

In the following example, DAPTESTFILE, LIBAGENT, vpnagent, and DUOAGENT were inserted in the Lua script:

EVAL(endpoint.file["DAPTESTFILE"].exists,"EQ","true") or 
EVAL(endpoint.file["LIBAGENT"].exists,"EQ","true") and 
EVAL(endpoint.process[""vpnagent""].exists,"EQ","true") and 
EVAL(endpoint.registry[""DUOAGENT""].exists,"EQ","true")

Step 7

Click Save.


Associate Dynamic Access Policy with Remote Access VPN

You can associate Dynamic Access Policy (DAP) with remote access VPN policy for the dynamic access policy attributes to match during VPN session authentication and authorization. You can then deploy the remote access VPN on the Firewall Threat Defense.

Procedure


Step 1

Choose Devices > Remote Access.

Step 2

Click Edit next to the remote access VPN policy to which you want to associate dynamic access policy.

Step 3

Click the link in remote access VPN to select the dynamic access policy.

Step 4

Select the policy from the Dynamic Access Policy drop-down or click Create a new Dynamic Access Policy to configure a new dynamic access policy.

Step 5

Click OK.

Step 6

Click Save to save the remote access VPN policy.


When the remote access VPN user tries to connect, the VPN checks the configured dynamic access policy records and attributes. VPN creates a dynamic access policy based on the matching dynamic access policy records and takes appropriate action on the VPN session.

History for Dynamic Access Policy

Feature

Minimum Firewall Management Center

Minimum Firewall Threat Defense

Details

Dynamic Access Policy

7.0

Any

The feature was introduced.