Route Leaking between VPNs

Route leaking is a fundamental mechanism in Cisco Catalyst SD-WAN that facilitates the exchange of routing information between different Virtual Private Networks (VPNs) or Virtual Routing and Forwarding (VRF) instances. This feature enables service sharing, simplifies network migrations, and enhances routing flexibility by allowing routes to be replicated bidirectionally between the global VRF and service VPNs, or directly between service VPNs.

Feature history for route leaking between VPNs

This table describes the developments of this feature, by release.

Table 1. Feature history

Feature Name

Release Information

Description

Route leaking between global VRF and service VPNs

Cisco IOS XE Catalyst SD-WAN Release 17.3.1a

Cisco vManage Release 20.3.1

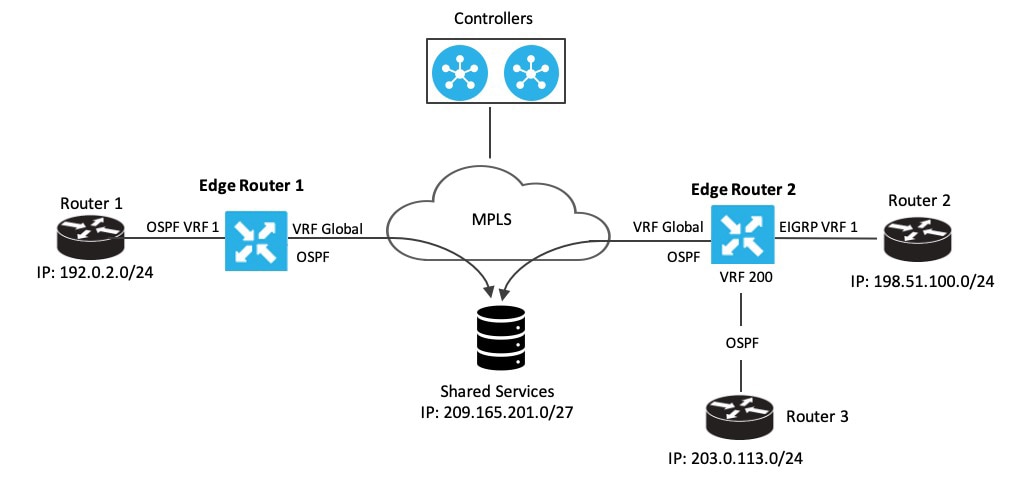
Route leaking enables you to leak routes bidirectionally between the global VRF and service VPNs. The feature allows service sharing and is beneficial in migration use cases because it allows bypassing hubs and provides migrated branches direct access to non-migrated branches.

Redistribution of replicated BGP routes to OSPF, EIGRP protocols

Cisco IOS XE Catalyst SD-WAN Release 17.5.1a

Cisco vManage Release 20.5.1

This feature allows you to leak or replicate BGP routes between the global VRF and service VPNs, then redistribute the leaked BGP routes. The redistribution of the leaked routes to the EIGRP and OSPF protocols occurs after replicating the BGP routes into the corresponding VRF.

Redistribution of replicated routes to BGP, OSPF, and EIGRP Protocols

Cisco IOS XE Catalyst SD-WAN Release 17.6.1a

Cisco vManage Release 20.6.1

This feature allows you to configure:

  • Redistribution of leaked or replicated routes between the global VRF and service VPNs for BGP, OSPF, and EIGRP protocols on Cisco IOS XE Catalyst SD-WANs,

  • OMP administrative distance option to prefer OMP routes over MPLS routes,

  • VRRP tracking to track whether a leaked route is reachable.

Route leaking between inter-service VPNs

Cisco IOS XE Catalyst SD-WAN Release 17.9.1a

Cisco vManage Release 20.9.1

With this feature, you can leak routes between the service VPNs at the same edge device.

Route leaking feature allows redistribution of replicated routes between the inter-service VPN for Connected, Static, BGP, OSPF, and EIGRP on Cisco IOS XE Catalyst SD-WANs.

Supported protocols

To enable users to identify the specific protocols supported for route leaking between global VRF and service VPNs, and for route redistribution between service VPNs and global VRF, including any usage restrictions.

Supported protocols for route leaking

  • Connected

  • Static

  • BGP

  • OSPF

  • EIGRP

Source Protocols

The supported protocols for route redistribution between service VPNs and the global VRF are:

  • Connected

  • Static

  • BGP

  • OSPF

  • EIGRP

Destination Protocols

  • BGP

  • OSPF

  • EIGRP


Note


EIGRP is supported only on service VPNs, not on the global VRF. As a result, you can leak routes for EIGRP only from service VPNs to the global VRF.


Restrictions for route leaking and redistribution

Observe these restrictions when configuring route leaking and redistribution:

EIGRP

  • EIGRP can only be used on service VRFs, not on the global VRF. Therefore, route leaking isn't supported for routes from the global VRF to the service VRFs, and between service VRFs for the EIGRP protocol.

  • Redistribution in EIGRP requires bandwidth, load, reliability, delay, and MTU settings to select the best path.

NAT

  • Service-side NAT is not supported with route leaking between the global VRF and service VRFs.

  • NAT is not supported with transport VRF route leaking.

Unsupported address families and features

  • IPv6 address family is not supported for route leaking.

  • Inter-service VRF route leaking is not supported on Cisco IOS XE Catalyst SD-WAN devices with multi-tenancy.

  • Route leaking using centralized policy is not supported.

  • Route leaking across different devices or sites using export policies in Cisco Catalyst SD-WAN is not supported.

Route filtering and capacity

  • Each service VRF can leak (import and export) a maximum of 1000 routes.

  • Only prefix-lists, tags, and metrics can be matched in route maps that are used to filter leaked routes.

OMP and static routes

  • Overlay Management Protocol (OMP) routes do not participate in VRF route leaking to prevent overlay looping.

  • Static routes that point to a next-hop resolved through a prefix replicated from a service-side VPN into the global routing table (GRT) are not supported. However, you can configure a static route in a service VPN and replicate it into the GRT.

Redistribution configuration

  • Route replicate with all keyword is not recommended.

  • When configuring route leaking for a VRF, the route-replicate command under global-address-family ipv4 should not use the all keyword as the protocol for the unicast option. Instead, specify a particular protocol (e.g., connected ) to prevent route looping.

  • Redistribution of replicated routes into BGP (which were imported into the global routing table from a VRF or into another VRF) is not supported within the same topology. For example, to redistribute a connected route from the BGP global routing table that was originally replicated from VRF 1, use redistribute connected vrf 1 instead of redistribute connected.

Route leaking

Route leaking is a mechanism that enables network segmentation using VPNs and allows sharing of common services that multiple VPNs need to access.

Route Leaking Between Global VRF and Service VPNs

Route leaking between the global or default VRF (transport VPN) and service VPNs allows you to share common services that multiple VPNs need to access. With this feature, routes are replicated through bidirectional route leaking between the global VRF (also known as transport VPN) and service VPNs. Route leaking between VRFs is done using Routing Information Base (RIB).

To leak routes to the routing neighbors, redistribute the leaked routes between the global VRF and service VPNs.


Note


In the context of Cisco Catalyst SD-WAN, the terms VRF and VPN are used interchangeably. Although Cisco IOS XE Catalyst SD-WAN devices use VRFs for segmentation and network isolation, the VPN feature template is used to configure them using Cisco SD-WAN Manager. When you use Cisco SD-WAN Manager to configure VPNs for Cisco IOS XE Catalyst SD-WAN devices, Cisco SD-WAN Manager automatically converts the VPN configuration to VRF configuration.


To leak routes to the routing neighbors, redistribute the leaked routes between the global VRF and service VPNs.

OMP administrative distance for leaked routes

You can configure the Cisco SD-WAN Overlay Management Protocol (OMP) administrative distance to a lower value that sets the OMP routes as the preferred and primary route over any leaked routes in a branch-to-branch routing scenario.

Ensure that you configure the OMP administrative distance on Cisco IOS XE Catalyst SD-WAN devices based on the following points:

  • If you configure the OMP administrative distance at both the global VRF and service VRF level, the VRF-level configuration overrides the global VRF-level configuration.

  • If you configure the service VRF with a lower administrative distance than the global VRF, then except the service VRF, all the remaining VRFs take the value of the administrative distance from the global VRF.

To configure the OMP administrative distance using Cisco SD-WAN Manager, see Configure Basic VPN Parameters and Configure OMP using SD-WAN Manager templates.

To configure the OMP administrative distance using the CLI, see the Configure OMP Administrative Distance section in Configure OMP Using the CLI.

Inter-Service VPN route leaking

The Inter-Service VPN Route Leaking feature provides the ability to leak selective routes between service VPNs back to the originating device on the same site.

To resolve routing-scalability challenges introduced when you use Cisco Catalyst SD-WAN Control Componentss, you can leak routes between the VPNs at the edge device.

To configure the inter-service VPN route leaking feature using Cisco SD-WAN Manager, see Configure Route Leaking Between Service VPNs.

To configure the inter-service VPNs route leaking feature using the CLI, see Configure Route Leaking Between Service VPNs Using the CLI.

Use VRRP tracker for leaked service VPNs

The Virtual Router Redundancy Protocol (VRRP) can track whether a leaked route is reachable. If tracked route is not reachable, VRRP changes the priority of the VRRP group. It can trigger a new primary router election. The VRRP tracker determines whether a route is reachable based on the existence of the route in the routing table of the routing instance that is included in the VRRP configuration.

To configure the VRRP tracker to track a leaked service VPN using Cisco SD-WAN Manager, see Configure VRRP for Cisco VPN Interface Ethernet template.

To configure the VRRP tracker to track any leaked service VPNs using the CLI, see Configure VRRP Tracker for Tracking Leaked Service VPNs Using the CLI.

Features of route leaking

Route leaking offers these features:

  • Routes between the global VRF and service VPNs can be leaked directly.

  • Multiple service VPNs can be leaked to the global VRF.

  • Multiple service VRFs leaking into the same service VRF is supported.

  • When routes are leaked or replicated between the global VRF and service VPNs, route properties such as metric, source VPN information, tags, administrative distance, and route origin are retained.

  • You can control leaked routes using route maps.

  • Route-maps can filter routes using match operations before leaking them.

  • The feature can be configured using both—Cisco SD-WAN Manager and CLI.

Use cases for route leaking

Route leaking provides solutions for various network scenarios, offering benefits such as service sharing, simplified migration, and enhanced network management.

Route leaking is applied in these scenarios:

  • Service Provider Central Services: This feature allows direct access to SP Central services under MPLS without duplicating them for each VPN. This approach makes accessing central services more efficient.

  • Migration: With route leaking, branches that have migrated to Cisco SD-WAN can directly access non-migrated branches bypassing the hub, thus providing improved application SLAs.

  • Centralized Network Management: You can manage the control plane and service-side equipment through the underlay.

  • Retailer Requirements for PCI compliance: Route leaking for service VPNs is used where the VPN traffic goes through a zone-based firewall on the same branch router while being PCI compliant.

How route preference is determined

When a route is replicated or leaked between the global VRF and service VPNs, a specific set of rules determines which route is preferred. These rules ensure consistent and predictable routing behavior within the network.

Route preference is determined by these rules:

  1. For a device that receives routes from two sources that both use the same source VRFs, and one of the routes is replicated, the non-replicated route is preferred.

  2. If the first rule does not apply, these rules determine route preference in this order:

    1. Prefer the route with smaller administrative distance.

    2. Prefer the route with smaller default administrative distance.

    3. Prefer a non-replicated route over a replicated route.

    4. Compare original VRF names. Prefer the route with the lexicographically smaller VRF name.

    5. Compare original subaddress families. Prefer unicast routing over multicast routing.

    6. Prefer the oldest route.

Configure route leaking

Use this task to enable route leaking within your Cisco Catalyst SD-WAN. Route leaking allows for service sharing between different VPNs and facilitates network migration by providing direct access between migrated and non-migrated branches.

Before you begin

Before you begin, ensure you understand the concepts of route leaking and have reviewed the associated restrictions. For more information, see Route leaking and Restrictions for route leaking and redistribution.

Follow these steps to configure route leaking:

Procedure


Step 1

Configure and enable a localized policy, then attach the route policy.

  1. Configure localized route policy. See Configure localized route policy.

  2. Add the route policy. See Add the route policy

  3. Attach the localized policy to the device template. See Attach the localized policy to the device template.

Step 2

Configure and enable the route leaking feature between global and service VPNs.

  1. Configure and enable route leaking between global and service VPNs using a configuration group. See Configure and enable route leaking between global and service VPNs using a configuration group.

  2. Configure and enable route leaking between global and service VPNs using Cisco SD-WAN Manager. See Configure and enable route leaking between global and service VPNs using Cisco SD-WAN Manager.

  3. Configure and verify route leaking between global VRF and service VPNs using the CLI. See Configure and verify route leaking between global VRF and service VPNs using the CLI.

Step 3

Configure and enable the route leaking feature between service VPNs.

  1. Configure route leaking between service VPNs using a configuration group. See Configure route leaking between service VPNs using a configuration group.

  2. Configure route leaking between service VPNs using Cisco SD-WAN Manager. See Configure route leaking between service VPNs using Cisco SD-WAN Manager.

  3. Configure route leaking between service VPNs using a CLI template. See Configure route leaking between service VPNs using a CLI template.

  4. Verify route-leaking configurations between service VPNs using the CLI. See Verify route-leaking configurations between service VPNs using the CLI.

  5. Configure VRRP tracker for tracking leaked service VPNs using the CLI. See Configure VRRP tracker for tracking leaked service VPNs using the CLI.

  6. Verify VRRP tracking. See Verify VRRP tracking.

Step 4

Attach the service side VPN feature template to the device template. See Attach the service side VPN feature template to the device template.


You have successfully configured route leaking in your Cisco Catalyst SD-WAN, enabling service sharing and optimizing routing paths.

What to do next

To view a configuration example for route leaking, see Configuration example for route leaking.

Configure localized route policy

Use this task to create a new localized route policy that defines how routes are handled within your Cisco Catalyst SD-WAN.

.

Before you begin

Follow these steps to configure localized route policy:

Procedure


Step 1

From the Cisco SD-WAN Manager menu, choose Configuration > Policies.

Step 2

Select Localized Policy.

Step 3

From the Custom Options drop-down, under Localized Policy, select Route Policy.

Step 4

Click Add Route Policy, and select Create New.

Step 5

Enter a name and description for the route policy.

Step 6

In the left pane, click Add Sequence Type.

Step 7

In the right pane, click Add Sequence Rule to create a single sequence in the policy. Match is selected by default.

Step 8

Select a desired protocol from the Protocol drop-down list. The options are: IPv4, IPv6, or both.

Step 9

Click a match condition.

Step 10

On the left, enter the values for the match condition.

Step 11

On the right enter the action or actions to take if the policy matches.

Step 12

Click Save Match and Actions to save a sequence rule.

Step 13

If no packets match any of the route policy sequence rules, the default action is to drop the packets. To change the default action:

  1. Click Default Action in the left pane.

  2. Click the Pencil icon.

  3. Change the default action to Accept.

  4. Click Save Match and Actions.

Step 14

Click Save Route Policy.


You have successfully created a localized route policy.

What to do next

Add the route policy. See Add the route policy.

Add the route policy

Use this task to import an existing route policy into your localized policy configuration.

Before you begin

Follow these steps to add the route policy:

Procedure


Step 1

From the Cisco SD-WAN Manager menu, choose Configuration > Policies.

Step 2

Choose the Localized Policy.

Step 3

Click Add Policy.

Step 4

Click Next in the Local Policy Wizard until you arrive at the Configure Route Policy option.

Step 5

Click Add Route Policy and choose Import Existing.

Step 6

From the Policy drop-down list, choose the route policy that you created previously.

Step 7

Click Import.

Step 8

Click Next.

Step 9

Enter the Policy Name and Description for this localized policy.

Step 10

Click Preview to view the policy configurations in CLI format.

Step 11

Click Save Policy.


You have successfully added the route policy to your localized policy configuration.

What to do next

Attach the localized policy to the device template to apply it to your network devices. For more information, see Attach the localized policy to the device template.

Attach the localized policy to the device template

Use this task to apply a previously configured localized policy to a device template.

Before you begin

Follow these steps to attach the localized policy to the device template:

Procedure


Step 1

From the Cisco SD-WAN Manager menu, choose Configuration > Templates.

Step 2

Click Device Templates and select the desired template.

Step 3

Click , and click Edit.

Step 4

Click Additional Templates.

Step 5

From the Policy drop-down list, choose the Localized Policy that you created.

Step 6

Click Update.

Note


Once the localized policy has been added to the device template, selecting the Update option immediately pushes a configuration change to all of the devices that are attached to this device template. If more than one device is attached to the device template, you will receive a warning that they are changing multiple devices.

Step 7

Click Next and then Configure Devices.

Step 8

Wait for the validation process and push configuration from Cisco SD-WAN Manager to the device.


You have successfully attached the localized policy to the device template, and the configuration has been pushed to the associated devices.

What to do next

Now that the localized policy is applied, you can proceed to configure and enable the route leaking feature between global and service VPNs. For more information, see step 2 in Configure route leaking.

Configure and enable route leaking between global and service VPNs using a configuration group

Use this task to configure route leaking between the global VRF and service VPNs using a configuration group in Cisco SD-WAN Manager. This method allows for centralized management and deployment of route leaking policies across multiple devices.

Before you begin

Follow these steps to configure and enable route leaking between global and service VPNs using a configuration group:

Procedure


Step 1

From the Cisco SD-WAN Manager menu, choose Configuration > Configuration Groups.

Step 2

Create and configure a Service VPN feature from a Service profile.

  1. To leak routes from the global VRF:

    1. In the Route Protocol* field, choose a protocol to configure leak routes from the global VPN to the service VPN that you are configuring. Options include static, connected, bgp, or ospf.

    2. In the Select Route Policy field, choose a route policy from the drop-down list.

    3. Under Redistribution (in service VPN), in the Protocol* field, choose a protocol from the available options to redistribute the leaked routes. Options include bgp, ospf(minimum supported release: Cisco Catalyst SD-WAN Manager Release 20.18.1) , or eigrp.

    4. In the Select Route Policy field, choose a route policy from the drop-down list.

  2. To leak routes from the service VPNs to the global VRF:

    1. In the Route Protocol* field, choose a protocol to leak routes from the service VPN that you are configuring to the global VPN. Options include static, connected, bgp, ospf or eigrp.

    2. In the Select Route Policy field, choose a route policy from the drop-down list.

    3. Under Redistribution (in global VPN), in the Protocol* field, choose a protocol from the available options to redistribute the leaked routes. Options include bgp, or ospf.

    4. In the Select Route Policy field, choose a route policy from the drop-down list.\

Step 3

Click Save.


You have successfully configured route leaking between the global VRF and service VPNs using a configuration group.

What to do next

Deploy the configuration group to apply these settings to your devices. See Deploy a configuration group.

Configure and enable route leaking between global and service VPNs using Cisco SD-WAN Manager

Use this task to configure and enable route leaking between the global VRF and service VPNs using feature templates in Cisco SD-WAN Manager. This method allows you to define route leaking policies and apply them to specific devices.

Before you begin

Note that route leaking can only be configured on service VPNs. The VPN numbers in the Basic Configuration must be within the range 1—511 or 513—65527. VPN 512 is reserved for network management traffic, and VPN 0 is reserved for control traffic.

Procedure


Step 1

From the Cisco SD-WAN Manager menu, choose Configuration > Templates.

Step 2

To configure route leaking, click Feature Templates.

Step 3

Do one of the following:

  1. To create a feature template:

    1. Click Add Template.

    2. Choose a device from the list of devices. The templates available for the selected device display in the right pane.

    3. Choose the Cisco VPN template from the right pane.

    4. Enter Template Name and Description for the feature template.

    5. Click Global Route Leak below the Description field.

    6. To leak routes from the global VRF, click Add New Route Leak from Global VPN to Service VPN.

      1. From the Route Protocol Leak from Global to Service drop-down list, choose Global to choose a protocol. Otherwise, choose Device-Specific to use a device-specific value.

      2. In the Route Policy Leak from Global to Service drop-down list, choose Global, then select one of the available route policies.

      3. For the Redistribute to protocol (in Service VPN) field, click Add Protocol.

      4. In the Protocol drop-down list, choose Global to select a protocol. Otherwise, choose Device-Specific to use a device-specific value.

      5. In the Redistribution Policy drop-down list, choose Global, then select one of the available redistribution policies.

      6. Click Add.

    7. To leak routes from the service VPNs to the global VRF, click Add New Route Leak from Service VPN to Global VPN.

      1. In the Route Protocol Leak from Service to Global drop-down list, choose Global to select a protocol. Otherwise, or choose Device-Specific to use a device-specific value.

      2. In the Route Policy Leak from Service to Global drop-down list, choose Global, then select one of the available route policies.

      3. For the Redistribute to protocol (in Global VPN) field, click Add Protocol.

      4. From the Protocol drop-down list, choose Global to choose a protocol. Otherwise, choose Device-Specific to use a device-specific value.

      5. In the Redistribution Policy drop-down list, choose Global, then select one of the available redistribution policies.

      6. Click Add.

    8. Click Save/Update.

    9. To redistribute the leaked routes using Cisco SD-WAN Manager, use the CLI Add-on Feature templates to enter the configuration applicable to your environment. Here's an example.

      
      Device(config)# router ospf 65535 
      Device(config-router)# redistribute vrf 1 ospf 103  
      
      
      Device(config)# router eigrp vpn 
      Device(config-router)# address-family ipv4 vrf 1 autonomous-system 50 
      Device(config-router-af)# topology base 
      Device(config-router-af-topology)# redistribute vrf global  ospf 65535 
      metric  1 2 3 4 5  

      After you create the CLI add-on template, you need to attach it to the protocol template to which you are redistributing routes. In this example, you would attach it to the EIGRP template.

  2. To modify an existing feature template:

    1. Choose a feature template you wish to modify.

    2. Click ... next to the row in the table, and click Edit.

    3. Click Global Route Leak.

    4. To edit information, from the table under Add New Route Leak from Global VPN to Service VPN or Add New Route Leak from Service VPN to Global VPN, click Edit.

    5. The update route leak dialog box appears. Perform the necessary modifications.

    6. Click Save Changes.

    7. Click Update.


You have configured route leaking between the global VRF and service VPNs within the feature template.

What to do next

Attach the service side VPN feature template to the device template to apply these configurations to your network devices. For more information, see Attach the service side VPN feature template to the device template.

Configure and verify route leaking between global VRF and service VPNs using the CLI

Use this task to directly configure and verify route leaking between VRFs using the command-line interface (CLI).\

Before you begin

Follow these steps to configure and verify route leaking using the CLI:

Procedure


Step 1

Configure and verify route leaking between a global VRF and a service VPN.

  • Configure route leaking.

    These examples show how to configure route leaking between a global VRF and a service VPN. In this example, VRF 103 is the service VPN. This example shows that connected routes are leaked into VRF 103 from the global VRF, similarly, the same connected routes are leaked from VRF 103 to the global VRF.

    vrf definition 103
     !
      address-family ipv4
       route-replicate from vrf global unicast connected
    !
    global-address-family ipv4
      route-replicate from vrf 103 unicast connected
      exit-address-family
  • Verify route leaking

    1. Verify routes leaked from service VRF 103 to the global VRF. Leaked routes are represented by a + sign next to the route. For example, C+ denotes a leaked connected route.

      Device#show ip route
      Codes: L - local, C - connected, S - static, R - RIP, M - mobile, B - BGP
      D - EIGRP, EX - EIGRP external, O - OSPF, IA - OSPF inter area
      N1 - OSPF NSSA external type 1, N2 - OSPF NSSA external type 2
      E1 - OSPF external type 1, E2 - OSPF external type 2, m - OMP
      n - NAT, Ni - NAT inside, No - NAT outside, Nd - NAT DIA
      i - IS-IS, su - IS-IS summary, L1 - IS-IS level-1, L2 - IS-IS level-2
      ia - IS-IS inter area, * - candidate default, U - per-user static route
      H - NHRP, G - NHRP registered, g - NHRP registration summary
      o - ODR, P - periodic downloaded static route, l - LISP
      a - application route
      + - replicated route, % - next hop override, p - overrides from PfR
      & - replicated local route overrides by connected
      
      Gateway of last resort is not set
      
      10.0.0.0/8 is variably subnetted, 14 subnets, 2 masks
      O 10.1.14.0/24 [110/11] via 10.1.15.13, 00:02:22, GigabitEthernet1
      C 10.1.15.0/24 is directly connected, GigabitEthernet1
      L 10.1.15.15/32 is directly connected, GigabitEthernet1
      O 10.1.16.0/24 [110/11] via 10.1.15.13, 00:02:22, GigabitEthernet1
      C 10.1.17.0/24 is directly connected, GigabitEthernet2
      L 10.1.17.15/32 is directly connected, GigabitEthernet2
      172.16.0.0/12 is subnetted, 1 subnets
      [170/10880] via 192.168.24.17(103), 01:04:13, GigabitEthernet5.103
      192.168.0.0/16 is variably subnetted, 2 subnets, 2 masks
      C + 192.0.2.0/24  is directly connected, GigabitEthernet5.103
      L & 192.168.24.15/16 is directly connected, GigabitEthernet5.103
      10.0.0.0/8 is variably subnetted, 2 subnets, 2 masks
      C 203.0.113.0/24 is directly connected, GigabitEthernet6
      L 203.0.113.15/32 is directly connected, GigabitEthernet6
      10.20.0.0/8 is variably subnetted, 2 subnets, 2 masks
      C 198.51.100.0/24 is directly connected, GigabitEthernet7
      L 198.51.100.15/24 is directly connected, GigabitEthernet7
      192.0.2.0/32 is subnetted, 1 subnets
      O E2 100.100.100.100 [110/20] via 10.1.15.13, 00:02:22, GigabitEthernet1
      172.16.0.0/32 is subnetted, 1 subnets
      O E2 172.16.255.14 [110/20] via 10.1.15.13, 00:02:22, GigabitEthernet1
    2. View Routes Leaked From Global VRF to Service VRF Table

      Use the show ip route vrf <vrf id> command to view the routes leaked from the global VRF to the service VRF table.

      Device#show ip route vrf 103 
      Routing Table: 103
      Codes: L - local, C - connected, S - static, R - RIP, M - mobile, B - BGP
      D - EIGRP, EX - EIGRP external, O - OSPF, IA - OSPF inter area
      N1 - OSPF NSSA external type 1, N2 - OSPF NSSA external type 2
      E1 - OSPF external type 1, E2 - OSPF external type 2, m - OMP
      n - NAT, Ni - NAT inside, No - NAT outside, Nd - NAT DIA
      i - IS-IS, su - IS-IS summary, L1 - IS-IS level-1, L2 - IS-IS level-2
      ia - IS-IS inter area, * - candidate default, U - per-user static route
      H - NHRP, G - NHRP registered, g - NHRP registration summary
      o - ODR, P - periodic downloaded static route, l - LISP
      a - application route
      + - replicated route, % - next hop override, p - overrides from PfR
      & - replicated local route overrides by connected
      
      Gateway of last resort is not set
      
      10.0.0.0/8 is variably subnetted, 14 subnets, 2 masks
      C + 10.0.1.0/24 is directly connected, GigabitEthernet9
      L & 10.0.1.15/32 is directly connected, GigabitEthernet9
      C + 10.0.20.0/24 is directly connected, GigabitEthernet4
      L & 10.0.20.15/32 is directly connected, GigabitEthernet4
      C + 10.0.100.0/24 is directly connected, GigabitEthernet8
      L & 10.0.100.15/32 is directly connected, GigabitEthernet8
      C + 10.1.15.0/24 is directly connected, GigabitEthernet1
      L & 10.1.15.15/32 is directly connected, GigabitEthernet1
      C + 10.1.17.0/24 is directly connected, GigabitEthernet2
      L & 10.1.17.15/32 is directly connected, GigabitEthernet2
      172.16.0.0/12 is subnetted, 1 subnets
      D EX 172.16.20.20
      [170/10880] via 192.168.24.17, 01:04:07, GigabitEthernet5.103
      192.168.0.0/16 is variably subnetted, 2 subnets, 2 masks
      C 192.0.2.0/24 is directly connected, GigabitEthernet5.103
      L 192.168.24.15/16 is directly connected, GigabitEthernet5.103
      10.0.0.0/8 is variably subnetted, 2 subnets, 2 masks
      C + 203.0.113.0/24 is directly connected, GigabitEthernet6
      L & 203.0.113.15/32 is directly connected, GigabitEthernet6
      10.20.0.0/8 is variably subnetted, 2 subnets, 2 masks
      C + 198.51.100.0/24 is directly connected, GigabitEthernet7
      L & 198.51.100.15/24 is directly connected, GigabitEthernet7
      192.0.2.0/32 is subnetted, 1 subnets

Step 2

Configure and verify route filtering before leaking.

To further filter the routes leaked between the global VRF and the service VRF, you can apply a route map as shown in this example.

vrf definition 103
 !
  address-family ipv4
   route-replicate from vrf global unicast connected route-map myRouteMap permit 10
    match ip address prefix-list pList seq 5 permit 10.1.17.0/24
!

Step 3

Verify route filtering.

Device#show ip route vrf 103

Routing Table: 1
Codes: L - local, C - connected, S - static, R - RIP, M - mobile, B - BGP
D - EIGRP, EX - EIGRP external, O - OSPF, IA - OSPF inter area
N1 - OSPF NSSA external type 1, N2 - OSPF NSSA external type 2
E1 - OSPF external type 1, E2 - OSPF external type 2, m - OMP
n - NAT, Ni - NAT inside, No - NAT outside, Nd - NAT DIA
i - IS-IS, su - IS-IS summary, L1 - IS-IS level-1, L2 - IS-IS level-2
ia - IS-IS inter area, * - candidate default, U - per-user static route
H - NHRP, G - NHRP registered, g - NHRP registration summary
o - ODR, P - periodic downloaded static route, l - LISP
a - application route
+ - replicated route, % - next hop override, p - overrides from PfR
& - replicated local route overrides by connected

Gateway of last resort is not set

10.0.0.0/8 is variably subnetted, 8 subnets, 2 masks
C + 10.1.17.0/24 is directly connected, GigabitEthernet2
L & 10.1.17.15/32 is directly connected, GigabitEthernet2
m 10.1.18.0/24 [251/0] via 172.16.255.14, 19:01:28, Sdwan-system-intf
m 10.2.2.0/24 [251/0] via 172.16.255.11, 17:28:44, Sdwan-system-intf
m 10.2.3.0/24 [251/0] via 172.16.255.11, 17:26:50, Sdwan-system-intf
C 10.20.24.0/24 is directly connected, GigabitEthernet5
L 10.20.24.15/32 is directly connected, GigabitEthernet5
m 10.20.25.0/24 [251/0] via 172.16.255.11, 16:14:18, Sdwan-system-intf
172.16.0.0/32 is subnetted, 3 subnets
m 172.16.255.112 [251/0] via 172.16.255.11, 17:28:44, Sdwan-system-intf
O E2 172.16.255.117 [110/20] via 10.20.24.17, 1d11h, GigabitEthernet5
m 172.16.255.118 [251/0] via 172.16.255.11, 16:14:18, Sdwan-system-intf

Step 4

Monitor leaked routes.

Device#show ip cef 10.1.17.0 internal
10.1.17.0/24, epoch 2, flags [rcv], refcnt 6, per-destination sharing
[connected cover 10.1.17.0/24 replicated from 1]
sources: I/F
feature space:
Broker: linked, distributed at 4th priority
subblocks:
gsb Connected receive chain(0): 0x7F6B4315DB80
Interface source: GigabitEthernet5 flags: none flags3: none
Dependent covered prefix type cover need deagg, cover 10.20.24.0/24
ifnums: (none)
path list 7F6B47831168, 9 locks, per-destination, flags 0x41 [shble, hwcn]
path 7F6B3D9E7B70, share 1/1, type receive, for IPv4
receive for GigabitEthernet5
output chain:
receive

You have configured and verified route leaking and route filtering using the CLI.

Configure route leaking between service VPNs using a configuration group

Use this task to configure route leaking between different service VPNs using a configuration group in Cisco SD-WAN Manager.

Before you begin

Follow these steps to configure route leaking between service VPNs using a configuration group:

Procedure


Step 1

From the Cisco SD-WAN Manager menu, choose Configuration > Configuration Groups.

Step 2

Create and configure a Service VPN feature from a Service profile.

  1. To leak routes between services:

    1. In the Source VPN field, enter the value of the source VPN from which routes will be leaked.

    2. In the Route Protocol* field, choose a protocol from the available options to leak routes from the source service VPN to the service VPN that you are configuring. Options include static, connected, bgp, ospf (minimum supported release: Cisco Catalyst SD-WAN Manager Release 20.18.1), or eigrp.

    3. In the Select Route Policy field, choose a route policy from the drop-down list.

    4. Under Redistribution (in Service VPN), in the Protocol* field, choose a protocol from the available options to redistribute the leaked routes. Options include bgp, ospf minimum supported release: Cisco Catalyst SD-WAN Manager Release 20.18.1, or eigrp.

    5. In the Select Route Policy field, choose a route policy from the drop-down list.

Step 3

Click Save.


You have configured route leaking between service VPNs using a configuration group.

What to do next

Deploy the configuration group to apply these settings to your devices. See Deploy a configuration group.

Configure route leaking between service VPNs using Cisco SD-WAN Manager

Use this task to configure route leaking directly between service VPNs using feature templates in Cisco SD-WAN Manager.

Before you begin

Follow these steps to configure route leaking between service VPNs:

Procedure


Step 1

From the Cisco SD-WAN Manager menu, choose Configuration > Templates.

Step 2

Click Feature Templates.

Step 3

Navigate to the Cisco VPN template for the device.

Note


To create a VPN template, see Create VPN Template

Step 4

Click Route Leak.

Step 5

Click Route Leak between Service VPN.

Step 6

Click Add New Inter Service VPN Route Leak.

Step 7

From the Source VPN drop-down list, choose Global to configure the service VPN from where you want to leak the routes, or choose Device-Specific to use a device-specific value.

You can configure service VPNs within the range VPNs 1 to 511, and 513 to 65530, for service-side data traffic on Cisco IOS XE Catalyst SD-WAN devices. (VPN 512 is reserved for network management traffic. VPN 0 is reserved for control traffic using the configured WAN transport interfaces.)

Step 8

From the Route Protocol Leak to Current VPN drop-down list, choose Global to select a route protocol to enable route leaking to the current VPN. Otherwise, choose Device-Specific to use a device-specific value.

You can choose Connected, Static, OSPF, BGP, and EIGRP protocols for route leaking.

Step 9

From the Route Policy Leak to Current VPN drop-down list, choose Global to select a route policy to enable route leaking to the current VPN. Otherwise, choose Device-Specific to use a device-specific value.

Note


This field is disabled if no route policies are available.

Step 10

To configure Redistribute to protocol (in Service VPN), click Add Protocol.

  1. From the Protocol drop-down list, choose Global to choose a protocol. Otherwise, choose Device-Specific to use a device-specific value.

    You can choose Connected, Static, OSPF, BGP, and EIGRP protocols for redistribution.

  2. (Optional) From the Redistribution Policy drop-down list, choose Global. Next, choose one of the available redistribution policies from the drop-down list.

    Note


    This field is disabled if no route policies are available.

Step 11

Click Add.

Step 12

Click Save.


You have successfully configured route leaking between service VPNs within the feature template.

What to do next

Attach the service side VPN feature template to the device template to apply these configurations to your network devices. For more information, see Attach the service side VPN feature template to the device template.

Configure route leaking between service VPNs using a CLI template

Use this task to configure route leaking between different service VPNs on the same device using a CLI template.

This topic provides sample CLI configurations to configure interservice VPN route leaking on Cisco IOS XE Catalyst SD-WAN devices.

Before you begin

Ensure your Cisco IOS XE Catalyst SD-WAN device is running Cisco IOS XE Catalyst SD-WAN Release 17.9.1a or later.

Follow these steps to configure inter-service VRF route leaking using a CLI template:

Procedure


Step 1

Replicate routes between interservice VRFs on the same device..


vrf definition vrf-number 
address-family ipv4 
route-replicate from vrf source-vrf-name unicast protocol [route-map map-tag] 

Step 2

Redistribute the routes that are replicated between the service VPNs:

You can configure the subnets only for bgp, nhrp, ospf, ospfv3, and static protocol types.


router ospf process-id vrf vrf-number 
redistribute vrf vrf-name protocol subnets[route-map map-tag] 

The following is a complete configuration example for interservice VRF route replication and redistribution:

vrf definition 2
 rd 1:2
 !
 address-family ipv4
  route-replicate from vrf 1 unicast static route-map VRF1_TO_VRF2
 exit-address-family
 !
!
ip prefix-list VRF1_TO_VRF2 seq 5 permit 10.10.10.97/32
!
route-map VRF1_TO_VRF2 permit 1
 match ip address prefix-list VRF1_TO_VRF2
!
router ospf 2 vrf 2
 redistribute vrf 1 static route-map VRF1_TO_VRF2

You have successfully configured inter-service VRF route leaking using a CLI template.

What to do next

Verify the route leaking configurations. See Verify route-leaking configurations between service VPNs using the CLI.

Configure VRRP tracker for tracking leaked service VPNs using the CLI

Use this task to configure a Virtual Router Redundancy Protocol (VRRP) tracker for monitoring the reachability of leaked routes within service VPNs using the CLI.

Before you begin

Follow these steps to configure a VRRP tracker for tracking leaked service VPNs:

Procedure


Step 1

Configure a track.

  1. Enter global configuration mode, and track the state of an IP route and enter tracking configuration mode.

    Device# config-transaction 
    Device(config)# track object-number {ip} route address|prefix-length  { reachability  | metric threshold}
  2. Configure a VPN routing and forwarding (VRF) table.

    Device(config-track)# ip vrf vrf-name 
  3. Return to privileged EXEC mode.

    Device(config-track)# end 

Step 2

Configure VRRP version 2 (VRRPv2).

  1. Configure an interface type such as, Gigabit Ethernet.

    Device(config)# interface type number [name-tag]
  2. Associate a VRF instance with the Gigabit Ethernet interface.

    Device(config-if)# vrf forwarding vrf-name 
  3. Set a primary IP address for the Gigabit Ethernet interface.

    Device(config-if)# ip address ip-address [mask] 
  4. Enable the autonegotiation protocol to configure the speed, duplex mode, and flow control on a Gigabit Ethernet interface.

    Device(config-if)# negotiation auto 
  5. Create a VRRP group and enter VRRP configuration mode.

    Device(config-if)# vrrp group address-family ipv4 
  6. Enable the support of VRRP version 2 simultaneously with VRRP version 3.

    Device(config-if-vrrp)# vrrpv2 
  7. Configure interface list tracking as a single entity.

    Device(config-if-vrrp)# track track-list-name [decrement priority] 
  8. Configure the preemption delay so that a device with higher priority waits for a minimum period before taking over.

    Device(config-if-vrrp)# preempt delay minimum seconds 
  9. Specify a primary IP address for VRRP.

    Device(config-if-vrrp)# address ip-address primary  

Step 3

Configure a VRF.

  1. Configure a VRF routing table instance and enter the VRF configuration mode.

    Device(config)# vrf definition vrf-number 
  2. Set an address family IPv4 in vrf configuration mode.

    Device(config-vrf)# address-family ipv4 
  3. Exit from address-family configuration mode.

    Device(config-ipv4)# exit-address-family 

The following is a sample configuration for configuring the VRRP tracking.

Use the following configuration to add a track to a VRF red.

config-transaction
track 1 ip route 10.1.15.13 255.255.255.0 reachability
ip vrf red

Use the following configuration to configure interface tracking and decrement the device priority.

interface GigabitEthernet 1.101
vrf forwarding 100
 ip address 10.1.15.13 255.255.255.0
 negotiation auto
 vrrp 2 address-family ipv4
  vrrpv2
  priority 220
  track 1 decrement 25
  preempt delay minimum 30
  address 10.1.15.100 primary
exit

Use the following configuration to configure the VRF routing table instance for the configured VRF.

vrf definition 100
!
 address-family ipv4
 exit-address-family

You have successfully configured a VRRP track object to monitor the reachability of a leaked route within a service VPN, and integrated it with VRRP on a specified interface.

What to do next

Verify the VRRP tracking configuration. See Verify VRRP tracking.

Configuration example for route leaking

Route leaking is typically used in scenarios requiring the use of shared services. Configuring route replication allows mutual redistribution between VRFs or VPNs. Route replication allows shared services because routes are replicated or leaked between the global VRF and service VPNs, enabling clients in one VPN to reach matching prefixes in another VPN.

Sample Topology

In this section, we'll use an example topology to show route-leaking configuration. Here, Edge routers 1 and 2 are located in two different sites in the overlay network and are connected to each other through MPLS. Both the edge routers have route leaking configured to be able to access services in the underlay network. Router 1 sits behind Edge Router 1 in the service side. The local network at this site runs OSPF. Router 2 sites behind the Edge Router 2 on network that has EIGRP in VRF 1. Router 3 also sites behind Edge Router 2 and has OSPF running in VRF 200.

Figure 1. Route Leaking

Edge Router 1 imports the source IP address of Router 1, 192.0.2.0/24 to the global VRF on Edge Router 1. Thus 192.0.2.0/24 is a route leaked into the global VRF. Edge Router 2 imports the source IP address of Router 2, 198.51.100.0/24 and the source IP address of Edge Router 3, 203.0.113.0/24 to the global VRF on Edge Router 2.

Shared services in the underlay MPLS network are accessed through a loopback address of 209.21.25.18/27. The IP address of the shared services is advertised to the global VRF on Edge Routers 1 and 2 through OSPF. This shared service IP address is then leaked to VRF 1 in Edge Router 1 and VRF 1 and VRF 200 in Edge Router 2. In terms of route-leaking, the leaked routes are imported into the service VRFs on both the edge routers.


Note


OMP doesn't advertise any leaked routes from service VPNs into the overlay network to prevent route looping.


Configuration Examples

This example shows the configuration of BGP and OSPF route leaking between the global VRF and VPN 1 on Edge Router 2.

vrf definition 1
 rd 1:1
 !
  address-family ipv4
   route-replicate from vrf global unicast ospf 65535 
 !
global-address-family ipv4
 route-replicate from vrf 1 unicast eigrp 
 exit-address-family

This example shows the configuration of BGP and OSPF route leaking between the global VRF and VPN 200 on Edge Router 2.

vrf definition 200
 rd 1:200
 !
  address-family ipv4
   route-replicate from vrf global unicast ospf 65535
 !
global-address-family ipv4
 route-replicate from vrf 200 unicast eigrp
 exit-address-family

Verify route-leaking configurations between service VPNs using the CLI

Use this task to verify that routes are being leaked and redistributed correctly between service VPNs on your Cisco IOS XE Catalyst SD-WAN device using the CLI.

Before you begin

Ensure your Cisco IOS XE Catalyst SD-WAN device is running Cisco IOS XE Catalyst SD-WAN Release 17.9.1a or later.

Follow these steps to verify route-leaking configurations between service VPNs:

Procedure


Step 1

View routes replicated for redistribution to a service VRF.

Device# show ip route vrf 2
Routing Table: 2
Codes: L - local, C - connected, S - static, R - RIP, M - mobile, B - BGP
       D - EIGRP, EX - EIGRP external, O - OSPF, IA - OSPF inter area 
       N1 - OSPF NSSA external type 1, N2 - OSPF NSSA external type 2
       E1 - OSPF external type 1, E2 - OSPF external type 2, m - OMP
       n - NAT, Ni - NAT inside, No - NAT outside, Nd - NAT DIA
       i - IS-IS, su - IS-IS summary, L1 - IS-IS level-1, L2 - IS-IS level-2
       ia - IS-IS inter area, * - candidate default, U - per-user static route
       H - NHRP, G - NHRP registered, g - NHRP registration summary
       o - ODR, P - periodic downloaded static route, l - LISP
       a - application route
       + - replicated route, % - next hop override, p - overrides from PfR
       & - replicated local route overrides by connected

Gateway of last resort is not set

      10.0.0.0/8 is variably subnetted, 3 subnets, 2 masks
S   +    10.10.10.97/32 [1/0] via 10.20.1.2 (1)
C        10.20.2.0/24 is directly connected, GigabitEthernet5
L        10.20.2.1/32 is directly connected, GigabitEthernet5

Step 2

View replicated routes in the Cisco Express Forwarding (CEF) table for specific replicated routes.

Device# show ip cef vrf 2 10.10.10.97 internal
10.10.10.97/32, epoch 0, RIB[S], refcnt 6, per-destination sharing
  sources: RIB 
  feature space:
    IPRM: 0x00048000
    Broker: linked, distributed at 3rd priority
  subblocks:
    Replicated from VRF 1
  ifnums:
    GigabitEthernet3(9): 10.20.1.2
  path list 7F890C8E2F20, 7 locks, per-destination, flags 0x69 [shble, rif, rcrsv, hwcn]
    path 7F890FB18F08, share 1/1, type recursive, for IPv4
      recursive via 10.20.1.2[IPv4:1], fib 7F890B609578, 1 terminal fib, v4:1:10.20.1.2/32
      path list 7F890C8E3148, 2 locks, per-destination, flags 0x49 [shble, rif, hwcn]
          path 7F890FB19178, share 1/1, type adjacency prefix, for IPv4
            attached to GigabitEthernet3, IP adj out of GigabitEthernet3, addr 10.20.1.2 7F890FAE4CD8
  output chain:
    IP adj out of GigabitEthernet3, addr 10.20.1.2 7F890FAE4CD8

You have successfully verified that routes are being leaked and redistributed between service VPNs as configured. The presence of + in the routing table and Replicated from VRF in the CEF output confirms the successful operation.

Verify VRRP tracking

Verifying VRRP tracking provides insight into the operational status of VRRP groups and their associated track objects. This information is crucial for confirming that VRRP is actively monitoring the reachability of leaked routes.

VRRP group status details

The following is a sample output from the show vrrp details command that shows the status of the configured VRRP groups on a Cisco IOS XE Catalyst SD-WAN device.

Device# show vrrp details 
GigabitEthernet1/0/1 - Group 1 - Address-Family IPv4
  State is BACKUP         <------ check states
  State duration 2 mins 13.778 secs
  Virtual IP address is 10.0.0.1
  Virtual MAC address is 0000.5E00.0101
  Advertisement interval is 1000 msec
  Preemption enabled
  Priority is 1 (Configured 100)    <----- shows current and configured priority
    Track object 121 state DOWN decrement 220  Master Router is 10.1.1.3, priority is 200 <---- track object state
  Master Advertisement interval is 1000 msec (learned)
  Master Down interval is 3609 msec (expires in 2737 msec)
  FLAGS: 0/1
  VRRPv3 Advertisements: sent 27 (errors 0) - rcvd 149
  VRRPv2 Advertisements: sent 0 (errors 0) - rcvd 0
  Group Discarded Packets: 0
    VRRPv2 incompatibility: 0
    IP Address Owner conflicts: 0
    Invalid address count: 0
    IP address configuration mismatch : 0
    Invalid Advert Interval: 0
    Adverts received in Init state: 0
    Invalid group other reason: 0
  Group State transition:
    Init to master: 0
    Init to backup: 1 (Last change Wed Feb 17 23:02:04.259)
    Backup to master: 1 (Last change Wed Feb 17 23:02:07.869)  <----- check this for flaps
    Master to backup: 1 (Last change Wed Feb 17 23:02:32.008)
    Master to init: 0
    Backup to init: 0

Track object status

The following is a sample output from the show track command that displays information about objects that are tracked by the VRRP tracking process.

Device# show vrrp details 
GigabitEthernet1/0/1 - Group 1 - Address-Family IPv4
  State is BACKUP         <------ check states
  State duration 2 mins 13.778 secs
  Virtual IP address is 10.0.0.1
  Virtual MAC address is 0000.5E00.0101
  Advertisement interval is 1000 msec
  Preemption enabled
  Priority is 1 (Configured 100)    <----- shows current and configured priority
    Track object 121 state DOWN decrement 220  Master Router is 10.1.1.3, priority is 200 <---- track object state
  Master Advertisement interval is 1000 msec (learned)
  Master Down interval is 3609 msec (expires in 2737 msec)
  FLAGS: 0/1
  VRRPv3 Advertisements: sent 27 (errors 0) - rcvd 149
  VRRPv2 Advertisements: sent 0 (errors 0) - rcvd 0
  Group Discarded Packets: 0
    VRRPv2 incompatibility: 0
    IP Address Owner conflicts: 0
    Invalid address count: 0
    IP address configuration mismatch : 0
    Invalid Advert Interval: 0
    Adverts received in Init state: 0
    Invalid group other reason: 0
  Group State transition:
    Init to master: 0
    Init to backup: 1 (Last change Wed Feb 17 23:02:04.259)
    Backup to master: 1 (Last change Wed Feb 17 23:02:07.869)  <----- check this for flaps
    Master to backup: 1 (Last change Wed Feb 17 23:02:32.008)
    Master to init: 0
    Backup to init: 0

VRRP interface configuration

The following is a sample output from the show running-config interface command that shows the configuration of a Gigabit Ethernet interface that is tracked by the VRRP tracking process.

Device# show running-config interface GigabitEthernet 4
Building configuration...
Current configuration : 234 bytes
!
interface GigabitEthernet4
ip address 172.16.0.1 255.255.255.0
negotiation auto
vrrp 7 address-family ipv4
  priority 200
  vrrpv2
  track 5 decrement 5ß-------priority decreament
  address 172.16.0.0 primary
  exit-vrrp
no mop enabled
no mop sysid
end

Route redistribution

Route redistribution is a mechanism that allows routing information learned from one routing protocol to be shared with another routing protocol. This process is essential for maintaining connectivity and enabling communication across different routing domains or segments within a network. It facilitates the exchange of routing information between VRFs (global to service, or service to service) and ensures that routes from disparate routing environments are known throughout the network.

Configure route redistribution between global VRF and service VPNs using the CLI

Use this task to configure route redistribution between the global VRF and service VPNs using the CLI.

Follow these steps to configure route redistribution between global VRF and service VPNs:

Procedure


Step 1

Enter the global configuration mode, and create a BGP routing process.

You can use the router eigrp, or router ospf to configure a routing process for a specific routing protocol. This example shows the syntax for BGP routing protocol. To know about the command syntax for various protocols, see the Cisco IOS XE SD-WAN Qualified Command Reference Guide.

Device# config-transaction 
Device(config)# router bgp autonomous-system-number

Step 2

Configure an IPv4 address family for service VPNs. This example shows the command syntax for the BGP and EIGRP protocols.

  • BGP protocol:

    Device(config-router-af)# address-family ipv4  [unicast][vrf vrf-name] 
  • EIGRP protocol:

    Device(config-router-af)# address-family ipv4 vrf vrf-number  

Step 3

Redistribute routes between the global VRF and service VPNs. Here, we're showing the syntaxes for the BGP, OSPF, and EIGRP protocols. .

  • Redistribute routes from service VPNs to the global VRF.

    1. BGP protocol:

      Device(config-router-af)# redistribute vrf vrf-name src_protocol  [src_protocol_id] [route-map route-map-name] 
    2. OSPF protocol:

      Device(config-router-af)# redistribute vrf vrf-name src_protocol  [src_protocol_id]  [match {internal|external 1|external 2}]  [metric {metric-value}]  [subnets] [route-map route-map-name] 
    3. EIGRP protocol:

      Device(config-router-af)# redistribute vrf vrf-name src_protocol [src_protocol_id] [metric bandwidth-metric delay-metric reliability-metric effective-bandwidth-metric mtu-bytes] [route-map route-map-name] 
  • Redistribute routes from the global VRF to service VPNs.

    1. BGP protocol:

      Device(config-router-af)# redistribute vrf global src_protocol  [src_protocol_id] [route-map route-map-name] 
    2. OSPF protocol:

      Device(config-router-af)# redistribute vrf global src_protocol  [src_protocol_id]  [match {internal|external 1|external 2}]  [subnets] [route-map route-map-name] 
    3. EIGRP protocol:

      Device(config-router-af)# redistribute vrf global src_protocol [src_protocol_id] [metric bandwidth-metric delay-metric reliability-metric effective-bandwidth-metric mtu-bytes]  

The following is a sample configuration for configuring route redistribution between a global VRF and service VPN. In this example, VRF 103 and VRF 104 are the service VPNs. The example shows that BGP routes are redistributed from the global VRF to VRF 103, VRF 104.

config-transaction
router bgp 100

address-family ipv4 vrf 103
redistribute vrf global bgp 100 route-map test2
!
address-family ipv4 vrf 104
redistribute vrf global bgp 100 route-map test2
!

The following is a sample configuration for configuring the OSPF internal and external routes that are redistributed from the global VRF 65535 to the service VRF.

In this case, all OSPF routes are redistributed into the service VRF by using both the internal and external keywords.

config-transaction
router ospf 1 
redistribute vrf global ospf 65535 match internal external 1 external 2 subnets route-map ospf-route-map

The following is a sample configuration for configuring the OSPF internal and external routes that are redistributed from service VPNs to the global VRF.

config-transaction
router ospf 101
redistribute vrf 101 ospf 101 match internal external 1 external 2 metric 1 subnets route-map ospf-route-map

The following is a sample configuration for configuring the BGP routes that are redistribution from a service VPN to the global VRF.

config-transaction
router bgp 50000
address-family ipv4 unicast 
redistribute vrf 102 bgp 50000 route-map BGP-route-map

The following is a sample configuration for configuring the BGP routes that are redistribution from the global VRF to a service VPN.

config-transaction
router bgp 50000
address-family ipv4 vrf 102 
redistribute vrf global bgp 50000

The following is a sample configuration for configuring route redistribution of BGP, connected, OSPF, and static protocols from the global VRF to VRF 1 when configuring under EIGRP routing process.

config-transaction
router eigrp 101
address-family ipv4 vrf 1
redistribute vrf global bgp 50000 metric 1000000 10 255 1 1500
redistribute vrf global connected metric 1000000 10 255 1 1500
redistribute vrf global ospf 65535 match internal external 1 external 2 metric 1000000 10 255 1 1500
redistribute vrf global static metric 1000000 10 255 1 1500

You have successfully configured route redistribution between the global VRF and service VPNs using the CLI.

What to do next

Verify the route redistribution.

Verify route redistribution

Use this task to verify that routes are being successfully redistributed between VRFs.

The following is a sample output from the show ip bgp command using the internal keyword. This example shows that a route from VRF 102 is redistributed successfully to the global VRF after the route is replicated.

Device# show ip bgp 10.10.10.10 internal     

BGP routing table entry for 10.10.10.10/8, version 515
Paths: (1 available, best #1, table default)
Not advertised to any peer
Refresh Epoch 1
700000 70707
10.10.14.17 from 0.0.0.0 (172.16.255.15)
Origin IGP, aigp-metric 77775522, metric 7777, localpref 100, weight 32768, valid, sourced, replicated, best
Community: 0:7227 65535:65535
Extended Community: SoO:721:75 RT:50000:102
rx pathid: 0, tx pathid: 0x0
net: 0x7FB320235DC0, path: 0x7FB320245DF8, pathext: 0x7FB3203A4660
flags: net: 0x0, path: 0x808040003, pathext: 0x81
attribute: 0x7FB38E5B6258, ref: 14
Updated on Jul 1 2021 01:16:36 UTC

In this output, the route is redistributed from VRF 102 to the global VRF.

The following is a sample output from the show ip route command that shows the routes replicated for redistribution.

Device# show ip route 10.10.10.10 

Routing entry for 10.10.10.10/8
Known via "bgp 50000", distance 60, metric 7777
Tag 700000, type external, 
replicated from topology(102)
Redistributing via ospf 65535, bgp 50000
Advertised by ospf 65535
bgp 50000 (self originated)
Last update from 10.10.14.17 5d15h ago
Routing Descriptor Blocks:
* 10.10.14.17 (102), from 10.10.14.17, 5d15h ago
opaque_ptr 0x7FB3202563A8 
Route metric is 7777, traffic share count is 1
AS Hops 2
Route tag 700000
MPLS label: none

The following is a sample output from the show ip bgp vpnv4 vrf command using the internal keyword.

Device# show ip bgp vpnv4 vrf 102 209.165.201.0 internal      

BGP routing table entry for 1:102:10.10.10.10/8, version 679
BGP routing table entry for 1:209.165.201.0/27, version 679
Paths: (1 available, best #1, table 102)
Advertised to update-groups:
4 
Refresh Epoch 1
7111 300000
10.1.15.13 (via default) from 0.0.0.0 (172.16.255.15)
Origin IGP, aigp-metric 5755, metric 900, localpref 300, weight 32768, valid, sourced, replicated, best
Community: 555:666
Large Community: 1:2:3 5:6:7 412789:412780:755
Extended Community: SoO:533:53 RT:50000:102
rx pathid: 0, tx pathid: 0x0
net: 0x7FB38E5C5718, path: 0x7FB3202668D8, pathext: 0x7FB38E69E960
flags: net: 0x0, path: 0x808040007, pathext: 0x181
attribute: 0x7FB320256798, ref: 7
Updated on Jul 6 2021 16:43:04 UTC

In this output, the route is redistributed from the global VRF to VRF 102.

The following is a sample output from the show ip route vrf command that shows the routes replicated for redistribution for VRF 102.

Device# show ip route vrf 102 209.165.201.0 

Routing Table: 102
Routing entry for 209.165.201.0/27
Known via "bgp 50000", distance 20, metric 900
Tag 7111, type external, 
replicated from topology(default)
Redistributing via bgp 50000
Advertised by bgp 50000 (self originated)
Last update from 10.1.15.13 00:04:57 ago
Routing Descriptor Blocks:
* 10.1.15.13 (default), from 10.1.15.13, 00:04:57 ago
opaque_ptr 0x7FB38E5B5E98 
Route metric is 900, traffic share count is 1
AS Hops 2
Route tag 7111
MPLS label: none