Optimize RSVP-TE Routing

The RSVP-TE optimization tool creates explicitly routed LSP paths to optimize route properties such as distance, TE metrics, utilization, and disjointness. The routing decisions are centralized within the tool, in contrast to traditional RSVP-TE routing, in which routing decisions are distributed across the head-end routers in the network. Although it has fewer parameters, this tool is faster and has a more predictable run-time than the Explicit LSP Optimization tool and is the recommended method for explicit RSVP-TE LSP path optimization.

The primary optimization goal is to minimize path distance (which can be based on interface TE metrics, delay, or user-defined value), while not exceeding a bandwidth bound defined for each interface so as to avoid congestion. Unlike RSVP-TE, LSPs are routed even if they cannot avoid exceeding bandwidth bounds for certain interfaces, though these bound violations are minimized. Additionally, you can use this tool for reoptimizing and reconfiguring RSVP-TE LSPs after events, such as network failures and subsequent route reconvergence.

You can specify different treatment for different LSPs: whether the LSPs should be rerouted to shorten the path distance, only as necessary to reduce congestion, or not optimized at all. These three LSP groups are called Opt, Fit, and Fix. Using these input parameters allows for a variety of use cases, such as:

  • Global optimization—Minimize the path length of all LSPs subject to specified interface bandwidth constraints.

  • New LSP optimization—Minimize the path length of newly created LSPs without exceeding bandwidth bounds specified for the interfaces. Existing LSPs are kept on their current paths, being moved only if necessary to prevent new LSPs from violating bandwidth bound constraints.

  • Tactical congestion mitigation—Change the routing of as few LSPs as possible to bring bandwidth on all interfaces below the specified bandwidth bound.

As such, the tool is beneficial for offline planning and configuration of an explicitly routed RSVP-TE network. It is also useful for providing routing decisions for a centralized, reactive network control application, such as can be implemented on the Cisco Crosswork Planning platform.


Note


RSVP-TE optimization tool supports both Inter-Area and Inter-AS functionalities.


This section contains the following topics:

Specify inputs for optimization

The RSVP-TE optimization tool (Actions > Tools > RSVP LSP optimization > RSVP-TE optimization) uses the LSP and interface input properties listed in Table 1 to execute its optimization calculations. These properties, which are specified in user columns in the LSPs and Interfaces tables, can be created in one of the two ways:

  • Use the tool to automatically create (initialize) the properties if they do not exist. The selections made in the Specify LSP groups, LSP parameters, and Interface parameters areas populate the input properties.

    Figure 1. RSVP-TE optimization options

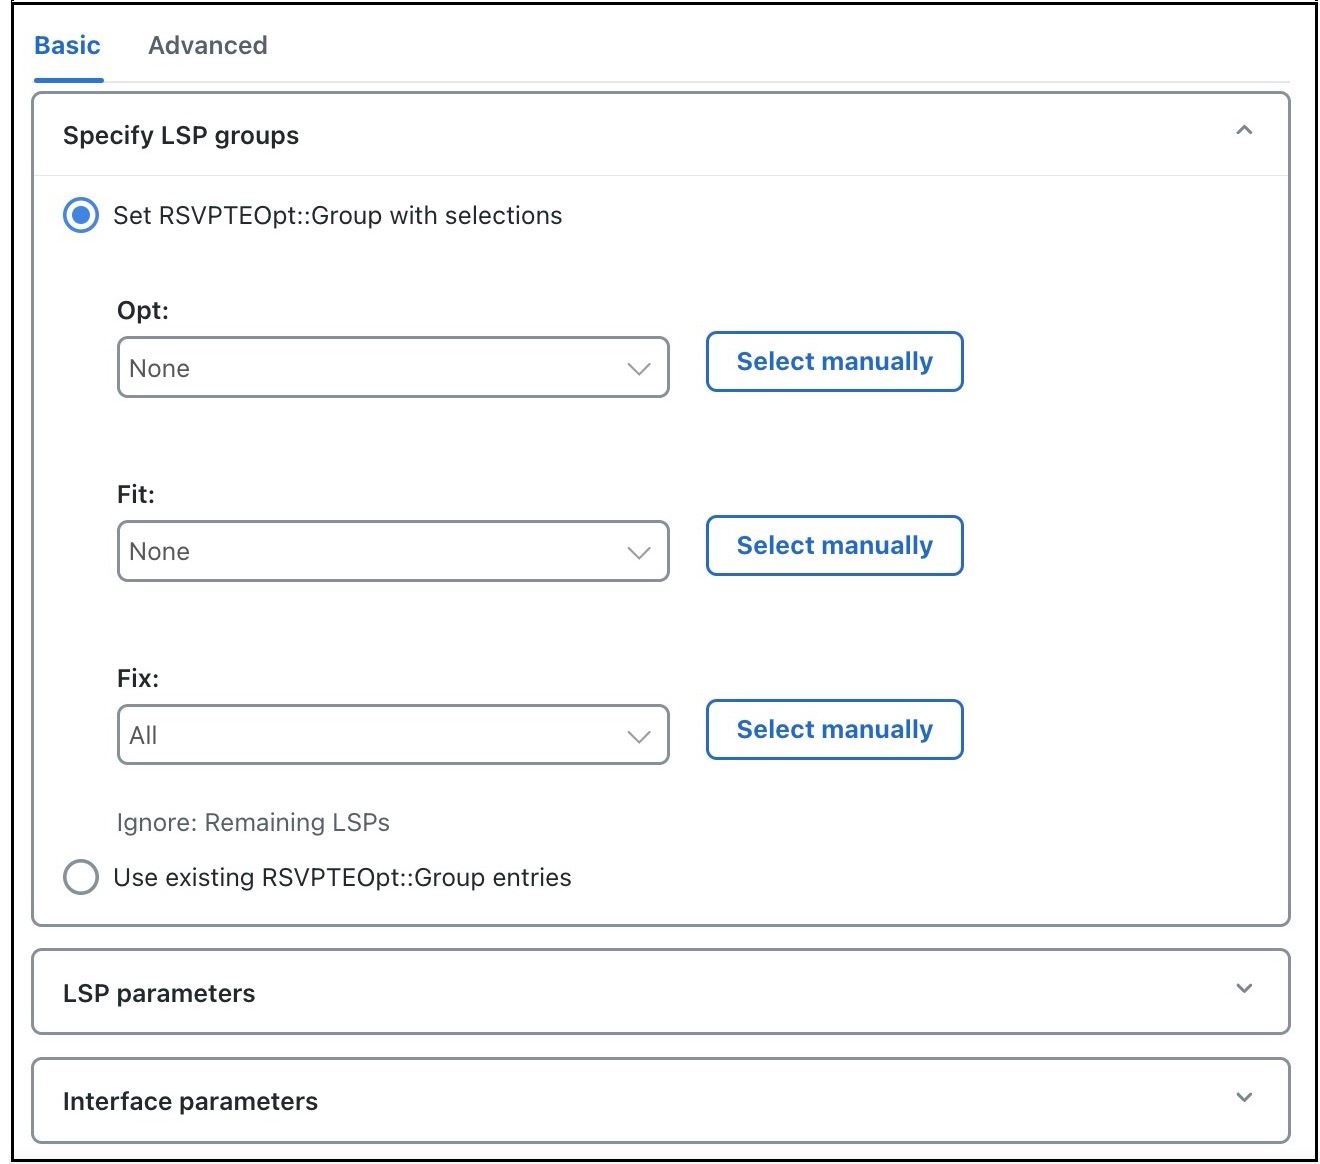
    Example: If you choose LSPs to optimize, to fit, and to fix (in the Specify LSP groups section), the tool creates the RSVPTEOpt::Group column in the LSPs table and sets this property to the appropriate values for each LSP (Opt, Fit, Fix). If the property already exists, it is updated with the new value if it has changed.

    Example: If you select to set the interface bandwidth bound based on the Resv BW property (in the Interface parameters section), the tool creates the RSVPTEOpt::BWBound column in the Interfaces table and for each interface, copies the Resv BW value to it. If the property already exists, it is updated with the new bandwidth bound value if it has changed.

  • Before running the tool, manually create the input properties as user columns in the LSPs and Interfaces tables. When running the tool, you must then select the Use existing RSVPTEOpt::property_name option. This is useful if you want to configure specific values rather than using existing properties and values. For information on creating user-defined columns, see Specify inputs for optimization.


    Note


    Because the resulting network model can potentially reset properties that can be used as input to optimizations, it is a best practice to run the optimization only on plan files or LSPs that have not yet been optimized. For example, by default Cisco Crosswork Planning resets the LSP setup BW property to 0 after optimizing LSPs, and this same property could be used as input to other optimizations.
Table 1. RSVPTEOpt input parameters

Table

Input Property

Description and Values Used to Create the Input Property

LSPs

RSVPTEOpt::Group

LSP optimization group.

The input property is derived based on your entries in the Specify LSP groups area unless you select to use the existing RSVPTEOpt::Group property. Values are Opt, Fit, or Fix. If the value is not defined, it is set to None.

For details, see Select LSP groups.

RSVPTEOpt::BWReq

The bandwidth required by each LSP that is being optimized.

The input property is derived from the Setup BW, Traff meas, or Traff sim properties in the LSP properties section, unless you specify to use the existing RSVPTEOpt::BWReq value.

For details, see Set optimization parameters.

Interfaces

RSVPTEOpt::BWBound

Sum total of LSP bandwidth routed over the interface should not exceed this value.

The input property is derived from the Resv BW, Capacity, or Capacity sim properties in the Interface properties section, unless you specify to use the existing RSVPTEOpt::BWBound value.

For details, see Set optimization parameters.

RSVPTEOpt::Metric

Metric value used in the shortest path calculations.

The input property is derived from either the TE metric or Delay property in the Interface properties section, unless you specify to use the existing RSVPTEOpt::Metric value.

For details, see Set optimization parameters.

Select LSP groups

To determine how and whether LSPs are optimized, select them from the Specify LSP groups area. If an LSP is in multiple groups, the first group in which it resides is how the LSP is treated.

Figure 2. Select LSP groups

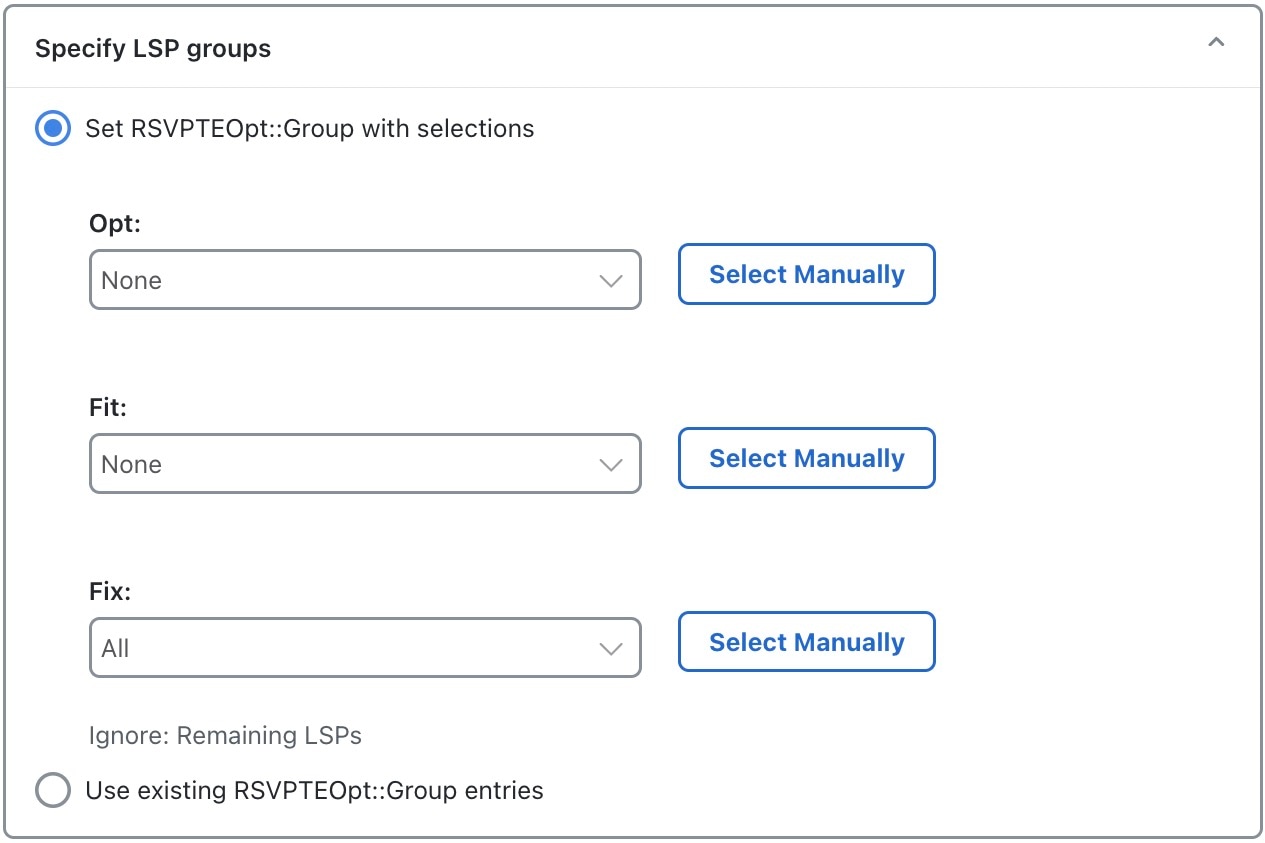
Select the Set RSVPTEOpt::Group with selections radio button and set the following properties, as required:

  • Opt—Explicitly route or reroute these LSPs to minimize their path length, while respecting the bandwidth bounds specified for the interfaces. The RSVP-TE optimization tool changes the LSP path as much as needed to find the optimal route. First, it tries to set the LSP to its shortest path, which is defined by the interface Metric parameter. The LSP is moved away from the shortest path only if needed due to congestion.

    Setting all LSPs to this option is useful when trying to achieve global optimization on all LSPs.

  • Fit—Reroute these LSPs only as necessary to respect specified bandwidth bounds on the interfaces, while accommodating the Opt group. If there is currently no explicit route or if the route is incomplete, treat like Opt LSPs.

    This option is useful when attempting tactical congestion mitigation, where it is desirable to move as few LSPs as possible to remove existing congestion.

    A combination of Opt and Fit or a combination of Opt and Fix is useful for targeting the optimization of new LSPs.

  • Fix—Do not reroute these LSPs, but consider them in the optimization calculations.

LSPs that are not selected are ignored, and as such, maintain their original configuration and are not considered in the optimization calculations. This can be useful if you have network regions that do not interfere with optimizations. Note that if measured interface traffic is used in the optimizations, traffic contributions from the ignored LSPs to this measured traffic might affect the results.

Because you can set each of the Set RSVPTEOpt::Group with selections selections to None, All, or manually selected, you can section off specific LSPs for one optimization treatment or another.

Set optimization parameters

Optimization calculations are based on two sets of parameters that define how much bandwidth the LSPs require, how much bandwidth the interfaces have available for these LSPs, and which metric to use for shortest path. See Table 1 for selection options.

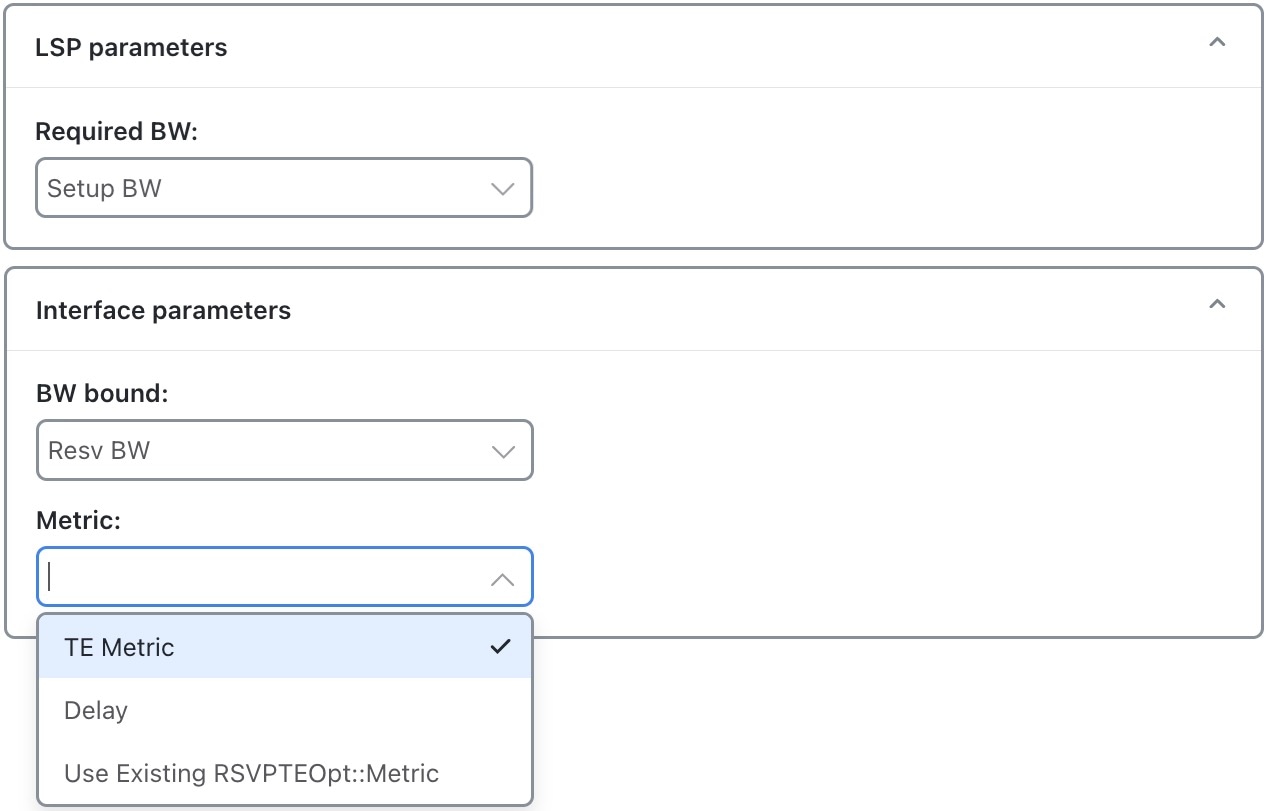
Expand the LSP parameters and Interface parameters panels to specify the following options:

  • LSP parameters:

    • Required BW—Specify how to determine the bandwidth required for the primary LSP paths. The options are: Setup BW, Traff meas, and Traff sim.

  • Interface parameters:

    • BW bound—Specify how much bandwidth the interfaces have available to carry LSPs. Cisco Crosswork Planning tries to route LSPs without surpassing this bound, but exceeds it if necessary. The options are: Resv BW, Capacity, and Capacity sim.

    • Metric—Specify which metric to use for shortest path calculations. The options are: TE Metric and Delay.

Set disjoint groups

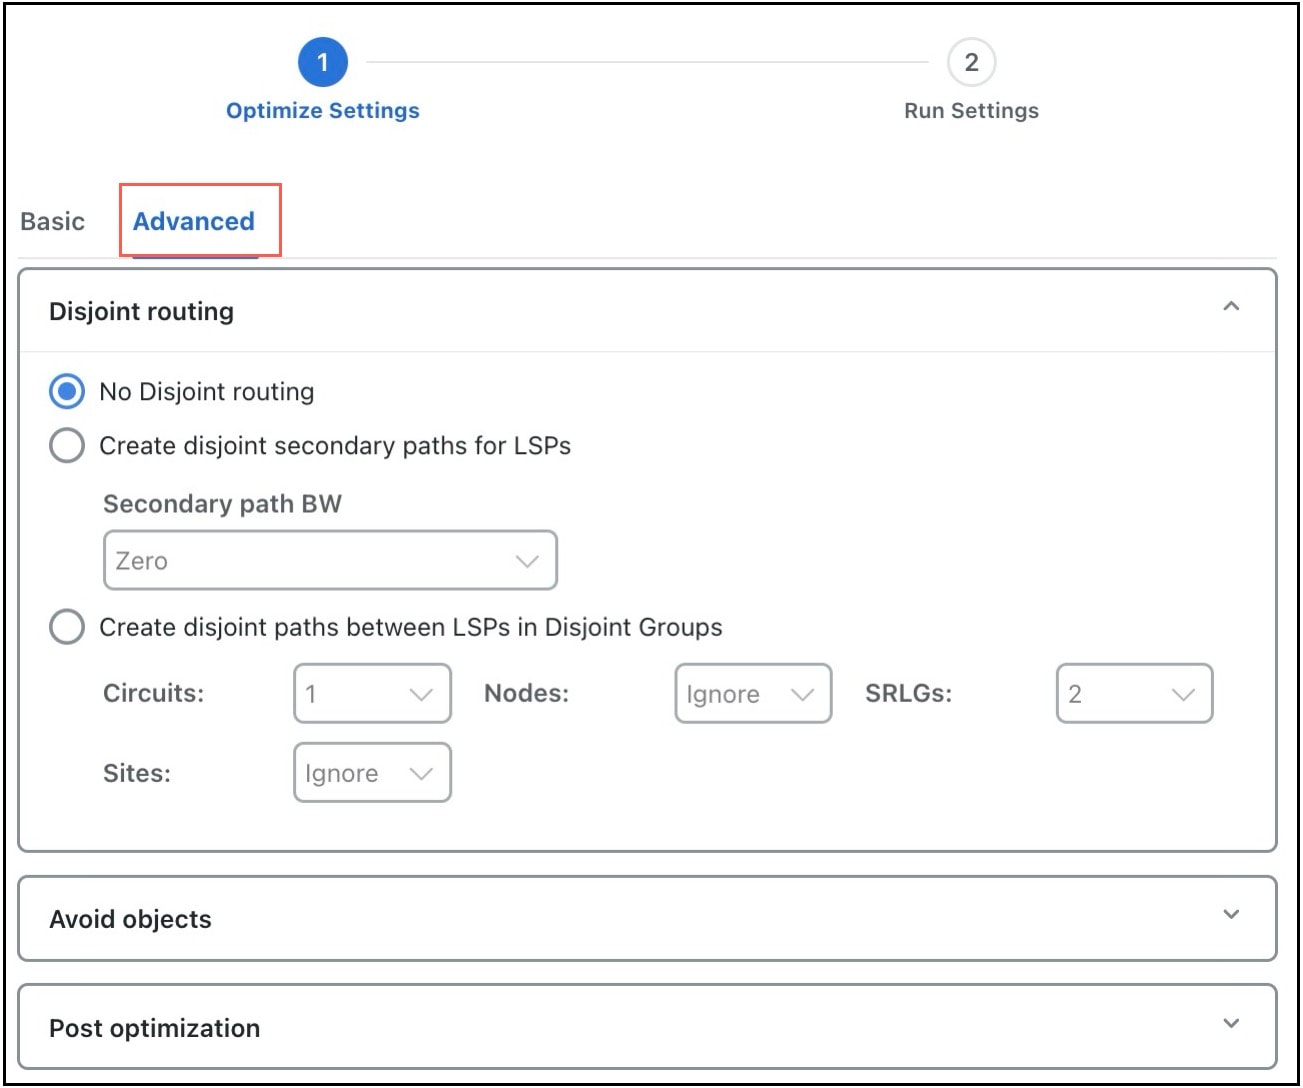
In the Advanced tab, you can create disjoint paths or use existing disjoint paths as follows. Note that two LSP paths are disjoint if they do not route over common objects. These objects are configurable and can be circuits, nodes, sites, or SRLGs.

Figure 3. RSVP-TE LSP optimization advanced options
  • No disjoint routing—Do not create disjoint secondary paths and do not enforce any disjointness on primary paths.

  • Create disjoint secondary paths for LSPs—Create secondary LSP paths that are disjoint from the primary LSP paths.

    Additionally, specify whether to include secondary paths in the optimization. If set to Zero, their bandwidths are set to 0 and are not included. Otherwise, their required bandwidths are set to be the same as the primary paths, and they are included in the optimization.

  • Create disjoint paths between LSPs in Disjoint Groups—Create disjoint paths between LSPs that are in disjoint groups.

Setting avoidance constraints

The Avoid objects section in the Advanced tab (see RSVP-TE LSP optimization advanced options) lets you to select Nodes, Interfaces, and SRLGs to be avoided when optimizing LSPs.

  • Nodes—LSPs are created to route away from the Nodes selected. Default is None.

  • Interfaces —LSPs are created to route away from the Interfaces selected. Default is None.

  • SRLGs—LSPs are created to route away from the SRLGs selected. Default is None.

Set post-optimization parameters

The Post optimization section in the Advanced tab (see RSVP-TE LSP optimization advanced options) lets you identify how to reset the Setup BW for modified LSPs. The available options are as follows:

  • Reset Setup BW to 0.

  • Reset Setup BW to be the same as the resulting RSVPTEOpt::BWReq value.

  • Keep the Setup BW the same.

Run RSVP-TE optimization

To run the RSVP-TE LSP optimization tool, do the following:

Before you begin

  • If this is the first time using the tool and if you want to use your own preconfigured RSVPTEOpt properties, you must manually edit the LSPs and Interfaces tables to create them.

    • LSP RSVPTEOpt::Group—Place LSPs into the Opt, Fit, or Fix groups. Any remaining LSPs are placed in the Ignore group.

    • LSP RSVPTEOpt::RequiredBW—Define an exact amount for the sum total of LSP bandwidth that is using the interface.

    • Interface RSVPTEOpt::BWBound—Define an exact amount of bandwidth that the interface can hold.

    • Interface RSVPTEOpt::Metric—Define an exact amount to use in shortest path calculations.

  • If creating disjoint paths between LSPs in the same disjoint group, the LSPs must first be added to the disjoint groups in the Edit LSP window. Here, you can also assign priorities to LSPs within these groups. Higher priority LSPs are assigned shorter routes based on the metric being used for shortest path calculations. The higher the number, the lower the priority.

Procedure


Step 1

Open the plan file (see Open plan files). It opens in the Network Design page.

Step 2

From the toolbar, choose any of the following options:

  • Actions > Tools > RSVP LSP optimization > RSVP-TE optimization

    OR

  • Preset workflows > Perform optimization, select RSVP LSP Optimization as the optimization type, choose RSVP-TE optimization from the drop-down list, and click Launch.

Step 3

In the Specify LSP groups section, make selections for optimizing LSPs based on Opt, Fit, or Fix LSP groups, or based on those defined in the RSVPTEOpt::Group property. For more information, see Select LSP groups.

Step 4

Expand the LSP parameters panel. In the Required BW field, set bandwidth requirements for the primary LSP paths. For more information, see Set optimization parameters.

Step 5

Expand the Interface parameters panel. In the BW bound field, set how much bandwidth the interfaces can carry. In the Metric field, specify on which property to base the shortest path. For more information, see Set optimization parameters.

Step 6

Click Next.

Step 7

On the Run Settings page, choose whether to execute the task now or schedule it for a later time. Choose from the following Execute options:

  • Now—Choose this option to execute the job immediately. The tool is run and changes are applied on the network model immediately. Also, a summary report is displayed. You can access the report any time later using Actions > Reports > Generated reports option.

  • As a scheduled job—Choose this option to execute the task as an asynchronous job. Set these options:

    • Priority: Select the priority of the task.

    • Engine profiles: Select the engine profile as per your requirement. This section lists all the available asynchronous engine profiles.

    • Schedule: Set the time at which you want to run the tool.

    The tool runs at the scheduled time and using the selected engine profile. You can track the status of the job at any time using the Job Manager window (from the main menu, choose Job Manager). Once the job is completed, download the output file (.tar file), extract it, and import the updated plan file into the user space to access it (for details, see Import plan files from the local machine).

    Note

     
    Ensure that you save the plan file before you schedule the job. Any unsaved changes in the plan file are not considered when you run the tool as a scheduled job.

Step 8

(Optional) If you want to display the result in a new plan file, specify a name for the new plan file in the Display results section.

In the previous step:
  • If you have selected to run the task immediately, by default, the changes are applied on the current plan file. If you want to display the results in a new file, select the Display results in a new plan file check box and enter the name of the new plan file.

  • If you have scheduled the task to run at a later time, by default, the results are displayed in the Plan-file-1. Update the name, if required.

Step 9

Click Submit.


What to do next

See Reports.

Analyze optimization output

Properties created

In addition to creating the input parameters, as described in Table 1, the tool generates the properties listed in Table 1. These properties provide further insight into the optimizations.

Table 2. RSVPTEOpt parameters created

Table

Property

Description

LSPs

RSVPTEOpt::Action

Identifies whether the LSP’s path was updated (optimized).

RSVPTEOpt::PathMetric

Sum of interface metrics on the LSP path.

RSVPTEOpt::ShortestPath

Identifies whether the LSP is now taking the shortest path.

RSVPTEOpt::ShortestPathMetric

Sum of interface metrics on the shortest LSP path.

Interfaces

RSVPTEOpt::BWTotal

Sum of the bandwidth required for all LSPs routed on the interface.

RSVPTEOpt::BWBoundExceeded

Identifies whether the bandwidth bound of the interface was exceeded.

Reports

Each time the optimizer is run, a report is automatically generated. You can access this information at any time by choosing Actions > Reports > Generated reports. Note that new reports replace the previous ones.

The report summarizes the results of the optimization, such as how many LSPs there are total compared to how many were optimized, as well as how they were optimized. It also summarizes how disjoint priorities were handled and the number of paths that exceed the interface’s bandwidth bound.

Optimized LSPs reconfigured

The optimized LSPs are reconfigured with the following parameters:

  • Metric type—Autoroute

  • Metric and Hop limit—na

  • Setup BW—0, the same value as the resulting RSVPTEOpt::BWReq, or unchanged, depending on how you configured the Post Optimization option in the Advanced tab

  • Primary paths Standby—T (true)

  • Status—Active

  • FRR enabled—T (true)

  • LSP entry in the Actual paths table is removed