Get Started

Key concepts

Before you begin using Cisco Crosswork Planning, be familiar with these key concepts.

Plan files

A plan file consists of tables that describe network characteristics, including network topology, traffic, service classes, and routing protocols. In Cisco Crosswork Planning, each plan file represents one network.

Figure 1. Opened plan file

Cisco Crosswork Planning discovery tools initially capture and store the network topology and routing information in plan files. These plan files are the basis of information displayed in and used by Cisco Crosswork Planning.

Plan files include this information:

  • Network configurations

  • Visual layouts

  • IP/MPLS routes, including multicast and LSPs

  • Measured traffic

  • Estimated end-to-end traffic matrix

  • Operational state of network objects

  • Results of analyses, such as worst-case failure analysis results

There are two formats for plan files:

  • The .pln format is compact and can be quickly loaded to and saved in the Cisco Crosswork Planning UI.

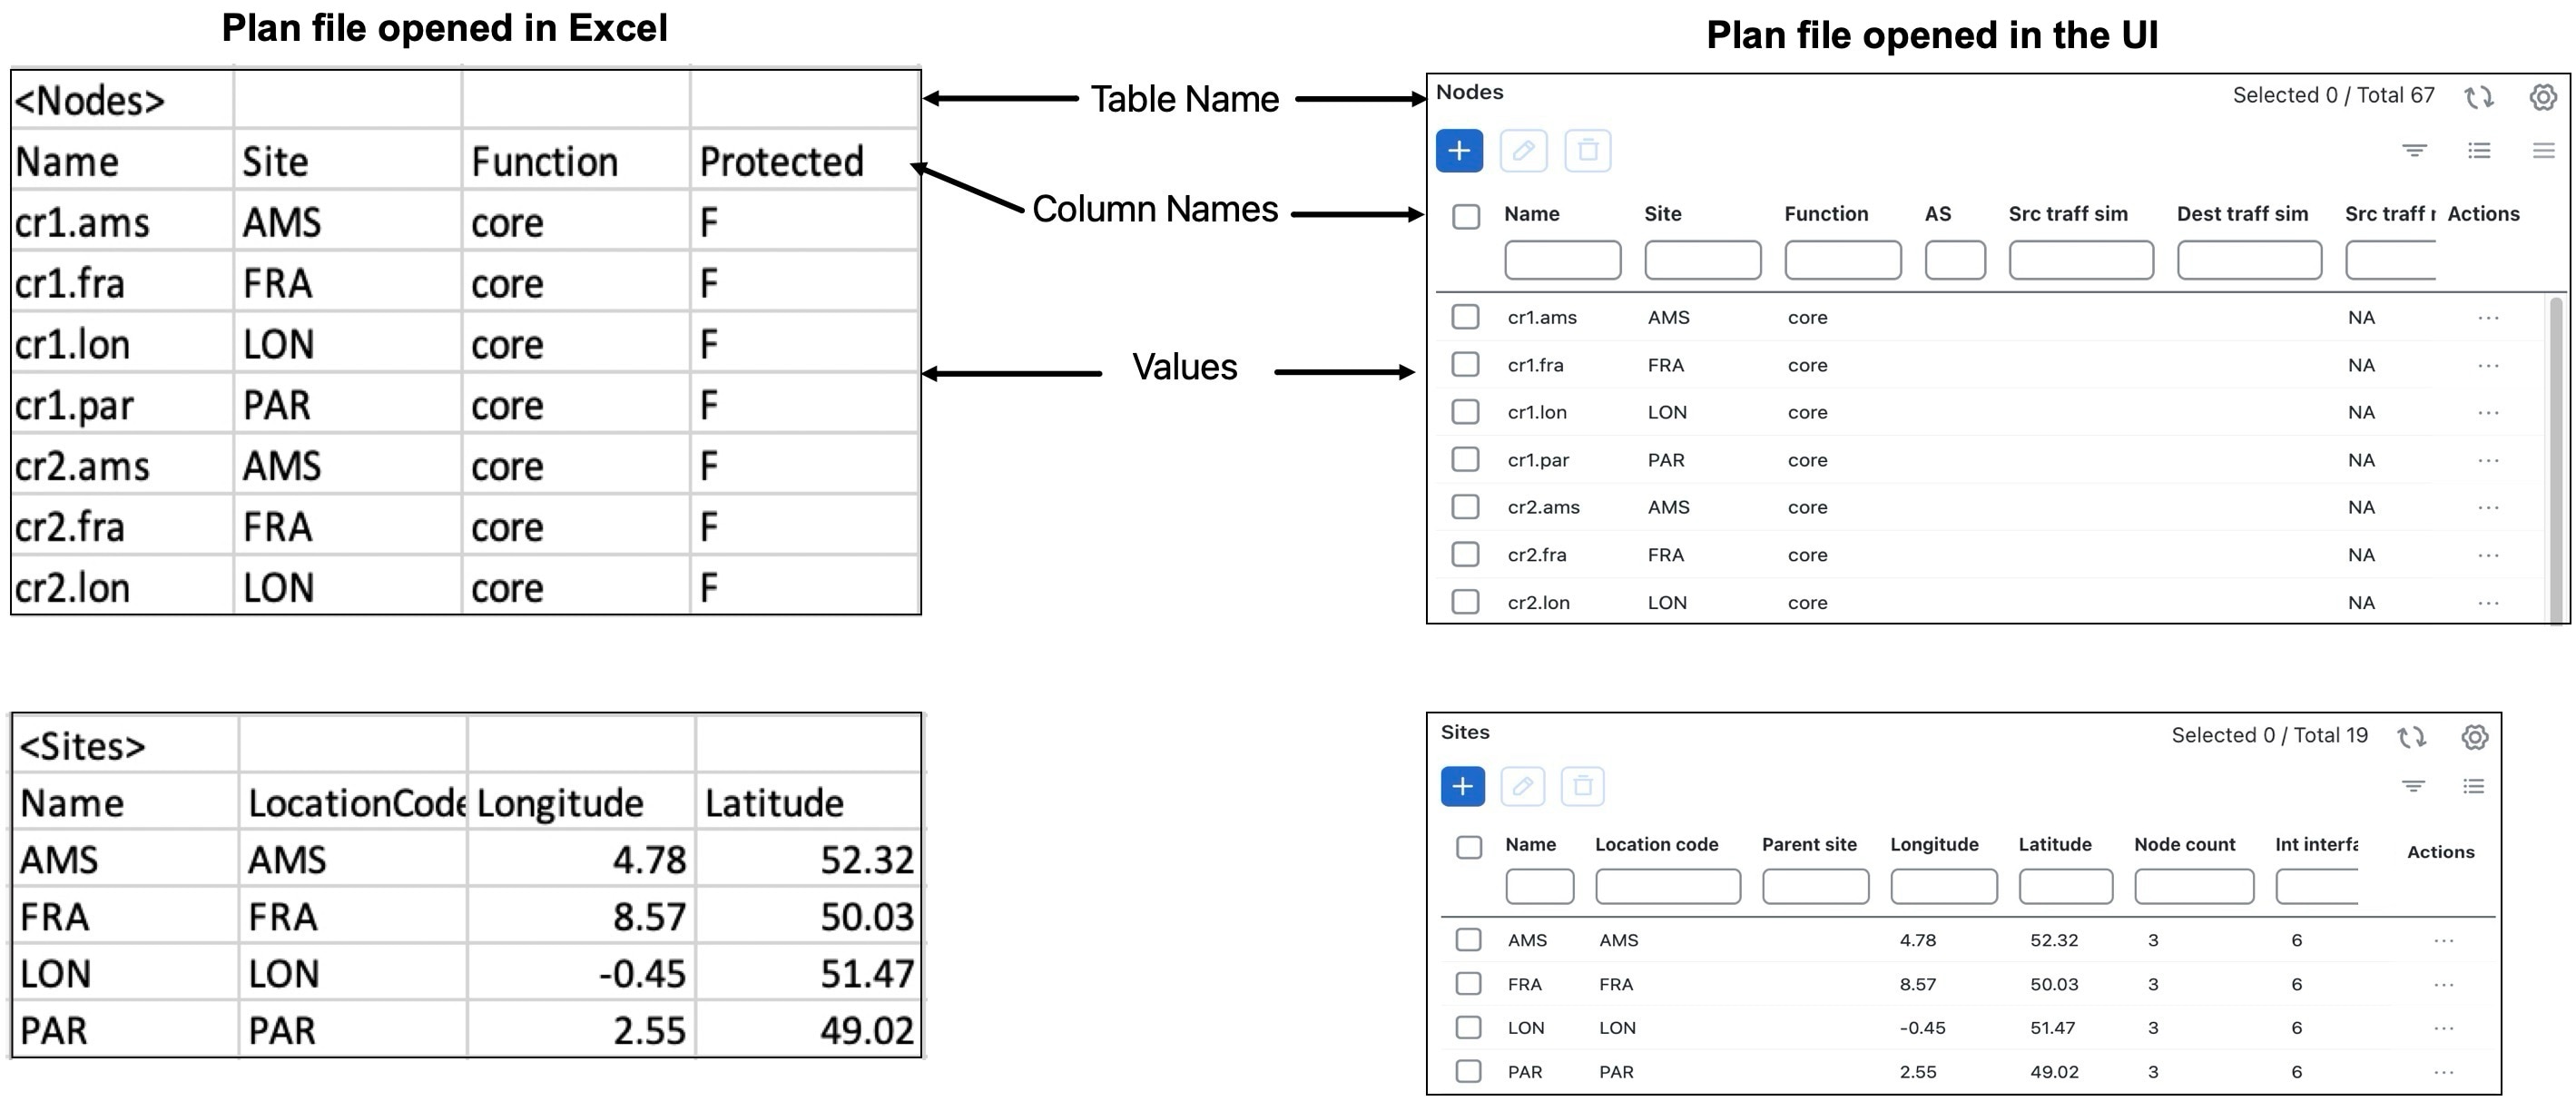
  • The .txt format contains tab-delimited columns. You can create and edit these directly in a text editor or spreadsheet like Excel to apply bulk changes efficiently. In these plan files, each table is labeled with angle brackets, such as <Nodes> and <Sites>.

Cisco Crosswork Planning Design application uses the information from plan files to visualize underlying network models, which are then used to perform simulations.

Plan objects

An object is a representation of elements found in networks, such as nodes, sites, circuits, interfaces, LSPs, and so on. For example, a node represents a router in a network. A site is an object, and is a Cisco Crosswork Planning construct for simplifying the visualization of a network by grouping nodes within a site, or even by grouping sites within a site.

For more information, see Understand Plan Objects.

Design engines

The design engine is the core component that manages simulations and optimizations. It allows performing tasks interactively, either as synchronous or as asynchronous jobs. When you log in and open a plan file, an engine is assigned to your session, subject to engine availability. Once assigned, this engine handles all user real-time activities. You can open a maximum of three plan files simultaneously. Each plan file is maintained individually as a network model, with only one network model active at any given time. You can switch the active network model among all opened network models and all activities are applied to the active network model only.

  • Engine spaces: Engines can be run in two spaces: user space and job space. Each space operates independently and uses only the resources assigned to it. Each engine runs on the same version of the image. However, depending on the space it operates in user space or job space, it operates in synchronous mode or asynchronous mode, respectively.

  • Synchronous mode: When the Cisco Crosswork Planning engine operates in user space, it is in synchronous mode. It can handle user requests interactively and provide results in real-time.

  • Asynchronous mode: When the Cisco Crosswork Planning engine operates in job space, it is in asynchronous mode. Depending on computation complexity, some operations may take longer time to complete. These operations are submitted as jobs and the engines running in job space process these job requests. These jobs run in the background without affecting the other user activities.

    In asynchronous mode, the engine processes every assigned task independently. After a job is complete, it saves the results as .tar files in the Job Manager. You can download and extract this .tar file, and then import the updated file into the user space.

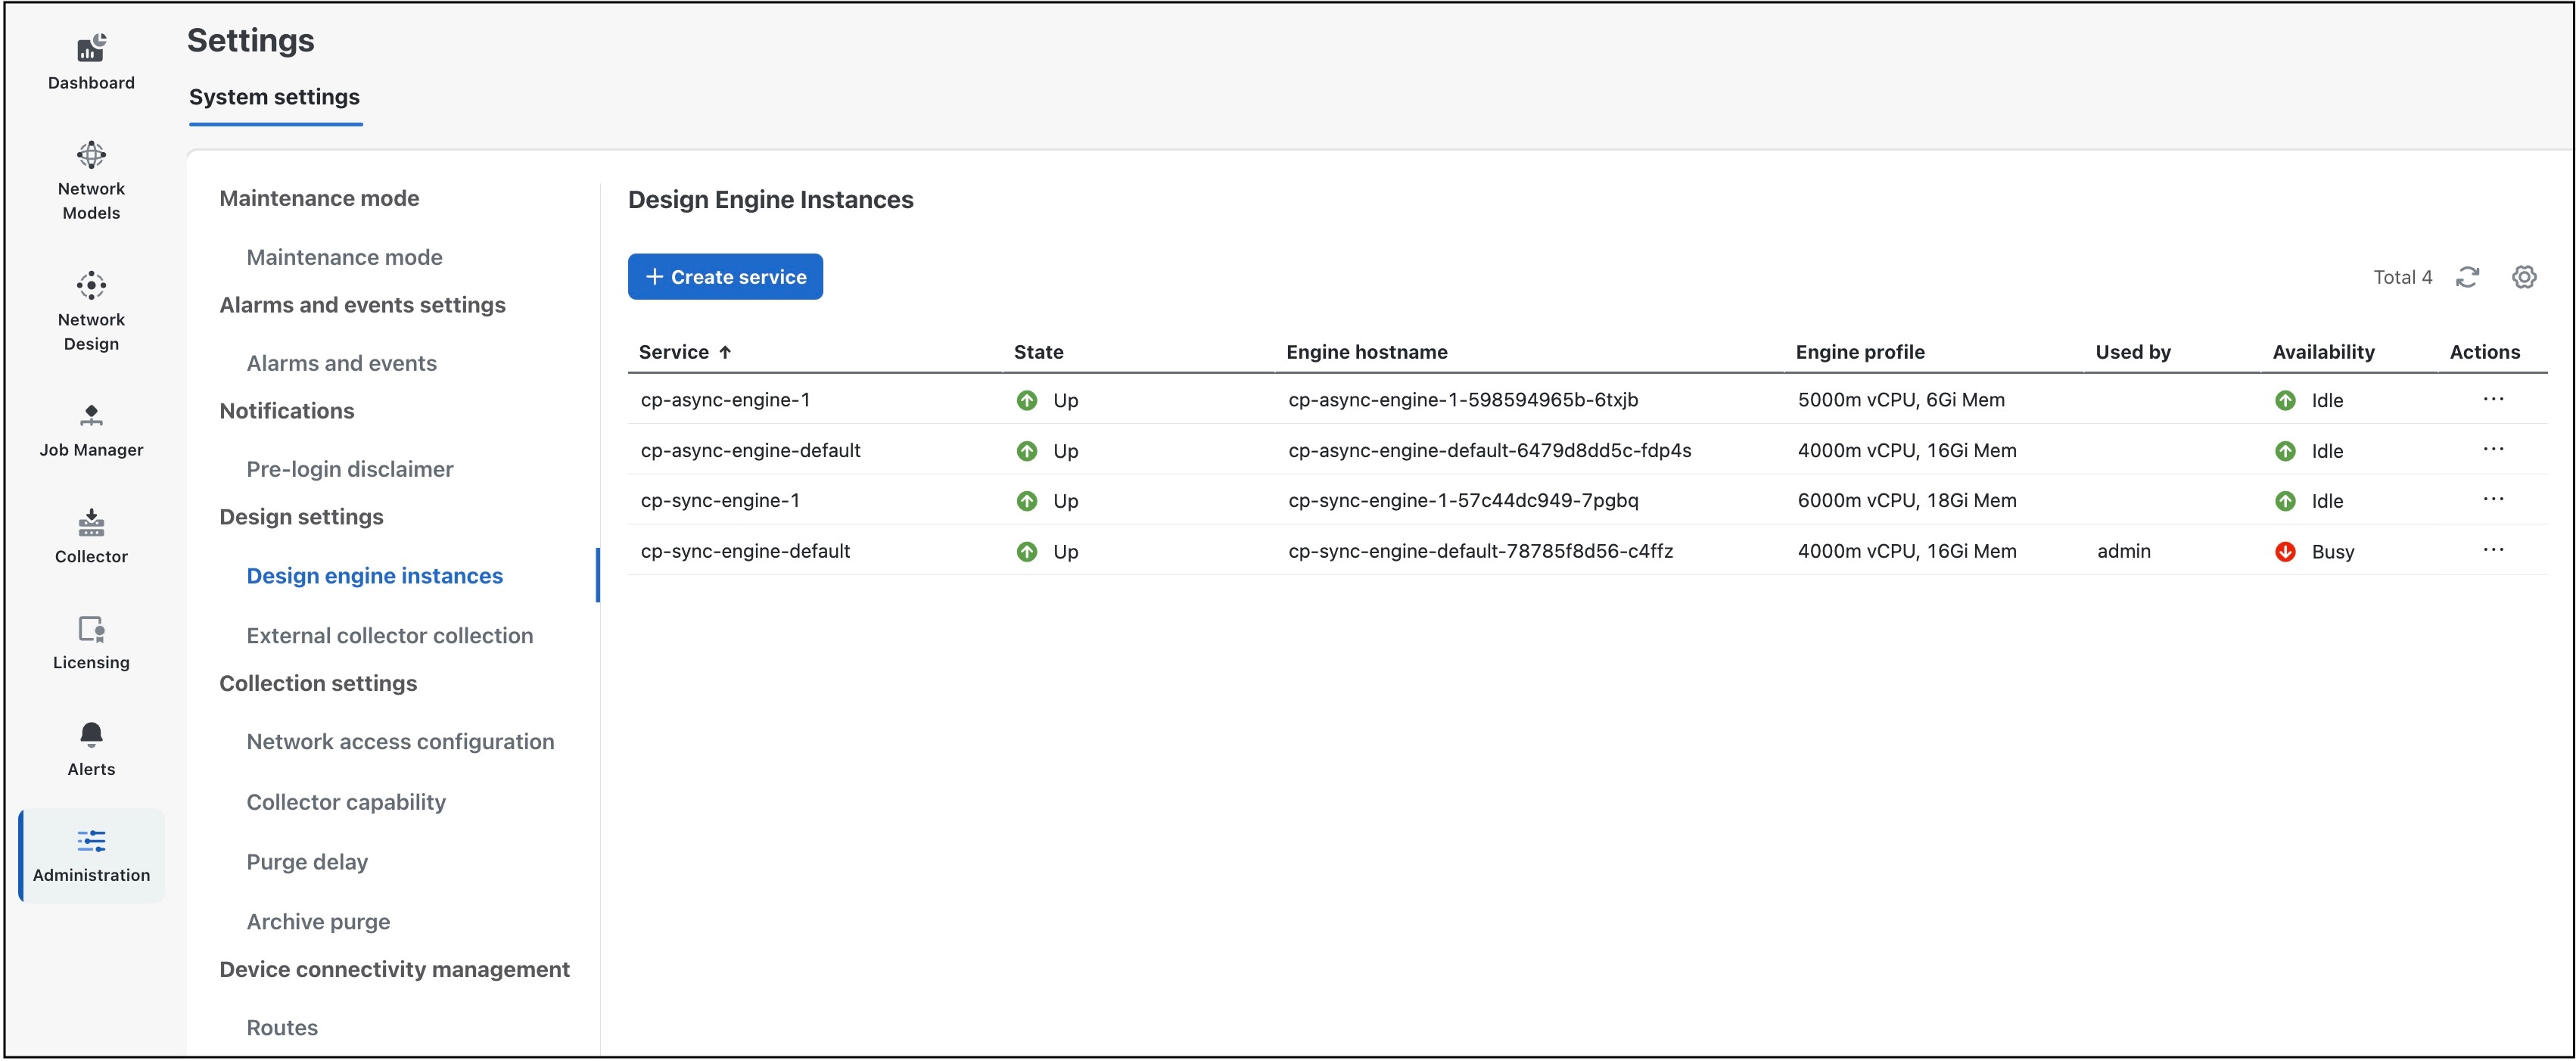
For more information, see Design engine instances.

Patch files

A patch file is a compact way to represent the differences between plan files. These differences, or “patches”, can be applied to other plan files or deployed to the network. Patch files have a .plp format.

For information on creating and applying patches, see Create and Use Patch Files.

Log in to and log out of Cisco Crosswork Planning

Cisco Crosswork Planning is a browser-based application. For details on supported browser versions, see the "Supported web browsers" section in the Cisco Crosswork Planning 7.1 Installation Guide.

After installing Cisco Crosswork Planning, follow these steps to access the Cisco Crosswork Planning UI.

Procedure


Step 1

Open a web browser and enter https://<Crosswork Management Network Virtual IP (IPv4)>:30603/

When you access Cisco Crosswork Planning from your browser for the first time, you may see a warning that the site is untrusted. When this happens, follow the prompts to add a security exception and download the self-signed certificate from the server. After you do this, the browser accepts the Cisco Crosswork Planning server as a trusted site in all subsequent logins.

Step 2

Enter your username and password. The default administrator username and password is admin. This account is created automatically at installation. You must change the initial password for this account during installation verification. We strongly recommend that you keep the default administrator credential secure, and never use it for routine logins. Instead, create new user roles with appropriate privileges and assign new users to those roles. At least one of the users you create should be assigned the "administrator" role.

Step 3

Click Login.

Step 4

To log out, at the top right of the main window, click > Logout.

Note


Logging out does not close the plan file you are working on. It remains open.


Dashboard

The Dashboard page provides a quick operational summary of Cisco Crosswork Planning. This page consists of various dashlets, which vary based on the Cisco Crosswork Planning application installed.

For example, the Collections and Archive network models dashlets appear only if you have installed the Cisco Crosswork Planning Collector application. Similarly, the My network design models, My design jobs, and Design engine dashlets appear only if you have installed the Cisco Crosswork Planning Design application.

Figure 2. Dashboard view

Dashlet navigation

Links in each dashlet allow you to navigate to the desired pages easily. For example, in Dashboard view, link 2 in the Open tab in the My network design models dashlet indicates that there are two network models open in the UI. If you click this number 2, the two opened network models are displayed in the Network Design page.

Dashlet customization

Use the Edit dashboard button at the top right corner to customize how the dashlets appear. For details, see Customize dashlets .

Custom dashboards

In addition to the default General dashboard, you can create custom dashboards to include dashlets of your choice.

Create custom dashboards

Follow these steps to create custom dashboards.
Procedure

Step 1

Click the + Add dashboard at the top right.

Step 2

Click + Add dashlet. The Add Dashlets window appears.

Step 3

From the list, select the dashlet you want and click + Add.

Step 4

Enter the name for the dashboard by clicking next to the dashboard title at the top left. Ensure that the title is between 5 and 50 characters long.

Step 5

Click Save in the Rename Dashboard dialog box.

Step 6

Click Save to save the dashboard.


Rename custom dashboards

Follow these steps to rename the custom dashboards.


Note


You cannot rename the default General dashboard.


Procedure

Step 1

Go to the required custom dashboard and click Edit dashboard at the top right.

Step 2

Enter the new name for the dashboard by clicking next to the dashboard title at the top left. Ensure that the title is between 5 and 50 characters long.

Step 3

Click Save in the Rename Dashboard dialog box.

Step 4

Click Save to save the dashboard.


Delete custom dashboards

Follow these steps to delete the custom dashboards.


Note


You cannot delete the default General dashboard.


Procedure

Step 1

Go to the required dashboard and click Edit dashboard at the top right.

Step 2

Click Delete dashboard at the top right.

Step 3

Click Delete in the confirmation dialog box.


Customize dashlets

By default, all the available dashlets appear in the default General dashboard. Using the Edit dashboard button at the top right corner, you can

  • rearrange the dashlets as per your requirement

  • add dashlets to the dashboard

  • remove dashlets from the dashboard

  • edit the names of the dashlets, and

  • make copies of the dashlets.

Procedure


Step 1

Go to the required dashboard and click Edit dashboard at the top right. The page becomes editable.

Step 2

To rearrange dashlets:

  1. Click in the dashlet you want to move, and drag and drop to the position you want.

  2. Click Save.

Step 3

To add dashlets to the dashboard:

  1. Click + Add dashlet at the top right. The Add Dashlets window appears.

  2. From the list, select the dashlet you want.

  3. Click + Add.

  4. Click Save.

Step 4

To edit dashlet names:

  1. In the text field displaying the current dashlet name, enter the new name for the dashlet. Ensure that the title is between 5 and 50 characters long.

  2. Click Save.

Step 5

To copy dashlets:

  1. Click > Copy in the dashlet you want to copy.

    A copy of the dashlet appears in the dashboard.

  2. Click Save.

Step 6

To remove dashlets:

  1. Click > Delete in the dashlet you want to delete.

    The selected dashlet is removed from the dashboard.

  2. Click Save.


Reset the General dashboard to the default view

Follow these steps to reset the General dashboard to the default view.


Note


You cannot perform this procedure on custom dashboards.


Procedure


Step 1

On the General dashboard, click Edit dashboard at the top right.

Step 2

Click the Reset to default button at the bottom of the page.

The Reset Dashboard confirmation window appears.

Step 3

Click Reset in the confirmation window.


Copy dashboards

To make a copy of the dashboard, go to the required dashboard and click Make a copy at the top.

Design engine instances

For an overview of design engines, see Key concepts.

Post installation, two design engine instances are created in the system.

  • cp-sync-engine-default: This engine is allocated for handling synchronous tasks.

  • cp-async-engine-default: This engine is allocated for running asynchronous jobs.

By default, these engine instances are configured with 4 vCPU (4000m vCPU) and 16 Gi of memory for large profiles, and 8 vCPU (8000m vCPU) and 24 Gi of memory for extra large (XLarge) profiles.

Cisco Crosswork Planning allows you to set up additional design engine instances, and allocate vCPU and memory based on your requirements. You can create up to 10 design engine instances in total, including both synchronous and asynchronous instances. By having multiple instances, you can run several tasks at the same time. For example, if there are eight asynchronous engine instances, it means that eight scheduled jobs can be run in parallel. Similarly, if the number of synchronous engine instances is five, it means that five users can run the synchronous jobs simultaneously.

Resource allocation for design engine instances

In large scale deployments, you may need to complete simulation analysis or capacity planning faster, or perform tasks on huge plan files. In such cases, you need to allocate higher vCPU and memory. Cisco Crosswork Planning allows you to allocate the vCPU and memory values to engine instances while creating them.

The maximum vCPU and memory you can allocate to an instance depend on the system's total resources. For example, if your system has 4 vCPUs and 64 Gi of memory, you can allocate a maximum of 4000m vCPU (that is, 4 vCPU) and 64 Gi of memory for an engine instance. To find the system's resource information, go to the Administration > Crosswork Manager > Crosswork summary > System summary page. The resource details allocated to the design engine instances are listed under the Engine profile column of the Design Engine Instances page.

Create design engine services

Follow these steps to create design engine services as per your requirement.

Before you begin

Ensure you have the "CW Planning Design Setting APIs" Role permission (Administration > Users and Roles > Users). For more details on managing user roles and permissions, see the "Manage Users" section of the Cisco Crosswork Planning 7.1 Collection Setup and Administration document.


Note


You can allocate a maximum of 10 design engines for both synchronous and asynchronous jobs combined.


Procedure


Step 1

From the main menu, choose Administration > Settings > System settings > Design settings > Design engine instances.

The Design Engine Instances page opens.

Figure 3. Design engine instances page

Step 2

Click Create Service.

The Create Service page opens.

Step 3

Enter the Virtual CPU in milli vCPU as per your requirement. For example, to allocate 5 vCPUs, enter 5000. Ensure the value is greater than 100 and does not exceed the system's virtual CPU capacity. For example, if the system has 6 vCPUs, do not enter a value more than 6000.

Step 4

Enter the Memory in Gi (gibibyte) as per your requirement. Ensure that the entered value does not exceed the system's memory.

Step 5

Choose whether to create synchronous or asynchronous instances.

Step 6

Click Save.

The creation process takes approximately 1 to 2 minutes. On successful creation, the Availability column of the newly created service displays the status as "Idle".

If this is the first service you are creating, a service named either cp-sync-engine-1 or cp-async-engine-1 is created based on your selection in Step 5. Subsequently, cp-sync-engine-2 or cp-async-engine-2 is created, and the pattern will continue.


Notice that:

  • The number of design engines increases in the Design Engines dashlet on the Dashboard page.

  • The newly created synchronous engine profile appears under the Auto drop-down list on the Network Design page. For details on using the dynamically created engine profiles, see Select design engine profiles.

  • The newly created asynchronous engine profile appears under the Engine Profile section on the Run Settings page while running the tools as scheduled jobs.

Reset engine sessions

Follow these steps to reset engine sessions.

Before you begin

Ensure you have the "CW Planning Design Setting APIs" Role permission (Administration > Users and Roles > Users). For more details on managing user roles and permissions, see the "Manage Users" section of the Cisco Crosswork Planning 7.1 Collection Setup and Administration document.

Procedure


Step 1

From the main menu, choose Administration > Settings > System settings > Design settings > Design engine instances.

The Design Engine Instances page opens, displaying the details of the available engine instances.

Step 2

Under the Actions column, click > Reset session for the engine instance whose session you want to reset.

Step 3

Click Reset in the confirmation dialog box.


After resetting the session, notice that:
  • The Availability column displays the status as "Idle".

  • For sync engine profiles, the opened plan files are closed.

  • For async engine profiles, the scheduled jobs are aborted.

Delete design engine instances

Follow these steps to delete the dynamically created design engine instances.

Before you begin

Ensure you have the "CW Planning Design Setting APIs" Role permission (Administration > Users and Roles > Users). For more details on managing user roles and permissions, see the "Manage Users" section of the Cisco Crosswork Planning 7.1 Collection Setup and Administration document.


Note


You cannot delete the default design engine instances.


Procedure


Step 1

From the main menu, choose Administration > Settings > System settings > Design settings > Design engine instances.

The Design Engine Instances page opens, displaying the details of the available engine instances.

Step 2

Under the Actions column, click > Delete for the service you want to delete.

Ensure that the design engine service you selected is not the default one.

Step 3

Click Delete in the confirmation dialog box.

The deletion process takes approximately 1 to 2 minutes to complete.


Recreate design engine services

The dynamically created design engine services are deleted when

  • upgrading the Cisco Crosswork Planning Design application

  • restoring the Cisco Crosswork Planning configuration data after a natural or human-caused disaster, or

  • migrating data from an older version of Cisco Crosswork Planning to a newer version.

Follow these steps to recreate them.

Procedure


Step 1

From the main menu, choose Administration > Settings > System settings > Design settings > Design engine instances.

The Design Engine Instances page opens, displaying the details of the available engine instances.

Step 2

Under the Actions column, click > Recreate for the service you want to recreate.

Step 3

Click Recreate in the confirmation dialog box.

The selected design engine instance is recreated.