View Jobs

This section contains the following topics:

Job Manager

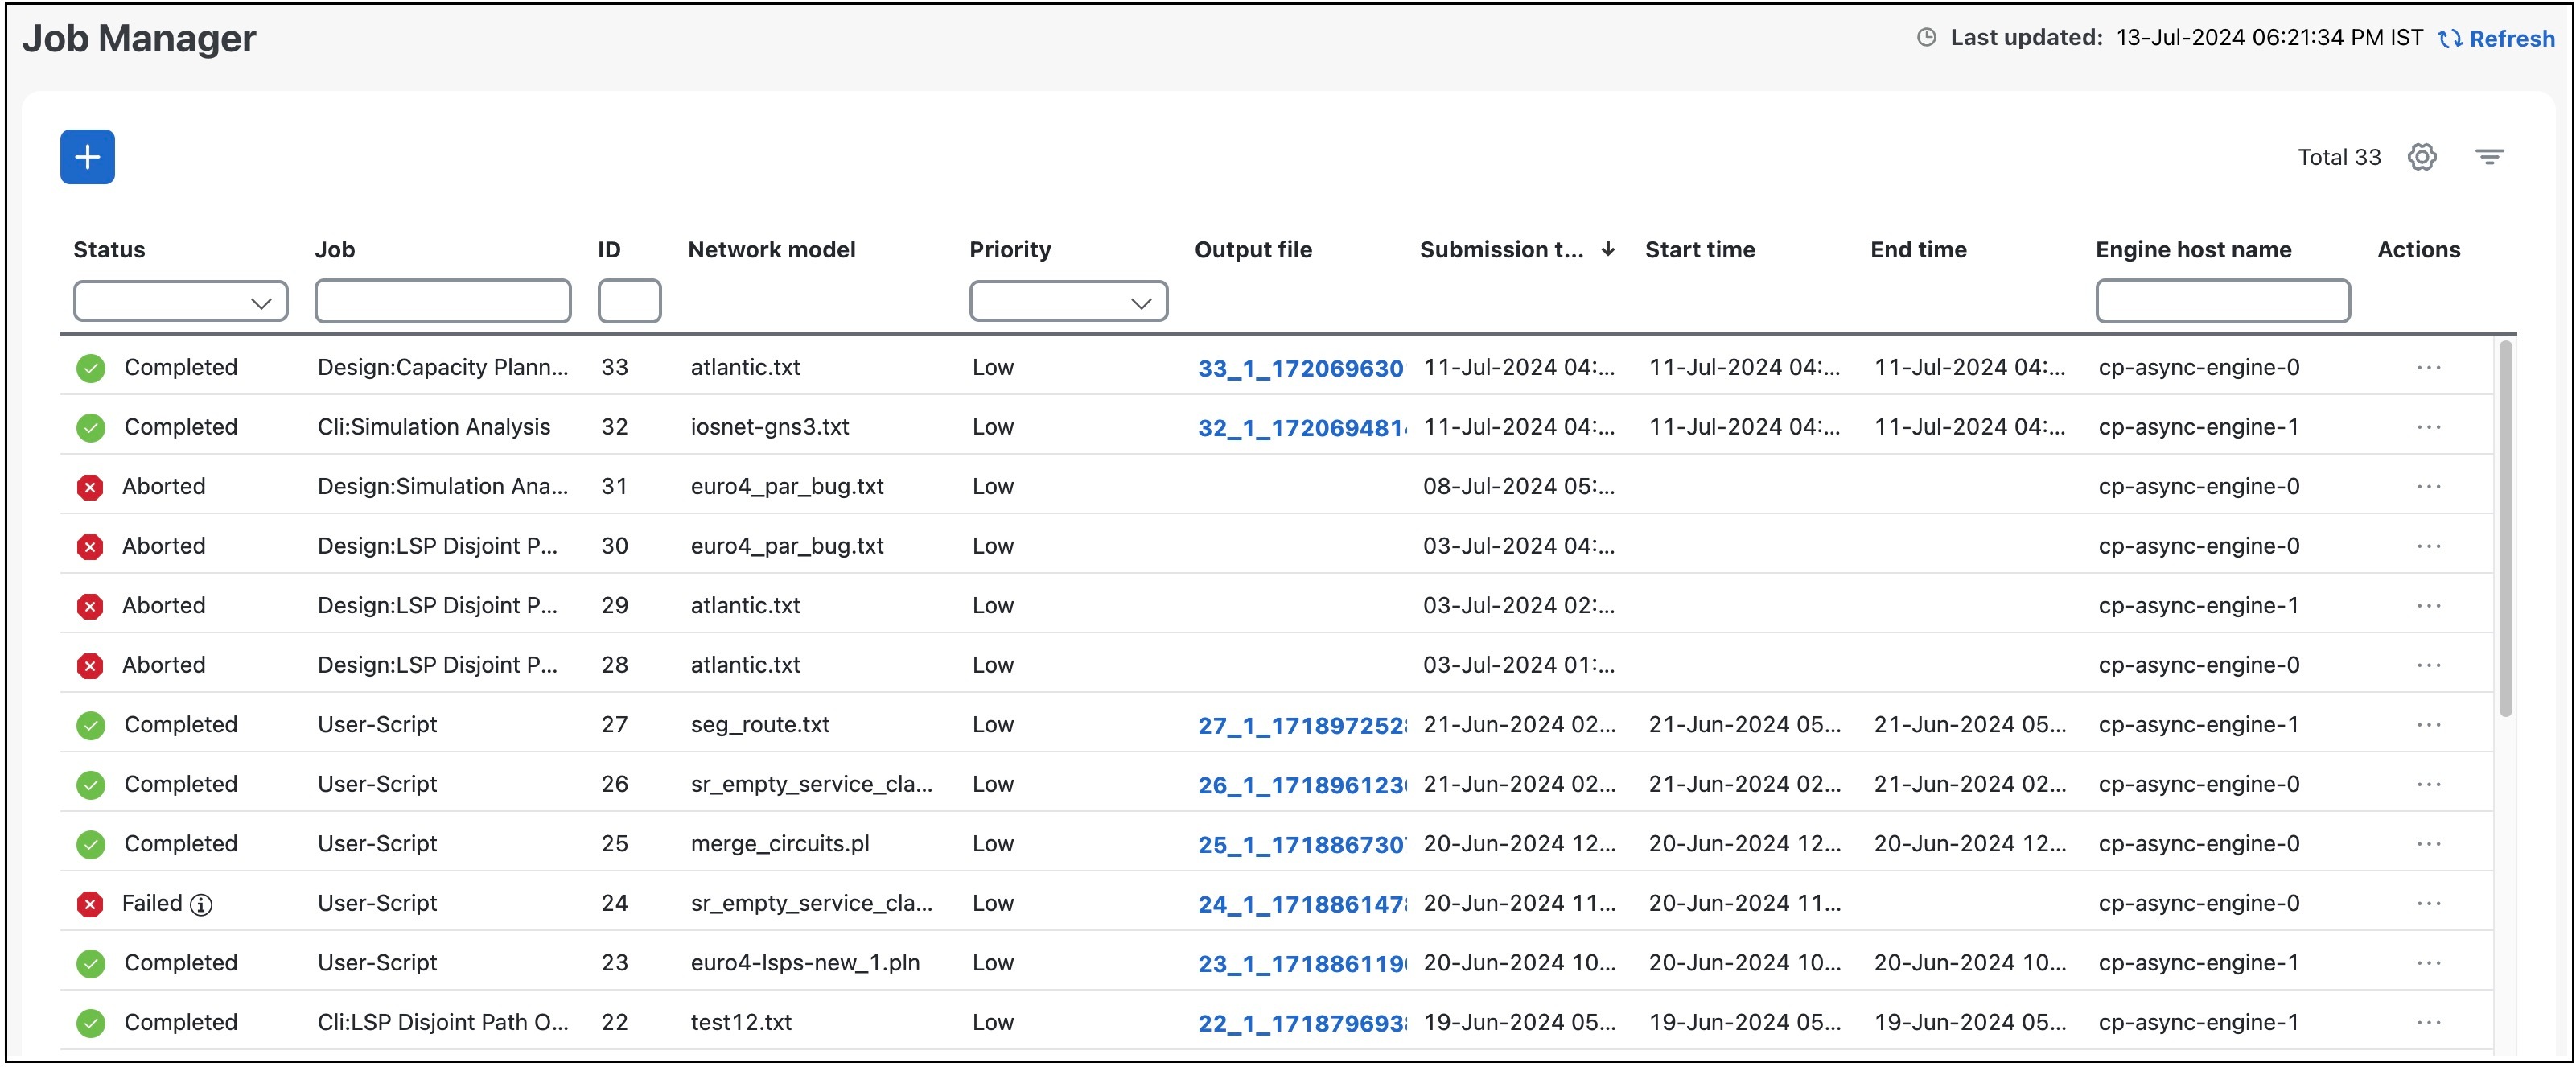
In Cisco Crosswork Planning, you can schedule tools and initializers to run as background jobs, also known as asynchronous jobs. These jobs execute in the background on the design engine instances configured during deployment. The Job Manager page provides details of these jobs.

With background jobs, you can

  • set a priority before it is submitted

  • schedule to run at a required time, or

  • cancel before it moves to the Running state

The Job Manager page also provides options to execute jobs using CLI and custom scripts. For details, see Run tools or initializers using CLI and Run external scripts.

User role permissions for Job Manager

In the Job Manager page

  • any user can view the jobs submitted by any other user

  • any user can view the results of the jobs submitted by any other user

  • any user can cancel (abort) the jobs submitted only by themselves, and

  • only admin users can cancel (abort) the jobs submitted by any user.

View job details

Follow these steps to see the details of the submitted background jobs.

Procedure


Step 1

From the main menu, choose Job Manager.

The Job Manager page opens, displaying the list of all jobs submitted as background jobs.

Figure 1. Job Manager page

The jobs are displayed in descending order of creation time, with the most recent job shown first. To sort the data in the table, click a column heading. Click the column heading again to toggle between ascending and descending sort order.

Click Show/Hide Columns Icon to show or hide the columns. Check the check boxes for the columns you want to show and uncheck the ones you want to hide.

Use Show/Hide Floating Filters icon to toggle the display of the floating filters at the top of each column. Using this filter you can set the filter criteria on one or more columns in the table. To clear all the filters, click the X icon in the Filters field that appears above the table.

Step 2

The Status column shows the types of states: Completed, Scheduled, Queued, Running, Failed, and Aborted. For any failed job, click shown next to the error for more information. For details on all the columns, see Table 1.

Step 3

The Output file column shows the .tar file that is generated after the job has been successfully completed. Click the name of the output file to download it to your local machine and extract the file to view the updated network model. Import this updated network model into the user space to access it (for details, see Import plan files from the local machine).

Step 4

Click > View details under the Actions column to view a comprehensive summary of the details of the submitted jobs.

If a job is in Scheduled, Queued, or Running state, you can use > Cancel under the Actions to abort the job.


Table 1. Job Manager column details

Column

Description

Status

Indicates the status of the submitted background job. The available status types are: Completed, Scheduled, Queued, Running, Failed, and Aborted.

Job

Indicates the type of the job.

If a job is submitted via

  • tools or initializers in the Network Design page, the Job column displays "Design: Tool/initializer name"

  • Using CLI option in the Job Manager page, the Job column displays "Cli: Tool/initializer name", and

  • Using Script option in the Job Manager page, the Job column displays "User-Script".

ID

Indicates the Job ID. When a job is submitted as a background job, a Job ID is created, which is displayed in this column.

Network model

Indicates the network model in which the job was submitted.

Priority

Indicates the priority of the job. When a job is submitted as a background job, you have the option to assign priority, which is displayed in this column. The available options are: High, Medium, and Low.

Options

Indicates the configuration options used while submitting the job. This column is hidden by default.

Output file

Indicates the file that is generated after the job has been successfully completed. Download this file to access the updated network model.

Submission time

Indicates the timestamp at which the job was submitted.

Start time

Indicates the timestamp at which the job execution began.

End time

Indicates the timestamp at which the job execution was completed successfully.

Engine host name

Indicates the engine name used for the job execution.

Schedule

Indicates the timestamp at which the job was scheduled to begin. This column is hidden by default.

Submitted by

Indicates the name of the system or user that submitted the job. For scheduled jobs, this column displays "system" as the job is submitted by the system at the scheduled time. For all other jobs, the "Submitted by" and "Created by" columns display the same information. This column is hidden by default.

Created by

Indicates the user who submitted the job. This column is hidden by default.

Actions

Displays the comprehensive summary of the submitted jobs when you use the > View details option under this column. You can also use > Cancel to abort the job if it is in the Scheduled, Queued, or Running state.

Run tools or initializers using CLI

In addition to running the tools and initializers from the Network Design page, Cisco Crosswork Planning supports running them using CLI.

Follow these steps to run the tools or initializers using CLI.

Procedure


Step 1

From the main menu, choose Job Manager.

The Job Manager page opens, displaying the list of all jobs submitted as background jobs.

Step 2

Click Add icon > Using CLI.

A list of all available tools and initializers appears.

Step 3

Select the required tool or initializer and click Next.

A list of all available network models appears.

Step 4

Select the network models in which you want to run the tool or initializer, and click Next.

The number of network models you can select varies based on the tool or initializer chosen in the previous step. An error message appears at the top when the allowed number is exceeded.

Step 5

Enter the input configuration options in the text field, and click Next.

For help with this, click Usage Help. The Usage Help page displays the details of the configuration parameters that you can use in a specific tool or initializer. It also displays syntax, required configuration options, optional configuration options, and an example command.

Note

 
You can enter only the Optional options. You need not enter the tool name and the Required options.

On this page, you can also update the tool or initializer, and name of the output file.

  • To change the tool or initializer, click Edit next to the tool name that you already selected.

  • To update the name of the output file, enter the new name in the Output file field. By default, tool_out.txt is used as the file name.

Step 6

On the Run Settings page, choose whether to execute the task immediately or schedule it for a later time. Choose from these Execute options:

  • Now—Choose this option to run the tool/initializer immediately using the selected engine profile.

  • As a scheduled job—Choose this option to execute the task as an asynchronous job. The tool runs at the scheduled time and using the selected engine profile.

Based on the selection, set these options:

  • Priority—Select the priority of the task.

  • Engine profiles—Select the engine profile as per your requirement. This section lists all the available asynchronous engine profiles.

  • Schedule—Set the time at which you want to run the tool. This option is available only for scheduled jobs.

Step 7

Track the status of the job on the Job Manager page. The job name is prefixed with "Cli:" in the Job column. Once the job is completed successfully, download the output file (.tar file), extract it, and import the updated plan file into the user space to access it (for details, see Import plan files from the local machine).


Run external scripts

In Cisco Crosswork Planning, OPM Python library (previously known as OPM API) and Design RPC Python libraries (previously known as Design RPC APIs) are supported via scripts. You can upload customized scripts that are created using these APIs. You can also use the scripts to run the CLI tools.

OPM Python libraries provide a powerful Python API to manipulate network models. It lets you operate on the network without having to worry about device-specific properties. Even if the underlying routers are replaced by routers from a different vendor, the API calls remain exactly the same.

For a sample Python script, see Example: Run external scripts.

Follow these steps to run the external scripts.

Procedure


Step 1

From the main menu, choose Job Manager.

The Job Manager page opens, displaying the list of all jobs submitted as background jobs.

Step 2

Click Add icon > Using script.

A list of scripts available in the user space appears.

Step 3

Select the required script and click Next to continue.

If the required script is not available in the list, use the Upload script option to upload the script. The script name appears under Available Scripts. You can also find the script file under the Network Models > My user space > All files section.

Step 4

Select the network models on which you want to run the script, and click Next.

Step 5

Enter the input configuration options in the text field using the following format, and click Next.

script_name arg1 arg2

Use the Edit button to change the script file, if required.

Step 6

On the Run Settings page, choose whether to execute the task immediately or schedule it for a later time. You can also set priority for the jobs. Choose from the following Execute options:

  • Now—Choose this option to run the script immediately.

  • As a scheduled job—Choose this option to execute the task as an asynchronous job. If you choose this option, set the time at which you want to run the script. The script runs at the scheduled time.

Step 7

Track the status of the job on the Job Manager page. The Job column displays "User-Script" for the script jobs. Once the job is completed successfully, download the output file (.tar file), extract it, and import the updated plan file into the user space to access it (for details, see Import plan files from the local machine).


Example: Run external scripts

This example describes how to use the external scripts in Cisco Crosswork Planning. The sample Python script (ext_exe_eg.py) appends a description to every interface in the network with "My IGP metric is <value>."

Contents of ext_exe_eg.py:

import sys
from com.cisco.wae.opm.network import Network

src  = sys.argv[1]
dest = sys.argv[2]

srcNet =  Network(src)

for node in srcNet.model.nodes:
    cnt = 1
    for iface in node.interfaces:
        iface.description = 'My IGP metric is ' + str(iface.igp_metric)
        cnt = cnt + 1    

srcNet.write(dest)

Upload this script and run it from Job Manager using the steps mentioned in Run external scripts. Use the following command:

ext_exe_eg.py input-plan.pln out-plan.pln

Once the job is completed successfully, download the output file (.tar file) from the Job Manager page, extract it, and import the updated plan file into the user space to access it.