Perform Explicit and Tactical RSVP-TE LSP Optimization

The Explicit RSVP-TE LSP optimization tool minimizes congestion by optimizing the placement of primary and secondary paths for selected RSVP LSPs. By default, Cisco Crosswork Planning minimizes the utilization across primary paths under normal operation and creates disjoint secondary paths so that a single failure cannot disrupt both paths simultaneously.

The default is to optimize utilization on all interfaces using all RSVP LSPs on those interfaces. Another default is to remove CSPF constraints, such as affinities and hop limits. For example, Cisco Crosswork Planning sets the setup bandwidth to 0, thus providing the greatest flexibility when setting these explicit paths.

Upon completion, Cisco Crosswork Planning writes a report containing the results of the optimization. To access this information later, choose Actions > Reports > Generated reports.

This section contains the following topics:

Run Explicit RSVP-TE LSP optimization

To run the Explicit RSVP-TE LSP optimization tool, do the following:

Procedure


Step 1

Open the plan file (see Open plan files). It opens in the Network Design page.

Step 2

From the toolbar, choose any of the following options:

  • Actions > Tools > RSVP LSP optimization > Explicit optimization

    OR

  • Preset workflows > Perform optimization, select RSVP LSP Optimization as the optimization type, choose Explicit optimization from the drop-down list, and click Launch.

Step 3

Select the interfaces you want to optimize and click Next.

By default, none of the interfaces are selected. You can, however, optimize a limited number of interfaces or specify a set of RSVP LSPs by preselecting them.

Step 4

Select the RSVP LSPs you want to optimize and click Next.

Step 5

Specify objectives for primary, secondary, and tertiary paths. For field descriptions, see Table 1.
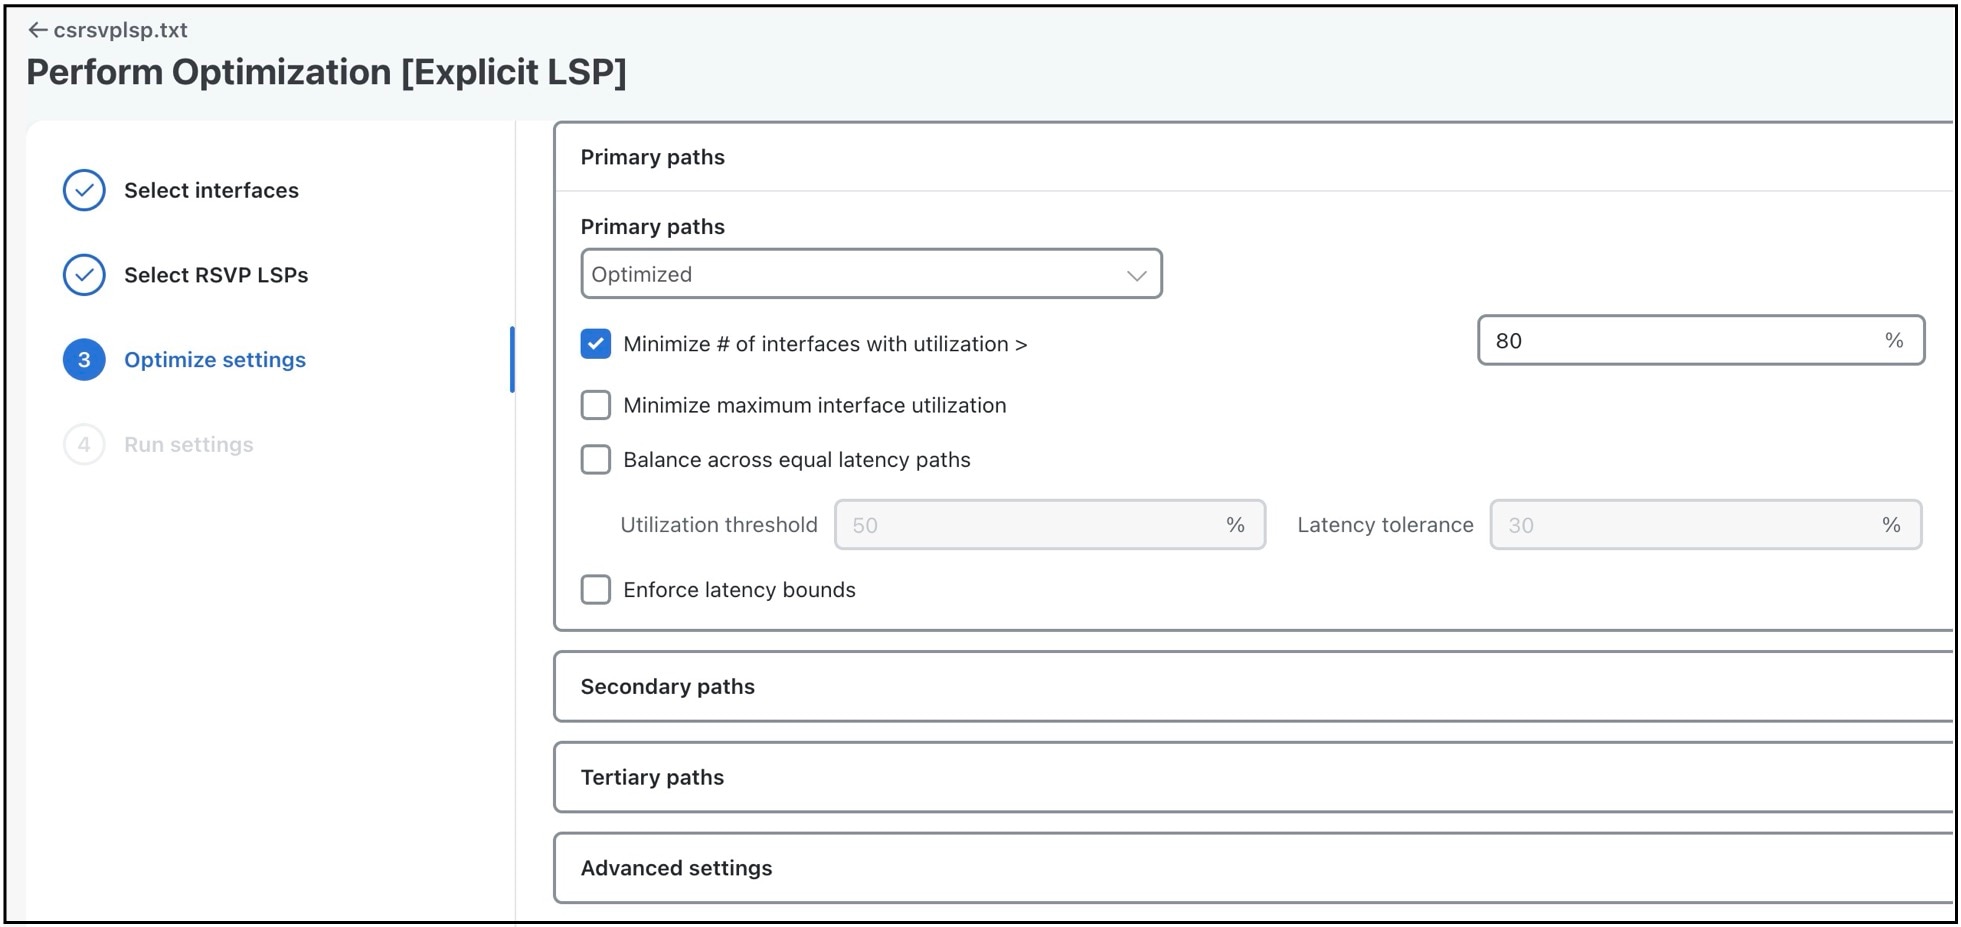
Figure 1. Explicit RSVP-TE LSP optimization options

Step 6

(Optional) Specify the required advanced settings. For field descriptions, see Table 1.

Step 7

Click Next.

Step 8

On the Run Settings page, choose whether to execute the task now or schedule it for a later time. Choose from the following Execute options:

  • Now—Choose this option to execute the job immediately. The tool is run and changes are applied on the network model immediately. Also, a summary report is displayed. You can access the report any time later using Actions > Reports > Generated reports option.

  • As a scheduled job—Choose this option to execute the task as an asynchronous job. Set these options:

    • Priority: Select the priority of the task.

    • Engine profiles: Select the engine profile as per your requirement. This section lists all the available asynchronous engine profiles.

    • Schedule: Set the time at which you want to run the tool.

    The tool runs at the scheduled time and using the selected engine profile. You can track the status of the job at any time using the Job Manager window (from the main menu, choose Job Manager). Once the job is completed, download the output file (.tar file), extract it, and import the updated plan file into the user space to access it (for details, see Import plan files from the local machine).

    Note

     
    Ensure that you save the plan file before you schedule the job. Any unsaved changes in the plan file are not considered when you run the tool as a scheduled job.

Step 9

(Optional) If you want to display the result in a new plan file, specify a name for the new plan file in the Display results section.

In the previous step:
  • If you have selected to run the task immediately, by default, the changes are applied on the current plan file. If you want to display the results in a new file, select the Display results in a new plan file check box and enter the name of the new plan file.

  • If you have scheduled the task to run at a later time, by default, the results are displayed in the Plan-file-1. Update the name, if required.

Step 10

Click Submit.


Optimization options

Following table describes the options that are available while running the Explicit and Tactical explicit RSVP-TE LSP optimization tools (Actions > Tools > RSVP LSP Optimization > Explicit optimization or Tactical explicit optimization):

Table 1. Explicit RSVP-TE LSP optimization options

Field

Description

Primary path options

Primary paths

Define whether to reroute primary RSVP LSP paths:

  • Optimized—Create optimized explicit primary paths based on the objectives selected.

  • Keep—Route RSVP LSPs along the existing primary paths.

    Primary paths are optimized using the following three objectives in order of priority. The first two objectives move RSVP LSPs away from their shortest latency path in an attempt to reduce the utilizations of the most highly utilized interfaces in the network.

Minimize # of interfaces with utilization > ___ %

Specify a percentage and minimize the number of selected interfaces with utilizations over that percentage under normal operation (default).

Minimize maximum interface utilization

Route primary paths so that the maximum interface utilization over all selected interfaces is minimized under normal operation.

Balance across equal latency paths

Balance utilizations over lower utilized interfaces. For example, use this option to balance utilizations on parallel interfaces between two nodes if the two interfaces have the same latency.

  • Utilization threshold—Keep the number of interfaces with utilization greater than this value as low as possible without significantly increasing the latencies of the primary paths.

  • Latency tolerance—Permit this percentage of additional latency.

Enforce latency bounds

Enforce latency bounds that can be specified for some or all demands in the plan file. If checked, this option takes precedence over all of the preceding objectives.

Secondary path options

Secondary paths

Define whether and how to route secondary paths. Following are the options:

  • Optimized—Create optimized explicit secondary paths based on the objectives selected.

  • Dynamic—Route secondary paths dynamically. No explicit hops will be created for the path.

  • None—No secondary paths are created; existing paths are removed.

For optimized secondary paths, the objectives are used in order of priority listed.

Hot standby

Set the secondary path to be a hot standby, which means it is established at the same time as the primary path, rather than after the primary path fails.

1. Maximize primary/secondary path disjointness with respect to:

Define primary and secondary paths for each RSVP LSP that are disjoint with respect to circuit, SRLG, and nodes, depending on what is selected.

  • Circuits—No circuit is used by both the primary and secondary paths (default = 1).

  • SRLGs—No SRLG is used by both the primary and secondary paths (default = 2).

  • Nodes—No node is used by both the primary and secondary paths (default = 3).

  • Traffic disjointness only—A path is acceptable even if it uses similar circuits, SRLGs, or nodes as other paths provided there is no traffic routed over the RSVP LSP when failures occur.

    You can specify the degree of disjointness of primary and secondary paths. The lower the number, the higher the disjointness priority. For example, if it is important that the paths are node disjoint and the SRLG disjointness are less important, you can change the setting to circuits 1, nodes 2, and SRLGs 3.

    Note that the network topology sometimes makes it impossible to fulfill all the selected disjointness requirements. In this case, paths are selected that are maximally disjoint. That is, they are disjoint for as many circuits, SRLGs, and nodes as possible.

2. Minimize # of interfaces with utilization > ___ %

Options 2 and 3 both operate on the selected failure scenarios (circuits, SRLGs, and nodes) listed in the “Failures to consider” options listed under 3. These choices are the failure scenarios over which the simulation is performed at the end of the optimization. Note that this selection of failure scenarios is distinct from the failure scenarios selected for the disjointness objective 1.

Use option 2 to minimize the number of interfaces with utilizations over the specified percentage across all selected failure scenarios.

3. Minimize maximum interface utilization

Use option 3 to minimize the maximum interface utilization over all interfaces and over all selected failure scenarios.

Failures to consider

Choose the objects to consider.

Tertiary path options

Tertiary paths

Define whether to create tertiary paths:

  • Dynamic—Create dynamic tertiary paths.

  • None—No tertiary paths are created.

Hot standby

Set the tertiary path to be a hot standby path, which means it is brought up with the primary path, rather than after the primary path fails.

Table 2. Advanced explicit RSVP-TE LSP optimization options

Field

Description

Non-optimized interfaces

You can specify whether to ignore non-optimized interfaces or set the acceptable level of utilization for them.

If setting an acceptable utilization level and if both options are selected, Cisco Crosswork Planning uses the higher of the two. These settings are calculated on a per-interface basis.

  • Acceptable utilization of optimized interfaces: ___%—This value is the same as the utilization threshold set in the Primary path area (Minimize # of interfaces with utilization > ___%, where the default is 80). To change this value, you must change it in the Primary path area.

    If using the Tactical explicit RSVP-TE LSP optimization tool, this field is equivalent to, and thus only changeable in, the Acceptable utilization ___% field.

  • Current utilization + ___%—Current utilization of non-optimized interfaces plus the added percentage.

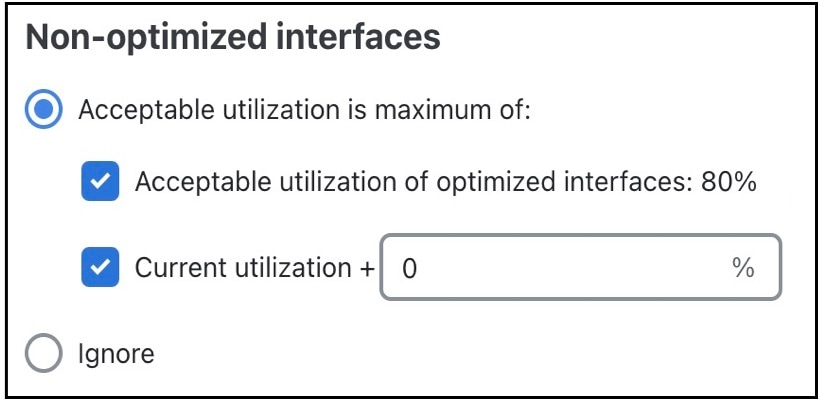
Example: There are two non-optimized interfaces: cr1.chi_cr1.mia has a utilization of 60% and cr2.sjc_cr2.okc has a utilization of 78%.

The acceptable utilization settings for non-optimized interfaces are:

  • The primary path utilization threshold is 80%.

  • The current utilization has 5% added to it.

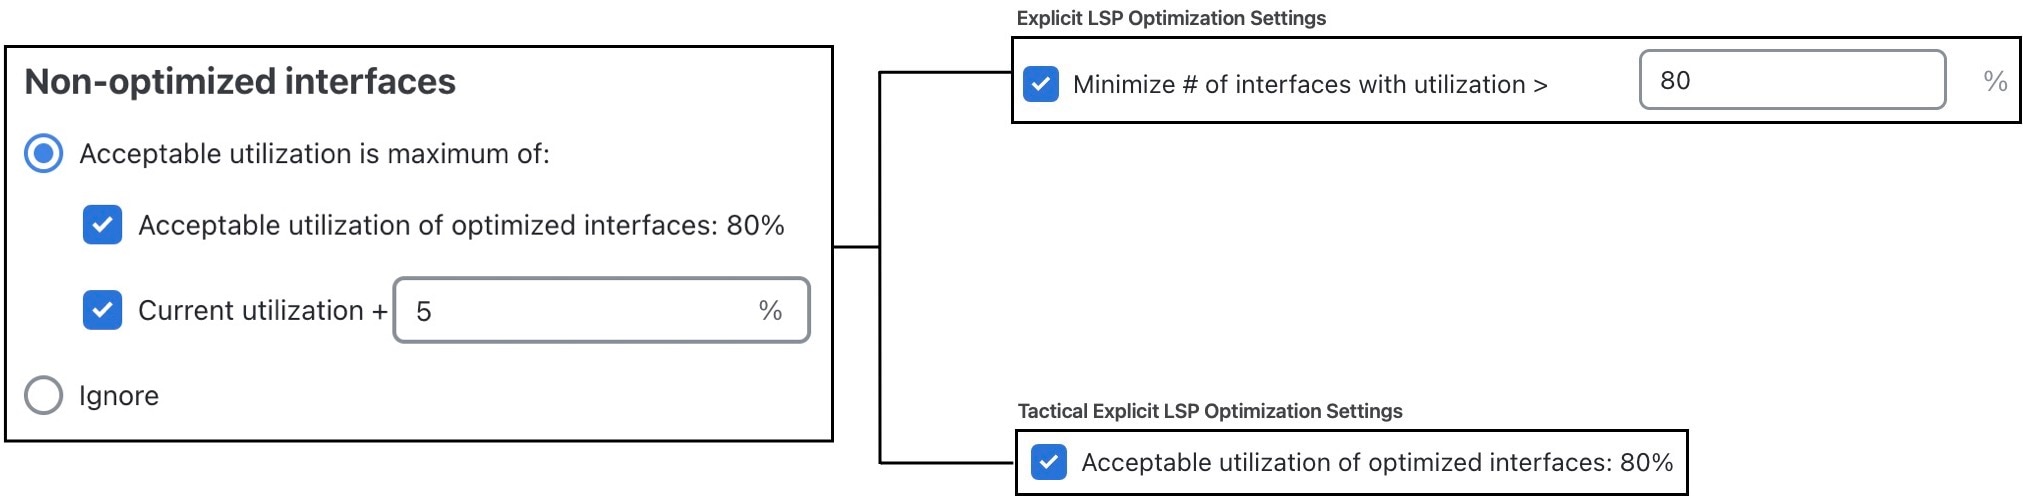
Result: The maximum utilization for each interface is individually calculated. The acceptable level of utilization for cr1.chi_cr1.mia is 80%, and the acceptable level of utilization for cr2.sjc_cr2.okc is 83% (78 + 5).

LSP configuration

By default, Cisco Crosswork Planning creates named paths across the RSVP LSPs that were selected if a reroute is required to achieve the optimization objectives. For example, if a selected dynamically routed RSVP LSP has an acceptable route, Cisco Crosswork Planning does not create a named path for it.

To change this default, click All selected LSPs. Cisco Crosswork Planning then creates and routes fully explicit named paths for all selected RSVP LSPs.

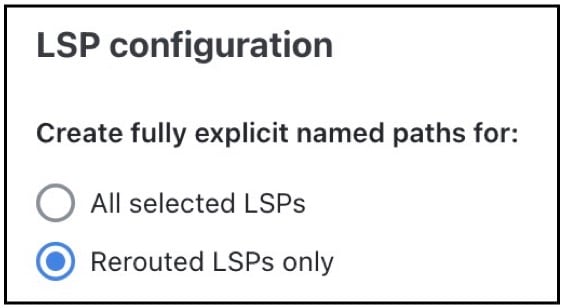
By default, Cisco Crosswork Planning sets the Setup BW to zero, providing the greatest flexibility when creating explicit routes. As well, all affinities and hop limits are removed, and the setup and hold priorities are set to 7. These changes apply only to the RSVP LSPs with newly created or changed explicit named paths.

You can turn off these defaults, and you can also set them individually after the optimization is performed using the Edit LSP Path window. If these defaults are turned off, the original parameters are preserved.
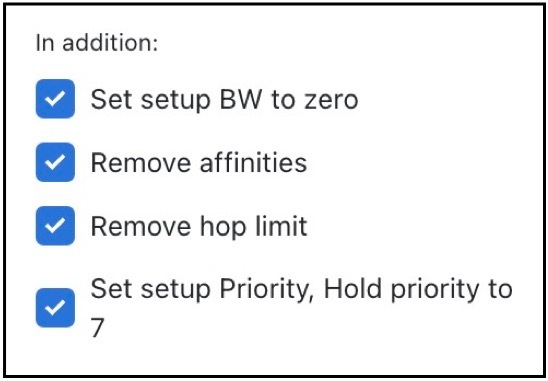
Traffic level

The traffic level used in the utilization calculations and optimizations. For information on traffic levels, see Simulate Traffic Flow from Source to Destination Using Demands.

Rerouting preference

By default, preferences on which RSVP LSPs to reroute are not based on traffic volume. You can select high-traffic or low-traffic options to sequentially give priority to RSVP LSPs with higher and lower traffic.

Tactical explicit RSVP-TE LSP optimization

The Tactical explicit optimization tool is a reduced version of the Explicit RSVP-TE LSP optimization tool. This tool optimizes only primary paths using the minimum number of path changes required to bring utilizations below an acceptable level. It is useful when you need to reduce congestion in a specific area of the network with a limited number of RSVP LSP reconfigurations.

If you need to target specific interfaces or RSVP LSPs to confine the optimization to problem areas, select those interfaces or RSVP LSPs first. Then, from the toolbar, choose any of the following options:

  • Actions > Tools > RSVP LSP optimization > Tactical explicit optimization

    OR

  • Preset workflows > Perform optimization, select RSVP LSP Optimization as the optimization type, choose Tactical explicit optimization from the drop-down list, and click Launch.