Manage Certificates

This section contains the following topics:

Overview

A certificate is an electronic document that identifies an entity such as a person, server, or company and links it to a public key. When a certificate is created, both a public key and a matching private key are generated. In the TLS protocol, the public key encrypts data, while the private key decrypts it.

Certificates are signed by an issuer, often a Certificate Authority (CA), which acts as a "parent" certificate. This process can also be self-signed. In a TLS exchange, a trust chain of certificates verifies the issuer's validity. This chain includes three types of entities: a self-signed root CA certificate, possibly several intermediate CA certificates, and an end-entity certificate. Intermediate certificates connect the server certificates to the root CA, adding security. Starting with the root certificate's private key, each certificate in the chain signs and issues the next one, ending with the end-entity certificate used for server or client authentication. See X.509 Certificates and HTTPS

Certificates in Crosswork Network Controller

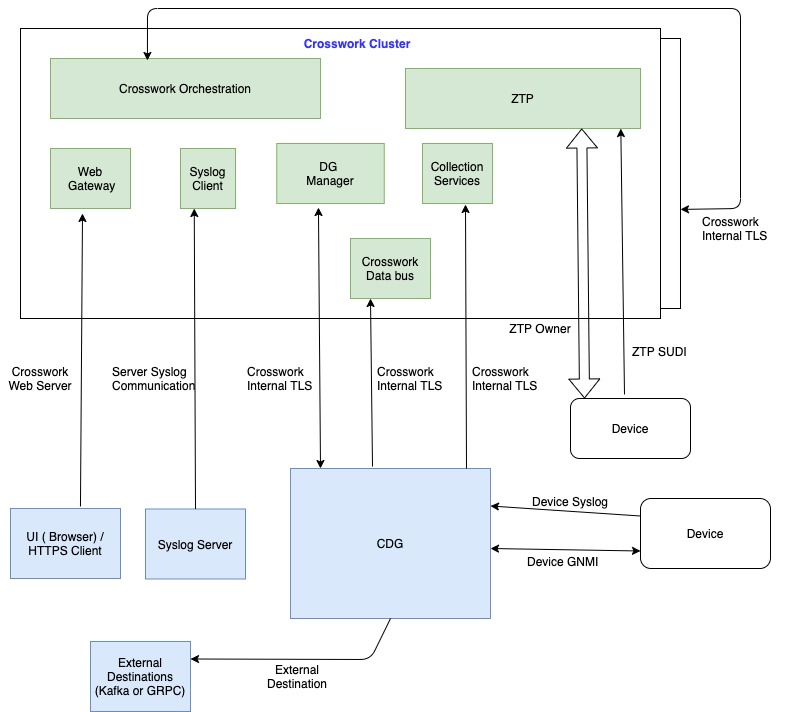
Crosswork Network Controller uses the TLS protocol for secure communication between devices and components. TLS utilizes X.509 certificates to authenticate devices and encrypt data, ensuring its integrity. The system employs a combination of generated certificates and those uploaded by clients. Uploaded certificates might be purchased from Certificate Authorities or be self-signed. For instance, the system's VM-hosted web server and the client browser interface use th system-generated X.509 certificates exchanged over TLS for secure communication

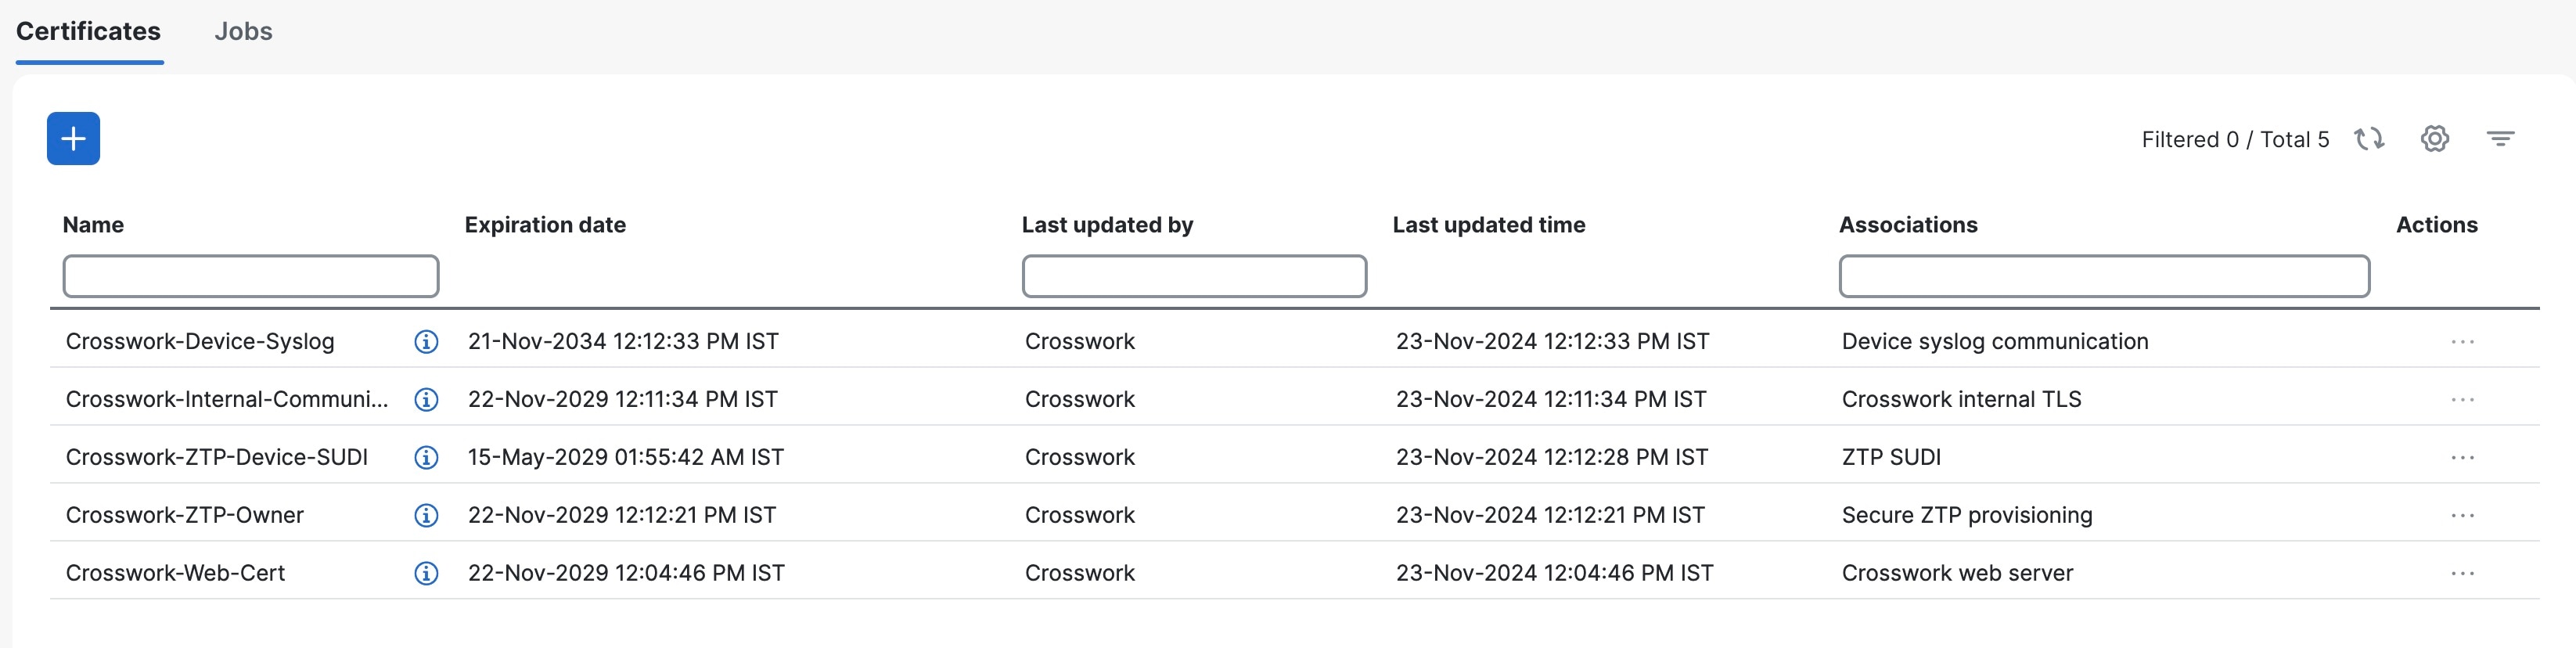
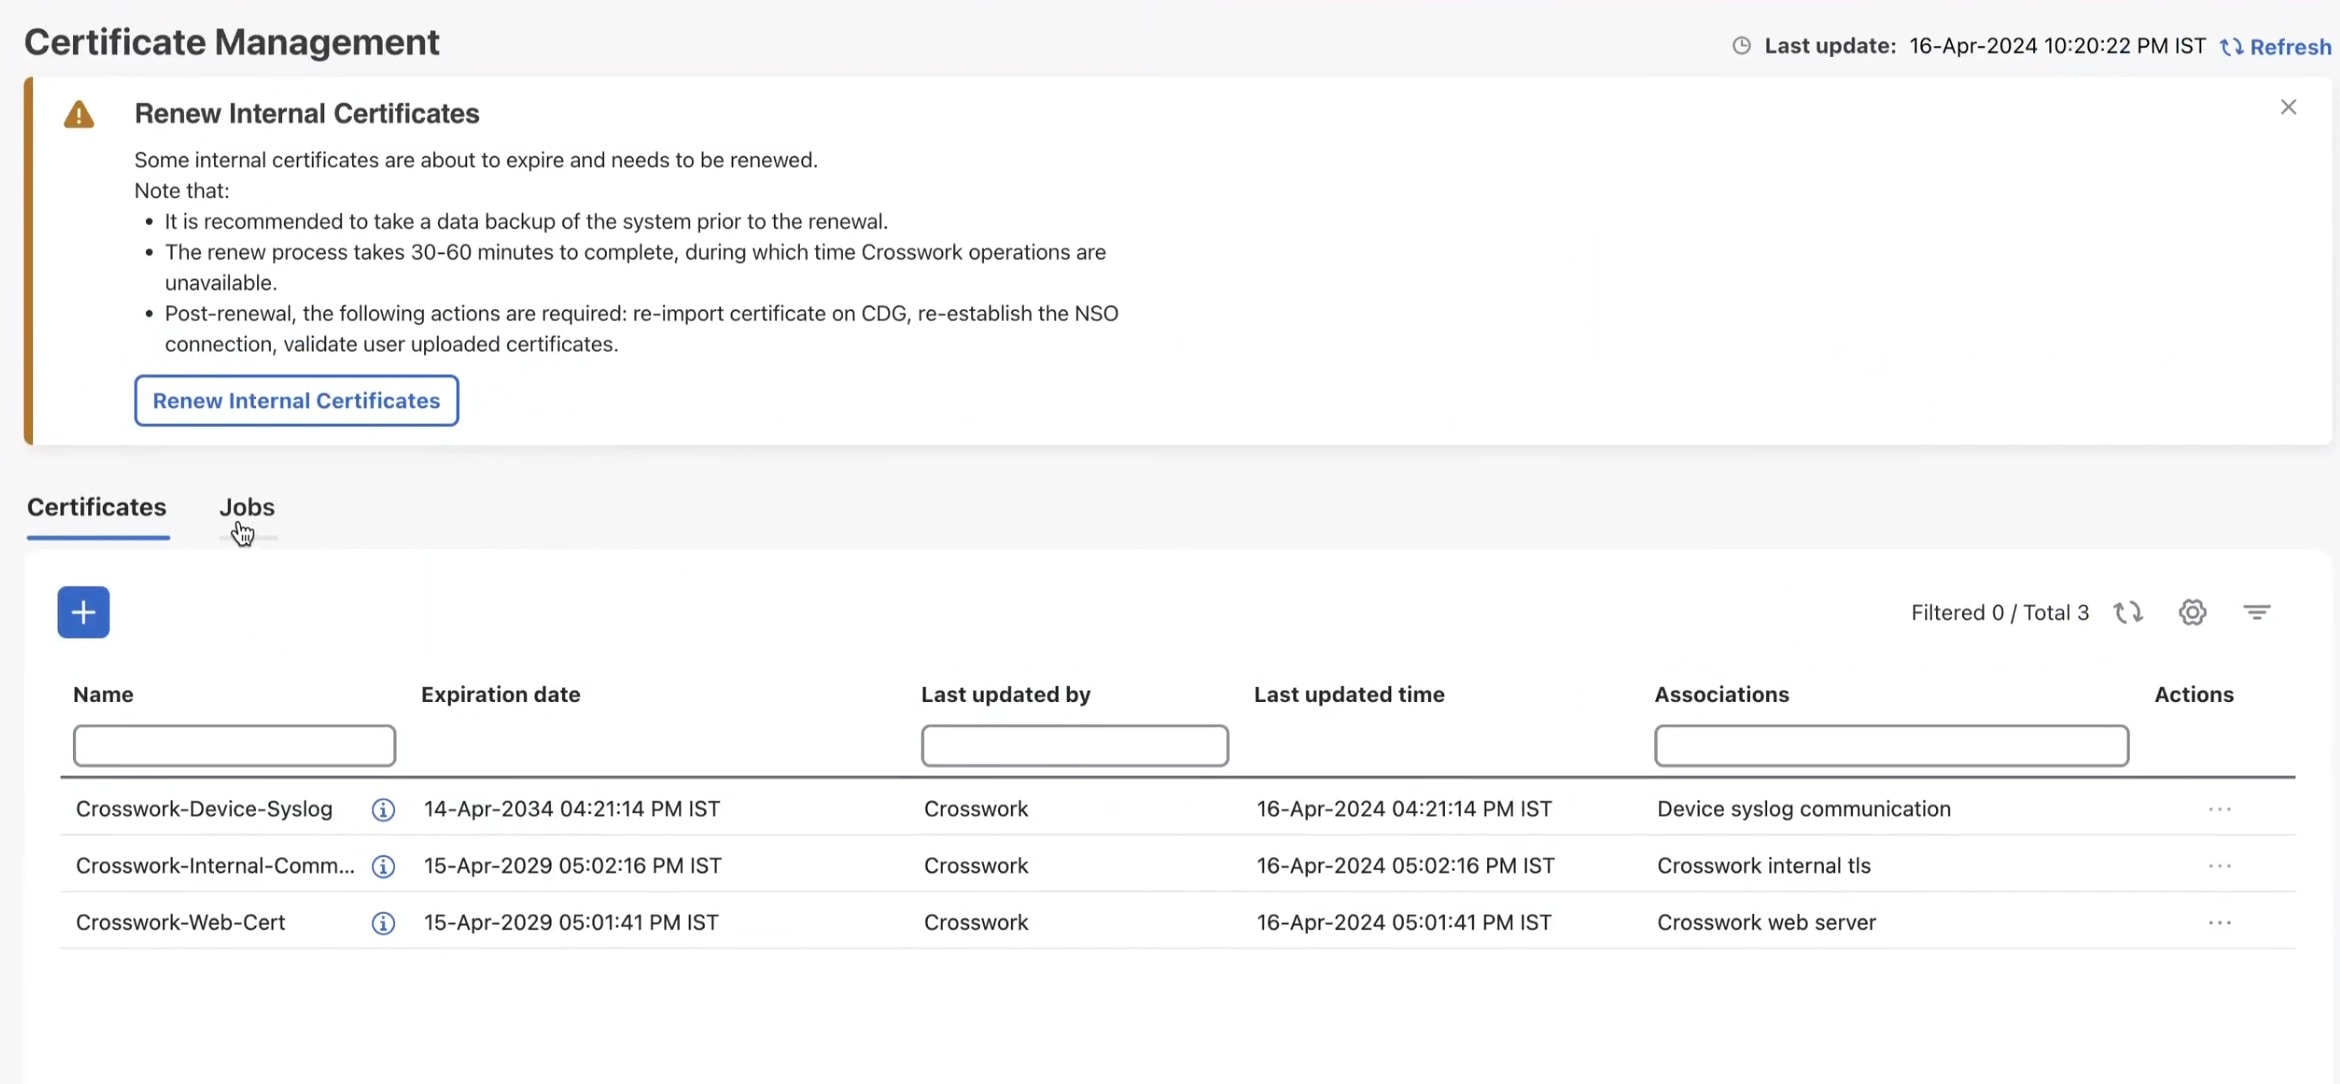
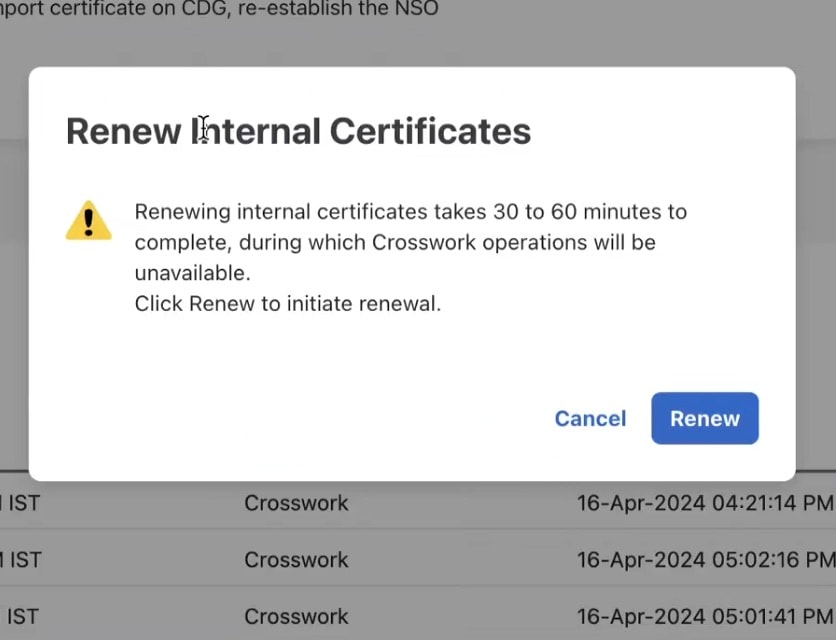
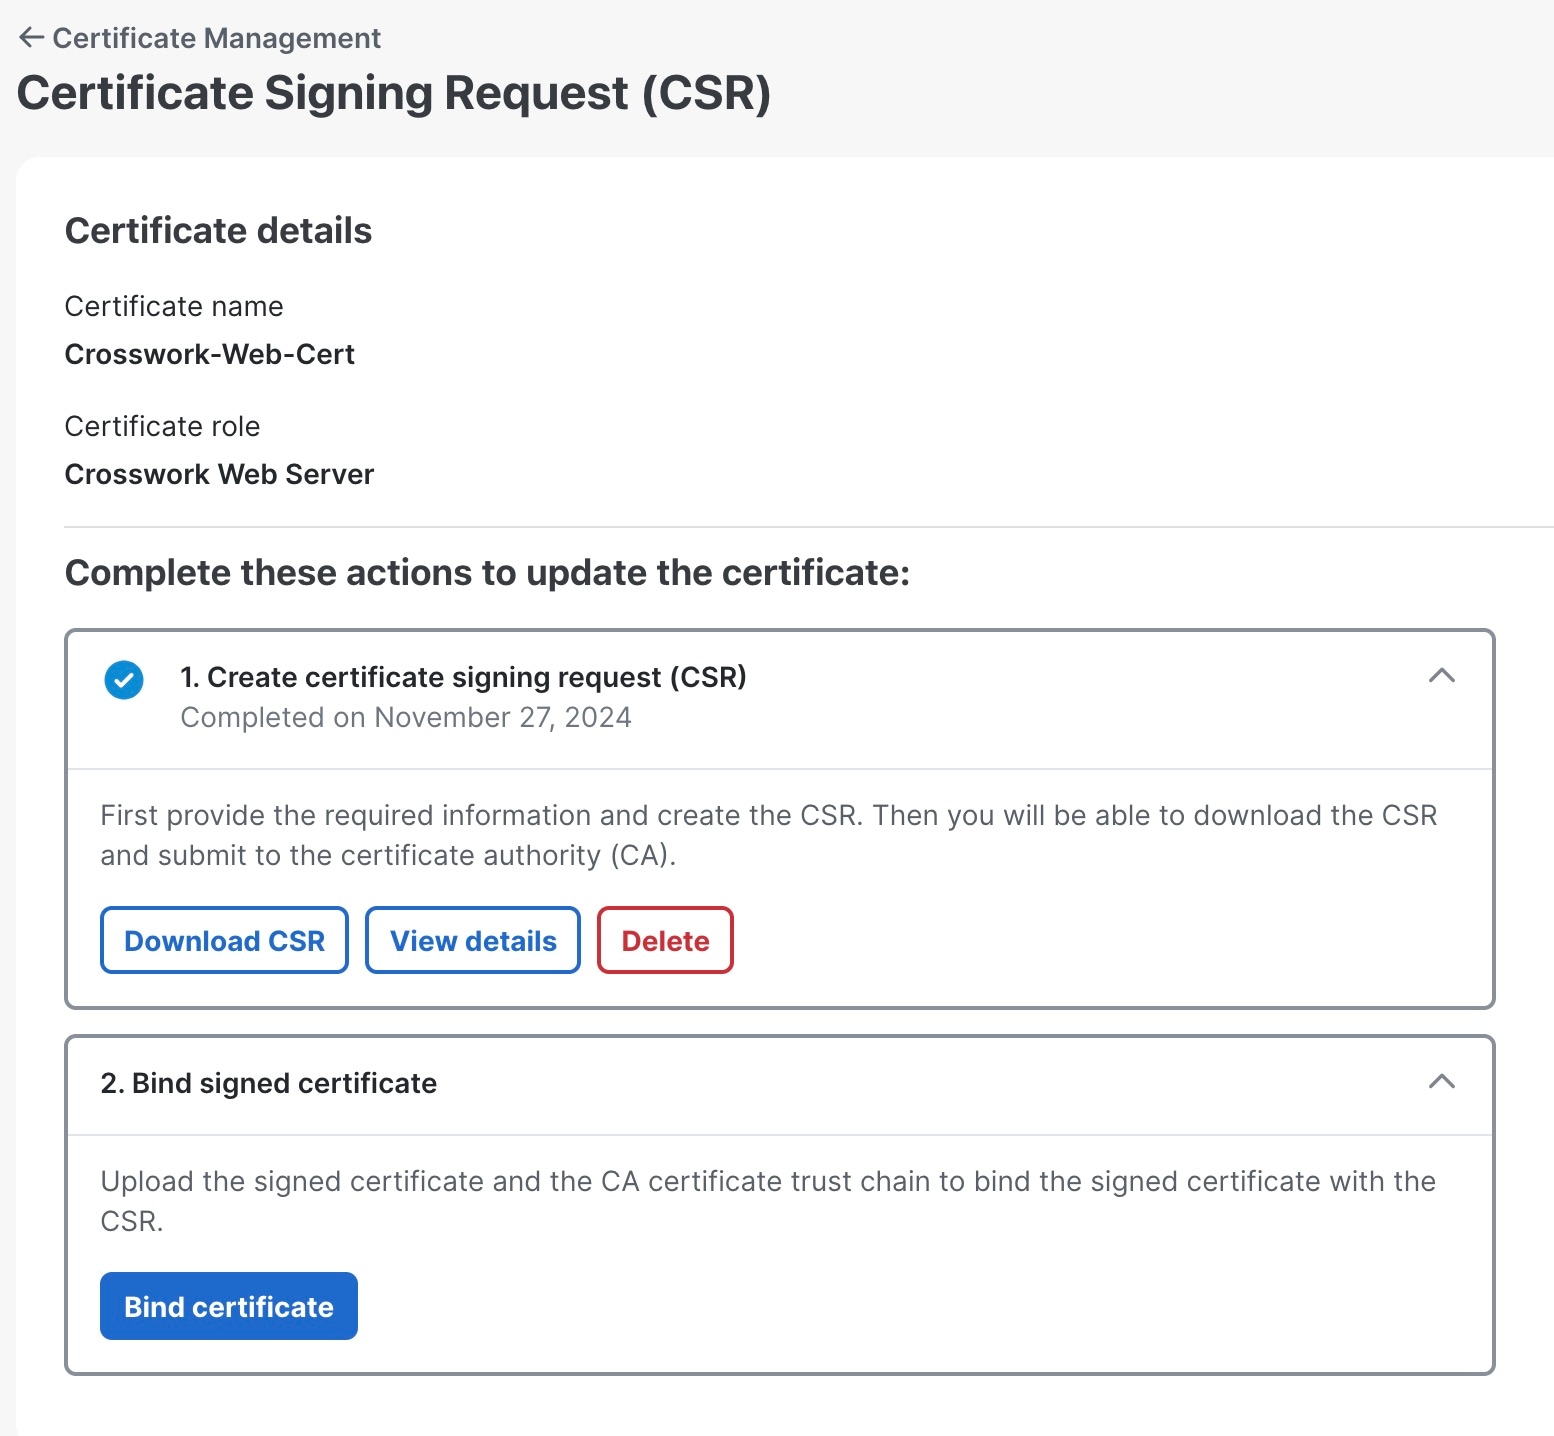
The Crosswork Cert Manager is a proxy for multiple microservices and services within the distributed framework and manages all the Crosswork certificates. The Certificate Management UI (Administration > Certificate Management) allows you to view, upload, and modify certificates. The following figure displays the default certificates provided by Cisco Crosswork.

Figure 1. Certificate Management page
Certificate Management page

Certificate Types and Usage

The following figure shows how Crosswork Network Controller uses certificates for various communication channels.

Figure 2. Certificates in Cisco Crosswork Network Controller
Certificate Types and Usage

These certificates are classified into various roles with different properties depending on their use case as shown in the following table.

Role

UI Name

Description

Server

Client

Allowed operations

Default Expiry

Allowed Expiry

Crosswork internal TLS

Crosswork-Internal-

Communication

  • Generated and provided by Crosswork Network Controller.

  • This trust-chain is available in the UI (including the server and client leaf certificates) and is created by Crosswork Network Controller during initialization. They are used for interprocess communications between Crosswork Network Controller and Crosswork Data Gateway and communication between internal Crosswork Network Controller components.

  • Allows mutual and server authentication.

Crosswork Network Controller

Crosswork Data Gateway

Crosswork Network Controller

Download

5 years

Device syslog communication

Crosswork-Device-Syslog
  • Generated and provided by Crosswork Network Controller.

  • Provides Syslog telemetry communications between devices and Crosswork Data Gateway.

  • Allows server authentication.

Crosswork Data Gateway

Device

Download

5 years

ZTP SUDI

Crosswork-ZTP-Device-SUDI
  • A public Cisco certificate that is provided as part of Crosswork Network Controller.

  • Provides ZTP protocol communication channel between the ZTP application and device.

  • Allows server authentication.

Crosswork ZTP

Device

  • Upload

  • Download

100 days

31 days. This value is user-defined

Secure ZTP provisioning

Crosswork-ZTP-Owner

  • Generated and provided by Crosswork Network Controller.

  • Forwarded by ZTP to devices and used for second layer of encryption.

Crosswork ZTP

Device

  • Upload

  • Download

5 years

31 days. This value is user-defined

Crosswork web server

Crosswork-Web-Cert

  • Generated and provided by Crosswork Network Controller.

  • Provides communication between the user browser and Crosswork Network Controller.

  • Allows server authentication.

Crosswork Web Server

User Browser or API Client

  • Upload

  • Download

5 years

30 days to 5 years

Secure gRPC communication

SR-PCE requires gRPC to discover topology and SR-MPLS policies. This certificate enables Transport Layer Security (TLS) and is required when the SR-PCE provider protocol is set to GRPC_SECURE.

Crosswork Network Controller

Clients that want secure connection to the gRPC server (Crosswork Data gateway, Device Group Manager pods, and so on )

  • Upload

  • Download

Defined by user

Device gNMI communication

Provides GNMI telemetry communications between devices and Crosswork Data Gateway.

Crosswork Data Gateway

Device

  • Upload

  • Download

Not Applicable

31 days. This value is user-defined

Server syslog communication

  • Allows syslog events and logs from Crosswork Network Controller to an external Syslog server.

  • Allows server authentication.

External Syslog Server

Crosswork Network Controller

  • Upload

    1
  • Download

31 days. This value is user-defined

External destination

Exports telemetry data from Crosswork Data Gateway to external destinations (Kafka or gRPC) after performing a mutual-authentication.

External Destinations (Kafka or gRPC)

Crosswork Data Gateway

  • Upload 2

  • Download

31 days. This value is user-defined

External destination server auth

Exports telemetry data from Crosswork Data Gateway to external destinations (Kafka or gRPC) after performing a server-based authentication.

External Crosswork Data Gateway Destinations (Kafka or gRPC)

Secure LDAP communication

Crosswork Network Controller uses the trust chain of this certificate to authenticate the secure LDAP server.

Secure LDAP server

Crosswork Network Controller

  • Upload

    3
  • Download

31 days. This value is user-defined

Application external destination

Exports telemetry data from Crosswork Network Controller to an external Kafka destination.

External Kafka Destinations

Crosswork Network Controller

Upload

31 days. This value is user-defined

Accedian provider mutual auth

Required to add provider connectivity assurance as a provider

Provider

Crosswork Network Controller

  • Upload

  • Download

31 days. This value is user-defined

1 You can upload multiple certificates associated with different servers.
2 You can upload one certificate and associate it with one or more external destinations. To upload multiple certificates, configure and select additional destinations.
3 You can upload multiple certificates associated with different servers.

There are two category roles in Crosswork Network Controller:

  • Roles which allow you to upload or download trust chains only.

  • Roles that allow upload or download of both the trust chain and an intermediate certificate and key.

Add a new certificate

This topic explains the steps to add a new certificate.

You can add certificates for these roles.

  • External destination: Certificates uploaded for this role are used to secure communication between Crosswork Data Gateway and external destinations like Kafka servers. To enable mutual authentication, you upload a CA Certificate Trustchain that will be common to both Crosswork Data Gateway and the external server. This trust chain contains a root CA certificate and any number of optional intermediate CA certificates. The last intermediate certificate in the chain and its corresponding private key is uploaded separately in the UI using Intermediate key, Intermediate certificate, and optionally Passphrase (if one was used for generating the intermediate key). Crosswork Network Controller internally creates a client certificate using this intermediate key for the Crosswork Data Gateways that connects to the external destination. The destination (for example: Kafka) server certificate trust needs to be derived from the same root CA certificate.

    You can upload certificates to the External Destination role, the authentication type must be opted as Mutual-Auth on the Add Destination page. For more information about the authentication types, see Add or edit a data destination.

  • Server Syslog Communication: You upload the trust chain of the Syslog server certificate. This trust chain is used by Crosswork Network Controller to authenticate the Syslog server. Once this trust chain is uploaded and propagated within Crosswork Network Controller, you can add the syslog server (Administration > Settings > Syslog Server Configuration) and associate the certificate to enable TLS. For more information, see Configure a Syslog Server.

  • Devices gNMI communication: You upload a bundle of trust chains used by Crosswork Data Gateway to authenticate the devices connecting to it. This trust chain and the device gNMI certificate must also be configured on the device. The trust chain file that is uploaded can contain multiple hierarchies of trust certificates as needed to allow all the devices in the network to connect. For more information, see Configure the gNMI Certificate.

  • Secure LDAP communication: You upload the trust chain of the secure LDAP certificate. This trust chain is used by Crosswork to authenticate the secure LDAP server. Once this trust chain is uploaded and propagated within Crosswork Network Controller, you can add the LDAP server (see Manage LDAP Servers) and associate the certificate.

  • External destination server auth: You upload the root CA certificate. This certificate is used to establish a secure communication between Crosswork Data Gateway and external destinations like Kafka servers.

    You can upload the certificates to the External Destination Server Auth role only when the authentication type is set to Server-Auth. For more information about the authentication types, see Add or edit a data destination.

  • Application external destination: You upload the application certificates to ensure secure transfer of telemetry data to an external Kafka destination. The Kafka channel is safeguarded through mutual TLS, and the TLS Manager is responsible for managing the certificates used by external Kafka.

  • Secure gRPC communication: You upload a well-known CA certificate trust chain bundle for secure communication between Crosswork Network Controller and gRPC server configured on an external SR-PCE provider. Currently, mutual authentication is not supported.

For information on certificate types and usage, see Certificate Types and Usage.


Note


Crosswork Network Controller does not receive a web certificate directly. It accepts an intermediate CA and intermediate Key to create a new web certificate, and apply it to the Web Gateway.


If you prefer to upload your own ZTP and web certificates (instead of using the default certificates provided within Crosswork Network Controller), use the Edit function (see Edit certificates).

Before you begin

  • All certificates that are uploaded must be in Privacy Enhanced Mail (PEM) format. Note where these certificates are in the system so that you can navigate to them easily.

  • Trust chain files that are uploaded may contain the entire hierarchy (root CA and intermediate certificates) in the same file. In some cases, multiple chains are also allowed in the same file.

  • Intermediate Keys need to be either PKCS1 or PKCS8 format.

  • A data destination must be configured prior to adding a new certificate for an external destination. For more information, see Add or edit a data destination.

  • Ensure there are no collection jobs configured for destinations when adding or updating a certificate with multiple destinations.

  • Ensure that the tyk service is in a healthy state.

Procedure


Step 1

From the main menu, choose Administration > Certificate Management and click Add icon.

Step 2

Enter a unique name for the certificate.

Step 3

From the Certificate Role drop-down menu, select the purpose for which the certificate is to be used. For more information, see Certificate Types and Usage.

Note


You can select available destinations (Kafka/gRPC) while adding or updating an External Destination certificate.

Step 4

Click Browse, and navigate to the certificate trustchain.

Step 5

In the case of an External Destination certificate, you must select one or more destinations and provide the CA certificate trustchain, intermediate certificate, and intermediate key. The passphrase field is optional and is used to create the intermediate key (if applicable).

Step 6

Click Save.

Note


Once uploaded, the Crosswork Cert manager accepts, validates, and generates the server certificate. Upon successful validation, an alarm ("Crosswork Web Server Restart") indicates that the certificate is about to be applied. The Certificate Management UI then logs out automatically and applies the certificate to the Web Gateway. The new certificate can be checked by clicking the lock <Not Secure>/<secure> icon next to the https://<crosswork_ip>:30603.


Edit certificates

Crosswork Network Controller allows you to update web certificates by importing an intermediate Certificate Authority (CA) certificate. You can edit certificates to add or remove connection destinations, and upload or replace expired or misconfigured certificates. This applies to user-provided certificates, ZTP certificates, and web certificates. However, system certificates provided by Cisco Crosswork cannot be modified and will not be available for selection.

Crosswork Network Controller also allows you to configure the client authentication for web certificates. Client authentication offers an alternative method for setting up user authentication in Crosswork, requiring both the client and server to present digital certificates to verify their identities. Enabling this feature can provide a more seamless login experience for users.

You can also “remove” a certificate by following this procedure to replace the certificate or by disabling security (disable Enable Secure Communication option) for any assigned destinations (see Add or edit a data destination). Permanently deleting a certificate from the Cisco Crosswork system is not supported.

Before you begin

  • Updating the certificate can disrupt the existing trust chain of certificates used for client authentication if enabled, so proceed with caution.

  • This process requires the Crosswork server to be restarted, which will take several minutes to complete.

  • Set the AAA mode to Local to enable client authentication.

Procedure


Step 1

Choose Administration > Certificate Management to view the Certificate Management window.

Step 2

To update a certificate:

  1. Under the Actions column, click on the certificate that you want to modify, and select Update certificate.

  2. Fill in the appropriate values for the fields based on the certificate you wish to update. Click the Field Help icon icon next to the field for more information.

  3. Click Save to save the changes.

Step 3

To enable the client certificate authentication of a web certificate:

  1. Under the Actions column, click on the Crosswork web certificate that you want to modify, and select Configure client certificate authentication.

    The Configure Client Authentication window is displayed.

  2. Check the Enable checkbox.

    The Certificate schema and OCSP settings are displayed.

    The OCSP settings are enabled by default, but you can disabled it if desired. If enabled, you can check the certificate revocation status using the Online Certificate Status Protocol (OCSP).

  3. Choose the Certificate schema value.

    • Automatic—Searches for the user principal name (UPN) in the alternate subject name area. If a UPN is not found, the system will use the common name value. This is the default selection.

    • Manual—Searches for the username in the subject area based on the user identity source and the specified regular expression.

  4. (Optional) Choose the OCSP value:

    • Automatic—Extracts the responder URL from the certificate and uses it to perform OCSP validation.

    • Manual—You must provide the OCSP responder URL.

  5. Click Save to save the changes.

Step 4

To update certificate and configure client authentication in a single step:

  1. Click on the Crosswork web certificate that you want to modify, and select Update certificate & config. client cert. authentication.

    The Update Certificate and Configure Client Authentication window is displayed.

    Note


    Choosing the combined option to update the certificate and configure client authentication minimizes downtime during the Crosswork server restart, as it occurs only once instead of twice if these actions are performed separately.

  2. Provide the data as per the instructions in step 2 and step 3.

  3. Click Save to save the changes.


Download certificates

To export certificates, do the following:

Procedure


Step 1

From the main menu, choose Administration > Certificate Management.

Step 2

Click Details icon for the certificate you want to download.

Step 3

To separately download the root certificate and the intermediate certificate, click Export icon next to the certificate. To download the certificates at once, click Export All.


Renew Certificates

Kubernetes certificate renewal

Certificates are valid for one year before they expire. After renewing the certificates, ensure that the pods are healthy before resuming other operations.


Note


When renewing certificates before expiry, it is recommended to perform this activity during a maintenance window as the cluster is in an operational state.


To renew a certificate, perform the following:

Before you begin

  • Create a plain text file on your local machine (for example, password.txt) that contains the SSH login password for the server.

  • Keep the management IP addresses readily available for the hybrid and worker nodes in your cluster.

Procedure


Step 1

Create a backup of your Crosswork Network Controller.

Step 2

Log in to one of your hybrid nodes.

Step 3

Renew the Kubernetes certificates using the renew_k8s_cert command. The required parameters depend on whether the certificates have already expired.

  • Before certificate expiry: If the certificates have not yet expired, you can renew them by running the following command. You do not need to specify the hybrid or worker node management IP addresses.

    renew_k8s_cert --user=<ssh-username> --passwdfile=<passfile-path>

    Example:

    renew_k8s_cert --user=cw-admin --passwdfile=/home/cw-admin/password.txt
  • After certificate expiry: If the Kubernetes certificates have already expired, you must specify the management IP addresses of the hybrid and (if applicable) worker nodes in your cluster.

    renew_k8s_cert --hybrid=hybridNodeMgmtIP1,hybridNodeMgmtIP2,hybridNodeMgmtIP3 
    --worker=workerNodeMgmtIP1,workerNodeMgmtIP2,workerNodeMgmtIP3 --user=<ssh-username> --passwdfile=<passfile-path>

    Replace the parameters as follows:

    • hybridNodeMgmtIP: Management IP of each hybrid node (comma separated).

    • workerNodeMgmtIP: Management IP of each worker node (comma separated, optional if you have no worker nodes).

    • ssh-username: The SSH username to use.

    • passfile-path: Path to the plain text file containing the SSH login password.

    IPv4 Example for a 6-node cluster:

    renew_k8s_cert --hybrid=10.10.10.101,10.10.10.102,10.10.10.103 
    --worker=10.10.10.104,10.10.10.105,10.10.10.106 --user=cw-admin 
    --passwdfile=/home/cw-admin/password.txt

    IPv4 Example for a 3-node cluster (hybrid nodes only):

    renew_k8s_cert --hybrid=10.10.10.101,10.10.10.102,10.10.10.103 --user=cw-admin 
    --passwdfile=/home/cw-admin/password.txt

    Pv4 Example for single VM deployment:

    renew_k8s_cert --hybrid=10.10.10.101 --user=cw-admin --passwdfile=/home/cw-admin/password.txt

    IPv6 Example for a dual-stack cluster:

    renew_k8s_cert --hybrid=fded:1bc1:fc3e:96d0:192:168:5:451,fded:1bc1:fc3e:96d0:192:168:5:452,
    fded:1bc1:fc3e:96d0:192:168:5:453 --worker=fded:1bc1:fc3e:96d0:192:168:5:454,fded:1bc1:fc3e:96d0:192:168:5:455 
    --user=cw-admin --passwdfile=/home/cw-admin/password.txt

    Attention

     
    • The --worker parameter is optional if you do not have worker nodes in your cluster.

    • Line breaks in the commands above are for display only. Remove all line breaks before executing the command.

Step 4

(Optional) Recover cluster: If multiple pods are stuck in ContainerCreating or terminating state after renewing the Kubernetes certificate, please run these commands on any hybrid node.

kubectl delete pod -n kube-system -l k8s-app=calico-kube-controllers --grace-period=0 --force

Wait for the calico-kube-controllers pods to come up, and run this command:

kubectl delete pod -n kube-system -l k8s-app=calico-node --grace-period=0 --force

Once all the Calico pods are up and running, all other pods should recover and enter a running state. If any pods remain in a non-running state, wait at least 10 minutes after the Calico pods have started, and then run this command:

kubectl get po --all-namespaces | awk '{if ($4 != "Running") system ("kubectl -n " $1 " delete pods " $2 " --grace-period=0 " " --force ")}'

Automatic renewal of internal certificates

Crosswork CA generates TLS certificate chains, including root, intermediate CA, and leaf certificates, for day 0 deployments (Geo HA and non-Geo HA). The leaf certificates are valid for 2 years, while root and intermediate CA certificates are valid for 5 years. Customers with Crosswork deployments lasting beyond 2 years will face certificate expiry, disrupting TLS communication and impacting cluster operations. Auto-renewal applies to all Crosswork certificates generated internally, including NATS, Kafka, and any application-specific internal certificates.

The renewal alert is generated only when the expiry period is less than 60 days. When an internal certificate is expiring and renewed, all internal certificates of that type will be renewed. For example, when a leaf certificate is renewed, the process will also renew all other leaf certificates.


Important


For geo HA deployment:

  • For a Geo HA deployment, the certificate renewal is triggered in the active AZ cluster. Internally, the TLS manager determines if the cluster has geo redundancy enabled or disabled and decides whether the certificate renewal must be performed on one cluster or both geo HA clusters. Once the renewal job is completed on the active cluster, the job will automatically run in the standby cluster after a delay of a few minutes. The job progress is displayed on the standby cluster along with alarm events.

    In a Geo HA setup with auto-arbitration, the certificate is first renewed on the active cluster, then simultaneously renewed on the standby cluster and the arbiter VM.


The certificate renewal process can cause a downtime of approximately 30 minutes to 1 hour. It is recommended to perform this activity during a maintenance window to avoid disrupting cluster operations.

To renew an internal certificate, perform the following:

Procedure


Step 1

From the main menu, choose Administration > Certificate Management. The Certificate Management window is displayed. If an internal certificate is about to be expired, a prompt is displayed for certificate renewal.

Note


Alerts about certificate expiry are displayed on the Crosswork dashboard when you log in. These alerts will be generated at various stages of the certificate expiry, with increasing severity as the expiry date approaches.

Figure 3. Renew Internal Certificate prompt

Step 2

Click Renew Internal Certificate. A confirmation popup is displayed. Click Renew to confirm.

Figure 4. Renewal Confirmation Prompt

This action invokes the REST API (/v2/cert/renew) and initiates the certificate expiry check. A notification about the new renewal job is displayed on the Certificate Management window.

Figure 5. Renewal Job Notification

You can view progress of the renewal job from the Jobs tab. Once the job is complete, an Info alarm event is raised about the successful completion. You must manually clear this alarm to acknowledge the event. Any error during the process will result in job failure; however, the job can be triggered again as the API is repeatable.

Step 3

In case of Geo HA deployment: After successfully completing the certificate renewal, run an on-demand or periodic sync across the active and standby clusters to ensure that asynchronous replication is re-established over a secure channel.

Step 4

Once the renewal job is completed, perform these steps to ensure TLS communication is maintained between Crosswork and other external components:

  1. Crosswork with Crosswork Data Gateway: When Crosswork certificates are renewed, it automatically pushes the updated certificates to each Crosswork Data Gateway. During the update process, Crosswork raises alarms for each Data Gateway to indicate the following events:

    • Certificate update started

    • Certificate update completed

    Note


    The automatic certificate renewal happens as part of the Crosswork Data Gateway day-N enablement process.

  2. In case of Geo HA deployment:

    • The automatic certificate renewal process starts when the certificates are updated. After DG-Manager pushes the updated certificates to the Data Gateway, all the affected Data Gateways automatically restart. This restart causes a brief service interruption.

    • If the certificate renewal fails, Crosswork Data Gateway enters the error state after the DG-Manager is restarted. To recover, manually reimport the certificates on the affected Data Gateway. See Import certificate.

  3. Crosswork Data Gateway and Device Syslog: If device syslog root and intermediate certificates are renewed, manually export and reconfigure these certificates on all devices. For internally generated Crosswork CA certificates, export the new device syslog root and intermediate CA certificates and configure them as CA trustpoints on IOS XR/XE devices. For more information, see the IOS XE and IOS XR instructions in Syslog Collection Job.

    If there is a renewal for device syslog root and intermediate certificates, manually export these certificates to the devices.

  4. External destination/Server Auth CA: Re-upload the External Destination and Server Auth CA certificates to Crosswork.

  5. Cisco NSO: Export the regenerated Crosswork Web server certificate from the Crosswork UI browser, configure it, and store it on the NSO server. For more information, see the Step 1b in the Configure Standalone NSO section.


Update web certificate using certificate signing request

Crosswork Network Controller enables the updating of web certificates by importing an intermediate Certificate Authority (CA) certificate. Starting with version 7.0.1, it also supports updating web certificates through a Certificate Signing Request (CSR).

This approach allows you to obtain a certificate signed by an Enterprise or Commercial CA without exposing the private key outside of the Crosswork Network Controller.

Before you begin

  • Updating the certificate can disrupt the existing trust chain of certificates used for client authentication if enabled, so proceed with caution.

  • This process requires the Crosswork server to be restarted, which will take several minutes to complete.

  • Set the AAA mode to Local to enable client authentication.

Procedure


Step 1

From the main menu, choose Administration > Certificate Management

Step 2

Click on the web certificate (Crosswork-Web-Cert) and select Update Certificate.

The Certificate Update Method window is displayed.

Step 3

Create a CSR to submit to the Certificate Authority.

  1. Select Create a certificate signing request (CSR) radio button and click Update certificate.

    The Certificate Signing Request (CSR) window is displayed.

  2. Click Create CSR.

    The Create Certificate Signing Request (CSR) window is displayed.

  3. Provide relevant values for the fields provided. Click the Field Help icon icon next to the field for more information. The mandatory fields are:

    • Common name (CN): By default, this is the fully qualified domain name (FQDN) of the server, but it can be any unique name that identifies the server. The length should not exceed 64 characters.

    • IP address: This is the Crosswork VIP address utilized in this deployment. Additional IP addresses should only be added if necessary for certificate validation.

    • Key Type: The options are RSA and ECDSA. By default, RSA is selected.

    • Key Size (in bits): The options are 2048, 3072, and 4096. By default, 2048 is selected.

    • Key Digest: The options are SHA-256, SHA-384, SHA-224, and SHA-512. By default, SHA-256 is selected.

  4. Click Create CSR to complete the action.

Step 4

After generating the CSR, click Download to download it and use the CSR to get a signed certificate from your CA.

Figure 6. Certificate Signing Request (CSR) window

Step 5

Upload the CA-signed certificate and CA certificate trustchain to bind the certificate.

  1. In the Certificate Signing Request (CSR) window, click Bind certificate.

    The Bind signed certificate window is displayed.

    Figure 7. Bind signed certificate
  2. Upload the relevant data for the fields provided. Click the Field Help icon icon next to the field for more information.

    • CA certificate trustchain: This is the certificate trust chain for the web server certificate obtained from the CA.

    • CA signed certificate: This is the final signed certificate for the web server obtained from the CA.

  3. (Optional) Click the Enable checkbox to configure client certificate authentication.

  4. Click Bind certificate to complete the operation.

    After the bind action is completed, the web certificate is updated, and Tyk will restart with the new web certificate.