Cisco MDS 9000 Family Configuration Guide, Release 2.x
Configuring SNMP

Table Of Contents

Configuring SNMP

SNMP Security

SNMP Version 1 and Version 2c

SNMP Version 3

SNMPv3 CLI User Management and AAA Integration

CLI and SNMP User Synchronization

Restricting Switch Access

Group-Based SNMP Access

Creating and Modifying Users

Configuring SNMP Users from the CLI

Enforcing SNMPv3 Message Encryption

Assigning SNMPv3 Users to Multiple Roles

AES Encryption-Based Privacy

Adding or Deleting Communities

Assigning SNMP Switch Contact and Location Information

Configuring SNMP Notifications (Traps and Informs)

Configuring SNMPv1 and SNMPv2c Notifications

Configuring SNMPv3 Notifications

Enabling SNMP Notifications

Configuring the Notification Target User

Configuring LinkUp/LinkDown Notifications for Interfaces

Displaying SNMP Security Information

Default Settings


Configuring SNMP


The CLI and SNMP use common roles in all switches in the Cisco MDS 9000 Family. You can use SNMP to modify a role that was created using CLI and vice versa.

Users, passwords, and roles for all CLI and SNMP users are the same. A user configured through CLI can access the switch using the SNMP (for example, the Fabric Manager or the Device Manager) and vice versa.

This chapter includes the following sections:

SNMP Security

SNMPv3 CLI User Management and AAA Integration

Restricting Switch Access

Group-Based SNMP Access

Creating and Modifying Users

Assigning SNMPv3 Users to Multiple Roles

AES Encryption-Based Privacy

Adding or Deleting Communities

Assigning SNMP Switch Contact and Location Information

Configuring SNMP Notifications (Traps and Informs)

Displaying SNMP Security Information

Default Settings

SNMP Security

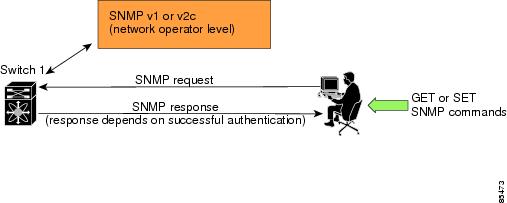
SNMP is an application layer protocol that facilitates the exchange of management information between network devices. In all Cisco MDS 9000 Family switches, three SNMP versions are available: SNMPv1, SNMPv2c, and SNMPv3 (see Figure 27-1).

Figure 27-1 SNMP Security

SNMP Version 1 and Version 2c

SNMP Version 1 (SNMPv1) and SNMP Version 2c (SNMPv2c) use a community string match for user authentication. Community strings provided a weak form of access control in earlier versions of SNMP. SNMPv3 provides much improved access control using strong authentication and should be preferred over SNMPv1 and SNMPv2c wherever it is supported.

SNMP Version 3

SNMP Version 3 (SNMPv3) is an interoperable standards-based protocol for network management. SNMPv3 provides secure access to devices by a combination of authenticating and encrypting frames over the network. The security features provided in SNMPv3 are:

Message integrity—Ensures that a packet has not been tampered with in-transit.

Authentication—Determines the message is from a valid source.

Encryption—Scrambles the packet contents to prevent it from being seen by unauthorized sources.

SNMPv3 provides for both security models and security levels. A security model is an authentication strategy that is set up for a user and the role in which the user resides. A security level is the permitted level of security within a security model. A combination of a security model and a security level determines which security mechanism is employed when handling an SNMP packet.

SNMPv3 CLI User Management and AAA Integration

The Cisco SAN-OS software implement RFC 3414 and RFC 3415, including user-based security model (USM) and role-based access control. While SNMP and the CLI have common role management and share the same credentials and access privileges, the local user database was not synchronized in earlier releases.

SNMP v3 user management can be centralized at the AAA server level. This centralized user management allows the SNMP agent running on the Cisco MDS switch to leverage the user authentication service of AAA server. Once user authentication is verified, the SNMP PDUs are processed further. Additionally, the AAA server is also used to store user group names. SNMP uses the group names to apply the access/role policy that is locally available in the switch.


Note The SNMPv3 user management with AAA servers in Cisco SAN-OS operates only with Fabric Manager and Device Manager, not with third party SNMP clients or applications. You cannot use one-time password (OTP) tokens as SNMP passwords because OTP tokens are suitable only for end entity authentication and not for the message authentication and integrity protection that SNMP provides. An OTP token is never a substitute for a password, especially for message authentication for SNMP protocol data units (PDUs). Once an OTP token is used for authentication, it is not usable for anything else and is public information. So using it later for the message authentication and integrity protection of SNMP PDU provides no security. Also, because Fabric Manager and Device Manager cannot distinguish a typed-in password from an OTP, Fabric Manager and Device Manager cannot automatically block usage of OTPs during login and for authenticating subsequent SNMP PDUs.


CLI and SNMP User Synchronization

Any configuration changes made to the user group, role, or password, results in the database synchronization for both SNMP and AAA.

To create an SNMP or CLI user, use either the username or snmp-server user commands.

The auth passphrase specified in the snmp-server user command is synchronized as the password for the CLI user.

The password specified in the username command is synchronized as the auth and priv passphrases for SNMP user.

Users are synchronized as follows:

Deleting a user using either command results in the user being deleted for both SNMP and CLI.

User-role mapping changes are synchronized in SNMP and CLI.


Note When the passphrase/password is specified in localized key/encrypted format, the password is not synchronized.


Existing SNMP users continue to retain the auth and priv information without any changes.

If the management station creates a SNMP user in the usmUserTable, the corresponding CLI user is created without any password (login is disabled) and will have the network-operator role.

Restricting Switch Access

You can restrict access to a Cisco MDS 9000 Family switch using IP Access Control Lists (IP-ACLs). See Chapter 29, "Configuring IP Access Control Lists."

Group-Based SNMP Access


Note Because group is a standard SNMP term used industry-wide, we refer to role(s) as group(s) in this SNMP section.


SNMP access rights are organized by groups. Each group in SNMP is similar to a role through the CLI. Each group is defined with three accesses: read access, write access, and notification access. Each access can be enabled or disabled within each group.

You can begin communicating with the agent once your user name is created, your roles are set up by your administrator, and you are added to the roles.

Creating and Modifying Users

You can create users or modify existing users using SNMP or the CLI.

SNMP—Create a user as a clone of an existing user in the usmUserTable on the switch. Once you have created the user, change the cloned secret key before activating the user. Refer to RFC 2574.

CLI—Create a user or modify an existing user using the snmp-server user command.

By default only two roles are available in a Cisco MDS 9000 Family switch—network-operator and network-admin. You can also use any role that is configured in the Common Roles database (see the "Configuring Common Roles" section on page 26-9).


Tip All updates to the CLI security database and the SNMP user database are synchronized. You can use the SNMP password to log into either Fabric Manager or Device Manager. However, after you use the CLI password to log into Fabric Manager or Device Manager, you must use the CLI password for all future logins. If a user exists in both the SNMP database and the CLI database before upgrading to Cisco MDS SAN-OS Release 2.0(1b), then the set of roles assigned to the user becomes the union of both sets of roles after the upgrade.


Configuring SNMP Users from the CLI

The passphrase specified in snmp-server user command and the username command are synchronized (see the "SNMPv3 CLI User Management and AAA Integration" section).

To create or modify SNMP users from the CLI, follow these steps:

 
Command
Purpose

Step 1 

switch# config t

Enters configuration mode.

Step 2 

switch(config)# snmp-server user joe network-admin auth sha abcd1234

Creates or modifies the settings for a user (joe) in the network-admin role using the HMAC-SHA-96 authentication password (abcd1234).

switch(config)# snmp-server user sam network-admin auth md5 abcdefgh

Creates or modifies the settings for a user (sam) in the network-admin role using the HMAC-MD5-96 authentication password (abcdefgh).

switch(config)# snmp-server user Bill network-admin auth sha abcd1234 priv abcdefgh

Creates or modifies the settings for a user (network-admin) in the network-admin role using the HMAC-SHA-96 authentication level and privacy encryption parameters.

switch(config)# no snmp-server user usernameA

Deletes the user (usernameA) and all associated parameters.

switch(config)# no snmp-server usam role vsan-admin

Deletes the specified user (usam) from the vsan-admin role.


switch(config)# snmp-server user user1 network-admin auth md5 0xab0211gh priv 0x45abf342 localizedkey

Specifies the password to be in localized key format (see RFC 2574). The localized key is provided in the hex format (for example, 0xacbdef).


switch(config)# snmp-server user user2 auth md5 asdgfsadf priv aes-128 asgfsgkhkj

Configures the user2 with the MD5 authentication protocol and AES-128 privacy protocol.

Step 3 

switch(config)# snmp-server user joe sangroup

Adds the specified user (joe) to the sangroup role.

switch(config)# snmp-server user joe techdocs

Adds the specified user (joe) to the techdocs role.


Caution Avoid using the localizedkey option when configuring an SNMP user from the CLI. The localized keys are not portable across devices as they contain device engine ID information. If a configuration file is copied to the device, the passwords may not be set correctly if the configuration file was generated at a different device. Explicitly configure the desired passwords after copying the configuration into the device. Passwords specified with the localizedkey option are limited to 130 characters.


Note The snmp-server user command takes engineID as an additional parameter. The engineID is for creating the notification target user (see to the "Configuring the Notification Target User" section). If the engineID is not specified, the local user is created.


Enforcing SNMPv3 Message Encryption

By default the SNMP agent allows the securityLevel parameters of 'authNoPriv' and 'authPriv' for the SNMPv3 messages that use SNMPv3 user configured with 'auth' and 'priv' keys. You can enforce the message encryption for a user by using the following configuration commands:

 
Command
Purpose

Step 1 

switch# config t

Enters configuration mode.

Step 2 

switch(config)# snmp-server user testUser enforcePriv

Enforces the message encryption for SNMPv3 messages using this user.

Note You can only use this command for previously existing users configured with both auth and priv keys. When the user is configured to enforce privacy, for any SNMPv3 PDU request using such a user with securityLevel parameter of either `noAuthNoPriv' or `authNoPriv', the SNMP agent responds with `authorizationError'.

switch(config)# no snmp-server user testUser enforcePriv

Disables SNMPv3 message encryption enforcement.

Alternatively, you can enforce the SNMPv3 message encryption globally on all the users using the following commands:

 
Command
Purpose

Step 1 

switch# config t

Enters configuration mode.

Step 2 

switch(config)# snmp-server globalEnforcePriv

Enforces the SNMPv3 message encryption for all the users on the switch.

switch(config)# no snmp-server globalEnforcePriv

Disables global SNMPv3 message encryption enforcement.

Assigning SNMPv3 Users to Multiple Roles

The SNMP server user configuration is enhanced to accommodate multiple roles (groups) for SNMPv3 users. After the initial SNMPv3 user creation, you can map additional roles for the user.


Note Only users belonging to network-admin role can assign roles to other users.


To configure multiple roles for SNMPv3 users from the CLI, follow these steps:

 
Command
Purpose

Step 1 

switch# config t

Enters configuration mode.

Step 2 

switch(config)# snmp-server user NewUser role1

Creates or modifies the settings for an SNMPv3 user (NewUser) for the role1 role.

switch(config)# snmp-server user NewUser role2

Creates or modifies the settings for an SNMPv3 user (NewUser) for the role2 role.

switch(config)# no snmp-server user User5 role2

Removes role2 for the specified user (User5)

AES Encryption-Based Privacy

The Advanced Encryption Standard (AES) is the symmetric cipher algorithm. The Cisco SAN-OS software uses AES as one of the privacy protocols for SNMP message encryption and conforms with RFC3826.

The priv option offers a choice of DES or 128-bit AES encryption for SNMP security encryption. The priv option along with aes-128 token indicates that this privacy password is for generating 128-bit AES key.The AES priv password can have a minimum of eight characters. If the passphrases are specified in clear text, you can specify a maximum of 64 characters. If you use the localized key, you can specify a maximum of 130 characters.


Note For an SNMPv3 operation using the external AAA server, user configurations in the external AAA server require AES to be the privacy protocol to use SNMP PDU encryption.


To create or modify SNMP users from the CLI, follow these steps:

 
Command
Purpose

Step 1 

switch# config t

switch(config)#

Enters configuration mode.

Step 2 

switch(config)# snmp-server user user1 role1 auth md5 0xab0211gh priv des 0x45abf342 localizedkey

Specifies the password to be in localized key format using the DES option for security encryption

switch(config)# snmp-server user user1 role2 auth sha 0xab0211gh priv aes-128 0x45abf342 localizedkey

Specifies the password to be in localized key format using the 128-bit AES option for security encryption

Adding or Deleting Communities

You can configure read-only or read-write access for SNMPv1 and SNMPv2 users. Refer to RFC 2576.

To create an SNMPv1 or SNMPv2c community, follow these steps:

 
Command
Purpose

Step 1 

switch# config t

Enters configuration mode.

Step 2 

switch(config)# snmp-server community snmp_Community ro

Adds read-only access for the specified SNMP community.

switch(config)# snmp-server community snmp_Community rw

Adds read-write access for the specified SNMP community.

switch(config)# no snmp-server community snmp_Community

Deletes access for the specified SNMP community (default).

Assigning SNMP Switch Contact and Location Information

You can assign the switch contact information, which is limited to 32 characters (without spaces) andthe switch location.

To configure contact and location information, follow these steps:

 
Command
Purpose

Step 1 

switch# config t

Enters configuration mode.

Step 2 

switch(config)# snmp-server contact NewUser

Assigns the contact name for the switch.

switch(config)# no snmp-server contact NewUser

Deletes the contact name for the switch.

Step 3 

switch(config)# snmp-server location SanJose

Assigns the switch location.

switch(config)# no snmp-server location SanJose

Deletes the switch location.

Configuring SNMP Notifications (Traps and Informs)

You can configure the Cisco MDS switch using the CLI to send notifications to SNMP managers when particular events occur. You can send these notifications as Traps or Informs. Traps are unreliable because the receiver does not send any acknowledgment when it receives a trap. The sender cannot determine if the trap was received. However, an SNMP manager that receives Informs acknowledges the message with an SNMP Response PDU. If the sender never receives a Response, the inform is normally retransmitted. Thus, Informs are more likely to reach their intended destination.


Note Use the SNMP-TARGET-MIB to obtain more information on the destinations to which notifications are to be sent either as Traps or as Informs. Refer to the Cisco MDS 9000 Family MIB Quick Reference for more information.


Tip The SNMP version 1 option is not available with the snmp-server host ip-address informs command.


Configuring SNMPv1 and SNMPv2c Notifications

To configure SNMPv1 and SNMPv2c notifications, follow these steps:

 
Command
Purpose

Step 1 

switch# config t

Enters configuration mode.

Step 2 

switch(config)# snmp-server host 171.71.187.101 traps version 2c private udp-port 1163

Configures the specified host to receive SNMPV2c trap notifications.

switch(config)# no snmp-server host 171.71.187.101 traps version 2c private udp-port 2162

Prevents the specified host from receiving SNMPv2c trap notifications on the configured UDP port.

Step 3 

switch(config)# snmp-server host 171.71.187.101 informs version 2c private udp-port 1163

Configures the specified host to receive SNMPV2c inform notifications using SNMPv2c community string "private".

switch(config)# no snmp-server host 171.71.187.101 informs version 2c private udp-port 2162

Prevents the specified host from receiving SNMP v2c inform notifications on the configured UDP port.

Configuring SNMPv3 Notifications

To configure SNMPv3 notifications, follow these steps:

 
Command
Purpose

Step 1 

switch# config t

Enters configuration mode.

Step 2 

switch(config)# snmp-server host 16.20.11.14 traps version 3 noauth testuser udp-port 1163

Configures the specified host to receive SNMPv3 trap notifications using SNMPv3 user "testuser" and securityLevel of "noAuthNoPriv".

switch(config)# snmp-server host 16.20.11.14 informs version 3 auth testuser udp-port 1163

Configures the specified host to receive SNMPv3 inform notifications using SNMPv3 user "testuser" and securityLevel of "AuthNoPriv".

switch(config)# snmp-server host 16.20.11.14 informs version 3 priv testuser udp-port 1163

Configures the specified host to receive SNMPv3 inform notifications using SNMPv3 user "testuser" and securityLevel of "AuthPriv".

switch(config)# no snmp-server host 172.18.2.247 informs version 3 testuser noauth udp-port 2162

Prevents the specified host from receiving SNMPv3 inform notifications.


Note In the case of SNMPv3 trap notifications, the SNMP manager is expected to know the user credentials (authKey/PrivKey) based on the switch's engineID to authenticate and decrypt the SNMP messages.


Enabling SNMP Notifications

Notifications (Traps and Informs) are system alerts that the switch generates when certain events occur. As of Cisco MDS SAN-OS Release 2.1(1a) , you can enable or disable notifications. By default, no notification is defined or issued. If a notification name, is not specified all notifications are disabled or enabled.

Table 27-1 lists the trap notifications that are disabled by default. This list does not include the entity fru, vrrp, license, unlisted trap notifications, and other generic trap notifications s such as coldstart, warmstart, linkup, and linkdown.

Table 27-1 List of SNMP Trap Notifications Enabled by Default 

Traps enabled
Related Commands

All traps listed in this table

snmp-server enable traps

Entity traps

snmp-server enable traps entity
snmp-server enable traps entity fru

FCC trap

snmp-server enable traps fcc

FC domain trap

snmp-server enable traps fcdomain

FC name server trap

snmp-server enable traps fcns

FCS trap

snmp-server enable traps fcs discovery-complete
snmp-server enable traps fcs request-reject

FDMI trap

snmp-server enable traps fdmi

FSPF trap

snmp-server enable traps fspf

License manager trap

snmp-server enable traps license

Port security trap

snmp-server enable traps port-security

RSCN traps

snmp-server enable traps rscn
snmp-server enable traps rscn els
snmp-server enable traps rscn ils

SNMP agent traps

snmp-server enable traps snmp
snmp-server enable traps snmp authentication

VRRP trap

snmp-server enable traps vrrp

Zone traps

snmp-server enable traps zone
snmp-server enable traps zone default-zone-behavior-change
snmp-server enable traps zone merge-failure
snmp-server enable traps zone merge-success
snmp-server enable traps zone request-reject
snmp-server enable traps zone unsupp-mem


To enable trap notification, follow these steps:

 
Command
Purpose

Step 1 

switch# config t

Enters configuration mode.

Step 2 

switch(config)# snmp-server enable traps fcdomain

Enables the specified SNMP trap (fcdomain) notification.

switch(config)# no snmp-server enable traps

Disables the specified SNMP trap notification. If a trap name is not specified, all traps are disabled.

As of Cisco MDS SAN-OS Release 2.1(1a), you can use the show snmp trap command to display all the traps and their status.

switch# show snmp trap
Trap type                            Enabled
---------                            -------
entity fru                            Yes
fcc                                   No
fcdomain                              No
fcns                                  No
fcs request-reject                    No
fcs discovery-complete                No
fdmi                                  No
fspf                                  No
license                               Yes
port-security                         No
rscn els                              No
rscn ils                              No
snmp authentication                   No
vrrp                                  Yes
zone unsupported member               No
zone request-reject                   No
zone merge-failure                    No
zone merge-success                    No
zone default-zone-behavior-change     No

Configuring the Notification Target User

You must configure a notification target user on the switch for sending SNMPv3 inform notifications to the SNMP manager.

To configure the notification target user, use the following command:

 
Command
Purpose

Step 1 

switch# config t

Enters configuration mode.

Step 2 

switch(config)# snmp-server user testusr auth md5 xyub20gh priv xyub20gh engineID 00:00:00:63:00:01:00:a1:ac:15:10:03

Configures the notification target user with the specified credentials for the SNMP manager with the specified engineID

switch(config)# no snmp-server user testusr auth md5 xyub20gh priv xyub20gh engineID 00:00:00:63:00:01:00:a1:ac:15:10:03

Removes the notification target user.

The credentials of the notification target user are used for encrypting the SNMPv3 inform notification messages to the configured SNMP manager (as in the snmp-server host command).


Note For authenticating and decrypting the received INFORM PDU, the SNMP manager should have the same user credentials in its local configuration data store of users.


Configuring LinkUp/LinkDown Notifications for Interfaces

As of Cisco MDS SAN-OS Release 2.1(2), you can configure which linkUp/linkDown notifications to enable on the interfaces. You can enable the following types of linkUp/linkDown notifications:

Cisco—Only traps (cieLinkUp, cieLinkDown) defined in CISCO-IF-EXTENSION-MIB.my are sent for an interface, if ifLinkUpDownTrapEnable (defined in IF-MIB) is enabled for that interface.

IETF—Only traps (linkUp, linkDown) defined in IF-MIB are sent for an interface, if ifLinkUpDownTrapEnable (defined in IF-MIB) is enabled for that interface. Only the varbinds defined in the trap definition are sent with the traps.

IEFT extended—Only traps (linkUp, linkDown) defined in IF-MIB are sent for an interface, if ifLinkUpDownTrapEnable (defined in IF-MIB) is enabled for that interface. In addition to the varbinds defined in trap definition, varbinds defined in the IF-MIB specific to the Cisco Systems implementation are sent. This is the default setting.

IEFT Cisco—Traps (linkUp, linkDown) defined in IF-MIB and traps (cieLinkUp, cieLinkDown) defined in CISCO-IF-EXTENSION-MIB.my are sent for an interface, if ifLinkUpDownTrapEnable (defined in IF-MIB) is enabled for that interface. Only the varbinds defined in the trap definition are sent with the linkUp and linkDown traps.

IEFT extended Cisco—Traps (linkUp, linkDown) defined in IF-MIB and traps (cieLinkUp, cieLinkDown) defined in CISCO-IF-EXTENSION-MIB.my are sent for an interface, if ifLinkUpDownTrapEnable (defined in IF-MIB) is enabled for that interface. In addition to the varbinds defined in linkUp and linkDown trap definition, varbinds defined in the IF-MIB specific to the Cisco Systems implementation are sent with the linkUp and linkDown traps.


Note For more information on the varbinds defined in the IF-MIB specific to the Cisco Systems implementation, refer to the Cisco MDS 9000 Family MIB Quick Reference.


To configure the linkUp/linkDown notification for interfaces, use the following command:

 
Command
Purpose

Step 1 

switch# config t

Enters configuration mode.

Step 1 

switch(config)# snmp-server enable traps link

Enables (default) only IETF extended linkUp/linkDown notifications.

switch(config)# snmp-server enable traps link cisco

Enables only Cisco Systems defined cieLinkUp/cieLinkDown notifications.

switch(config)# snmp-server enable traps link ietf

Enables only IETF linkUp/linkDown notifications.

switch(config)# snmp-server enable traps link ietf-extended

Enables (default) only IETF extended linkUp/linkDown notifications with extra varbinds.

switch(config)# snmp-server enable traps link ietf cisco

Enables IETF (linkUp/linkDown) and Cisco Systems defined (cieLinkUp/cieLinkDown) notifications.

switch(config)# snmp-server enable traps link ietf-extended cisco

Enables IEFT (linkUp/linkDown) and Cisco Systems defined (cieLinkUp/cieLinkDown) notifications with extra varbinds.

switch(config)# no snmp-server enable traps link

Reverts to the default setting (IETF extended).

Displaying SNMP Security Information

Use the show snmp commands to display configured SNMP information (see Example 27-1 and 27-3).

Example 27-1 Displays SNMP User Details

switch# show snmp user
______________________________________________________________
                  SNMP USERS
______________________________________________________________

User                          Auth  Priv(enforce) Groups
____                          ____  _____________ ______
admin                         md5   des(no)       network-admin

testusr                       md5   aes-128(no)   role111
                                                  role222

______________________________________________________________
 NOTIFICATION TARGET USERS (configured  for sending V3 Inform)
______________________________________________________________

User                          Auth  Priv
____                          ____  ____
testtargetusr                 md5   des
(EngineID 0:0:0:63:0:1:0:0:0:15:10:3)

Example 27-2 Displays SNMP Community Information

switch# show snmp community 
Community                      Access
---------                      ------
private                         rw
public                          ro
v93RACqPNH 								ro

Example 27-3 Displays SNMP Host Information

switch# show snmp host
Host                            Port Version  Level  Type   SecName
____                            ____ _______  ______ ____  ______
171.16.126.34                   2162 v2c      noauth trap   public
171.16.75.106                   2162 v2c      noauth trap   public
...
171.31.58.97                    2162 v2c      auth   trap   public
...

The show snmp command displays counter information for SNMP contact, location, and packet settings. This command provides information that is used entirely by the Cisco MDS 9000 Family Fabric Manager (refer to the Cisco MDS 9000 Family Fabric Manager Configuration Guide). See Example 27-4.

Example 27-4 Displays SNMP Information

switch# show snmp
sys contact:
sys location:
1631 SNMP packets input
        0 Bad SNMP versions
        0 Unknown community name
        0 Illegal operation for community name supplied
        0 Encoding errors
        64294 Number of requested variables
        1 Number of altered variables
        1628 Get-request PDUs
        0 Get-next PDUs
        1 Set-request PDUs
152725 SNMP packets output
        0 Too big errors
        1 No such name errors
        0 Bad values errors
        0 General errors
Community                      Group / Access
---------                      ------
public                          rw

______________________________________________________________
                  SNMP USERS
______________________________________________________________

User                          Auth  Priv(enforce) Groups
____                          ____  _____________ ______
admin                         md5   des(no)       network-admin

testusr                       md5   aes-128(no)   role111
                                                  role222

______________________________________________________________
 NOTIFICATION TARGET USERS (configured  for sending V3 Inform)
______________________________________________________________

User                          Auth  Priv
____                          ____  ____
testtargetusr                 md5   des
(EngineID 0:0:0:63:0:1:0:0:0:15:10:3)

Example 27-5 Displays SNMP Engine IDs

switch# show snmp engineID
Local SNMP engineID: 800000090300053000851E

Example 27-6 Displays Information on SNMP Security Groups

switch# show snmp group
groupname: network-admin
security model: any
security level: noAuthNoPriv
readview: network-admin-rd
writeview: network-admin-wr
notifyview: network-admin-rd
storage-type: permanent
row status: active

groupname: network-admin
security model: any
security level: authNoPriv
readview: network-admin-rd
writeview: network-admin-wr
notifyview: network-admin-rd
storage-type: permanent
row status: active

groupname: network-operator
security model: any
security level: noAuthNoPriv
readview: network-operator-rd
writeview: network-operator-wr
notifyview: network-operator-rd
storage-type: permanent
row status: active

groupname: network-operator
security model: any
security level: authNoPriv
readview: network-operator-rd
writeview: network-operator-wr
notifyview: network-operator-rd
storage-type: permanent
row status: active

Default Settings

Table 27-2 lists the default settings for all SNMP features in any switch.

Table 27-2 Default SNMP Settings 

Parameters
Default

User account

No expiry (unless configured).

Password

None.