Utilization Reports

Utilization Reports

Use the Utilization Reports feature to export utilization data via reports.The Utilization Reports section in the Space Utilization App allows you to create, view, and download utilization reports. It lists previously created reports along with their location scope, reporting period, completion status, and download access.

Key features

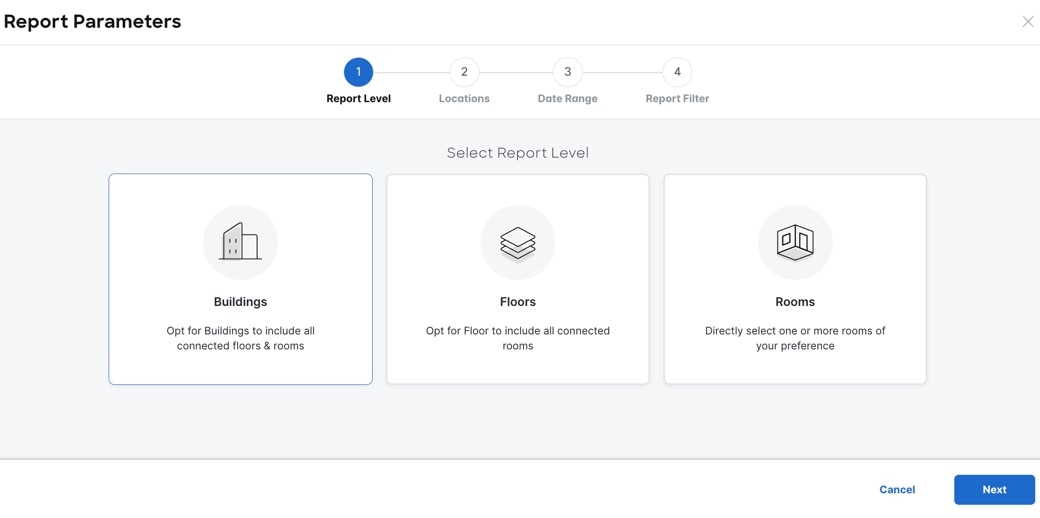
  • Create new utilization reports to generate exportable utilization data for selected locations and time periods.

  • View all existing reports in one list with key metadata (report name, location scope, reporting period).

  • Track report readiness using Last completed period to confirm whether an output is available.

  • Download report outputs on demand directly from the report row entry.

You can view the existing reports and also create new reports.
Figure 1. Utilization reports
The Utilization Reports page includes these details:
Table 1. Utilization reports

Field

Description

Report Name

Identify the report entry and open its details by selecting the linked name (for example, Report 2497).

Locations

Displays the location scope included in the report (often displayed as a campus/building/floor path).

Report Type

Displays the reporting timeframe covered by the report (for example, a date range such as 2026-01-01 – 2026-02-04.

Last completed period

Displays the most recent period for which the report successfully completed, or display N/A when no completed output is available yet.

Download

Click to download the generated report output file for that report entry.

More options (… )

Includes Edit and Delete options.

View reports

To view an existing report, click Report Name to view utilization data for the same. View these information:

  • Workspace

  • Date

  • Interval Start Time (Local)

  • Building

  • Floor

  • Capacity

  • Peak People Count

Perform these additional tasks:

  • Edit: Click to edit and regenerate the report.

  • Download: Click to download the report.

Create report

Use Create New to define a new utilization report by choosing the location scope and reporting period.

The Utilization Reports feature allows you to create utilization report exports for specific locations and time periods, track completion, and download the results for offline analysis and distribution.

Complete these steps to create new reports.

Procedure


Step 1

In the Utilization Reports window, click + Create New.

The Report Parameters wizard is displayed.

Step 2

In the Report Level section, click to choose one among Buildings, Floors, or Rooms.

Step 3

Click Next.

The Locations section is displayed.

Step 4

In the left pane, expand the hierarchy to navigate to the desired location, and select the corresponding check box.

Note


Alternatively, in the left pane, you can search for the desired Building, Floor, or Room.

The selected locations are displayed in the right side of the pane.

Step 5

Click Next.

The Date Range pane is displayed.

Step 6

In the Select Date Range section, you can either specify a date range or choose a cadence for the occupancy report.

  1. Specify Date Range: Choose this option if you need a report for a fixed time period and select the Start Date and End Date from the date picker.

    Note


    The dates are based on the selected location's local time zone.

  2. Recurring Report: Choose this option if you want to generate a recurring occupancy report and specify the cadence by choosing one among the following options:

    • Weekly: This report contains data for the last completed week (Sunday to Saturday).

    • Bi-weekly: This report contains data for the last completed two weeks.

    • Monthly: This report will contain data for the last completed month.

  3. Specify the Reporting Time Interval by choosing one of these options: 15 minutes, 30 minutes, or 60 minutes.

Step 7

Click Next.

The Report Filters pane is displayed.

Step 8

In the Report Filters pane, you can specify the following criteria for the occupancy report:

  1. Under Filter By Specific Day(s), you can either select specific days of the week, or All Days of the Week.

    Note


    You must select at least one day. If not, the following error message is displayed:

    Atleast one day must be selected to generate a report.

  2. Under Filter By Specific Hours, you can either choose Full Day (24 Hrs) or specify the Start Time and End Time.

  3. Under Filter By Capacity of Room(s), choose the desired room capacity.

    Note


    You must select at least one room capacity group. If not, the following error message is displayed:

    Atleast one capacity group must be selected to generate a report.

  4. Choose Skip Empty Rows to exclude entries for those intervals where there is no data.

Step 9

Click Create Report.


The new report is generated.

What to do next

View the report details in the Utilization Reports window.