AP Management

Access point crash files

A crash file is a diagnostic file that

  • is created when an AP experiences an unexpected reboot,

  • contains information about the state of the AP at the time of the crash, and

  • is stored in the local flash memory of the AP for retrieval.

AP crash files provide data that is essential for diagnosing the causes of unexpected reboots in access points. This data aids in troubleshooting and maintenance.

Process crash details

When a process crashes, the device collects various types of data. and compiles it into a single, compressed archive for analysis.

  • Full process core

  • Trace logs

  • Cisco IOS syslogs (not guaranteed in case of nonactive crashes)

  • System process information

  • Bootup logs

  • Reload logs

  • Certain types of proc information


Note


Except for the full core and tracelogs, everything else is a text file. This consolidated information provides a snapshot of the AP's state, which can be used for further diagnosis.


Limitations

Reports are not generated by the system in case of a reload.
Configure access point crash file upload process (CLI)

Set up and configure an access point to collect and upload crash files for diagnostics.

This involves configuring multiple data collection commands and ensuring files are available for troubleshooting access point failures.

Follow these steps to configure the AP crash file upload process:

Procedure


Step 1

Enter privileged EXEC mode.

Example:

Device# enable

Step 2

Collect AP crash information.

Example:

Device# ap name ap-name crash-file get-crash-data

The crash file is uploaded automatically after the AP reloads to the ready state. As a result, this command does not have to be manually executed.

Step 3

Collect the AP core dump file for slot 0 or slot 1.

Example:

Device# ap name ap-name crash-file get-radio-core-dump slot {0 | 1}

Step 4

Upload the AP crash coredump file to the given TFTP location.

Example:

Device# ap name ap-name core-dump tftp-ip crash-file uncompress

Step 5

Display your AP crash file and the radio crash file.

Step 6

Display the crash file in bootflash with .crash extension.

Example:

Device# dir bootflash

The AP crash files and core dumps are collected and available in specified locations for troubleshooting.

LED states for access points

A LED state for access points is a configuration that

  • allows the identification of specific access points in a LAN network,

  • can be configured globally or for individual APs, and

  • prioritizes global configurations over individual AP settings.


Note


When disabling the LED on an access point, note that the LED state that is controlled by the AP-Join profile.

To maintain the LED in a disabled state, it is recommended to create a separate AP-Join profile and Site Tag specifically for APs with the LED disabled.


Note


For APs that have Ethernet LEDs in addition to the main system LED, the Ethernet LEDs are enabled or disabled (switched ON or OFF) as per the system LED. For example, if the system LED is ON, the Ethernet LED will also be ON.


Configure the LED State on Access Points (GUI)

Configure the LED state on access points to optimize visibility and performance using the GUI.

Procedure


Step 1

Choose Configuration > Wireless > Access Points.

Step 2

Click an AP from the AP list.

The Edit AP window is displayed.

Step 3

In the General tab, under the General section, go to LED Settings.

  1. Click the box adjacent to the LED State field to enable or disable the LED state.

  2. From the LED Brightness Level drop-down list, choose a value from 1 to 8.

Step 4

Under the Flash Settings section, perform the following steps:

  1. Click the box adjacent to the Flash State field to enable or disable the flash state.

    When the flash state is enabled, the current status of the flash and the flash duration fields are displayed.
  2. From the Flash Duration drop-down list, choose either Always ON or Timed.

    If you choose the Timed option, the Time Duration field is displayed.
  3. In the Time Duration field, specify the flash duration time, in seconds. The default value is one second. The range is between 1 and 3600 seconds.

Step 5

Click Update & Apply to Device.


The LED state and related settings on the access points are configured according to your selections, enhancing network device visibility or conserving energy.

Configure LED state for access points (CLI)

Configure the LED state for APs in the global configuration mode using commands.

Procedure


Step 1

Enable privileged EXEC mode.

Example:

Device> enable

Enter your password if prompted.

Step 2

Enable the LED state for APs, globally.

Example:

Device# ap name Cisco-AP-name led 

Step 3

Configure the starting and the stopping of the AP LED flash.

Example:

Device# ap name Cisco-AP-name led flash start duration 20
Device# ap name Cisco-AP-name led flash stop

The valid start duration range is between 0 and 3600 seconds.

Step 4

Configure the LED brightness level.

Example:

Device# ap name Cisco-AP-name led-brightness-level 4

The brightness value ranges from 1 to 8.


The LED state is successfully configured with adjusted brightness and flash settings according to commands executed.

Configure LED state in the access point profile

The task enables the LED state for all APs, ensuring active visual indicators across the network.

Procedure


Step 1

Enter global configuration mode.

Example:

Device# configure terminal

Step 2

Enter the AP profile configuration mode.

Example:

Device(config)#ap profile default-ap-profile

Step 3

Enable the LED-state for all APs.

Example:

Device(config-ap-profile)# led

Verify that the LED status is visible on the access point, confirming successful configuration.

Verify LED state for access points

To verify the LED state of the access points, use this command

Device# show ap name AXXX-APXXXX.bdXX.f2XX config general 
Cisco AP Name : AXXX-APXXXX.bdXX.f2XX 
=================================================
Cisco AP Identifier : 0cXX.bdXX.65XX
Country Code : Multiple Countries : FR,IN,US
Regulatory Domain Allowed by Country : 802.11bg:-AE 802.11a:-ABDEN
AP Country Code : US - United States
AP Regulatory Domain
802.11bg : -A
802.11a : -B
.
.
.
CAPWAP Preferred mode : IPv4
CAPWAP UDP-Lite : Not Configured
AP Submode : WIPS
Office Extend Mode : Disabled
Dhcp Server : Disabled
Remote AP Debug : Disabled
Logging Trap Severity Level : information
Logging Syslog facility : kern
Software Version : 17.X.0.XXX
Boot Version : 1.1.X.X
Mini IOS Version : 0.0.0.0
Stats Reporting Period : 180
LED State : Enabled
MDNS Group Id : 0
.

Access point support bundle

An AP support bundle is a data package that:

  • contains core files, crash files, show run configuration, configuration commands, message logs, and trap logs,

  • is supported only on Cisco Wave2 APs and Cisco Catalyst APs.

The AP Support Bundle feature provides comprehensive diagnostic information for troubleshooting and configuring the AP.

Retrieving Support Bundle Information

Retrieve the support bundle information of your AP and export it to the controller or an external server.


Note


The destination file path for a Cisco Catalyst 9800 controller-initiated SCP copy of an AP's support bundle must be a pre-existing folder name.

ap name APNAME export support-bundle mode scp target ip-address 10.11.12.13 path /
ap name APNAME export support-bundle mode scp target ip-address 10.11.12.13 path flash:
ap name APNAME export support-bundle mode scp target ip-address 10.11.12.13 path /BUNDLE
                

Export an access point support bundle (GUI)

You can export an AP support bundle using GUI for analysis or backup.

Complete these steps to export the support bundle.

Procedure


Step 1

Choose Configuration > Wireless > Access Points.

Step 2

Click the corresponding AP name.

The Edit AP window is displayed.

Step 3

Click the Support Bundle tab.

Step 4

From the Destination drop-down list, choose one of the following:

  • This Device: If you choose this, enter the values for the Server IP, Destination File Path, Controller Username, and Password fields.

    Note


    When you choose This Device, a bundle is sent through Secure Copy (SCP) to the controller (if you have configured the ip scp server enable command globally on the controller). You can easily retrieve the bundle later from your browser, using the controller file manager.

  • External Server: If you choose this, from the Transfer Mode drop-down list, choose either scp or tftp.

    If you choose the scp transfer mode, enter the values for the Server IP, Destination File Path, Controller Username, and Password fields.

    If you choose the tftp transfer mode, enter the values for the Server IP, and Destination File Path fields.

Note

 
Information about the Last Export Status, such as State, Transfer Mode, Server IP, File Path, and Time of Export, is displayed on the right-hand side of the window.

Step 5

Click Start Transfer to initiate the export.


Once you complete the transfer, the AP support bundle will be ready at your chosen destination for analysis or backup.

Export an access point support bundle (CLI)

This task guides you to export a support bundle from an access point using CLI commands. This helps in troubleshooting and support.

Procedure


Step 1

Enable privileged EXEC mode.

Example:

Device> enable

Enter your password, if prompted.

Step 2

Export the AP support bundle through the SCP or TFTP transfer modes.

Example:

Device> ap name Cisco-AP-name export support-bundle mode scp target ip-address 10.1.1.1 path file-path

If you select the scp , you will be prompted to provide your username and password.

For tftp , username and password are not required.


After completing these steps, the access point support bundle will be successfully exported to the specified file path using the selected transfer mode.

Monitor the status of support bundle export

To monitor the status of a support bundle export, run this command:

Device# show ap support-bundle summary
AP Name    Server-IP   Status        Last Successful Time      Path File-name
------------------------------------------------------------------------------------------------------------------------------------------------------------------------------------------------------------------------------------
AP_28XXX   81.1.1.10   Copy Success  04/24/2020 07:27:38 UTC   AP_28XXX_support.17.4.0.2.2020.07XXXX.tgz

Access point memory information

Access point memory information is a feature that:

  • allows viewing the memory type of an access point (AP),

  • provides details about the CPU type of the AP, and

  • displays the memory size per AP after single sign-on authentication.

With the introduction of the Access Point Memory Information feature, APs share memory information with the controller during the join phase. This facilitates enhanced network management and can aid in troubleshooting by providing detailed hardware specifications.

Verify access point memory information

To verify the memory information of a specified AP, including the CPU type, memory type and memory size, use thia command:

Device# show ap name AP-NAME  config general 
Cisco AP Name   : AP-NAME
=================================================
Cisco AP Identifier                             : 00XX.f1XX.e0XX
Country Code                                    : Multiple Countries : FR,IN,US
Regulatory Domain Allowed by Country            : 802.11bg:-AE   802.11a:-ABDEN
AP Country Code                                 : US  - United States
AP Regulatory Domain
  802.11bg                                      : -A
  802.11a                                       : -B
.
.
.
CPU Type                                        : ARMv7 Processor rev 1 (v7l)
Memory Type                                     : DDR4
Memory Size                                     : 1028096 KB
.
.
.  

Access point tag persistency

Access point tag persistency allows mapped tags to be saved on the APs.

  • Enabled globally on the controller from Cisco IOS XE Bengaluru 17.6.1 onwards.

  • Eliminates the need to write tag configurations individually on each AP.

Supporting reference information

Access point tag persistency is disabled by default. When APs join a controller with tag persistency enabled, the mapped tags are saved on the APs.

Configure access point tag persistency (GUI)

The purpose of this task is to enable tag persistency on access points, allowing them to retain their tag mapping information without requiring individual configuration after reconnection.

Follow these steps to configure AP Tag Persistency using GUI

Procedure


Step 1

Choose Configuration > Tags & Profiles > Tags.

Step 2

Click the AP tab.

Step 3

In the Tag Source tab, check the Enable AP Tag Persistency check box to configure AP Tag persistency globally.

When APs join a controller with the tag persistency enabled, the mapped tags are saved on the AP without having to write the tag configurations on each AP individually.

Step 4

Click Apply to Device.


The AP tag persistency is enabled, allowing access points to retain their tag configurations even after disconnections.

What to do next

Save tags on an AP.

Save tags on an access point (GUI)

This task guides you on how to save tags, including policy, site, and RF tags, on an access point using the graphical user interface (GUI). Saving tags ensures the access point remembers its configuration across different controllers.

Procedure


Step 1

Choose Configuration > Wireless > Access Points.

Step 2

Click an AP from the list.

The Edit AP page is displayed.

Step 3

Click the General tab.

Step 4

In the Tags section, specify the appropriate policy, site, and RF tags that you created in the Configuration > Tags & Profiles > Tags page.

Step 5

From the Policy drop-down list, select a value.

Step 6

From the Site drop-down list, select a value.

Step 7

From the RF drop-down list, select a value.

Step 8

Check the Write Tag Config to AP check box to push the tags to the AP so that the AP can save and remember this information even when the AP is moved from one controller to another.

Step 9

Click Update & Apply to Device.


Upon completion, the access point will have saved the specified tags and configurations, allowing seamless operation even if the AP is transferred between controllers.

Delete saved tags on an access point (GUI)

The purpose of this task is to guide you to delete saved tags on an access point through the GUI.

Use these steps to delete saved tags on an access point:

Procedure


Step 1

Choose Configuration > Wireless > Access Points.

Step 2

Click an AP from the list of APs.

The Edit AP window is displayed.

Step 3

In the Edit AP window, choose the Advanced tab.

Step 4

In the Set to Factory Default section, check the Clear Resolved Tag Config check box to clear the saved tags on an AP.

Step 5

Click Update & Apply to Device.


The access point is updated and all saved tags are cleared.

Configure access point tag persistency (CLI)

The purpose of this task is to configure access point tag persistency to ensure APs maintain their assigned tags when connecting to different controllers, which aids in redundancy scenarios.

Before you begin

For an AP to preserve its policy tag, site tag, and RF tag configured from the primary controller, these tags must also exist on the other controllers to which the AP connects. If all the three tags do not exist, the AP applies the default policy tag, site tag, and RF tag. Similarly, the tag policy is applicable even if one or two tags exist. AP tag persistency helps in priming an AP in N+1 redundancy scenarios. For more information about configuring tags, see "New Configuration Model" chapter in Cisco Catalyst 9800 Series Wireless Controller Software Configuration Guide.


Note


Once enabled, AP tag persistency takes effect during the AP joining process. Therefore, if there are any APs that are already joined to the controller, those APs must rejoin the controller.


Procedure


Step 1

Enter global configuration mode.

Example:

Device# configure terminal

Step 2

Configure AP tag persistency

Example:

Device(config)# ap tag persistency enable

Step 3

Exit configuration mode and return to privileged EXEC mode.

Example:

Device(config)# end

After completing these steps, the AP tag persistency feature will be enabled on the controller, ensuring APs keep their tag assignments when moving to different controllers.

Verify access point tag persistency

To verify AP tag persistency in the primary controller, use this command:

Device# show ap tag summary
Number of APs: 1

AP Name         AP Mac           Site Tag Name         Policy Tag Name        RF Tag Name            Misconfigured    Tag Source
--------------------------------------------------------------------------------------------------------------------------------
Cisco01_AP      xxxx.xxxx.xxxx   default-site-tag      OpenRoaming            default-rf-tag         No               Static

Note


If the Tag Source displays Static or Filter, it means that the AP tag mappings were configured on the primary controller. If the source displays Default, it means that the AP received the default tags when joining the controller.


To verify the AP tag persistency in the secondary controller, use this command:

Device# show ap tag summary
Number of APs: 1

AP Name       AP Mac           Site Tag Name        Policy Tag Name     RF Tag Name       Misconfigured   Tag Source
--------------------------------------------------------------------------------------------------------------------
Cisco01_AP   xxxx.xxxx.xxxx    default-site-tag     OpenRoaming         default-rf-tag     No              AP

Note


If the Tag Source displays AP, it means that the policy tag, site tag, and RF tag match what was configured on the primary controller, indicating that the AP tags have persisted across controllers.


Access point power save

The power-save mode in APs allows a network administrator to force APs to operate in low-power mode to reduce power consumption.

Feature history for access point power save

Table 1. Feature History

Release

Feature Information

Cisco IOS XE 17.13.1

AP Power Distribution support in Cisco Catalyst 9124 Series APs.

Cisco IOS XE Dublin 17.10.1

The following features are supported:

  • Radio spatial streams

  • Flexible PoE profiles

Cisco IOS XE Cupertino 17.9.1

Feature support for the following APs:

  • Cisco Catalyst 9164 Series Access Points

  • Cisco Catalyst 9166 Series Access Points

Cisco IOS XE Cupertino 17.8.1

This feature allows a network administrator to force APs to operate in low-power mode to reduce power consumption.

For more information about the APs that support the AP Power Save feature, see https://www.cisco.com/c/en/us/td/docs/wireless/access_point/feature-matrix/ap-feature-matrix.html.

Access point power policies

Access point power policies are a set of policies that

  • define power budget utilization for an AP,

  • allow management of different interfaces on an AP, and

  • support different modes for Cisco Catalyst 9124 APs under insufficient power conditions.

Additional reference information

  • Cisco Catalyst 9124 AXI Series APs and Cisco Catalyst 9124D Series APs support up to two radio interfaces (single 5 GHz).

  • Cisco Catalyst 9124 AXE APs support up to three (dual 5 GHz) radio interfaces.

  • Operation modes under 802.3at/PoE+/30W insufficient power conditions include dual or tri-radio modes.

Use case for AP power policy

These are the use cases of an AP power policy:

  • Define a power policy for available power inputs, such as 802.3af, 802.3at, 802.3bt, and DC power.

  • Predetermine AP operations for non-802.3bt power situations with tri-radio or quad-radio APs.

Power-Save Mode

The power-save mode enables an AP to switch to a low-power mode when no clients are associated with the AP. For example, when this mode is enabled in workspaces, the AP falls asleep during after hours, thereby saving power consumption of the AP throughout the night.

From Cisco IOS-XE Cupertino 17.10.1 onwards, you can shut down AP radios or lower the radio spatial streams, to reduce usage of power. You can enforce radio speed by configuring the number of spatial streams on the radios. The combinations for radio spatial stream policies are: 1X1, 2X2, 3X3 (only for Cisco Catalyst 9130 Series Access Points), 4X4, and 8X8.

The following are the advantages of the power-save mode:

  • Increases the energy saving per AP: In the power save mode you can reduce AP functions during off-peak hours and save an additional 20% in energy costs compared to the regular idle mode.

  • Enables environmentally conscious purchases: Large enterprises and companies track environmental performance as one of their key indices. They have a centralized energy team to monitor their energy efficiency, which magnifies the importance of the power-save feature.

PoE profiles

A PoE profile is a configuration framework for managing PoE settings that:

  • facilitates negotiation and adaptation of power levels based on AP requirements,

  • comprises fixed and flexible options for interface configuration, and

  • supports policy-based profiles tailored for both normal and power-saving operational modes.

Supporting reference information

  • Fixed PoE Profiles:

    • Fixed PoE Profiles enable APs to negotiate the power required from the switches they are connected to. The power needed can vary between different AP models.

    • If an AP does not receive the power it requests, it operates within the power budget, potentially causing certain interfaces to function under degraded conditions. For instance, radios might operate at 2SS instead of their full 4SS capability.

    • These profiles are used when APs are in normal operation mode (nonpower-save mode). During power-save mode, the configured PoE power policies are applied instead.

  • PoE Power Policy:

    • PoE Power Policies allow for the configuration of interfaces to specific speeds or settings according to a schedule.

    • These policies can push a defined profile to APs based on timing or calendar settings, such as turning off all but the 2.4-GHz radio and the multigigabit Ethernet at 100 MB at specific times, for example, from 7 p.m. to 7 a.m. on a group of APs located on a second floor.

  • Flexible PoE Profiles:

    • Flexible PoE Profiles allow you to configure different interfaces with specific parameter values and states, instead of fixed profile rules.

    • In cases where an AP does not obtain the necessary power, it operates under the power budget, following the guidelines of the flexible PoE profile.

Additional Reference Information

  • Cisco IOS XE 17.13.1 introduces a new interface, PoE-out, for Cisco Catalyst 9124 Series APs. This interface, alongside USB, Ethernet, and LAN, enables PoE-out only if the RLAN port is activated.

  • Operational parameters for each AP interface may be modified based on the hardware specifications, as detailed in the accompanying tables.

AP power draw specifications

Provides detailed specifications on the power draw requirements for various AP models to enable accurate planning and deployment in network setups.

Table 2. AP Power Draw Specifications

AP

Power Draw Specification

Cisco Wireless 9172 Series Access Points

See the Input power requirements in the Product specifications section of Cisco Wireless 9172 Series Access Points Data Sheet

Cisco Wireless 9176 Series Access Points

See the Input power requirements in the Product specifications section of Cisco Wireless 9176 Series Access Points Data Sheet

Cisco Wireless 9178 Series Access Points

See the Input power requirements in the Power over Ethernet section of Cisco Wireless 9178 Series Access Points Data Sheet

Table 3. AP Power Draw Specifications: Cisco Catalyst 9115, 9120, 9130 Series APs

Access Points

PoE-In-Mode/DC Mode

Consumption @ Power Device

Consumption @ Power Source Equipment

Feature Mode

AP

Worst-Case Cable

Radio 1

Radio 2

Radio 3

Ethernet

USB

Module

PoE-Out

Cisco Catalyst 9115AXI Access Points

.3af

13.0

15.4

2X2

2X2

—

1G

N

—

—

.3at

16.0

18.9

4X4

4X4

—

2.5G

N

—

—

.3at

20.4

24.1

4X4

4X4

—

2.5G

Y(3.75W)

—

—

Cisco Catalyst 9115AXE Access Points

.3af

13.0

15.4

2X2

2X2

—

1G

N

—

—

.3at

17.0

20.1

4X4

4X4

—

2.5G

N

—

—

.3at

21.4

25.3

4X4

4X4

—

2.5G

Y(3.75W)

—

—

Cisco Catalyst 9120AXI/E Access Points

.3af

13.8

15.4

1X1

1X1

Enabled

1G

N

—

—

.3at

20.5

23.2

4X4

4X4

Enabled

2.5G

N

—

—

.3at

25.5

30.0

4X4

4X4

Enabled

2.5G

Y(4.5W)

—

—

Cisco Catalyst 9130AXI/E Access Points

.3af

13.8

15.4

1X1

1X1

Enabled

1G

N

—

—

.3at

25.5

30.0

8X8

4X4

Enabled

5G

N

—

—

.3at

25.5

30.0

Primary 4X4

Secondary Off

4X4

Enabled

5G

Y(4.5W)

—

—

.3at

25.5

30.0

Primary 4X4

Secondary 4X4

Disabled

Enabled

5G

Y(4.5W)

—

—

.3bt

30.5

33.3

8X8

4X4

Enabled

5G

Y(4.5W)

—

—

Table 4. AP Power Draw Specifications: Cisco Catalyst 9136 Series APs

Access Points

PoE-In-Mode

Consumption @Power Device

Consumption @Power Source Equipment

Feature Mode

at AP

Worst-Case Cable

5G Radio

2G Radio

6G Radio

AUX Radio

Mgig0

Mgig1

USB

Module

PoE-Out

Cisco Catalyst 9136 Series Access Points

.3af - Fixed

13.9

15.4

Disabled

Disabled

Disabled

Enabled

1G

Disabled

Disabled

—

—

.3at - Fixed

24.0

27.90

Primary - 4X4

Secondary - Disabled

2X2

2X2

Enabled

2.5G

2.5G (hitless failover standby)

Disabled

—

—

.3bt - Fixed

43.4

54.81

8X8 or Dual

4X4

4X4

4X4

Enabled

5G

5G

Y(9W)

—

—

.3bt - PoE Policy 1

37.3

41.63

8X8 or Dual

4X4

4X4

4X4

Enabled

5G

5G

Disabled

—

—

Table 5. AP Power Draw Specifications: Cisco Catalyst 9166 Series APs

Access Points

PoE-In-Mode

Consumption @Power Device

Consumption @Power Source Equipment

Feature Mode

at AP

Worst-Case Cable

5G Radio

2G Radio

6G Radio

AUX Radio

Mgig0

Mgig1

USB

Module

PoE-Out

Cisco Catalyst 9166 Series Access Points

.3af - Fixed

13.9

15.4

Disabled

Disabled

Disabled

Enabled

1G

—

Disabled

—

—

.3at - Fixed Policy

25.5

30.0

4X4

4X4

4X4

Enabled

5G

—

Disabled

—

—

.3bt - Fixed

30.5

32.8

4X4

4X4

4X4

Enabled

5G

—

Y (4.5 W)

—

—

DC Jack - Fixed

30.5

—

4X4

4X4

4X4

Enabled

5G

—

Y (4.5 W)

—

—

Table 6. AP Power Draw Specifications: Cisco Catalyst 9164 Series APs

Access Points

PoE-In-Mode

Consumption @Power Device

Consumption @Power Source Equipment

Feature Mode

at AP

Worst-Case Cable

5G Radio

2G Radio

6G Radio

AUX Radio

Mgig0

Mgig1

USB

Module

PoE-Out

Cisco Catalyst 9164 Series Access Points

.3af - Fixed

13.9

15.4

Disabled

Disabled

Disabled

Enabled

1G

—

Disabled

—

—

.3at - Fixed

25.5

30.0

4X4

2X2

4X4

Enabled

2.5G

—

Disabled

—

—

.3bt - Fixed

30.1

32.8

4X4

2X2

4X4

Enabled

2.5G

—

Y (4.5 W)

—

—

DC Jack - Fixed

30.1

—

4X4

2X2

4X4

Enabled

2.5G

—

Y (4.5 W)

—

—

Table 7. AP Power Draw Specifications: Cisco Catalyst 9162 Series APs

Access Points

PoE-In-Mode

Consumption @Power Device

Consumption @Power Source Equipment

Feature Mode

at AP

Worst-Case Cable

5G Radio

2G Radio

6G Radio

AUX Radio

Mgig0

Mgig1

USB

Module

PoE-Out

Cisco Catalyst 9162 Series Access Points

.3af

13.3

14.32

1X1

Disabled

1X1

Enabled

1G

—

Disabled

—

—

.3at

20.1

22.67

2X2

2X2

2X2

Enabled

2.5G

—

Disabled

—

—

.3at

25.5

30

2X2

2X2

2X2

Enabled

2.5G

—

Y (4.5W)

—

—

Table 8. AP Power Draw Specifications: Cisco Catalyst 9124 Series APs

Access Points

PoE-In-Mode

Consumption @Power Device

Consumption @Power Source Equipment

Feature Mode

at AP

Worst-Case Cable

Radio 0

R0 dBm Per Path

Radio 1

R1 dBm Per Path

Radio 2

R02 dBm Per Path

AUX Radio

Ethernet Mgig

SFP Module

GbE PHY

PoE-Out

2.4 GHz Radio

5 GHz Primary Radio

5 GHz Secondary Radio

Chillwave

Cisco Catalyst 9124 AXI

Cisco Catalyst 9124 AXD

Cisco Catalyst 9124 AXE Dual Radio Mode

.3af

13.8

15.4

Disabled

—

Disabled

—

NA

NA

Enabled

1G

N

N

N

.3at

25.5

30

2X2

23

2X2

23

NA

NA

Enabled

1G

N

Y

N

.3bt / UPOE / DC

33.6

39.5

4X4

24

4X4

24

NA

NA

Enabled

2.5G

Y

Y

N

.3bt / UPOE / DC

51

60

4X4

24

4X4

24

NA

NA

Enabled

2.5G

Y

Y

Y

Cisco Catalyst 9124 AXI

Cisco Catalyst 9124 AXD

Single 5G Radio

.3at

25.5

30

Shutdown

—

4X4

24

Shutdown

—

Enabled

2.5G

Y

N

N

Cisco Catalyst 9124 AXE Tri-Radio Mode

.3af

13.8

15.4

Disabled

—

Disabled

—

Disabled

—

Enabled

1G

N

N

N

.3at

25.5

30

Disabled

—

Disabled

—

Disabled

—

Enabled

1G

N

N

N

.3bt / UPOE / DC

33.6

39.5

2X2

24

2X2

24

2X2

24

Enabled

2.5G

Y

Y

N

.3bt / UPOE / DC

51

60

2X2

24

2X2

24

2X2

24

Enabled

2.5G

Y

Y

Y

Cisco Catalyst 9124 AXE Dual 5G Radio

.3at

25.5

30

Shutdown

—

2X2

23

2X2

23

Enabled

1G

N

Y

N

Wakeup threshold for access point power save mode

A wakeup threshold is a power management feature in access points that

  • allows the definition of a client threshold within the AP power profile configuration,

  • determines when the AP applies the calendar-associated power profile to wake up from power save mode, and

  • manages the conditions to either shut down the interface or lower interface speed to conserve power.

When the AP applies the power profile associated with the calendar for an active calendar, and the number of connected clients reaches the wakeup threshold, it triggers the AP to exit power save mode. Conversely, when the number of connected clients is less than the wakeup threshold, the AP will either shut down the interface or reduce the interface speed to save power.

This feature is useful in maintaining optimal energy efficiency by adjusting the AP's operation based on connected client demand.

  • If there are enough clients connected to reach the defined threshold, the AP becomes active to ensure adequate performance.

  • If client connections drop below the threshold, the AP powers down or reduces speed to conserve energy.

Access point power save scenarios

A smart energy AP scenario is a situation where

  • APs implement energy-saving modes

  • adjust power modes to optimize energy efficiency, and

  • apply PoE power policies based on calendar profiles.

The power Save feature helps APs enter a power-save mode or low-power mode by associating a calendar with the corresponding power profile. This feature is aimed at conserving energy during periods with lower activity, such as after hours.

Examples

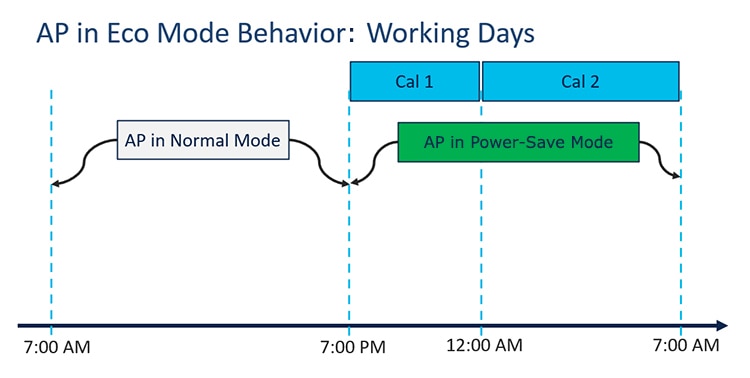
  • AP in eco mode behavior on working days: On working days, from 7:00 a.m. to 7:00 p.m, the AP functions in normal mode or fixed mode when the maximum number of clients connect to the AP. From 7:00 p.m. to 12:00 midnight., the Cal1 calendar profile timer starts to put the AP in the power-save mode. Likewise, the Cal2 calendar profile timer starts, and extends the power-save mode from 12:00 a.m. to 7:00 a.m. Again, at 7:00 a.m., the AP goes into normal mode.

    Figure 1. AP in Eco Mode Behavior: Working Days
    This image shows the Access Point in Eco Mode Behaviour in the working day scenario.
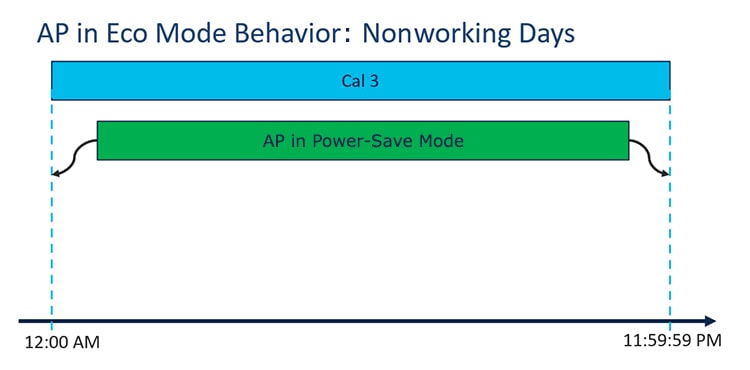
  • AP in eco mode behavior on nonworking days: On nonworking days, the AP enters power-saving mode from 12:00 a.m. to 11:59:59 p.m. The Cal3 calendar profile is applied here. This profile defines the timer for the power-save mode. This means there are no clients connected to the AP, and the AP is asleep.

    Figure 2. AP in Eco Mode Behavior: Nonworking Days
    This image shows the Access Point in Eco Mode Behavior in the nonworking day scenario
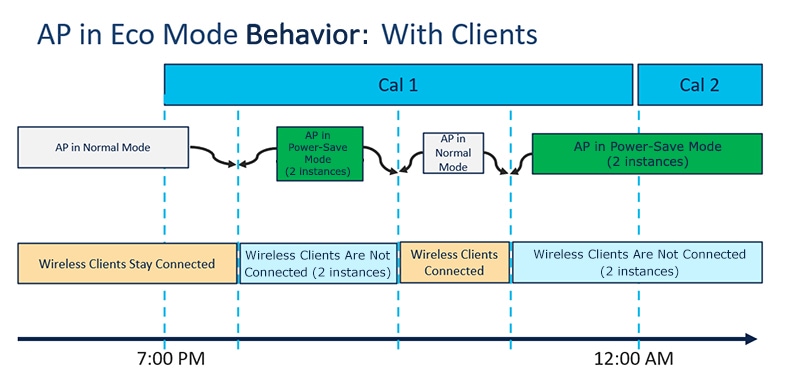
  • AP behavior when clients connect: When clients are connected to the AP, the AP switches to the normal mode based on client connections. For example, in the calendar profile Cal1, the AP is in normal mode, because wireless clients are connected to the AP. At 8:00 p.m., clients dissociate from the AP, and the AP goes into power-save mode. When clients enter the AP coverage area at 9:30 p.m., the AP automatically switches from power-save mode to normal mode of operation.

    Figure 3. AP in Eco Mode Behavior: With Clients
    This image shows the Access Point in Eco Mode Behavior with Clients

Configure power policy profile (GUI)

Use the GUI to configure a power policy profile, enabling you to manage power settings for network components effectively.

Procedure


Step 1

Choose Configuration > Tags & Profiles > Power Profile.

Step 2

Click Add.

The Add Power Profile window is displayed.

Step 3

Enter a name and description for your power profile. Ensure the name contains only ASCII characters, up to 128 characters, without leading or trailing spaces.

Step 4

Click Add to add rules for the power profile.

Step 5

Enter a unique sequence number in the Sequence number field to designate the priority for power disablement of the component. A sequence number of 0 indicates the component is disabled first.

Step 6

From the Interface and Interface ID drop-down list, choose interface and interface ID to designate to the component for which the power derating rule applies.

Step 7

From the Parameter and Parameter value drop-down list, choose the values depending on the interface you have previously chosen.

For example, if you chose Ethernet as an interface, you can further customize the rule for the interface by choosing the associated speed. This rule ensures that the AP disables power for the Ethernet interface that is operating at a higher speed, and thereby consuming more power.

Step 8

Click the check mark to save and then click Apply to Device.


After configuration, you can effectively manage power for network components.

Configure a power policy profile (CLI)

et up a power policy profile to manage AP energy by configuring Ethernet and USB components through the CLI.

Before you begin

Make sure you activate at least one radio interface before configuring a power policy profile.

Procedure


Step 1

Enter global configuration mode.

Example:

Device# configure terminal

Step 2

Configure the power policy profile.

Example:

Device(config)# wireless profile power power-profile-name

Step 3

Configure the power policy for Ethernet.

Example:

Device(config-wireless-power-profile)# 10 ethernet gigabitethernet1 speed 1000mbps

sequence-number : You can derate the AP based on the sequence number you enter. The same combination of interface identifiers and parameter values does not appear in another sequence number. The same interface with the same parameter can appear multiple times with different parameter values, however, the parameter value that yields the lowest power consumption is the one that gets selected, irrespective of the sequence number if there is active calendar.

Note

 
  • The Ethernet interface is used to join the controller. The uplink interface is not disabled even if it is defined in the power policy.

  • Ethernet speed configuration is not operational in Cisco IOS XE 17.8.1 and later releases.

Step 4

Configure the power policy for USB.

Example:

Device(config-wireless-power-profile)# 60 usb 0 state disable

The power policy profile is successfully configured, allowing efficient management of power resources through defined configurations for Ethernet and USB interfaces.

Configure a calendar profile (GUI)

Set up calendar profiles to define daily, weekly, or monthly recurrence schedules applied to configurations like power management on APs.

Procedure


Step 1

Choose Configuration > Tags & Profiles > Calendar.

Step 2

Click Add.

The Add Calendar Profile window is displayed.

Step 3

Enter a name for the calendar profile. Names must include ASCII characters up to 32 in length, with no leading or trailing spaces.

Step 4

From the Recurrence drop-down list, choose the schedule for which you want to create a profile.

Step 5

Select the Start Time and the End Time for the recurrence schedule.

Note

 
  • For daily recurrences, you can select the start time and end time. For example, if you want the AP to derate the power on certain interfaces between 7 p.m. to 7 a.m. daily, or if you want the controller to not allow any clients to be associated during this period, you can set up this daily recurrence schedule.

    To cover this timespan, you must create two calendar profiles, one for 7 p.m. till 23:59:59, and another one from midnight to 7 a.m. of the next calendar day, and map it to the same power profile. Assign it to the AP Join profile after completing this step.

  • For weekly recurrences, select the specific days of the week along with the start and end time.

  • For monthly recurrence, select the specific days of the month along with the start and end time.

Step 6

Click Apply to save the configuration.


The calendar profile is applied to manage schedules as defined to influence device behavior based on the recurrence schedule.

Configure a calendar profile (CLI)

Configure a calendar profile to automatically schedule device operations based on defined timing parameters.

Procedure


Step 1

Enter global configuration mode.

Example:

Device# configure terminal

Step 2

Configure a calendar profile. Enter the calendar profile configuration mode.

Example:

Device# wireless profile calendar-profile name <i>ap_power_calendar</i>

Here, name refers to the name of the calendar profile.

Step 3

Configure daily recurrence for daily profile.

Example:

Device(config-calendar-profile)# recurrence daily

Step 4

Configure the start time and end time for the calendar profile.

Example:

Device(config-calendar-profile)# start 16:00:00 end 20:00:00

Step 5

Return to privileged EXEC mode.

Example:

Device(config-calendar-profile)# end

The device uses the specified calendar profile to manage operations according to the configured timings.

Configure a power policy in an access point join profile (GUI)

Configure a power policy using a power profile or a mapped configuration of a power profile with a calendar profile in an AP join profile.

During an AP join session, you can use a power profile or a mapped configuration of a power profile and a calendar profile. Map up to five combination profiles (calendar and power) per AP profile.

Before you begin

Ensure that the power profile and calendar profile are created and displayed in the respective drop-down lists in the GUI.

Procedure


Step 1

Choose Configuration > Tags & Profiles > AP Join.

The Add AP Join Profile window is displayed.

Step 2

Click the AP tab.

Step 3

Under the AP tab, click the Power Management tab.

Step 4

From the Regular Power Profile drop-down list, choose the power profile.

The AP applies these settings to derate the power based on the configured priority list.

Note

 
If you want the AP to apply the power profile configuration during a specific time period, choose the Calendar Profile and map it to the power profile from the drop-down list.

Step 5

Click the check mark to associate the mapping.

Step 6

Click Apply to Device to save the configuration.


The AP adjusts its power settings based on designated profiles and according to set priorities and calendar schedules.

Map a power profile under an access point profile (CLI)

Before you begin

Ensure that you have defined a calendar profile in the wireless profile, before you map the calendar profile to an AP join profile.

Procedure

  Command or Action Purpose

Step 1

Enter global configuration mode.

Example:

Device# configure terminal

Step 2

Configure an AP profile and enter AP profile configuration mode.

Example:

Device(config)#  ap profile  ap-profile-name

Step 3

Configure the AP power profile.

Example:

Device(config-ap-profile)#  power-profile  power-profile-name

This power profile is used during non-calendar hours to meet the power budget provided by the switch connected to the AP.

Step 4

Map a calendar profile to the AP profile. Enter the AP profile calendar configuration mode.

Example:

Device(config-ap-profile)#  calendar-profile  ap-calendar-profile

Step 5

Map a specific power profile to a specific calendar profile.

Example:

Device(config-ap-profile-calendar)# action power-saving-mode 
power-profile power-profile1

Maps the power-saving mode action for the calendar profile. Use the no form of this command to disable the command.

Note


You can have more than one mapping of calendar profile to power profile.

Configure client wakeup threshold using commands

Configure the client wakeup threshold on devices to manage power save mode effectively.

This task involves setting a threshold for clients that influences the power save mode of APs.

Procedure


Step 1

Enter global configuration mode.

Example:

Device# configure terminal

Step 2

Configure the power policy profile.

Example:

Device(config)# wireless profile power power-profile1

Step 3

Configure the client threshold up to which the AP can stay in the power save mode.

Example:

Device(config-wireless-power-profile)# power-save-client-threshold 5

The valid range is between 1 and 32 clients. The default value is 1.


The power save mode configuration is completed successfully for the specified client threshold.

Configure PoE-Out Interface in Power Profile using GUI

Configure the PoE-Out interface in a power profile through the GUI. This setup is necessary to ensure proper power management of connected devices through an AP.

Before you begin

Enable the RLAN port for the AP.

Procedure


Step 1

Choose Configuration > Tags & Profiles > Power Profile.

Step 2

Click Add.

The Add Power Profile window is displayed.

Step 3

Enter a name and description for the power profile. The name can contain up to 128 ASCII characters, without leading or trailing spaces.

Step 4

(Optional) From the Power Save Client Threshold counter, select a value to set a limit to the number of client associations with the AP. The default value is 1. The range is between 1 and 32.

Step 5

Click Add to create a rule for the PoE-Out interface.

The Rule section is displayed in the window.

Step 6

In the Rule section, complete the following steps:

  1. In the Sequence number field, enter a unique sequence number to assign the priority in which power should be disabled for the component. A sequence number of 0 indicates that the component should be disabled first.

  2. From the Interface drop-down list, choose Ethernet as the interface.

  3. From the Interface ID drop-down list, choose one of the following interfaces: LAN1, LAN2, or LAN3.

  4. From the Parameter drop-down list, choose POE-out.

    An AP uses a POE-out port to provide power to another device, like a camera. This selection ensures that the power usage of the port is reduced or shut down at the specified sequence.

Step 7

Click Apply to Device.


The power profile is configured, setting the PoE-Out interface according to specified parameters, effectively managing power to connected devices.

Configure PoE-out interface in the power profile

Configure PoE-out interfaces in your network within a specified power profile using CLI commands.

Procedure


Step 1

Enter global configuration mode.

Example:

Device# configure terminal

Step 2

Configure the power policy profile. Enter the wireless power profile configuration mode.

Example:

Device(config)# wireless profile power poe-out-power-profile

Step 3

Disable the PoE-out state.

Example:

Device(config-wireless-power-profile)# 1 ethernet LAN1 poe-out disable

The interface disables the PoE-out state according to the specified power profile settings for optimized power management.

Configuration example of power profile

The example shows how to define a power save policy:

wireless profile power power-save
            10 radio 5ghz state shutdown
            20 radio secondary-5ghz state shutdown
            30 radio 6ghz state shutdown
            40 usb 0 state disable

The example shows how to define a calendar profile:

wireless profile calender-profile name eve-to-midnight
            recurrence daily
            start 19:00:00 end 23:59:59
wireless profile calender-profile name midnight-to-morning
            recurrence daily
            start 00:00:00 end 07:00:00
wireless profile calender-profile name weekends
            recurrence weekly
            day Saturday
            day Sunday
            start 00:00:00 end 23:59:59

The example shows how to define an AP join profile and map a calendar profile to a power profile:

ap profile wireless-prof-site1
	                calendar-profile eve-to-midnight
		                action power-saving-mode power-profile power-save
	                calendar-profile midnight-to-morning
		                action power-saving-mode power-profile power-save
	                calendar-profile weekends
		                action power-saving-mode power-profile power-save

Verify access point power policy (GUI)

The purpose of this task is to verify the AP Power Policy applied on the Cisco Catalyst 9136 series using the GUI.

To verify the applied configuration on the GUI, use these steps:

Procedure


Step 1

Choose Monitoring > AP Statistics.

Step 2

Click a Cisco Catalyst 9136 series AP from the list of APs.

The General window is displayed.

Step 3

Click the Power tab.

The Power Operational Status and the AP Fixed Power Policy details are displayed.

Step 4

Click OK.


These steps help verify whether the power policy settings are correctly applied to the AP.

Verify the access point fixed power policy details

Ensure that the access points are operating with the correct power settings by verifying and updating the AP fixed power policy details, which helps maintain optimal network performance and coverage.

To verify the AP fixed power policy details from the list of configured APs, use these steps:

Procedure


Step 1

Choose Configuration > Access Points.

Step 2

Click a Cisco Catalyst 9136 series AP from the list of APs.

The Edit AP window is displayed.

Step 3

Click the Interfaces tab.

The AP Fixed Power Policy details are displayed.

Step 4

Click Update & Apply.


The AP fixed power policy details will be displayed.

Verify the access point power profile

To view the calendar profile and its mapping, use this command:

Device# show ap profile name default-ap-profile detailed
AP Profile Name                     : default-ap-profile
Description                         : default ap profile
Power profile name                  : power_prof_day
AP packet capture profile           : Not Configured
AP trace profile                    : Not Configured
Mesh profile name                   : default-mesh-profile
Power profile name                  : Not Configured
Calendar Profile
    Profile Name                   : cal47
    Power saving mode profile name : pow_da
    ----------------------------------------------------
    Profile Name                   : cal48
    Power saving mode profile name : pow23
    ----------------------------------------------------

To view the operational details of the AP, use this command:
Device# show ap name cisco-ap power-profile summary
AP power derate Capability      : Capable

Power saving mode
Power saving mode profile        : pow2
Associated calendar profile      : cal1

AP power profile status         : Insufficient De-rating

Interface    Interface-ID       Parameter        Parameter value    Status
---------------------------------------------------------------------------------------
Radio        5 GHz              State            DISABLED           Success             
Radio        6 GHz              State            DISABLED           Not Applicable      
Ethernet     LAN1               State            DISABLED           Not Applicable      
Radio        2.4 GHz            State            DISABLED           Success             
Ethernet     Gig0               Speed            5000 MBPS          Fixed Policy        

AP power derate capability is displayed in the output as Capable only for those APs that support power policy. For the other APs, it is displayed as Not Capable.

In the show ap name cisco-ap power-profile summary output, in the power saving mode, the status of the interface configured in the power profile (for example, pow2) is applied on the AP, and the AP sends the details (that are displayed in the show command) such as, the name of the power saving profile and the associated calendar profile.

The table that is displayed shows the interfaces and the parameter status of the power saving profile. The AP sends the information as to which of the interfaces are disabled. For example, if the AP does not have a 6-GHz radio interface, the Status is displayed as Not Applicable. If the interfaces are applied without any errors, then Success is displayed.


Note


When the AP uses the fixed power policy, due to inactive calendar or client connectivity, the interfaces are not displayed in the power profile summary if their status is UP on the AP.


Verify radio spatial streams

To view the configuration and operational details of radio spatial stream rules in the power profile, run these commands:
Device# show wireless profile power detailed wireless_pow_profile_name 
Power profile name             : wireless_pow_profile_name
-------------------------------------------------
Description                    : 
.
.
Seq No       Interface    Interface-id       Parameter        Parameter value
-------------------------------------------------------------------------------
100          Radio        6 GHz              Spatial Stream   2 x 2             
200          Radio        5 GHz              Spatial Stream   8 x 8             
400          USB          USB0               State            DISABLED          
500          Ethernet     Gig0               Speed            100 MBPS          
600          Radio        6 GHz              State            DISABLED          
700          Radio        2.4 GHz            State            DISABLED          
900          Radio        5 GHz              State            DISABLED          
Device# show ap name cisco-ap-name power-profile summary
AP power derate Capability      : Capable

AP fixed power policy
---------------------

Interface    Interface-ID       Parameter        Parameter value    Status
---------------------------------------------------------------------------------------
Ethernet     Gig0               Speed            5000 MBPS          Fixed Policy        
Radio        2.4 GHz            Spatial Stream   4 x 4              Fixed Policy        
Radio        5 GHz              Spatial Stream   8 x 8              Fixed Policy        
Radio        Sec 5 GHz          Spatial Stream   4 x 4              Fixed Policy        
USB          USB0               State            DISABLED           Fixed Policy        

Verify client threshold

To view the client threshold details, run this command:

Device# show wireless profile power detailed profile1
Power profile name             : profile1
-------------------------------------------------
Description                    : Power profile 1
Power save client threshold    : 5
Seq No       Interface    Interface-id       Parameter        Parameter value
-------------------------------------------------------------------------------
0             Radio        6 GHz             State              DISABLED   
1             Radio        5 GHz             Spatial Stream     1 x 1      
2             Radio        2.4 GHz           Spatial Stream     2 x 2      
3             USB          USB0              State              DISABLED   

Verify PoE-out details

To view the PoE-out details in the wireless power profile, run these commands:
Device# show wireless profile power detailed poe-out_profile_name 
Power profile name             : poe-out_profile_name
-------------------------------------------------
Description                    : profile-description
Seq No       Interface    Interface-id       Parameter        Parameter value
-------------------------------------------------------------------------------
10 ...
20           Ethernet     LAN 1              POE_OUT          DISABLED
30 ...
Device# show ap name Cisco-Ap1 power-profile summary
AP power derate Capability      : Capable

AP fixed power policy
---------------------

Interface    Interface-ID       Parameter        Parameter value    Status
---------------------------------------------------------------------------------------
...
Ethernet     LAN 1              POE_OUT          DISABLED           Fixed Policy   
...

Access point real-time statistics

An access point real-time statistic is a tool that

  • allows tracking of CPU utilization and memory usage of an AP,

  • monitors the health of an AP, and

  • generates real-time statistics from an AP.

Starting from Cisco IOS XE 17.5.1, you can monitor both CPU utilization and memory usage to assess the health of an AP through generated real-time statistics.

Feature history for real time access point statistics

Table 9. Feature history

Release

Feature

Feature information

Cisco IOS XE 17.7.1

Real time access point statistics

The system implements this feature with AP threshold values between 0 and 50.

  • SNMP Traps: SNMP traps are notifications sent out when thresholds are crossed for specific statistics like CPU and memory usage in both the APs and the controller.

  • Sampling Period and Statistics Interval: These parameters can be configured using SNMP, YANG, and CLI to manage how frequently statistics are sampled and reported.

Supporting reference information

SNMP traps are sent out when the threshold is crossed. The sampling period and statistics interval can be configured using SNMP, YANG, and CLI.

From Cisco IOS XE 17.7.1 release onwards, for radio monitoring, you can reset the radios based on the statistics sent by the AP for a sampling period. When you configure the radios in the controller, if there is no increment in the Tx or Rx statistics when the radio is up, then the radio reset is triggered.

Restrictions for AP radio monitoring statistics

You cannot reset the radio firmware from the controller. The controller will shut and then restart the radio if the Rx or Tx count does not increase for a radio slot within a specified period.

Configure access point real time statistics (GUI)

This task helps you configure real-time statistics for access points using a graphical user interface, allowing you to effectively monitor and manage AP behavior.

Procedure


Step 1

Choose Configuration > Tags & Profiles > AP Join.

Step 2

Click Add. The Add AP Join Profile page is displayed.

Step 3

Under the AP tab, click the AP Statistics tab.

Step 4

In the System Monitoring section:

  • Enable Monitor Real Time Statistics to get calculated statistics and alarms of the AP.

  • To receive an alarm when the upper threshold is surpassed for parameters such as CPU utilization and memory, enable Trigger Alarm for AP.

  • Enter the threshold percentage for CPU and memory usage in the CPU Threshold to Trigger Alarm field and Memory Threshold to Trigger Alarm fields, respectively. The valid range is between 0 and 50. An SNMP trap is sent out when this threshold is crossed.

  • In the Interval to Hold Alarm field, enter the time for which the alarm is held before it gets triggered. The range is between 0 and 3600 seconds.

  • In the Trap Retransmission Time field, enter the time between retransmissions of the alarm. The range is between 0 and 65,535 seconds.

  • To define how often data should be collected from the AP, enter a value in the Sampling Interval field. The range is between 720 and 3600 seconds.

  • To define the interval at which AP statistics are to be calculated, enter a value in the Statistics Interval field. The range is between 2 and 900 seconds.

  • To automatically reload the AP when there is high CPU and memory usage in the defined sampling interval, select the Reload the AP check box.

Step 5

Under the Radio Monitoring section:

  • Select the Monitoring of AP Radio stuck check box to verify that the Tx and Rx statistics of the AP are updated each time the payloads are coming in from the AP to the controller.

  • To generate an alarm for the radio of the AP when there is no increment in the Tx and RX statistics for the payloads, select the Alarms for AP Radio stuck check box.

  • Select the Reset the stuck AP Radio check box to recover the radio from the bad state. A radio admin state payload will be sent from the controller to toggle the radio and the radio will be shut when there is no increment in the Tx and Rx statistics.

  • To define how often data should be collected from the radio, enter a value in the Sampling Interval field. The valid range is between 720 and 3600 seconds.

Step 6

Click Apply to Device to save the configuration.


The AP monitors real-time statistics and triggers alarms based on defined thresholds to aid you in efficiently managing AP resources.

Configure access point real-time statistics (CLI)

This task provides instructions on how to configure real-time statistics for an access point using CLI commands.

This task is intended for network administrators who need to monitor and configure various system parameters on a Cisco access point, particularly real-time statistics related to performance monitoring.

Procedure


Step 1

Enter global configuration mode.

Example:

Device# configure terminal

Step 2

Configure the AP profile. The default AP join profile name is default-ap-profile.

Example:

Device(config)# ap profile doc-test

Step 3

(Optional) Configure the statistics timer.

Example:

Device(config-ap-profile)# stats-timer 60

This step configures the interval for the statistics reports coming from the AP, with values ranging from 0 to 65535 seconds.

Step 4

(Optional) Enable monitoring for AP system.

Example:

Device(config-ap-profile)# statistics ap-system-monitoring enable

Step 5

Enable alarms for AP system monitoring.

Example:

Device(config-ap-profile)# statistics ap-system-monitoring alarm-enable

Step 6

Define the hold time for system monitoring alarms on the AP.

Example:

Device(config-ap-profile)# statistics ap-system-monitoring alarm-hold-time 400

The values range from 0 to 3600 seconds.

Step 7

Define the retransmission interval for the trap alarms.

Example:

Device(config-ap-profile)# statistics ap-system-monitoring alarm-retransmit-time 100

Set the interval, with values from 0 to 65535 seconds, for retransmitting trap alarms when conditions persist.

Step 8

Define the CPU usage threshold for the AP to trigger alarms.

Example:

Device(config-ap-profile)# statistics ap-system-monitoring cpu-threshold 90

Note


From Cisco IOS XE 17.7.1 release onwards, the threshold value for triggering alarms is from 0 to 100%.

Step 9

Define the memory usage threshold on the AP to trigger alarms.

Example:

Device(config-ap-profile)# statistics ap-system-monitoring mem-threshold 90

The percentage threshold for memory usage on the AP to trigger is from 0 to 100%.

Note


From Cisco IOS XE 17.7.1 release onwards, the memory usage threshold to trigger alarms ranges from 0 to 100%.

Step 10

(Optional) Configure the statistics sampling interval.

Example:

Device(config-ap-profile)# statistics ap-system-monitoring sampling-interval 600

The interval can range from 2 to 65535 seconds.

Step 11

Exit from AP profile configuration mode and return to global configuration mode.

Example:

Device(config-ap-profile)# exit

Step 12

Enable sending AP-related trap flags for statistics that exceed set thresholds.

Example:

Device(config)# trapflags ap ap-stats

Traps are sent when statistics exceed the configured thresholds, enabling alerts and automated responses.


The statistics of the access point have been configured, enabling real-time monitoring and alarm triggering for system performance parameters.


                Device(config)# ap profile default-policy-profile
                Device(config-ap-profile)# statistics ap-system-monitoring enable
                Device(config-ap-profile)#statistics ap-system-monitoring sampling-interval 600
                Device(config-ap-profile)#statistics ap-system-monitoring alarm-enable
                Device(config-ap-profile)#statistics ap-system-monitoring alarm-hold-time 3
                Device(config-ap-profile)#statistics ap-system-monitoring alarm-retransmit-time 10
                Device(config-ap-profile)#statistics ap-system-monitoring cpu-threshold 90
                Device(config-ap-profile)#statistics ap-system-monitoring mem-threshold 90
                Device(config)# trapflags ap ap-stats

Configure the access point radio monitoring statistics (CLI)

Learn how to configure monitoring statistics for AP radios to enable stuck radio statistics, alarms, and actions for optimal performance.

These steps help configure AP radio monitoring statistics:

Procedure


Step 1

Enter global configuration mode.

Example:

Device# configure terminal

Step 2

Configure an AP profile and enter the AP profile configuration mode.

Example:

Device(config)# ap profile test1 

Step 3

Enable the monitoring of AP radio stuck statistics.

Example:

(config-ap-profile)#statistic ap-radio-monitoring enable

Step 4

Enable the alarm for AP radio stuck statistics.

Example:

(config-ap-profile)#statistic ap-radio-monitoring alarm-enable

Step 5

Specify the sampling interval in seconds.

Example:

(config-ap-profile)# statistic ap-radio-monitoring action reload-ap interval850

The values range from 720 to 3,600 seconds.

Step 6

Generate an alarm and reset the radio if the radio is stuck.

Example:

(config-ap-profile)# statistic ap-radio-monitoring action radio-reset

Step 7

Reload the AP.

Example:

(config-ap-profile)# statistic ap-system-monitoring action reload-ap

The AP radio monitoring statistics help identify stuck radios and automatically take corrective actions to ensure optimal performance.

Device(config)# ap profile test1
Device(config-ap-profile)# statistics ap-radio-monitoring enable
Device(config-ap-profile)#statistic ap-radio-monitoring alarm-enable
Device(config-ap-profile)#statistic ap-radio-monitoring sampling-interval 750
Device(config-ap-profile)# statistic ap-radio-monitoring action radio-reset
Device(config-ap-profile)#statistic ap-system-monitoring action reload-ap

Monitor access point real-time statistics (GUI)

This task enables network administrators to monitor access point performance and diagnose potential issues by viewing real-time statistics.

Procedure


Step 1

Choose Monitoring > Wireless > AP Statistics.

Step 2

Click the General tab.

Step 3

Click an AP name. The General window is displayed.

Step 4

To view the AP Statistics data, click the AP Statistics tab.

These types of information are displayed:

  • Memory alarm last send time: Displays the time of the last memory trap sent.

  • Memory Alarm Status: Displays the state of the memory alarm. An alarm can be ACTIVE, INACTIVE, INACTIVE_SOAKING, ACTIVE_SOAKING. An alarm is soaked until the configured hold time has passed.

  • Memory alarm raise time: Displays the last time the memory alarm was active.

  • Memory alarm clear time: Displays the last time the memory alarm was inactive.

  • Last statistics received: Displays the time of the last statistics report received from the AP.

  • Current CPU Usage: Displays the latest percentage of CPU usage reported.

  • Average CPU Usage: Displays the average CPU usage calculated.

  • Current Memory Usage: Displays the latest percentage of memory usage reported.

  • Average Memory Usage: Displays the average memory usage calculated.

  • Current window size: Displays the window size. The window size is calculated by dividing the statistics interval by the sampling interval. The average CPU and memory usage is calculated by the window size.

  • CPU alarm last send time: Displays the time of the last CPU trap sent.

  • CPU Alarm Status: Displays the state of the CPU alarm. An alarm can be ACTIVE, INACTIVE, INACTIVE_SOAKING, ACTIVE_SOAKING. An alarm is soaked until the configured hold time has passed.

  • CPU alarm raise time: Displays the last time the CPU alarm was active.

  • CPU alarm clear time: Displays the last time the CPU alarm was inactive.

Step 5

Click OK.


The current statistics for the selected access point are displayed, allowing for comprehensive monitoring and analysis of AP performance metrics.

Verify access point real-time statistics

To verify AP real-time statistics, run this command:

Device# show ap config general | section AP statistics
!Last Statistics 
AP statistics : Enabled
Current CPU usage : 4
Average CPU usage : 49
Current memory usage : 35
Average memory usage : 35
Last statistics received : 03/09/2021 15:25:08
!Statistics Configuration
Current window size : 1
Sampling interval : 30
Statistics interval : 300
AP statistics alarms : Enabled
!Alarm State - Active, Inactive, Inactive_Soaking, Inactive_Soaking
Memory alarm status : Active
Memory alarm raise time : 03/09/2021 15:24:29
Memory alarm clear time : NA
Memory alarm last send time : 03/09/2021 15:24:59
CPU alarm status : Inactive
CPU alarm raise time : 03/09/2021 15:24:25
CPU alarm clear time : 03/09/2021 15:25:05
CPU alarm last send time : 03/09/2021 15:25:05
!Alarm Configuration
Alarm hold time : 6
Alarm retransmission time : 30
Alarm threshold cpu : 30
Alarm threshold memory : 32

To verify that the statistics reporting period is accurate, run this command:

Device# show ap config general | i Stats Reporting Period
Stats Reporting Period : 10