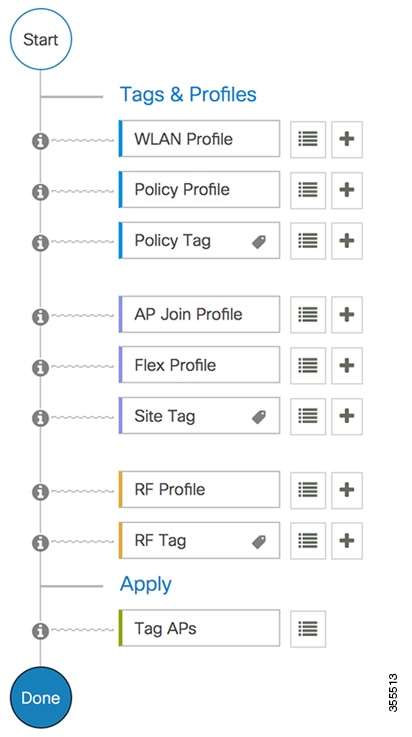
New Configuration Model

New configuration model, tags, and profile

The new configuration model is a wireless network configuration approach that

  • uses profiles to define feature-specific parameters

  • uses tags to bundle and apply profiles to APs, and

  • separates policy, site, RF, and WLAN definitions for modular deployment.

Profiles define attributes such as WLAN policy, RF behavior, and AP join characteristics. Tags are logical containers that map these profiles to APs, ensuring flexible and scalable configurations.

A tag is a logical container that

  • is defined by the property of policies you associate with it

  • maps multiple profiles—policy, site, and RF—to an AP or client, and determines that device's configuration and behavior, and

  • enables modular and flexible deployment across sites.

Every tag has a default that is created when the system boots up.

A profile is a logical container that

  • include feature-specific attributes and parameters applied to tags

  • represent multiple attributes related to policy, site, and RF

  • determine the configuration and behavior of applied APs and associated clients, and

  • is a reusable entities that can be used across tags.

Configuration workflow

Configuring wireless networks involves establishing profiles and tags that link configurations to APs for effective wireless management.

Summary

The key components involved in the process are:

  • Profiles: Logical groupings of settings (such as WLAN, Policy, AP Join, Flex, and RF) used to configure APs.

  • Tags: Logical containers or labels (such as Policy, Site, Tag) that help link profiles with APs.

  • APs: Devices that implement the configurations provided by profiles and tags to deliver wireless connectivity.

Workflow

Figure 1. Configuration workflow

These are the stages of configuration:

  1. Profile creation creates specific profiles:
    • WLAN profile for managing wireless network settings.
    • Policy profile for enforcing network rules.
    • AP Join profile for controlling AP associations.
    • Flex profile for handling local switching.
    • RF profile for optimizing radio frequency settings.
  2. Tag creation: generates tags to complement profiles:
    • Policy tag to align with the Policy profile.
    • Site tag for specific location identification.
    • RF tag corresponding to the RF profile.
  3. Tag association: associates the created tags with an AP to apply the configured settings and policies.

Result

The configuration workflow enables APs to be set up correctly with designated profiles and tags, resulting in efficient network operation and management.

Tags and their associated profiles

The new configuration model has different types of tags that contain various types of profiles, depending on the functionality they represent.

Table 1. Various types of tags and the contained profiles

Tag

Contains

Function

RF Tag

Radio profile

RF tags are used to group and manage radio frequency profiles for wireless networks.

Site Tag

Flex profile and AP join profile

Site tags define the properties of a site and maps the flex profile to the the AP join profile.

Policy Tag

WLAN profile and policy profile

Policy tags map WLAN profile to the policy profile

The figure depicts the various types of tags and their contained profiles. The figure also depicts how the tag is thus applied to access points easily.

RF Tags

An RF tag is a configuration object that

  • contains profiles for different radio frequency bands

  • are used to group and manage radio frequency profiles for wireless networks

  • defines global or band-specific parameters for wireless devices, and

  • provides default settings for each RF profile to ensure consistent operation across radios.

The RF tag contains the 2.4 GHz, 5 GHz, and 6 GHz RF profiles. The default RF tag contains the global configuration for 2.4 and 5 GHz bands and default RF profile for 6 GHz band. All these profiles contain the same default values for global or RF profile parameters for the respective radios.

Example of RF tag

For a device operating in multiple frequency bands, applying an RF tag ensures that each radio (such as 2.4 GHz or 5 GHz) uses the network-approved configuration for coverage, performance, and reliability.

RF Profiles

An RF profile is a configuration set that

  • centralizes radio settings for APs

  • applies a uniform set of radio parameters to all APs within an AP group, and

  • ensures consistent wireless performance and feature deployment across the group.

Some RF profile options are specific to the 6-GHz band and include features such as Unsolicited Broadcast Probe Response, FILS Discovery, Multi-BSSID, and Preferred Scanning Channels. These features address 802.11ax requirements and help optimize management traffic or channel selection for reliable wireless performance..

Preferred Scanning Channels is a feature that helps RRM choose PSC channels to 6-GHz radios.

Site Tags

A site tag is a configuration object that

  • defines the properties of a wireless site

  • maps a flex profile to an AP join profile, and

  • specifies site-specific settings, such as a list of primary APs for upgrades.

Additional reference information

  • Attributes unique to a flex or remote site are part of the flex profile, while attributes that belong to the actual physical site—like the primary APs list—are directly included in the site tag.

  • The site tag includes settings that are not suited for shared, reusable profiles.

  • If the flex profile name or AP profile name is changed within the site tag, associated APs are required to rejoin the controller by disconnecting their Datagram Transport Layer Security (DTLS) session.

  • When a site tag is created, the AP and flex profiles default to preset values (default-ap-profile and default-flex-profile).

Example of site tag

Assigning a set of primary APs for efficient software upgrades is done through the site tag, not the flex profile, since this information applies specifically to the physical site.

Flex profiles

A Flex profile is a configuration profile that

  • contains policy attributes for network management

  • specifies remote site–specific parameters, and

  • supports custom mappings such as VLAN-to-ACL and VLAN name-to-ID assignments.

The FlexConnect configuration helps the central controller to manage sites that are geo-distributed, for example, retail, campus, and so on.

Example of flex profile

A Flex profile can include EAP profiles used when an AP acts as an authentication server for local RADIUS information, as well as mappings for VLANs and associated ACLs or VLAN names and IDs

Analogy: A Flex profile is like a master checklist for a remote office: just as a checklist ensures every necessary step, tool, and contact is available for smooth operation at the branch, a Flex profile gathers all the required policies and site-specific settings so each access point at a remote site works according to the organization’s requirements without repeated manual configuration.

AP join profiles

An AP join profile is a configuration set that

  • specifies global and AP group-specific parameters for APs

  • defines network and communication settings specific to an AP, such as CAPWAP, IPv4, IPv6, and protocol configurations, and

  • centralizes control of AP-specfic settings—including retransmit configuration, UDP Lite, high availability, Global AP failover, Hyperlocation config parameters, Telnet and SSH, and 11u parameters—to streamline access point management across a network.

Policy Tag

A policy tag is a network configuration object that

  • maps each WLAN profile to a specific policy profile

  • determines how network and switching policies are assigned to wireless clients, and

  • controls the deployment of WLAN and policy profiles to access points (APs) based on their enabled state.

Policy tag mapping

A policy tag maps the WLAN profile to the policy profile.

Network Configuration Object

Function

WLAN profile

defines the wireless characteristics of the WLAN.

Policy profile

defines the network policies and the switching policies for the client (Quality of Service [QoS] is an exception, which constitutes AP policies as well).

Policy Tag

maps the WLAN profile to the policy profile.

There are 16 such WLAN-to-policy profile pairs.

The policy tag directs how wireless services and policies are applied across the network.


Note


Quality of Service (QoS) policies are an exception, as they are managed as part of AP policies instead of policy profiles.


Example of policy tag

If a policy tag includes WLAN1 mapped to Policy1, and both profiles are enabled, their definitions are pushed to APs assigned that policy tag. If either the WLAN profile or the policy profile is disabled, that mapping is not pushed to the AP. You can also remove a WLAN profile from an AP by deleting its mapping in the policy tag configuration.

WLAN profiles

A WLAN profile is a configuration entity that

  • defines the wireless network by specifying the service set identifier (SSID)

  • associates Layer 2 security policies with WLANs, and

  • groups related settings required for controllers to manage wireless local area networks.

Create WLANs with the same SSID you to assign different Layer 2 security policies within a single wireless LAN.

Distinguish WLANs that use the same SSID by assigning a unique WLAN profile name to each. Each WLAN with a shared SSID must have a unique Layer 2 security policy so that clients can select the appropriate WLAN based on the security information advertised in beacon and probe responses.


Note


Switching and network policies are not included in the WLAN profile definition; they are configured separately.


Analogy: A WLAN profile is like a membership card for a club. The card (profile) shows which club you belong to (SSID), lists the rules you must follow to enter (Layer 2 security policies), and includes the necessary information for the club staff (controller) to manage your membership. Just as two people can have cards for the same club but with different access levels, multiple WLAN profiles can share the same SSID but have different security policies to distinguish them.

Policy profiles

A policy profile is a network configuration entity that

  • allows you to group and manage multiple policies

  • is reusable across tags and deployments, and applied to APs or controllers for client access, and

  • improves consistency and efficiency in large-scale wireless environments.

Example of policy profile

Policy profile centralizes policy parameters such as VLAN, access control list (ACL), Quality of Service (QoS), session timeout, idle timeout, AVC profile, Bonjour profile, local profiling, device classification, and BSSID QoS.

Table 2. Comparison between policy profiles and WLAN profiles

Policy profiles

WLAN profiles

Contain network and switching policies

Contain wireless-related security attributes, and features such as authentication and encryption

Reusable across tags and deployments, and applied to APs or controllers for client access

Configured per WLAN (SSID)

Table 3. Comparison between policy profiles and WLAN profiles

Policy profiles

WLAN profiles

Contain network and switching policies

Contain wireless-related security attributes, and features such as authentication and encryption

Reusable across tags and deployments, and applied to APs or controllers for client access

Configured per WLAN (SSID)

Analogy: A policy profile is like a preset rulebook for network access, grouping the common rules that apply to all players (clients), while the WLAN profile acts like a gatekeeper, focusing on who can enter and under what security conditions.

Table 4. Comparison between policy profiles and WLAN profiles

Policy profiles

WLAN profiles

Contain network and switching policies

Contain wireless-related security attributes, and features such as authentication and encryption

Reusable across tags and deployments, and applied to APs or controllers for client access

Configured per WLAN (SSID)

Methods for associating APs with tags

APs can be associated with tags in several ways, supporting flexible and scalable network configuration. The main association methods are:

  • Ethernet MAC address association: The default option where an AP’s Ethernet MAC address is directly mapped to a policy-tag, site tag, and RF tag.

  • Filter-based association: Uses regular expressions (regex) to match AP Ethernet MAC addresses. Any AP matching the pattern receives the assigned tags (policy-tag, site tag, and RF tag) configured through an AP filter.

  • AP-based association: Tag names are pre-configured at the Plug and Play (PnP) server. The AP stores these and submits the tag name during the discovery process.

  • Location-based association: Tags are mapped to specific locations. Any AP mapped to a location receives the corresponding tags.

Effect of AP tag modification

Modifying an AP tag results in DTLS connection reset, forcing the AP to rejoin the controller. If only one tag is specified in the configuration, default tags are used for other types, for example, if only policy tag is specified, the default-site-tag and default-rf-tag will be used for site tag and RF tag.

Modifying an AP tag has these effects:

  • It resets the DTLS connection, forcing the AP to rejoin the controller.

  • If only one tag is specified (for example, only a policy tag), the system assigns default tags for the other types:

    • The default-site-tag is used for the site tag.

    • The default-rf-tag is used for the RF tag.

Configure a wireless profile policy (GUI)

Define and apply a wireless profile policy to manage network behavior and access for wireless clients.

Use this task to create or modify a policy profile, ensuring wireless network policies suit your organization's needs.

Procedure


Step 1

Choose Configuration > Tags & Profiles > Policy.

Step 2

On the Policy Profile page, click Add.

Step 3

In the Add Policy Profile window, in General tab, enter a name and description for the policy profile. The name can be ASCII characters from 32 to 126, without leading and trailing spaces. Do not use spaces as it causes system instability.

Step 4

To enable the policy profile, set Status as Enabled.

Step 5

Use the slider to enable or disable Passive Client and Encrypted Traffic Analytics.

Step 6

In the CTS Policy section, choose the appropriate status for the following:

  • Inline Tagging—a transport mechanism using which a controller or access point understands the source SGT.

  • SGACL Enforcement

Step 7

Specify a default SGT. The valid range is from 2 to 65519.

Step 8

In the WLAN Switching Policy section, choose the following, as required:

  • Central Switching: Tunnels both the wireless user traffic and all control traffic via CAPWAP to the centralized controller where the user traffic is mapped to a dynamic interface/VLAN on the controller. This is the normal CAPWAP mode of operation.

  • Central Authentication: Tunnels client data to the controller, as the controller handles client authentication.

  • Central DHCP: The DHCP packets received from AP are centrally switched to the controller and then forwarded to the corresponding VLAN based on the AP and the SSID.

  • Central Association Enable: When central association is enabled, all switching is done on the controller.

  • Flex NAT/PAT: Enables Network Address Translation(NAT) and Port Address Translation (PAT) mode.

Step 9

Click Save & Apply to Device.


The wireless profile policy is successfully created and applied. Devices use the updated policy settings for wireless client management.

Configure a wireless policy profile (CLI)

Define and apply a wireless policy profile on your device using command-line interface commands.

Use this task to configure wireless profile policies on Cisco wireless controllers. Policy profiles specify settings such as VLAN mapping, idle timeouts, and accounting lists for wireless networks.


Note


When a client moves from an old controller to a new controller (managed by Cisco Prime Infrastructure), the old IP address of the client is retained, if the IP address is learned by ARP or data gleaning. To avoid this scenario, ensure that you enable ipv4 dhcp required command in the policy profile. Otherwise, the IP address gets refreshed only after a period of 24 hours.


Follow the procedure given to configure a wireless profile policy:

Before you begin

  • Ensure you have administrator privileges to access and configure the device.

  • Have the required VLAN ID, idle timeout value, and accounting list details available, if applicable.

Follow these steps to configure a wireless profile policy:

Procedure


Step 1

Enter global configuration mode.

Example:

Device# configure terminal

Step 2

Configure the WLAN policy profile and enters wireless policy configuration mode.

Example:

Device(config)# wireless profile policy rr-xyz-policy-1

Step 3

(Optional) Configure the duration of idle timeout in seconds.

Example:

Device(config-wireless-policy)# idle-timeout 1000

Step 4

Configure the VLAN name or VLAN ID.

Example:

Device(config-wireless-policy)# vlan 24

Step 5

Set the accounting list for IEEE 802.1x.

Example:

Device(config-wireless-policy)# accounting-list user1-list

Step 6

Save the configuration, exit configuration mode, and return to privileged EXEC mode.

Example:

Device(config-wireless-policy)# no shutdown

Step 7

(Optional) View detailed information about a policy profile, using the show wireless profile policy detailed policy-profile-name command.

Example:

Device# show wireless profile policy summary

The wireless policy profile is configured and enabled on the device. All specified settings are applied to the selected policy.

What to do next

  • Associate the policy profile with a WLAN as needed.

  • Review and validate the applied settings by connecting a client device and confirming expected behavior.

Configure a flex profile (GUI)

Create or modify a flex profile to customize wireless network behavior for specific sites or device groups.

Use flex profiles within your network management system to define site-specific configurations such as VLANs, SSIDs, or access policies.

Before you begin

Identify the devices or sites to apply the flex profile.

Procedure


Step 1

Choose Configuration > Tags & Profiles > Flex.

Step 2

Click Add.

Step 3

Enter the Name of the flex profile. Use ASCII characters from 32 to 126. Do not include leading and trailing spaces.

Step 4

In the Description field, enter a description for the flex profile.

Step 5

Click Apply to Device.


The flex profile is created or updated and available for assignment to devices or sites.

What to do next

Assign the flex profile to the relevant site, device, or group as needed.

Configure a flex profile

Create or modify a flex profile to customize wireless network behavior for specific sites or device groups.

Use flex profiles within your network management system to define site-specific configurations such as VLANs, SSIDs, or access policies.

Before you begin

Identify the devices or sites to apply the flex profile.

Procedure


Step 1

Enter global configuration mode.

Example:

Device# configure terminal

Step 2

Configure a flex profile and enter flex profile configuration mode.

Example:

Device(config)# wireless profile flex rr-xyz-flex-profile

Step 3

(Optional) Enable default parameters for the flex profile.

Example:

Device(config-wireless-flex-profile)# description xyz-default-flex-profile

Step 4

(Optional) Enable ARP caching.

Example:

Device(config-wireless-flex-profile)# arp-caching

Step 5

Save the configuration, exit configuration mode, and return to privileged EXEC mode.

Example:

Device(config-wireless-flex-profile)# end

Step 6

(Optional) View detailed parameters about the flex profile, use the show wireless profile flex detailed flex-profile-name command.

Example:

Device# show wireless profile flex summary  

The flex profile is created or updated and available for assignment to devices or sites.

What to do next

Assign the flex profile to the relevant site, device, or group as needed.

Configure an AP profile (GUI)

Configure and customize AP join profiles for your wireless deployment.

Use this task to define, modify, or apply AP profile parameters such as country code, LED state, timers, VLAN tagging, security settings, management options, and advanced features, using the device’s graphical interface.

Before you begin

  • Review the default AP join profile to update parameters for your environment (For example, Control and Provisioning of Wireless Access Points (CAPWAP), IPv4 or IPv6, UDP Lite, High Availability, retransmit configuration parameters, global AP failover, Hyperlocation configuration parameters, Telnet or SSH, 11u parameters, and so on.)

  • Obtain required information, such as network-specific settings, controller addresses, credentials, and profile names.

Procedure


Step 1

Choose Configuration > Tags & Profiles > AP Join.

Step 2

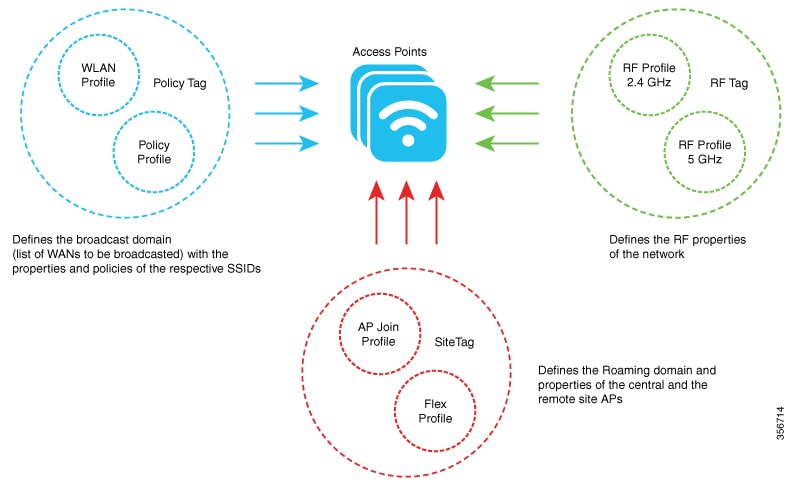
On the AP Join Profile window, click Add.

The Add AP Join Profile window is displayed.

Note


DHCP fallback is enabled by default. If an AP is assigned a static IP address and unable to reach the controller, the AP falls back to the DHCP. To prevent an AP from switching the static IP to DHCP, you must disable the DHCP fallback configuration in an AP join profile.

Step 3

In the General tab, enter a name and description for the AP join profile. The name can be ASCII characters from 32 to 126, without leading and trailing spaces.

Step 4

Check the LED State check box to set the LED state of all APs connected to the device to blink, making them easier to locate. The LED state is enabled by default.

Step 5

In the Client tab and Statistics Timer section, enter the time in seconds that the AP sends its 802.11 statistics to the controller.

Step 6

In the TCP MSS Configuration section, check the Adjust MSS Enable check box to enter value for Adjust MSS. You can enter or update the maximum segment size (MSS) for transient packets that traverse a router. TCP MSS adjustment enables the configuration of the maximum segment size (MSS) for transient packets that traverse a router, specifically TCP segments with the SYN bit set.

In a CAPWAP environment, a lightweight AP discovers a device by using CAPWAP discovery mechanisms, and then sends a CAPWAP join request to the device. The device sends a CAPWAP join response to the AP that allows the AP to join the device.

When the AP joins the device, the device manages its configuration, firmware, control transactions, and data transactions.

Step 7

In the CAPWAP tab, you can configure these options:

  • High Availability

    You can configure primary and secondary backup controllers for all APs (which are used if primary, secondary, or tertiary controllers are not responsive) in this order: primary, secondary, tertiary , primary backup, and secondary backup.In addition, you can configure various timers, including heartbeat timers and discovery request timers. To reduce the controller failure detection time, you can configure the fast heartbeat interval (between the controller and the AP) with a smaller timeout value. When the fast heartbeat timer expires (at every heartbeat interval), the AP determines if any data packets have been received from the controller within the last interval. If no packets have been received, the AP sends a fast echo request to the controller.

  1. In the High Availability tab, enter the time (in seconds) in the Fast Heartbeat Timeout field to configure the heartbeat timer for all APs. Specifying a small heartbeat interval reduces the amount of time it takes to detect device failure.

    Note


    Configure Fast Heartbeat Timeout to assist AP in sending primary discovery request periodically to the configured backup controllers along with the primary, secondary, and tertiary-base controllers.

  2. In the Heartbeat Timeout field, enter the time in seconds to configure the heartbeat timer for all APs. Specifying a small heartbeat interval reduces the amount of time it takes to detect device failure.

  3. In the Discovery Timeout field, enter a value between one and 10 seconds (inclusive) to configure the AP discovery request timer.

  4. In the Primary Discovery Timeout field, enter a value between 30 and 3000 seconds (inclusive) to configure the AP primary discovery request timer.

  5. In the Primed Join Timeout field, enter a value between 120 and 43200 seconds (inclusive) to configure the AP primed join timeout.

  6. In the Retransmit Timers Count field, enter the number of times that you want the AP to retransmit the request to the device and vice versa. Valid range is between three and eight.

  7. In the Retransmit TimersInterval field, enter the time duration between retransmission of requests. Valid range is between two and five.

  8. Check the Enable Fallback check box to enable fallback.

  9. Enter the Primary Controller name and IP address.

  10. Enter the Secondary Controller name and IP address.

  11. Click Save & Apply to Device.

    Note

     
    The primary and secondary settings in the AP join profile are not used for AP fallback. This means that the AP will not actively probe for those controllers (which are a part of the AP join profile), when it has joined one of them.

    This setting is used only when the AP loses its connection with the controller, and then prioritizes which other controller it should join. These controllers have a priority of four and five, following APs in the High Availability tab of the AP page.

    The APs that are added as the primary, secondary, and tertiary APs in the High Availability tab of the AP configuration page, are actively probed and are used for the AP fallback option.

  • Advanced

  1. In the Advanced tab, check the Enable VLAN Tagging check box to enable VLAN tagging.

  2. Check the Enable Data Encryption check box to enable Datagram Transport Layer Security (DTLS) data encryption.

  3. Check the Enable Jumbo MTU to enable large maximum transmission unit (MTU). The MTU is the largest physical packet size, measured in bytes, that a network can transmit. Any messages larger than the MTU are divided into smaller packets before transmission. Jumbo frames exceed the standard Ethernet frame size, which is 1518 bytes (including Layer 2 (L2) header and FCS). Because vendors may have different frame size definitions, jumbo frames are not standardized by IEEE.

  4. Use the Link Latency drop-down list to select the link latency. Link latency monitors the round-trip time of the CAPWAP heartbeat packets (echo request and response) from the AP to the controller and back.

  5. From the Preferred Mode drop-down list, choose the mode.

  6. Click Save & Apply to Device.

Step 8

In the AP tab, you can configure these options:

  • General

  1. In the General tab, check the Switch Flag check box to enable switches.

  2. Check the Power Injector State check box if power injector is being used. Use power injectors to provide flexible powering options for APs, such as local power, multiport switches with inline power, or multiport power patch panels.

    Power Injector Selection parameter enables you to protect your switch port from an accidental overload if the power injector is inadvertently bypassed.

  3. From the Power Injector Type drop-down list, choose power injector type from these options:

    • Installed—This option examines and remembers the MAC address of the currently connected switch port and assumes that a power injector is connected. Choose this option if your network contains older Cisco 6-Watt switches and you want to avoid possible overloads by forcing a double-check of any relocated APs.

      If you want to configure the switch MAC address, enter the MAC address in theInjector Switch MAC Address text box. If you want the AP to find the switch MAC address, leave theInjector Switch MAC Address text box blank.

      Note


      Each time an AP is relocated, the MAC address of the new switch port fails to match the remembered MAC address, and the AP remains in low-power mode. You must then physically verify the existence of a power injector and reselect this option to cause the new MAC address to be remembered.

    • Override—This option allows the AP to operate in high-power mode without first verifying a matching MAC address. You can use this option if your network does not contain any older Cisco 6-W switches that could be overloaded if connected directly to a 12-W AP. The advantage of this option is that if you relocate the AP, it continues to operate in high-power mode without any further configuration. The disadvantage of this option is that if the AP is connected directly to a 6-W switch, an overload occurs.

  4. In theInjector Switch MAC field, enter the MAC address of the switch either in xx:xx:xx:xx:xx:xx, xx-xx-xx-xx-xx-xx, or xxxx.xxxx.xxxx format.

  5. From the EAP Type drop-down list, choose the EAP type as EAP-FAST , EAP-TLS , or EAP-PEAP.

  6. From the AP Authorization Type drop-down list, choose the type as either CAPWAP DTLS + or CAPWAP DTLS.

  7. In the Client Statistics ReportingInterval section, enter the interval for 5 GHz and 2.4 GHz radios in seconds.

  8. Check the Enable check box to enable extended module.

  9. From the Profile Name drop-down list, choose a profile name for mesh.

  10. Click Save & Apply to Device.

  • Hyperlocation: Cisco Hyperlocation is a location solution that allows to track the location of wireless clients with the accuracy of one meter. Selecting this option disables all other fields in the screen, except NTP Server.

  1. In the Hyperlocation tab, check the Enable Hyperlocation check box.

  2. Enter the Detection Threshold value to filter out packets with low RSSI. The valid range is –100 dBm to –50 dBm.

  3. Enter the Trigger Threshold value to set the number of scan cycles before sending a BAR to clients. The valid range is zero to 99.

  4. Enter the Reset Threshold value to reset value in scan cycles after trigger. The valid range is zero to 99.

  5. Enter the NTP Server IP address.

  6. Click Save & Apply to Device.

  • BLE: If your APs are Bluetooth Low Energy (BLE) enabled, they can transmit beacon messages that are packets of data or attributes transmitted over a low energy link. These BLE beacons are frequently used for health monitoring, proximity detection, asset tracking, and in-store navigation. For each AP, you can customize BLE Beacon settings configured globally for all APs.

  1. In the BLE tab, enter a value in the BeaconInterval field to indicate how often you want your APs to send out beacon advertisements to nearby devices. The range is from one to 10, with a default value of one.

  2. In the Advertised Attenuation Level field, enter the attenuation level. The range is from 40 to 100, with a default of 59.

  3. Click Save & Apply to Device.

  • Packet Capture: Packet Capture feature allows to capture the packets on the AP for the wireless client troubleshooting. The packet capture operation is performed on the AP by the radio drivers on the current channel on which it is operational, based on the specified packet capture filter.

  1. In the Packet Capture tab, choose an AP Packet Capture Profile from the drop-down list.

  2. You can also create a new profile by clicking the + sign.

  3. Enter a name and description for the AP packet capture profile.

  4. Enter the Buffer Size.

  5. Enter the Duration.

  6. Enter the Truncate Length information.

  7. In the Server IP field, enter the IP address of the TFTP server.

  8. In the File Path field, enter the directory path.

  9. Enter the username and password details.

  10. From the Password Type drop-down list, choose the type.

  11. In the Packet Classifiers section, use the option to select or enter the packets to be captured.

  12. Click Save.

  13. Click Save & Apply to Device.

Step 9

In the Management tab, you can configure these options:

  • Device

  1. In the Device tab, enter the IPv4/IPv6 Address of the TFTP server, TFTP Downgrade section.

  2. In the Image File Name field, enter the name of the software image file.

  3. From the Facility Value drop-down list, choose the appropriate facility.

  4. Enter the IPv4 or IPv6 address of the host.

  5. Choose the appropriate Log Trap Value.

  6. Enable Telnet, SSH or both configurations, if required.

  7. Enable core dump, if required.

  8. Click Save & Apply to Device.

  • User

  1. In the User tab, enter username and password details.

  2. Choose the appropriate password type.

  3. In the Secret field, enter a custom secret code.

  4. Choose the appropriate secret type.

  5. Choose the appropriate encryption type.

  6. Click Save & Apply to Device.

  • Credentials

  1. In the Credentials tab, enter local username and password details.

  2. Choose the appropriate local password type.

  3. Enter 802.1x username and password details.

  4. Choose the appropriate 802.1x password type.

  5. Enter the time in seconds after which the session should expire.

  6. Enable local credentials, 802.1x credentials, or both as required.

  7. Click Save & Apply to Device.

  • CDPInterface

  1. In the CDPInterface tab, enable the CDP state, if required.

  2. Click Save & Apply to Device.

Step 10

In the Rogue AP tab, check the Rogue Detection check box to enable rogue detection.

Step 11

In the Rogue Detection Minimum RSSI field, enter the RSSI value.

This field specifies the minimum RSSI value for which a Rogue AP should be reported. All Rogue APs with RSSI lower than what is configured will not be reported to controller.

Step 12

In the Rogue Detection TransientInterval field, enter the transient interval value.

This field indicates how long the Rogue AP should be seen before reporting the controller.

Step 13

In the Rogue Detection ReportInterval field, enter the report interval value.

This field indicates the frequency (in seconds) of Rogue reports sent from AP to controller.

Step 14

Check the Rogue Containment Automatic Rate Selection check box to enable rogue containment automatic rate selection.

The AP selects the best rate for the target Rogue, based on its RSSI.

Step 15

Check the Auto Containment on FlexConnect Standalone check box to enable the feature.

The AP continues containment if it moves to FlexConnect standalone mode.

Step 16

Click Save & Apply to Device.


The AP join profile is created or updated. Devices assigned to this profile use its configuration for network operation and management.

What to do next

  • Verify that APs have successfully joined and received the new settings by reviewing AP status.

  • Adjust profile settings as necessary for site-specific needs or to resolve configuration issues.

Configure an AP profile (CLI)

Set up and customize an AP profile using CLI commands to apply network-wide AP configurations.

Use this procedure when you need to define or modify an AP profile for your wireless controller, typically to standardize AP settings or apply feature-specific options.

Before you begin

Identify the name and required settings for your AP profile.

Procedure


Step 1

Enter global configuration mode.

Example:

Device# configure terminal

Step 2

Configure an AP profile and enter AP profile configuration mode.

Example:

Device(config)# ap profile xyz-ap-profile 

Note

 
  • In an AP profile, the EAP-FAST is the default EAP type.

  • When you delete a named profile, the APs associated with that profile does not revert to the default profile.

Step 3

Add a description for the AP profile.

Example:

Device(config-ap-profile)# description "xyz ap profile"

Step 4

Configure DHCP fallback.

Example:

Device(config-ap-profile)# ip dhcp fallback

Note


DHCP fallback is enabled by default. If an AP is assigned a static IP address and cannot reach the controller, the AP falls back to the DHCP. To prevent an AP from switching from a static IP to DHCP, disable the DHCP fallback configuration in an AP join profile.

Step 5

Enable CDP for all Cisco APs.

Example:

Device(config-ap-profile)# cdp

Step 6

Save the configuration, exit configuration mode, and return to privileged EXEC mode.

Example:

Device(config-ap-profile)# end

Step 7

(Optional) Display detailed information about an AP join profile.

Example:

Device# show ap profile name xyz-ap-profile detailed  

The AP profile is created or updated with specified settings, and changes are active on the controller.

What to do next

Assign APs to the new profile as required, and verify AP behavior matches the intended configuration.

Configure user for AP management (CLI)

Set up a management user account to centrally control APs through CLI.

Procedure


Step 1

Enter global configuration mode.

Example:

Device# configure terminal

Step 2

Configure an AP profile, and then enter AP profile configuration mode.

Example:

Device(config)# ap profile default-ap-profile 

Step 3

Specify the AP management username and password for managing all of the APs configured to the controller.

Example:

Device(config-ap-profile)# mgmtuser username myusername password 0 12345678
  • 0: Specifies an UNENCRYPTED password.

  • 8: Specifies an AES encrypted password.

Note


While configuring a username, ensure that you do not use special characters. Using special characters may cause a configuration error.

Step 4

Return to privileged EXEC mode.

Example:

Device(configure-ap-profile)# end

The AP management user is configured for all APs that are managed by the controller.

Set a private configuration key for password encryption

Configure a private configuration key to enable password encryption on the device.

Use this task to set or change a private key used for encrypting passwords. You must do this before you enable AES password encryption.

Procedure


Step 1

Enter global configuration mode.

Example:

Device# configure terminal

Step 2

Set the password encryption keyword.

Example:

Device(config)# key config-key password-encrypt 12345678
                    

Here, config-key refers to any key value with at least eight characters.

Note


The config-key value must not begin with these special characters:

  • !

  • #

  • ;

Step 3

Enable the encrypted pre-shared key.

Example:

Device(config)# password encryption aes

Step 4

Return to privileged EXEC mode. Alternatively, you can also press Ctrl-Z to exit global configuration mode.

Example:

Device(config)# end

You have now enabled password encryption using your specified private configuration key.

What to do next

You can now enable AES password encryption, if needed.

Configure an RF profile (GUI)

Create and enable an RF profile to optimize radio frequency settings for your wireless network.

Use this task to define an RF profile that sets parameters for radio bands and device operation. This ensures consistent performance across your wireless deployment.

Before you begin

Use the same RF profile name when configuring the wireless RF tag. If the RF tag contains an RF profile that does not exist, the radios do not operate.

Procedure


Step 1

Choose Configuration > Tags & Profiles > RF.

Step 2

On the RF Profile window, click Add.

Step 3

In the General tab, enter a name for the RF profile. The name can be ASCII characters from 32 to 126, without leading and trailing spaces.

Step 4

Choose the appropriate Radio Band.

Step 5

To enable the profile, set the status as Enable.

Step 6

Enter a Description for the RF profile.

Step 7

Click Save & Apply to Device.


The new RF profile is created, enabled, and applied to the device.

What to do next

  • Verify that the RF profile settings are visible and active on your device.

  • Assign the profile to RF tags or APs, if required, to complete your configuration.

Configure an RF profile (CLI)

Create and enable an RF profile to optimize radio frequency settings for your wireless network.

Use this task to define an RF profile that sets parameters for radio bands and device operation. This ensures consistent performance across your wireless deployment.

Before you begin

Use the same RF profile name when configuring the wireless RF tag. If the RF tag contains an RF profile that does not exist, the radios do not operate.

Procedure


Step 1

Enter global configuration mode.

Example:

Device# configure terminal

Step 2

Configure an RF profile, and enter RF profile configuration mode.

Example:

Device(config)# ap dot11 24ghz rf-profile rfprof24_1

Note

 
Use the 24ghz command to configure the 802.11b parameters. Use the 5ghz command to configure the 802.11a parameters. Use the 6ghz command to configure the 802.11 6-GHz parameters.

Step 3

(Optional) Enable default parameters for the RF profile.

Example:

Device(config-rf-profile)# default

Step 4

Enable the RF profile on the device.

Example:

Device(config-rf-profile)# no shutdown

Step 5

Exit configuration mode and return to privileged EXEC mode.

Example:

Device(config-rf-profile)# end

Step 6

(Optional) Display a summary of available RF profiles.

Example:

Device# show ap rf-profile summary

Step 7

(Optional) Display detailed information about a particular RF profile.

Example:

Device# show ap rf-profile name rfprof24_1 detail

You have created and enabled a new RF profile, and applied it to the device.

What to do next

  • Verify that the RF profile settings are visible and active on your device.

  • Assign the profile to RF tags or APs as required to complete your configuration.

Configure a site tag (GUI)

Create and apply a site tag to organize and manage APs within your wireless network.

Use site tags to assign AP join profiles and control plane names to APs, supporting flexible network segmentation and management.

Before you begin

Confirm required AP join profiles and control plane names are already set up.

Procedure


Step 1

Choose Configuration > Tags & Profiles > Tags.

Step 2

On the Manage Tags page, click the Site tab.

Step 3

Click Add to view the Add Site Tag window.

Step 4

Enter a name and description for the site tag. The name can be ASCII characters from 32 to 126, without leading and trailing spaces.

Step 5

Choose the required AP Join Profile to be attached to the site tag.

Step 6

Choose the required Control Plane Name.

Step 7

If required, enable the Local Site.

If you disable Local Site, the site is remote and the deployment uses FlexConnect mode.

Step 8

Click Save & Apply to Device .


The site tag is created and applied to the device. The selected AP join profile and control plane name are now associated with the site tag.

What to do next

Verify that your APs are assigned to the correct site tag and check their operational status in the device list.

Configure a site tag for FlexConnect APs (CLI)

Set up a site tag for wireless deployments to enable site-specific configurations using the CLI.

Before you begin

Gather required information, such as the desired site tag name and flex profile name.

Procedure


Step 1

Enter global configuration mode.

Example:

Device# configure terminal

Step 2

Configure a site tag and enter site tag configuration mode.

Example:

Device(config)# wireless tag site rr-xyz-site 

Step 3

Configure a flex profile.

Example:

Device(config-site-tag)# flex-profile rr-xyz-flex-profile
  • You cannot remove flex profile configurations from a site tag that is configured as a local site.

    Use the no local-site command to remove local site configurations before applying flex profile configurations.

Step 4

Add a description for the site tag.

Example:

Device(config-site-tag)# description "default site tag"

Step 5

Save the configuration, exit configuration mode, and return to privileged EXEC mode.

Example:

Device(config-site-tag)# end

Step 6

(Optional) Display the number of site tags.

Example:

Device# show wireless tag site summary  

The site tag is configured on the device, and site-specific settings are applied.

Enhanced Site Tag-Based Load Balancing

Enhanced site tag-based load balancing

A site tag-based load balancing is a controller mechanism that

  • distributes APs across Wireless Network Control Daemon (WNCD) processes based on site tags,

  • allows configuration of a site load for each site tag to optimize AP assignment considering site size, and

  • automatically retains site tags in persistent memory and balances them during controller bootup in descending order of the configured site load.

The controller takes the load balancing decision for a site tag when the first AP from that site tag joins.
Table 5. Feature History

Feature

Release

Feature Information

Enhanced Site Tag-Based Load Balancing

Cisco IOS XE Dublin 17.10.1

When the first AP from a site joins the controller, it takes the decision to load balance the entire site. However, this is done without knowing the site load.

How controllers functioned before load balancing

Previously, controllers did not consider the actual size of sites when making load balancing decisions. The system functioned optimally only when all sites were of approximately equal size. Unequal distribution caused some WNCDs to be overloaded while others remained underused.

The enhanced feature enables administrators to specify a site load for each site tag, ensuring the controller takes site size into account when distributing APs and thus resulting in improved load distribution among WNCDs.

Behavior during controller reboot

  • After you configure site load balancing in one or more site tags and reboot the controller, The feature retains actively used site tags and balances them at bootup by prioritizing those with higher configured site load before any APs join.

  • If load balancing is configured for a site tag with APs already joined, load balancing assignments remain unchanged unless all APs, including those not in the site tag, disconnect or the controller is rebooted.

assigning a higher site load to one site over the other

Suppose Site Tag X is assigned a higher site load than Site Tag Y. Upon controller bootup, APs from Site Tag X are distributed among WNCDs before those from Site Tag Y, helping prevent excessive load on any single WNCD even if Site Tag X contains many more APs than Site Tag Y.

Analogy: assigning classes to school buses

Think of enhanced site tag-based load balancing like assigning students from different-sized classes (site tags) to school buses (WNCDs). If you ignore class size, you might put all students from the largest class on a single bus, overloading it while leaving other buses half empty. By taking class sizes into account when assigning students, you distribute them more evenly and efficiently among the buses, preventing overcrowding and making better use of all resources. Similarly, by setting site load values, the controller assigns APs more fairly to WNCDs, balancing the work and avoiding overload.

Prerequisites for Enhanced Site Tag-Based Load Balancing

  • Ensure that you configure the site load.

  • We recommended that you configure all the named sites with a load value.


    Note


    The configured load is only an estimate. It will only be used for site load balancing. Specifically, it does not prevent APs, or clients from joining or associating.


Use cases

The site load configuration uses a load factor instead of an absolute number to address different use cases. Although the load factor does not have to match the number of APs in a site, using the AP count often provides a practical approximation of the site load.

Here are the use cases:

  • Sites with normal client density and roaming load can use AP count as a good approximation of site load. Examples include cubicle areas in offices and hospitals.

  • For sites with high client density and roaming load, configure a load factor greater than the number of APs. For example, when a site has 200 APs, use a load factor of 300 or 400 to accommodate the increased client load. Examples include stadiums, cafeterias, and conference floors.

Configure site load (CLI)

Assign a relative load value to a site tag using CLI. This helps the system optimize resource allocation and network performance for wireless deployments.

Use this task when you need to set or adjust the load recommendation for a specific site on your wireless controller. The load value influences how resources are distributed across sites.

Before you begin

Identify the name of the site tag you want to configure.

Procedure


Step 1

Enter global configuration mode.

Example:

Device# configure terminal

Step 2

Configure site tag and enter site tag configuration mode.

Example:

Device(config)# wireless tag site area1

Step 3

Configure the site load.

Example:

Device(config-site-tag)# load 200

The load is the estimate of the relative load reserved for the site. Values range between zero to 1000. The default value zero means no load recommendation for the site.

Step 4

Return to privileged EXEC mode.

Example:

Device(config-site-tag)# end

The controller uses the configured load value for the specified site tag to optimize network resource allocation for that site

What to do next

Optionally, verify your changes by displaying the site tag configuration and confirming the new load value.

Verify enhanced site tag-based load balancing configuration

To view detailed information about a site, use the command:

Device# show wireless tag site detailed area1
Site Tag Name        : area1
Description          : 
----------------------------------------  
AP Profile           : default-ap-profile
Local-site           : Yes
Image Download Profile: default
Fabric AP DHCP Broadcast : Disabled
Fabric Multicast Group IPv4 Address : 239.1.1.1
Site Load            : 200    

To view the default site tag type for Wireless Network Controller daemon (WNCD) instances, use the command:

Device# show wireless loadbalance tag affinity
Tag           Tag type    No of AP's Joined   Wncd Instance
-----------------------------------------------------------------------
area1         SITE TAG                   50         0
area2         SITE TAG                   50         0         
area3         SITE TAG                   100        1         
area4         SITE TAG                   150        2         

Configure policy tag (GUI)

Create and apply a policy tag to group wireless local area network (WLAN) and policy profiles for your network configuration.

Use this task when you need to define or update policy tags for your wireless network devices using the GUI.

Before you begin

  • Prepare unique names for policy tags using ASCII characters (32 to 126, no leading or trailing spaces).

  • Identify the WLAN and policy profiles you plan to map.

Procedure


Step 1

Choose Configuration > Tags & Profiles > Tags > Policy.

Step 2

Click Add to view the Add Policy Tag window.

Step 3

Enter a name and description for the policy tag. You can use ASCII characters from 32 to 126, but do not include any leading or trailing spaces.

Step 4

Click Add to map WLAN and policy.

Step 5

Choose the WLAN profile to map with the appropriate policy profile, and click the tick icon.

Step 6

Click Save & Apply to Device.


Your device has the new policy tag applied. The mapped WLAN and policy profiles are now active based on your configuration.

What to do next

Verify that connected devices use the updated policy tag and that expected network policies are enforced.

Configure a policy tag (CLI)

Create and apply a policy tag to group wireless local area network (WLAN) and policy profiles for your network configuration.

Use this task when you need to define or update policy tags for your wireless network devices using the CLI.

Before you begin

  • Prepare unique names for policy tags using ASCII characters (32 to 126, no leading or trailing spaces).

  • Identify the WLAN and policy profiles you plan to map.

Procedure


Step 1

Enter global configuration mode.

Example:

Device# configure terminal

Step 2

Configure policy tag and enter policy tag configuration mode.

Example:

Device(config-policy-tag)# wireless tag policy default-policy-tag

Note


When performing local web authentication, the clients connected to a controller get disconnected intermittently before session timeout.

Step 3

Add a description to a policy tag.

Example:

Device(config-policy-tag)# description "default-policy-tag"

Step 4

Map a remote-LAN profile to a policy profile.

Example:

Device(config-policy-tag)# remote-lan rr-xyz-rlan-aa policy rr-xyz-rlan-policy1 port-id 2

Step 5

Map a policy profile to a WLAN profile.

Example:

Device(config-policy-tag)# wlan rr-xyz-wlan-aa policy rr-xyz-policy-1

Note


Ensure that the WLAN profile is not used by any other profiles. If the AP uses the default profile, ensure that the no central switching command is configured on other profiles.

Step 6

Exit policy tag configuration mode, and return to privileged EXEC mode.

Example:

Device(config-policy-tag)# end

Step 7

(Optional) Display the configured policy tags.

Example:

Device# show wireless tag policy summary

Note


To view detailed information about a policy tag, use the show wireless tag policy detailed policy-tag-name command.


Your device has the new policy tag applied. The mapped WLAN and policy profiles are now active based on your configuration.

What to do next

Verify that connected devices use the updated policy tag and the expected network policies are applied.

Configuring wireless RF tag (GUI)

Create and apply an RF tag that defines radio frequency profiles for device groups.

Procedure


Step 1

  1. Choose Configuration > Tags & Profiles > Tags > RF.

Step 2

Click Add to view the Add RF Tag window.

Step 3

Enter a name and description for the RF tag. The name can be ASCII characters from 32 to 126 and must not include leading or trailing spaces.

Step 4

Choose the required 5 GHz Band RF Profile, 5 GHz Band RF Profile, and 2.4 GHz Band RF Profile to be associated with the RF tag.

Step 5

Click Update & Apply to Device.


The RF tag is created with the specified RF profiles and applied to the device.

Configuring wireless RF tag (CLI)

Assign and configure an radio frequency (RF) tag on your wireless device using the CLI, to manage radio profile settings per tag.

Perform this task to create or modify a wireless RF tag. This allows you to apply specific 2.4 GHz, 5 GHz, or 6 GHz RF profiles to associated APs.

Before you begin

  • You can use only two profiles (2.4-GHz and 5-GHz band RF profiles) in an RF tag.

  • You can use only three profiles (2.4-GHz, 5-GHz and 6-GHz band RF profiles) in an RF tag.

  • Ensure you use the same AP tag name you created during the AP configuration task.

Procedure


Step 1

Enter global configuration mode.

Example:

Device# configure terminal

Step 2

Create an RF tag to enter wireless RF tag configuration mode.

Example:

Device(config)# wireless tag rf rftag1

Step 3

Attach an IEEE 802.11b RF policy to the RF tag.

Example:

Device(config-wireless-rf-tag)# 24ghz-rf-policy rfprof24_1

To configure a dot11a policy, use the 5ghz-rf-policy command. To configure a 6GHz radio dot11 policy, use the 6ghz-rf-policy command.

Step 4

Add a description for the RF tag.

Example:

Device(config-wireless-rf-tag)# description Test

Step 5

Exit configuration mode to return to privileged EXEC mode.

Example:

Device(config-wireless-rf-tag)# end

Step 6

Display the available RF tags.

Example:

Device# show wireless tag rf summary

Step 7

Display detailed information of a particular RF tag.

Example:

Device# show wireless tag rf detailed rftag1

You have configured the RF tag and it is now available for assignment.

What to do next

Assign the RF tag to the appropriate AP tag or APs if you have not already done so.

Attaching a policy tag and site tag to an AP (GUI)

Assign a policy tag and site tag to an AP using the GUI.

Use this procedure to associate specific network policies and locations with an AP in your Cisco wireless deployment.

Before you begin

Make sure you have the wired MAC address of the AP.

Procedure


Step 1

Choose Configuration > Wireless > Access Points.

The All Access Points section displays details of all the APs on your network.

Step 2

To edit the configuration details of an AP, select the row for that AP.

The Edit AP window is displayed.

Step 3

In the General tab and Tags section, specify the appropriate policy, site, RF tags, and radio profile that you created on the Configuration > Tags & Profiles > Tags window.

Step 4

Click Update & Apply to Device.

Note

 
To see the policy tag, site tag, or the RF tag that is applied to the AP through the GUI, refresh the GUI window.

The AP is now associated with the specified policy, site, and optionally RF tags you selected.

Attach policy tag and site tag to an AP (CLI)

Assign a policy tag and site tag to an AP using the CLI.

Use this procedure to associate specific network policies and locations with an AP in your Cisco wireless deployment.

Before you begin

Make sure you have the wired MAC address of the AP.

Procedure


Step 1

Enter global configuration mode.

Example:

Device# configure terminal

Step 2

Configure a Cisco AP and enters AP profile configuration mode.

Example:

Device(config)# ap F866.F267.7DFB 

Note


The mac-address should be a wired mac address.

Step 3

Map a policy tag to the AP.

Example:

Device(config-ap-tag)# policy-tag rr-xyz-policy-tag

Step 4

Map a site tag to the AP.

Example:

Device(config-ap-tag)# site-tag rr-xyz-site

Step 5

Associate the RF tag.

Example:

Device(config-ap-tag)# rf-tag rf-tag1

Step 6

Save the configuration, exit configuration mode, and return to privileged EXEC mode.

Example:

Device(config-ap-tag)# end

Step 7

(Optional) Display AP details and the tags associated to it.

Example:

Device# show ap tag summary  

Step 8

Display the AP name with tag information.

Example:

Device# show ap name "ap-name" tag info  

Step 9

(Optional) Display the AP name with tag details.

Example:

Device# show ap name ap-name tag detail

The AP is now associated with the specified policy, site, and optionally, RF tags you selected

Configuring a Radio Profile

Wireless radio profiles

A wireless radio profile is a configuration profile that

  • defines radio parameters and beam steering settings for APs with specific antennae

  • enables administrators to select antenna count, beam selection mode, and beam direction for supported APs, and

  • allows application of customized radio settings to AP slots through RF tag configurations.

Table 6. Feature history Table

Feature Name

Release

Description

Cisco IOS XE 17.6.1

C-ANT9104 antenna support along with beam width and antenna count configuration on the controller

With this feature

  • you can configure radio profiles for beam-selection APs with the C-ANT9104 antenna.

  • you can configure antenna count for Cisco Catalyst 9124AXI/D outdoor APs

  • you can configure the antenna beam-selection for the 5-GHz slots—slot 1 and slot 2, and

  • you must explicitly configure the beam selection mode for APs with the C-ANT9104 antenna, as there is no default value for the beam-selection configuration.

Beam steering modes

The C-ANT9104 antenna-enabled Cisco Catalyst 9130AX Series APs have precise control over the antennae pattern. You can thus configure the beam-steering direction for the antennae on the controller. The C-ANT9104 antenna-enabled Cisco Catalyst 9130AX Series APs can operate on these beam-steering modes:

  • Wide beam

  • Narrow beam

  • Narrow beam with 10 degrees tilt

  • Narrow beam with 20 degrees tilt

After you create the radio profile, link the radio profile under the radio frequency (RF) tag configuration, so that the radio profile is applied to the APs.

Analogy: smart lighting presets

A wireless radio profile is like a preset scene on a smart lighting system. It lets you preconfigure a group of lights (APs) for specific conditions—such as brightness, color, and focus—so applying the scene guarantees the desired ambiance every time

Restrictions

  • Radio Resource Management (RRM) configuration is not supported for Cisco ANT9104 antennae.

    RRM features such as Dynamic Channel Assignment (DCA), Radio Transmit Power Control (TPC), Flexible Radio Assignment (FRA), and so on, are disabled on C-ANT9104 antenna-enabled Cisco Catalyst 9130 Series APs.

  • If the AP enabled with Cisco ANT9104 antenna uses a software version earlier than Cisco IOS XE 17.6.1, the AP can still join the controller. However, the AP does not function as the operation status of the radios is down.

Configure a wireless radio profile (GUI)

Create and apply a wireless radio profile using the GUI

Use this task when you need to define or update radio settings on Cisco wireless devices through the GUI.

Before you begin

Confirm the devices support the intended profile settings.

Procedure


Step 1

Choose Configuration > Tags & Profiles > RF/Radio.

Step 2

On the Radio Profile window, click Add .

Step 3

Enter a name and description for the radio profile.

Step 4

Choose the appropriate Antenna Beam selection. Configure this option for APs connected with the C-ANT9104 antenna.

Note


The antenna beam selection is set to Not Configured if no settings are detected.

Step 5

Enter the number in the Number of antenna to be enabled field.

Note


The option is available for the Cisco Catalyst 9124AXE Outdoor Access Points.

Step 6

Click Save & Apply to Device.


The new wireless radio profile is saved and applied to selected devices.

Configure a radio profile and beam selection

Set up a wireless radio profile and define antenna beam selection parameters to optimize wireless performance.

Use this task to create or update a wireless radio profile and specify how the antenna selects its transmission beam using CLI commands.

Procedure


Step 1

Enter global configuration mode.

Example:

Device# configure terminal

Step 2

Configure the radio profile to enter the wireless radio profile configuration mode.

Example:

Device(config)# wireless profile radio wireless-radio-profile
                    

Step 3

Configure the beam selection of the antenna under the new radio profile.

Example:

Device(config-wireless-radio-profile)# antenna beam-selection narrow tilt 10

The wireless radio profile is applied with the specified antenna beam selection settings.

Configure the number of antennas in a wireless radio profile

Set the number of antennas to be enabled for each slot in a wireless radio profile.

Perform this task to ensure the correct number of antennas are active on your wireless device, optimizing radio performance according to deployment needs.

Procedure


Step 1

Enter global configuration mode.

Example:

Device# configure terminal

Step 2

Configure the radio profile to enter the wireless radio profile configuration mode.

Example:

Device(config)# wireless profile radio wireless-radio-profile

Step 3

Configure the number of antennas to be enabled under the new radio profile.

Example:

Device(config-wireless-radio-profile)# antenna count 4

The specified number of antennas are enabled under the radio profile, ensuring the wireless device operates with the intended antenna configuration.

Configure a slot for each radio in the RF tag profile

Assign a radio profile to each slot in an RF tag, ensuring that specific profile configurations are applied to each radio in a wireless network device.

Each radio (such as 2.4 GHz or 5 GHz) in a device slot must be linked to a radio profile that is under an RF tag. This is achieved using the CLI. Applying the correct radio profile for each slot ensures optimal RF behavior and feature settings.

Procedure


Step 1

Enter global configuration mode.

Example:

Device# configure terminal

Step 2

Configure the RF tag to enter the wireless RF tag configuration mode.

Example:

Device(config)# wireless tag rf wireless-rf-tagname


Step 3

Configure the 802.11a or 802.11b radio profile.

Example:

Device(config-wireless-rf-tag)# dot11 5ghz slot1 radio-profile wireless-radio-profile

You have configured each radio slot under the RF tag with the designated radio profile. The device applies the profile settings to the correct radio.

Verify a radio profile

To view the summary of all the configured radio profiles, use the command:

Device# show wireless profile radio summary                  
 
Number of radio-profiles: 3

Antenna Profile Name             Description                           
------------------------------------------------------------------------
radio-profile-1                  Custom profile for Slot1                     
antenna-ewlc                     Add description                        
default_radio_profile            Preconfigured default radio profile

To view detailed information about the parameters configured for a radio profile, use the command:

Device# show wireless profile radio detailed radio-profile-name 
Radio Profile name                              : radio-profile-1
Description                                     : Custom profile for slot1
Beam-Selection                                  : Wide beam

To view radio profile and RF tag information, use the command:

Device # show ap name Cisco-AP tag info 
AP Name            : Cisco-AP
AP Mac             : 04xx.40xx.XXXX

Applied Tags :
-------------------------------------------
  Tag Type             Tag Name
  -----------------------------------------
  RF Tag               test-rf
  Site Tag             default-site-tag
  Policy Tag           default-policy-tag

Tag/Profile Type Misconfigured
-----------------------------------------
RF Tag No
Policy Tag No
Site Tag No
Flex profile No
AP join profile No
2.4GHz Rf Profile No
5 GHz Rf Profile No
5 GHz Slot1 Radio Profile NO
5 GHz Slot2 Radio Profile Yes
          
Resolved Tags :
-------------------------------------------
Tag Source         : Static

  Tag Type             Tag Name
  -----------------------------------------
  RF Tag               test-rf
  Site Tag             default-site-tag
  Policy Tag           default-policy-tag

To display beam selection and the number of antennas, run the commands:

Device# show wireless profile radio detailed radio-profile-1 
Radio Profile name : radio-profile-1
Description        : Custom profile for slot1
Beam-Selection     : Wide beam
Device# show ap name cisco-ap config slot 1 | section 11n
802.11n Antennas
      Number of Antennas selected               : 2
      Supported Antenna  modes                  : 1x1 2x2 4x4
      Antenna port mapping                      : AB
      SIA Status                                : Not Present
Device# show ap name cisco-ap config slot 1 | include beam
Beam Selection : Narrow from centre 20

AP Filter

AP filters

An AP filter is a global tagging mechanism that

  • associates APs with specific tag sources based on defined filter criteria

  • organizes and applies tag sources in priority order according to configuration, and

  • enables flexible control over which tags are assigned to each AP throughout the device discovery and onboarding process.

Additional reference information

AP filters function similarly to access control lists (ACLs) on the controller and operate at the global level. You can create AP filters based on AP names or other attributes, and incorporate filter criteria into discovery requests. Tag sources for APs can originate from static configuration, the AP filter engine, per-AP Plug and Play (PnP), or default configuration. The AP filter feature determines tag precedence, ensuring the correct tags are assigned according to organizational policies.

You cannot disable the AP filter feature. However, you can configure the priority of tag sources using the ap filter-priority <priority> <filter-name> command.

You can specify tag names at the PnP server (similarly to Flex groups or AP groups). During AP discovery and join requests, the AP stores and sends the allocated tag name as part of the request, allowing for automated and dynamic tag assignment.

Analogy: ticket sorting gate

An AP filter is like a ticket sorting gate at an event venue. Each attendee (AP) presents information at the entrance, and the sorting gate (filter) checks their details to assign them to the right group or area (tag source) based on predefined criteria and priorities. Just as event organizers use sorting gates to efficiently direct attendees, network administrators use AP filters to efficiently assign tags and manage APs in large wireless environments.

Set Tag Priority (GUI)

Procedure


Step 1

Choose Configuration > Tags & Profiles > Tags > AP > Tag Source.

Step 2

Drag and Drop the Tag Sources to change priorities.


Set Tag Priority

Multiple tag sources might result in ambiguity for network administrators. To address this, you can define priority for tags. When an AP joins the controller, the tags are picked based on priority. If precedence is not set, the defaults are used.

Use the following procedure to set tag priority:

Procedure

  Command or Action Purpose

Step 1

configure terminal

Example:

Device# configure terminal

Enters the global configuration mode.

Step 2

ap tag-source-priority source-priority source {filter | pnp}

Example:

Device(config)# ap tag-source-priority 2 source pnp

Configures AP tag source priority.

Note


It is not mandatory to configure AP filter. It comes with default priorities for Static, Filter, and PnP.

Step 3

end

Example:

Device(config)# end

Exits configuration mode and returns to privileged EXEC mode.

Step 4

ap tag-sources revalidate

Example:

Device# ap tag-sources revalidate

Revalidates AP tag sources. The priorities become active only after this command is run.

Note


If you change the priorities for Filter and PnP, and want to evaluate them, run the revalidate command.

Create an AP Filter (GUI)

Procedure


Step 1

Choose Configuration > Tags & Profiles > Tags > AP > Filter.

Step 2

Click Add.

Step 3

In the Associate Tags to AP dialog box which is displayed, enter the Rule Name, the AP name regex and the Priority. Optionally, you can also choose the policy tag from the Policy Tag Name drop-down list, the site tag from the Site Tag Name drop-down list and the RF tag from the RF Tag Name drop-down list.

Step 4

Click Apply to Device.


Create an AP Filter (CLI)

Procedure

  Command or Action Purpose

Step 1

configure terminal

Example:

Device# configure terminal

Enters the global configuration mode.

Step 2

ap filter name filter_name

Example:

Device(config)# ap filter filter-1

Configures an AP filter.

Step 3

ap name-regex regular-expression

Example:

Device(config-ap-filter)# ap name-regex testany

Configures the AP filter based on regular expression.

For example, if you have named an AP as ap-lab-12, then you can configure the filter with a regular expression, such as ap-lab-\d+ , to match the AP name.

Step 4

tag policy policy-tag

Example:

Device(config-ap-filter)# tag policy pol-tag1

Configures a policy tag for this filter.

Step 5

tag rf rf-tag

Example:

Device(config-ap-filter)# tag rf rf-tag1

Configures an RF tag for this filter.

Step 6

tag site site-tag

Example:

Device(config-ap-filter)# tag site site1

Configures a site tag for this filter.

Step 7

end

Example:

Device(config-ap-filter)# end

Exits configuration mode and returns to privileged EXEC mode.

Set Up and Update Filter Priority (GUI)

Procedure


Step 1

Choose Configuration > Tags & Profiles > Tags > AP > Filter.

Step 2

  1. If you want to setup a new AP filter, then click Add. In the Associate Tags to AP dialog box which is displayed, enter the Rule Name, the AP name regex and the Priority. Optionally, you can also select the Policy Tag Name, the Site Tag Name and the RF Tag Name. Click Apply to Device.

  2. If you want to update the priority of an existing AP filter, click on the Filter and in the Edit Tags dialog box and change the Priority. In case the Filter is Inactive, no priority can be set to it. Click Update and Apply to Device.


Configure filter priority

Before you begin

Ensure that you create a filter before you configure filter priority.

Procedure

  Command or Action Purpose

Step 1

Enter global configuration mode.

Example:

Device# configure terminal

Step 2

Configure AP filter priority. Valid values range from zero to 1023. The value zero represents the highest priority.

Example:

Device(config)# ap filter priority 10 filter-name test1
This step is necessary to activate the filter.

Step 3

Exit configuration mode and return to privileged EXEC mode.

Example:

Device(config-ap)# end

Verify AP Filter Configuration

The following show commands are used to display tag sources and filters, and their priorities.

To view the tag source priorities, use the following command:

Device# show ap tag sources

Priority Tag source 
--------------------------------
0 Static 
1 Filter 
2 AP 
3 Default

To view the available filters, use the following command:

Device# show ap filter all

Filter Name             regex             Policy Tag               RF Tag              Site Tag  
-------------------------------------------------------------------------------------------------
first                   abcd              pol-tag1                 rf-tag1             site-tag1 
test1                   testany                                                        site1     
filter1                 testany                                                                  

To view the list of active filters, use the following command:


Device# show ap filters active 

Priority   Filter Name       regex          Policy Tag              RF Tag              Site Tag                    
--------------------------------------------------------------------------------------------------------------------
10         test1             testany                                                    site1                      

To view the source of an AP tag, use the following command:

Device# show ap tag summary

Number of APs: 4

AP Name          AP Mac         Site Tag Name    Policy Tag Name    RF Tag Name    Misconfigured Tag Source
---------------------------------------------------------------------------------------------------------------------
AP002A.1034.CA78 002a.1034.ca78 named-site-tag   named-policy-tag   named-rf-tag   No Filter 
AP00A2.891C.2480 00a2.891c.2480 named-site-tag   named-policy-tag   named-rf-tag   No Filter 
AP58AC.78DE.9946 58ac.78de.9946 default-site-tag default-policy-tag default-rf-tag No AP 
AP0081.C4F4.1F34 0081.c4f4.1f34 default-site-tag default-policy-tag default-rf-tag No Default

Configuring Access Point for Location Configuration

Information About Location Configuration

During location configuration, you can perform the following:

  • Configure a site or location for an AP.

  • Configure a set of tags for this location.

  • Add APs to this location.

Any location comprises of the following components:

  • A set of unique tags, one for each kind, namely: Policy, RF and Site.

  • A set of ethernet MAC addresses that applies to the tags.

This feature works in conjunction with the existing tag resolution scheme. The location is considered as a new tag source to the existing system. Similar, to the static tag source.

Prerequisite for Location Configuration

If you configure an access point in one location, you cannot configure the same access point in another location.

Configuring a Location for an Access Point (GUI)

Before you begin


Note


When you create local and remote sites in the Basic Setup workflow, corresponding policies and tags are created in the backend. These tags and policies that are created in the Basic Setup cannot be modified using the Advanced workflow, and vice versa.


Procedure


Step 1

Choose Configuration > Wireless Setup > Basic.

Step 2

On the Basic Wireless Setup page, click Add.

Step 3

In the General tab, enter a name and description for the location.

Step 4

Set the Location Type as either Local or Flex.

Step 5

Use the slider to set Client Density as Low, Typical or High.

Step 6

Click Apply.


Configuring a Location for an Access Point (CLI)

Procedure

  Command or Action Purpose

Step 1

configure terminal

Example:

Device# configure terminal

Enters global configuration mode.

Step 2

ap location name location_name

Example:

Device(config)# ap location name location1

Configures a location for an access point.

Run the no form of this command to remove location for an access point.

Step 3

tag {policy policy_name| rf rf_name | site site_name}

Example:

Device(config-ap-location)# tag policy policy_tag
Device(config-ap-location)# tag rf rf_tag
Device(config-ap-location)# tag site site_tag

Configures tags for the location.

Step 4

location description

Example:

Device(config-ap-location)# location description

Adds description to the location.

Step 5

end

Example:

Device(config-ap-location)# end

Returns to privileged EXEC mode. Alternatively, you can also press Ctrl-Z to exit global configuration mode.

Adding an Access Point to the Location (GUI)


Note


When the tag source is not set to location, the AP count and AP location tagging will not be correctly reflected on the web UI. To change static tag source on the AP, run the no ap ap-mac command on the controller to change AP tag source to default (which is location).


Procedure


Step 1

Choose Configuration > Wireless Setup > Basic.

Step 2

On the Basic Wireless Setup page, click Add to configure the following:

  • General

  • Wireless Networks

  • AP Provisioning

Step 3

In the AP Provisioning tab and Add/Select APs section, enter the AP MAC address and click the right arrow to add the AP to the associated list. The MAC address can be either in xx:xx:xx:xx:xx:xx, xx-xx-xx-xx-xx-xx, or xxxx.xxxx.xxxx format.

You can also add a CSV file from your system. Ensure that the CSV has the MAC Address column.

Step 4

Use the search option in the Available AP List to select the APs from the Selected AP list and click the right arrow to add the AP to the associated list.

Step 5

Click Apply.


Adding an Access Point to the Location (CLI)

Procedure

  Command or Action Purpose

Step 1

configure terminal

Example:

Device# configure terminal

Enters global configuration mode.

Step 2

ap location name location_name

Example:

Device(config)# ap location name location1

Configures a location for an access point.

Step 3

ap-eth-mac ap_ethernet_mac

Example:

Device(config-ap-location)# ap-eth-mac 188b.9dbe.6eac

Adds an access point to the location.

Step 4

end

Example:

Device(config-ap-location)# end

Returns to privileged EXEC mode. Alternatively, you can also press Ctrl-Z to exit global configuration mode.

Note


After adding an AP to a location, the AP may reset automatically to get the new configuration

Configuring SNMP in Location Configuration

SNMP MIB

The SNMP MIB provides information on a set of managed objects that represent logical and physical entities, and relationships between them.

Table 7. MIB Objects and Notes
MIB Objects Notes
cLApLocationName

Provides the name of the AP location.

cLApLocationPolicyTag

Provides the policy tag configured on the location.

cLApLocationSitetag

Provides the site tag configured on the location.

cLApLocationRfTag

Provides the RF tag configured on the location.

cLAssociatedApsApMac

Provides the configured APs on the location.

Verifying Location Configuration

To view the summary of AP location configuration, use the following command:

Device# show ap location summary

Location Name    Description     Policy Tag           RF Tag           Site Tag  
---------------------------------------------------------------------------------------------------
first            first floor     default-policy-tag   default-rf-tag   default-site-tag  
second           second floor    default-policy-tag   default-rf-tag   default-site-tag  

To view the AP location configuration details for a specific location, use the following command:

Device# show ap location details first

Location Name......................: first
Location description...............: first floor
Policy tag.........................: default-policy-tag
Site tag...........................: default-site-tag
RF tag.............................: default-rf-tag

Configured list of APs
005b.3400.0af0   
005b.3400.0bf0

To view the AP tag summary, use the following command:

Device# show ap tag summary

Number of APs: 4
AP Name      AP Mac           Site Tag Name      Policy Tag Name      RF Tag Name      Misconfigured  Tag Source    
--------------------------------------------------------------------------------------------------------------------
Asim_5-1     005b.3400.02f0   default-site-tag   default-policy-tag   default-rf-tag   Yes            Filter        
Asim_5-2     005b.3400.03f0   default-site-tag   default-policy-tag   default-rf-tag   No             Default       
Asim_5-9     005b.3400.0af0   default-site-tag   default-policy-tag   default-rf-tag   No             Location      
Asim_5-10    005b.3400.0bf0   default-site-tag   default-policy-tag   default-rf-tag   No             Location

Verifying Location Statistics

To view the AP location statistics, use the following command:

Device# show ap location stats

Location name    APs joined     Clients joined     Clients on 11a     Clients on 11b     
-----------------------------------------------------------------------------------------------
first             2             0                   3                  4                  
second            0             0                   0                  0