SSM

Feature history for SSM

This table provides release and platform support information for the features explained in this module.

These features are available in all the releases subsequent to the one they were introduced in, unless noted otherwise.

Release

Feature name and description

Supported platform

Cisco IOS XE 17.18.1

SSM: SSM extends IP multicast by forwarding datagram traffic to receivers only from multicast sources that receivers explicitly join.

Cisco C9350 Series Smart Switches

Cisco C9610 Series Smart Switches

Understand SSM

Source-specific multicast (SSM) extends IP multicast by forwarding datagram traffic to receivers only from multicast sources that receivers explicitly join.

This section describes how to configure source-specific multicast (SSM). To get a complete description of the SSM commands in this section, check the IP Multicast Command Reference.

SSM components

SSM is a datagram delivery model that best supports one-to-many applications, also known as broadcast applications. SSM is a core networking technology used in Cisco's IP multicast solutions, specifically designed for audio and video broadcast applications. The device contains components necessary for SSM implementation:

  • Protocol Independent Multicast Source-Specific Mode (PIM-SSM), a routing protocol supporting SSM, derived from PIM Sparse Mode (PIM-SM)

  • Internet Group Management Protocol version 3 (IGMPv3)

SSM and ISM

The current IP multicast infrastructure in the Internet and many enterprise intranets is based on the PIM-SM protocol and Multicast Source Discovery Protocol (MSDP). These protocols have the limitations of the Internet Standard Multicast (ISM) service model. For example, with ISM, the network must maintain knowledge about which hosts in the network are actively sending multicast traffic.

The ISM service consists of the delivery of IP datagrams from any source to a group of receivers called the multicast host group. The datagram traffic for the multicast host group consists of datagrams with an arbitrary IP unicast source address (S) and the multicast group address (G) as the IP destination address. Systems receive this traffic by becoming members of the host group. Membership in a host group simply requires signaling the host group through IGMP version 1, 2, or 3.

In SSM, delivery of datagrams is based on (S, G) channels. In both SSM and ISM, no signaling is required to become a source. In SSM, receivers must subscribe to specific (S, G) channels to receive traffic and unsubscribe to stop receiving traffic. In other words, receivers can receive traffic only from (S, G) channels to which they are subscribed, whereas in ISM, receivers need not know the IP addresses of sources from which they receive their traffic. The proposed standard for channel subscription signaling uses IGMP and includes mode membership reports, which are supported only in IGMP version 3.

SSM IP address range

SSM can coexist with the ISM service by applying the SSM delivery model to a configured subset of the IP multicast group address range. You can configure SSM in Cisco IOS software for IP multicast addresses from 224.0.0.0 to 239.255.255.255. Existing IP multicast applications using an address within the SSM range will not receive traffic unless they are explicitly modified for (S, G) channel subscription

SSM operations

A network using PIM-SM for IP multicast services can support SSM. SSM can also be deployed alone in a network without the full range of protocols required for interdomain PIM-SM, such as MSDP, Auto-RP, or bootstrap router (BSR), if only SSM service is needed.

If SSM is deployed in a network already configured for PIM-SM, only the last-hop routers support SSM. You do not need to support SSM for routers not directly connected to receivers. In general, these not-last-hop routers must only run PIM-SM in the SSM range and might need additional access control configuration to suppress MSDP signalling, registering, or PIM-SM shared tree operations from occurring within the SSM range.

Use the ip pim ssm global configuration command to configure the SSM range and to enable SSM. This configuration has these effects:

  • For groups within the SSM range, (S, G) channel subscriptions are accepted through IGMPv3 include-mode membership reports.

  • PIM operations within the SSM range of addresses change to PIM-SSM, a mode derived from PIM-SM. In this mode, only PIM (S, G) join and prune messages are generated by the router, and no (S, G) rendezvous point tree (RPT) or (*, G) RPT messages are generated. Incoming messages related to RPT operations are ignored or rejected, and PIM register messages are immediately answered with register-stop messages. PIM-SSM is backward-compatible with PIM-SM unless a router is a last-hop router. Therefore, routers that are not last-hop routers can run PIM-SM for SSM groups (for example, if they do not yet support SSM).

  • No MSDP source-active (SA) messages within the SSM range are accepted, generated, or forwarded.

SSM mapping

A typical set-top box deployment assigns each TV channel a separate IP multicast group, with one active server host sending the TV channel. A single server can send multiple TV channels, but each to a different group. In this network environment, if a router receives an IGMPv1 or IGMPv2 membership report for a particular group, the report addresses the well-known TV server for the TV channel associated with the multicast group.

When SSM mapping is configured, if a router receives an IGMPv1 or IGMPv2 membership report for a particular group, the router translates this report into one or more channel memberships for the well-known sources associated with this group.

When the router receives an IGMPv1 or IGMPv2 membership report for a group, the router uses SSM mapping to determine one or more source IP addresses for the group. SSM mapping translates the membership report into an IGMPv3 report and processes it accordingly. The router then sends PIM joins and continues to be joined to these groups as long as it continues to receive the IGMPv1 or IGMPv2 membership reports, and the SSM mapping for the group remains the same.

The last hop router uses SSM mapping to determine source addresses from a statically configured table or a DNS server. When the statically configured table or the DNS mapping changes, the router leaves the current sources associated with the joined groups.

Use the Source Specific Multicast (SSM) mapping feature when the end system cannot support SSM due to administrative or technical reasons. Use SSM mapping for video delivery to set-top boxes that lack IGMPv3 support or have applications not using the IGMPv3 host stack.

Static SSM mapping

Static SSM mapping allows you to configure the last hop router to determine which sources send to groups. Static SSM mapping requires configuring ACLs to define group ranges. After you configure the ACLs to define group ranges, map the groups permitted by those ACLs to sources using the ip igmp ssm-map static global configuration command.

You can configure static SSM mapping in smaller networks when a DNS is not needed or to locally override DNS mappings. When configured, static SSM mappings take precedence over DNS mappings.

DNS-based SSM mapping

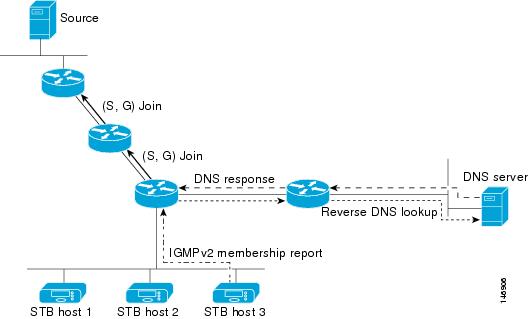
DNS-based SSM mapping allows the last hop router to perform a reverse DNS lookup to identify the sources sending to groups. When DNS-based SSM mapping is configured, the router constructs a domain name that includes the group address and performs a reverse lookup into the DNS. The router queries IP address resource records and assigns them as source addresses associated with this group. SSM mapping supports up to 20 sources for each group. The router joins all sources configured for a group.

Figure 1. DNS-based SSM mapping. The figure displays DNS-based SSM mapping.

The SSM mapping mechanism, which enables the last hop router to join multiple sources for a group, can provide source redundancy for a TV broadcast. In this context, the last hop router provides redundancy using SSM mapping to simultaneously join two video sources for the same TV channel. To prevent the last hop router from duplicating video traffic, video sources must use a server-side switchover mechanism. One video source is active, and the other backup video source is passive. The passive source waits until an active source failure is detected before sending the video traffic for the TV channel. Thus, the server-side switchover mechanism ensures that only one of the servers is actively sending video traffic for the TV channel.

Configure these DNS records to look up source addresses for groups: G1, G2, G3, G4.

G4.G3.G2.G1 [multicast-domain] [timeout]	IN A source-address-1
	IN A source-address-2
	IN A source-address-n

Refer to the DNS server documentation for details on configuring DNS resource records.

Prerequisites for SSM

Here are the prerequisites for configuring SSM and SSM mapping:

  • Before configuring SSM mapping, enable IP multicast routing, PIM sparse mode, and configure SSM.

  • Before configuring static SSM mapping, configure ACLs that define the group ranges to be mapped to source addresses.

  • Before configuring SSM mapping with DNS lookups, add records to a running DNS server. Install a DNS server if one is not already running.


    Note


    Use Cisco Network Registrar to add records to a running DNS server.

Restrictions for SSM

Here are the restrictions for configuring SSM:

  • To run SSM with IGMPv3, SSM must be supported in the Cisco IOS router, the host where the application is running, and the application itself.

  • Applications existing in a network before SSM must be modified to support (S, G) channel subscriptions within the SSM range. Enabling SSM might cause issues for these applications if they use addresses in the designated SSM range.

  • IGMPv3 uses new membership report messages that older IGMP snooping devices might not recognize.

  • When SSM is used with Layer 2 switching mechanisms, some degree of address management remains necessary. Cisco Group Management Protocol (CGMP), IGMP snooping, or Router-Port Group Management Protocol (RGMP) support only group-specific filtering, not (S, G) channel-specific filtering. If different receivers in a switched network request different (S, G) channels sharing the same group, they do not benefit from these existing mechanisms.

    Instead, both receivers receive all (S, G) channel traffic and filter out the unwanted traffic on input. SSM can reuse group addresses in the SSM range for many independent applications, potentially decreasing traffic filtering in a switched network. For this reason, it is important to use random IP addresses from the SSM range for an application to minimize the chance for re-use of a single address within the SSM range between different applications. For example, an application service providing a set of television channels should, even with SSM, use a different group for each television (S, G) channel.

    This setup guarantees that multiple receivers to different channels within the same application service never experience traffic aliasing in networks that include Layer 2 devices.

  • In PIM-SSM, the last hop router will continue to periodically send (S, G) join messages if appropriate (S, G) subscriptions are on the interfaces. Therefore, as long as receivers send (S, G) subscriptions, the shortest path tree (SPT) state from the receivers to the source will be maintained, even if the source is not sending traffic for longer periods of time, or even never.

    In PIM-SM, the (S, G) state is maintained only when the source sends traffic and receivers join the group. If a source stops sending traffic for more than three minutes in PIM-SM, the (S, G) state is deleted and only reestablished after packets from the source arrive again through the RPT (rendezvous point tree). Because no mechanism in PIM-SSM notifies a receiver that a source is active, the network must maintain the (S, G) state in PIM-SSM as long as receivers are requesting receipt of that channel.

Here are the restrictions for configuring SSM mapping:

  • The SSM Mapping feature does not share the benefit of full SSM. SSM mapping takes a group G join from a host and identifies this group with an application associated with one or more sources, therefore, it can only support one such application per group G. Nevertheless, full SSM applications may still share the same group also used in SSM mapping.

  • Enable IGMPv3 with care on the last hop router when you rely solely on SSM mapping as a transition solution for full SSM. When you enable both SSM mapping and IGMPv3 and the hosts already support IGMPv3 (but not SSM), the hosts send IGMPv3 group reports. SSM mapping does not support these IGMPv3 group reports, and the router does not correctly associate sources with these reports.

Configure SSM

This section provides configuration information about SSM and SSM mapping.

Configure SSM

Follow these steps to configure SSM:

This procedure is optional.

Before you begin

If you want to use an access list to define the Source Specific Multicast (SSM) range, configure the access list before you reference the access list in the ip pim ssm command.

Procedure

  Command or Action Purpose

Step 1

enable

Example:


Device> enable

Enables privileged EXEC mode.

  • Enter your password if prompted.

Step 2

configure terminal

Example:


Device# configure terminal

Enters global configuration mode.

Step 3

ip pim ssm [default | range access-list]

Example:


Device(config)# ip pim ssm range 20

Defines the SSM range of IP multicast addresses.

Step 4

interface type number

Example:


Device(config)# interface gigabitethernet 1/0/1

Selects an interface that is connected to hosts on which IGMPv3 can be enabled, and enters the interface configuration mode.

Step 5

ip pim {sparse-mode}

Example:


Device(config-if)# ip pim sparse-mode

Enables PIM on an interface.

Step 6

ip igmp version 3

Example:


Device(config-if)# ip igmp version 3

Enables IGMPv3 on this interface. The default version of IGMP is set to Version 2.

Step 7

end

Example:


Device(config)# end

Returns to privileged EXEC mode.

Step 8

show running-config

Example:


Device# show running-config 

Verifies your entries.

Step 9

copy running-config startup-config

Example:


Device# copy running-config startup-config 

(Optional) Saves your entries in the configuration file.

Configure static SSM mapping

Follow these steps to configure static SSM Mapping:

Procedure

  Command or Action Purpose

Step 1

enable

Example:


Device> enable

Enables privileged EXEC mode.

  • Enter your password if prompted.

Step 2

configure terminal

Example:


Device# configure terminal

Enters global configuration mode.

Step 3

ip igmp ssm-map enable

Example:


Device(config)# ip igmp ssm-map enable

Enables SSM mapping for groups in the configured SSM range.

Note


By default, this command enables DNS-based SSM mapping.

Step 4

no ip igmp ssm-map query dns

Example:


Device(config)# no ip igmp ssm-map query dns

(Optional) Disables DNS-based SSM mapping.

Note


Disable DNS-based SSM mapping if you only want to rely on static SSM mapping. By default, the ip igmp ssm-map command enables DNS-based SSM mapping.

Step 5

ip igmp ssm-map static access-list source-address

Example:


Device(config)# ip igmp ssm-map static 11 172.16.8.11

Configures static SSM mapping.

  • The ACL supplied for the access-list argument defines the groups to be mapped to the source IP address entered for the source-address argument.

Note


You can configure additional static SSM mappings. If additional SSM mappings are configured and the router receives an IGMPv1 or IGMPv2 membership report for a group in the SSM range, the device determines the source addresses associated with the group by walking each configured ip igmp ssm-map static command. The device associates up to 20 sources per group.

Repeat this step to configure additional static SSM mappings, if required.

Step 6

end

Example:


Device(config)# end

Returns to privileged EXEC mode.

Step 7

show running-config

Example:


Device# show running-config 

Verifies your entries.

Step 8

copy running-config startup-config

Example:


Device# copy running-config startup-config 

(Optional) Saves your entries in the configuration file.

Configure DNS-based SSM mapping

To configure DNS-based SSM mapping, create a DNS server zone or add records to an existing zone. If the routers that are using DNS-based SSM mapping are also using DNS for other purposes, you should use a normally configured DNS server. If the router uses only DNS-based SSM mapping, you can configure a false DNS setup with an empty root zone or a root zone that points back to itself.

Procedure

  Command or Action Purpose

Step 1

enable

Example:


Device> enable

Enables privileged EXEC mode.

  • Enter your password if prompted.

Step 2

configure terminal

Example:


Device# configure terminal

Enters global configuration mode.

Step 3

ip igmp ssm-map enable

Example:


Device(config)# ip igmp ssm-map enable

Enables SSM mapping for groups in a configured SSM range.

Step 4

ip igmp ssm-map query dns

Example:


Device(config)# ip igmp ssm-map query dns

(Optional) Enables DNS-based SSM mapping.

  • By default, the ip igmp ssm-map command enables DNS-based SSM mapping. Only the no form of this command is saved to the running configuration.

Note

 
Use this command to reenable DNS-based SSM mapping if DNS-based SSM mapping is disabled.

Step 5

ip domain multicast domain-prefix

Example:


Device(config)# ip domain multicast ssm-map.cisco.com

(Optional) Changes the domain prefix used for DNS-based SSM mapping.

  • By default, the software uses the ip-addr.arpa domain prefix.

Step 6

ip name-server server-address1 [server-address2 ...server-address6 ]

Example:


Device(config)# ip name-server 10.48.81.21

Specifies the address of one or more name servers to use for name and address resolution.

Repeat this step to configure additional DNS servers for redundancy, if required. .

Step 7

end

Example:


Device(config)# end

Returns to privileged EXEC mode.

Step 8

show running-config

Example:


Device# show running-config 

Verifies your entries.

Step 9

copy running-config startup-config

Example:


Device# copy running-config startup-config 

(Optional) Saves your entries in the configuration file.

Configure static traffic forwarding with SSM mapping

Follow these steps to configure static traffic forwarding with SSM mapping on the last hop router:

Procedure

  Command or Action Purpose

Step 1

enable

Example:


Device> enable

Enables privileged EXEC mode.

  • Enter your password if prompted.

Step 2

configure terminal

Example:


Device# configure terminal

Enters global configuration mode.

Step 3

interface interface-id

Example:


Device(config)# interface gigabitethernet 1/0/1

Selects an interface on which to statically forward traffic for a multicast group using SSM mapping, and enters interface configuration mode.

Note


Static forwarding of traffic with SSM mapping works with either DNS-based SSM mapping or statically configured SSM mapping.

Step 4

ip igmp static-group group-address source ssm-map

Example:


Device(config-if)# ip igmp static-group 239.1.2.1 source ssm-map

Configures SSM mapping to statically forward a (S, G) channel from the interface.

Use this command if you want to statically forward SSM traffic for certain groups. Use DNS-based SSM mapping to determine the source addresses of the channels.

Step 5

end

Example:


Device(config)# end

Returns to privileged EXEC mode.

Step 6

show running-config

Example:


Device# show running-config 

Verifies your entries.

Step 7

copy running-config startup-config

Example:


Device# copy running-config startup-config 

(Optional) Saves your entries in the configuration file.

Configure IPv6 SSM mapping

When the SSM mapping feature is enabled, DNS-based SSM mapping is automatically enabled, which means that the switch will look up the source of a multicast MLD version 1 report from a DNS server.

You can use either DNS-based or static SSM mapping, depending on your switch configuration. If you choose to use static SSM mapping, you can configure multiple static SSM mappings. If multiple static SSM mappings are configured, the source addresses of all matching access lists will be used.


Note


To use DNS-based SSM mapping, the switch needs to find at least one correctly configured DNS server, to which the switch may be directly attached.


To configuring SSM mapping, perform this procedure:

Procedure

  Command or Action Purpose

Step 1

enable

Example:


Device> enable 

Enables privileged EXEC mode.

Enter your password if prompted.

Step 2

configure terminal

Example:


Device# configure terminal

Enters global configuration mode.

Step 3

ipv6 mld ssm-map enable

Example:


Device(config)# ipv6 mld ssm-map enable

Enables the SSM mapping feature for groups in the configured SSM range.

Step 4

no ipv6 mld ssm-map query dns

Example:


Device(config)# no ipv6 mld ssm-map query dns

Disables DNS-based SSM mapping.

Step 5

ipv6 mld ssm-map static access-list source-address

Example:


Device(config-if)# ipv6 mld ssm-map static SSM_MAP_ACL_2 2001:DB8:1::1

Configures static SSM mappings.

Step 6

exit

Example:


Device(config-if)# exit

Exits global configuration mode, and returns the switch to privileged EXEC mode.

Step 7

show ipv6 mld ssm-map [source-address]

Example:


Device(config-if)# show ipv6 mld ssm-map

Displays SSM mapping information.

Step 8

copy running-config startup-config

(Optional) Save your entries in the configuration file.

Monitor SSM

Use the privileged EXEC commands in this table to monitor SSM.

Table 1. Commands for monitoring SSM

Command

Purpose

show ip igmp groups detail

Displays the (S, G) channel subscription through IGMPv3.

show ip mroute

Displays whether a multicast group supports SSM service or whether a source-specific host report was received.

show ip igmp ssm-mapping

Displays information about SSM mapping.

show ip igmp ssm-mapping group-address

Displays the sources that SSM mapping uses for a particular group.

show ip igmp groups [group-name | group-address | interface-type interface-number] [detail]

Displays the multicast groups with receivers that are directly connected to the router and that were learned through IGMP.

show host

Displays the default domain name, the style of name lookup service, a list of name server hosts, and the cached list of hostnames and addresses.

debug ip igmp group-address

Displays the IGMP packets received and sent and IGMP host-related events.