
Intent-Based Policy for Tier-Based Microsegmentation
Use Intent-Based Policy for Tier-Based Microsegmentation
This use case describes how to leverage Cisco Secure Workload to define, implement, and manage intent-based policies for tier-based microsegmentation. In Cisco Secure Workload, the ‘Application tier’ or ‘Component tier’ refers to the middle layer of a multi-tier application architecture. This is the layer where the core business logic and processing occur.
Secure Workload creates micro-perimeters around each workload or application tier, effectively isolating them from others unless explicitly permitted. This limits lateral movement of threats and enforces zero-trust policies, ensuring that only authorized communication occurs between tiers, such as between the application tier and the data tier.
Is this Use Case for You?
Today, financial institutions run critical applications everywhere. The challenge in this hybrid environment is to apply consistent security policies regardless of where these applications or workloads are located.
Globally, more than 60% of security attacks involve lateral movement and a recent cyber security audit in a large financial organization identified significant risks associated with lateral movement across their workloads. The organization, which operates in a complex hybrid environment comprising legacy systems, virtual machines, and containers is looking to minimize the surface risk exposure, reduce cyber-insurance rates, and maintain regulatory compliance. To achieve this, the network team decides to implement intent-based policies that reflect the business logic and application architecture rather than relying solely on traditional network segmentation. This approach allows them to create microsegmentation policies that specifically govern communication between each application tier and the environment.
This document is useful if you are a Security architect, Network administrator, or a Network engineer looking to define security policies, automate policy creation, enforce zero-trust principles, and ensure that policies dynamically adapt to changes in your application environment, such as on-prem data centers, private clouds, public clouds, and containers.
Understand Intent-Based Policy for Microsegmentation
Intent-based policies allow organizations to define high-level access policies based on business intent, application logic and regulatory needs. The policies are built using metadata and labels, such as application name, environment, user roles, and component or tiers. The platform interprets this intent by dynamically translating human-readable statements into precise enforcement rules across enforcement points, including host, network, and cloud firewalls. For example, ‘payment application servers’ can only communicate to ‘database servers’, 'web servers' in production can communicate only with 'application servers' in the same environment.
Prerequisites for Implementing Intent-Based Policy
Ensure that you meet these requirements to successfully discover, analyze, and enforce policies:
- Verify that the Secure Workload cluster is active and healthy (Secure Workload version 3.10 or according to the deployment).
- Deploy Secure Workload agents (software or hardware) on all workloads that are intended to be part of the workload segmentation.
- Annotate your workloads using a well-defined annotation strategy. For more information, refer to Inventory Search and Management.
- Assign the appropriate User Roles and Permissions so that you can create scopes, access inventory, define, discover policies, and view flow data.
Limitations of Enforcing Intent-Based Policy
Be aware of the following limitations:
- Ensure that labeling of workloads is accurate and consistent to avoid mis-segmenting the workloads.
- By default, the content of encrypted traffic in Secure Workload is not inspected. Therefore, policy decisions are based on flow metadata (IPs, ports, protocols, process information from agents).
- Initially, AI Policy Discovery (ADM) analysis and policy definition will require significant time.
- Secure Workload agents are generally lightweight. However, they consume some resources on the workloads that must be considered for resource-constrained systems.
Key Assumptions for Enforcing Policy
Consider the following assumptions while enforcing policies:
- Complex application: Financial institutions often use multi-tier applications that are dependent on front-end, app-tier, and database-tier components.
- Network infrastructure: Your network infrastructure depends on load balancers and firewalls.
- Regulatory compliance: Compliance with PCI-DSS and Zero Trust frameworks requires strict segmentation.
- Policy fragmentation: Often, teams such as, NetSec, Cloud, and DevSecOps work in silos, and policies become inconsistent across environments. Coordinate across teams to improve policy consistency.
How Can Secure Workload Help?
Use the Cisco Secure Workload intent-based policy framework to help secure critical applications, including web, application, and datacenter workloads. The framework uses fine-grained policies to restrict unnecessary communication and allow only necessary flows required for your applications.
Workflow of Intent-Based Policy for Microsegmentation
This workflow illustrates how you build a scope hierarchy for your organization.
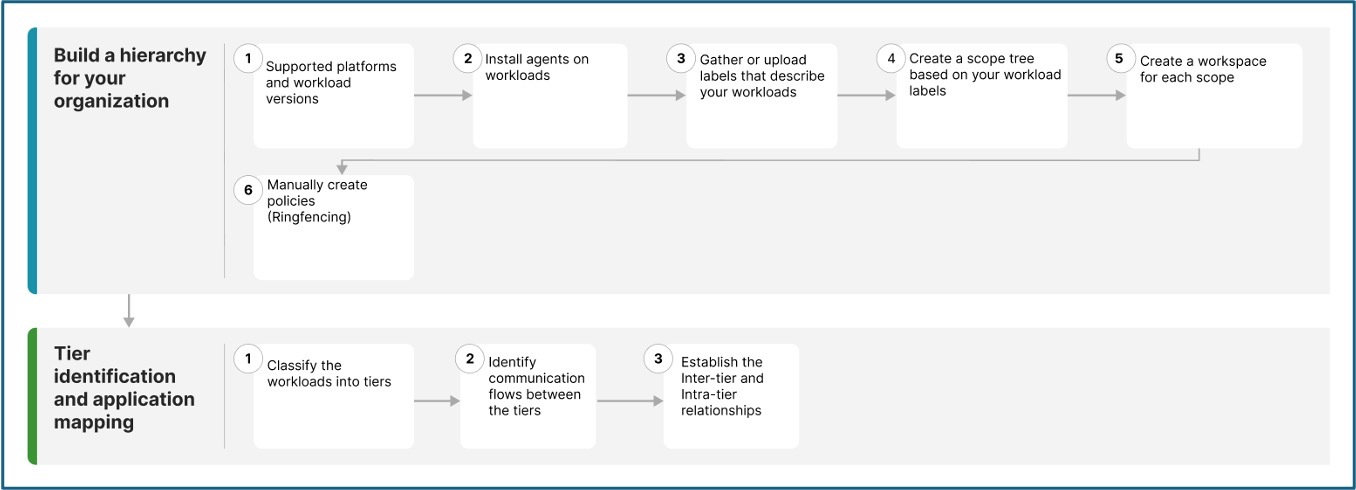
This table explains how to build a scope hierarchy by creating workloads, installing agents on the workloads, gathering and uploading labels and creating a workspace for each scope.
|
Step 1 |
Ensur that Secure Workload supports the platforms and versions you use for your workloads. |
|
|
Step 2 |
Secure Workload groups workloads and determines policies using flow data and other information collected by agents. |
|
|
Step 3 |
Group workloads, apply policies, and review policy recommendations using this information. |
|
|
Step 4 |
Use the scope tree view to delegate responsibilities for specific applications. Administrators can then determine the appropriate policies for workloads. |
|
|
Step 4 |
The workspace is where you manage policies for the workloads in that scope. |
|
|
Step 5 |
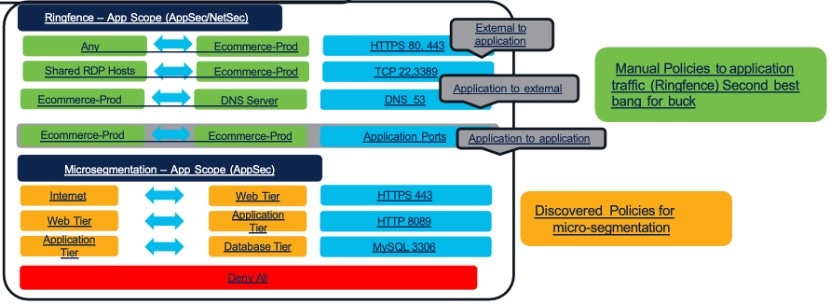
Create policies (ringfencing) that apply across your network. For example, you can:
|
This table explains how workloads are classified into different tiers. It also describes how policies are discovered using AI policy discovery and reviewed to establish relationships with the various tiers.
|
Step 1 |
Identify the application tiers and classify the workloads into web, application, and database tiers for segmentation. |
|
|
Step 2 |
Agent-based and agentless microsegmentation define how telemetry is collected. Machine learning then discovers communication flows and automatically generates appropriate allow list (zero trust) policies for workload protection. For example, the web server communicates with the app server only on TCP 443. A policy is suggested to block any other protocol or destination. |
|
|
Step 3 |
Use this information with Application Dependency Mapping (ADM) to identify communication flows between tiers and to establish the inter-tier and intra-tier relationships. |
Build a Scope Hierarchy for your Organization
To build a scope hierarchy in Cisco Secure Workload, start by organizing your workloads into logical groups called 'scopes', which are collections of workloads labeled based on attributes, such as location, role, or function. This hierarchical scope tree should mirror the application's ownership hierarchy or organizational structure, grouping workloads with similar labels to support segmentation and policy assignment.
Before you begin
Create the necessary workspaces, scopes, and assign labels to the workloads in your organization. Organize workloads into a hierarchy of scopes that represent organizational units, applications, or environments. Assign descriptive labels and metadata to workloads so they reflect business context, such as application name, environment, owner, and compliance requirements.
Step 1 | Agents gather flow data and other required information for Secure Workload to group workloads and determine appropriate policies. Agents also enforce approved policies. For more information, see Secure Workload Compatibility Matrix. |
Step 2 | Install agents on workloads. Agents gather flow data and other information that is required for Secure Workload to group workloads and determine appropriate policies. The agents also enforce approved policies. For more information, including links to lists of supported platforms and requirements, see Deploying Software Agents. |
Step 3 | Gather or upload labels that describe your workloads. Labels let you easily understand the purpose of each workload and provide other key information about each workload. Labels are the foundation of maintaining groups that simplify policy management. For more information, see Workload Labels and Importing Custom Labels. |
Step 4 | Create a scope tree based on your workload labels. The hierarchical view lets you create a policy and automatically apply it to all workloads on that branch. It also allows you to delegate responsibility for specific applications or network segments to qualified individuals. 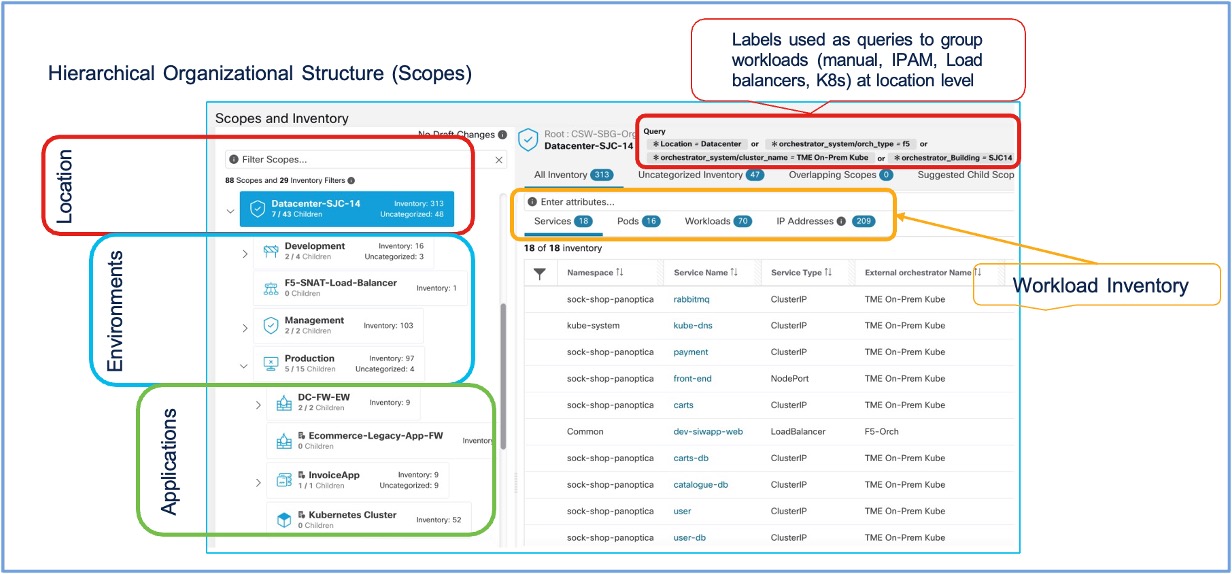
You can query workloads and group them into scopes based on their labels. For example,
For more information, use the Quick Start Wizard to create a scope tree and Scopes and Inventory. |
Step 5 | Create workspaces for each scope to manage policies for the workloads in that scope. For more information on how to manage policies in workspaces, see Workspaces to Manage Policies. |
Step 6 | Create policies (ringfencing) that apply across your network. Policies can be absolute or they can be default. However, policies can be overridden by more specific policies. For example, you might want to allow access or deny from all internal workloads to your NTP server or deny all external traffic, or deny access from all non-internal hosts unless explicitly permitted. For more information on policies and policy templates, see Manually create granular policies and Policy Templates. 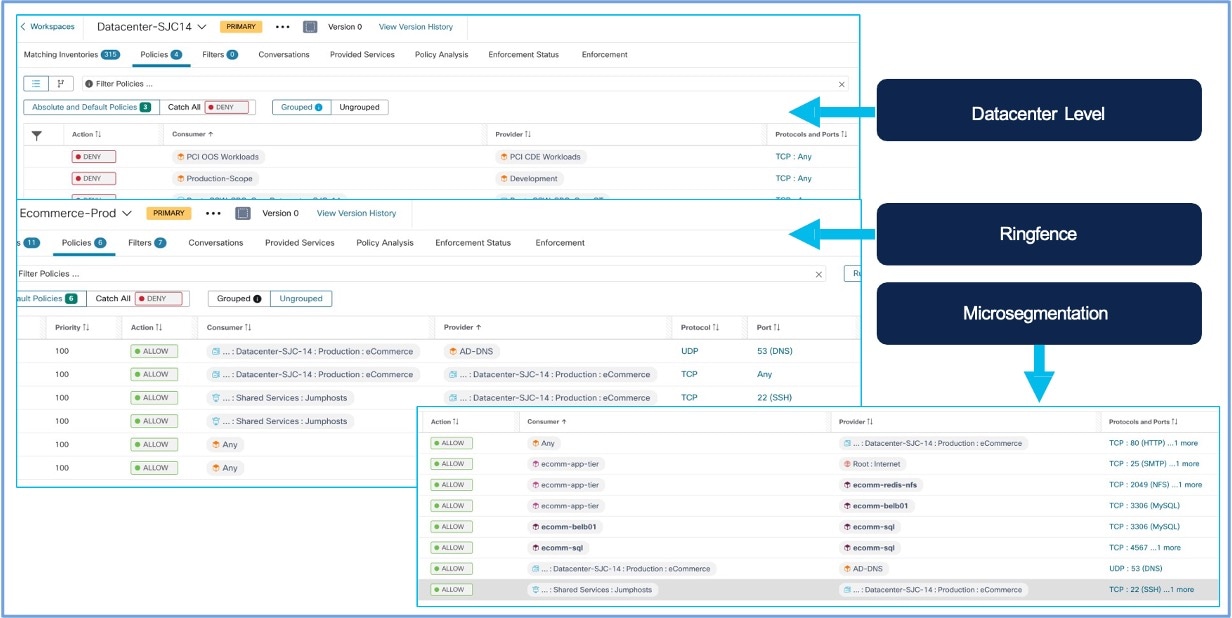
|
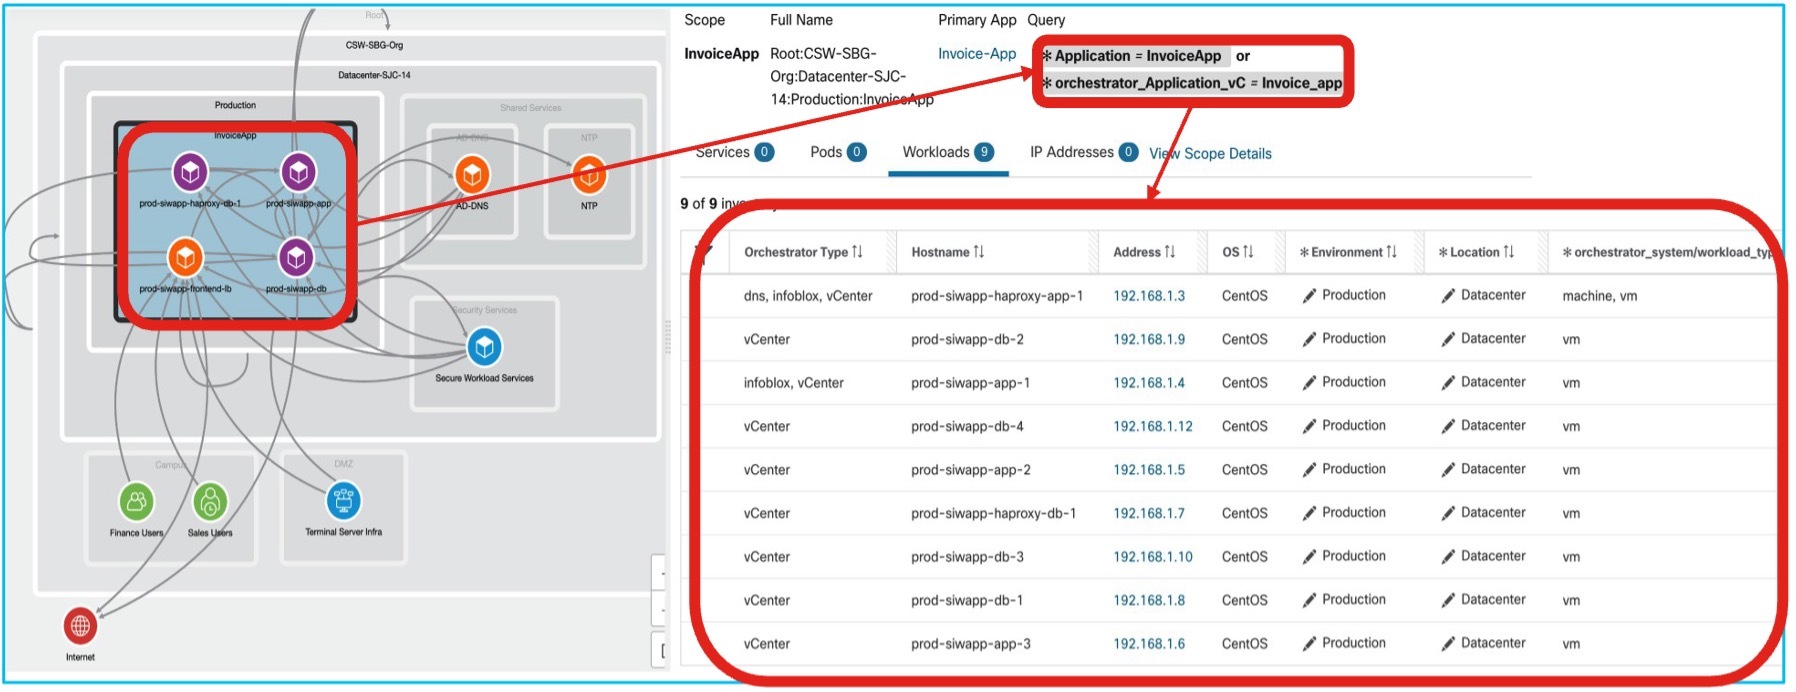
Tier Identification and Application Mapping
The microsegmentation framework in Secure Workload automatically discovers and labels workloads by tiers using contextual metadata, such as labels, or application mapping. This design enables organizations to articulate security requirements and systematically translate this intent into enforceable security policies across the infrastructure.
Before you begin
To secure diverse workloads, use intent-based policies to enable component or tier-based microsegmentation. This approach ensures fine-grained control over application communication, reduces risk exposure and helps meet the regulatory requirements.
Step 1 | Log in to the Cisco Secure Workload application. From the navigation pane, choose . To determine the workload inventory:
|
Step 2 | Identify the application tiers to be segmented. Define the desired communication outcomes. For example:
Determine the annotation strategy. For example:

|
Step 3 | Use Application Dependency Mapping (ADM) to identify communication flows between the tiers:
|
Step 4 | Establish the Inter-tier and Intra-tier relationships so that there's a:
This results in dynamic grouping of workloads that belong to the same tier, which is possible even when the environment changes. |
Policy Simulation and Validation
After you have reviewed and approved the set of security policies generated by automatic policy discovery, use live policy analysis to see how the policies affect actual network traffic before enforcement.
- Run policy analysis on workspaces with active policies because workloads in any scope may be affected by policies defined in other scopes.
-
Run policy analysis for all relevant scopes before enforcing policy for a specific scope.
- Analyze policies for all scopes that may affect traffic in a given scope. For example, policies defined in a scope that is higher in the scope tree than the specific scope may apply to workloads in this scope.
- Policies in another scope may affect communication with those in another and influence policy analysis results. For more information, refer to Policy Analysis.
- Policy rank determines if a more specific policy placed lower in the priority list or scope tree can override a less specific policy. The lowest priority policy in each scope is called 'Catch-all rule'. For more information on how policies are overridden, refer to Policy Rank: Absolute, Default, and Catch-All.
 Note
NotePerform policy analysis any time you revise policies, to ensure that changes don't break applications.
Enforcement of Policy for Tier-Based Microsegmentation
After you have determined that policies associated with a workspace and the associated scope are appropriate, and will block unwanted traffic while not interrupting essential services, you can enforce those policies. Enforcement of policies ensures that high-level, human-readable security intents are automatically translated into precise and system level enforcement rules.
You can iteratively enforce policies. For example, you might initially enforce just the manually created policies in scopes near the top of your tree. Then, over time, enforce discovered policies in scopes lower in the tree. For more information on how to enforce policies, see Enforce Policies.
Validate Policy Enforcement and Application Behavior
After enforcement of policies, verify that policies are working as intended and applications remain healthy.
Verify allowed traffic using Flow Search
- Log in to Secure Workload. From the navigation pane, choose .
- Filter for traffic between your defined scopes that should be allowed.
-
Example:
Consumer Scope: Datacenter-SJC-14, Provider Scope: Prod-Invoice-App. - Confirm these flows are marked with an 'Allow' disposition and reference the correct policy rule.
Verify denied traffic using Flow Search
- Filter for traffic that should be denied. For example, Consumer Scope: ecomm-app-tier, Provider Scope: Development.
-
Confirm these flows are marked with a 'Deny' or 'Drop' disposition.
Flows with Deny or Drop disposition
Check policy hit counters
Log in to Cisco Secure Workload and from the navigation pane, choose . Review the hit counters for your rules. An increase in allow or deny rule counts indicates that these rules are being matched.
For more information, refer to Calculate Policy Statistics.
Attempt prohibited connections
-
Start from a workload within a scope that should be denied access:
The connection should fail.A Dev. server attempting to connect to a service in a protected scope (Prod. database). - Observe the corresponding ‘Denied’ flow in Flow Search.
Monitor Policy Compliance and Visibility
Monitoring the Secure Workload clusters’ health helps to ensure that policies remain effective and compliant with your security intent. Continuously monitor all workload communications and policy compliance in near real-time.
- Regular flow review: Periodically log in to the Secure Workload application. From the navigation menu, choose to look for anomalous traffic patterns or unexpected denied or allowed flows.
- Policy compliance dashboards: Use Secure Workload's dashboards, such as Segmentation Compliance Score in Security Dashboard and Summary Reports for security compliance in Reporting Dashboard to get an overview of policy adherence.
- Alert notifications: Configure alerts for critical policy violations. For example, attempts to breach key deny rules) as described in the Configure Alerts.
- AI Policy Discovery drift analysis: If your policies rely primarily on an initial ADM run, rerun ADM at regular intervals or monitor for unexpected new flows that could prompt updates to your policies.
- Resource usage: Monitor the resource usage (CPU, memory) on the Secure Workload cluster and on workloads with agents. For more information on monitoring cluster health, see Cluster Status.
Use dashboards to track workload protection levels, compliance status, and security posture aligned with human intent. For more information, refer to Policy Compliance in Secure Workload
Troubleshoot Common Policy Issues
Refer to the Secure Workload user guide for support on troubleshooting issues due to policy enforcement.
- Symptoms: Traffic that should be denied by a policy is still observed as allowed. Deny rule hit counters are unexpectedly low or zero.
-
Scenario in which the issue occurs
- Incorrect scope definition (workloads not correctly included/excluded).
- Incorrect workload annotations (labels).
- Policy rule order: A broader 'allow' rule may match the traffic before other rules. Secure Workload policies are typically evaluated from the top down within a ruleset or by priority.
- Policy is not in 'Enforced' state.
- Agent issues on source or destination workload. For example, the agent is not able to receive policy information or reporting traffic flows correctly.
-
Workaround
- Verify scope queries and workload annotations meticulously using Inventory.
- Review policy rule order within the Workspace. Adjust, if necessary.
- Confirm the policy is in 'Enforced' state.
- Check agent health and communication status in Inventory.
- Use Flow Search to see which policy rule, if any, is allowing the traffic.
- Symptoms: Application components are failing; users report errors. Flow Search shows legitimate flows being 'Denied'.
-
Scenario in which the issue occurs
- If the scope definition is too broad, workloads may be included in a deny rule, or they may be excluded from a necessary allow rule.
- An essential service/port was missed in an 'allow' rule.
- Dependencies may not have been fully understood, or details may not have been correctly captured from ADM.
-
Workaround
- Use Flow Search to identify the specific flows being denied and the rule causing it.
- Refine scope definitions to be more precise.
- Modify or add 'allow' rules for the legitimate traffic. Ensure it's placed correctly relative to deny rules.
- Temporarily set the problematic rule to 'Monitoring' state to allow traffic during investigation. After correcting the issue, enforce the rule again.
- Consult ADM map to validate dependencies again.
- Symptoms: Policy is set to Enforced, but no traffic seems to be affected (neither allowed nor denied flows match the new rules specifically), or hit counters remain zero.
-
Scenario in which the issue occurs:
- Scope definitions do not match any active workloads.
- Policy rules are for services/ports not actually in use by the scoped workloads.
- Significant delay in policy propagation, which is less common over extended periods.
- Underlying agent communication issues across many agents.
-
Workaround
- Check scope queries against current workload annotations in inventory carefully.
- Verify the services (ports/protocols) in policy rules are correct for the application flows.
- Check overall agent health and Secure Workload cluster status.
- Use Flow Search without policy filters to view raw traffic from/to expected workloads, then compare with scope definitions.
Additional References
- Cisco Secure Workload User Guide On–Premises, Release 3.10:
- Chapter: Manage Inventory for Secure Workload
- Chapter: Manage Scopes and Inventory
- Chapter: AI Policy Discovery (ADM)
- Chapter: Manage Policy Lifecycle
- Chapter: Searching for Flows referencing a Scope
- Cisco Secure Workload Quick Start Guide
- Cisco Secure Workload At-A-Glance and Secure Workload Data Sheet on cisco.com for general product information.
Full Cisco Trademarks with Software License
THE SPECIFICATIONS AND INFORMATION REGARDING THE PRODUCTS IN THIS MANUAL ARE SUBJECT TO CHANGE WITHOUT NOTICE. ALL STATEMENTS, INFORMATION, AND RECOMMENDATIONS IN THIS MANUAL ARE BELIEVED TO BE ACCURATE BUT ARE PRESENTED WITHOUT WARRANTY OF ANY KIND, EXPRESS OR IMPLIED. USERS MUST TAKE FULL RESPONSIBILITY FOR THEIR APPLICATION OF ANY PRODUCTS.
THE SOFTWARE LICENSE AND LIMITED WARRANTY FOR THE ACCOMPANYING PRODUCT ARE SET FORTH IN THE INFORMATION PACKET THAT SHIPPED WITH THE PRODUCT AND ARE INCORPORATED HEREIN BY THIS REFERENCE. IF YOU ARE UNABLE TO LOCATE THE SOFTWARE LICENSE OR LIMITED WARRANTY, CONTACT YOUR CISCO REPRESENTATIVE FOR A COPY.
The Cisco implementation of TCP header compression is an adaptation of a program developed by the University of California, Berkeley (UCB) as part of UCB's public domain version of the UNIX operating system. All rights reserved. Copyright © 1981, Regents of the University of California.
NOTWITHSTANDING ANY OTHER WARRANTY HEREIN, ALL DOCUMENT FILES AND SOFTWARE OF THESE SUPPLIERS ARE PROVIDED “AS IS" WITH ALL FAULTS. CISCO AND THE ABOVE-NAMED SUPPLIERS DISCLAIM ALL WARRANTIES, EXPRESSED OR IMPLIED, INCLUDING, WITHOUT LIMITATION, THOSE OF MERCHANTABILITY, FITNESS FOR A PARTICULAR PURPOSE AND NONINFRINGEMENT OR ARISING FROM A COURSE OF DEALING, USAGE, OR TRADE PRACTICE.
IN NO EVENT SHALL CISCO OR ITS SUPPLIERS BE LIABLE FOR ANY INDIRECT, SPECIAL, CONSEQUENTIAL, OR INCIDENTAL DAMAGES, INCLUDING, WITHOUT LIMITATION, LOST PROFITS OR LOSS OR DAMAGE TO DATA ARISING OUT OF THE USE OR INABILITY TO USE THIS MANUAL, EVEN IF CISCO OR ITS SUPPLIERS HAVE BEEN ADVISED OF THE POSSIBILITY OF SUCH DAMAGES.
Any Internet Protocol (IP) addresses and phone numbers used in this document are not intended to be actual addresses and phone numbers. Any examples, command display output, network topology diagrams, and other figures included in the document are shown for illustrative purposes only. Any use of actual IP addresses or phone numbers in illustrative content is unintentional and coincidental.
All printed copies and duplicate soft copies of this document are considered uncontrolled. See the current online version for the latest version.
Cisco has more than 200 offices worldwide. Addresses and phone numbers are listed on the Cisco website at www.cisco.com/go/offices.
Cisco and the Cisco logo are trademarks or registered trademarks of Cisco and/or its affiliates in the U.S. and other countries. To view a list of Cisco trademarks, go to this URL: https://www.cisco.com/c/en/us/about/legal/trademarks.html. Third-party trademarks mentioned are the property of their respective owners. The use of the word partner does not imply a partnership relationship between Cisco and any other company. (1721R)