Decryption Policies

The following topics provide an overview of decryption policy creation, configuration, management, and logging.

About Decryption Policies

A decryption policy determines how the system handles encrypted traffic on your network. You can configure one or more decryption policies, associate a decryption policy with an access control policy, then deploy the access control policy to a managed device. When the device detects a TCP handshake, the access control policy first handles and inspects the traffic. If it subsequently identifies a TLS/SSL-encrypted session over the TCP connection, the decryption policy takes over, handling and decrypting the encrypted traffic.

You can create multiple rules at the same time, including rules for decrypting incoming traffic (Decrypt - Known Key rule action) and outgoing traffic (Decrypt - Resign rule action). To create a rule with a Do Not Decrypt or other rule action (such as Block or Monitor), create an empty decryption policy and add the rule afterward.

Do Not Decrypt policy example

Following is an example decryption policy with a Do Not Decrypt rule action:
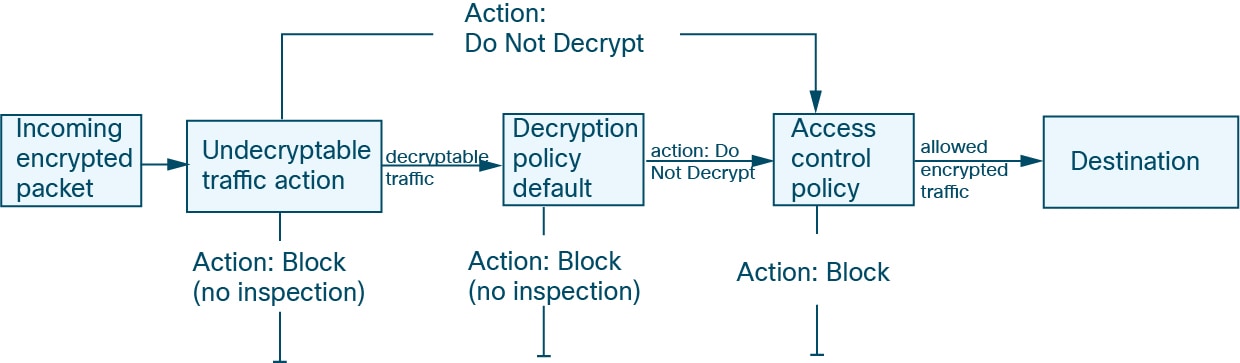
A Do Not Decrypt rule action passes the traffic through the firewall without trying to decrypt it; the access control policy then determines whether or not the traffic is inspected

The simplest decryption policy, as shown in the following diagram, directs the device where it is deployed to handle encrypted traffic with a single default action. You can set the default action to block decryptable traffic without further inspection, or to inspect undecrypted decryptable traffic with access control. The system can then either allow or block the encrypted traffic. If the device detects undecryptable traffic, it either blocks the traffic without further inspection or does not decrypt it, inspecting it with access control.

Requirements and Prerequisites for Decryption Policies

Supported domains

Any

User roles

  • Admin

  • Access Admin

  • Network Admin

Create a decryption policy

A decryption policy is a rule-based security policy that controls how encrypted network traffic is handled.

Create decryption policy to protect outbound and inbound network connections through various rule actions.

You can create any of these types of decryption policies:

Create a decryption policy with outbound connection protection

This task creates a decryption policy that protects outbound connections by intercepting and decrypting SSL/TLS traffic between internal clients and external servers, then re-encrypting the traffic with an internal CA certificate.

This task discusses how to create a decryption policy with a rule that protects outbound connections; that is, the destination server is outside your protected network. This type of rule has a Decrypt - Resign rule action.

When you create a decryption policy, you can create multiple rules at the same time, including multiple Decrypt - Known Key rules and multiple Decrypt - Resign rules.

Before you begin

You can optionally must upload or generate an internal CA certificate for your managed device before you can create a decryption policy that protects outbound connections. You can do this in any of the following ways:

  • Create an internal CA certificate object by going to Objects > Object Management > PKI > Internal CAs and referring to PKI objects.

  • At the time you create this decryption policy.

Follow these steps to create a decryption policy with outbound connection protection:

Procedure


Step 1

Log in to Secure Firewall Management Center if you haven't already done so.

Step 2

Click Policies > Access Control heading > Decryption.

Step 3

Click Create Decryption Policy.

Step 4

Give the policy a unique Name and, optionally, a Description.

The following characters are not supported in decryption policy names:

  • Leading period

  • #,;,{,},=,$,<,>

Step 5

Click the Outbound Connections tab.

Step 6

From the Internal CA list, upload or choose certificates for the rules.

For more information about internal certificates, see Generate an internal CA for outbound protection and Upload an internal CA for outbound protection.

  1. (Optional.) Choose networks and ports.

    For more information:


What to do next

Create a decryption policy with inbound connection protection

This task creates a decryption policy that protects inbound connections using either a Decrypt - Known Key rule action.

This task discusses how to create a decryption policy with a rule that protects inbound connections; that is, the destination server is inside your protected network. This type of rule has a Decrypt - Known Key rule action.

When you create a decryption policy, you can create multiple rules at the same time, including multiple Decrypt - Known Key rules and multiple Decrypt - Resign rules.

Before you begin

You must upload an internal certificate for your internal server before you can create a decryption policy that protects inbound connections. You can do this in any of the following ways:

  • Create an internal certificate object by going to Objects > Object Management > PKI > Internal Certs and referring to PKI objects.

  • At the time you create this decryption policy.

Follow these steps to create a decryption policy with inbound connection protection:

Procedure


Step 1

Log in to Secure Firewall Management Center if you haven't already done so.

Step 2

Click Policies > Access Control heading > Decryption.

Step 3

Click Create Decryption Policy.

Step 4

Perform these steps:

  1. Give the policy a unique Name and, optionally, a Description.

    The following characters are not supported in decryption policy names:

    • Leading period

    • #,;,{,},=,$,<,>

  2. From the Internal Certificates list, upload or choose certificates for the rules.

    For more information about internal CA certificates, see Internal certificate authority objects.

  3. (Optional.) Choose networks and ports.

    For more information:

  4. Click Next.

Step 5

Continue with Configure Decryption policy exclusions.

Step 6

Click Save.


What to do next

Configure Decryption policy exclusions

This task helps you create exclusions in your decryption policy to prevent decryption of traffic that should remain encrypted for compliance, security, or functional reasons.

This task discusses how to exclude certain types of traffic from decryption. We create Do Not Decrypt rules in your decryption policy for this purpose. The rules are initially enabled only for an outbound decryption policy (a policy that uses the Decrypt - Resign policy action).

Before you begin

You must upload an internal CA certificate for your managed device before you can create a decryption policy that protects outbound connections. You can do this in any of the following ways:

  • Create an internal CA certificate object by going to Objects > Object Management > PKI > Internal CAs and referring to PKI objects.

  • At the time you create this decryption policy.

Follow these steps to configure decryption policy exclusions:

Procedure


Step 1

Complete the tasks discussed in:

Step 2

Select the appropriate exclusion options based on your security requirements.

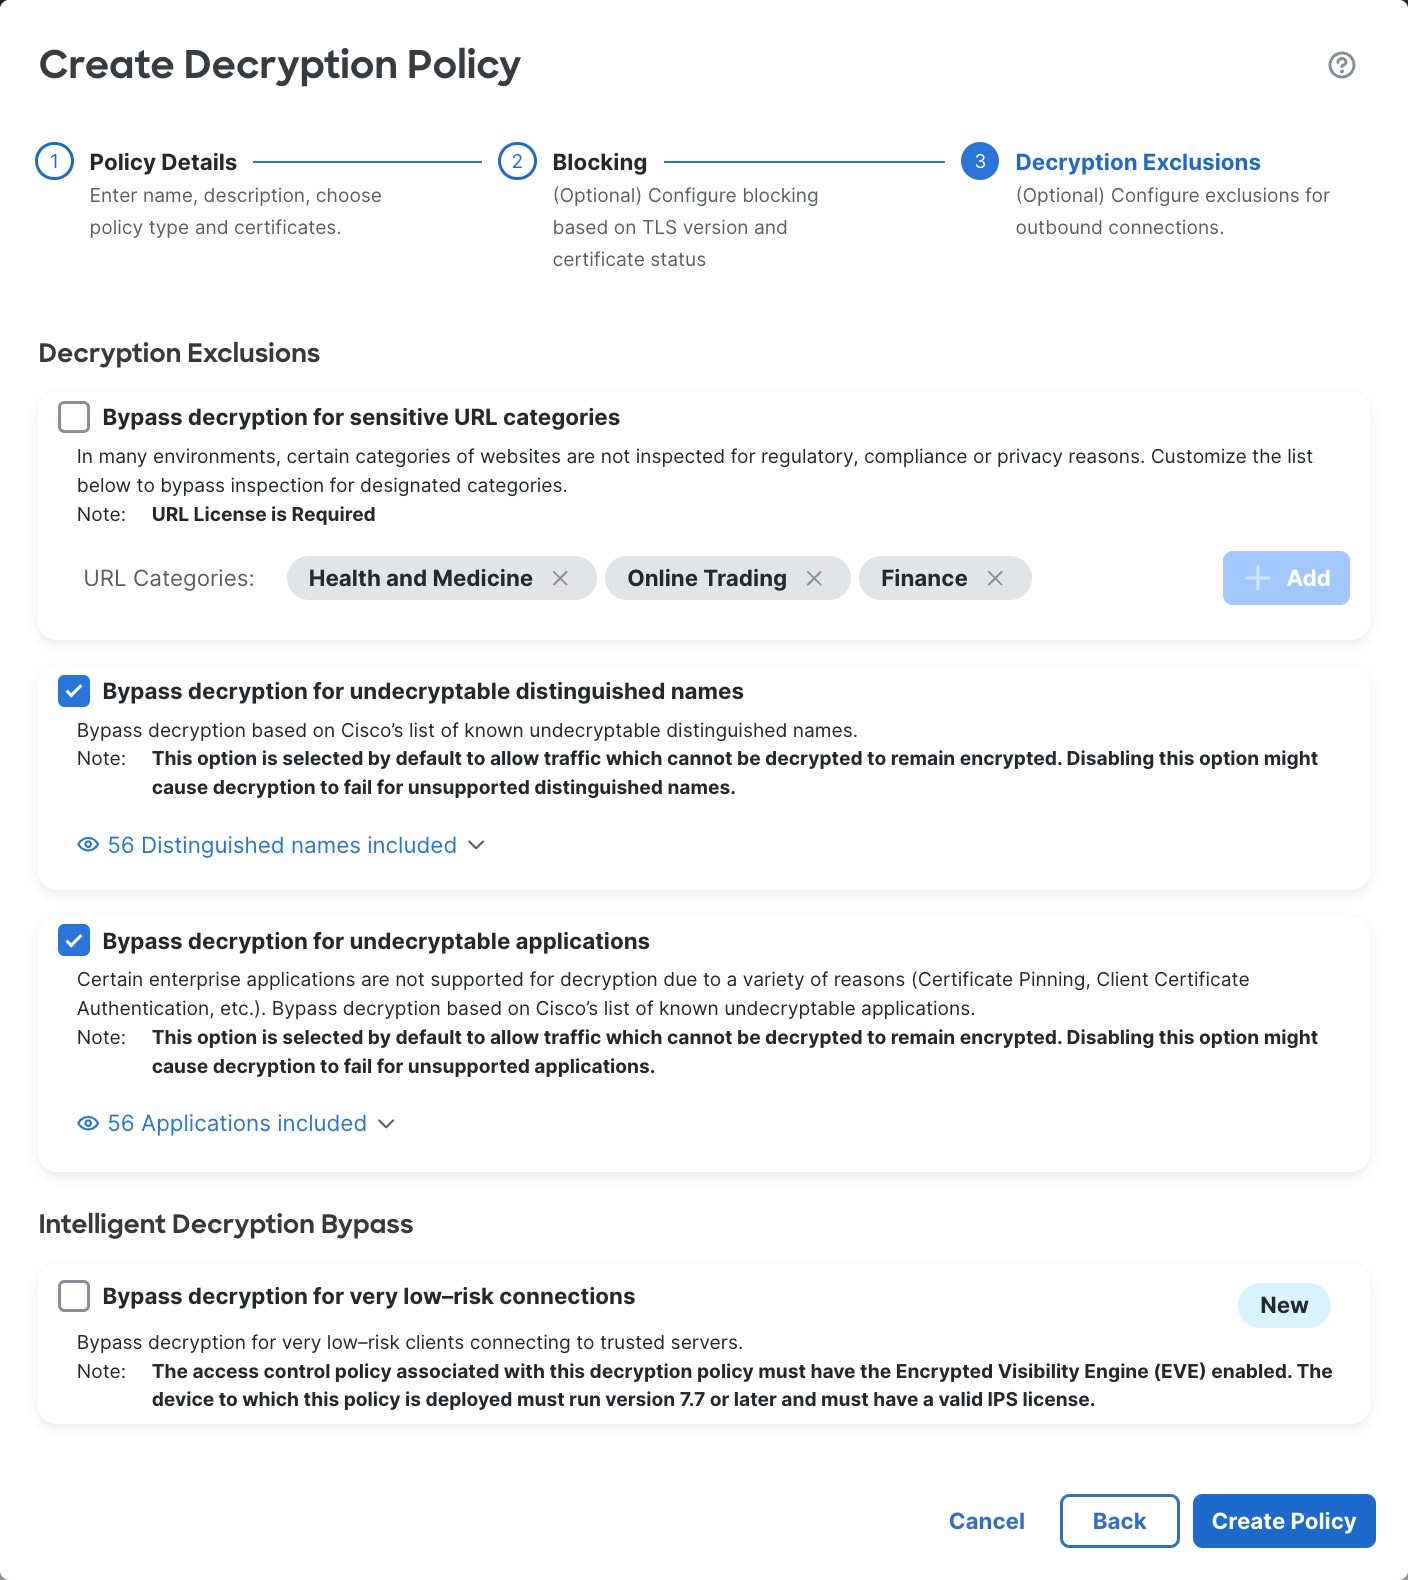
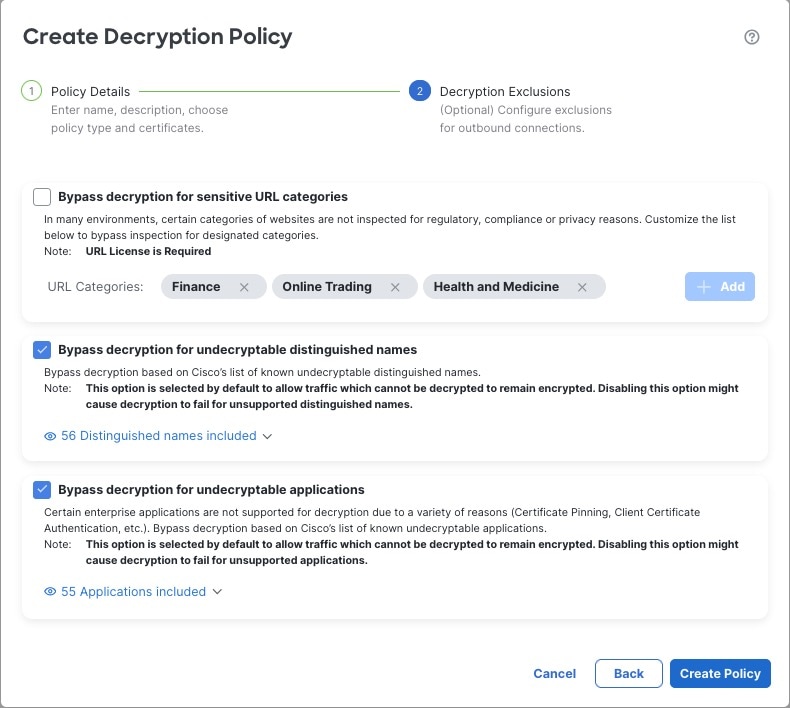
The exclusions page provides the following options. All options are enabled for an outbound protection policy (Decrypt - Resign rule action) and disabled for all other decryption policy actions.

Item

Description

Bypass decryption for sensitive URL categories

Check the box to not decrypt traffic from the indicated categories. Depending on the laws in your area, decryption certain traffic, such as finance or health-related, might be prohibited. Consult an authority in your area for more information.

Click Add to add more categories.

Click Delete (delete icon) to remove categories.

Bypass decryption for undecryptable distinguished names

Check the box to not decrypt traffic when re-signing the certificate is likely to cause the connection to fail. Typically, this behavior is associated with certificate pinning, which is discussed in TLS/SSL certificate pinning guidelines.

The list of undecryptable distinguished names is maintained by Cisco.

Bypass decryption for undecryptable applications

Check the box to not decrypt traffic when re-signing the certificate is likely to cause the connection to fail.

Typically, this behavior is associated with certificate pinning, which is discussed in TLS/SSL certificate pinning guidelines.

Undecryptable applications are updated automatically in the Vulnerability Database (VDB). You can find a list of all applications on the Secure Firewall Application Detectors page; the undecryptable tag identifies applications Cisco determines are undecryptable.

The list of undecryptable applications is maintained by Cisco.

This figure shows default options.

For an outbound decryption policy, you can specify which (if any) types of traffic to exclude from decryption. For example, you can exclude traffic going to sensitive website categories such as finance or health.

For an outbound decryption policy, you can specify which (if any) types of traffic to exclude from decryption. For example, you can exclude traffic going to sensitive website categories such as finance or health.

Step 3

Click Create Policy.

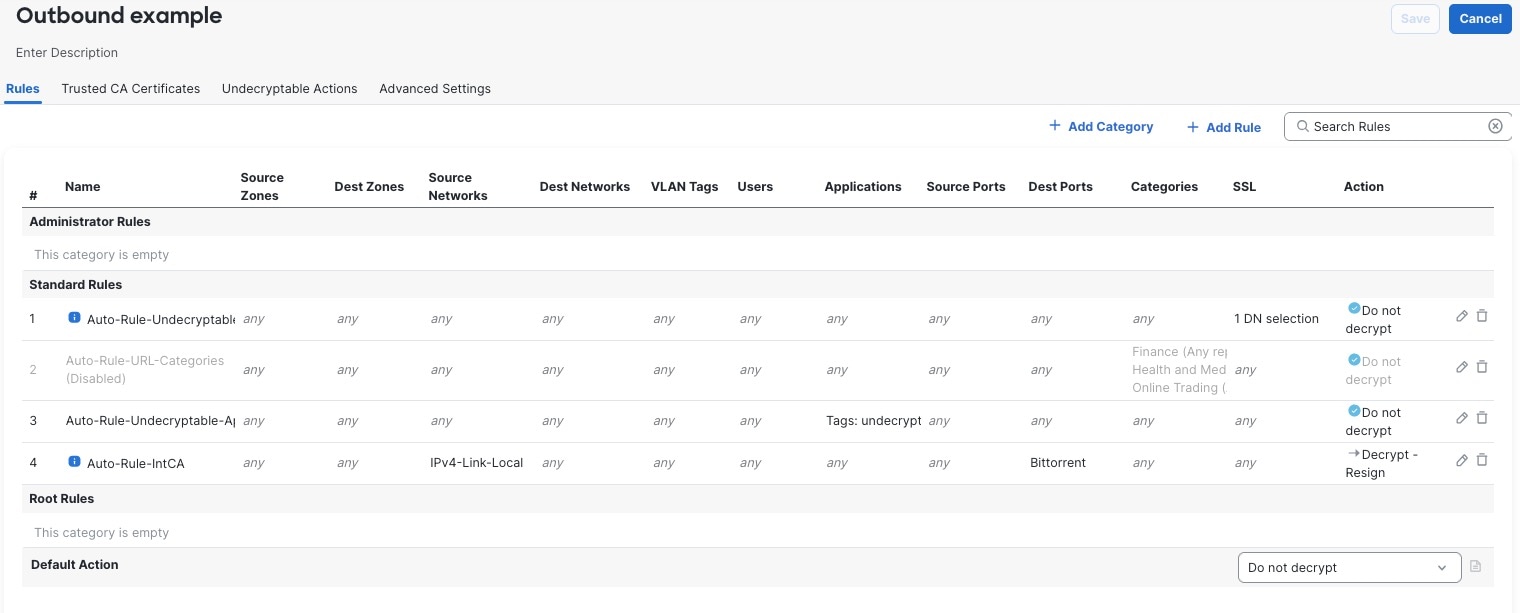
This figure shows a sample outbound protection policy.

This sample decryption policy has one Decrypt - Resign rule applied to traffic that matches the networks and ports chosen. It decrypts traffic and subsequently re-encrypts it by signing with the internal certificate object you specified. We add Do Not Decrypt rules for traffic you specified to be excluded from decryption.

In the preceding example, the Do Not Decrypt rules corresponding to your choices for rule exclusions are automatically added before the Decrypt - Resign rule. The rule for sensitive URL categories is disabled because, by default, that exclusion is disabled. Had you selected the Bypass decryption for sensitive URL categories check box, the rule would have been enabled.


What to do next

Generate an internal CA for outbound protection

This task allows you to generate an internal certificate authority object to protect outbound connections when creating a decryption rule.

This task discusses how you can optionally generate an internal certificate authority when you create a decryption rule that protects outbound connections. You can also perform these tasks using Objects > Object Management as discussed in Upload a signed certificate issued in response to a CSR.

Before you begin

Make sure you understand the requirements for generating an internal certificate authority object as discussed in Internal certificate authority objects.

Procedure


Step 1

From the Internal CA list, click Create New > Generate CA.

Step 2

Give the internal CA a Name and provide a two-letter Country Name.

Step 3

Click Self-Signed or CSR.

For more information about these options, see Internal certificate authority objects.

Step 4

Enter the requested information in the provided fields.

Step 5

Click Save.

Step 6

If you chose CSR, after the signing request has been completed, click Install Certificate as follows:

  1. Repeat the preceding steps in this procedure.

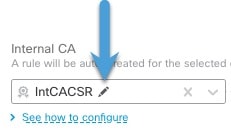
  2. Edit the CA from the Internal CA list as follows.

    To install an internal CA from a certificate signing request, click Edit next to the name of the internal CA

  3. Click Install Certificate.

  4. Follow the prompts on your screen to complete the task.

Step 7

Continue creating the policy as discussed in Create a decryption policy with outbound connection protection.


Upload an internal CA for outbound protection

Upload an internal certificate authority to create a decryption rule that protects outbound connections.

This task discusses how you can optionally upload an internal certificate authority when you create a decryption rule that protects outbound connections. You can also perform these tasks using Objects > Object Management as discussed in Upload a signed certificate issued in response to a CSR.

Before you begin

Make sure you understand the requirements for generating an internal certificate authority object as discussed in Internal certificate authority objects.

Follow these steps to upload an internal CA for outbound protection:

Procedure


Step 1

From the Internal CA list, click Create New > Upload CA.

Step 2

Give the internal CA a Name.

Step 3

Paste or browse to locate the certificate and its private key in the provided fields.

Step 4

If the CA has a password, select the Encrypted check box and enter the password in the adjacent field.

Step 5

Continue creating the policy as discussed in Create a decryption policy with outbound connection protection.


Upload an internal certificate for inbound protection

This task helps you manage certificate objects and configure decryption for secure access control by uploading an internal certificate for inbound protection.

This task discusses how to upload an internal certificate when you create a decryption rule that protects inbound connections. You can also upload the internal certificate using Objects > Object Management as discussed in Import a CA certificate and private key.

Before you begin

Make sure you have an internal certificate in one of the formats discussed in Internal certificate authority objects.

Follow these steps to upload an internal certificate for inbound protection:

Procedure


Step 1

Log in to Secure Firewall Management Center if you haven't already done so.

Step 2

Click Policies > Access Control heading > Decryption.

Step 3

Click Create Decryption Policy.

Step 4

Enter a name for the policy in the Name field and an optional description in the Description field.

Step 5

Click the Inbound Connections tab.

Step 6

From the Internal Certificates list, click Add (add icon).

Step 7

If an internal certificate object exists, click its name. Otherwise, click Upload.

  1. Enter the required information.

    See Add internal certificate objects.

Continue creating the decryption policy as discussed in Create a decryption policy with inbound connection protection.


Create a decryption policy with other rule actions

Create and manage decryption policies in the Secure Firewall Management Center to control encrypted traffic actions, such as Do Not Decrypt, Block, Block With Reset, or Monitor.

To create a decryption rule with a Do Not Decrypt, Block, Block With Reset, or Monitor rule action, create a decryption policy and edit the policy to add the rule.

When you create a decryption policy , you can create multiple rules at the same time, including multiple Decrypt - Known Key rules, and multiple Decrypt - Resign rules.

Procedure


Step 1

Log in to Secure Firewall Management Center if you haven't already done so.

Step 2

Click Policies > Access Control heading > Decryption.

Step 3

Perform these actions:

  1. Give the policy a unique Name and, optionally, a Description.

    The following characters are not supported in decryption policy names:

    • Leading period

    • #,;,{,},=,$,<,>

  2. Wait for the policy to be created.

Step 4

Click Edit (edit icon) next to the decryption policy name.

Step 5

Click Add Rule.

  1. Give the rule a Name.

  2. From the Action list, click a rule action and see one of the sections for more information:

Step 6

Click Save.


What to do next

Decryption policy default actions

The default action for a decryption policy determines how the system handles decryptable encrypted traffic that does not match any non-monitor rule in the policy. When you deploy a decryption policy without a decryption rules, the default action determines how all decryptable traffic on your network is handled. Note that the system does not perform any kind of inspection on encrypted traffic that the default action blocks.

To set the policy default action:

  1. Log in to the Secure Firewall Management Center if you haven't already done so.

  2. Click Policies > Access Control heading > Decryption.

  3. Click Edit (edit icon) next to the name of the decryption policy.

  4. In the Default Action row, click one of the actions from the list.

Table 1. Decryption policy Default Actions

Default Action

Effect on Encrypted Traffic

Block

Block the TLS/SSL session without further inspection.

Block with reset

Block the TLS/SSL session without further inspection and reset the TCP connection. Choose this option if traffic uses a connectionless protocol like UDP. In that case, the connectionless protocol tries to reestablish the connection until it is reset.

This action also displays a connection reset error in the browser so the users are informed that the connection is blocked.

Do not decrypt

Inspect the encrypted traffic with access control.

Default handling options for undecryptable traffic

This reference provides information about identifying and managing undecryptable TLS/SSL traffic types in decryption policies. It covers handling handshake errors, unsupported cipher suites, compressed sessions, and session caching issues, along with user-facing actions for blocking or allowing such encrypted connections.

Table 2. Undecryptable traffic types

Type

Description

Default Action

Available Action

Compressed Session

The TLS/SSL session applies a data compression method.

Inherit default action

Do not decrypt

Block

Block with reset

Inherit default action

SSLv2 Session

The session is encrypted with SSL version 2.

Note that traffic is decryptable if the ClientHello message is SSL 2.0, and the remainder of the transmitted traffic is SSL 3.0.

Inherit default action

Do not decrypt

Block

Block with reset

Inherit default action

Unknown Cipher Suite

The system does not recognize the cipher suite.

Inherit default action

Do not decrypt

Block

Block with reset

Inherit default action

Unsupported Cipher Suite

The system does not support decryption based on the detected cipher suite.

Inherit default action

Do not decrypt

Block

Block with reset

Inherit default action

Session not cached

The TLS/SSL session has session reuse enabled, the client and server reestablished the session with the session identifier, and the system did not cache that session identifier.

Inherit default action

Do not decrypt

Block

Block with reset

Inherit default action

Handshake Errors

An error occurred during TLS/SSL handshake negotiation.

Inherit default action

Do not decrypt

Block

Block with reset

Inherit default action

Decryption Errors

An error occurred during traffic decryption.

Block

Block

Block with Reset

When you first create a decryption policy, logging connections that are handled by the default action is disabled by default. Because the logging settings for the default action also apply to undecryptable traffic handling, logging connections handled by the undecryptable traffic actions is disabled by default.

Note that if your browser uses certificate pinning to verify a server certificate, you cannot decrypt this traffic by re-signing the server certificate. For more information, see guidelines and limitations.

Set default handling for undecryptable traffic

Set undecryptable traffic actions to handle certain types of encrypted traffic the system cannot decrypt or inspect, ensuring proper network security enforcement for encrypted connections.

You can set undecryptable traffic actions at the decryption policy level to handle certain types of encrypted traffic the system cannot decrypt or inspect. When you deploy adecryption policy that contains no decryption rules, the undecryptable traffic actions determine how all undecryptable encrypted traffic on your network is handled.

Depending on the type of undecryptable traffic, you can choose to:

  • Block the connection.

  • Block the connection, then reset it. This option is preferrable for connectionless protocols like UDP, which keep trying to connect until the connection is blocked.

  • Inspect the encrypted traffic with access control.

  • Inherit the default action from the decryption policy.

Procedure


Step 1

Log in to Secure Firewall Management Center if you haven't already done so.

Step 2

Click Policies > Access Control heading > Decryption.

Step 3

Click Edit (edit icon) next to the name of the decryption policy.

Step 4

In the decryption policy editor, click Undecryptable Actions.

Step 5

For each field, choose either the decryption policy's default action or another action you want to take on the type of undecryptable traffic. See Default handling options for undecryptable traffic and Decryption policy default actions for more information.

Step 6

Click Save to save the policy.


What to do next

Decryption policy advanced options

A decryption policy 's Advanced Settings page contains global settings. These settings apply to all managed devices that are configured for Snort 3.

A decryption policy advanced settings are all ignored on any managed device that runs:

  • A version earlier than 7.1

  • Snort 2

Block flows requesting ESNI

Encrypted Server Name Indication (ESNI (link to draft proposal)) is a way for a client to tell a TLS 1.3 server what the client is requesting. Because the SNI is encrypted, the system cannot identify the server. You can choose to block these connections.

Disable HTTP/3 advertisement

This option strips HTTP/3 (RFC 9114) from the ClientHello in TCP connections. HTTP/3 is part of the QUIC transport protocol, not the TCP transport protocol. Blocking clients from advertising HTTP/3 provides protection against attacks and evasion attempts potentially burried within QUIC connections.

Propagate untrusted server certificates to clients

This setting applies only to traffic matching a Decrypt - Resign rule action.

Enable this option when the server certificate is untrusted. The managed device substitutes its certificate authority (CA) for the server certificate. An untrusted server certificate is one that is not listed as a trusted CA in the Secure Firewall Management Center. (Objects > Object Management > PKI > Trusted CAs).

Enable TLS 1.3 decryption

Whether to apply decryption rules to TLS 1.3 connections. If you do not enable this option, the decryption rules apply to TLS 1.2 or lower traffic only. See TLS 1.3 decryption best practices.

Enable adaptive TLS server identity probe

Automatically enabled when TLS 1.3 decryption is enabled. A probe is a partial TLS connection with the server, the purpose of which is to obtain the server certificate and cache it. (If the certificate is already cached, the probe is never established.)

If TLS 1.3 Server Identity Discovery is disabled on the access control policy with which the decryption policy is associated, we attempt to use the Server Name Indication (SNI), which is not as reliable.

The adaptive TLS server identity PROBE occurs on any of these conditions as opposed to on every connection as in earlier releases:


Note


Enable adaptive TLS server discovery mode is not supported on any Secure Firewall Threat Defense Virtual deployed to AWS. If you have any such managed devices managed by the Secure Firewall Management Center, the connection event PROBE_FLOW_DROP_BYPASS_PROXY increments every time the device attempts to extract the server certificate.


TLS 1.3 decryption best practices

Both the decryption policy and the access control policy have advanced options that affect how traffic is handled, whether the traffic is being decrypted or not.

The advanced options are:

  • Decryption policy:

    • TLS 1.3 decryption

    • TLS adaptive server identity probe

  • Access control policy: TLS 1.3 Server Identity Discovery

    The access control policy setting takes precedence over the decryption policy setting.

Use the following table to decide which option to enable:

TLS adaptive server identity probe setting (decryption policy)

TLS 1.3 Server Identity Discovery setting (access control policy)

Result

Recommended when

Enabled

Disabled

Adaptive probe sent if decryption policy contains any rule conditions specified in Decryption policy advanced options and if the server certificate is not cached.

  • You're not using application or URL conditions in access control rules

  • You're decrypting traffic

Enabled

Enabled

Probe is always sent if the server certificate is not cached.

Use only if your access control rules have URL or application conditions

Disabled

Enabled

Probe is always sent if the server certificate is not cached.

Not recommended.

Disabled

Disabled

Probe is never sent.

Very limited usefulness; use only if not decrypting traffic and not using application or URL conditions in the access control rule


Note


A cached TLS server's certificate is available to all Snort instances on a particular Firewall Threat Defense. The cache can be cleared with a CLI command and is automatically cleared when the device is rebooted.


For more information, see the discussion of TLS server identity discovery on secure.cisco.com.