Policy Based Routing

This chapter describes how to configure Firewall Threat Defense to support policy based routing (PBR) through Firewall Management Center's Policy based Routing page. The following sections describe policy based routing, guidelines for PBR, and configuration for PBR.

About policy based routing

In traditional routing, packets are routed based on the destination IP address. Changing the routing of specific traffic in a destination-based routing system is difficult. Policy Based Routing (PBR) extends and complements the mechanisms provided by routing protocols, giving you more control over routing.

PBR allows you to set the IP precedence. It also allows you to specify a path for certain traffic, such as priority traffic over a high-cost link. With PBR, you can define routing that is based on criteria other than destination network such as source port, destination address, destination port, protocol, applications, or a combination of these objects.

You can use PBR to classify the network traffic based on applications. This routing method applies to scenarios involving numerous devices accessing applications and data in large network deployment. In large deployments, network traffic is typically backhauled to a hub as encrypted traffic in a route-based VPN. These topologies often result in issues such as packet latency, reduced bandwidth, and packet drop. Resolving these issues requires costly, complex deployments and management.

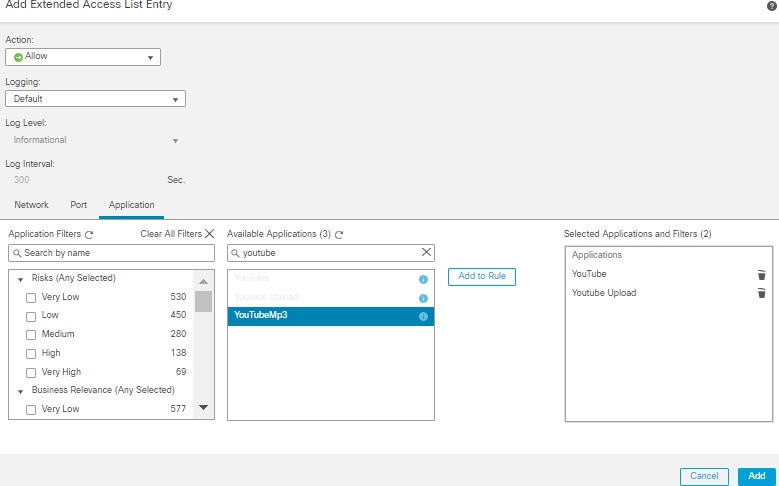
PBR policy enables you to securely breakout traffic for specified applications. You can configure PBR policy in the Secure Firewall Management Center user interface to allow the applications to be directly accessed.

Why use policy based routing

Consider a company that has two links between locations: one a high-bandwidth, low-delay expensive link, and the other a low-bandwidth, higher-delay, less-expensive link. While using traditional routing protocols, the higher-bandwidth link gets most, if not all, of the traffic sent across it based on the metric savings obtained by the bandwidth, delay, or both (using EIGRP or OSPF) characteristics of the link. With PBR, you can route higher priority traffic over the high-bandwidth/low-delay link, while sending all other traffic over the low-bandwidth/high-delay link.

These are a few scenarios where you can use Policy Based Routing:

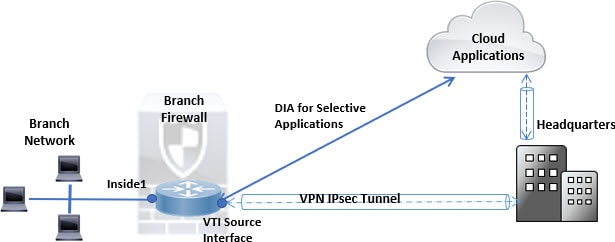
  • Direct internet access

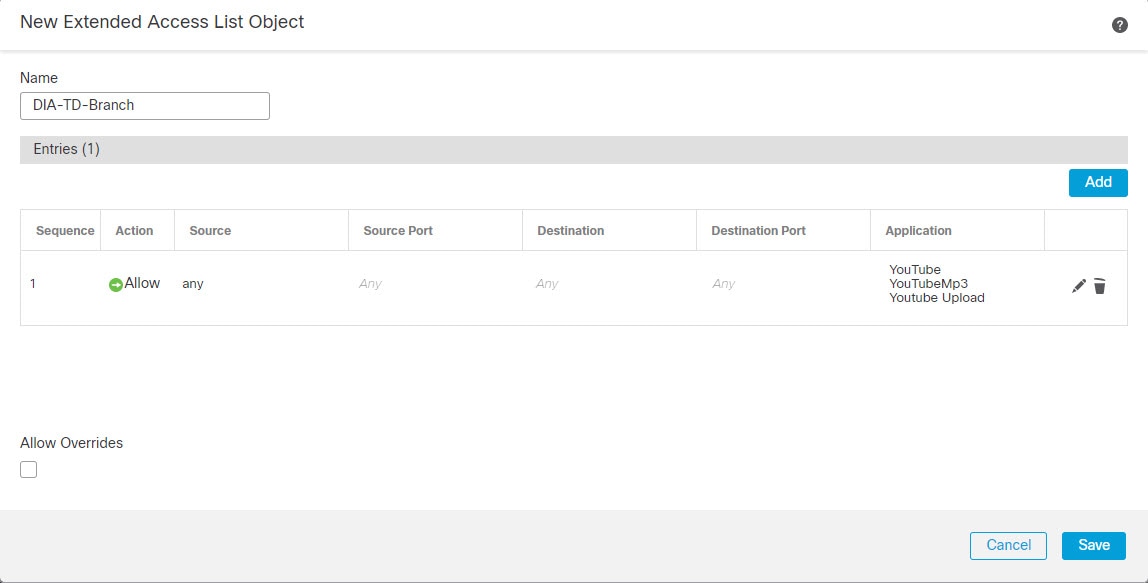
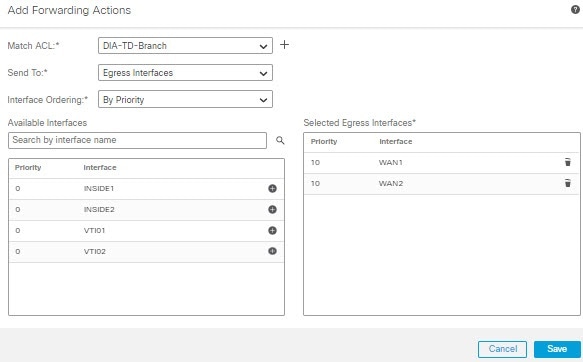
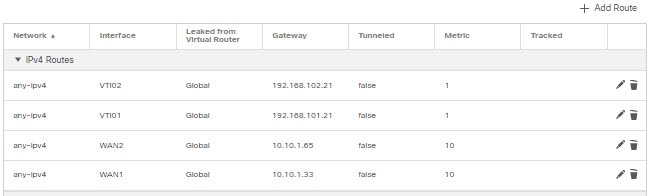
    In this topology, application traffic from the branch office can be routed directly to the internet instead of through the VPN tunnel connecting to the headquarters. The branch Firewall Threat Defense is configured with an internet exit point. The PBR policy is applied on the ingress interface (Inside 1) to identify the traffic based on the applications defined in the ACL. Correspondingly, the traffic is forwarded through the egress interfaces directly to the internet or to the IPsec VPN tunnel.

    DIA scenario
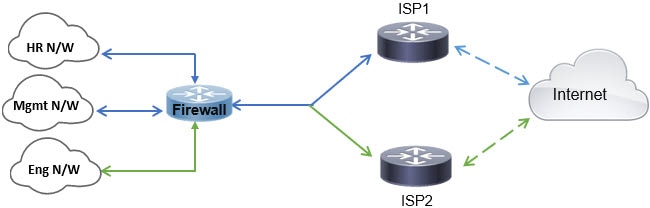
  • Equal-access and source-sensitive routing

    In this topology, traffic from the HR and Mgmt networks can be configured to go through ISP1 and traffic from Eng network can be configured to go through ISP2. Thus, policy based routing enables the network administrators to provide equal-access and source-sensitive routing, in this example.

    Equal access scenario
  • Load sharing

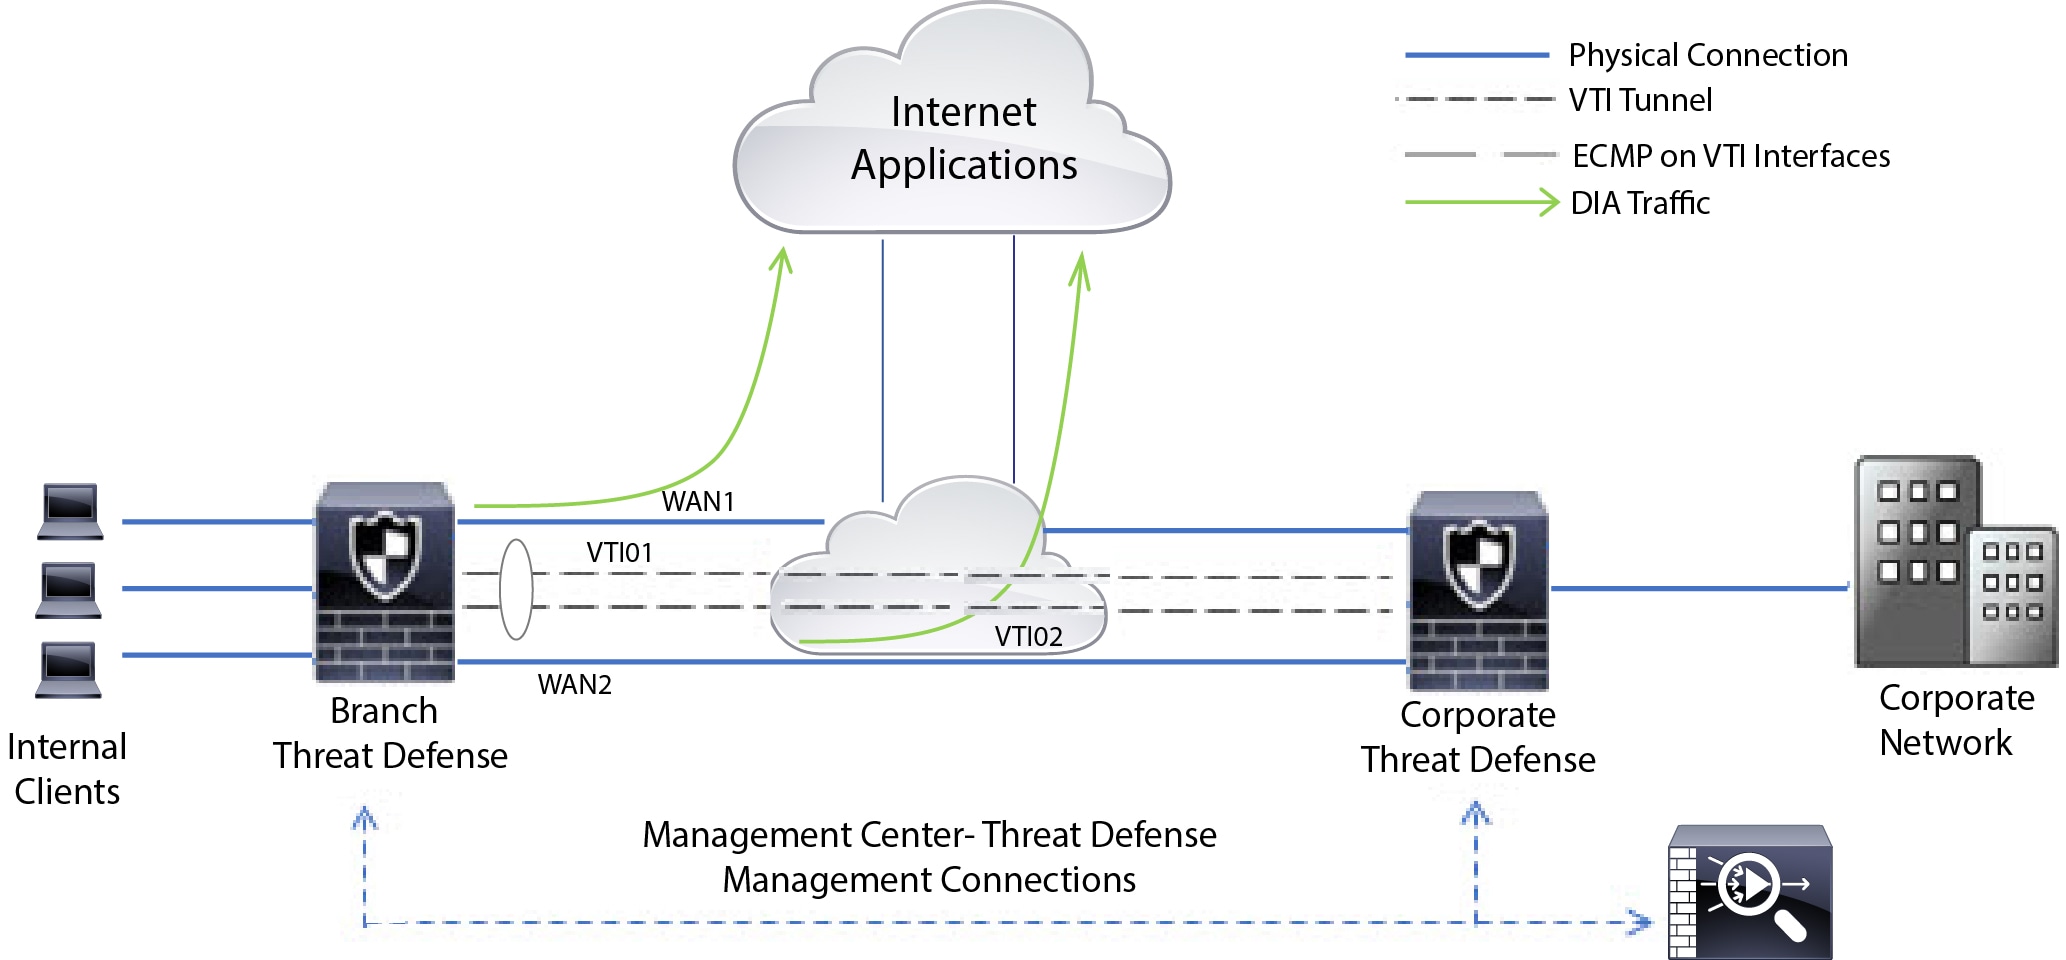
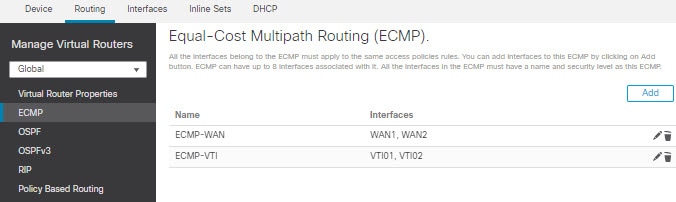
    In addition to the dynamic load-sharing capabilities offered by ECMP load balancing, network administrators can now implement policies to distribute traffic among multiple paths based on the traffic characteristics.

    As an example, in the topology depicted in the Equal-Access Source Sensitive Routing scenario, an administrator can configure policy based routing to route the traffic from HR network through ISP1 and traffic from Eng network through ISP2 and thus share the load.

Licenses for policy based routing

  • All PBR policy features are supported with the Essentials Firewall Threat Defense smart license.

  • Secure Client licensing is required if you are configuring PBR for routing traffic through RA VPN tunnel interface.

  • Cisco ISE license is required for ISE usage in PBR policy.

Guidelines for policy based routing

Device Guidelines

  • PBR through Firewall Management Center's Policy Based Routing page is supported only from version 7.1 or later on both the Firewall Management Center and the Firewall Threat Defense device.

  • When you upgrade Firewall Management Center or Firewall Threat Defense to version 7.1 or later, the PBR configuration in the device is removed. You must configure PBR again using the Policy Based Routing page. If the managed device is earlier than version 7.1, you must configure PBR again using FlexConfig with deploy option set to "every time."

  • On cluster devices, do not configure application based PBR policies, because they are not supported on cluster devices.

Interface guidelines

  • Configure only routed-mode interfaces and non management-only interfaces in the Global virtual router as ingress or egress interfaces for the PBR policy. You cannot configure user-defined virtual router interfaces for the policy.

  • The interfaces that you want to define in the policy must have a logical name.

  • Configure Static VTIs only as egress interfaces.

  • Do not choose Dynamic VTIs for configuring the PBR egress interfaces.

IP address

You can apply PBR for managing both IPv4 and IPv6 traffic.

Application-based PBR and DNS configuration

  • Application-based PBR uses DNS snooping for application detection. Application detection succeeds only if the DNS requests pass through Firewall Threat Defense in a clear-text format; the DNS traffic is not encrypted.

  • You must configure trusted DNS servers for the application detection to succeed.

For more information on configuring DNS servers, refer to DNS.

PBR policies not applied for output route look-up

Policy Based Routing is an ingress-only feature; The system applies PBR only to the first packet of a new incoming connection, at which time the egress interface for the forward leg of the connection is selected. Note that PBR will not be triggered if the incoming packet belongs to an existing connection, or if NAT is applied and NAT chooses the egress interface.

PBR policies not applied for embryonic traffic

An embryonic connection is where the necessary handshake between source and destination has not been made. When a new internal interface is added and a new VPN policy is created using a unique address pool, PBR is applied to the outside interface matches the source of the new client pool. Thus, PBR sends traffic from the client to the next hop on the new interface. However, PBR does not process return traffic from a host until the new internal interface establishes a connection with the client. Thus, the return traffic from the host to the VPN client, specifically, the VPN client response is dropped as there is no valid route. To prevent the response from being dropped, configure a weighted static route with a higher metric on the internal interface.

Additional guidelines

  • All existing configuration restrictions and route map limitations remain in effect.

  • When you define the ACL for the policy match criteria, you can select multiple predefined applications from a list to form an Access Control Entry (ACE). In Firewall Threat Defense, the predefined applications are stored as Network Service objects and the group of applications as Network Service Groups (NSG). You can create a maximum of 1024 such NSGs. The application or network service group is detected through first-packet classification. Currently, you cannot add to or modify the predefined applications list.

  • Unicast Reverse Path Forwarding (uRPF) validates the source IP address of packets received on an interface against the routing table and not against the PBR route map. When uRPF is enabled, packets received on an interface through PBR are dropped as they are without the specific route entry. Therefore, when using PBR, ensure you disable uRPF.

Determining best path route using path monitoring metrics

PBR uses either static cost or path monitoring (dynamic metrics) to route its traffic.

Path monitoring, when configured on interfaces, derive metrics such as round trip time (RTT), jitter, mean opinion score (MOS), and packet loss per interface. These metrics are used to determine the best path for routing PBR traffic.

The metrics on the interfaces are collected dynamically using ICMP probe messages to the interface's default gateway or a specified remote peer.

Default monitoring timers for metric collection

For metric collection and monitoring, the following timers are used:

  • The interface monitor average interval is 30 seconds. This interval indicates the frequency to which the probes average.

  • The interface monitor update interval is 30 seconds. This interval indicates the frequency at which the average of the collected values are calculated and made available for PBR to determine the best routing path.

  • The interface monitor probe interval by ICMP is one second. This interval indicates the frequency at which an ICMP ping is sent.


Note


You cannot configure or modify the interval for any of these timers.


PBR and path monitoring

Typically, in PBR, traffic is forwarded through egress interfaces based on the priority value (interface cost) configured on them. From management center version 7.2, PBR uses IP-based path monitoring to collect the performance metrics (RTT, jitter, packet-lost, and MOS) of the egress interfaces. PBR uses the metrics to determine the best path (egress interface) for forwarding the traffic. Path monitoring periodically notifies PBR about the monitored interface whose metric got changed. PBR retrieves the latest metric values for the monitored interfaces from the path monitoring database and updates the data path.

Path monitoring functions only with dynamic metrics, and only if the RTT, jitter, packet-lost, or MOS variables are set on the interfaces. Path monitoring does not function with static metrics—interface cost (cost set in interface).

You must enable path monitoring for the interface and configure the monitoring type. The PBR policy page allows you to specify the desired metric for path determination. See Configure policy-based routing policy.

Configure path monitoring settings

The PBR policy relies on flexible metrics, such as round-trip time (RTT), jitter, mean opinion score (MOS), and packet loss of the interfaces to identify the best routing path for its traffic. Path monitoring collects these metrics on the specified interfaces. On the Interfaces page, you can configure path monitoring settings on interfaces to send ICMP probes to collect metrics.

Procedure


Step 1

Select Devices > Device Management and click Edit (edit icon) for your Firewall Threat Defense device. The Interfaces page is selected by default.

Step 2

Click Edit (edit icon) for the interface you want to edit.

Step 3

Click the Path Monitoring tab.

Step 4

Click the Enable Path Monitoring check box.

Step 5

From the Monitoring Type drop-down list, select the relevant option:

  • Auto—Sends ICMP probes to the IPv4 default gateway of the interface. If the IPv4 gateway does not exist, path monitoring sends the probes to the IPv6 default gateway of the interface.

  • Peer IPv4—Sends ICMP probes to the specified peer IPv4 address (next-hop IP) for monitoring. If you select this option, enter the IPv4 address in the Peer IP To Monitor field.

  • Peer IPv6—Sends ICMP probes to the specified peer IPv6 address (next-hop IP) for monitoring. If you select this option, enter the IPv6 address in the Peer IP To Monitor field.

  • Auto IPv4—Sends ICMP probes to the default IPv4 gateway of the interface.

  • Auto IPv6—Send ICMP probes to the default IPv6 gateway of the interface.

Note

 
  • The Auto options are not available for VTI interfaces. You must specify the peer address.

  • Only one next-hop is monitored to a destination. That is, you cannot specify more than one peer address to monitor for an interface.

Step 6

Click Ok.

Step 7

To save the settings, click Save.


Add path monitoring dashboard

To view the path monitoring metrics, you must add the path monitoring dashboard to the Health Monitoring page of the device.

Procedure


Step 1

Choose System (system gear icon) > Health > Monitor.

Step 2

Select the device, and click Add new dashboard (add icon).

Step 3

Enter a name for the custom dashboard.

Step 4

In the Metrics area, click the Add from predefined correlations button.

Step 5

From the list, click Interface - Path metrics.

By default, all four metrics and an additional metric field are selected to display as widgets in the dashboard. To exclude any, click Delete (delete icon).

Step 6

Click Add dashboard.


Configure policy-based routing policy

You can configure the PBR policy on the Policy Based Routing page by specifying the ingress interfaces, match criteria (Extended Access Control List), and egress interfaces.

Before you begin

To use the path monitoring metrics for configuring the traffic forwarding priority over egress interfaces, you must configure the path monitoring settings for the interfaces. See Configure path monitoring settings.

Procedure


Step 1

Choose Devices > Device Management, and edit the Firewall Threat Defense device.

Step 2

Click Routing.

Step 3

Click Policy Based Routing.

On the Policy Based Routing page, you can view the configured policy. The grid shows ingress interfaces and the combination of the policy-based route access list and egress interfaces.

Step 4

To configure the policy, click Add.

Step 5

In the Add Policy Based Route dialog box, select the Ingress Interface from the drop-down list.

Note


You can only select interfaces with logical names that belong to a global virtual router from the drop-down list. You cannot configure a VLAN interface with a logical name as the source (ingress) interface.

Step 6

To specify the match criteria and the forward action in the policy, click Add.

Step 7

In the Add Forwarding Actions dialog box, do the following:

  1. From the Match ACL drop-down, choose the extended access control list object. You can predefine the ACL object (see Configure Extended ACL Objects) or click the Add (add icon) icon to create the object. In the New Extended Access List Object box, enter a name, click Add to open the Add Extended Access List Entry dialog box, where you can define the network, port, or application match criteria for the PBR policy.

    Note


    You cannot have both application and destination address defined in an ACE.

    To selectively apply PBR on the incoming interface, you can define Block criteria in the ACE. When the traffic matches the block rule of the ACE, the traffic is forwarded to the egress interface based on the routing table.

  2. From the Send To drop-down list:

    • To select the configured interfaces, choose Egress Interfaces.

    • To specify the IPv4/IPv6 next hop addresses, choose IP Address. Proceed to Step 7.e

  3. If you have selected Egress Interfaces, from the Interface Ordering drop-down, choose the relevant option:

    • By Interface Priority—The traffic is forwarded based on the priority of the interfaces. Traffic is routed to the interface with the least priority value first. When the interface is not available, the traffic is then forwarded to the interface with the next lowest priority value. For example, let us assume that Gig0/1, Gig0/2, and Gig0/3 are configured with priority values 0,1, and 2 respectively. The traffic is forwarded to Gig0/1. If Gig0/1 becomes unavailable, the traffic is then forwarded to Gig0/2.

      Note


      To configure the priority for the interfaces, click Configure Interface Priority on the Policy Based Routing page. In the dialog box, provide the priority number against the interfaces, and then click Save. You can also configure the priority for an interface in the Interface Settings.

      When the priority value is the same for all the interfaces, the traffic is balanced among the interfaces. By default, the interface priority for PBR is set to 0. Interfaces with the lowest priority value are preferred for traffic forwarding.

    • By Order—The traffic is forwarded based on the sequence of the interfaces specified here. For example, let us assume that Gig0/1, Gig0/2, and Gig0/3 are selected in the following order, Gig0/2, Gig0/3, Gig0/1. The traffic is forwarded first to Gig0/2, then to Gig0/3, regardless of their priority values.

    • By Minimal Jitter—The traffic is forwarded to the interface that has the lowest jitter value. You need to enable Path Monitoring on the interfaces for PBR to obtain the jitter values.

    • By Maximum Mean Opinion Score—The traffic is forwarded to the interface that has the maximum mean opinion score (MOS). You need to enable Path Monitoring on the interfaces for PBR to obtain the MOS values.

    • By Minimal Round Trip Time—The traffic is forwarded to the interface that has the minimal round trip time (RTT). You need to enable Path Monitoring on the interfaces for PBR to obtain the RTT values.

    • By Minimal Packet Loss—The traffic is forwarded to the interface that has the minimal packet loss. You need to enable Path Monitoring on the interfaces for PBR to obtain the packet loss values.

  4. In the Available Interfaces box, all the interfaces with their priority values are listed. From the list of interfaces, click the Add (add icon) button to add to the selected egress interfaces. Proceed to Step 7.k

    Note


    The route to the selected interface must be present in the routing table.

  5. If you have selected IP Address, enter the IP addresses separated by commas in the IPv4 Addresses or IPv6 Addresses fields. The traffic is forwarded as per the sequence of the specified IP addresses.

    Note


    When multiple next-hop IP addresses are provided, the traffic is forwarded as per the sequence of the specified IP addresses until a valid routable next-hop IP address is found. The configured next-hops should be directly connected.

  6. From the Don't Fragment drop-down list, select Yes, No, or None. If the DF (Don't Fragment) flag is set to Yes, the intermediate routers never perform fragmentation of a packet.

  7. To specify the current interface as the default for forwarding, check the Default Interface check box.

  8. The IPv4 Settings and IPv6 Settings tabs enable you to specify the recursive and default settings:

    Note


    For a route-map, you can only specify either IPv4 or IPv6 next-hop settings.

    • Recursive—The route map configuration is applied only when the specified next-hop address and the default next-hop address are found on a directly connected subnet. However, you could use the recursive option, where the next-hop address need not be directly connected. Here, a recursive lookup is performed on the next-hop address, and matching traffic is forwarded to the next-hop used by that route entry according to the current routing path of the router.

    • Default—If the normal route lookup fails to match traffic, the traffic is forwarded to this specified next-hop IP address.

  9. Check the Peer Address check box to use the next-hop address as the peer address.

    Note


    You cannot configure a route map with both default next-hop address and peer address.

  10. For IPv4 settings, you can check whether the next IPv4 hops of a route map are available under Verify Availability—click the Add (add icon) button and add the next-hop IP address entries:

    • IP Address—Enter the next hop IP address.

    • Sequence—Entries are assessed in order using the sequence number. Ensure that no duplicate sequence numbers are entered. The valid range is 1 to 65535.

    • Track—Enter a valid ID. The valid range is 1 to 255.

  11. Click Save.

Step 8

To save the policy, click Save and Deploy.


The Firewall Threat Defense uses ACLs to match traffic and perform routing actions on the traffic. Typically, you configure a route map that specifies an ACL against which traffic is matched, and then you specify one or more actions for that traffic. With the use of path monitoring, PBR can now select the best egress interface for routing the traffic. Finally, you associate the route map with an interface on which you want to apply PBR on all incoming traffic.

Configuration example for policy based routing

Consider a typical corporate network scenario where all the branch network traffic passes through a route-based VPN of the corporate network and diverges to the extranet, when required. Accessing web-based applications through the corporate network to support daily operations may increase network size and maintenance costs. This example illustrates how to configure PBR for direct internet access.

The following figure depicts the topology of a corporate network. The branch network is connected to the corporate network through a route-based VPN. Traditionally, the corporate Firewall Threat Defense is configured to handle both the internal and external traffic of the branch office. With the PBR policy, the branch Firewall Threat Defense is configured with a policy that routes specific traffic to the WAN network instead of the virtual tunnels. The rest of the traffic flows through the route-based VPN, as usual.

This example also illustrates how to configure the WAN and VTI interfaces with ECMP zones to achieve load balancing.

Figure 1. Configuring Policy Based Routing on Branch Firewall Threat Defense in Firewall Management Center
Policy based routing configuration - an example

Before you begin

This example assumes that you have already configured WAN and VTI interfaces for the branch Firewall Threat Defense in Firewall Management Center.

Procedure


Step 1

Configure policy based routing for the branch Firewall Threat Defense, select the ingress interfaces:

  1. Choose Devices > Device Management, and edit the Firewall Threat Defense device.

  2. Choose Routing > Policy Based Routing, and on the Policy Based Routing page, click Add.

  3. In the Add Policy Based Route dialog box, select the interfaces (say, Inside 1, and Inside 2) from the Ingress Interface drop-down list.

Step 2

Specify the match criteria:

  1. Click Add.

  2. To define the match criteria, click the Add (add icon) button.

  3. In New Extended Access List Object, enter the name for the ACL (say, DIA-FTD-Branch), and click Add.

  4. In the Add Extended Access List Entry dialog box, choose the required web-based applications from the Application tab:

    Figure 2. Applications Tab
    Applications tab

    On the Firewall Threat Defense, the application group in an ACL is configured as a network service group and each of the applications as a network service object.

    Figure 3. Extended ACL
    Extended acl for policy based routing
  5. Click Save.

  6. Select DIA-FTD-Branch from the Match ACL drop-down list.

Step 3

Specify the egress interfaces:

  1. From the Send To and Interface Ordering drop-down lists, choose Egress Interfaces, and Interface Priority respectively.

  2. Under Available Interfaces, click the button against the respective interface names to add WAN1 and WAN2:

    Figure 4. Configuring Policy Based Routing
    pbr
  3. Click Save.

Step 4

Configure interface priority:

You can set the priority value for the interfaces either in the Edit Physical Interface page, or in the Policy Based Routing page (Configure Interface Priority). In this example, the Edit Physical Interface method is described.

  1. Choose Devices > Device Management, and edit the branch Firewall Threat Defense.

  2. Set the priority for the interfaces. Click Edit against the interface and enter the priority value:

    Figure 5. Setting Interface Priority
    Setting interface priority
  3. Click Ok and Save.

Step 5

Create ECMP zones for load balancing:

  1. In the Routing page, click ECMP.

  2. To associate interfaces to the ECMP zone, click Add.

  3. Select WAN1 and WAN 2 and create an ECMP zone—ECMP-WAN. Similarly, add VTI01 and VTI02 and create an ECMP zone—ECMP-VTI:

    Figure 6. Associating Interfaces with ECMP Zone
    ECMP zone and interfaces

Step 6

Configure static routes for the zone interfaces for load balancing:

  1. In the Routing page, click Static Route.

  2. Click Add and specify the static routes for WAN1, WAN2, VTI01, and VTI02. Ensure that you specify the same metric value for the interfaces belonging to the same ECMP zones (Step 5):

    Figure 7. Configuring Static Routes for ECMP Zone Interfaces
    Configuring static routes - ECMP zones

    Note


    Ensure that the zone interfaces have the same destination address and metric, but different gateway addresses.

Step 7

Configure trusted DNS on the WAN objects of the branch Firewall Threat Defense to ensure secure flow of traffic to the internet:

  1. Choose Devices > Platform Settings, and create a DNS policy on the branch Firewall Threat Defense.

  2. To specify the trusted DNS, edit the policy and click DNS.

  3. To specify the DNS servers for the DNS resolution to be used by WAN objects, in the DNS Settings tab, provide the DNS server group details and select WAN from the interface objects.

  4. Use the Trusted DNS Servers tab to provide specific DNS servers that you trust for the DNS resolution.

Step 8

Click Save, and then click Deploy.


Any YouTube related access requests from the branch inside network INSIDE1 or INSIDE2 are routed to WAN1 or WAN2 as they would match the DIA-FTD-Branch ACL. Any other request, say google.com, are routed through VTI01 or VTI02 as configured in the Site to Site VPN Settings.

Figure 8. Site to Site VPN Settings
Example s2s vpn

With the ECMP configured, the network traffic is seamlessly balanced.

Configuration example for PBR with path monitoring

This example describes how to configure PBR with path monitoring for the following applications with flexible metrics:

  • Audio or video sensitive applications (example, WebEx Meetings) with Jitter.

  • Cloud-based application (example, Office365) with RTT.

  • Network-based access control (with a specific source and destination) with packet loss.

Before you begin

  1. This example assumes that you are aware of the basic configuration steps for PBR.

  2. You have configured ingress and egress interfaces with logical names. In this example, the ingress interface is named Inside1, and egress interfaces are named ISP01, ISP02, and ISP03.

Procedure


Step 1

Path monitoring configuration on interfaces ISP01, ISP02, and ISP03:

For the metrics collection on the egress interfaces, you must enable and configure path monitoring on them.

  1. Choose Devices > Device Management, and edit Firewall Threat Defense.

  2. Under the Interfaces tab, edit the interface (in our example, ISP01)

  3. Click the Path Monitoring tab, select the Enable Path Monitoring check box, and then specify the monitoring type (see Configure path monitoring settings).

  4. Click Ok and Save.

  5. Repeat these steps to configure the path monitoring settings for ISP02 and ISP03.

Step 2

Configure policy-based routing for a branch in an organization Firewall Threat Defense, select the ingress interfaces:

  1. Choose Devices > Device Management, and edit the Firewall Threat Defense device.

  2. Choose Routing > Policy Based Routing, and on the Policy Based Routing page, click Add.

  3. In the Add Policy Based Route dialog box, select Inside 1 from the Ingress Interface drop-down list.

Step 3

Specify the match criteria:

  1. Click Add.

  2. To define the match criteria, click the Add (add icon) button.

  3. In New Extended Access List Object, enter the name for the ACL (example, PBR-WebEx), and click Add.

  4. In the Add Extended Access List Entry dialog box, choose the necessary web-based applications, such as WebEx Meetings) from the Application tab.

    Remember


    On Firewall Threat Defense, the application group in an ACL is configured as a network service group and each of the applications as a network service object.

  5. Click Save.

  6. Select PBR-WebEx from the Match ACL drop-down list.

Step 4

Specify the egress interfaces:

  1. From the Send To drop-down list, choose Egress Interfaces.

  2. From the Interface Ordering drop-down list, choose By Minimal Jitter.

  3. Under Available Interfaces, click the Right Arrow (right arrow icon)button against the respective interface names to add ISP01, ISP02, and ISP03.

  4. Click Save.

Step 5

Repeat Step 2 and Step 3 to create PBRs for the Inside1 interface to route Office365 and network-based access control traffic:

  1. Create a match criteria object, example PBR-Office365, and select the Office365 application from the Application tab.

  2. From the Interface Ordering drop-down list, choose By Minimal Round Trip Time.

  3. Specify the egress interfaces ISP01, ISP02, and ISP03, and click Save.

  4. Now, create a match criteria object, example PBR-networks, and specify the source and destination interface in the Network tab.

  5. From the Interface Ordering drop-down list, choose By Minimal Packet Loss.

  6. Specify the egress interfaces ISP01, ISP02, and ISP03, and click Save.

Step 6

Click Save, and then click Deploy.

Step 7

To view path monitoring metrics, choose Devices > Device Management, and from More (more icon) click Health Monitor. To view the metric details for the interfaces of the device, you must add the path metrics dashboard. For details, see Add path monitoring dashboard.


The WebEx, Office365, and networks-based ACL traffic are forwarded through the best route derived from the metrics value collected on ISP01, ISP02, and ISP03.

Useful CLIs for monitoring PBR

Run the monitoring commands described in this topic from the Firewall Threat Defense device CLI.

Interface configurations

To view the interface configurations of the device, run the show run interface command:

> show run interface
!
interface Ethernetl/l 
 description Outside ispl handoff 
 nameif outside1
 security-level 0 
 zone-member ECMP-WAN 
 ip address dhcp setroute 
 policy-route cost 10 
 policy-route path-monitoring 8.8.8.8 
 policy-route path-monitoring object-group network-service FMC_NSG_4295470581 policy-route path-monitoring object-group network-service FMC_NSG_4295470600
!
interface Ethernet1/2
 description Outside isp2 handoff 
 nameif outside2 
 security-level 0 
 zone-member ECMP-WAN
 ip address 192.133.243.240 255.255.255.192 
 policy-route cost 20 
 policy-route path-monitoring 8.8.8.8
 policy-route path-monitoring object-group network-service FMC_NSG_4295470581 policy-route path-monitoring object-group network-service FMC_NSG_4295470600
!

DNS configurations

Application-based routing only uses trusted DNS servers to resolve domains. To view the dns configurations of the device, run the show run dns command:

> show run dns
DNS server-group DefaultDNS 
dns trusted-source 10.100.0.5 
dns trusted-source 10.200.0.5

Route map configurations

When you configure PBR on the device, the Management Center auto-generates the route-map and applies it to the specified ingress interface. To view the route maps of the device, run the show run route-map command:

> show run route-map 
!
route-map FMC_VPN_CONNECTED_DIST_RMAP_1000 permit 10 
 match interface inside-employee
 set community 1000 
!
route-map FMC GENERATED PBR 1729024850865 permit 5
 match ip address Cloud-storage-apps-acl
  set adaptive-intertace cost outside1 outside2

!
route-map FMC_GENERATED PBR 1729024850865 permit 10 
match ip address Social-media-apps-acl  
set adaptive-interface rtt outsidel outside2

!
route-map FMC GENERATED PBR 1729024850865 permit 15
match ip address Conferencing-apps-acl
set adaptive-interface jitter outside1 outside2

!
route-map FMC_GENERATED_PBR_1729024850865 permit 20
match ip address Corp-internal-apps-acl
set adaptive-interface cost outsidel_static_vti_1 outside2_static_vti_4

Access lists and network service groups configurations

The route-map applied to the ingress interface can reference an extended access control list. To view the details of an access list for PBR, run the show run access list <access list_name> command:

> show run access-list Cloud-storage-apps-acl
access-list Cloud-storage-apps-acl extended permit ip any object-group-network-service FMC_NSG_4295470562

The network-service objects and object-groups are configured in extended access control lists and referenced in policy-based routing route maps and access control groups. To view the NSG configurations, run the show object-group network-service <network-service-groups-name> command. The network-service-groups-name is derived from the above show command for an access list.

> show object-group network-service FMC_NSG_4295470562
 object-group network-servire FMC_NSG_4295470562 (id=@xfdff0000) 
 network-service-member "Box" dynamic 
 description File storage and transfer site.
 app-id 1326
 domain box.com (bid=436735707) ip (hitcnt=0)
 domain boxcloud.com (bid=436924171) ip (hitcnt=0)
 domain box.net (bid=437080553) ip (hitcnt=0)
 domain box.org (bid=437174273) ip (hitcnt=0)
 domain boxcdn.net (bid=437272231) ip (hitcnt=0)
 domain boxrelay.com (bid=437481703) ip (hitcnt=0)
 domain boxenterprise.net (bid=437626005) ip {hitcnt=0)
 domain boxinvestorrelations.com (bid=437672765) ip (hitcnt=0)
 domain segment-box.com (bid=437886771) ip (hitcnt=0)
 domain box-corp.com (bid=437924995) ip (hitcnt=0)
 domain boxcn.net (bid=438072833) ip (hitcnt=0)
network-service-member "Dropbox" dynamic
 description Cloud based tile storage. 
 app-id 125
 domain dropbox.com (bid=24259639) ip (hitcnt=0)
 domain cfl.dropboxstatic.com (bid=24495525) ip (hitcnt=0)
 domain dl.dropboxusercontent.com (bid=24596237) ip (hitcnt=0)
 domain dropboxapi.com (bid=24694467) ip (hitcnt=0)
 domain dropboxbusiness.com (bid=24859859) ip (hitcnt=0)
 domain dropboxcaptcha.com (bid=25008145) ip {hitcnt=0)
 domain dropbox-dns.com (bid=25087753) ip (hitcnt=0)
 domain dropboxer.net (bid=25236751) ip (hitcnt=0)
 domain dropboxusercontent.com (bid=25324335) ip (hitcnt=0)
 domain getdropbox.com (bid=25437501) ip (hitcnt=0)
 domain cloudon.com (bid=25580229) ip (hitcnt=0)

Path monitoring configurations

To view the path monitoring metrics collected on the egress interface, run the show path-monitor command:

> show path-monitor 
Interface: outside2 (Ethernetl/2) 
Remote peer: 8.8.8.8
    Remote peer reachable: Yes
    RTT average: 9138 microsecondes) Jitter: 1093 microsecond(s)
    Packet loss: 0% MOS: 4.39
    Last updated: 12 second(s) ago
Interface: outside2 (Ethernetl/2) 
Remote NSG: FMC_NSG_4295470581
    Network Service: Facebook Domain name: fbsbx.com Remote peer reachable: Yes
    RTT average: 17460 microsecond(s) Jitter: 911 microseconde)
    Packet loss: 0%
    MOS: 4.39
    Last updated: 12 second(s) ago

    Network Service: Facebook 
    Domain name: facebook.net 
    Remote peer reachable: Yes 
    RTT average: 17444 microsecondes) 
    Jitter: 836 microsecondes)
    Packet loss: 0%
    MOS: 4.39
    Last updated: 12 second(s) ago

    Network Service: Instagram
    Domain name: instagram.com Remote peer reachable: Yes
    RTT average: 17576 microsecondes)
    Jitter: 429 microsecondes)
    Packet loss: 0%
    MOS: 4.39
    Last updated: 12 secondes) ago

Interface: outside2 (Ethernetl/2) 
Remote NSG: FMC_NSG_4295470600
    Network Service: WebEx 
    Domain name: webex.com Remote peer reachable: Yes RTT average: 18537 microsecond(s) Jitter: 318 microseconde)
    Packet loss: 0%
    MOS: 4.39
    Last updated: 12 second(s) ago
    Network Service: Zoom Domain name: zoom.com Remote peer reachable: Yes
    RTT average: 98196 microsecond(s) Jitter: 4120 microseconde)
    Packet loss: 0%
    MOS: 4.34
    Last updated: 12 second(s) ago

Troubleshooting PBR

To debug PBR configuration when packets get dropped, complete these steps.

  1. Check that all essential routes for recursive resolution are present by using the show route or show ipv6 route commands in the appropriate tables. Unless the route map for the interfaces participating in PBR is updated with correct routes, PBR will not work as intended.

  2. The show running-config interface command displays the remote address that path-monitoring uses to monitor metrics by sending ICMP packets or HTTP pings.

    interface GigabitEthernet0/0
    nameif outside_0
    security-level 0
    zone-member ecmp-zone
    ip address 20.0.0.3 255.255.255.0 -> This is egress interface ”show running-config” output, the monitored address and cost metric value is determined in this output. 
    policy-route cost 1
    policy-route path-monitoring
    20.0.0.4
    !
    int GigabitEthernet 0/3
    !
    interface GigabitEthernet0/3
    nameif outside_3
    security-level 0
    ip address 11.1.1.2 255.255.255.0 -> This is ingress interface ”show running-config” output, the specific route-map will be used by PBR to determine the next route.
    policy-route route-map rtt-tes
  3. Examine the show path-monitoring and show run route-map outputs for packet loss.

    ciscoasa(config)# show path-monitoring
    Interface: outside_0  -> The remote address used for ICMP monitoring
    Remote peer: 20.0.0.4
    Version: 6223
    Remote peer reachable: Yes -> If this value turns ”No”, then the ICMPv4/v6 packet is not reaching the required remote address.
    RTT average: 1920 microsecond(s)
    Jitter: 394 microsecond(s)
    Packet loss: 0%
    MOS: 4.40
    Last updated: 17 second(s) ago -> The data should be updated by path monitoring after every 30 seconds. The 'show route-map' would show the
    updated metric values. 
    Interface: outside_2
    Remote peer: 40.0.0.4
    Version: 6223
    Remote peer reachable: Yes
    RTT average: 1935 microsecond(s)
    Jitter: 433 microsecond(s)
    Packet loss: 0%
    MOS: 4.40
    Last updated: 17 second(s) ago
    ciscoasa(config)# show route-map
    route-map rtt-test, permit, sequence 10
    Match clauses:
    Set clauses:
    adaptive-interface rtt outside_0 (1920) outside_2 (1935) outside_1 (1971) -> Displays the metric type (rtt) that is used by the policy route to select the adequate interface to send the packet. The interface list where cost of each interface is given. As the metric type is “rtt” and considering the minimum rtt value, the “outside_0” interface route will be selected by PBR. 
    route-map mos-test, permit, sequence 10
    Match clauses:
    Set clauses:
    adaptive-interface mos outside_0 (378) outside_1 (390) outside_2 (440) - > As the metric type is “mos”, considering the maximum value of mos, the “outside_2” interface will be selected by PBR.

    The metric types (lost, rtt, jitter, cost) should select the interface with the minimum metric value for routing.

    The metric type “mos” should select the interface with the maximum metric value for routing.

  4. Use packet-tracer command to validate the interface selection based on the metric type defined in the PBR.

    packet-tracer input <interface> icmp <src ip address> 8 0 <dst ip
    address> detailed
    Phase: 3
    Type: PBR-LOOKUP
    Subtype: policy-route
    Result: ALLOW
    Elapsed time: 60656 ns
    Config:
    route-map rtt-test permit 10
    match ip address allow_101_1_1_2
    set adaptive-interface rtt outside_0 outside_2
    Additional Information:
    Matched route-map rtt-test, sequence 10, permit
    Found next-hop 40.0.0.4 using egress ifc outside_2 -> PBR selects the adequate interface from adaptiveinterface list given in “rtt-test” route-map.
  5. Similar to the debug policy-route command, you can also use the packet-tracer command:

    • When PBR successfully selects the route, the packet tracer output looks like this:

      pbr: policy based route lookup called for 101.1.1.1/0 to 101.1.1.2/0 proto 1 sub_proto 8 received on
      interface outside_3, NSGs, nsg_id=none
      pbr: First matching rule from ACL(-1)
      pbr: route map rtt-test, sequence 10, permit; proceed with policy routing
      pbr: policy based routing applied; egress_ifc = outside_2 : next_hop = 20.0.0.4
    • When PBR is not able to find the adequate route, it falls back to normal route lookup, and the packet tracer output looks like this:

      pbr: policy based route lookup called for 100.1.1.1/0 to 100.1.1.2/0 proto 1 sub_proto 8
      received on interface outside_3, NSGs, nsg_id=none
      pbr: First matching rule from ACL(-1)
      pbr: route map mos-test, sequence 10, permit; proceed with policy routing
      pbr: no route to 100.1.1.2 on adaptive-interface outside_2
      pbr: no route to 100.1.1.2 on adaptive-interface outside_1
      pbr: no route to 100.1.1.2 on adaptive-interface outside_0
      pbr: policy based routing could not be applied; proceeding with normal route lookup
    • When a monitored remote address goes down, and path monitoring marks Remote peer reachable as No for that address, the PBR displays the a log that excludes the interface from adaptive-interface list.

      pbr: policy based route lookup called for 100.1.1.1/0 to 101.1.1.2/0 proto 1 sub_proto 8 received on
      interface outside_3, NSGs, nsg_id=none
      pbr: First matching rule from ACL(-1)
      pbr: route map rtt-test, sequence 10, permit; proceed with policy routing
      pbr: Path Monitoring Ifc Down : adaptive-interface outside_1 Excluded from PBR routing
      pbr: policy based routing applied; egress_ifc = outside_2 : next_hop = 40.0.0.4

      Note


      The interface becomes eligible for adaptive PBR routing when the interface is reported as reachable in the path monitoring module.


History for policy based routing

Table 1. History table

Feature

Minimum Firewall Management Center

Minimum Firewall Threat Defense

Details

Dual WAN/ISP Threat Defense Management Support

7.3.0

7.3.0

On a dual WAN-enabled threat defense, a single data interface was configured to communicate with the management center. Now, support to configure a secondary data interface is provided so that the communication channel is sustained when the primary data interface fails. The management center autoconfigures PBR to route the SF-Tunnel traffic from the tapnlp (internal) interface to one of the available data interfaces based on the priority and SLA metric.

Next-hop settings for PBR route map

7.3.0

7.1.0

You can configure the next-hops for the PBR route-map while enabling packet forwarding actions.

New/modified screens: New fields in Add/Edit Forwarding Actions page for configuring egress interfaces: Device Management > Routing > Policy Based Routing > Add Forwarding Actions page.

PBR and Path Monitoring

7.2.0

7.2.0

PBR uses path monitoring to collect the performance metrics (RTT, jitter, packet-lost, and MOS) of the egress interfaces. You must enable path monitoring for the interface and configure the monitoring type. You can configure a PBR policy with the desired metric for path determination.

New/modified screens: New tab in Interfaces page for enabling path monitoring: Devices > Device Management > Edit Interfaces > Path Monitoring tab.

Configure policy based routing from the FMC web interface.

7.1.0

7.1.0

Upgrade impact. Redo FlexConfigs after upgrade.

You can now configure policy based routing (PBR) from the FMC web interface. This allows you to classify network traffic based on applications and to implement direct internet access (DIA) to send traffic to the internet from a branch deployment. You can define a PBR policy and configure it on ingress interfaces, specifying match criteria and egress interfaces. Network traffic that matches the access control policy is forwarded through the egress interface based on priority or the order as configured in the policy.

This feature requires Version 7.1+ on both the FMC and the device. When you upgrade the FMC to Version 7.1+, existing policy based routing FlexConfigs are removed. After you upgrade your devices to Version 7.1+, redo your policy based routing configurations in the FMC web interface. For devices that you do not upgrade to Version 7.1+, redo the FlexConfigs and configure them to deploy "every time."

New/modified screens: Devices > Device Management > Routing > Policy Based Routing