Event Analysis Using External Tools

Cisco cloud event settings

Cisco cloud event settings are firewall configurations that

  • enable devices to send firewall events to the Security Services Exchange (SSE),

  • allow external tools to investigate firewall incidents through cloud service integration, and

  • unify visibility and enhance threat investigations by forwarding events to various cloud services.

Prerequisites and integration requirements

To allow your devices to send firewall events to Cisco Security Cloud, you must either register the Firewall Management Center with the smart license (System (system gear icon) > Licenses > Smart Licenses) or enable SecureX integration.

Cisco Security Cloud integration associates the Firewall Management Center with your Security Cloud Control account and brings your secure firewall deployment onboard to the Cisco cloud tenancy, allowing it to connect to Cisco's integrated security cloud services.

For more information about integrating the Firewall Management Center with Cisco Security Cloud, refer to Enable SecureX Integration.

Security Services Exchange event consolidation parameters:

  • For identifying duplication of intrusion events, the system considers: Initiator IP, Initiator IP, SID, and GID.

  • For identifying duplication of connection events and security-related connection events, the system considers: Initiator IP, Initiator IP, and Security Intelligence Category.

  • For identifying duplication of file and malware events, all elements except Event Second are considered.


Note


The Security Services Exchange does not display the complete list of events from the Firewall Management Center. Instead, it correlates and consolidates events, presenting only unique events. This approach reduces redundancy of events and enhances clarity.


Enable sending events to the Cisco Security Cloud

The cloud region and event types that you configure in the SecureX Integration page can be used for multiple integrations when applicable and enabled.

Before you begin

  • Ensure that you register the management center with Smart License (System (system gear icon) > Licenses > Smart Licenses) or enable Cisco Security Cloud integration to allow your devices to send firewall events to Cisco cloud.

  • In the Firewall Management Center:

    • Go to the System (system gear icon) > Configuration page and give your Firewall Management Center a unique name to clearly identify it in the Devices list in the cloud.

    • Add your Firewall Threat Defense devices to the Firewall Management Center, assign licenses to them, and ensure that the system is working correctly. Ensure that you have created the necessary policies and that the generated events are displayed as expected in the Firewall Management Center UI under the Analysis menu.

  • Ensure that you have your Security Cloud Sign-On credentials and can sign in to the regional cloud in which your account was created.

    For more information on regional cloud URLs and supported device versions, see Regional Clouds.

  • If you are currently sending events to the cloud using syslog, disable it to avoid duplication.

Follow these steps to enable sending events to the Cisco Security Cloud:

Procedure


Step 1

Determine the regional cloud that you want to use for sending firewall events.

For more information about choosing a regional cloud, refer to Cisco Secure Firewall Threat Defense and Cisco XDR Integration Guide.

Note

 
If SecureX integration is enabled and the Firewall Management Center is registered to the selected regional cloud, changing the regional cloud disables SecureX integration. You can enable the SecureX integration again after changing the regional cloud.

Step 2

In your Firewall Management Center, choose Integration > SecureX.

Step 3

Choose a regional cloud from the Current Region drop-down list.

Step 4

Check the Send events to the cloud check box to enable the cloud event configuration.

Step 5

Select the event types that you want to send to the cloud.

Note

 
Events that you send to the cloud can be used for multiple integrations, as shown in this table.

Integration

Supported Event Options

Notes

Cisco Security Analytics and Logging (SaaS)

All

High-priority connection events include:

  • Security Intelligence connection events

  • Connection events related to file and malware events

  • Connection events related to intrusion events

Cisco Extended Detection and Response (Cisco XDR)

Depending on your version:

  • Security-related connection events

  • Intrusion events

  • File and malware events

Even if you send all the connection events, Cisco XDR supports only security-related connection events.

Note


Cisco XDR is a separately licensed product. It requires an additional subscription beyond the licenses required for Cisco Secure Firewall products. For more information, see Cisco XDR Licenses.

Note

 
  • When you enable Intrusion Events, the Firewall Threat Defense device sends events along with the impact flag.

  • If you enable File and Malware Events, in addition to the events sent from the Firewall Threat Defense devices, the Firewall Management Center sends retrospective events.

Step 6

Click Save.


Analyze events using Cisco XDR

Cisco Extended Detection and Response (Cisco XDR) is a cloud-based solution that

  • unifies visibility by correlating detections across multiple telemetry sources,

  • enables security teams to detect, prioritize, and respond to the most sophisticated threats, and

  • integrates with Firewall Threat Defense to connect Cisco's integrated security portfolio for a consistent experience that strengthens security across network.

Cisco XDR licensing and migration information

For more information about Cisco XDR, refer to Cisco XDR Help Center.


Important


  • Cisco XDR is a separately licensed product. It requires an additional subscription beyond the licenses required for Cisco Secure Firewall products. For more information, refer to Cisco XDR Licenses.

  • If you were already sending events to the Cisco Security Cloud using a SecureX subscription before Version 7.6, you can continue to send events to Cisco XDR. However, if you now register your Firewall Management Center to the cloud tenancy using your Security Cloud Control account to send firewall events to Cisco XDR, your Security Cloud Control account must have a Security Analytics and Logging license to forward events to Cisco XDR.


To integrate Firewall Threat Defense with Cisco XDR, refer to Cisco Secure Firewall Threat Defense and Cisco XDR Integration Guide.


Note


As of July 31, 2024, Cisco SecureX is phased out and no longer available. Cisco SecureX cannot be provisioned for users, and access to Cisco SecureX is not provided alongside Cisco Secure Firewall product purchases. Additionally, all existing Cisco SecureX environments are disabled, and all capabilities are made unavailable. If you are using Firefox, you should remove Cisco SecureX Ribbon browser extension. For more information, refer to Frequently Asked Questions.


Event investigation using web-based resources

Event investigation using web-based resources is a security analysis method that

  • enables quick access to threat intelligence from external sources outside of the Secure Firewall Management Center,

  • allows direct navigation from events to relevant information in external resources based on IP addresses, ports, protocol, domain, and SHA 256 hash, and

  • provides access to predefined links to commonly used Cisco and third-party threat intelligence services, plus custom links to other web-based services and SIEMs.

Event investigation capabilities

The contextual cross-launch feature supports various investigation scenarios:

  • Look up a suspicious source IP address in a Cisco or third-party cloud-hosted service that publishes information about known and suspected threats

  • Look for past instances of a particular threat in your organization's historical logs, if your organization stores that data in a Security Information and Event Management (SIEM) application

  • Look for information about a particular file, including file trajectory information, if your organization has deployed Cisco Secure Endpoint

When investigating an event, you can click directly from an event in the event viewer or dashboard in the Secure Firewall Management Center to the relevant information in the external resource. This lets you quickly gather context around a specific event based on its IP addresses, ports, protocol, domain, and/or SHA 256 hash.


Note


Some resources may require an account or a product purchase.


Talos IP address investigation

Suppose you are looking at the Top Attackers dashboard widget and you want to find out more information about one of the source IP addresses listed. You want to see what information Talos publishes about this IP address, so you choose the "Talos IP" resource. The Talos website opens to a page with information about this specific IP address.

Manage contextual cross-launch resources

Manage external web-based resources using the Analysis > Advanced > Contextual Cross-Launch page.

Exception: Manage cross-launch links to a Secure Network Analytics appliance following the procedure in Configure cross-launch links for Secure Network Analytics.

Pre-defined resources offered by Cisco are marked with the Cisco logo. The remaining links are third-party resources.

You can disable or delete any resources that you do not need, or you can rename them, for example by prefixing a name with a lower-case "z" so the resource sorts to the bottom of the list. Disabling a cross-launch resource disables it for all users. You cannot reinstate deleted resources, but you can re-create them.

To add a resource, refer to Add contextual cross-launch resources.

Requirements for custom contextual cross-launch resources

A custom contextual cross-launch resource is an integration feature that

  • enables web browser access to predefined or custom resources, and

  • restricts configuration and usage based on user role permissions.

Custom contextual cross-launch resource specifications

Custom contextual cross-launch resources must meet these requirements:

  • Resources must be accessible via web browser.

  • Only http and https protocols are supported.

  • Only GET requests are supported; POST requests are not.

  • Encoding of variables in URLs is not supported. While IPv6 addresses may require colon separators to be encoded, most services do not require this encoding.

  • Up to 100 resources can be configured, including pre-defined resources.

  • You must be an Admin or Security Analyst user to create a cross launch, but you can also be a read-only Security Analyst to use them.

Add contextual cross-launch resources

In multidomain deployments, you can see and use resources in parent domains, but you can only create and edit resources in the current domain. The total number of resources across all domains is limited to 100.

Before you begin

  • If you are adding links to a Secure Network Analytics appliance, check to see if the links you want already exist; most links are automatically created for you when you configure Security Analytics and Logging (On Premises).

  • See Requirements for custom contextual cross-launch resources.

  • If needed for the resource you will link to, create or obtain an account and the credentials needed for access. Optionally, assign and distribute credentials for each user who needs access.

  • Determine the syntax of the query link for the resource that you will link to:

    Access the resource via browser and, using the documentation for that resource as needed, formulate the query link needed to search for a specific sample of the type of information you want your query link to find, such as an IP address.

    Run the query, then copy the resulting URL from the browser's location bar.

    For example, you might have the query URL https://www.talosintelligence.com/reputation_center/lookup?search=10.10.10.10.

Procedure


Step 1

Choose Analysis > Advanced > Contextual Cross-Launch.

Step 2

Click New Cross-launch.

In the form that appears, all fields marked with an asterisk require a value.

Step 3

Enter a unique resource name.

Step 4

Paste the working URL string from your resource into the URL Template field.

Step 5

Replace the specific data (such as an IP address) in the query string with an appropriate variable: Position your cursor, then click a variable (for example, IP) once to insert the variable.

In the example from the "Before You Begin" section above, the resulting URL might be https://www.talosintelligence.com/reputation_center/lookup?search={IP}. When the contextual cross-launch link is used, the {IP} variable in the URL will be replaced by the IP address that the user right-clicks on in the event viewer or dashboard.

For a description of each variable, hover over the variable.

You can create multiple contextual cross-launch links for a single tool or service, using different variables for each.

Step 6

Click Test with example data (test with example data icon) to test your link with example data.

Step 7

Fix any problems.

Step 8

Click Save.


Investigate events using contextual Cross-Launch

Contextual cross-launch allows you to right-click on event data and immediately access external analysis tools and threat intelligence resources. The available options depend on the data type you select, ensuring you only see relevant investigation resources.

Before you begin

If the resource you will access requires credentials, make sure you have those credentials.

Follow these steps to investigate events using contextual cross-launch:

Procedure


Step 1

Navigate to one of the following pages in the Secure Firewall Management Center that shows events:

  • A dashboard (Overview > Dashboards heading > Dashboard), or

  • An event viewer page (any menu option under the Analysis menu that includes a table of events.)

Step 2

Right-click the event of interest and choose the contextual cross-launch resource to use.

If necessary, scroll down in the context menu to see all available options.

The data type you right-click on determines the options you see; for example, if you right-click an IP address, you will only see contextual cross-launch options that are relevant to IP addresses.

For example, to get threat intelligence from Cisco Talos about a source IP address in the intrusion event, choose Talos SrcIP or Talos IP.

If a resource includes multiple variables, the option to choose that resource is available only for events that have a single possible value for each included variable.

The contextual cross-launch resource opens in a separate browser window.

It may take some time for the query to be processed, depending on the amount of data to be queried, speed of and demand on the resource, and so on.

Step 3

Sign in to the resource if necessary.


Configure cross-launch links for Secure Network Analytics

You can cross-launch from event data in Firewall Threat Defense to related data in your Secure Network Analytics appliance. For more information about the Secure Network Analytics product, visit the Cisco Security Analytics and Logging product page.

For general information about contextual cross-launching, see Investigate events using contextual Cross-Launch.

Before you begin

  • Ensure that a Secure Network Analytics appliance is available for use

  • If your device sends events directly to Secure Network Analytics, disable syslog for those devices or assign them an access control policy without syslog configurations. This avoids duplicate events on the remote volume.

  • Ensure you have these items:

    • Hostname or IP address of your manager.

    • Credentials for an account on your Secure Network Analytics appliance that has administrator privileges.

If you want to send Firewall Threat Defense data to your Secure Network Analytics appliance using Security Analytics and Logging (On Premises), see Remote data storage on a Secure Network Analytics appliance.

Follow these steps to configure a set of cross-launch links to your Secure Network Analytics appliance:

Procedure


Step 1

Choose Integration > Security Analytics & Logging.

Step 2

You have two options for Secure Network Analytics deployment:

  • Manager Only—Deploy a standalone Manager to receive and store events, and from which you can review and query events.

  • Data Store—Deploy a Cisco Secure Network Analytics Flow Collector to receive events, a Secure Network Analytics Data Store to store events, and a Manager from which you can review and query events.

Choose the deployment option and click Start.

Step 3

Complete the wizard. For more information, see the Firewall Management Center Configuration section of Cisco Security Analytics and Logging Firewall Event Integration Guide.

Step 4

Choose Analysis > Advanced > Contextual Cross-Launch to verify your new cross-launch links.

If you want to make changes, return to this procedure; you cannot make changes directly on the contextual cross-launch listing page.

Note

 
  • If you want to change these links later, return to this procedure; you cannot make changes directly on the contextual cross-launch listing page.

  • You can manually create additional links to cross-launch into your Secure Network Analytics appliance using the procedure in Add contextual cross-launch resources, but those links remain independent of the auto-created resources and you must manage them manually.


What to do next

Use your Secure Network Analytics credentials to cross-launch from an event into the Secure Network Analytics event viewer.

To cross launch from an event in the Firewall Management Center event viewer or dashboard, right-click a relevant event's table cell and choose the appropriate option.

Processing queries may take some time, depending on the amount of data, data transfer speed on the Secure Network Analytics Manager, and other factors.

Sending syslog messages for security events

Sending syslog messages for security events is a data transmission capability that

  • sends data related to connection, security intelligence, intrusion, and file and malware events via syslog to a Security Information and Event Management (SIEM) tool or another external event storage and management solution,

  • supports events displayed in the Firewall Management Center web interface in the menu options under the Analysis menu, which are sometimes collectively referred to as "the event viewer", and

  • handles events that are also sometimes referred to as Snort® events.

Syslog forwarding behavior changes


Note


In version 7.2.1, syslog traffic was allowed to be forwarded using route lookup. This enabled the traffic to be forwarded regardless of the interface specified in the logging host configuration. However, in versions 7.2.5.1 and higher, the changes introduced in 7.2.1 were removed.

Thus, from 7.2.5.1 and higher versions, the configuration specified in logging host configuration precedes over the route lookup and the syslog traffic is forwarded from the specified interface.


About Configuring the System to Send Security Event Data to Syslog

To find more about the platform settings that apply to syslog messages for security events, refer to Threat Defense Platform Settings that Apply to Security Event Syslog Messages in the Cisco Secure Firewall Management Center Device Configuration Guide.

Note that if you make changes to syslog settings in any policy, you must redeploy for the changes to take effect.

Best practices for configuring security event syslog messaging

Best practices for configuring security event syslog messaging are recommended configuration approaches that

  • ensure consistent syslog configuration across device types,

  • optimize security event logging for external analysis tools, and

  • avoid configuration conflicts between policy levels.

Configuration approaches by device type

Configuration requirements vary by device type and version.

Table 1. Security event syslog configuration by device

Device and Version

Configuration Location

All

If you will use syslog or store events externally, avoid special characters in object names such as policy and rule names. Object names should not contain special characters, such as commas, that the receiving application may use as separators.

Secure Firewall Threat Defense

  1. Do the following to configure syslog in Firewall Threat Defense platform settings:

    1. Click Devices > Platform Settings.

    2. Edit the threat defense settings policy.

    3. In the left navigation pane, click Syslog.

    For more information, refer to Threat Defense Platform Settings That Apply to Security Event Syslog Messages in the Cisco Secure Firewall Management Center Device Configuration Guide.

  2. In your access control policy Logging tab, opt to use the Firewall Threat Defense platform settings.

  3. (For intrusion events) Configure intrusion policies to use the settings in your access control policy Logging tab. (This is the default.)

Overriding any of these settings is not recommended.

For essential details, refer to Send security event syslog messages from your Firewall Threat Defense devices.

All other devices

  1. Create an alert response.

  2. Configure access control policy Logging to use the alert response.

  3. (For intrusion events) Configure syslog settings in intrusion policies.

For complete details, refer to Configure security event syslog messages for Classic devices.

Send security event syslog messages from your Firewall Threat Defense devices

This task outlines the recommended procedure for sending syslog messages for connection, Security Intelligence, intrusion, file, and malware events from devices managed by Secure Firewall Management Center.


Note


Many Firewall Threat Defense syslog settings are not applicable to security events. Configure only the options described in this procedure.


Before you begin

  • In Secure Firewall Management Center , configure policies to generate security events and verify that the events you expect to see appear in the applicable tables under the Analysis menu.

  • Gather the syslog server IP address, port, and protocol (UDP or TCP):

  • Ensure that your devices can reach the syslog server(s).

  • Confirm that the syslog server(s) can accept remote messages.

  • For additional information about connection logging, refer to Connection Logging .

Follow these steps to configure security event syslog messaging:
Procedure

Step 1

Configure syslog settings for your Firewall Threat Defense device:

  1. Click Devices > Platform Settings.

  2. Click Edit to edit the platform settings policy associated with your Firewall Threat Defense device.

  3. Click Syslog from the navigation pane.

  4. Click Syslog Servers and click Add (add icon) to enter server, protocol, interface, and related information.

    If you have questions about options on this page, refer to Cisco Secure Firewall Management Center Device Configuration Guide .

  5. Click Syslog Settings and configure the following settings:

    • Enable timestamp on syslog messages

    • Timestamp Format

    • Enable syslog device ID

  6. Click Logging Setup.

  7. On the Basic Logging Settings, select whether or not to Send syslogs in EMBLEM format.

  8. Click Save to save your settings.

Step 2

Configure general logging settings for the access control policy (including file and malware logging):

  1. Click Policies > Access Control heading > Access Control.

  2. Edit the applicable access control policy.

  3. From the More drop-down, click Logging.

  4. Firewall Threat Defense 6.3 and later: Select Use the syslog settings configured in the Threat Defense Platform Settings policy deployed on the device .

  5. (Optional) Select a Syslog Severity.

  6. If you want to send file and malware events, select Send Syslog messages for File and Malware events.

  7. Click Save.

Step 3

Enable logging for Security Intelligence events for the access control policy:

  1. In the same access control policy, click the Security Intelligence tab.

  2. In each of the following locations, click Logging (logging icon) and enable beginning and end of connections and Syslog Server:

    • Beside DNS Policy.

    • In the Block List box, for Networks and for URLs.

  3. Click Save.

Step 4

Enable syslog logging for each rule in the access control policy:

  1. In the same access control policy, click Access Control , and then choose Add Rule.

  2. Select a rule to edit, and select the Logging tab in the rule.

  3. Choose whether to log the beginning or end of connections, or both.

    (Connection logging generates a lot of data; logging both beginning and end generates roughly double that much data. Not every connection can be logged both at beginning and end.)

  4. If you want to log file events, select Log Files .

  5. Enable Syslog Server .

  6. Verify that the rule is " Using default syslog configuration in Access Control Logging ."

  7. Click Confirm .

  8. Repeat for each rule in the policy.

Step 5

If you send intrusion events:

  1. Navigate to the intrusion policy associated with your access control policy.

  2. In your intrusion policy, from Advanced Settings drop-down menu, click Syslog Alerting , and then click Enabled .

  3. If necessary, click Edit

  4. Enter options:

    Option

    Value

    Logging Host

    Unless you will send intrusion event syslog messages to a different syslog server than you will send other syslog messages, leave this blank to use the settings you have configured above.

    Facility

    This setting is applicable only if you specify a Logging Host on this page.

    For descriptions, refer to SYSLOG alert facilities .

    Severity

    This setting is applicable only if you specify a Logging Host on this page.

    For descriptions, refer to Syslog severity levels .

  5. Click Back .

  6. Click Policy Information in the left navigation pane.

  7. Click Commit Changes .


What to do next

Configure security event syslog messages for Classic devices

Syslog messages generated by Classic devices contain critical security events that help track incidents and maintain compliance. To ensure proper logging, configure both the alert response and relevant policies.

Before you begin

  • Configure policies to generate security events.

  • Ensure that your devices can reach the syslog server(s).

  • Confirm that the syslog server(s) can accept remote messages.

  • For important information about connection logging, refer to Connection Logging.

Follow these steps to configure security event syslog messages for Classic devices:

Procedure

Step 1

Configure an alert response for your Classic devices.

For more information, refer to Create a syslog alert response.

Step 2

Configure syslog settings in the access control policy:

  1. Click Policies > Access Control heading > Access Control.

  2. Edit the applicable access control policy.

  3. Click Logging.

  4. Select Send using specific syslog alert.

  5. Select the Syslog Alert you created above.

  6. Click Save.

Step 3

If sending file and malware events:

  1. Select Send Syslog messages for File and Malware events.

  2. Click Save.

Step 4

If sending intrusion events:

  1. Navigate to the intrusion policy associated with your access control policy.

  2. In your intrusion policy, from Advanced Settings drop-down menu, click Syslog Alerting, and then click Enabled.

  3. If necessary, click Edit

  4. Enter options:

    Option

    Value

    Logging Host

    Unless you will send intrusion event syslog messages to a different syslog server than you will send other syslog messages, leave this blank to use the settings you have configured above.

    Facility

    This setting is applicable only if you specify a Logging Host on this page.

    For more information, refer to SYSLOG alert facilities.

    Severity

    This setting is applicable only if you specify a Logging Host on this page.

    For more information, refer to Syslog severity levels.

  5. Click Back.

  6. Click Policy Information in the navigation pane.

  7. Click Commit Changes.


What to do next

Configuration locations for security event syslogs

These topics describe how to configure location for security event syslogs.

Configuration Locations for Syslogs for Connection and Security Intelligence Events (All Devices)

There are many places to configure logging settings. Use the table below to ensure that you set the options you need.


Important


  • Pay careful attention when configuring syslog settings, especially when using inherited defaults from other configurations. Some options may NOT be available to all managed device models and software versions, as noted in the table below.

  • For important information when configuring connection logging, see the chapter on Connection Logging.


Configuration Location

Description and More Information

Devices > Platform Settings, Threat Defense Settings policy, Syslog

This option applies only to Firewall Threat Defense devices.

Settings you configure here can be specified in the Logging settings for an Access Control policy and then used or overridden in the remaining policies and rules in this table.

See Cisco Secure Firewall Management Center Device Configuration Guide.

Policies > Access Control heading > Access Control, <each policy>, Logging

Settings you configure here are the default settings for syslogs for all connection and security intelligence events, unless you override the defaults in descendant policies and rules at the locations specified in the remaining rows of this table.

Recommended setting for Firewall Threat Defense devices: Use Threat Defense Platform Settings. For information, see Cisco Secure Firewall Management Center Device Configuration Guide.

Required setting for all other devices: Use a syslog alert.

If you specify a syslog alert, see Create a syslog alert response.

For more information about the settings on the Logging tab, see Cisco Secure Firewall Management Center Device Configuration Guide.

Policies > Access Control heading > Access Control, <each policy>, Rules, Default Action row, Logging (logging icon)

Logging settings for the default action associated with an access control policy.

See information about logging in Cisco Secure Firewall Management Center Device Configuration Guide and Logging connections with a policy default action.

Policies > Access Control heading > Access Control, <each policy>, Rules, <each rule>, Logging

Logging settings for a particular rule in an access control policy.

See information about logging in Cisco Secure Firewall Management Center Device Configuration Guide.

Policies > Access Control heading > Access Control, <each policy>, Security Intelligence, Logging (logging icon)

Logging settings for Security Intelligence Block lists.

Click these buttons to configure:

  • DNS Block List Logging Options

  • URL Block List Logging Options

  • Network Block List Logging Options (for IP addresses on the blocked list)

See Cisco Secure Firewall Management Center Device Configuration Guide

Policies > Access Control heading > SSL, <each policy>, Default Action row, Logging (logging icon)

Logging settings for the default action associated with an SSL policy.

See Logging connections with a policy default action.

Policies > Access Control heading > SSL, <each policy>, <each rule>, Logging

Logging settings for SSL rules.

See Cisco Secure Firewall Management Center Device Configuration Guide.

Policies > Access Control heading > Prefilter, <each policy>, Default Action row, Logging (logging icon)

Logging settings for the default action associated with a prefilter policy.

See Logging connections with a policy default action.

Policies > Access Control heading > Prefilter, <each policy>, <each prefilter rule>, Logging

Logging settings for each prefilter rule in a prefilter policy.

See Cisco Secure Firewall Management Center Device Configuration Guide

Policies > Access Control heading > Prefilter, <each policy>, <each tunnel rule> , Logging

Logging settings for each tunnel rule in a prefilter policy.

See Cisco Secure Firewall Management Center Device Configuration Guide

Additional syslog settings for Firewall Threat Defense cluster configurations:

The Cisco Secure Firewall Management Center Device Configuration Guide has multiple references to syslog; search the chapter for "syslog."

Syslog configuration locations for intrusion events (Firewall Threat Defense devices)

Syslog settings for intrusion policies can be specified in various locations. You may also inherit settings from the access control policy or Threat Defense Platform Settings.

The table summarizes each configuration location and its purpose.

Configuration Location

Description and More Information

Devices > Platform Settings, Threat Defense Settings policy, Syslog

Syslog destinations that you configure here can be specified in the Logging tab of an access control policy which can be the default for an intrusion policy.

For more information, refer to Cisco Secure Firewall Management Center Device Configuration Guide.

Policies > Access Control heading > Access Control, <each policy>, Logging

Default setting for syslog destination for intrusion events, if the intrusion policy does not specify other logging hosts.

See Cisco Secure Firewall Management Center Device Configuration Guide.

Policies > Access Control heading > Intrusion, <each policy>, Advanced Settings, enable Syslog Alerting, click Edit

To specify syslog collectors other than the destinations specified in the access control policy Logging tab, and to specify facility and severity, refer to Configure syslog alerting for intrusion events.

If you want to use the Severity or Facility or both as configured in the intrusion policy, you must also configure the logging hosts in the policy. If you use the logging hosts specified in the access control policy, the severity and facility specified in the intrusion policy will not be used.

Policies > Access Control heading > Intrusion > Logging > IPS settings

If you want to send syslog messages for IPS events. Default syslog settings configured are used for syslog destinations for IPS events.

Configuration Locations for Syslogs for Intrusion Events (Devices Other than Firewall Threat Defense)

By default, the intrusion policy uses the settings in the Logging tab of the access control policy. If settings applicable to devices other than Firewall Threat Defense are not configured there, syslogs will not be sent for devices other than Firewall Threat Defense and no warning appears.

Configuration locations for syslogs for file and malware events

This reference provides information about where to configure syslogs for file and malware events in the system.

Configuration Location

Description and More Information

In an access control policy:

Policies > Access Control, <each policy>, Logging

This is the main location for configuring the system to send syslogs for file and malware events.

If you do not use the syslog settings in Firewall Threat Defense Platform Settings, you must also create an alert response. For more information, refer to Create a syslog alert response.

In Firewall Threat Defense Platform Settings:

Devices > Platform Settings, Threat Defense Settings policy, Syslog

These settings apply only to Firewall Threat Defense devices running supported versions, and only if you configure the Logging tab in the access control policy to use Firewall Threat Defense platform settings.

See Cisco Secure Firewall Management Center Device Configuration Guide.

In an access control rule:

Policies > Access Control, <each policy>, <each rule>, Logging

If you do not use the syslog settings in Firewall Threat Defense Platform Settings, you must also create an alert response. For more information, refer to Create a syslog alert response.

Components of security event syslog messages

Describes the structure and components of security event syslog messages, including examples and detailed field descriptions.

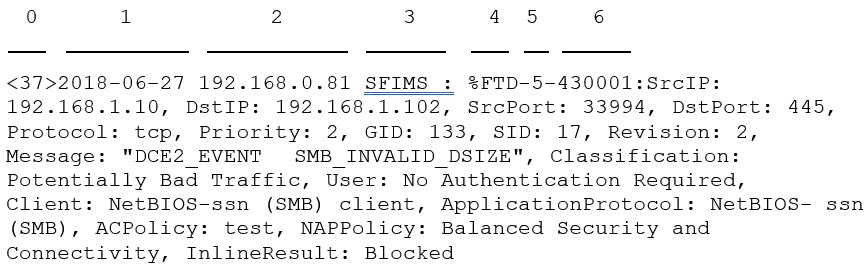
Example security event message from Firewall Threat Defense (Intrusion Event)

The image illustrates the structure of security event syslog messages, highlighting key components such as timestamps, event types, and source information for both intrusion and connection events.

Table 2. Components of security event syslog messages

Item Number in Sample Message

Header Element

Description

0

PRI The priority value that represents both Facility and Severity of the alert. The value appears in the syslog messages only when you enable logging in EMBLEM format using Firewall Management Center platform settings. If you enable logging of intrusion events through access control policy Logging tab, the PRI value is automatically displayed in the syslog messages. For information on how to enable the EMBLEM format, refer to Cisco Secure Firewall Management Center Device Configuration Guide. For information on PRI, refer to RFC5424.

1

Timestamp

Date and time the syslog message was sent from the device.

  • (Syslogs sent from Firewall Threat Defense devices) For syslogs sent using settings in the access control policy and its descendants, or if specified to use this format in the Threat Defense Platform Settings, the date format is the format defined in the ISO 8601 timestamp format as specified in RFC 5424 (yyyy-MM-ddTHH:mm:ssZ), where the letter Z indicates the UTC time zone.

  • (Syslogs sent from all other devices) For syslogs sent using settings in the access control policy and its descendants, the date format is the format defined in the ISO 8601 timestamp format as specified in RFC 5424 (yyyy-MM-ddTHH:mm:ssZ), where the letter Z indicates the UTC time zone.

  • Otherwise, it is the month, day, and time in UTC time zone, though the time zone is not indicated.

To configure the timestamp setting in Threat Defense Platform Settings, refer to Cisco Secure Firewall Management Center Device Configuration Guide .

2

Device or interface from which the message was sent.

This can be:

  • IP address of the interface

  • Device hostname

  • Custom device identifier

(For syslogs sent from Firewall Threat Defense devices)

If the syslog message was sent using the Threat Defense Platform Settings, this is the value configured in Syslog Settings for the Enable Syslog Device ID option, if specified.

Otherwise, this element is not present in the header.

To configure this setting in Threat Defense Platform Settings, refer to Cisco Secure Firewall Management Center Device Configuration Guide .

3

Custom value

If the message was sent using an alert response, this is the Tag value configured in the alert response that sent the message, if configured. (Refer to Create a syslog alert response .)

Otherwise, this element is not present in the header.

4

%FTD

Type of device that sent the message. %FTD is Secure Firewall Threat Defense

5

Severity

The severity specified in the syslog settings for the policy that triggered the message.

For severity descriptions, refer to Severity Levels in the Cisco Secure Firewall Management Center Device Configuration Guide or Syslog severity levels .

6

Event type identifier

  • 430001: Intrusion event

  • 430002: Connection event logged at beginning of connection

  • 430003: Connection event logged at end of connection

  • 430004: File event

  • 430005: File malware event

--

Facility

Refer to Facility values and locations for security event syslog messages.

--

Remainder of message

Fields and values separated by colons.

Fields with empty or unknown values are omitted from messages.

For field descriptions, refer to:

Note


Field description lists include both syslog fields and fields visible in the event viewer (menu options under the Analysis menu in the Firewall Management Center web interface.) Fields available via syslog are labeled as such.

Some fields visible in the event viewer are not available via syslog. Also, some syslog fields are not included in the event viewer (but may be available via search), and some fields are combined or separated.

Facility values and locations for security event syslog messages

Facility values are not generally relevant to syslog messages generated for security events. However, some scenarios may require facility values to be specified.

The table summarizes how facility information is included or derived for different device types and security event categories.

Device

To Include Facility in Connection Events

To Include Facility in Intrusion Events

Location in Syslog Message

Firewall Threat Defense

Use the EMBLEM option in Threat Defense Platform Settings.

Facility is always ALERT for connection events when sending syslog messages using Threat Defense Platform Settings.

Use the EMBLEM option in Threat Defense Platform Settings or configure logging using the syslog settings in the intrusion policy. If you use the intrusion policy, you must also specify the logging host in the intrusion policy settings.

Enable syslog alerting and configure facility and severity on the intrusion policy. For more information, refer to Configure syslog alerting for intrusion events.

Facility does not appear in the message header, but the syslog collector can derive the value based on RFC 5424, section 6.2.1.

Devices other than Firewall Threat Defense

Use an ALERT response.

Use the syslog setting in the intrusion policy advanced settings or an ALERT response identified in the access control policy Logging tab.

For more information, refer to Facility and severity values for intrusion syslog alerts and Create a syslog alert response.

Syslog message types supported by Secure Firewall devices

Secure Firewall devices can send multiple types of syslog messages.

The table summarizes each message type and provides references for configuration or further information.

Syslog Data Type

See

Audit logs from Firewall Management Center

Stream Audit Logs to Syslog and the Audit and Syslog chapter

Device health and network-related logs from Firewall Threat Defense devices

Cisco Secure Firewall Management Center Device Configuration Guide

Connection, security intelligence, and intrusion event logs from Firewall Threat Defense devices

About Configuring the System to Send Security Event Data to Syslog.

Connection, security intelligence, and intrusion event logs from Classic devices

About Configuring the System to Send Security Event Data to Syslog

Logs for file and malware events

About Configuring the System to Send Security Event Data to Syslog

IPS Settings

Send Syslog messages for IPS events. Syslog configuration locations for intrusion events (Firewall Threat Defense devices)

Limitations of syslog for security events

Syslog limitations for security events are system constraints that

  • restrict certain object naming conventions and special character usage,

  • introduce delays in event delivery to syslog collectors, and

  • limit availability of specific file and malware event data types.

Syslog security event restrictions

The following limitations apply when using syslog for security events:

  • If you will use syslog or store events externally, avoid special characters in object names such as policy and rule names. Object names should not contain special characters, such as commas, that the receiving application may use as separators.

  • It may take up to 15 minutes for events to appear on your syslog collector.

  • Data for the following file and malware events is not available via syslog:

    • Retrospective events

    • Events generated by Secure Endpoint

eStreamer server streaming

An eStreamer server is a streaming service that

  • streams several kinds of event data from a Secure Firewall Management Center to custom-developed client applications,

  • delivers event data either as binary data or as fully-qualified events in plaintext format, and

  • requires configuration to specify which event types can be transmitted to requesting clients.

eStreamer server configuration requirements

Before the appliance you want to use as an eStreamer server can begin streaming eStreamer events to an external client, you must configure the eStreamer server to send events to clients, provide information about the client, and generate a set of authentication credentials to use when establishing communication. You can perform all of these tasks from the appliance's user interface. Once your settings are saved, the events you selected will be forwarded to eStreamer clients when requested.

You can control which types of events the eStreamer server is able to transmit to clients that request them.


Note


eStreamer Client has been deprioritized, and the eNcoreCLI is End of Life as of 7/1/2024.


For more information, refer to Secure Firewall Management Center Event Streamer Integration Guide.

Table 3. Event types transmittable by the eStreamer server

Event type

Description

Intrusion Events

intrusion events generated by managed devices

Intrusion Event Packet Data

packets associated with intrusion events

Intrusion Event Extra Data

additional data associated with an intrusion event such as the originating IP addresses of a client connecting to a web server through an HTTP proxy or load balancer

Discovery Events

Network discovery events

Correlation and Allow List Events

correlation and compliance allow list events

Impact Flag Alerts

impact alerts generated by the Firewall Management Center

User Events

user events

Malware Events

malware events

File Events

file events

Connection Events

information about the session traffic between your monitored hosts and all other hosts.

Comparison of syslog and eStreamer for security eventing

Generally, organizations that do not currently have significant existing investment in eStreamer should use syslog rather than eStreamer to manage security event data externally.

Syslog

eStreamer

No customization required

Significant customization and ongoing maintenance required to accommodate changes in each release

Standard

Proprietary

Syslog standard does not protect against data loss, especially when using UDP

Protection against data loss

Sends directly from devices

Sends from Firewall Management Center, adding processing overhead

Support for file and malware events, connection events (including security intelligence events) and intrusion events.

Support for all event types listed in eStreamer server streaming.

Some event data can be sent only from Firewall Management Center. For more information, refer to Data sent only via eStreamer, not via syslog.

Includes data that cannot be sent via syslog directly from devices. For more information, refer to Data sent only via eStreamer, not via syslog.

Data sent only via eStreamer, not via syslog

This reference provides information about data that is available only from Secure Firewall Management Center and thus cannot be sent via syslog from devices.

  • Packet Logs

  • Intrusion Event Extra Data events

    For description, refer to eStreamer server streaming.

  • Statistics and aggregate events

  • Network Discovery events

  • User activity and login events

  • Correlation events

  • For malware events:

    • retrospective verdicts

    • ThreatName and Disposition, unless information about the relevant SHAs has already been synchronized to the device

  • Most raw IDs and UUIDs.

    Exceptions:

    • Syslogs for connection events do include these: FirewallPolicyUUID, FirewallRuleID, TunnelRuleID, MonitorRuleID, SI_CategoryID, SSL_PolicyUUID, and SSL_RuleID

    • Syslogs for intrusion events do include IntrusionPolicyUUID, GeneratorID, and SignatureID

  • Extended metadata, including but not limited to:

    • User details provided by LDAP, such as full name, department, phone number, etc.

      Syslog only provides usernames in the events.

    • Details for state-based information such as SSL Certificate details.

      Syslog provides basic information like the certificate fingerprint, but will not provide other certificate details like the cert CN.

    • Detailed application information, such as App Tags and Categories.

      Syslog provides only Application names.

    Some metadata messages also include extra information about the objects.

  • Geolocation information

Choose eStreamer event types

The eStreamer Event Configuration checkboxes control which events the eStreamer server can transmit. Your client must still specifically request the types of events you want it to receive in the request message it sends to the eStreamer server. For more information, refer to Secure Firewall Management Center Event Streamer Integration Guide.

In a multidomain deployment, you can configure eStreamer Event Configuration at any domain level. However, if an ancestor domain has enabled a particular event type, you cannot disable that event type in the descendant domains.

You must be an Admin user to perform this task, for Firewall Management Center.

Procedure


Step 1

Choose Integration > Other Integrations.

Step 2

Click eStreamer.

Step 3

Under eStreamer Event Configuration, check or clear the check boxes next to the types of events you want eStreamer to forward to requesting clients, described in eStreamer server streaming.

Step 4

Click Save.


Configure eStreamer client communications

Before eStreamer can send eStreamer events to a client, you must add the client to the eStreamer server's peers database from the eStreamer page. You must also copy the authentication certificate generated by the eStreamer server to the client. After completing these steps you do not need to restart the eStreamer service to enable the client to connect to the eStreamer server.

In a multidomain deployment, you can create an eStreamer client in any domain. The authentication certificate allows the client to request events only from the client certificate's domain and any descendant domains. The eStreamer configuration page shows only clients associated with the current domain, so if you want to download or revoke a certificate, switch to the domain where the client was created.

You must be an Admin or Discovery Admin user to perform this task, for Firewall Management Center.

Procedure


Step 1

Choose Integration > Other Integrations.

Step 2

Click eStreamer.

Step 3

Click Create Client.

Step 4

In the Hostname field, enter the host name or IP address of the host running the eStreamer client.

If you want to encrypt the certificate file, enter a password in the Password field.

Note


If you have not configured DNS resolution, use an IP address.

Step 5

Click Save.

The eStreamer server now allows the host to access port 8302 on the eStreamer server and creates an authentication certificate to use during client-server authentication.

Step 6

Click Download (download icon) next to the client hostname to download the certificate file.

Step 7

Save the certificate file to the appropriate directory used by your client for SSL authentication.

Step 8

To revoke access for a client, click Delete (delete icon) next to the host you want to remove.

Note


You do not need to restart the eStreamer service; access is revoked immediately.


Event analysis in splunk

Event analysis in Splunk is a security investigation capability that

  • enables you to use the Cisco Secure Firewall app for Splunk as an external tool to display and work with Secure Firewall event data,

  • allows you to hunt and investigate threats on your network, and

  • requires eStreamer for advanced functionality.

Implementation options

You have two options for implementing event analysis in Splunk:

  • Use eStreamer with the Splunk App - This is an advanced functionality that requires eStreamer configuration. Refer to eStreamer server streaming.

For more information about the Splunk App, refer to User Guide for Cisco Secure Firewall App for Splunk.

IBM QRadar events

IBM QRadar events are security functionalities that

  • provide an alternate way to display event data using the Cisco Firepower app for IBM QRadar,

  • help you analyze, hunt for, and investigate threats to your network, and

  • require eStreamer for advanced functionality.

Additional reference information

eStreamer is required for advanced capabilities. For more information, refer to eStreamer server streaming.

For more information, refer to https://www.cisco.com/c/en/us/td/docs/security/firepower/integrations/QRadar/integration-guide-for-the-cisco-firepower-app-for-ibm-qradar.html.

History for analyzing event data using external tools

Documents the history of features for analyzing event data using external tools, including enhancements and deprecations.

Feature

Minimum Firewall Management Center

Minimum Firewall Threat Defense

Details

Deprecated: SecureX Ribbon

Any

Any

SecureX Ribbon is deprecated.

If you have installed the Cisco SecureX Ribbon browser extension in your Firefox browser and are experiencing compatibility errors while using Firewall Management Center , remove the SecureX Ribbon extension.

To remove the extension, open Firefox, go to the browser's add-ons or extensions manager, locate the Cisco SecureX Ribbon extension, and remove or disable it. Restart Firefox to apply the changes.

Register your firewall deployment to Cisco Security Cloud tenancy using your Cisco Security Cloud Sign-On account and your Security Cloud Control tenant.

Any

Any

You can now register your Firewall Management Center and its managed devices to the Cisco Security Cloud using your Cisco Security Cloud Sign-On account and your Security Cloud Control tenant.

Cisco SecureX is phased out and no longer available. If you have an active Cisco SecureX environments, you will continue to receive support from the Cisco Technical Assistance Center (TAC) through the product end-of-support. For more information, refer to Frequently Asked Questions.

SecureX ribbon

7.0

Any

The SecureX ribbon pivots into SecureX for instant visibility into the threat landscape across your Cisco security products.

To display the SecureX ribbon in Firewall Management Center , refer to the Firepower and SecureX Integration Guide at https://cisco.com/go/firepower-securex-documentation .

New/Modified screens: New page: System > SecureX .

Send all connection events to the Cisco cloud

7.0

Any

You can now send all connection events to the Cisco cloud, rather than just sending high-priority connection events.

New/Modified screens: New option on the System > Integration > Cloud Services page .

Cross-launch to view data in Secure Network Analytics

6.7

Any

This feature introduces a quick way to create multiple entries for your Secure Network Analytics appliance on the Analysis > Contextual Cross-Launch page.

These entries allow you to right-click a relevant event to cross-launch Secure Network Analytics and display information related to the data point from which you cross-launched.

New menu item: System > Logging > Security Analytics and Logging .

New page to configure sending events to Secure Network Analytics .

Contextual cross-launch from additional field types

6.7

Any

You can now cross-launch into an external application using the following additional types of event data:

  • Access control policy

  • Intrusion policy

  • Application protocol

  • Client application

  • Web application

  • Username (including realm)

New menu options: Contextual-cross launch options are now available when right-clicking the above data types for events in Dashboard widgets and event tables on pages under the Analysis menu.

Supported platforms: Secure Firewall Management Center

Integration with IBM QRadar

6.0 and later

Any

IBM QRadar users can use a new Firepower-specific app to analyze their event data.

Available functionality is affected by your Firepower version.

Refer to IBM QRadar events.

Enhancements to integration with SecureX Threat Response

6.5

Any

  • Support for regional clouds:

    • United States (North America)

    • Europe

  • Support for additional event types:

    • File and malware events

    • High-priority connection events

      These are connection events related to the following:

      • Intrusion events

      • Security Intelligence events

      • File and malware events

Modified screens: New options on System > Integration > Cloud Services .

Supported Platforms: All devices supported in this release, either via direct integration or syslog.

Syslog

6.5

Any

The AccessControlRuleName field is now available in intrusion event syslog messages.

Integration with Cisco Security Packet Analyzer

6.5

Any

Support for this feature was removed.

Integration with SecureX Threat Response

6.3 (via syslog, using a proxy collector)

6.4 (direct)

Any

Integrate Firepower intrusion event data with data from other sources for a unified view of threats on your network using the powerful analysis tools in SecureX Threat Response .

Modified screens (version 6.4): New options on System > Integration > Cloud Services .

Supported Platforms: Secure Firewall Threat Defense devices running version 6.3 (via syslog) or 6.4.

Syslog support for File and Malware events

6.4

Any

Fully-qualified file and malware event data can now be sent from managed devices via syslog.

Modified screens: Policies > Access Control > Access Control > Logging.

Supported Platforms: All managed devices running version 6.4.

Integration with Splunk

Supports all 6.x versions

Any

Splunk users can use a new, separate Splunk app, Cisco Secure Firewall app for Splunk , to analyze events.

Available functionality is affected by your Firepower version.

Refer to Event analysis in splunk.

Integration with Cisco Security Packet Analyzer

6.3

Any

Feature introduced: Instantly query Cisco Security Packet Analyzer for packets related to an event, then click to examine the results in Cisco Security Packet Analyzer or download them for analysis in another external tool.

New screens:

System > Integration > Packet Analyzer

Analysis > Advanced > Packet Analyzer Queries .

New menu options: Query > Packet Analyzer menu item when right-clicking on an event on Dashboard pages and event tables on pages under the Analysis menu.

Supported platforms: Secure Firewall Management Center

Contextual cross-launch

6.3

Any

Feature introduced: Right-click an event to look up related information in predefined or custom URL-based external resources.

New screens: Analysis > Advanced > Contextual Cross-Launch.

New menu options: Multiple options when right-clicking on an event on Dashboard pages and event tables on pages under the Analysis menu.

Supported platforms: Secure Firewall Management Center

Syslog messages for connection and intrusion events

6.3

Any

Ability to send fully-qualified connection and intrusion events to external storage and tools via syslog, using new unified and simplified configurations. Message headers are now standardized and include event type identifiers, and messages are smaller because fields with unknown and empty values are omitted.

Supported Platforms:

  • All new functionality: Firewall Threat Defense devices running version 6.3.

  • Some new functionality: Non- Firewall Threat Defense devices running version 6.3.

  • Less new functionality: All devices running versions older than 6.3.

For more information, refer to the topics under Sending syslog messages for security events and subtopics.

eStreamer

6.3

Any

Moved eStreamer content from the Host Identity Sources chapter to this chapter and added a summary comparing eStreamer to syslog.