Cisco Security Cloud Control: Network Devices with Generic SSH Access Management

PDF

Cisco Security Cloud Control: Network Devices with Generic SSH Access Management

Synchronizing configurations between Security Cloud Control and device

Want to summarize with AI?

Log in

Learn how to synchronize configurations between Security Cloud Control and device.


About configuration conflicts

In the Security Devices page, you may see devices or services have the status "Synced," "Not Synced," or "Conflict Detected." To know the status of an On-Premises Firewall Management Center that you manage using Security Cloud Control, navigate Administration > Integrations > Firewall Management Center.

  • When a device is Synced, the configuration on Security Cloud Control) and the configuration stored locally on the device are the same.

  • When a device is Not Synced, the configuration stored in Security Cloud Control was changed and it is now different that the configuration stored locally on the device. Deploying your changes from Security Cloud Control to the device changes the configuration on the device to match Security Cloud Control's version.

  • Changes made to devices outside of Security Cloud Control are called out-of-band changes. When out-of-band changes are made, you'll see the device state change to "Conflict Detected," if conflict detection is enabled for the device. Accepting the out-of-band changes, changes the configuration on Security Cloud Control to match the configuration on the device.
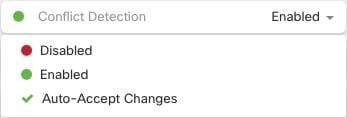
Conflict Detection

When conflict detection is enabled, Security Cloud Control polls the device for the default interval to to determine if a change has been made to the device's configuration outside of Security Cloud Control. If Security Cloud Control detects that a change was made, it changes the configuration status for the device to Conflict Detected. Changes made to a device outside of Security Cloud Control are called "out-of-band" changes.

In the case of an On-Premises Firewall Management Center that is managed by Security Cloud Control, if there are changes that are staged and the device is in Not Synced state, Security Cloud Control stops polling the device to check for changes. When there are changes made outside Security Cloud Control which are pending to be synchronized with Security Cloud Control and changes made in Security Cloud Control which are pending to be deployed to the on-premises Firewall Management Center, Security Cloud Control declares the on-premises Firewall Management Center to be in the Conflict Detected state.

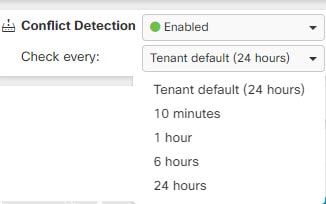
Once this option is enabled, you can configure how often conflicts or OOB changes are detected per device. See Schedule polling for device changes for more information.


Enable Conflict Detection

Enabling conflict detection alerts you to instances where changes have been made to a device outside of Security Cloud Control.

Procedure

1.

Choose Security Devices.

2.

Click the Devices tab.

3.

Select the appropriate device type tab.

4.

Select the device or devices for which you want to enable conflict detection.

5.

In the Conflict Detection box at the right of the device table, select Enabled from the list.


Automatically Accept Out-of-Band Changes from your Device

You can configure Security Cloud Control to automatically accept any change made directly to a managed device by enabling auto-accept changes. Changes made directly to a device without using Security Cloud Control are referred to as out-of-band changes. An out-of-band change creates a conflict between the device's configuration stored on Security Cloud Control and the configuration stored on the device itself.

The auto-accept changes feature is an enhancement to conflict detection. If you have auto-accept changes enabled on your device, Security Cloud Control checks for changes every 10 minutes to determine if there have been any out-of-band changes made to the device's configuration. If there have been configuration changes, Security Cloud Control automatically updates its local version of the device's configuration without prompting you.

Security Cloud Control will not automatically accept a configuration change if there are configuration changes made on Security Cloud Control that have not yet been deployed to the device. Follow the prompts on the screen to determine your next action.

To use auto-accept changes, you first enable the tenant to display the auto-accept option in the Conflict Detection menu on the Security Devices page; then, you enable auto-accept changes for individual devices.

If you want Security Cloud Control to detect out-of-band changes but give you the option to accept or reject them manually, enable Conflict Detection instead.


Configure Auto-Accept Changes

Procedure

1.

Log in to Security Cloud Control using an account with Admin or Super Admin privileges.

2.

Choose Administration > General Settings.

3.

In the Tenant Settings area, click the toggle to Enable the option to auto-accept device changes. This enables the Auto-Accept Changes menu option to appear in the Conflict Detection menu on the Security Devices page.

4.

In the left pane, click Security Devices and select the device for which you want to automatically accept out-of-band changes.

5.

In the Conflict Detection menu, select Auto-Accept Changes in the drop-down menu.


Disabling Auto-Accept Changes for All Devices on the Tenant

Procedure

1.

Log-in to Security Cloud Control using an account with Admin or Super Admin privileges.

2.

Choose Administration > General Settings.

3.

In the Tenant Settings area, disable the "Enable the option to auto-accept device changes" by sliding the toggle to the left so it shows a grey X. This disables Auto-Accept Changes option in the Conflict Detection menu and disables the feature for every device on your tenant.

Note

Disabling "Auto-Accept" will require you to review each device conflict before you can accept it into Security Cloud Control. This includes devices previously configured to auto-accept changes.


Resolve configuration conflicts

This section explains how to resolve configuration conflicts that occur on the device.


Resolve the Not Synced Status

Use the following procedure to resolve a device with a "Not Synced" Configuration Status:

Procedure

1.

Choose Security Devices.

Note

For an On-Premises Firewall Management Center, click Administration > Integrations > Firewall Management Center and select the FMC that is in Not Synced state and continue from Step 5.

2.

Click the Devices tab to locate the device or the Templates tab to locate the model device.

3.

Click the appropriate device type tab.

4.

Select the device reported as Not Synced.

5.

In the Not synced panel to the right, select either of the following:

  • Preview and Deploy... -If you want to push the configuration change from Security Cloud Control to the device, preview and deploy the changes you made now, or wait and deploy multiple changes at once.

  • Discard Changes -If you do not want to push the configuration change from Security Cloud Control to the device, or you want to "undo" the configuration changes you started making on Security Cloud Control. This option overwrites the configuration stored in Security Cloud Control with the running configuration stored on the device.


Resolve the conflict detected status

Security Cloud Control allows you to enable or disable conflict detection on each live device. If Conflict Detection is enabled and there was a change made to the device's configuration without using Security Cloud Control, the device's configuration status will show Conflict Detected.

To resolve a Conflict Detected status, follow this procedure:

Procedure

1.

Choose Security Devices.

Note

For an On-Premises Firewall Management Center, click Administration > Integrations > Firewall Management Center and select the FMC that is in Not Synced state and continue from Step 5.

2.

Click the Devices tab to locate your device.

3.

Click the appropriate device type tab.

4.

Select the device reporting the conflict and click Review Conflict in the details pane on the right.

5.

In the Device Sync page, compare the two configurations by reviewing the highlighted differences.

  • The panel labeled "Last Known Device Configuration" is the device configuration stored on Security Cloud Control.

  • The panel labeled "Found on Device" is the configuration stored in the running configuration on the ASA.

6.

Resolve the conflict by selecting one of the following:

  • Accept Device changes: This will overwrite the configuration and any pending changes stored on Security Cloud Control with the device's running configuration.

    Note

    As Security Cloud Control does not support deploying changes to the Cisco IOS devices outside of the command line interface, your only choice for a Cisco IOS device will be to select Accept Without Review when resolving the conflict.

  • Reject Device Changes: This will overwrite the configuration stored on the device with the configuration stored on Security Cloud Control.

Note

All configuration changes, rejected or accepted, are recorded in the change log.


Schedule polling for device changes

If you enable Conflict Detection or Enable the option to auto-accept device changes from the Settings page, Security Cloud Control polls the device at the default interval to check for configuration changes made outside Security Cloud Control. You can set how often Security Cloud Control polls for changes for each device. This customization can be applied to multiple devices.

If you do not configure a selection for a device, the interval is automatically configured for "tenant default".

Note

If you set a custom interval per device on the Security Devices page, it overrides the polling interval selected as the Default Conflict Detection Interval on the General Settings page.

After you enable Conflict Detection from the Security Devices page or Enable the option to auto-accept device changes from the Settings page, you can schedule how often Security Cloud Control polls your devices with this procedure.

Procedure

1.

Choose Security Devices.

2.

Click the Devices tab to locate your device.

3.

Click the appropriate device type tab.

4.

Select the devices where you want to enable conflict detection.

5.

Next to Conflict Detection, click the drop-down menu for Check every and select the polling interval you want.

Conflict detection and polling interval drop-down lists on the device page.