Deploy the Arbiter VM

This chapter contains the following topics:

Auto-arbitration in Crosswork Network Controller

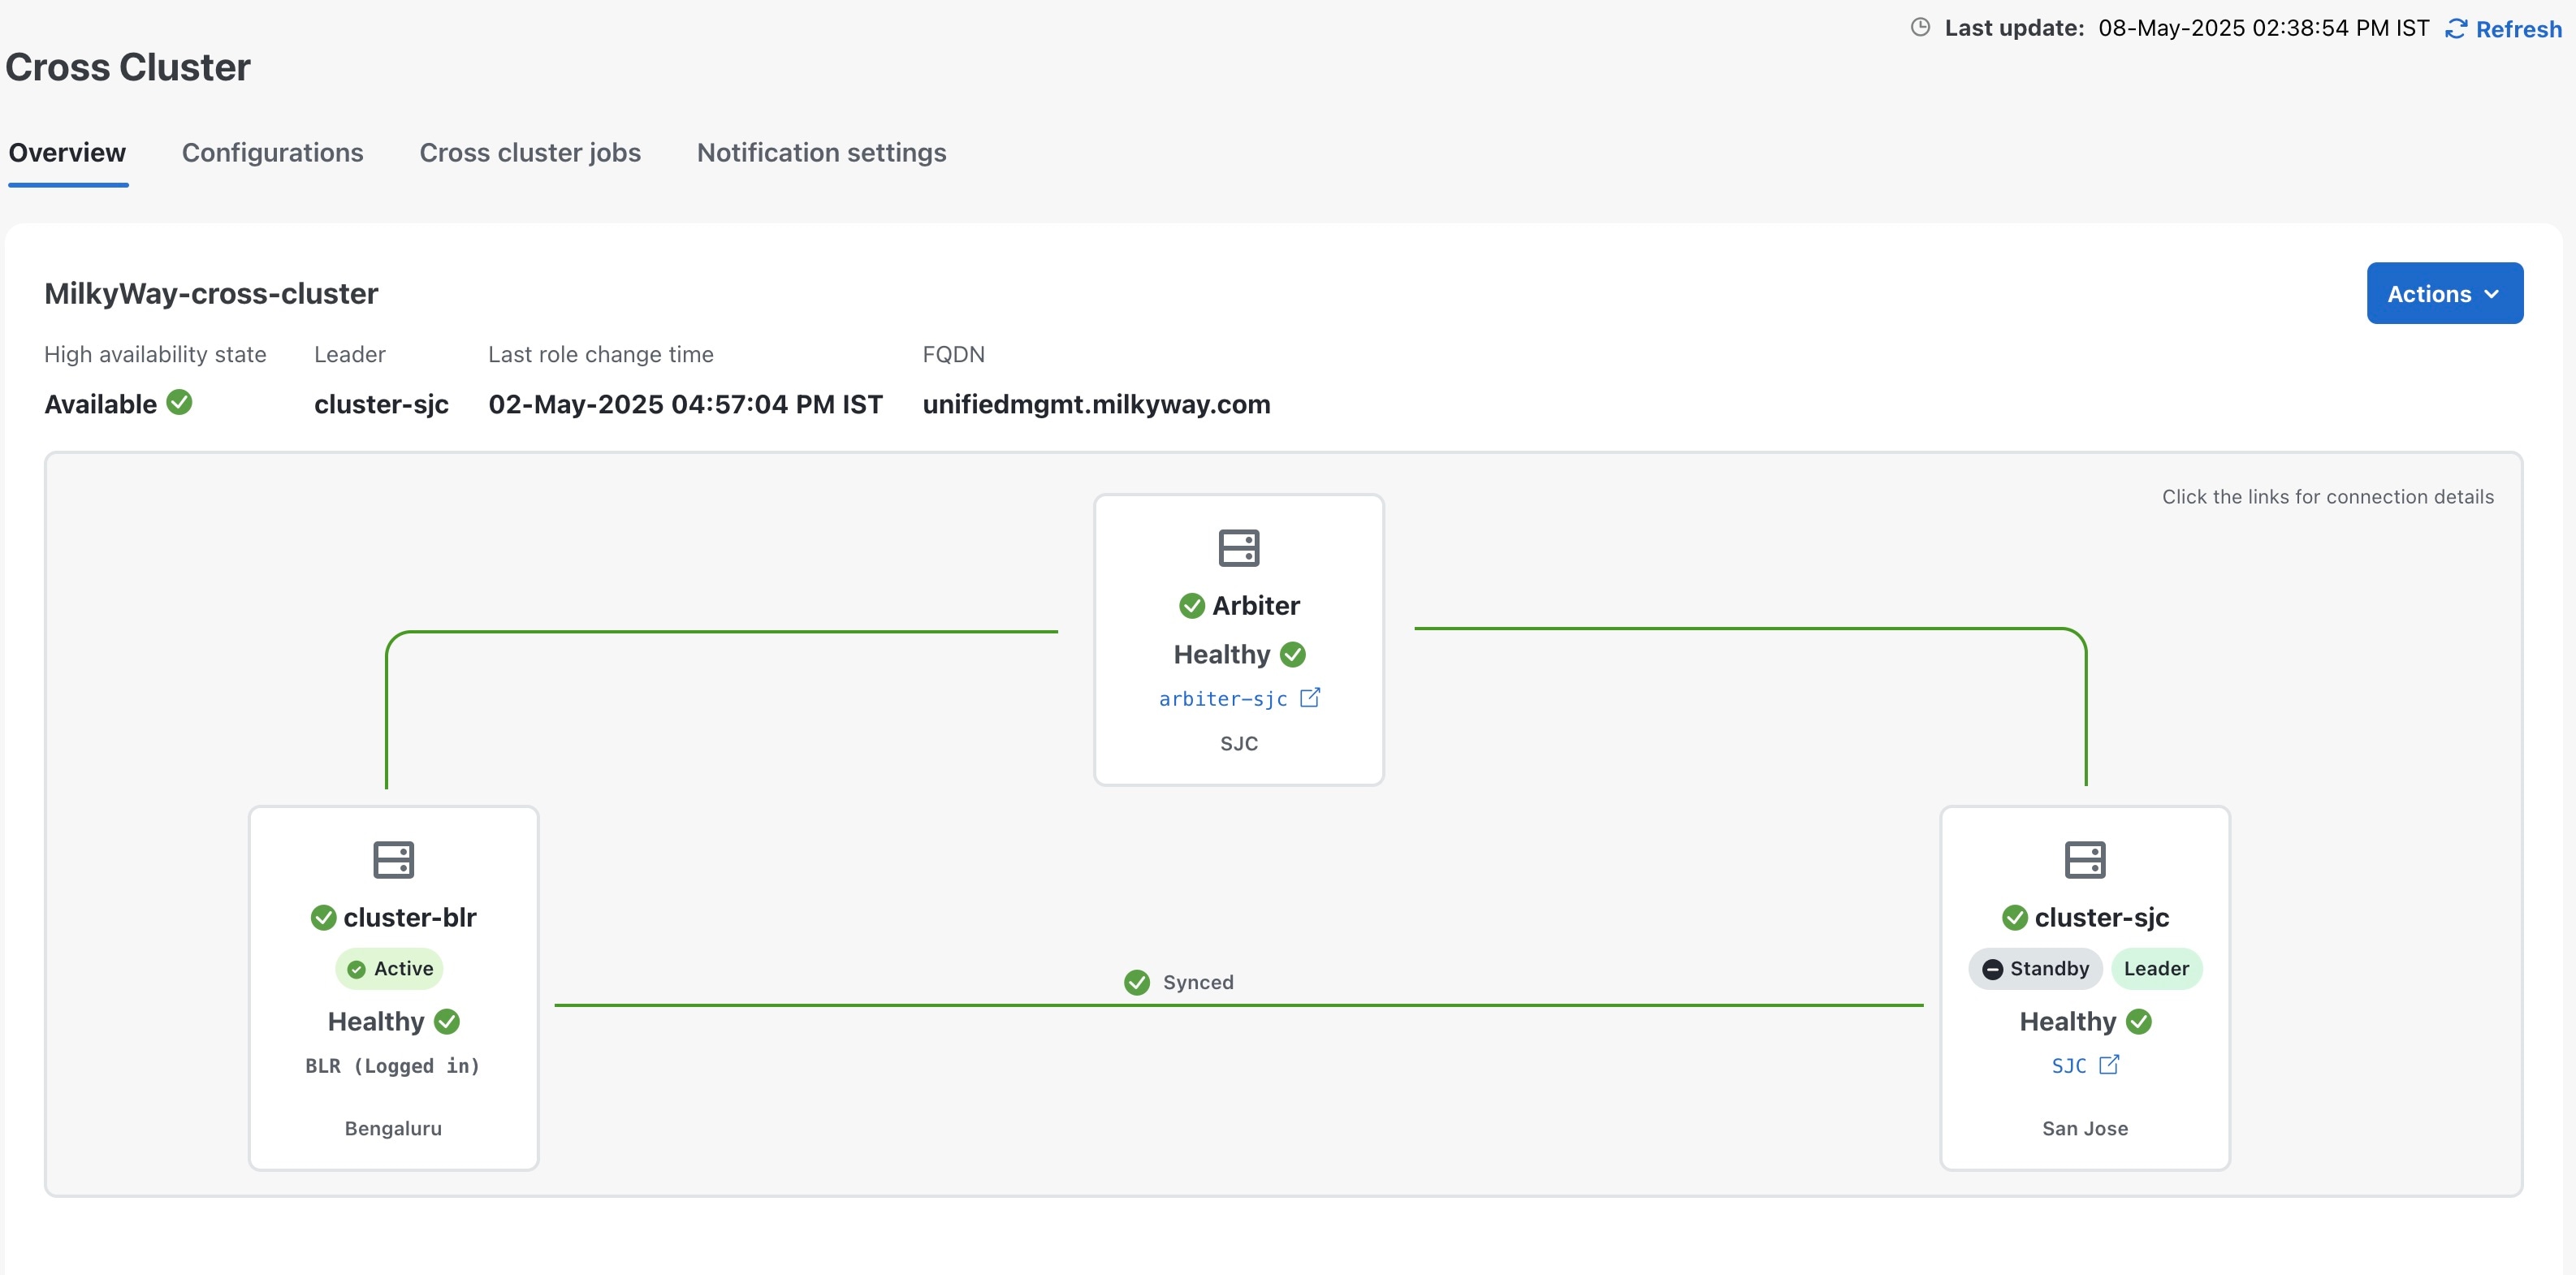
Auto-arbitration is a functionality in Crosswork Network Controller that automates the switchover process between active and standby clusters during communication failures, eliminating the need for manual intervention. It introduces an arbiter VM (AZ3), which acts as a mediator to prevent split-brain scenarios and ensures the integrity of the system.

Figure 1. Cross cluster with active, standby, and arbiter AZs

Key features

  1. Split-brain scenario prevention:

    • In a geo redundant setup, communication failures can cause the standby cluster to mistakenly assume the active cluster is down, leading to both clusters becoming active (split-brain scenario). This can result in data loss if one cluster fails.

    • Auto-arbitration uses an arbiter VM and the leader election protocol to prevent such conflicts by ensuring consensus on the active cluster.

  2. Arbiter VM role:

    • The arbiter VM is deployed on a single VM with a small resource footprint.

    • It provides the essential quorum needed to form a majority vote for electing a leader among the three AZs.

    • It includes only essential infrastructure components and does not allow application installations after deployment.


    Important


    By design, the arbiter VM in the geo HA cluster is a minimal node used primarily for quorum voting. It does not host workload services like other cluster nodes. By default, only the admin user is created on the arbiter node for administrative operations. The arbiter VM does not synchronize AAA users or settings from other nodes. However, you can create and manage additional users independently on the arbiter VM if needed.


  3. Switchover automation: During a switchover (manual request or network failure), the arbiter node performs these steps.

    When auto arbitration mode is enabled, the elected cluster leader automates the three steps of a switchover, whether triggered manually or by a failure in a network node or link.

    • Updates the active cluster's role to standby.

    • Updates the standby cluster's role to active.

    • Updates the DNS FQDN records for data and management to point to the new active cluster.

    For more information, see Auto-arbitration workflow.

  4. Day 0 and day N deployments:

    • Day 0: All three clusters (active, standby, and arbiter) are deployed and configured sequentially on day-0. For more information, see Geo redundancy workflow (Day 0).

    • Day N: You can add an arbiter VM to an existing two-cluster geo-redundant model (active and standby) by reimporting the updated cross cluster inventory file, which includes new parameters for the arbiter VM. For more information, see Geo redundancy workflow (Day N).

Auto-arbitration is a critical enhancement for ensuring reliable and fail-safe operations in distributed environments, enabling seamless cluster management with minimal manual effort.

Arbiter VM requirements

  • The arbiter VM is deployed as a single VM using a small profile.

  • The arbiter VM requires a neutral third site which has different subnet from other two sites which has workload.

  • An arbiter VM requires a resource footprint of 8 vCPUs, 48 GB of RAM, and 650 GB of storage.

  • After deploying the arbiter VM, ensure that the Crosswork inventory is onboarded before proceeding.

Deploy an arbiter VM on VMware

You must install the Arbiter VM using the arbiter OVA file to reduce manual steps and simplify the installation process.

Install via the vCenter UI

For installation instructions, see Install Crosswork Network Controller using the vCenter vSphere UI.

  1. You must set these parameters during the deployment:

    • Select the virtual disk format as Thin provision.

    • Set Datafs Disk Size to 100.

    • Select VM type as Hybrid.

    • Set Cluster seed node to True.

    • Set Initial node count to 1.

    • Set Initial leader node count to 1.

    • Set Enable Skip Auto Install Feature to True.

  2. Once the deployment is completed, right-click on the VM and select Edit Settings. The Edit Settings dialog box is displayed. Under the Virtual Hardware tab, update these attributes:

    • CPU: change to 8 (for Small profile).

    • Memory: change to 48 GB (for Small profile).

Install using OVF tool

For installation instructions, see Install Crosswork Network Controller via the OVF Tool.

Here is a sample template:

env variables

numberOfCpus=8
memorySize=49152
EnableSkipAutoInstallFeature="True"
ddatafs=100


  ovftool --acceptAllEulas --skipManifestCheck --X:injectOvfEnv --datastore="${vmDatastore[$i]}" --diskMode="${vmDiskMode[$i]}" \
    --numberOfCpus:"*"=$numberOfCpus  --memorySize:"*"=$memorySize \
    --coresPerSocket:"*"=1 \
    --viCpuResource=-1:$viCpuResource:-1 --viMemoryResource=-1:$memorySize:-1 \
    --overwrite --noSSLVerify --allowExtraConfig \
    --name="${vmName[$i]}" \
    --prop:"ManagementIPv4Address=${vmMngIP[$i]}" \
    --prop:"ManagementIPv4Gateway=$mngGw" \
    --prop:"ManagementIPv4Netmask=$mngMask" \
    --prop:"ManagementVIP=$mngVIP" \
    --prop:"ManagementVIPName=$mngVIPName" \
    --prop:"DataIPv4Address=${vmDataIP[$i]}" \
    --prop:"DataIPv4Gateway=$dataGw" \
    --prop:"DataIPv4Netmask=$dataMask" \
    --prop:"DataVIP=$dataVIP" \
    --prop:"DataVIPName=$dataVIPName" \
    --net:"Management Network=$mngNet" \
    --net:"Data Network=$dataNet" \
    --prop:"DNSv4=$dns" \
    --prop:"NTP=$ntp" --prop:"Domain=$domain" \
    --prop:"Disclaimer=Cisco..." \
    --prop:"ddatafs=$ddatafs" --prop:"logfs=$logfs" \
    --prop:"Timezone=$timezone" \
    --prop:"EnableSkipAutoInstallFeature=$EnableSkipAutoInstallFeature" \      
    --prop:"CWUsername=cw-admin" \
    --prop:"CWPassword=$pass" \
    --prop:"VMType=${vmType[$i]}" --prop:"IsSeed=$isSeed" --prop:"InitNodeCount=$nodes" --prop:"InitMasterCount=$masterCount" \
    --prop:"IgnoreDiagnosticsCheckFailure=False" \
    ${CW_IMAGE} vi://"${vcenter_user}:${vcenter_pass}"@"$url"

Install using Docker installer

You must set these parameters in the tfvars file:

ManagerDataFsSize = 100
VMSize = "Small"
EnableSkipAutoInstallFeature = "True"

The other parameters can be modified as per your setup. For complete installation instructions, see Install Crosswork Network Controller using the Docker installer tool.

Docker deployment command example:

docker run --rm -it  -v `pwd`:/data <cw-na-platform-7.2.0-529-develop-260127> 
-exec 'yes yes | ./cw-installer.sh install -p -m /data/svm_tfvar.txt 
-o https://software.cisco.com/crosswork/release-7.2.0/<cw-arbiter ova>.ova -y -s'

Deploy an arbiter VM on KVM

For installation instructions, see Install Crosswork Network Controller VM using CLI.

The arbiter installation requires an arbiter tar bundle.

Sample command:

"cw-na-arbiter-7.2.0-releasecnc720-260130" is the arbiter tar bundle in this example.

virt-install --boot uefi --boot hd,cdrom --connect qemu:///system --virt-type kvm --name arbiter 
--ram 58982 --vcpus 8 --os-type linux --disk path=cw-na-arbiter-7.2.0-releasecnc720-260130_rootfs.qcow2,
format=qcow2,bus=scsi --disk path=cw-na-arbiter-7.2.0-releasecnc720-260130_dockerfs.qcow2,
format=qcow2,bus=scsi --disk path=disk3,format=qcow2,bus=scsi --disk path=disk4,
format=qcow2,bus=scsi --disk path=cw-na-arbiter-7.2.0-releasecnc720-260130_extrafs.qcow2,
format=qcow2,bus=scsi --disk path=disk6,format=qcow2,bus=scsi --disk=arbiter.iso,device=cdrom,bus=scsi 
--import --network bridge=intCWMgmt1,model=virtio --network bridge=intData,model=virtio --noautoconsole 
--os-variant ubuntu22.04 --graphics vnc,listen=0.0.0.0