-
Cisco MDS 9000 Family Fabric Manager Configuration Guide, Release 3.4(1a)
-
Index
-
New and Changed Information
-
Preface
- Getting Started
- Installation and Switch Management
- Switch Configuration
-
Fabric Configuration
-
Configuring and Managing VSANs
-
SAN Device Virtualization
-
Creating Dynamic VSANs
-
Configuring Inter-VSAN Routing
-
Configuring and Managing Zones
-
Distributing Device Alias Services
-
Configuring Fibre Channel Routing Services and Protocols
-
Dense Wavelength Division Multiplexing
-
Managing FLOGI, Name Server, FDMI, and RSCN Databases
-
Discovering SCSI Targets
-
Configuring FICON
-
Advanced Features and Concepts
-
-
Security
-
Configuring FIPS
-
Configuring Users and Common Roles
-
Configuring SNMP
-
Configuring RADIUS and TACACS+
-
Configuring IPv4 Access Control Lists
-
Configuring Certificate Authorities and Digital Certificates
-
Configuring IPsec Network Security
-
Configuring FC-SP and DHCHAP
-
Configuring Port Security
-
Configuring Fabric Binding
-
- IP Services
- Intelligent Storage Services
- Network and Switch Monitoring
- Traffic Management
- Troubleshooting
-
Launching Fabric Manager in Cisco SAN-OS Releases Prior to 3.2(1)
-
Cisco Fabric Manager Unsupported Feature List
-
Interface Nonoperational Reason Codes
-
Managing Cisco FabricWare
-
Configuration Limits for Cisco MDS SAN-OS Release 3.1(x) and 3.2(x)
-
 Feedback
Table Of Contents
Configuring SANTap
SANTap is one of the Intelligent Storage Services features supported on the Storage Services Module (SSM) and MSM 9222i and 18+4. The Storage Services Module (SSM) supports SANTap in Cisco MDS SAN-OS Release 2.0(2b) and later.
For licensing details, see Chapter 10, "Obtaining and Installing Licenses."
This chapter includes the following sections:
•

About SANTap
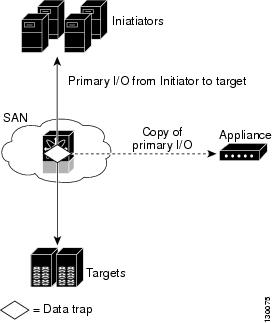
The SANTap feature allows third-party data storage applications, such as long distance replication and continuous backup, to be integrated into the SAN. The protocol-based interface that is offered by SANTap allows easy and rapid integration of the data storage service application because it delivers a loose connection between the application and an SSM, which reduces the effort needed to integrate applications with the core services being offered by the SSM. See Figure 49-1.
Figure 49-1 Integrating Third-Party Storage Applications in a SAN
SANTap has a control path and a data path. The control path handles requests that create and manipulate replication sessions sent by an appliance. The control path is implemented using an SCSI-based protocol. An appliance sends requests to a Control Virtual Target (CVT), which the SANTap process creates and monitors. Responses are sent to the control LUN on the appliance. SANTap also allows LUN mapping to Appliance Virtual Targets (AVTs). You can have a maximum of 512 target LUNs.
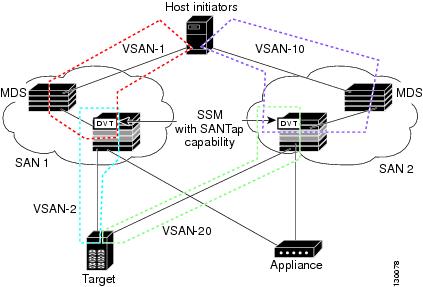
SANTap does not require reconfiguration of either the host or target when introducing SANTap-based applications. Also, neither the host initiator nor the target is required to be directly connected to an SSM. This is accomplished by assigning Cisco-specific WWNs to the virtual initiators (VIs) and Data Virtual Targets (DVTs). A host initiator or a target can be connected directly to an SSM. However, you must partition the SAN using VSANs.
You must configure the host initiator and the DVT in one VSAN and configure the VI and the target in another VSAN. See Figure 49-2.
Figure 49-2 SANTap Proxy Mode-2 Example
Configuring SANTap
This section includes the following topics:
Enabling SANTap
SANTap can be enabled on an entire SSM or it can be enabled on a group of four ports on an SSM. Enabling SANTap on interfaces has the following restrictions:
•
•
•
See "Enabling Intelligent Storage Services" section on page 55-4. In the Create SSM dialog, select SANTap from the Feature drop-down list.
Note
Creating a SANTap CVT
You have to configure a logical port on a switch to create the CVT for SANTap. CVTs create the control path, which processes the SANTap service requests sent by an appliance.
Before requesting the SANTap service, the appliance contacts the CVT, specifies the initiator and the target for replicating the data flowing between them.
To create a SANTap CVT for SANTap on the Fibre Channel switch modules using Fabric Manager, follow these steps:
Step 1
You see the FCWA tab in the Information pane.
Step 2
You see the SANTap configuration in the Information pane.
Step 3
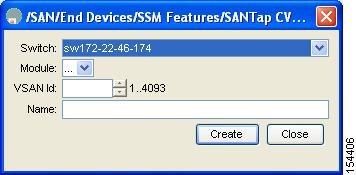
You see the create SANTap CVT dialog box shown in Figure 49-3.
Figure 49-3 Create SANTap CVT Dialog Box
Step 4
Note
Step 5
Step 6
Deleting a SANTap CVT
To delete a SANTap CVT using Fabric Manager, follow these steps:
Step 1
You see the FCWA tab in the Information pane.
Step 2
You see the SANTap configuration in the Information pane.
Step 3
Step 4
You see the Fabric Manager Confirmation dialog box.
Step 5
Creating a SANTap DVT SSM
To create a SANTap DVT using Fabric Manager, follow these steps:
Step 1
You see the FCWA tab in the Information pane.
Step 2
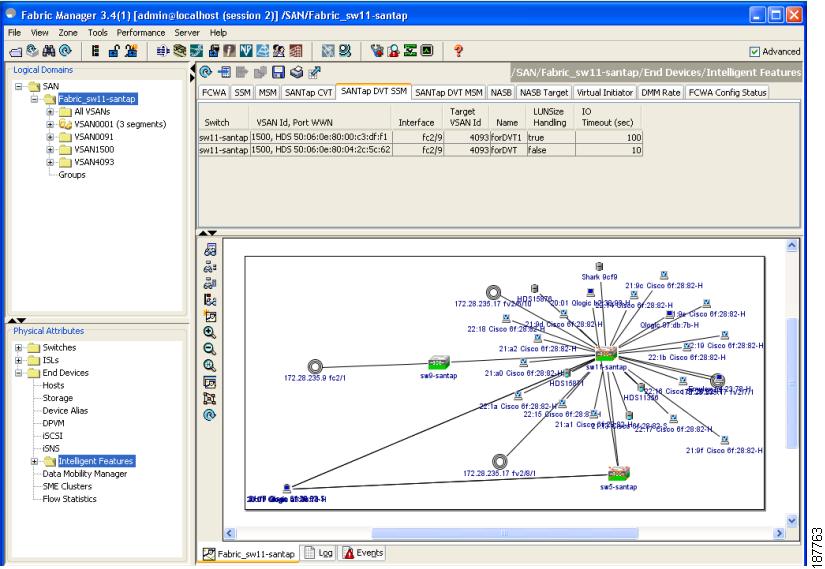
You see the SANTap configuration in the Information pane (see Figure 49-4).
Figure 49-4 SANTap DVT SSM Tab
Step 3
You see the create SANTap DVT SSM dialog box as shown in Figure 49-5.
Figure 49-5 Create SANTap DVT SSM Dialog Box
Step 4
Step 5
Step 6
Step 7
Step 8
Note
Step 9
Step 10
Step 11
Step 12
Deleting a SANTap DVT SSM
To delete a SANTap DVT using Fabric Manager, follow these steps:
Step 1
You see the FCWA tab in the Information pane.
Step 2
You see the SANTap configuration in the Information pane.
Step 3
Step 4
You see the Fabric Manager Confirmation dialog box.
Step 5
Creating a SANTap DVT MSM
To create a SANTap DVT MSM using Fabric Manager, follow these steps:
Step 1
You see the FCWA tab in the Information pane.
Step 2
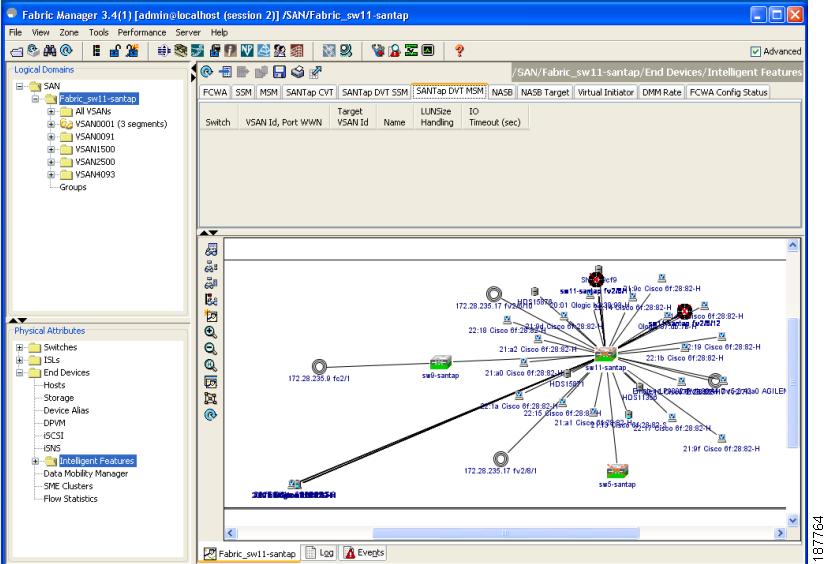
You see the SANTap configuration in the Information pane (see Figure 49-6).
Figure 49-6 SANTap DVT MSM Tab
Step 3
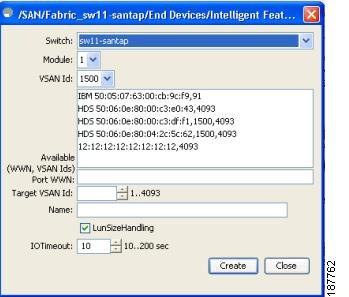
You see the create SANTap DVT MSM dialog box as shown in Figure 49-7.
Figure 49-7 Create SANTap DVT MSM Dialog Box
Step 4
Step 5
Step 6
Step 7
Step 8
Note
Step 9
Step 10
Step 11
Step 12
Default Settings
Table 49-1 lists the default settings for SANTap parameters.