-
Cisco MDS 9000 Family Fabric Manager Configuration Guide, Release 3.4(1a)
-
Index
-
New and Changed Information
-
Preface
- Getting Started
- Installation and Switch Management
- Switch Configuration
-
Fabric Configuration
-
Configuring and Managing VSANs
-
SAN Device Virtualization
-
Creating Dynamic VSANs
-
Configuring Inter-VSAN Routing
-
Configuring and Managing Zones
-
Distributing Device Alias Services
-
Configuring Fibre Channel Routing Services and Protocols
-
Dense Wavelength Division Multiplexing
-
Managing FLOGI, Name Server, FDMI, and RSCN Databases
-
Discovering SCSI Targets
-
Configuring FICON
-
Advanced Features and Concepts
-
-
Security
-
Configuring FIPS
-
Configuring Users and Common Roles
-
Configuring SNMP
-
Configuring RADIUS and TACACS+
-
Configuring IPv4 Access Control Lists
-
Configuring Certificate Authorities and Digital Certificates
-
Configuring IPsec Network Security
-
Configuring FC-SP and DHCHAP
-
Configuring Port Security
-
Configuring Fabric Binding
-
- IP Services
- Intelligent Storage Services
- Network and Switch Monitoring
- Traffic Management
- Troubleshooting
-
Launching Fabric Manager in Cisco SAN-OS Releases Prior to 3.2(1)
-
Cisco Fabric Manager Unsupported Feature List
-
Interface Nonoperational Reason Codes
-
Managing Cisco FabricWare
-
Configuration Limits for Cisco MDS SAN-OS Release 3.1(x) and 3.2(x)
-
 Feedback
Table Of Contents
Configuring DPVM with the DPVM Wizard
Configuring DPVM Config and Pending Databases
Activating DPVM Config Databases
About DPVM Database Distribution
Disabling DPVM Database Distribution
Comparing Database Differences
Creating Dynamic VSANs
Port VSAN membership on the switch is assigned on a port-by-port basis. By default each port belongs to the default VSAN.
You can dynamically assign VSAN membership to ports by assigning VSANs based on the device WWN. This method is referred to as Dynamic Port VSAN Membership (DPVM). DPVM offers flexibility and eliminates the need to reconfigure the port VSAN membership to maintain fabric topology when a host or storage device connection is moved between two Cisco MDS switches or two ports within a switch. It retains the configured VSAN regardless of where a device is connected or moved. To assign VSANs statically, see Chapter 1, "Configuring and Managing VSANs."
This chapter includes the following sections:
•
DPVM
DPVM
DPVM configurations are based on port world wide name (pWWN) and node world wide name (nWWN) assignments. A DPVM database contains mapping information for each device pWWN/nWWN assignment and the corresponding VSAN. The Cisco SAN-OS software checks the database during a device FLOGI and obtains the required VSAN details.
The pWWN identifies the host or device and the nWWN identifies a node consisting of multiple devices. You can assign any one of these identifiers or any combination of these identifiers to configure DPVM mapping. If you assign a combination, then preference is given to the pWWN.
DPVM uses the Cisco Fabric Services (CFS) infrastructure to allow efficient database management and distribution. DPVM uses the application driven, coordinated distribution mode and the fabric-wide distribution scope (see Chapter 13, "Using the CFS Infrastructure").
Note
Note
This section describes DPVM and includes the following topics:
•
•
•
About DPVM Configuration
To use the DPVM feature as designed, be sure to verify the following requirements:
•
•
•
Note
To begin configuring DPVM, you must explicitly enable DPVM on the required switches in the fabric. By default, this feature is disabled in all switches in the Cisco MDS 9000 Family.
Configuring DPVM with the DPVM Wizard
To use the DPVM Setup Wizard in Fabric Manager to set up dynamic port VSAN membership, follow these steps:
Step 1
Figure 28-1 DPVM Wizard Icon
You see the Select Master Switch page.
Step 2
Step 3
You see the AutoLearn Current End Devices page.
Step 4
Step 5
You see the Edit and Activate Configuration page.
Step 6
Step 7
About DPVM Databases
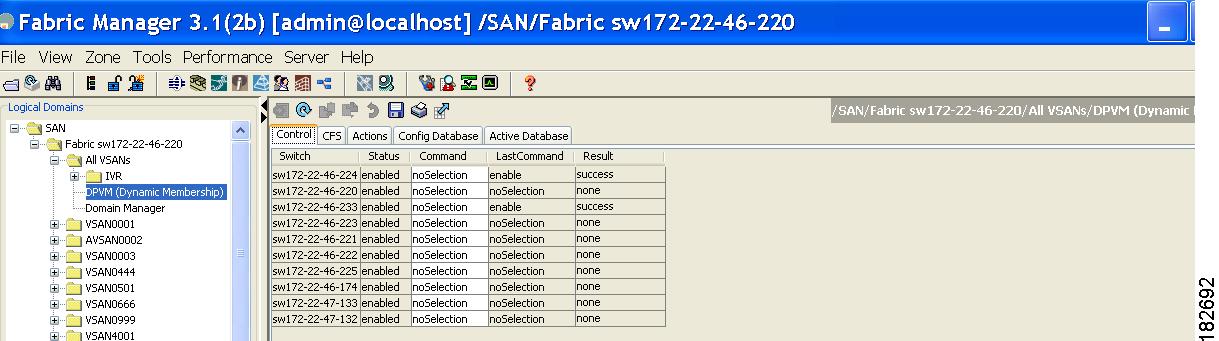
The DPVM database consists of a series of device mapping entries. Each entry consists of a device pWWN/nWWN assignment along with the dynamic VSAN to be assigned. You can configure a maximum of 16,000 DPVM entries in the DPVM database. This database is global to the whole switch (and fabric) and is not maintained for each VSAN.
The DPVM feature uses three databases to accept and implement configurations.
•
•
•
Changes to the DPVM config database are not reflected in the active DPVM database until you activate the DPVM config database. Changes to the DPVM pending database are not reflected in the config/active DPVM database until you commit the DPVM pending database. This database structure allows you to create multiple entries, review changes, and let the DPVM config and pending databases take effect.
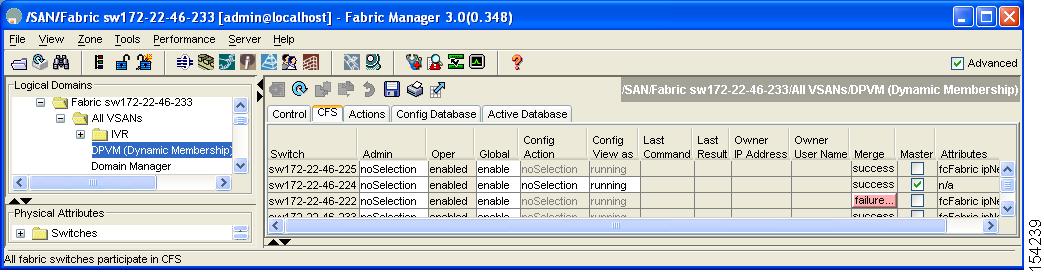
Figure 28-2 shows an example of the DPVM databases in the Information pane in Fabric Manager.
Figure 28-2 DPVM Configuration in Fabric Manager
Configuring DPVM Config and Pending Databases
To create and populate the config and pending databases using Fabric Manager, follow these steps:
Step 1
You see the DPVM configuration in the Information pane.
Step 2
Step 3
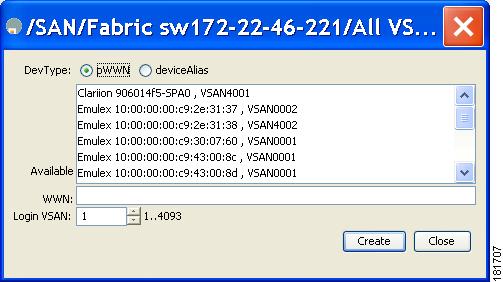
You see the Create Config Database dialog box shown in Figure 28-3.
Figure 28-3 Create Config Database
Step 4
Step 5
Step 6
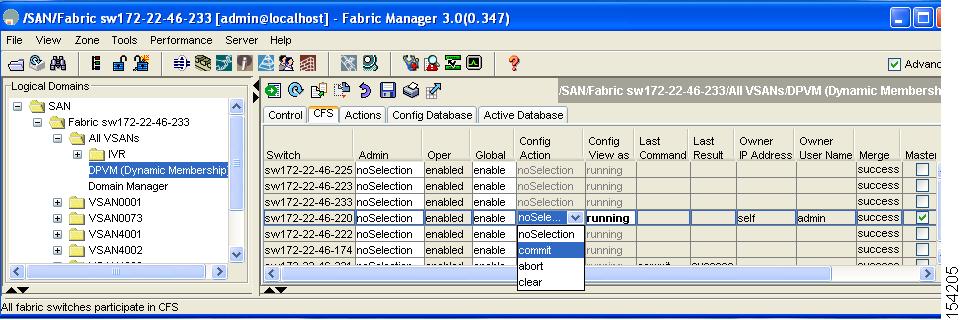
You see the options shown in Figure 28-4.
Figure 28-4 Config Action Drop-down Menu
Step 7
Activating DPVM Config Databases
When you explicitly activate the DPVM config database, the DPVM config database becomes the active DPVM database. Activation may fail if conflicting entries are found between the DPVM config database and the currently active DPVM database. However, you can force activation to override conflicting entries.
To activate the DPVM config database using Fabric Manager, follow these steps:
Step 1
You see the DPVM configuration in the Information pane.
Step 2
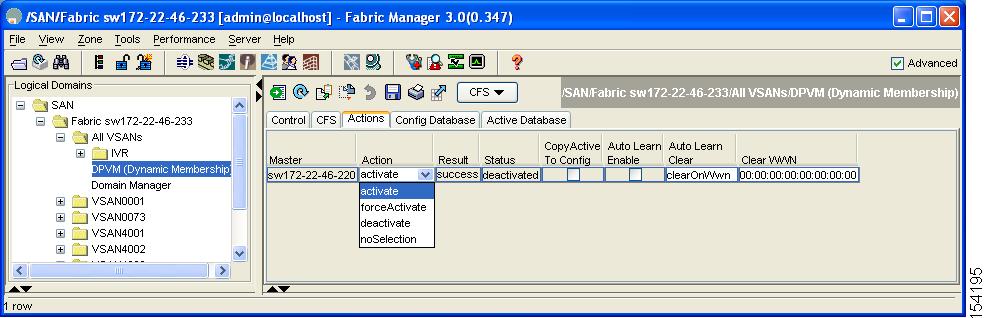
Figure 28-5 Activate a Configured Database
Step 3
You see the options shown in Figure 28-6.
Figure 28-6 Config Action Drop-down Menu
Step 4
Note
Viewing the Pending Database
To view the pending database using Fabric Manager, follow these steps:
Step 1
You see the DPVM configuration in the Information pane.
Step 2
Figure 28-7 CFS Tab with Master Switch Checked
Step 3
Step 4
You see the pending database entries.
About Autolearned Entries
The DPVM database can be configured to automatically learn (autolearn) about new devices within each VSAN. The autolearn feature can be enabled or disabled at any time. Learned entries are created by populating device pWWNs and VSANs in the active DPVM database. The active DPVM database should already be available to enable autolearn.
You can delete any learned entry from the active DPVM database when you enable autolearn. These entries only become permanent in the active DPVM database when you disable autolearn.
Note
The following conditions apply to learned entries:
•
•
•
•
–
–
Enabling Autolearning
To enable autolearning using Fabric Manager, follow these steps:
Step 1
You see the DPVM configuration in the Information pane.
Step 2
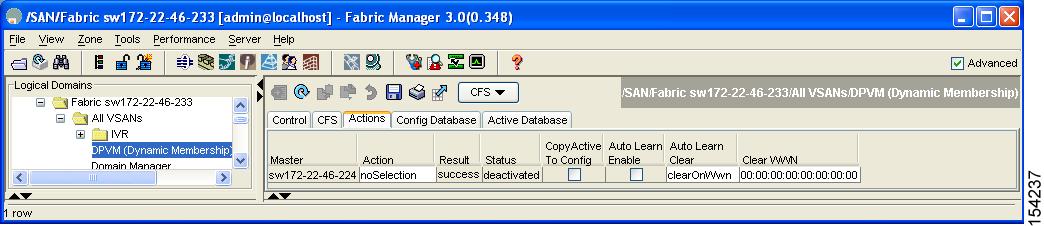
Figure 28-8 DPVM Actions Tab
Step 3
Clearing Learned Entries
You can clear DPVM entries from the active DPVM database (if autolearn is still enabled) using one of two methods.
To clear a single autolearn entry using Fabric Manager, follow these steps:
Step 1
You see the DPVM configuration in the Information pane.
Step 2
Step 3
Step 4
To clear all autolearn entries using Fabric Manager, follow these steps:
Step 1
You see the DPVM configuration in the Information pane.
Step 2
You see the DPVM Actions menu shown in Figure 28-9.
Figure 28-9 DPVM Actions Tab
Step 3
Step 4
Note
DPVM Database Distribution
If the DPVM database is available on all switches in the fabric, devices can be moved anywhere and offer the greatest flexibility. To enable database distribution to the neighboring switches, the database should be consistently administered and distributed across all switches in the fabric. The Cisco SAN-OS software uses the Cisco Fabric Services (CFS) infrastructure to achieve this requirement (see Chapter 13, "Using the CFS Infrastructure").
This section describes how to distribute the DPVM database and includes the following topics:
•
•
About DPVM Database Distribution
Using the CFS infrastructure, each DPVM server learns the DPVM database from each of its neighboring switches during the ISL bring-up process. If you change the database locally, the DPVM server notifies its neighboring switches, and that database is updated by all switches in the fabric.
If fabric distribution is enabled, all changes to the configuration database are stored in the DPVM pending database. These changes include the following tasks:
•
•
•
These changes are distributed to all switches in a fabric when you commit the changes. You can also discard (abort) the changes at this point.
Tip
Disabling DPVM Database Distribution
These changes are distributed to all switches in a fabric when you commit the changes. You can also discard (abort) the changes at this point.
Tip
To disable DPVM database distribution to the neighboring switches using Fabric Manager, follow these steps:
Step 1
You see the DPVM configuration in the Information pane.
Step 2
Step 3
About Locking the Fabric
The first action that modifies the existing configuration creates the DPVM pending database and locks the feature in the fabric. Once you lock the fabric, the following conditions apply:
•
•
Locking the Fabric
To lock the fabric and apply changes to the DPVM pending database using Fabric Manager, follow these steps:
Step 1
You see the DPVM configuration in the Information pane.
Step 2
You see the Create Config Database dialog box shown in Figure 28-10.
Figure 28-10 Create Config Database
Step 3
Step 4
Committing Changes
If you commit the changes made to the configuration, the configuration in the DPVM pending database are distributed to other switches. On a successful commit, the configuration change is applied throughout the fabric and the lock is released.
To commit the DPVM pending database using Fabric Manager, follow these steps:
Step 1
You see the DPVM configuration in the Information pane.
Step 2
Step 3
Discarding Changes
If you discard (abort) the changes made to the DPVM pending database, the configurations remain unaffected and the lock is released.
To discard the DPVM pending database using Fabric Manager, follow these steps:
Step 1
You see the DPVM configuration in the Information pane.
Step 2
Step 3
Clearing a Locked Session
If you have performed a DPVM task and have forgotten to release the lock by either committing or discarding the changes, an administrator can release the lock from any switch in the fabric. If the administrator performs this task, your changes to the DPVM pending database are discarded and the fabric lock is released.
Tip
To use administrative privileges and release a locked DPVM session using Fabric Manager, follow these steps:
Step 1
You see the DPVM configuration in the Information pane.
Step 2
Step 3
Database Merge Guidelines
A database merge refers to a union of the configuration database and static (unlearned) entries in the active DPVM database. See the "CFS Merge Support" section on page 13-9 for detailed concepts.
When merging the DPVM database between two fabric, follow these guidelines:
•
•
Caution
This section describes how to merge DPVM databases and includes the following topics:
•
About Copying DPVM Databases
The following circumstances may require the active DPVM database to be copied to the DPVM config database:
•
•
Note
Copying DPVM Databases
To copy the currently active DPVM database to the DPVM config database using Fabric Manager, follow these steps:
Step 1
You see the DPVM configuration in the Information pane.
Step 2
Step 3
Comparing Database Differences
To compare the currently active database entries to the DPVM config database using Fabric Manager, follow these steps:
Step 1
You see the DPVM configuration in the Information pane.
Step 2
You see the DPVM active database in the Information pane.
Step 3
You see the comparison dialog box.
Step 4
Default Settings
Table 28-1 lists the default settings for DPVM parameters.
Table 28-1 Default DPVM Parameters
DPVM
Disabled.
DPVM distribution
Enabled.
Autolearning
Disabled.