-
Cisco MDS 9000 Family Fabric Manager Configuration Guide, Release 3.4(1a)
-
Index
-
New and Changed Information
-
Preface
- Getting Started
- Installation and Switch Management
- Switch Configuration
-
Fabric Configuration
-
Configuring and Managing VSANs
-
SAN Device Virtualization
-
Creating Dynamic VSANs
-
Configuring Inter-VSAN Routing
-
Configuring and Managing Zones
-
Distributing Device Alias Services
-
Configuring Fibre Channel Routing Services and Protocols
-
Dense Wavelength Division Multiplexing
-
Managing FLOGI, Name Server, FDMI, and RSCN Databases
-
Discovering SCSI Targets
-
Configuring FICON
-
Advanced Features and Concepts
-
-
Security
-
Configuring FIPS
-
Configuring Users and Common Roles
-
Configuring SNMP
-
Configuring RADIUS and TACACS+
-
Configuring IPv4 Access Control Lists
-
Configuring Certificate Authorities and Digital Certificates
-
Configuring IPsec Network Security
-
Configuring FC-SP and DHCHAP
-
Configuring Port Security
-
Configuring Fabric Binding
-
- IP Services
- Intelligent Storage Services
- Network and Switch Monitoring
- Traffic Management
- Troubleshooting
-
Launching Fabric Manager in Cisco SAN-OS Releases Prior to 3.2(1)
-
Cisco Fabric Manager Unsupported Feature List
-
Interface Nonoperational Reason Codes
-
Managing Cisco FabricWare
-
Configuration Limits for Cisco MDS SAN-OS Release 3.1(x) and 3.2(x)
-
 Feedback
Table Of Contents
Enabling Intelligent Storage Services
Disabling Intelligent Storage Services
Configuring NASB
Intelligent Storage Services are features supported on the Storage Services Module (SSM). Intelligent Storage Services include Network-Accelerated Serverless Backup (NASB).
For licensing details, see Chapter 10, "Obtaining and Installing Licenses."
This chapter includes the following sections:
Intelligent Storage Services
All Intelligent Storage Services must be enabled on an SSM before the service can be configured. Services can be enabled for all ports on the SSM, or provisioned in groups of four ports. Switches running earlier releases that support intelligent storage services enable a service across all ports.
Note
The four port groups are contiguous, requiring you to configure ports 1 through 4, 5 through 8, and so on.
This section contains the following topics:
•
•
Enabling Intelligent Storage Services
In Cisco MDS SAN-OS Release 2.1(1a) or later, you can provision a subset of the ports for an SSM feature. The port range must be a multiple of four (for example fc4/1 through fc4-12).
To enable Intelligent Storage Services for an SSM and provision all ports or a group of ports to use these services using Fabric Manager, follow these steps:
Step 1
You see the Intelligent Storage Services configuration in the Information pane.
Step 2
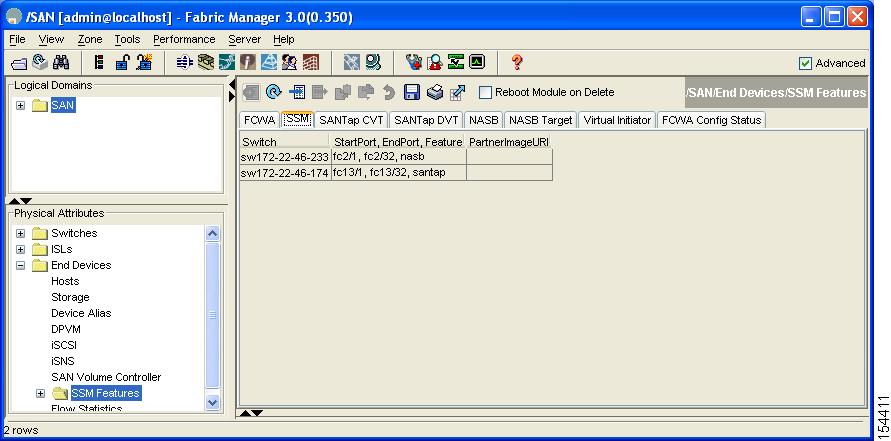
You see the set of configured services in the Information pane (See Figure 50-1).
Figure 50-1 SSM Configured Services
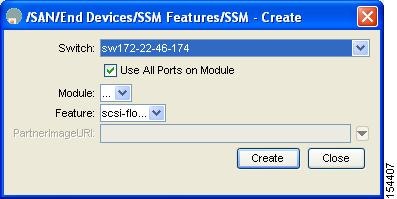
Step 3
You see the Create SSM dialog box shown in Figure 50-2.
Figure 50-2 Create SSM Dialog Box
Step 4
Step 5
Step 6
Note
Step 7
Step 8
Step 9
Disabling Intelligent Storage Services
To disable Intelligent Storage Services in Fabric Manager for an SSM and free up a group of ports that used these services, follow these steps:
Step 1
You see the Intelligent Storage Services configuration in the Information pane.
Step 2
You see the set of configured services in the Information pane (see Figure 50-1).
Step 3
Step 4
Step 5
Note
About NASB
Data movement in the fabric uses considerable processor cycles, which can cause client applications to slow down noticeably. Offloading data movement operations to a media server allows the client applications to run normally even during a backup operation. Media servers can further offload the data movement operation to NASB devices, which allows the media server to focus on the coordination functions needed to complete the backup.
Most backups performed today are server-free. In server-free backups, the application server is not involved in moving the data. The data can be moved by either a media server or a NASB device.
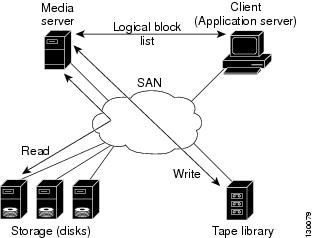
When the media server is the data mover, it moves the data between the disks and the tapes. The backup application runs on both the client device and the media server. However, the backup application in the client device performs minimal tasks for the backup operation.
The media server performs the following backup operations:
•
•
•
The backup application in the client device maps the data to be backed up and creates the logical block list associated with the data. The movement of data from the physical disks to the backup device (tape) is not performed by the client device. This reduces substantial load on the client device.
Note
An example configuration is shown in Figure 50-3. The media server moves the data directly between the storage disks and the tape devices during backups.
Figure 50-3 Example Configuration with Media Server as Data Mover
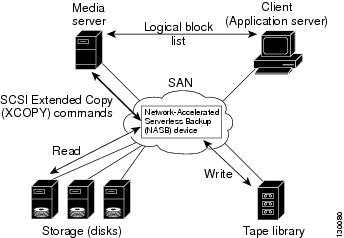
When the NASB is the data mover, it moves the data between the disks and the tapes. The NASB device is a SCSI target device capable of handling SCSI Extended Copy (XCOPY) commands as well as a SCSI initiator device capable of issuing READ/WRITE commands to disks and other backup media, such as tapes. See Figure 50-4.
Figure 50-4 Example Configuration with NASB Device as Data Mover
The task of managing and preparing the source and destination targets is performed by the media server. For example, if the destination is a tape library, the media server issues commands to load and unload the correct tape and position of the tape write head at the correct offset within the tape.
Configuring NASB
Network-Accelerated Serverless Backup (NASB) can be enabled on an entire SSM or it can be enabled on one or more groups of four ports on an SSM. Enabling NASB on interfaces has the following restrictions:
•
•
•
To configure NASB using Fabric Manager, follow these steps:
Step 1
You see the Intelligent Storage Services configuration in the Information pane.
Step 2
You see the NASB configuration in the Information pane.
Step 3
You see the NASB configuration dialog box shown in Figure 50-5.
Figure 50-5 NASB Configuration Dialog Box
Step 4
Note
Step 5
Note
Step 6
Step 7
Note
Note
Step 8
Note
Default Settings
Table 50-1 lists the default settings for NASB parameters.