Layer 2 Mesh Transparency

Overview of layer 2 mesh transparency

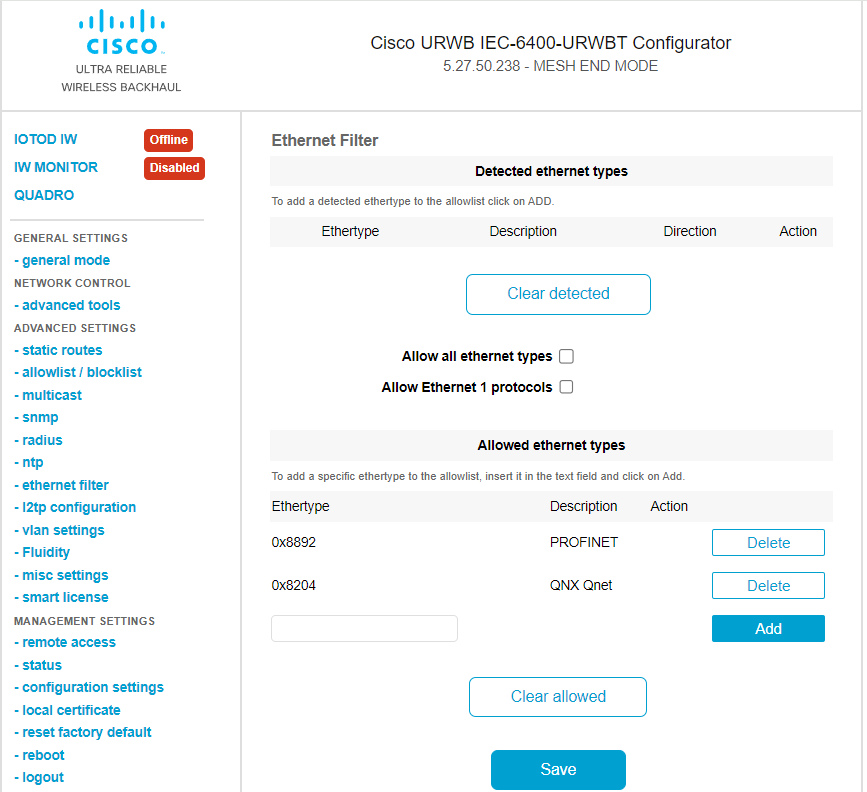
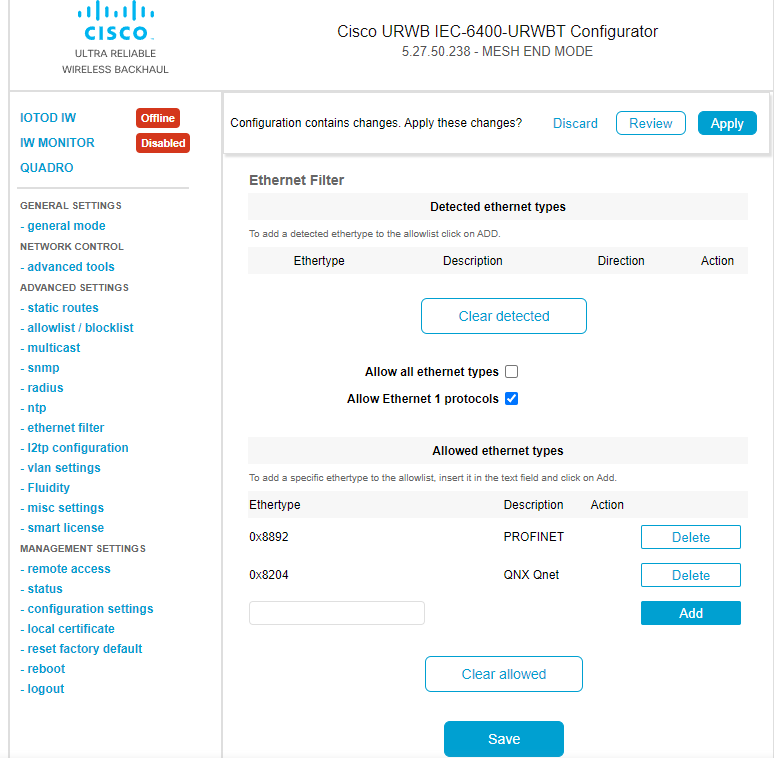
From IEC6400 Release 1.1.0, the IEC6400 gateway supports Layer 2 Mesh Transparency feature. Layer 2 mesh transparency feature allows to forward non-IPv4 Layer 2 protocols across the URWB network by selectively filtering which ether-types are permitted. The selection of allowed ether-types can be performed from either the CLI or the GUI.

Features of URWB MPLS layer 2 mesh networks

The URWB mesh data plane supports these functionalities when used in MPLS Layer 2 mode:

  • Detects and reports Ethertype present in the URWB network automatically.

  • Supports the configurable list of Ethertypes allowed in the network.

  • Manages transparency of Layer 2 protocols in a convenient manner.

List of reserved ethertypes

These Ethertypes are reserved and cannot be added to the allow list:

Ethertype (value)

Forwardable

Additional Information

0x0000 – 0x05FF

User-configurable

Ethernet-I frames: STP and CDP are subject to other configuration options

0x0800

Yes

IPv4

0x0806

Yes

ARP

0x0900 – 0x09FF

No

URWB signaling protocols

0x8100

Yes

IEEE 802.1Q VLAN encapsulation

0x8847 – 0x8848

No

MPLS

0xFFFF

No

IANA reserved

Advantages of layer 2 mesh transparency

  • Provides detailed control over the forwarding of Layer 2 protocols.

  • Ensures backward compatibility with existing deployments by default.

  • Allows for full transparency to enable all Layer 2 protocols, if needed.

  • Facilitates MAC address learning for generic Ethernet types.

Manage ethertypes using GUI

Perform these tasks to manage Layer 2 protocols parameters on the gateway:

Add an ethertype to allowed ethernet list using GUI

This task allows you to add Ethertypes to the allowed Ethernet list, enabling specific Ethernet frame types to pass through the filter configuration.

Use this procedure when you need to manage Ethernet frame filtering by adding specific Ethertypes to the allowed list. You can add both detected and undetected Ethertypes through the URWB configurator interface.

Before you begin

Follow these steps to add an Ethertype to the allowed Ethernet list using the GUI:

Procedure


Step 1

Launch your computer's web browser and enter the URL to open the configurator login page.

Step 2

Enter your username and password in the respective Username and Enable Password fields.

Step 3

Click Login.

Once you have successfully logged into the GUI, the URWB configurator is displayed.

Step 4

From the ADVANCED SETTINGS, click ethernet filter to open the Ethernet Filter window.

Step 5

In the Detected ethernet types section, click Add to add an Ethertype to the Allowed ethernet types section.

Step 6

In the Allowed ethernet types section, to add an Ethertype that has not been detected yet, enter the specific Ethertype value in the text box and click Add.

Step 7

Click Save and Apply to update the configuration.

The gateway reboots to apply the changes.

The Ethertype is successfully added to the allowed Ethernet types list in the GUI, indicating an update to the gateway configuration.


Allow all ethertypes to the allow list using GUI

This task allows all Ethernet types to pass through the gateway by enabling the allow all ethernet types option in the Ethernet Filter configuration.

Use this procedure when you need to configure the gateway to accept all Ethernet frame types without filtering. This setting is typically used when broad network compatibility is required.

Procedure


Step 1

Launch your computer's web browser and enter the URL to open the configurator login page.

Step 2

Enter your username and password in the respective Username and Enable Password fields.

Step 3

Click Login.

Once you have successfully logged into the GUI, the URWB configurator is displayed.

Step 4

From the ADVANCED SETTINGS, click ethernet filter to open the Ethernet Filter window.

Step 5

Check the Allow all ethernet types check box in the Ethernet Filter section to allow all Ethertypes.

Step 6

Click Save and Apply to update the configuration.

The gateway reboots to apply the changes.

The configuration interface shows the updated allow list with all Ethernet types enabled for the gateway after the reboot cycle.


Clear list of allowed ethertypes from the allowed ethernet list using GUI

Clear all allowed Ethertypes from the allowed Ethernet list to reset the filtering configuration.

Use this procedure when you need to remove all previously configured allowed Ethertypes from the gateway's Ethernet filter SETTINGS through the web interface.

Before you begin

Follow these steps to clear the list of allowed Ethertypes from the allowed Ethernet list using GUI:

Procedure


Step 1

Launch your computer's web browser and enter the URL to open the configurator login page.

Step 2

Enter your username and password in the respective Username and Enable Password fields.

Step 3

Click Login.

Once you have successfully logged into the GUI, the URWB configurator is displayed.

Step 4

From the ADVANCED SETTINGS, click ethernet filter to open the Ethernet Filter window.

Step 5

In the Allowed ethernet types section, click Clear allowed to clear all the Ethertypes from the Allowed ethernet types section.

When you click Clear allowed, the Allowed ethernet types section is cleared.

Step 6

Click Save and Apply to update the configuration.

The gateway reboots to apply the changes.


Delete list of detected ethertypes in the detected ethernet list using GUI

Delete all detected Ethertypes from the detected Ethernet types list to maintain a clean configuration and remove previously identified network traffic types.

Use this procedure when you need to clear the detected Ethernet types list that has accumulated detected Ethertypes over time. This operation removes all entries from the detected list, allowing for a fresh start in Ethernet type detection.

Before you begin

Follow these steps to delete the list of detected Ethertypes in the detected Ethernet list using the GUI:

Procedure


Step 1

Launch your computer's web browser and enter the URL to open the configurator login page.

Step 2

Enter your username and password in the respective Username and Enable Password fields.

Step 3

Click Login.

Once you have successfully logged into the GUI, the URWB configurator is displayed.

Step 4

From the ADVANCED SETTINGS, click ethernet filter to open the Ethernet Filter window.

Step 5

In the Detected ethernet types section, click Clear detected to clear all the detected Ethertypes from the list.

When you click Clear detected, the Detected ethernet types section is cleared.


Manage ethernet 1 protocols using GUI

Enable Ethernet 1 protocols on the gateway to allow specific network traffic filtering and protocol management through the web-based configuration interface.

Use this procedure when you need to enable Ethernet 1 protocol filtering on your URWB gateway. The configuration is performed through the web-based GUI configurator and requires a system reboot to take effect.

Procedure


Step 1

Launch your computer's web browser and enter the URL to open the configurator login page.

Step 2

Enter your username and password in the respective Username and Enable Password fields.

Step 3

Click Login.

Once you have successfully logged into the GUI, the URWB configurator is displayed.

Step 4

From the ADVANCED SETTINGS, click ethernet filter to open the Ethernet Filter window.

Step 5

Check the Allow Ethernet 1 protocols check box in the Ethernet Filter window to enable Ethernet 1 protocols.

Step 6

Click Save and Apply to update the configuration.

The gateway reboots to apply the changes.

The URWB configurator interface shows the Ethernet 1 protocols enabled on the gateway after a successful reboot.


Manage ethertypes using CLI

Perform these tasks to manage Layer 2 protocols parameters on the gateway:

Add an ethertype to the allow list using CLI

Add a specific Ethertype to the allow list to control which Ethernet frame types are permitted.

Use this procedure when you need to configure MPLS Ethernet filtering by adding specific Ethertype values to the allow list.

Procedure


Use the mpls ether-filter allow-list add Ethertype value command to add a specific Ethertype to the allow list.

Example:

Device#mpls ether-filter allow-list add 0x86DD

Delete an ethertype from the allow list using CLI

Remove a specific Ethertype from the MPLS Ethernet filter allow list to control which Ethernet frame types are permitted.

Use this procedure when you need to remove an Ethertype that is no longer required in the allow list configuration.

Procedure


Use the mpls ether-filter allow-list delete Ether-type value command to delete a specific Ethertype from the allow list.

Example:

Device#mpls ether-filter allow-list delete 0x86DD

Verify list of allowed ethertypes using CLI

Use the mpls command to view the list of allowed Ethertypes from the Ethernet filter allow list.

Device#mpls
.
.
.
Ethernet Filter allow-list: 0x8892 0x8204 0x86dd, ethernet-I block
.
.
.

Note


If Ethernet-I is enabled, the mpls show output is shown with Ethernet Filter allow-list: 0x8892 0x8204 0x86dd .


Clear all ethertypes from the allow list using CLI

This task removes all detected and allowed Ethertypes from the allow list to reset the filter configuration.

When you need to clear the current allow list configuration and start fresh, use this command to remove all previously detected and allowed Ethertypes.

Procedure


Use the mpls ether-filter allow-list clear command to delete all the detected and allowed Ethertypes from the allow list.

Example:

Device#mpls ether-filter allow-list clear

Verify removed ethernet filter allow list status using CLI

Use the mpls command to view the Ethernet filter allow list.

Device#mpls
.
.
.
Ethernet Filter allow-list: none, ethernet-I block
.
.
.

Note


If the allowed ethertypes has been cleared the mpls show output is shown with Ethernet Filter allow-list: none .


Add all ethertypes to the allow list using CLI

Use the mpls ether-filter allow-list add all command to add all the Ethertypes to allow list.

Device#mpls ether-filter allow-list add all

Verify all ethertypes in the allow list using CLI

Use mpls command to view the Ethernet filter allow list.

Device#mpls
.
.
.
Ethernet Filter allow-list: all, ethernet-I block

Note


If all Ethertypes are allowed, the mpls show output is shown with Ethernet Filter allow-list: all .


Enable ethernet 1 protocol using CLI

Use the mpls ether-filter ethernet-I forward command to enable Ethernet 1 protocol.

Device#mpls ether-filter ethernet-I forward

Block ethernet 1 protocol using CLI

Use the mpls ether-filter ethernet-I block command to block the Ethernet 1 protocol.

Device#mpls ether-filter ethernet-I block

Verify ethernet 1 allowed ethertypes using CLI

Use the mpls command to view the list of allowed Ethertypes from the Ethernet filter allow list.

Device#mpls
.
.
.
Ethernet Filter allow-list: 0x8892 0x8204 0x86dd, ethernet-I block
.
.
.

Note


If Ethernet-I is enabled, the mpls show output is shown with ethernet-I forward .


Clear all detected ethertypes using CLI

This task deletes all detected Ethertypes from the device to reset the detection table.

The MPLS Ethernet filter maintains a table of detected Ethertypes during normal operation. Clearing this table may be necessary for troubleshooting or maintenance purposes.

Procedure


Use the mpls ether-filter table clear command to delete all the detected Ethertypes.

Example:

Device#mpls ether-filter table clear

Note


The detection process works in background after clearing the detected Ethernet types.


Verify list of detected ethertypes using CLI

Use the mpls ether-filter table command to view the list of detected Ethertypes from the Ethernet filter allow list.

Device#mpls ether-filter table
Ether-type Direction Description
0x8899     INGRESS   ---
0x86DD     INGRESS   IPv6