Hotspot 2.0
Hotspot 2.0 is a network interworking feature that
-
enables IEEE 802.11 devices to interwork with external networks
-
provides network discovery and selection services, and
-
allows mobile devices to join Wi-Fi networks automatically, including during roaming.
Hotspot 2.0 components
The Hotspot 2.0 feature has four distinct parts:
-
Hotspot 2.0 Beacon Advertisement: Allows a mobile device to discover Hotspot 2.0-compatible and 802.11u-compatible WLANs.
-
Access Network Query Protocol (ANQP) Queries: Sends queries about the networks from IEEE 802.11 devices, such as network type (private or public); connectivity type (local network, internet connection, and so on), or the network providers supported by a given network.
-
Online Sign-up: Allows a mobile device to obtain credentials to authenticate itself with the Hotspot 2.0 or WLAN.
-
Authentication and Session Management: Provides authentication (802.1x) and management of the STA session (session expiration, extension, and so on).
Hotspot 2.0, also known as HS2 and Wi-Fi Certified Passpoint, is based on the IEEE 802.11u and Wi-Fi Alliance Hotspot 2.0 standards. It seeks to provide better bandwidth and services-on-demand to end users.
The interworking service aids network discovery and selection, enabling information transfer from external networks. It provides information to the stations about the networks before association.
Interworking not only helps users within the home, enterprise, and public access domains, but also assists manufacturers and operators to provide common components and services for IEEE 802.11 customers. These services are configured on a per-WLAN basis on the Cisco Wireless Controller (controller).
In order to mark a WLAN as Hotspot 2.0-compatible, the 802.11u-mandated information element and the Hotspot 2.0 information element is added to the basic service set (BSS) beacon advertised by the corresponding AP, and in WLAN probe responses.
 Note |
The Hotspot 2.0 feature supports only local mode or FlexConnect mode (central switching and central authentication). FlexConnect local switching is only supported when the Open Roaming configuration template is set up using the wireless hotspot ANQP-server server-name type open-roaming command. If the configuration diverges from this template, FlexConnect local switching will not be supported. |
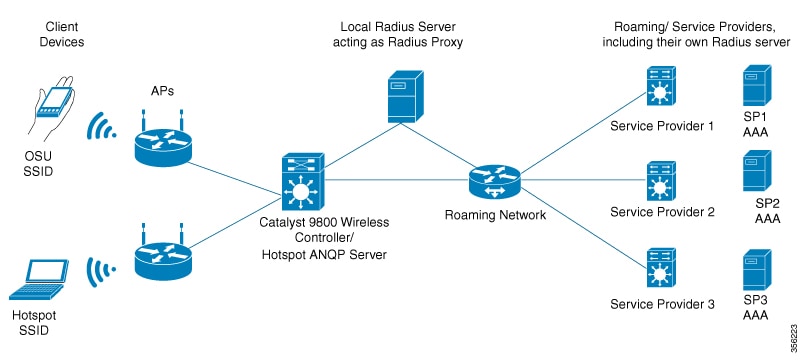
This figure shows a standard deployment of the Hotspot 2.0 network architecture:
Hotspot 2.0 enhancements
From Cisco IOS XE Amsterdam 17.3.1, the Hotspot 2.0 feature has been enhanced with these options:
-
New ANQP elements:
-
Advice of charge: Provides information on the financial charges for using the SSID of the NAI realm
-
Operator icon metadata
-
Venue URL: Defines an optional URL for each of the configured venue names
-
-
Introduction of Terms and Conditions: This requires a user to accept certain Terms and Conditions before being allowed internet access, after connecting to a Hotspot SSID.
-
Integration of OSEN security and WPA2 security on the same SSID.
From Cisco IOS XE Amsterdam 17.3.1 onwards, two encryption methods are supported on a single SSID, namely WPA2 802.1x for Hotspot 2.0 and OSEN for online sign-up. Based on the type of encryption selected during client association, the client will be put on Hotspot 2.0 VLAN or online sign-up VLAN.
In WPA2 802.1x authentication, a client should match the credentials provisioned on a device. In online sign-up, a service provider WLAN is used by a client to perform online sign-up. For Hotspot 2.0 SSIDs, the RADIUS server enforces the terms and conditions before allowing internet connectivity to clients.
This release also supports OSEN-specific VLAN in a policy profile. If an OSEN VLAN is defined in a policy profile, OSEN clients are added to the VLAN. Otherwise, clients are added to the regular policy profile VLAN or to the default VLAN. If OSEN is enabled with WPA2 on an SSID, it is mandatory to define an OSEN VLAN in the policy profile. Otherwise, clients cannot join the VLAN.
In FlexConnect mode, if an OSEN VLAN is defined in a policy profile, the same VLAN needs to be added to the flex profile. Failing to do so excludes the clients from the VLAN.
Note |
When Hotspot 2.0 is enabled in a WLAN, the Wi-Fi direct clients that support cross-connect feature should not be allowed to associate to the Hotspot 2.0 WLAN. To make sure this policy is enforced, ensure that the following configuration is in place: |
Restrictions
-
Clients are excluded if an OSEN VLAN is not added to a flex profile.
-
In FlexConnect mode, clients are excluded if an OSEN VLAN is not added in a flex profile.
-
In FlexConnect deployments, the URL filter should reference an existing URL filter (configured using the urlfilter list urlfilter-name command). Otherwise, a client is added to the excluded list, after authentication.
-
Only central authentication is supported.
-
Fragmented ANQP replies are not synchronized to the standby controller in high-availability mode. Therefore, clients have to re-issue a query if there is a switchover.
Open roaming
Open roaming is a configuration feature that
-
enables mobile users to automatically and seamlessly roam across Wi-Fi and cellular networks
-
simplifies the task of setting up a Hotspot 2.0 ANQP server with a new configuration template, and
-
is supported from Cisco IOS XE Amsterdam Release 17.2.1 on the controller.
Open roaming configuration options
When you configure open roaming, fixed ANQP parameters are automatically populated.
You can configure different identity types by defining roaming organizational identifiers. The organizational unique identifier (OUI) is a three-octet number that identifies the type of organizations available in a given roaming consortium. The OUI list determines the type of identities allowed to roam into the network. The default configuration allows all the identities on the access network. However, access networks can customize the Roaming Consortium Organization Identifier (RCOI) they advertise.
You can configure three types of policies for access networks:
-
Allow all: Accepts users from any identity provider (IDP), with any privacy policy.
-
Real ID: Accepts users from any IDP, but only with a privacy policy that shares real identity (anonymous not accepted).
-
Custom: Accepts users of select identity types and privacy policies associated with the identity types; basically all the other RCOIs.
Users can select the following privacy modes:
-
Anonymous
-
Share real identity
The list of currently defined organizational identifiers and their aliases are given in the following table.
|
Description |
Roaming Organizational Identifier |
WBA Value |
Display Name |
|---|---|---|---|
|
All |
004096 |
5A03BA0000 |
All |
|
All with real ID |
00500b |
5A03BA1000 |
All with real-ID only |
|
All paid members |
00500f |
BAA2D00000 |
All paid |
|
Device manufacturer all ID |
00502a |
5A03BA0A00 |
Device Manufacturer |
|
Device manufacturer real ID only |
0050a7 |
5A03BA1A00 |
Device Manufacturer real-ID |
|
Cloud or Social ID |
005014 |
5A03BA0200 |
Cloud ID |
|
Cloud or Social real ID |
0050bd |
5A03BA1200 |
Cloud ID real-ID |
|
Enterprise Employee ID |
00503e |
5A03BA0300 |
Enterprise ID |
|
Enterprise Employee real ID |
0050d1 |
5A03BA1300 |
Enterprise ID real ID |
|
Enterprise Customer ID |
005050 |
- |
Enterprise Customer program ID |
|
Enterprise Customer real ID |
0050e2 |
- |
Enterprise Customer program real ID |
|
Loyalty Retail ID |
005053 |
5A03BA0B00 |
Loyalty Retail |
|
Loyalty Retail real ID |
0050f0 |
5A03BA1B00 |
Loyalty Retail real ID |
|
Loyalty Hospitality ID |
005054 |
5A03BA0600 |
Loyalty Hospitality |
|
Loyalty Hospitality real ID |
00562b |
5A03BA1600 |
Loyalty Hospitality real ID |
|
SP free Bronze Qos |
005073 |
5A03BA0100 |
SP free Bronze Qos |
|
SP free Bronze Qos Real ID |
0057D2 |
5A03BA1100 |
SP free Bronze Qos Real ID |
|
SP paid Bronze QoS |
- |
BAA2D00100 |
SP paid Bronze QoS |
|
SP paid Bronze QoS real ID |
- |
BAA2D01100 |
SP paid Bronze QoS real ID |
|
SP paid Silver QoS |
- |
BAA2D02100 |
SP paid Silver QoS |
|
SP paid Silver QoS real ID |
- |
BAA2D03100 |
SP paid Silver QoS real ID |
|
SP paid Gold QoS |
- |
BAA2D04100 |
SP paid Gold QoS |
|
SP paid Gold QoS real ID |
- |
BAA2D05100 |
SP paid Gold QoS real ID |
|
Government ID free |
- |
5A03BA0400 |
Government ID free |
|
Automotive ID free |
- |
5A03BA0500 |
Automotive ID free |
|
Automotive Paid |
- |
BAA2D00500 |
Automotive Paid |
|
Education or Research ID free |
- |
5A03BA0800 |
Education or Research ID free |
|
Cable ID free |
- |
5A03BA0900 |
Cable ID free |
Configure Hotspot 2.0
Configure an access network query protocol server (CLI)
The Access Network Query Protocol Server (ANQP) is a query and response protocol that defines the services offered by an AP, usually at a Wi-Fi Hotspot 2.0.
Note |
When configuring roaming-OI in the ANQP server, ensure that you set the beacon keyword for at least one roaming-OI, as mandated by the 802.11u standard. |
Procedure
|
Step 1 |
Enter global configuration mode. Example: |
||
|
Step 2 |
Configure a Hotspot 2.0 ANQP server. Example:Example: |
||
|
Step 3 |
Add a description for the ANQP server. Example:Example: |
||
|
Step 4 |
Configure a 802.11u Third Generation Partnership Project (3GPP) cellular network. Example:Example:The mobile-country-code should be a 3-digit decimal number. The mobile-network-code should be a 2-digit or 3-digit decimal number. |
||
|
Step 5 |
Configure the ANQP reply fragmentation threshold, in bytes. Example:Example:The ANQP protocol can be customized by setting the fragmentation threshold, after which the ANQP reply is split into multiple messages.
|
||
|
Step 6 |
Configure the Hotspot 2.0 ANQP domain identifier. Example:Example: |
||
|
Step 7 |
Configure the 802.11u network authentication type. Example:Example:Depending on the authentication type, a URL is needed for HTTP and HTTPS. |
||
|
Step 8 |
Configure the Hotspot 2.0 protocol and port capabilities. Example:Example:
|
||
|
Step 9 |
Configure an 802.11u domain name. Example:Example:You can configure up to 32 domain names. The domain-name should not exceed 220 characters. |
||
|
Step 10 |
Configure an 802.11u IPv4 address type in the Hotspot 2.0 network. Example:Example: |
||
|
Step 11 |
Configure an 802.11u IPv6 address type in the Hotspot 2.0 network. Example:Example: |
||
|
Step 12 |
Configure an 802.11u NAI realm profile that identifies the realm that is accessible using the AP. Example:Example: |
||
|
Step 13 |
Configure a Hotspot 2.0-operating class identifier. Example:Example: |
||
|
Step 14 |
Configure a Hotspot 2.0 operator-friendly name in a given language. Example:Example:Use only the first three letters of the language, in lower case, for the language code. For example, use eng for English. To see the full list of language codes, go to: http://www.loc.gov/standards/iso639-2/php/code_list.php.
|
||
|
Step 15 |
Configure the SSID that wireless clients will use for OSU. Example:Example:The SSID length can be up to 32 characters. |
||
|
Step 16 |
Configure the 802.11u roaming organization identifier. Example:Example:If the beacon keyword is specified, the roaming OUI is advertised in the AP WLAN beacon or probe response. Otherwise, it will only be returned while performing the roaming OUI ANQP query.
|
||
|
Step 17 |
Configure the 802.11u venue information. Example:Example:The venue-name should not exceed 220 characters and the language-code should only be 2 or 3 lowercase letters (a-z) in length. |
Configure ANQP global server settings (GUI)
Configure ANQP (Access Network Query Protocol) global server settings to define network parameters and connection types for wireless hotspot services.
Use this procedure to configure global server settings for ANQP, which enables wireless clients to discover network services and connection information before associating with the access point.
Procedure
|
Step 1 |
Choose Configuration > Wireless > Hotspot/OpenRoaming. |
||
|
Step 2 |
Select an existing server from the list of servers. |
||
|
Step 3 |
Click the Server Settings tab. |
||
|
Step 4 |
Go to the Global Server Settings section. |
||
|
Step 5 |
From the IPv4 Type drop-down list, choose an IPv4 type. |
||
|
Step 6 |
From the IPv6 Type drop-down list, choose an IPv6 type. |
||
|
Step 7 |
In the OSU SSID field, enter the SSID that wireless clients will use for Online Sign-Up (OSU). |
||
|
Step 8 |
Click the Show Advanced Configuration link to view the advanced options.
|
||
|
Step 9 |
Click Apply to Device. |
The ANQP global server settings are configured and applied to the device. Wireless clients can now query the access point for network information using the configured parameters.
Configure open roaming (CLI)
For example, these are the default values enforced with the type open-roaming template:
-
nai-realm open.openroaming.org
-
eap-method eap-tls
-
eap-method eap-ttls
-
inner-auth-non-eap mschap-v2
-
inner-auth-non-eap pap
-
eap-method eap-aka
Procedure
|
Step 1 |
Enter global configuration mode. Example: |
|
Step 2 |
Configure a Hotspot 2.0 ANQP server with open roaming. Example:Example: |
|
Step 3 |
Set the open roaming element alias. Example:Example: |
|
Step 4 |
Configure a preferred domain name to ensure that clients roam into a preferred network. Example:Example:You can configure up to 32 domain names. The domain-name should not exceed 220 characters. |
Configure open roaming (GUI)
Configure an ANQP server as an open roaming server to enable seamless connectivity for users across different networks without requiring separate authentication credentials.
Use this procedure when you need to set up open roaming functionality through the GUI interface to allow automatic network access for compatible devices.
Procedure
|
Step 1 |
Choose Configuration > Wireless > Hotspot/OpenRoaming. |
||
|
Step 2 |
Click Add. The Add New ANQP Server window is displayed. |
||
|
Step 3 |
In the Name field, enter a name for the server. |
||
|
Step 4 |
In the Description field, enter a description for the server. |
||
|
Step 5 |
Check the OpenRoaming Server check box to use the server as an open roaming server.
|
||
|
Step 6 |
Check the Internet Access check box to enable internet access for the server. |
||
|
Step 7 |
From the Network Type drop-down list, choose the network type. |
||
|
Step 8 |
Click Apply to Device. |
The ANQP server is configured as an open roaming server and applied to the device, enabling seamless network access for compatible client devices.
Configure NAI realms (GUI)
Configure NAI realms to define Network Access Identifier realms for OpenRoaming authentication, specifying supported EAP methods and credential types for wireless clients.
NAI realms are used in 802.11u networks to specify authentication parameters and supported EAP methods for network access. This configuration is essential for OpenRoaming implementations where clients need to understand available authentication options.
Procedure
|
Step 1 |
Choose Configuration > Wireless > Hotspot/OpenRoaming. |
|
Step 2 |
Select an existing server from the list of servers. |
|
Step 3 |
Go to the NAI Realms section. |
|
Step 4 |
Click Add. The Add NAI Realm window is displayed. |
|
Step 5 |
In the NAI Realm Name field, enter an 802.11u NAI realm of the OSU operator. |
|
Step 6 |
In the EAP Methods section, use the toggle button to enable the required EAP methods. After an EAP method is enabled, a pane is displayed to configure the details. Users are shown a configuration section where they can enable credential, inner-auth-EAP, inner-auth-non-EAP, tunneled-EAP-credential. The user can select multiple options for each of the configuration.
|
|
Step 7 |
Click Apply to Device. |
The NAI realm is configured with the specified authentication methods and applied to the device, enabling OpenRoaming clients to identify supported authentication options for network access.
Configure organizational identifier alias (GUI)
Configure organizational identifier alias to enable proper roaming functionality and domain management for wireless hotspot and OpenRoaming services.
Use this procedure when you need to set up roaming organization identifiers and domain names for wireless hotspot or OpenRoaming configurations through the graphical user interface.
Procedure
|
Step 1 |
Choose Configuration > Wireless > Hotspot/OpenRoaming. |
||
|
Step 2 |
Select an existing server from the list of servers. |
||
|
Step 3 |
In the Roaming OIs area, enter an 802.11u roaming organization identifier in the Roaming OI field. |
||
|
Step 4 |
Check the Beacon State check box to enable the beacon. If the beacon is specified, the roaming OUI is advertised in the AP WLAN beacon or probe response. Otherwise, it will only be returned while performing the roaming OUI ANQP query.
|
||
|
Step 5 |
Click Add to add a roaming OI. |
||
|
Step 6 |
In the Available OpenRoaming OI window, select an organizational identifier and click the right arrow to add an OpenRoaming OI. |
||
|
Step 7 |
In the Domains area, enter an 802.11u domain name in the Domain Name field. |
||
|
Step 8 |
Click Add to use the domain name that you have entered as the preferred domain. |
||
|
Step 9 |
Click Apply to Device. |
The organizational identifier alias is configured with the specified roaming OIs and domain names. The configuration is applied to the device and roaming functionality is enabled for the wireless hotspot or OpenRoaming service.
Configure WAN metrics (GUI)
Configure WAN metrics to define network performance parameters including downlink load, downlink speed, upload load, upload speed, and link status for hotspot servers.
WAN metrics configuration allows you to specify network performance characteristics that affect how the hotspot server manages wireless connections and traffic flow.
Procedure
|
Step 1 |
Choose Configuration > Wireless > Hotspot/OpenRoaming. |
|
Step 2 |
Select an existing server from the list of servers. |
|
Step 3 |
Click the Server Settings tab. |
|
Step 4 |
Go to the WAN Metrics area. |
|
Step 5 |
In the Downlink Load field, enter the WAN downlink load. |
|
Step 6 |
In the Downlink Speed (kbps) field, enter the WAN downlink speed, in kbps. |
|
Step 7 |
In the Load Duration (100ms) field, enter the load duration. |
|
Step 8 |
In the Upload Load field, enter the WAN upload load. |
|
Step 9 |
In the Upload Speed (kbps) field, enter the WAN upload speed, in kbps. |
|
Step 10 |
From the Link Status drop-down list, choose the link status. |
|
Step 11 |
Use the Full Capacity Link toggle button to enable the WAN link to operate at its maximum capacity. |
|
Step 12 |
Click Apply to Device. |
The WAN metrics configuration is applied to the selected hotspot server, and the network performance parameters are updated according to your specified settings.
Configure WAN metrics
Procedure
|
Step 1 |
Enter global configuration mode. Example: |
|
Step 2 |
Configure a Hotspot 2.0 ANQP server. Example:Example: |
|
Step 3 |
Configure the WAN downlink load. Example:Example: |
|
Step 4 |
Configure the WAN downlink speed, in kbps. Example:Example: |
|
Step 5 |
Configure the WAN link to operate at its maximum capacity. Example: |
|
Step 6 |
Set the WAN link status. Example:Example: |
|
Step 7 |
Configure the uplink or downlink load measurement duration. Example:Example: |
|
Step 8 |
Configure the WAN uplink load. Example:Example: |
|
Step 9 |
Configure the WAN uplink speed, in kbps. Example:Example: |
Configure beacon parameters (GUI)
This task allows you to configure beacon parameters for hotspot and OpenRoaming functionality on wireless networks, including setting the homogenous extended service set identifier, domain identifier, and venue information.
Use this procedure when you need to establish beacon parameters for wireless hotspot services or OpenRoaming configurations through the web-based GUI interface.
Procedure
|
Step 1 |
Choose Configuration > Wireless > Hotspot/OpenRoaming. |
|
Step 2 |
Select an existing server from the list of servers. |
|
Step 3 |
Click Server Settings tab. |
|
Step 4 |
Go to the Beacon Parameters section. |
|
Step 5 |
In the Hess ID field, enter the homogenous extended service set identifier. The Hess ID can be either in xx:xx:xx:xx:xx:xx, xx-xx-xx-xx-xx-xx, or xxxx.xxxx.xxxx format. |
|
Step 6 |
In the Domain ID field, enter the domain's identifier. |
|
Step 7 |
From the Venue Type drop-down list, select the venue. Choosing a venue activates the subvenue type. |
|
Step 8 |
From the subvenue-type drop-down list, select the sub-venue. |
|
Step 9 |
Click Apply to Device. |
The beacon parameters are configured and applied to the device. The wireless network will now broadcast the specified hotspot and OpenRoaming configuration settings.
Configure authentication and venue (GUI)
Configure authentication types, venue details, and connection capabilities for Hotspot/OpenRoaming services through the wireless controller GUI.
Use this procedure to set up authentication methods, venue information, and connection capabilities for wireless hotspot services. This configuration ensures compliance with Hotspot 2.0 specifications and provides proper authentication and venue identification for wireless clients.
Procedure
|
Step 1 |
Choose Configuration > Wireless > Hotspot/OpenRoaming. |
|
Step 2 |
Select an existing server from the list of servers. |
|
Step 3 |
Click the Authentication/Venue tab. |
|
Step 4 |
Under the Network Auth Types section, check the DNS Redirect, Online Enrolment, HTTP/HTTPS Redirect, Terms and Conditions check boxes. For HTTP/HTTPS Redirect and Terms and Conditions, the URL field is enabled after selecting them. |
|
Step 5 |
Add the URL for the corresponding authentication type. |
|
Step 6 |
Click Apply. |
|
Step 7 |
Go to the Venues section and click Add. The Venue Details pane is displayed. |
|
Step 8 |
In the Language Code field, enter the language code. Use the first two or three letters of the language, in lower case, for the language code. For example, use eng for English. To see the full list of language codes, go to: http://www.loc.gov/standards/iso639-2/php/code_list.php. |
|
Step 9 |
In the Venue URL field, enter the URL of the venue. |
|
Step 10 |
In the Venue Name field, enter the name of the venue. |
|
Step 11 |
Click check mark icon to add the venue details. |
|
Step 12 |
Go to the Connection Capability section and click Add. The Connection Capabilities pane is displayed. See the connection-capability command in the Cisco Catalyst 9800 Series Wireless Controller Command Reference document for a list of open ports and protocols. |
|
Step 13 |
In the Port Number field, enter the port number. |
|
Step 14 |
From the Connection Status drop-down list, choose a connection status. |
|
Step 15 |
In the IP Protocol field, enter the IP protocol number. Hotspot 2.0 specifications require that you predefine some open ports and protocols. Ensure that you meet these requirements in order to comply with the Hotspot 2.0 specifications. See the connection-capability command in the Cisco Catalyst 9800 Series Wireless Controller Command Reference document for a list of open ports and protocols. |
|
Step 16 |
Click the check mark icon to add the connection details. |
|
Step 17 |
Click Apply to Device. |
The authentication types, venue details, and connection capabilities are configured and applied to the wireless controller. The hotspot service is now configured with the specified authentication methods and venue information.
Configure 3GPP/operator (GUI)
This task allows you to configure 3GPP cellular networks and Hotspot 2.0 operators for wireless hotspot and OpenRoaming functionality.
Use this configuration when you need to set up 3GPP cellular network information and operator details for wireless hotspot services. This configuration includes operating class indicators, mobile country and network codes, and operator language settings.
Procedure
|
Step 1 |
Choose Configuration > Wireless > Hotspot/OpenRoaming. |
||
|
Step 2 |
Select an existing server from the list of servers. |
||
|
Step 3 |
Go to the 3GPP/Operator tab. |
||
|
Step 4 |
In the Operating Class Indicator field, enter the operating class identifier and click the + icon. The operating class identifier is added and displayed in the pane below. Use the delete icon to delete them, if required.
|
||
|
Step 5 |
Go to the 3GPP Cellular Networks section and click Add. The 3GPP Network Details pane is displayed. |
||
|
Step 6 |
In the Mobile Country Code (MCC) field, enter the mobile country code, which should be a 3-digit decimal number. |
||
|
Step 7 |
In the Mobile Network Code (MNC) field, enter the mobile network code, which should be a 2 or 3-digit decimal number. For the list of Mobile Country Codes (MCC) and Mobile Network Codes (MNC), see the following links: https://www.itu.int/pub/T-SP-E.212B-2018 or https://www.MCC-MNC.com. |
||
|
Step 8 |
Click check mark icon to add the network details. |
||
|
Step 9 |
Go to the Hotspot 2.0 Operators section and click Add. The Operator Details pane is displayed. |
||
|
Step 10 |
In the Language Code field, enter the language code. Use only the first three letters of the language, in lower case, for the language code. For example, use eng for English. To see the full list of language codes, go to: http://www.loc.gov/standards/iso639-2/php/code_list.php. |
||
|
Step 11 |
In the Name field, enter the name of the OSU operator. |
||
|
Step 12 |
Click check mark icon to add the operator details. |
||
|
Step 13 |
Click Apply to Device. |
The 3GPP/operator configuration is applied to the device. The configured operating class indicators, cellular network details, and operator information are now active for wireless hotspot and OpenRoaming services.
Configure OSU provider (GUI)
Configure an OSU (Online Sign-Up) provider to enable wireless clients to connect and provision network access through the Hotspot/OpenRoaming service.
Use this procedure to set up an OSU provider with the necessary configuration parameters including provider name, NAI realm, authentication methods, server URI, icon configuration, and friendly names for different languages.
Before you begin
Follow these steps to configure OSU provider using GUI:
Procedure
|
Step 1 |
Choose Configuration > Wireless > Hotspot/OpenRoaming. |
|
Step 2 |
Select an existing server from the list of servers. |
|
Step 3 |
Go to the OSU Provider tab. |
|
Step 4 |
Click Add. The General Config pane is displayed. |
|
Step 5 |
In the Provider Name field, enter the OSU provider name. |
|
Step 6 |
In the NAI Realm field, enter the Network Access Identifier (NAI) realm of the OSU operator. |
|
Step 7 |
From the Primary Method drop-down list, choose the primary supported OSU method of the OSU operator. This activates the Secondary Method drop-down list. If you choose None as the primary supported OSU method, you will not get the secondary method. |
|
Step 8 |
(Optional) From the Secondary Method drop-down list, choose the secondary supported OSU method of the OSU operator. |
|
Step 9 |
In the Server URI field, enter the server Uniform Resource Identifier (URI) of the OSU operator. |
|
Step 10 |
Click Icon Config tab. |
|
Step 11 |
Click Add. |
|
Step 12 |
From the Icon Name drop-down list, choose the icon name. |
|
Step 13 |
Click Save. |
|
Step 14 |
Click Friendly Names tab. |
|
Step 15 |
Click Add. |
|
Step 16 |
In the Language field, enter the language code. |
|
Step 17 |
In the Name field, enter the name of the OSU operator. |
|
Step 18 |
In the Description field, enter the description for the OSU operator. |
|
Step 19 |
Click Save. |
|
Step 20 |
Click the check mark icon to save. |
|
Step 21 |
Click Apply to Device. |
The OSU provider is configured and applied to the device, enabling wireless clients to use the Online Sign-Up service for network provisioning.
Configure OSU provider (CLI)
Configure an OSU (Online Sign-Up) provider to enable wireless clients to connect and provision network access through the Hotspot/OpenRoaming service.
Use this procedure to set up an OSU provider with the necessary configuration parameters including provider name, NAI realm, authentication methods, server URI, icon configuration, and friendly names for different languages.
Before you begin
Follow these steps to configure OSU provider using CLI:
Procedure
|
Step 1 |
Enter global configuration mode. Example: |
|
Step 2 |
Configure an icon for Hotspot 2.0 and its parameters, such as media type, language code, icon width, and icon height. Example: |
|
Step 3 |
Configure a Hotspot 2.0 ANQP server. Example: |
|
Step 4 |
Configure a Hotspot 2.0 OSU provider name. Example: |
|
Step 5 |
Configure the name of the OSU operator in a given language. Example:The OSU operator name and description should not exceed 220 characters. The language code should be 2 or 3 lower-case letters (a-z). |
|
Step 6 |
Configure the server Uniform Resource Identifier (URI) of the OSU operator. Example: |
|
Step 7 |
Configure the primary supported OSU method of the OSU operator. Example: |
|
Step 8 |
Configures the Network Access Identifier (NAI) realm of the OSU operator. Example:The nai-realm should not exceed 220 characters. |
|
Step 9 |
Configure the icon for the OSU provider. Example:The file-name should not exceed 100 characters. |
The OSU provider is configured and applied to the device, enabling wireless clients to use the Online Sign-Up service for network provisioning.
Configure Hotspot 2.0 WLAN
Procedure
|
Step 1 |
Enter global configuration mode. Example: |
|
Step 2 |
Configure a WLAN and enter WLAN configuration mode. Example:Example: |
|
Step 3 |
Configure random GTK for hole 196 mitigation. Example:Hole 196 is the name of WPA2 vulnerability. |
|
Step 4 |
Enable the WLAN. Example: |
Configure an online subscription with encryption WLAN (CLI)
Procedure
|
Step 1 |
Enter global configuration mode. Example: |
||
|
Step 2 |
Configure a WLAN and enter WLAN configuration mode. Example:Example: |
||
|
Step 3 |
Enable WPA OSEN security support. Example:
|
||
|
Step 4 |
Enable the WLAN. Example: |
Attach an ANQP server to a policy profile (CLI)
Procedure
|
Step 1 |
Enter global configuration mode. Example: |
|
Step 2 |
Configure a policy profile. Example:Example: |
|
Step 3 |
Disable the policy profile. Example: |
|
Step 4 |
Attach the Hotspot 2.0 ANQP server to the policy profile. Example:Example: |
|
Step 5 |
Enable the policy profile. Example: |
What to do next
Attach the policy profile to the WLAN to make the WLAN Hotspot 2.0 enabled.Configure interworking for Hotspot 2.0
Procedure
|
Step 1 |
Enter global configuration mode. Example: |
|
Step 2 |
Configure a Hotspot 2.0 ANQP server. Example:Example: |
|
Step 3 |
Configure a 802.11u network type. Example:Example:The access-level can be allowed or forbidden. |
|
Step 4 |
(Optional) Configure a homogenous extended service set. Example:Example: |
|
Step 5 |
Select a group type and venue type from the list of available options. Example:Example: |
Configure the Generic Advertisement Service rate limit (CLI)
Procedure
|
Step 1 |
Enter global configuration mode. Example: |
|
Step 2 |
Configure an AP profile and enter AP profile configuration mode. Example:Example: |
|
Step 3 |
Configure the number of Generic Advertisement Services (GAS) request action frames sent to the controller by an AP in a given interval. Example:Example: |
|
Step 4 |
Return to global configuration mode. Example: |
|
Step 5 |
Configure the number of GAS request action frames to be processed by the controller. Example:Example: |
Configure global settings (GUI)
Configure global settings to manage GAS rate limits and icon configurations for wireless hotspot and OpenRoaming services.
Use this task to set up global parameters that control the behavior of wireless hotspot and OpenRoaming features across your network.
Procedure
|
Step 1 |
Choose Configuration > Wireless > Hotspot/OpenRoaming > Global Settings. |
|
Step 2 |
In the GAS Rate Limit (Requests per sec) field, enter the number of GAS request action frames to be processed by the controller. |
|
Step 3 |
Go to the Icons Configuration area. |
|
Step 4 |
Click Add. The Add Global Icon window is displayed. |
|
Step 5 |
From the System Path drop-down list, choose the path. |
|
Step 6 |
In the Icon Name field, enter the icon name. |
|
Step 7 |
In the Icon Type field, enter the icon type. |
|
Step 8 |
In the Language Code field, enter the language code. |
|
Step 9 |
In the Icon Height field, enter the icon height. |
|
Step 10 |
In the Icon Width field, enter the icon width. |
|
Step 11 |
Click Apply to Device. |
The global settings for wireless hotspot and OpenRoaming are configured with the specified GAS rate limit and icon parameters applied to the device.
Configure advice of charge
Procedure
|
Step 1 |
Enter global configuration mode. Example: |
||
|
Step 2 |
Configure a Hotspot 2.0 ANQP server. Example:Example: |
||
|
Step 3 |
Configure advice of charge for data usage. Example:Example:Advice of charge provides information on the financial charges for using the SSID of the NAI realm. |
||
|
Step 4 |
Configure advice of charge information, which includes language, currency, and plan information. Example:Example:
|
||
|
Step 5 |
Configure NAI realm for this advice of charge. Example:Example:
|
Configure terms and conditions (CLI)
Before you begin
Define a URL filter list, as shown in this example:urlfilter list url-filter-name
action permit
filter-type post-authentication
url allow-url
For information on configuring an URL list, see the Defining URL Filter List section.
Procedure
|
Step 1 |
Enter global configuration mode. Example: |
|
Step 2 |
Configure a Hotspot 2.0 ANQP server. Example:Example: |
|
Step 3 |
Configure the terms and conditions filename for the clients. Example:Example: |
|
Step 4 |
Configure the terms and conditions timestamp. Example:Example: |
|
Step 5 |
Configure the terms and conditions URL filter list name. Example:Example: |
Define ACL and URL filter in AP for FlexConnect
Procedure
|
Step 1 |
Enter global configuration mode. Example: |
|
Step 2 |
Define an extended UDP access list and set access conditions for BOOTP client to server traffic. Example:Example:Sets access conditions to match only the packets on a given port number of bootstrap protocol (BOOTP) clients from any source host to match only the packets on a given port number of the bootstrap protocol (BOOTP) server of a destination host. |
|
Step 3 |
Define an extended UDP access list for BOOTP server to client traffic. Example:Example:Sets access conditions to match only the packets on a given port number of bootstrap protocol (BOOTP) server from any source host to match only the packets of a given port number of the bootstrap protocol (BOOTP) clients of a destination host. |
|
Step 4 |
Define an extended UDP access list for DNS traffic. Example:Example:Sets access conditions to match a destination host Domain Name Service (DNS) with only the packets from a given port number of the source DNS. |
|
Step 5 |
Define an extended IP access list to permit traffic from any source to a specific destination host. Example:Example:Forwards packets from a source host to a single destination host. |
|
Step 6 |
Define an extended IP access list to permit traffic from a specific source host to any destination. Example:Example:Forwards packets from a single source host to a destination host. |
|
Step 7 |
Exit access list configuration mode and return to global configuration mode. Example: |
|
Step 8 |
Configure a new FlexConnect policy profile. Example:Example:Enters wireless flex profile configuration mode. |
|
Step 9 |
Configure an ACL policy for the FlexConnect profile. Example:Example: |
|
Step 10 |
Apply a URL filter list to the FlexConnect profile. Example:Example: |
|
Step 11 |
Configure a production VLAN name. Example:Example:Ensure that filter-type post-authentication configuration is in place for the URL filter to work. For information on configuring URL filter list, see the Defining URL Filter List section of the chapter DNS-Based Access Control Lists. |
|
Step 12 |
Create a production VLAN ID. Example:Example: |
|
Step 13 |
Configure an OSU VLAN name. Example:Example: |
|
Step 14 |
Create an OSU VLAN ID. Example:Example: |
Configure an OSEN WLAN - single SSID (CLI)
Procedure
|
Step 1 |
Enter global configuration mode. Example: |
|
Step 2 |
Configure a WLAN and enter WLAN configuration mode. Example:Example: |
|
Step 3 |
Disable fast transition over the data source on the WLAN. Example: |
|
Step 4 |
Disable adaptive 11r. Example: |
|
Step 5 |
Enable WPA2 security. Example: |
|
Step 6 |
Enable WPA2 ciphers for AES. Example: |
|
Step 7 |
Enable WPA OSEN security support. Example: |
|
Step 8 |
Enable the WLAN. Example: |
|
Step 9 |
Return to global configuration mode. Example: |
|
Step 10 |
Configure a policy profile. Example:Example: |
|
Step 11 |
Attach the Hotspot 2.0 ANQP server to the policy profile. Example:Example: |
|
Step 12 |
Configure the VLAN ID with OSEN encryption for single SSID. Example:Example: |
Verify Hotspot 2.0 configuration
Use these show commands to verify the quality of service (QoS) and AP GAS rate limit.
To view whether a QoS map ID is user configured or the default one, use this command:
Device# show ap profile <profile name> detailed

QoS Map                       : user-configured
To view the QoS map values used and their source, use this command:
Device# show ap profile <profile name> qos-map

QoS Map                       : default
DSCP ranges to User Priorities
 User Priority   DSCP low   DSCP high   Upstream UP to DSCP
-----------------------------------------------------------
             0          0           7                     0
             2         16          23                    10
             3         24          31                    18
             4         32          39                    26
             5         40          47                    34
             6         48          55                    46
             7         56          63                    48

DSCP to UP mapping exceptions
 DSCP   User Priority
---------------------
    0               0
    2               1
    4               1
    6               1
   10               2
   12               2
   14               2
   18               3
   20               3
   22               3
To view the AP rate limiter configuration, use this command:
Device# show ap name AP0462.73e8.f2c0 config general | i GAS

GAS rate limit Admin status                     : Enabled
Number of GAS request per interval              : 30
GAS rate limit interval (msec)                  : 100
Verify client details
To verify the wireless-specific configuration of active clients based on their MAC address, use this command:
Device# show wireless client mac 001e.f64c.1eff detail
.
.
.
Hotspot version : Hotspot 2.0 Release 2
Hotspot PPS MO ID :
Hotspot Terms and Conditions URL : http://host1.ciscohotspot.com/terms.php?addr=b8:27:eb:5a:dc:39&ap=123
.
.
.
Policy Type : OSEN (within RSN)
Resultant Policies:
  		VLAN Name        : VLAN0010
VLAN : 10 Feedback