Recycling Server Components

This chapter contains the following topics:

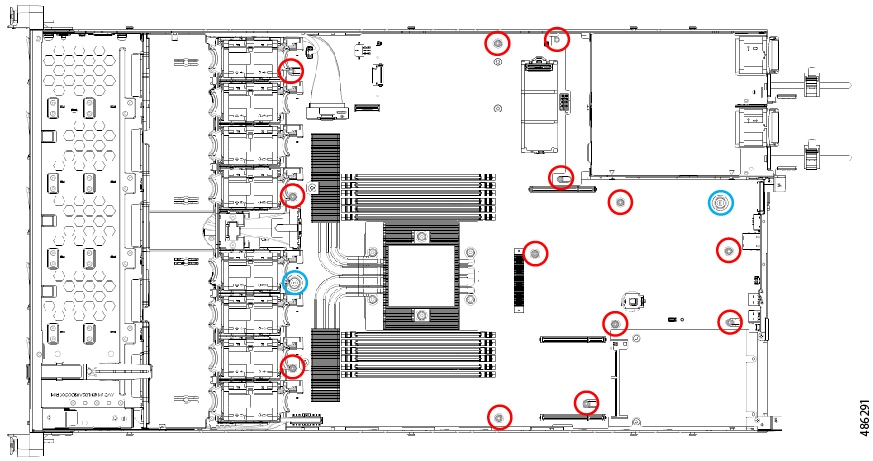
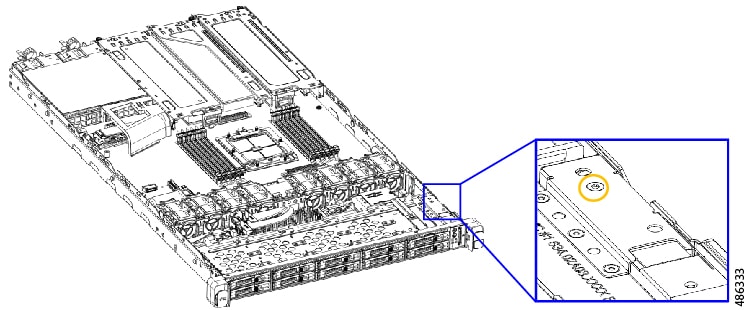
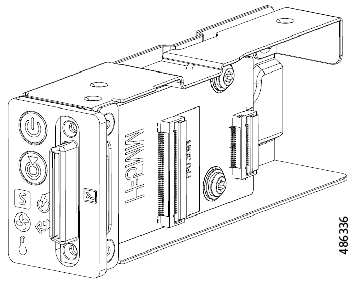
Server Recycling and E-Waste

The server has various components that can be recycled. When recycling the server and its components, always comply with your local laws governing recycling and e-waste.


Warning


The procedures in this chapter are destructive and can render the server unusable, so this content is not for standard use or FRU procedures! These procedures are for recyclers only.


Battery Warning

The server has a round button-style battery which is used for the real-time clock.


Warning


Recyclers: Do not shred the battery! Make sure you dispose of the battery according to appropriate regulations for your country or locale.


For information about removing the battery, see Replacing the RTC Battery.

Recycling the Main Motherboard PCB Assembly (PCBA)

The PCBA is secured to the server's sheet metal. You must disconnect the PCBA from the tray before recycling the PCBA. The PCBA is secured by different types of fasteners.

Before you begin


Note


For Recyclers Only! This procedure is not a standard field-service option. This procedure is for recyclers who will be reclaiming the electronics for proper disposal to comply with local eco design and e-waste regulations.

To remove the printed circuit board assembly (PCBA), the following requirements must be met:

  • The server must be disconnected from facility power.

  • The server must be removed from the equipment rack.

  • The server's top cover must be removed. See Removing the Server Top Cover.

  • The server's fan modules must be removed. See Replacing Fan Modules.

Gather the following tools before beginning this procedure:

  • Pliers

  • T10 Torx screwdriver

  • #2 Phillips screwdriver


Procedure


Step 1

Locate the PCBA's mounting screws. The following figure shows the location of the mounting screws.

Indicator

Fastener

Required Tool

Red circles (

M3.5x0.6 mm screws (18)

Torx T10 - Torque: 10.0 kgf-cm (8.68 in-lbs)

Blue circles ()

M3.5x0.6 mm Thumb screws (2)

Torx T10 - Torque: 5.0 kgf-cm (4.34 in-lbs)

Step 2

Using the appropriate tools, remove the screws.

Step 3

Remove the PCBA from the sheet metal and dispose of each in compliance with your local e-waste and recycling regulations.


Recycling the Front Mezzanine Module PCBA (SAS Backplane)

The server's front mezzanine module contains one PCBA, which is the vertical PCB for the SAS drive backplane. The PCBA is attached to the server's sheetmetal by 4 T10 screws.

You must disconnect the PCBA from the sheetmetal before recycling the PCBA.

Before you begin


Note


For Recyclers Only! This procedure is not a standard field-service option. This procedure is for recyclers who will be reclaiming the electronics for proper disposal to comply with local eco design and e-waste regulations.


To remove the printed circuit board assembly (PCBA), the following requirements must be met:

Gather a T10 Torx screwdriver.

Procedure


Step 1

Disconnect the vertical drive backplane.

  1. Using a T10 Torx driver, remove the four screws of the vertical drive backplane.

  2. Grasp the drive backplane and disconnect it from the sheetmetal frame.

Step 2

Disconnect the PCBA from the sheetmetal frame.

  1. Using a T10 Torx screwdriver, remove the four screws that secure the PCBA to the sheetmetal frame.

Step 3

Remove the PCBA and dispose of it properly in accordance with your local recycling and e-waste laws.


Recycling the Server KVM PCBA

The server contains a KVM port, which is vertically mounted in the front right mounting ear. The KVM has a small PCB attached to a flat ribbon cable.

  • Two size 2.5 slotted screws on the face of the tray.

  • One #1 Phillips-head screw.

  • One T10 Torx screws that secure the PCBA to the interior of the tray.

You must disconnect the PCBA from the server before recycling the PCBA.

Before you begin


Note


For Recyclers Only! This procedure is not a standard field-service option. This procedure is for recyclers who will be reclaiming the electronics for proper disposal to comply with local eco design and e-waste regulations.


To remove the printed circuit board assembly (PCBA), the following requirements must be met:

  • The server must be disconnected from facility power.

  • The server must be removed from the equipment rack.

  • The server's top cover must be removed. See Removing the Server Top Cover.

Gather the following tools:

  • A size 2.5 slotted screwdriver.

  • A #1 Phillips screwdriver

  • A T10 Torx screwdriver.

Procedure


Step 1

Disconnect the KVM port from the front panel.

  1. Using a 2.5 Phillips screwdriver, remove the two screws on the face of the front panel.

  2. On the back of the front panel, use a #1 Phillips head screwdriver to remove the 1 screw that secures the KVM port to the front panel.

  3. On the side of the chassis, use a T10 Torx driver to remove the one T10 screw.

  4. Grasp the side trim piece and remove it.

Step 2

Remove the screws on the KVM board.

Step 3

Remove the PCBA and dispose of it properly in accordance with your local recycling and e-waste laws.