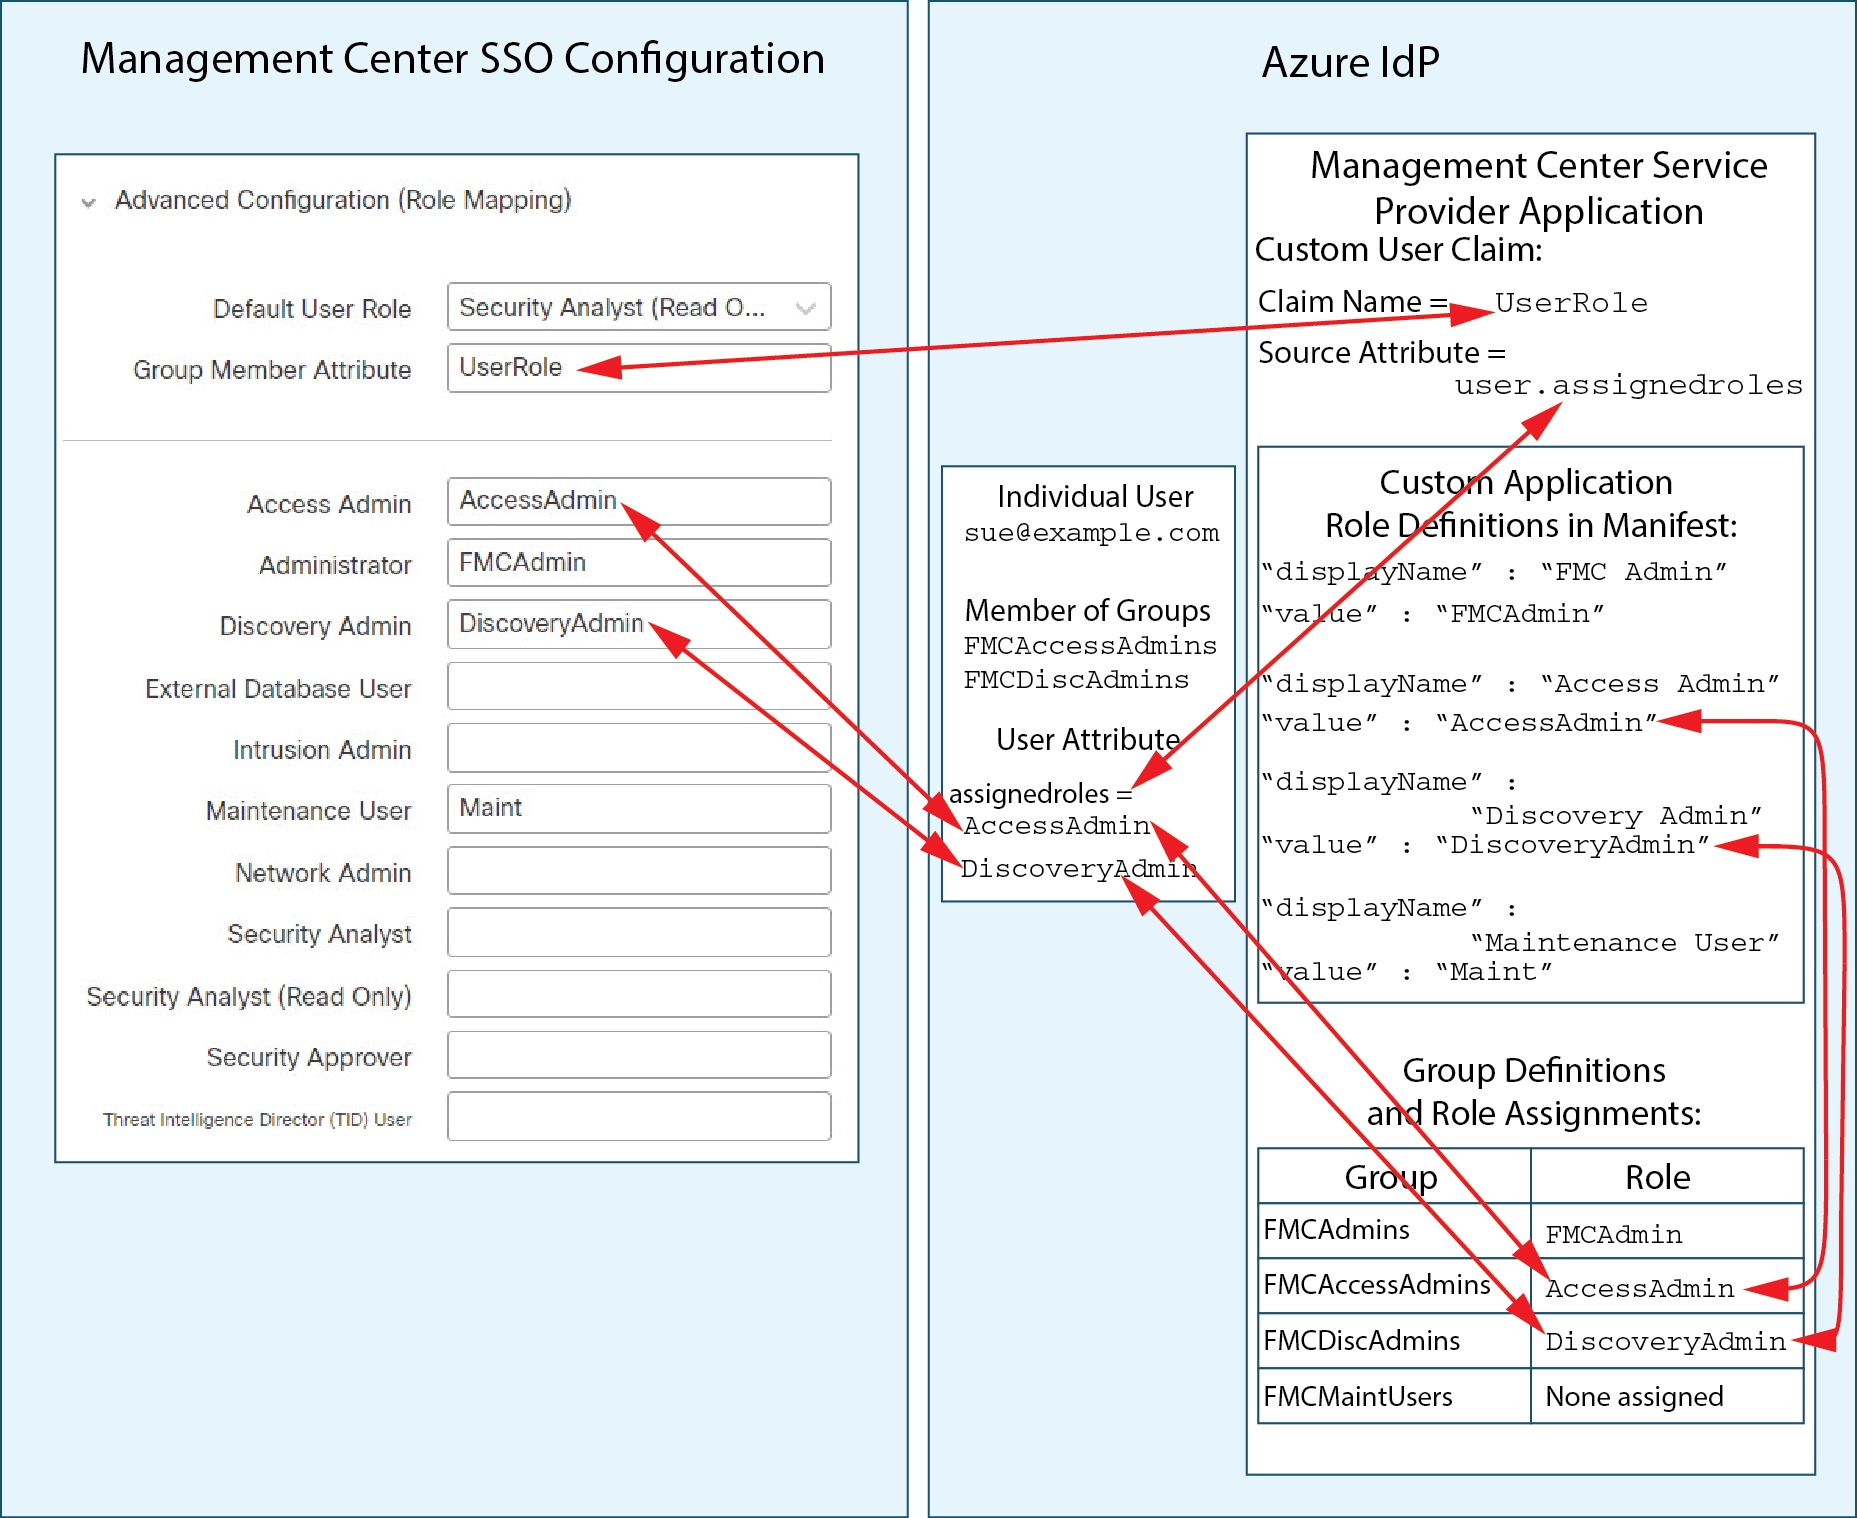
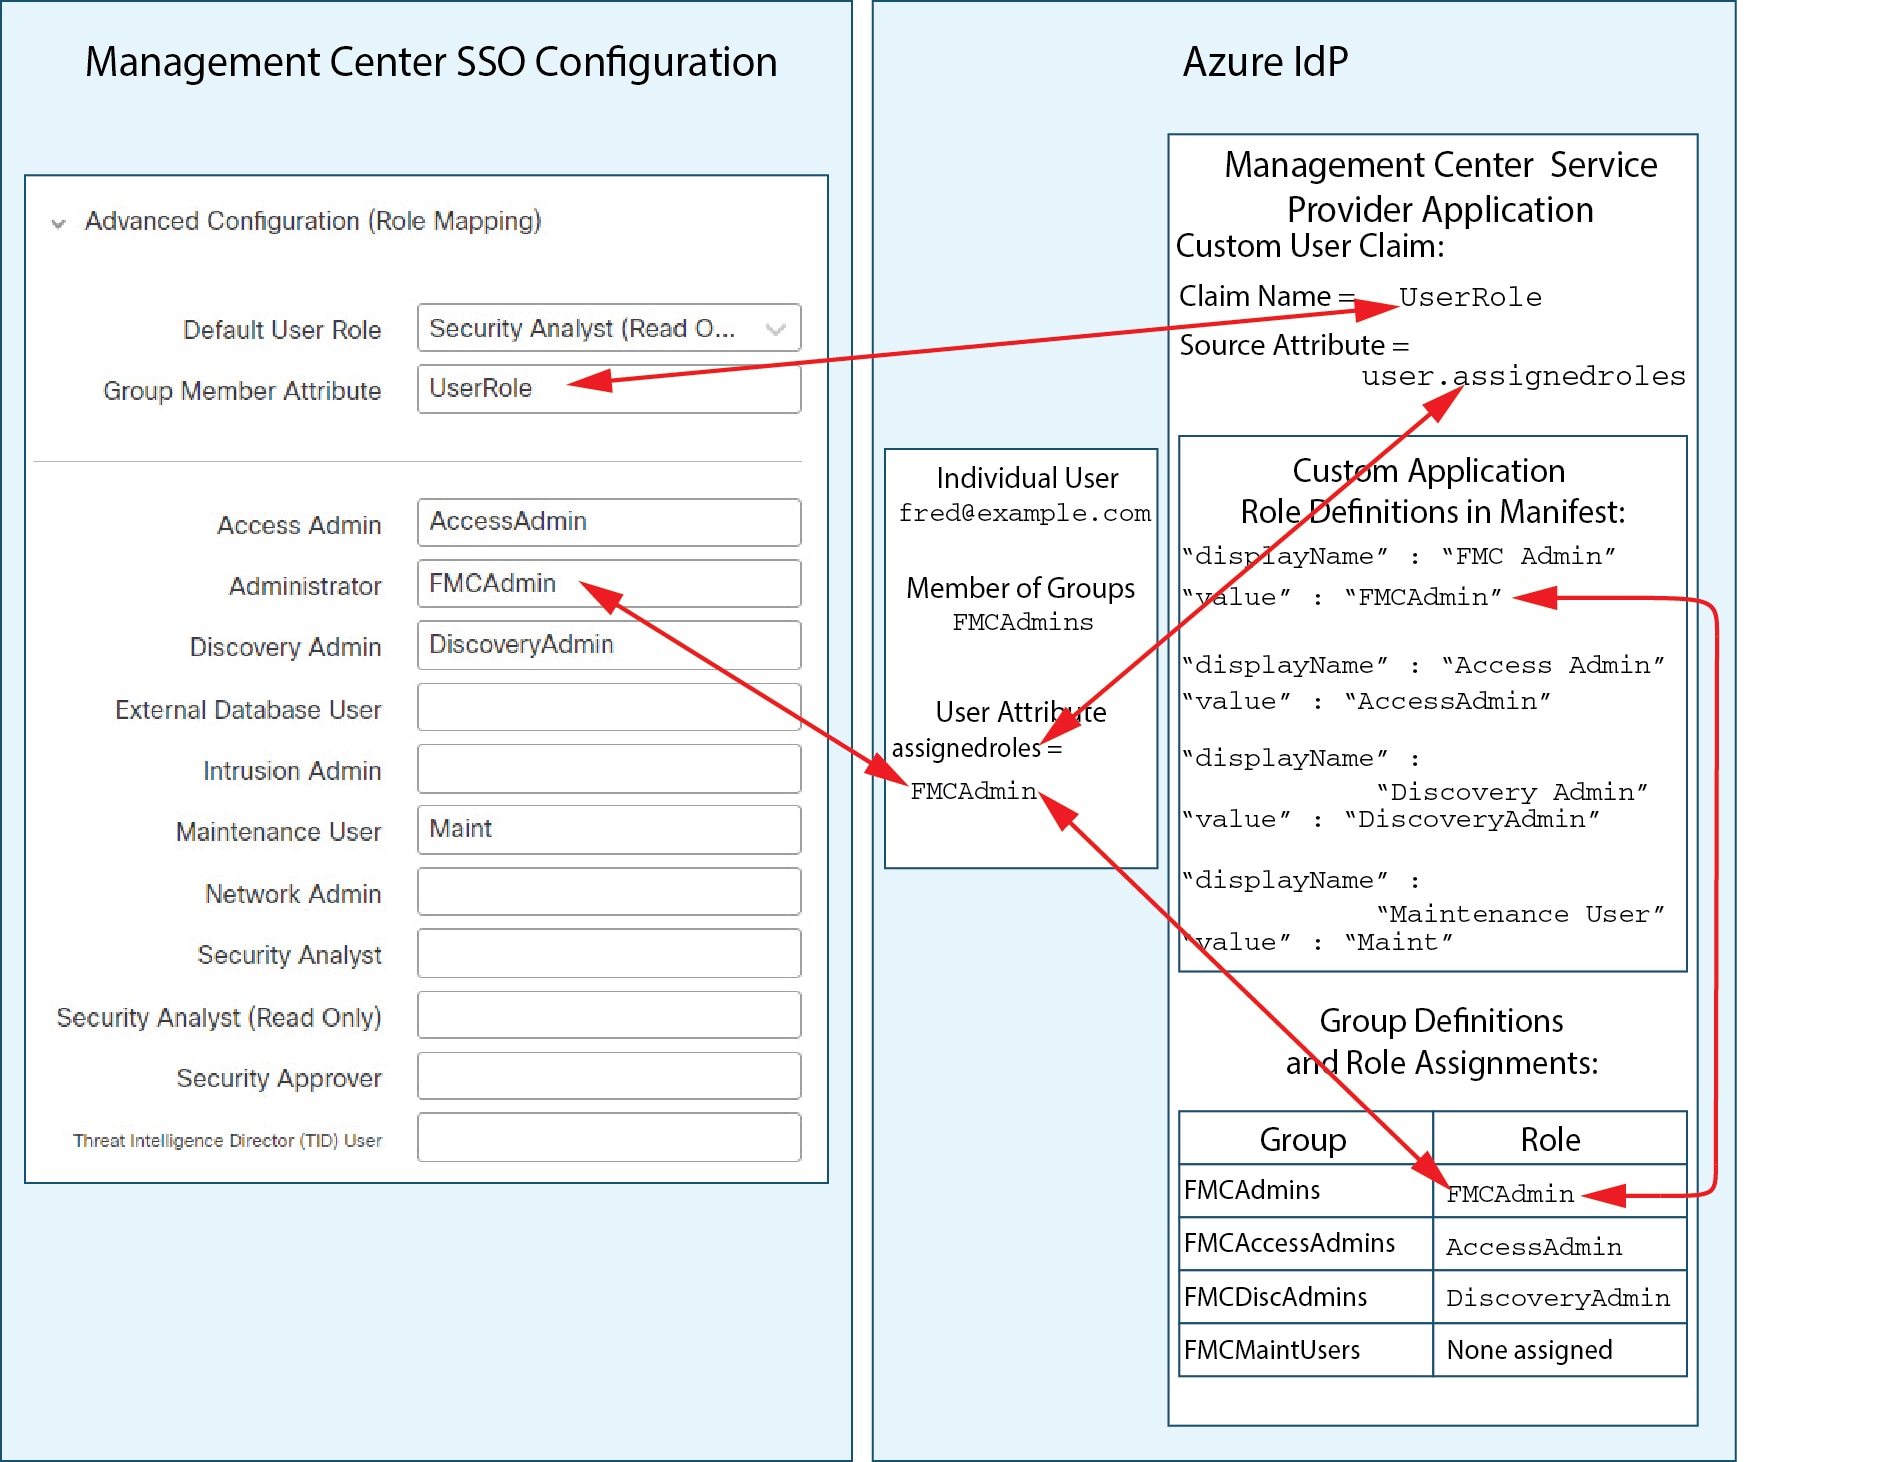
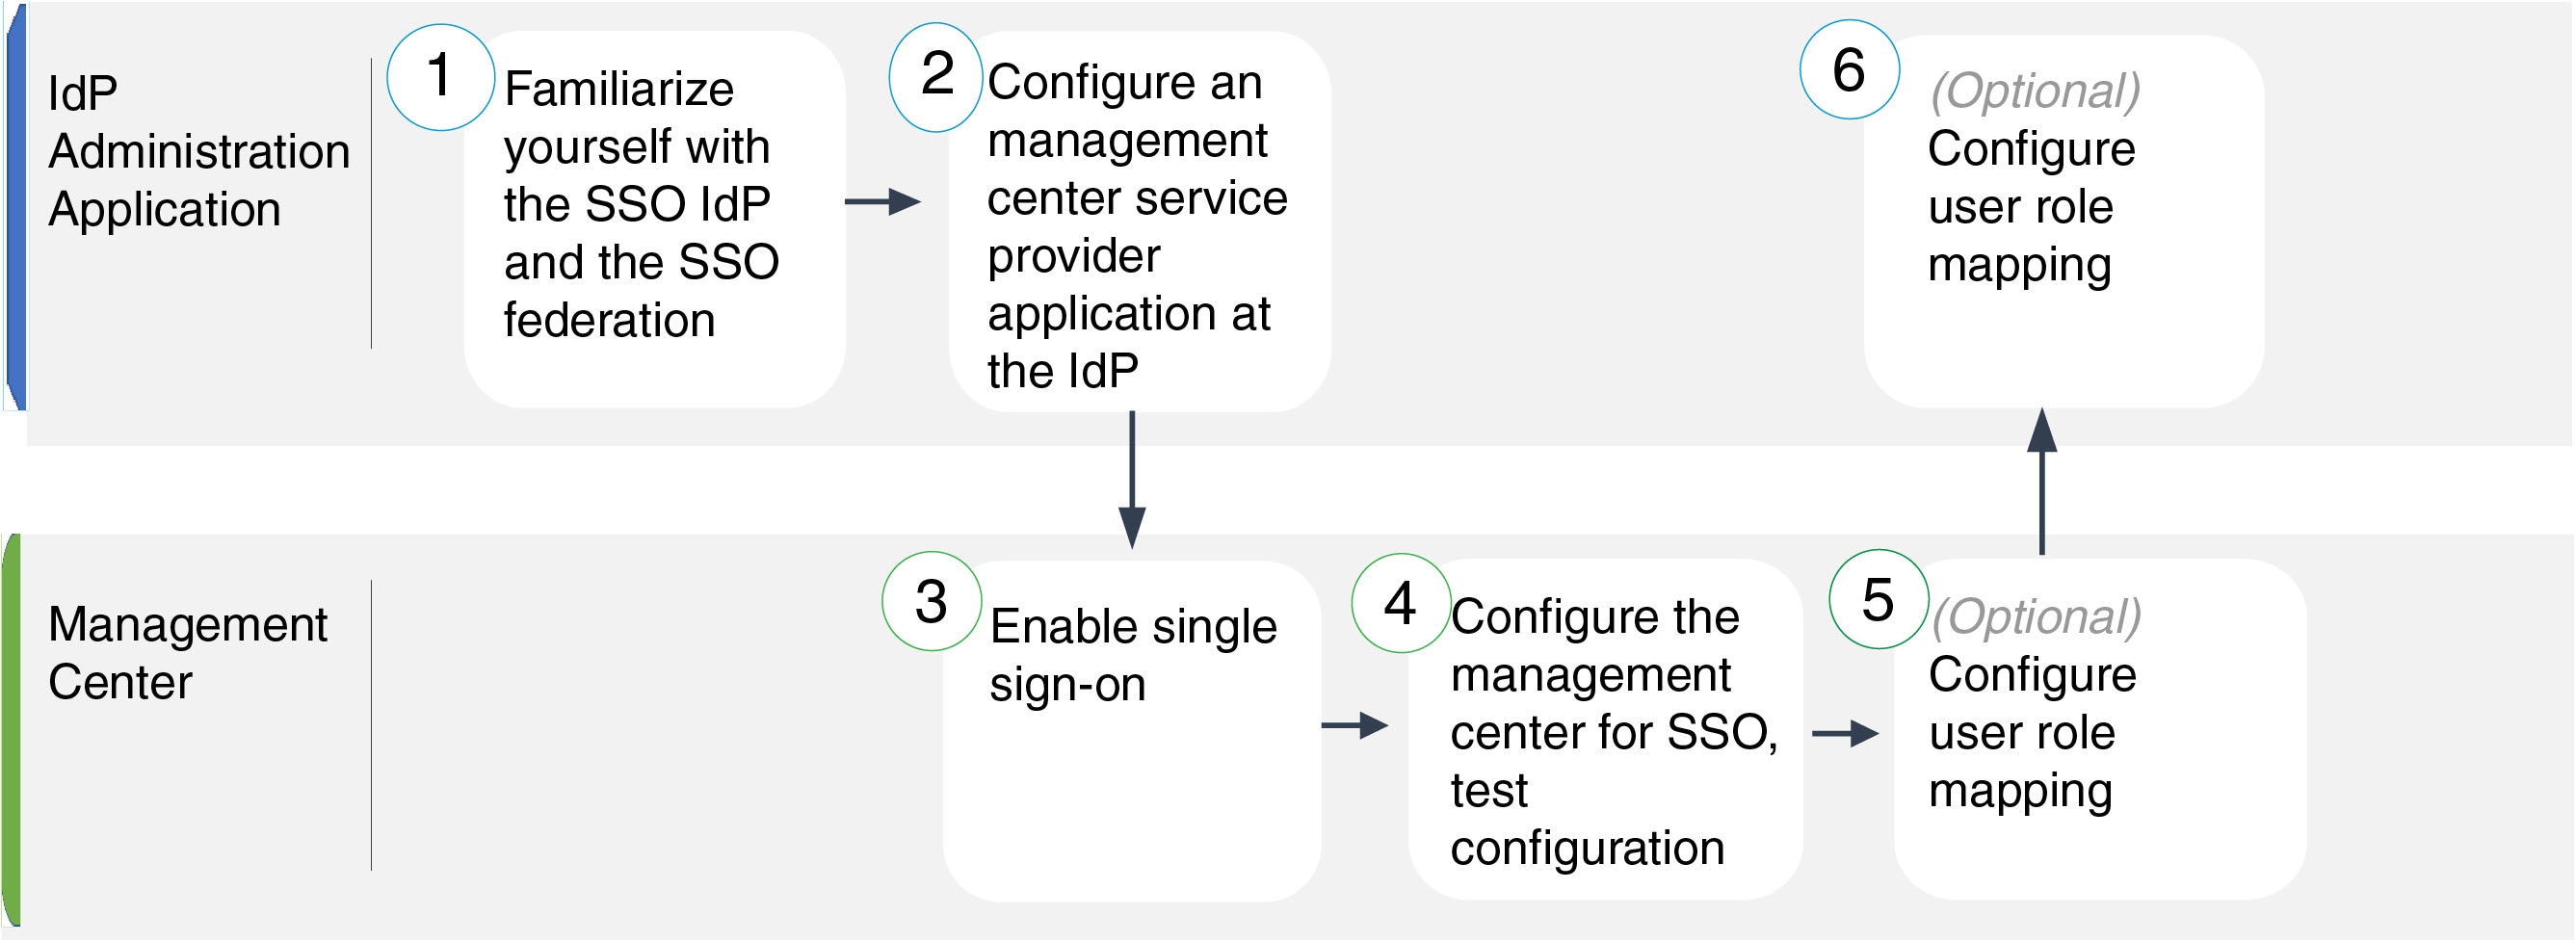
Users

The Firewall Management Center includes default admin accounts for web and CLI access. This chapter discusses how to create custom user accounts. See Logging into the Management Center for detailed information about logging into the Firewall Management Center with a user account.

CLI users

A CLI user is a user account that

  • can be added as internal users or as external users on a LDAP or RADIUS server

  • is maintained separately on each managed device, and

  • requires separate configuration for access to the Firewall Management Center versus managed devices.

User account separation

When you add a user to the Firewall Management Center, that user only has access to the Firewall Management Center; you cannot then use that username to log directly into a managed device. You must separately add a user on the managed device.

Internal and external users

Internal and external users are authentication categories that managed devices support for user access control.

  • Internal users authenticate through a local database on the device

  • External users authenticate through external LDAP or RADIUS authentication servers when not present in the local database, and

  • both user types enable secure access management to network devices.

User authentication types

Managed devices support these user authentication methods:

  • Internal user—The device checks a local database for user authentication.

  • External user—If the user is not present in the local database, the system queries an external LDAP or RADIUS authentication server.

Web interface and CLI access

The Firewall Management Center provides access through a web interface, CLI (via console or SSH to the management interface), and Linux shell. For details about management UIs, refer to System user interfaces.

  • The Firewall Management Center supports two different internal admin users: one for the web interface and another for CLI access. The system initialization process synchronizes the passwords for these two admin accounts initially. However, they are managed separately, and the passwords may diverge after configuration. Refer to the Getting Started Guide for your model for more information on system initialization. To change the password for the web interface admin, use System (system gear icon) > Users > Users. To change the password for the CLI admin, use the Firewall Management Center CLI command configure password .

  • Internal users added in the web interface have web interface access only.

  • External users have web interface access, and you can optionally configure CLI access.

  • SSO users have web interface access only.

Caution: linux shell access and user management

CLI users can access the Linux shell using the expert command. We strongly recommend that you do not use the Linux shell unless directed by Cisco TAC or provided with explicit instructions in the Firewall Management Center documentation. CLI users can obtain sudoers privileges in the Linux shell, which can present a security risk. For system security reasons, we strongly recommend that you:

  • Restrict the list of external users with CLI access appropriately.

  • Do not add users directly in the Linux shell; only use the procedures in this chapter.

User roles

CLI User Role

CLI external users on the Firewall Management Center do not have a user role; they can use all available commands.

Web Interface User Roles

User privileges are based on the assigned user role. For example, you can grant analysts predefined roles such as Security Analyst and Discovery Admin and reserve the Administrator role for the security administrator managing the device. You can also create custom user roles with access privileges tailored to your organization’s needs.

To view the privileges assigned to predefined user roles, click Copy (copy icon) for a role to make a custom role based on the predefined role. You can then view all of the assigned privileges.
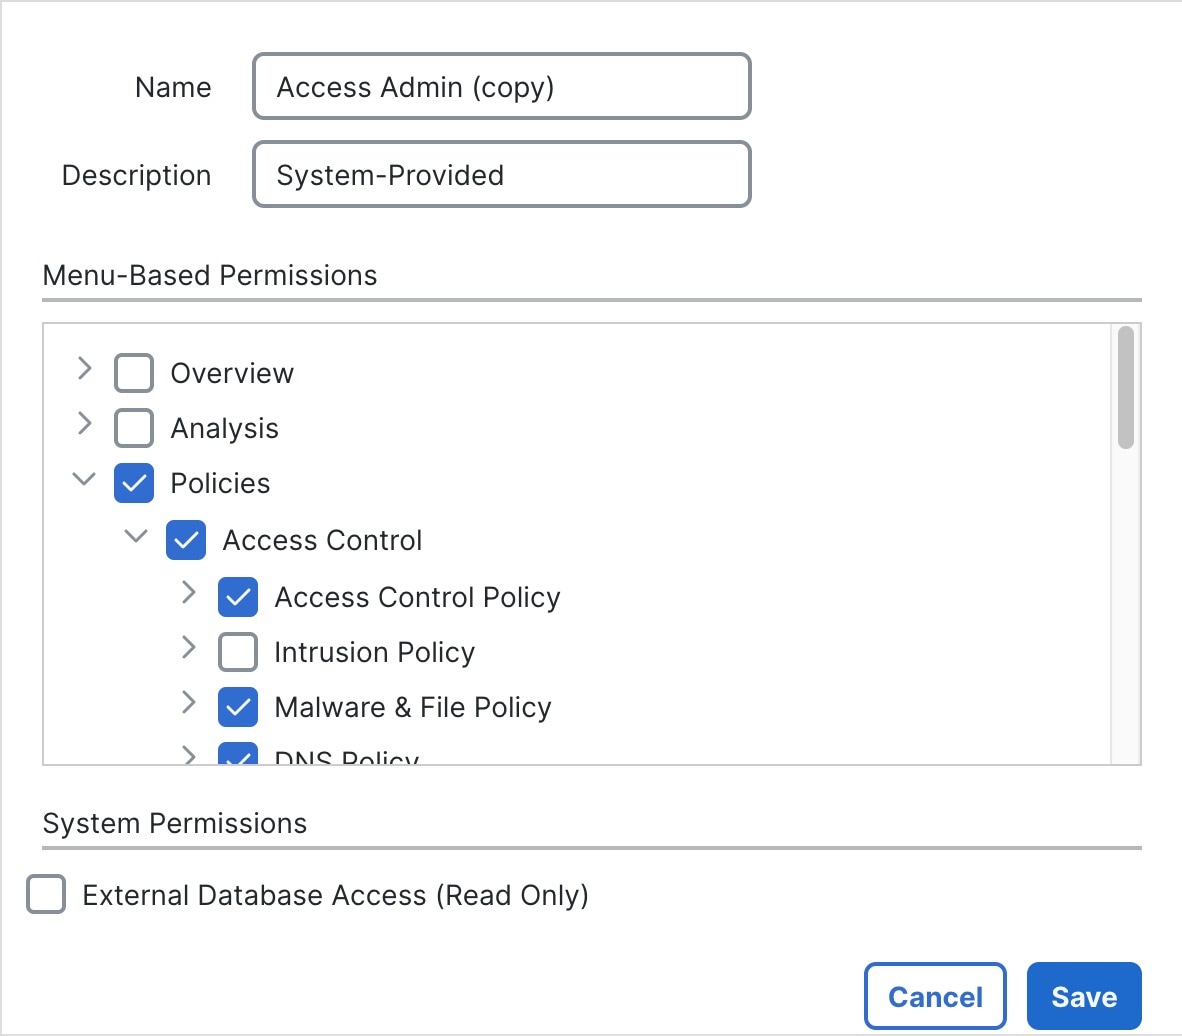
Figure 1. View User Role Privileges
View User Role Privileges

The Firewall Management Center includes these predefined user roles:

Access Admin

Provides access to access control policy and associated features in the Policies menu. Access Admins cannot deploy policies.

Administrator

Administrators have access to everything in the product; their sessions present a higher security risk if compromised, therefore, you cannot make them exempt from login session timeouts.

You should limit use of the Administrator role for security reasons.

Discovery Admin

Provides access to network discovery, application detection, and correlation features in the Policies menu. Discovery Admins cannot deploy policies.

External Database User (Read Only)

Provides read-only access to the database using an application that supports JDBC SSL connections. For the third-party application to authenticate to the appliance, you must enable database access in the system settings. On the web interface, External Database Users have access only to online help-related options in the Help menu. This role’s function does not involve the web interface. Access is provided only for support and password changes.

Intrusion Admin

Provides access to all intrusion policy, intrusion rule, and network analysis policy features in the Policies and Objects menus. Intrusion Admins cannot deploy policies.

Maintenance User

Provides access to monitoring and maintenance features. Maintenance Users have access to maintenance-related options in the Health and System menus.

Network Admin

Provides access to access control, SSL inspection, DNS policy, and identity policy features in the Policies menu, as well as device configuration features in the Devices menus. Network Admins can deploy configuration changes to devices.

Security Analyst

Provides access to security event analysis features, and read-only access to health events, in the Overview, Analysis, Health, and System menus.

Security Analyst (Read Only)

Provides read-only access to security event analysis features and health event features in the Overview, Analysis, Health, and System menus.

A user with this role can also:

  • From the health monitor pages for specific devices, generate and download troubleshooting files.

  • Under user preferences, set file download preferences.

  • Under user preferences, set the default time window for event views (with the exception of the Audit Log Time Window).

Security Approver

Provides limited access to access control and associated policies and network discovery policies in the Policies menu. Security Approvers can view and deploy these policies, but cannot make policy changes.

Threat Intelligence Director (TID) User

Provides access to Threat Intelligence Director configurations in the Intelligence menu. Threat Intelligence Director (TID) Users can view and configure TID.

User passwords

This reference describes the rules and requirements for passwords on internal user accounts for the Firewall Management Center, with Lights-Out Management (LOM) enabled or disabled. Different password requirements apply to externally authenticated accounts and to systems with security certification compliance enabled. Refer to external authentication configuration for Firewall Management Center and Security certifications compliance for more information.

During Firewall Management Center initial configuration, the system requires the admin user to set the account password to comply with strong password requirements. For physical Firewall Management Centers, the system uses the strong password requirements with LOM enabled. For virtual Firewall Management Centers, the system uses the strong password requirements with LOM not enabled. The system synchronizes the passwords for the web interface admin and CLI access admin. After initial configuration, the web interface admin can remove the strong password requirement. However, the CLI access admin must always comply with strong password requirements with LOM not enabled.

Table 1. Password requirements for internal user accounts

LOM Not Enabled

LOM Enabled

Password Strength Checking On

Passwords must include:

  • At least eight characters or the number of characters configured for the user by the administrator, whichever is greater.

  • No more than two consecutively repeating characters

  • At least one lowercase letter.

  • At least one uppercase letter.

  • At least one digit.

  • At least one special character such as ! @ # * - _ +.

The system checks passwords against a special dictionary containing many English words and other character strings that could be easily cracked with common password hacking techniques.

Passwords must include:

  • Between eight and twenty characters (On MC 1000, MC 2500, and MC 4500 the upper limit is 14 characters rather than 20.)

  • No more than two sequentially repeating characters

  • At least one lower case letter

  • At least one upper case letter

  • At least one digit

  • At least one special character such as ! @ # * - _ +

The rules for special characters are different for each series of physical Firewall Management Centers. Choose special characters only from the list in the final bullet.

Do not include the user name in the password.

The system checks passwords against a special dictionary of English words and character strings that can be easily cracked with common password hacking techniques.

Password Strength Checking Off

Passwords must include the minimum number of characters configured for the user by the administrator. (Refer to Add or edit an internal user for more information.)

Passwords must include:

  • Between 8 and 20 characters (On MC 1000, MC 2500, and MC 4500 the upper limit is 14 characters rather than 20.)

  • Characters from at least three of the four categories:

    • Uppercase letters

    • Lowercase letters

    • Digits

    • Special characters such as ! @ # * - _ +

The rules for special characters vary between different series of physical Firewall Management Centers. Use only the special characters from the permitted list.

Do not include the user name in the password.

Users and domains

A user account is an access entity that

  • can be created in any domain where Administrator access is assigned

  • is only visible in the domain in which it is created, and

  • can have different privileges and roles in ancestor and descendant domains.

User roles and domain management

Users can have different privileges in each domain, and user roles can be assigned in both ancestor and descendant domains.

  • Assign read-only privileges to a user in the Global domain.

  • Assign Administrator privileges in a descendant domain.

Figure 2. User roles per domain
User Roles Per Domain

Users are only visible in the domain in which they are created. If a user is added in the current domain but assigned a user role in a subdomain, the user will only show on the current domain's Users page.


Figure 3. Global domain users
Global Domain Users
Figure 4. Subdomain users
Subdomain Users

Users added from the Global domain log in with just their username, even if their roles are only in a subdomain.

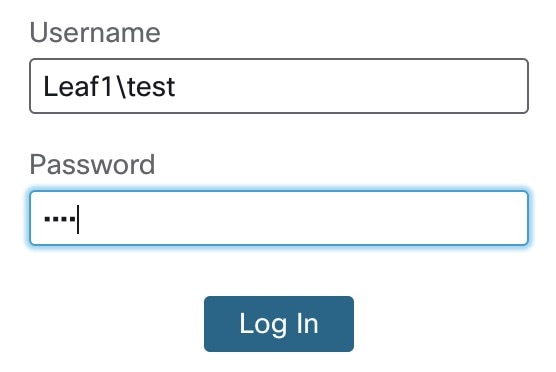
Figure 5. User login when added in global
User Login When Added in Global
log into the Firewall Management Center with the subdomain or subdomains as part of the login name, depending on which domain their user was added from: subdomain1\subdomain2\username. You do not need to enter the Global parent domain.
Figure 6. Global domain user login
Admin User Domain at Login

When you log in, you are placed in the domain where your username was added. For example, the admin user defaults to the Global domain.

Figure 7. User domain at login
User Domain at Login

After you log in, click the down arrow to change to a subdomain.
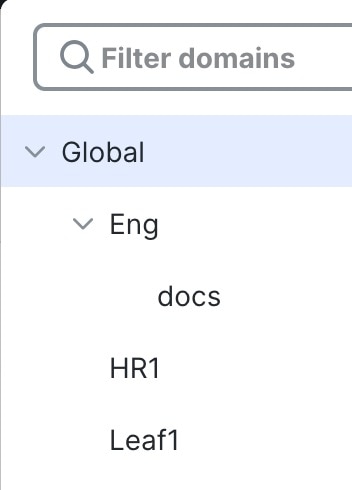
Figure 8. Change to a subdomain
Change to a Subdomain

User account examples in domains

For example, from the Global domain, you add user leaf and assign a role for Leaf1. Because the user was added from the Global domain, it is visible from the Global domain. If you change domains to Leaf1, you cannot view the user leaf, but you can view the user test, which was added directly from the Leaf1 subdomain.

Guidelines and limitations for user accounts for Firewall Management Center

Guidelines for default admin user and password management

The Firewall Management Center includes an admin user as a local user account for all forms of access. You cannot delete the admin user. The default initial password is Admin123. During initialization, the system requires you to change this password. It supports a maximum of 16 characters. For more information about system initialization, refer to the Getting Started Guide for your model.

  • By default, these settings apply to all user accounts on the Firewall Management Center:

    • There are no limits on password reuse.

    • The system does not track successful logins.

    • The system does not enforce a timed temporary lockout for users who enter incorrect login credentials.

    • The system allows unlimited read-only and read or write sessions simultaneously.

    You can change these settings for all users as a system configuration. (System (system gear icon) > Configuration > User Configuration) Refer to User Configuration.

Best practice for assigning default access roles and privilege management

Assign default access roles to users at initial setup according to the principles of least privilege. When a user logs in to the system for the first time, the system assigns the default access role to their account. Assign the minimum privilege required for users to log in to the system. For example, you can assign the Security Analyst (Read-Only) role as the default access role for common users. You can add administrators to a separate administrator group to give them full administrator rights. This guideline applies to all internal, external, and CAC users.


Note


Assign the default access role using the principles of least privilege to prevent users from receiving unintended privilege levels on subsequent logins.
  • If a user with the default access role needs temporary elevated privileges, an administrator can assign a higher-privilege role to that user. The system revokes elevated privileges after 24 hours of inactivity. The user then returns to their default access role.

  • To permanently assign a higher-privilege access role, such as System Admin, use the Group Controlled Access Roles method to provide admin access. This method ensures that the provided access role persists beyond 24 hours and users will have the correct privilege level as per the group assignment. For more information, refer to the Add an LDAP External Authentication Object for Management Center section.

Requirements and prerequisites for user accounts for Firewall Management Center

This reference lists the requirements and prerequisites for user accounts for Firewall Management Center, including supported models, domains, and user roles.

Model support

Supported domains

  • SSO configuration—Global only.

  • All other features—Any.

User roles

Add or edit an internal user

This procedure allows you to create custom internal user accounts for the Firewall Management Center and modify existing user configurations including passwords, roles, and access permissions.

The Users tab in System (system gear icon) > Users displays both internal users that you add manually and external users who are added automatically when logging in with LDAP or RADIUS authentication. For external users, you can modify the user role on this screen if you assign a role with higher privileges; you cannot modify the password settings.

If you enable security certifications compliance or Lights-Out Management (LOM) on a device, different password restrictions apply. For more information on security certifications compliance, refer to Security certifications compliance.


Note


Avoid having multiple Admin users simultaneously creating new users on the Firewall Management Center, as this may cause an error resulting from a conflict in user database access.


Procedure


Step 1

Choose System (system gear icon) > Users.

Step 2

To create a new user:

  1. Click Create User.

  2. Enter a User Name.

    The username must comply with these restrictions:

    • Maximum 32 alphanumeric characters, plus hyphen (-) and underscore (_).

    • Letters may be upper or lower case.

    • Cannot include any punctuation or special characters other than period (.), hyphen (-), and underscore (_).

Step 3

To edit an existing user, click the Edit (edit icon) icon next to the user you want to edit.

  1. Real Name: Enter descriptive information to identify the user or department to whom the account belongs.

  2. (Optional) Email Address: Provide your email address. Cisco uses your email address to send product renewal information, newsletters about new releases, and other product updates.

  3. The Use External Authentication Method check box is checked for users that were added automatically when they logged in with LDAP or RADIUS. You do not need to preconfigure external users, so you can ignore this field. For an external user, you can revert this user to an internal user by unchecking the check box.

  4. Enter values in the Password and Confirm Password fields.

    The values must conform to the password options you set for this user.

  5. Set the Maximum Number of Failed Logins.

    Enter an integer without spaces to specify the maximum number of times each user can try to log in after a failed login attempt before the account is locked. The default setting is 5 tries; use 0 to allow an unlimited number of failed logins. The admin account is exempt from being locked out after a maximum number of failed logins unless you enable security certification compliance.

  6. Set the Minimum Password Length.

    Enter an integer without spaces to specify the minimum required length, in characters, of a user's password. The default setting is 8. A value of 0 indicates that no minimum length is required.

  7. Set the Days Until Password Expiration.

    Enter the number of days after which the user's password expires. The default setting is 0, which indicates that the password never expires. If you change from the default, then the Password Lifetime column of the Users list indicates the days remaining on each user's password.

  8. Set the Days Before Password Expiration Warning. Enter the number of warning days users have to change their password before their password actually expires. The default setting is 0 days.

  9. Set these Options:
    • Force Password Reset on Login: Forces users to change their passwords the next time they log in.

    • Check Password Strength: Requires strong passwords. When password strength checking is enabled, passwords must comply with the strong password requirements described in User passwords.

    • Exempt from Browser Session Timeout: Exempts a user's login sessions from termination due to inactivity. Users with the Administrator role cannot be made exempt.

  10. In the User Role Configuration area, assign the user roles. For more information about user roles, refer to Custom user roles for the web interface.

    For external users, if the user role is assigned through group membership (LDAP), or based on a user attribute (RADIUS), you cannot remove the minimum access rights. You can, however, assign additional rights. If the user role is the default user role that you set on the device, then you can modify the role in the user account without limitations. When you modify the user role, the Authentication Method column on the Users tab provides a status of External - Locally Modified.

    The options that you view depend on whether the device is in a single domain or multidomain deployment.

    • Single domain: Check the user roles you want to assign the user.

    • Multidomain: In a multidomain deployment, you can create user accounts in any domain in which you have been assigned Administrator access. Users can have different privileges in each domain. You can assign user roles in both ancestor and descendant domains. For example, you can assign read-only privileges to a user in the Global domain, but Administrator privileges in a descendant domain. For more information, including how to log in when a user is added in a subdomain, refer to Users and domains. Refer to these steps:

      1. Click Add Domain.

      2. Choose a domain from the Domain drop-down list.

      3. Check the user roles that you want to assign the user.

      4. Click Save.

Step 4

(Optional, for physical Firewall Management Centers only) If you have assigned the user the Administrator role, the Administrator Options appear. You can select Allow Lights-Out Management Access to grant Lights-Out Management access to the user. Refer to Using IPMI with Lights-Out Management for more information about Lights-Out Management.

Step 5

Click Save.


The system creates or updates the user account with the specified configuration settings. The new or modified user appears in the Users list, displaying the assigned roles and authentication method.

external authentication configuration for Firewall Management Center

An external authentication configuration is a security setup that

  • adds one or more external authentication objects

  • enables users to authenticate through external identity providers, and

  • replaces local credential authentication with external authentication.

External authentication objects for Firewall Management Center

An external authentication object is a security configuration element that

  • enables the Firewall Management Center to verify user credentials with LDAP or RADIUS servers

  • supports multiple objects for web interface access, allowing users from any configured object to authenticate, and

  • restricts CLI access to a single external authentication object, permitting authentication only through the first object in the list.

External authentication object usage and configuration

External authentication objects can be used by the Firewall Management Center and Firewall Threat Defense devices. You can either share the same object across different devices or create distinct objects for each device type.


Note


The timeout range is different for the Firewall Threat Defense and the Firewall Management Center, so if you share an object, be sure not to exceed the Firewall Threat Defense's smaller timeout range (1 to 30 seconds for LDAP, and 1 to 300 seconds for RADIUS). If you set the timeout to a higher value, the Firewall Threat Defense external authentication configuration will not work.


For the Firewall Management Center, enable the external authentication objects directly on the System (system gear icon) > Users > External Authentication tab. This setting affects only Firewall Management Center usage. You do not need to enable it on this tab for managed device usage. For Firewall Threat Defense devices, enable the external authentication object in the platform settings that you deploy to the devices.

Define web interface users and CLI users separately in the external authentication object. For RADIUS, pre-configure the list of CLI usernames in the object. For LDAP, set up a filter on the LDAP server to match CLI users.

You cannot use an LDAP object for CLI access if that object is also configured for CAC authentication.


Note


Users with CLI access can gain Linux shell access with the expert command. Linux shell users can obtain root privileges. This access creates a security risk. Make sure you:

  • Restrict the list of users with CLI or Linux shell access.

  • Do not create Linux shell users.


External authentication object configuration example

If you have five external authentication objects configured for web interface access, users from any of them can be authenticated to access the web interface. For CLI access, only the first external authentication object in the list is used for authentication.

Unsupported external authentication object scenario

You cannot use an LDAP object for CLI access if it is also configured for CAC authentication.

External authentication object analogy

An external authentication object functions as a control point, permitting access only to users with valid credentials from specified sources.

LDAP

The Lightweight Directory Access Protocol (LDAP) is a directory service protocol that allows you to set up a directory on your network that organizes objects, such as user credentials, in a centralized location. Multiple applications can then access those credentials and the information used to describe them. If you ever need to change a user's credentials, you can change them in one place.

LDAP binding information

Microsoft has announced that Active Directory servers will start enforcing LDAP binding and LDAP signing in 2020. Microsoft is making these a requirement because when using default settings, an elevation of privilege vulnerability exists in Microsoft Windows that could allow a man-in-the-middle attacker to successfully forward an authentication request to a Windows LDAP server. For more information, see 2020 LDAP channel binding and LDAP signing requirement for Windows on the Microsoft support site.

If you have not done so already, we recommend you start using TLS/SSL encryption to authenticate with an Active Directory server.

RADIUS

RADIUS is a network authentication protocol that

  • provides centralized authentication and authorization for network access

  • operates using client-server architecture for user credential verification, and

  • supports accounting functions to track user sessions and network usage.

Guidelines

Remote Authentication Dial In User Service (RADIUS) is an authentication protocol used to authenticate, authorize, and account for user access to network resources. You can create an authentication object for any RADIUS server that conforms to RFC 2865.

Secure Firewall devices support the use of SecurID tokens. When you configure authentication by a server using SecurID, users authenticated against that server append the SecurID token to the end of their SecurID PIN and use that as their password when they log in. You do not need to configure anything extra on the Secure Firewall device to support SecurID.

  • The default RADIUS authentication port is 1812.

  • The default RADIUS accounting port is 1813 (one number more than the RADIUS authentication port).

If you change the RADIUS authentication port, the RADIUS accounting port changes accordingly. Ensure that the Firewall Management Center can connect to the RADIUS server on the new accounting port; otherwise, authentication delays may occur.

Although you cannot configure RADIUS accounting parameters, the Firewall Threat Defense uses port 1813 for RADIUS accounting on the same server used for authentication. If the RADIUS server is unreachable on port 1813, it can cause delays in logging in.

Add an LDAP external authentication object for the Firewall Management Center

Add an LDAP server to support external users for device management.

Before you begin

  • You must specify DNS server(s) for domain name lookup on your device. Even if you specify an IP address for the LDAP server during this procedure, the server may return a URI for authentication that includes a hostname. A DNS lookup is required to resolve the hostname. Refer to Modify Firewall Management Center Management Interfaces to add DNS servers.

  • If you are configuring an LDAP authentication object for use with CAC authentication, do not remove the CAC from your computer. You must have a CAC inserted at all times after enabling user certificates.

Procedure


Step 1

(Optional) Choose System (system gear icon) > Users and click the External Authentication tab. Click Add icon (add icon) Add External Authentication Object and set the Authentication Method to LDAP. Now, check the check box for CAC if you plan to use this authentication object for CAC authentication and authorization.

You must also follow the procedure in Configure common access card authentication with LDAP to fully configure CAC authentication and authorization. You cannot use this object for CLI users.

Step 2

In the CAC Environment Variable field, enter the environment variable containing the username used for login. This field appears when CAC check box is selected. With CAC enabled and used with browser to access the appliance, environment variables containing CAC information can be used for login. Example, SSL_CLIENT_S_DN_CN = last.first.1234567890. In the CAC User Name Template field, enter the template to extract the username portion from the CAC Environment Variable. Example, enter \.(\d{10})$ to extract the last 10 digits of the CAC environment variable string. Enter a Name and optional Description.

Step 3

Choose a Server Type from the drop-down list.

Tip


If you click Set Defaults , the device populates the User Name Template , UI Access Attribute , CLI Access Attribute , Group Member Attribute , and Group Member URL Attribute fields with default values for the server type.

Step 4

For the Primary Server, enter a Host Name/IP Address. If you are using a certificate to connect via TLS or SSL, the host name in the certificate must match the host name used in this field. In addition, IPv6 addresses are not supported for encrypted connections. Now, change the Port from the default and enter the Backup Server parameters and LDAP-Specific Parameters.

  1. Enter the Base DN for the LDAP directory you want to access. For example, to authenticate names in the Security organization at the Example company, enter ou=security,dc=example,dc=com . Alternatively click Fetch DNs , and choose the appropriate base distinguished name from the drop-down list.

  2. (Optional) Enter the Base Filter . For example, if the user objects in a directory tree have a physicalDeliveryOfficeName attribute and users in the New York office have an attribute value of NewYork for that attribute, to retrieve only users in the New York office, enter (physicalDeliveryOfficeName=NewYork) .

    If you are using CAC authentication, to filter only active user accounts (excluding the disabled user accounts), enter (!(userAccountControl:1.2.840.113556.1.4.803:=2)) . This criteria retrieves user accounts within AD belonging to ldpgrp group and with userAccountControl attribute value that is not 2 (disabled).

  3. Enter a User Name for a user who has sufficient credentials to browse the LDAP server. For example, if you are connecting to an OpenLDAP server where user objects have a uid attribute, and the object for the administrator in the Security division at your example company has a uid value of NetworkAdmin , you might enter uid=NetworkAdmin,ou=security,dc=example,dc=com.

  4. Enter the user password in the Password and the Confirm Password fields.

  5. (Optional) Click Show Advanced Options to configure these advanced options.

    • Encryption —Click None , TLS , or SSL .

      If you change the encryption method after specifying a port, you reset the port to the default value for that method. For None or TLS , the port resets to the default value of 389

      • None — LDAP communication is unencrypted.

      • TLS — LDAP communication is upgraded to TLS using the STARTTLS operation on default port 389

      • SSL — LDAP communication is encrypted using TLS immediately upon connection (LDAPS) on default port 636.

    • SSL Certificate Upload Path —For SSL or TLS encryption, click Choose File and choose the complete CA chain certificate.

      Note


      Do not choose a binary certificate (PKCS12, DER, and alike) file because Firewall Threat Defense does not support them.

      To remove the uploaded certificate, check the Clear loaded certificate check box. This option only appears when you have uploaded a certificate, and when you are in the Edit mode of the external authentication object.

      If you had previously uploaded a certificate and want to replace it, reupload the new certificate (complete CA chain), and redeploy the configuration to your devices to copy over the new certificate.

      Note


      TLS encryption requires a certificate on all platforms. We recommend that you always upload a certificate for SSL to prevent adversary-in-the-middle attacks.

    • User Name Template —Provide a template that corresponds with your UI Access Attribute . For example, to authenticate all users who work in the Security organization of the Example company by connecting to an OpenLDAP server where the UI access attribute is uid , you might enter uid=%s,ou=security,dc=example,dc=com in the User Name Template field. For a Microsoft Active Directory server, you could enter %s@security.example.com .

      This field is required for CAC authentication.

    • Shell User Name Template —Provide a template that corresponds with your CLI Access Attribute to authenticate CLI users. For example, to authenticate all users who work in the Security organization by connecting to an OpenLDAP server where the CLI access attribute is sAMAccountName , you might enter %s in the Shell User Name Template field.

    • Timeout (Seconds) —Enter the number of seconds before rolling over to the backup connection, between 1 and 1024. The default is 30.

      Note


      The timeout range is different for Firewall Threat Defense and the Firewall Management Center , so if you share an object, be sure not to exceed the Firewall Threat Defense 's smaller timeout range (1-30 seconds). If you set the timeout to a higher value, the Firewall Threat Defense LDAP configuration will not work.

Step 5

Configure Attribute Mapping to retrieve users based on an attribute.

  • Enter a UI Access Attribute , or click Fetch Attrs to retrieve a list of available attributes. For example, on a Microsoft Active Directory Server, you may want to use the UI access attribute to retrieve users, because there may not be a uid attribute on Active Directory Server user objects. Instead, you can search the userPrincipalName attribute by typing userPrincipalName in the UI Access Attribute field.

    This field is required for CAC authentication.

  • Set the CLI Access Attribute if you want to use a shell access attribute other than the user distinguished type. For example, on a Microsoft Active Directory Server, use the sAMAccountName CLI access attribute to retrieve CLI access users by typing sAMAccountName .

Step 6

(Optional) Configure Group Controlled Access Roles.

If you do not configure a user’s privileges using group-controlled access roles, a user has only the privileges granted by default in the external authentication policy.

  1. (Optional) In the fields that correspond to user roles, enter the distinguished name for the LDAP groups that contain users who should be assigned to those roles.

    Any group you reference must exist on the LDAP server. You can reference static LDAP groups or dynamic LDAP groups. Static LDAP groups are groups where membership is determined by group object attributes that point to specific users, and dynamic LDAP groups are groups where membership is determined by creating an LDAP search that retrieves group users based on user object attributes. Group access rights for a role only affect users who are members of the group.

    If you use a dynamic group, the LDAP query runs exactly as it is configured on the LDAP server. To prevent infinite loops caused by search syntax errors, the device limits recursions of a search to four.

    Example:

    Enter this in the Administrator field to authenticate names in the information technology organization at the Example company:

    
    cn=itgroup,ou=groups, dc=example,dc=com
    
  2. Choose a Default User Role for users that do not belong to any of the specified groups.

  3. If you use static groups, enter a Group Member Attribute .

    Example:

    If the member attribute is used to indicate membership in the static group for default Security Analyst access, enter member .

  4. If you use dynamic groups, enter a Group Member URL Attribute .

    Example:

    If the memberURL attribute contains the LDAP search that retrieves members for the dynamic group you specified for default Admin access, enter memberURL .

If you change a user's role, you must save/deploy the changed external authentication object and also remove the user from the Users screen. The user will be re-added automatically the next time they log in.

Step 7

(Optional) Set the CLI Access Filter to allow CLI users.

To prevent LDAP authentication of CLI access, leave this field blank. To specify CLI users, choose one of these methods:

  • To use the same filter you specified when configuring authentication settings, check the check box of Same as Base Filter .

  • To retrieve administrative user entries based on attribute value, enter the attribute name, a comparison operator, and the attribute value you want to use as a filter, enclosed in parentheses. For example, if all network administrators have a manager attribute which has an attribute value of shell , you can set a base filter of (manager=shell) .

The usernames must be Linux-valid:

  • Maximum 32 alphanumeric characters, plus period (.), hyphen (-), and underscore (_)

  • All lowercase

  • Cannot start with hyphen (-); cannot be all numbers; cannot include at sign (@) or slash (/)

Note


Users with CLI access can gain Linux shell access with the expert command. "Linux shell users can obtain root privileges, which presents a security risk. Make sure that you restrict the list of users with CLI or Linux shell access.

Note


Do not create any internal users that have the same user name as users included in the CLI Access Filter. The only internal Firewall Management Center user should be admin ; do not include an admin user in the CLI Access Filter.

Step 8

(Optional) Click Test to test connectivity to the LDAP server.

The test output lists valid and invalid user names. Valid user names are unique, and can include underscores ( _ ), periods ( . ), hyphens ( - ), and alphanumeric characters. Note that testing the connection to servers with more than 1000 users only returns 1000 users because of UI page size limitations. If the test fails, refer to Troubleshoot LDAP authentication connections .

Step 9

(Optional) You can also enter Additional Test Parameters to test user credentials for a user who should be able to authenticate: enter a User Name uid and Password , and then click Test. Click Save. Enable use of this server. Refer to Enable external authentication for users on the Firewall Management Center.

If you are connecting to a Microsoft Active Directory Server and supplied a UI access attribute in place of uid , use the value for that attribute as the user name. You can also specify a fully qualified distinguished name for the user.

Tip


If you mistype the name or password of the test user, the test fails even if the server configuration is correct. To verify that the server configuration is correct, click Test without entering user information in the Additional Test Parameters field first. If that succeeds, supply a user name and password to test with the specific user.

Example:

To test if you can retrieve the JSmith user credentials at the Example company, enter JSmith and the correct password.


Examples

Basic Example

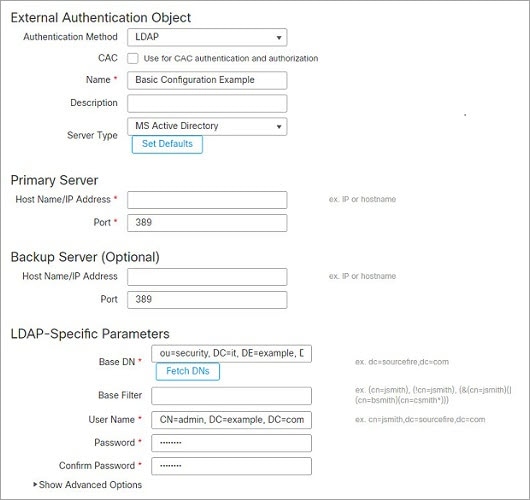
This figures illustrate a basic configuration of an LDAP login authentication object for a Microsoft Active Directory Server. The LDAP server in this example has an IP address of 10.11.3.4. The connection uses port 389 for access.

The LDAP external authentication object configuration example illustrates the necessary parameters and settings required for successful integration with an LDAP server.

This example shows a connection using a base distinguished name of OU=security,DC=it,DC=example,DC=com for the security organization in the information technology domain of the Example company.

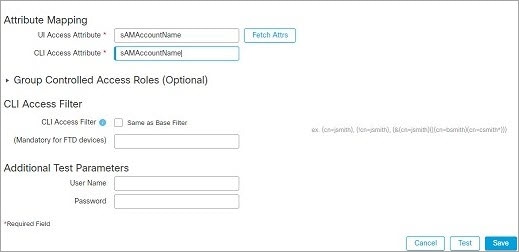
The diagram illustrates the steps to add an LDAP external authentication object, highlighting the necessary configuration fields and their relationships within the system.

However, because this server is a Microsoft Active Directory server, it uses the sAMAccountName attribute to store user names rather than the uid attribute. Choosing the MS Active Directory server type and clicking Set Defaults sets the UI Access Attribute to sAMAccountName . As a result, the system checks the sAMAccountName attribute for each object for matching user names when a user attempts to log into the system.

In addition, a CLI Access Attribute of sAMAccountName causes each sAMAccountName attribute to be checked for all objects in the directory for matches when a user logs into a CLI account on the appliance.

Note that because no base filter is applied to this server, the system checks attributes for all objects in the directory indicated by the base distinguished name. Connections to the server time out after the default time period (or the timeout period set on the LDAP server).

Advanced Example

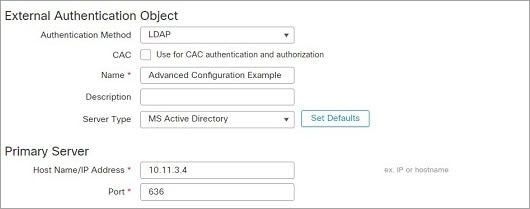
This example illustrates an advanced configuration of an LDAP login authentication object for a Microsoft Active Directory Server. The LDAP server in this example has an IP address of 10.11.3.4. The connection uses port 636 for access.

The diagram illustrates the process of adding an LDAP external authentication object, highlighting the necessary configuration steps and components involved in the setup.

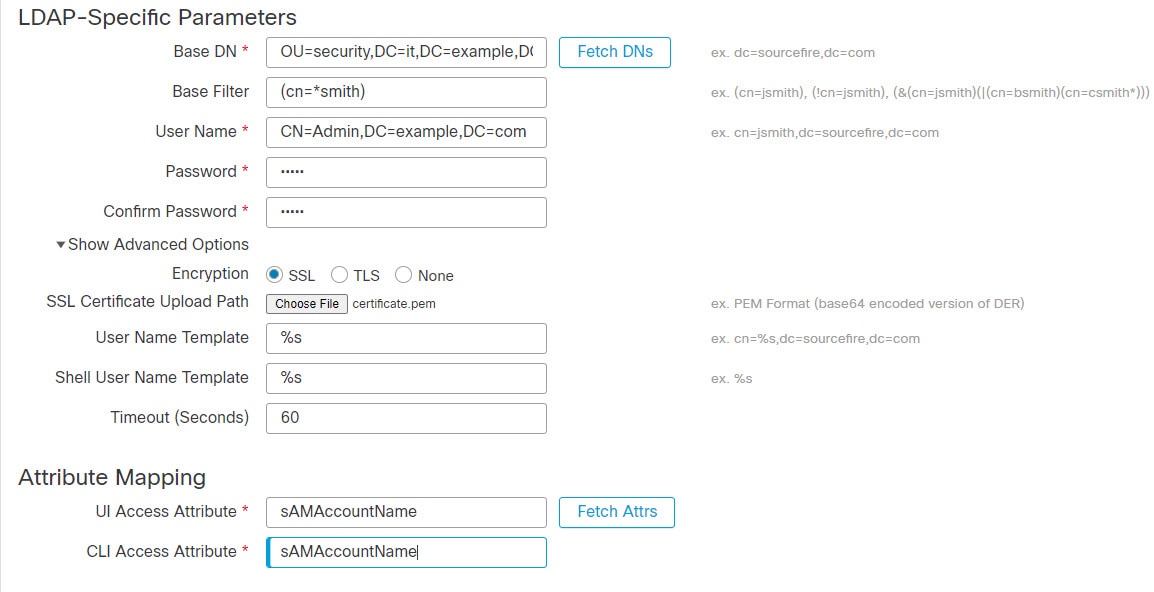
This example shows a connection using a base distinguished name of OU=security,DC=it,DC=example,DC=com for the security organization in the information technology domain of the Example company. However, note that this server has a base filter of (cn=*smith) . The filter restricts the users retrieved from the server to those with a common name ending in smith .

The diagram illustrates the process of adding an LDAP external authentication object, highlighting the necessary configuration steps and components involved in the setup.

The connection to the server is encrypted using SSL and a certificate named certificate.pem is used for the connection. In addition, connections to the server time out after 60 seconds because of the Timeout (Seconds) setting.

Because this server is a Microsoft Active Directory server, it uses the sAMAccountName attribute to store user names rather than the uid attribute. Note that the configuration includes a UI Access Attribute of sAMAccountName . As a result, the system checks the sAMAccountName attribute for each object for matching user names when a user attempts to log into the system.

In addition, a CLI Access Attribute of sAMAccountName causes each sAMAccountName attribute to be checked for all objects in the directory for matches when a user logs into a CLI account on the appliance.

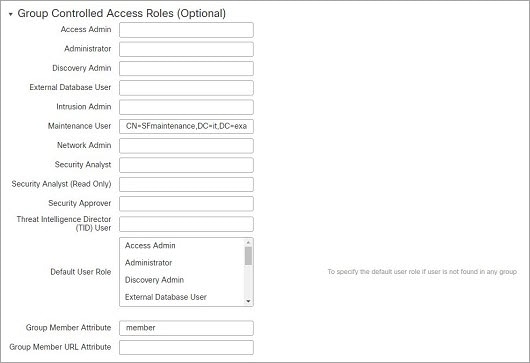
This example also has group settings in place. The Maintenance User role is automatically assigned to all members of the group with a member group attribute and the base domain name of CN=SFmaintenance,DC=it,DC=example,DC=com .

The diagram illustrates the process of adding an LDAP external authentication object, highlighting the necessary configuration steps and components involved in the setup.

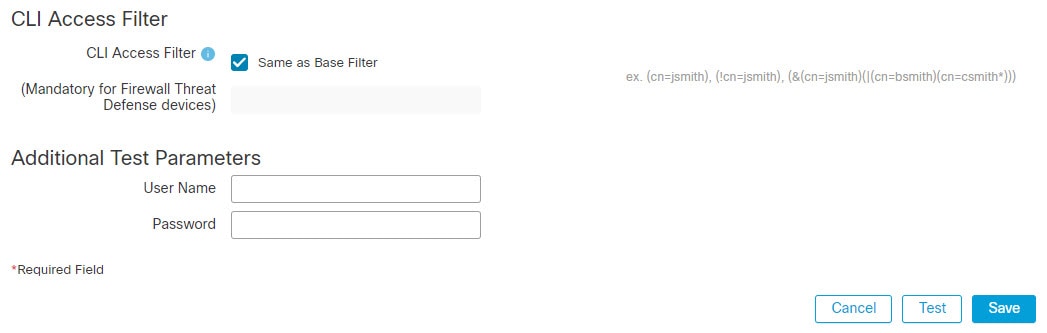
The CLI Access Filter is set to be the same as the base filter, so the same users can access the appliance through the CLI as through the web interface.

The diagram illustrates the process of adding an LDAP external authentication object to support external users for device management. It highlights the necessary configuration steps and connections involved in the setup.

Add a RADIUS external authentication object for Firewall Management Center

Add a RADIUS server to support external users for device management.

In a multidomain deployment, external authentication objects are only available in the domain in which they are created.

Note that Firewall Management Center supports only these six attributes in the access request of the RADIUS authentication:

  • NAS-IP-Address : Used in UI and CLI authentication

  • NAS-Identifier : Used in CLI authentication

  • NAS-Port : Used in UI and CLI authentication

  • NAS-Port-Type : Used in CLI authentication

  • Service-Type : Used in UI and CLI authentication

  • Calling-Station-Id : Used in CLI authentication


Note


  • NAS-Port attribute: The attribute value is dynamically generated and cannot be configured.

  • NAS-Port-Type attribute: The server always sets the attribute value to Virtual, regardless of whether the device is virtual or physical. of whether the Firewall Management Center is virtual or physical.

  • NAS-Identifier attribute: The attribute value is always sshd.

  • Service-Type attribute: Firewall Management Center supports only Login and Authenticate Only service types


Before you begin

Procedure


Step 1

Choose System (system gear icon) > Users. Click External Authentication.

Step 2

Click Add icon (add icon) Add External Authentication Object and set the Authentication Method to RADIUS. Enter a Name and optional Description.

Step 3

Check the RADIUS Server-Enabled Message Authenticator check box. This requires the Message-Authenticator attribute in all RADIUS responses and ensures that every response from the RADIUS server is securely verified by the Firewall Threat Defense .

The feature is enabled by default for new RADIUS servers. Enable it for existing servers after the upgrade. Enable message authenticators to protect your firewalls from potential attacks. Ensure that your RADIUS server has the Message-Authenticator configuration.

Note


The Message-Authenticator attribute persists whether the feature is enabled or disabled. The server always requires this attribute. When the check box is enabled in the configuration, it also becomes a requirement from the Firewall Management Center .

Step 4

For the Primary Server, enter a Host Name/IP Address. Then, change the Port from the default and then enter the RADIUS Secret Key.

Step 5

(Optional) Enter the Backup Server parameters, then provide the RADIUS-Specific Parameters.

  1. Enter the Timeout in seconds before retrying the primary server, between 1 and 1024. The default is 30.

    Note


    The timeout range is different for the Firewall Threat Defense and the Firewall Management Center , so if you share an object, be sure not to exceed the Firewall Threat Defense 's smaller timeout range (1-300 seconds). If you set the timeout to a higher value, the Firewall Threat Defense RADIUS configuration will not work.

  2. Enter the Retries before rolling over to the backup server. The default is 3.

  3. In the fields that correspond to user roles, enter the name of each user or identifying attribute-value pair that should be assigned to those roles.

    Separate usernames and attribute-value pairs with commas.

    Example:

    If you know all users who should be Security Analysts have the value Analyst for their User-Category attribute, you can enter User-Category=Analyst in the Security Analyst field to grant that role to those users.

    Example:

    To grant the Administrator role to the users jsmith and jdoe , enter jsmith, jdoe in the Administrator field.

    Example:

    To grant the Maintenance User role to all users with a User-Category value of Maintenance , enter User-Category=Maintenance in the Maintenance User field.

  4. Select the Default User Role for users that do not belong to any of the specified groups.

After you change a user's role, save and deploy the updated external authentication object. Remove the user from the Users screen. The system adds the user when they log in again.

Step 6

(Optional) Define Custom RADIUS Attributes.

If your RADIUS server returns values for attributes not included in the dictionary file in /etc/radiusclient/, define those attributes. You must define them if you plan to use the attributes to set roles for users.You can locate the attributes returned for a user by looking at the user’s profile on your RADIUS server.

Note


Before you configure custom RADIUS attributes, obtain the Attribute ID and Type from the RADIUS server administrator. If there is a mismatch, the RADIUS packet capture displays the custom RADIUS attribute as Unassigned Attribute.

  1. Enter an Attribute Name.

    Enter an attribute name using alphanumeric characters. Separate words in an attribute name with dashes instead of spaces.

  2. Enter the Attribute ID as an integer.

    Enter an integer for the attribute ID. Make sure the attribute ID does not conflict with any existing IDs in the etc/radiusclient/dictionary file.

  3. Choose the Attribute Type from the drop-down list.

    You also specify the type of attribute: string, IP address, integer, or date.

  4. Click Add to add the custom attribute.

When you create a RADIUS authentication object, a new dictionary file for that object is created on the device in the /var/sf/userauth directory. Any custom attributes you add are added to the dictionary file.

Example:

If a RADIUS server is used on a network with a Cisco router, you might want to use the Ascend-Assign-IP-Pool attribute to grant a specific role to all users logging in from a specific IP address pool. Ascend-Assign-IP-Pool is an integer attribute that defines the address pool where the user is allowed to log in, with the integer indicating the number of the assigned IP address pool.

To declare that custom attribute, you create a custom attribute with an attribute name of Ascend-IP-Pool-Definition , an attribute ID of 218 , and an attribute type of integer .

You could then enter Ascend-Assign-IP-Pool=2 in the Security Analyst (Read Only) field to grant read-only security analyst rights to all users with an Ascend-IP-Pool-Definition attribute value of 2.

Step 7

(Optional) In the CLI Access Filter area Administrator CLI Access User List field, enter the usernames that should have CLI access, separated by commas.

Enter usernames that match those on the RADIUS server. Usernames must be valid Linux usernames:

  • Maximum of 32 alphanumeric characters, plus period (.), hyphen (-), and underscore (_).

    (_)

  • All letters must be lowercase.

  • "The username cannot start with a hyphen (-), cannot be composed entirely of numbers, and cannot include an at sign (@) or a slash (/).

Leave the field blank to disable RADIUS authentication for CLI access.

Note


Users with CLI access can gain Linux shell access with the expert command. Linux shell users can obtain root privileges, which can present a security risk. Make sure that you restrict the list of users with CLI or Linux shell access.

Note


Remove any internal users that have the same user name as users included in the shell access filter. For the Firewall Management Center , the only internal CLI user is admin, so do not also create an admin external user.

Step 8

(Optional) Click Test to test Firewall Management Center connectivity to the RADIUS server.

Step 9

(Optional) You can also enter Additional Test Parameters to test user credentials for a user who should be able to authenticate: enter a User Name and Password, and then click Test. Click Save. For more information, refer to Enable external authentication for users on the Firewall Management Center.

Tip


If you mistype the name or password of the test user, the test fails even if the server configuration is correct. To verify that the server configuration is correct, click Test without entering user information in the Additional Test Parameters field first. If that succeeds, supply a user name and password to test with the specific user.

Example:

To test if you can retrieve the JSmith user credentials at the Example company, enter JSmith and the correct password.


Simple user role assignments

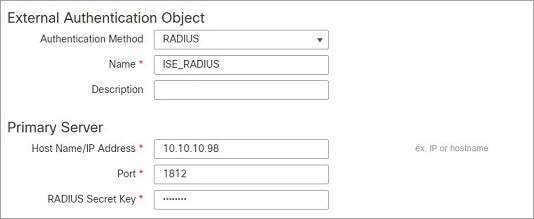
This figure illustrates a sample RADIUS login authentication object for a server running Cisco Identity Services Engine (ISE) with an IP address of 10.10.10.98 on port 1812. No backup server is defined.

The figure illustrates a sample RADIUS login authentication object for a Cisco Identity Services Engine (ISE) server, detailing parameters such as the server's IP address, port, timeout, and retry settings.

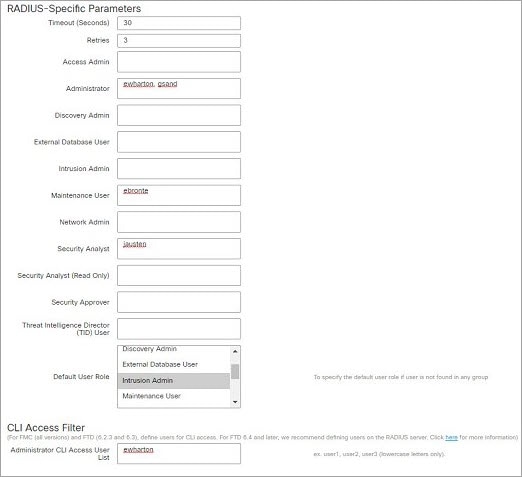
This example shows RADIUS-specific parameters, including the timeout (30 seconds) and number of failed retries before the Secure Firewall System attempts to contact the backup server, if any.

This example illustrates important aspects of RADIUS user role configuration:

Users ewharton and gsand are granted web interface Administrative access.

The user cbronte is granted web interface Maintenance User access.

The user jausten is granted web interface Security Analyst access.

The user ewharton can log into the device using a CLI account.

This graphic depicts the role configuration for the example:

The figure illustrates the role configuration for users matching an attribute-value pair in a RADIUS external authentication setup, highlighting how specific attributes can determine user roles.

Roles for users matching an attribute-value pair

You can use an attribute-value pair to identify users who should receive a particular user role. If the attribute you use is a custom attribute, you must define the custom attribute.

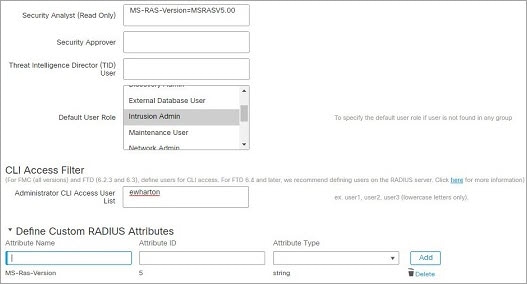
This figure illustrates the role configuration and custom attribute definition in a sample RADIUS login authentication object for the same ISE server as in the previous example.

In this example, however, the MS-RAS-Version custom attribute is returned for one or more of the users because a Microsoft remote access server is in use. Note the MS-RAS-Version custom attribute is a string. In this example, all users logging in to RADIUS through a Microsoft version 5.00 remote access server should receive the Security Analyst (Read Only) role, so you enter the attribute-value pair of MS-RAS-Version=MSRASV5.00 in the Security Analyst (Read Only) field.

The diagram illustrates the process of adding a RADIUS external authentication object, highlighting the necessary configuration steps and connections for integrating the RADIUS server into the device management system.

Enable external authentication for users on the Firewall Management Center

Enable external authentication for users to allow the Firewall Management Center to verify user credentials with an LDAP or RADIUS server, enhancing security and centralized user management.

When you enable external authentication for management users, the Firewall Management Center verifies the user credentials with an LDAP or RADIUS server as specified in an External Authentication object.

Before you begin

Add one or more external authentication objects according to Add an LDAP external authentication object for the Firewall Management Center and Add a RADIUS external authentication object for Firewall Management Center.

Follow these steps to enable external authentication for users on the Firewall Management Center:

Procedure


Step 1

Choose System (system gear icon) > Users.

Step 2

Click External Authentication.

Step 3

Set the default user role for external web interface users.

If a user does not have a role, they cannot perform any actions. Roles set in the external authentication object override the default user role.

  1. Click the Default User Role value (by default, no selection).

  2. In the Default User Role Configuration dialog box, check the role or roles that you want to use.

  3. Click Save.

Step 4

Click the Slider enabled (slider enabled) next to the each external authentication object that you want to use. If you enable more than one object, users are compared against servers in the specified order. Refer to the next step to reorder servers.

If you enable shell authentication, you must enable an external authentication object that includes a CLI Access Filter. Also, CLI access users can only authenticate against the server whose authentication object is highest in the list.

Step 5

(Optional) Drag and drop servers to change the order in which the system accesses them during authentication.

Step 6

From the Shell Authentication drop-down list, click Enabled if you want to allow CLI access for external users.

Note


The multidomain feature is not supported in CLI. Therefore, the Shell Authentication option is available only in the Global domain and not in Subdomains.

The first external authentication object name is shown next to the Enabled option to remind you that only the first object is used for CLI.

Step 7

Click Save and Apply.


When you complete this task, the system enables external authentication for users. Firewall Management Center verifies their credentials with the LDAP or RADIUS servers you configured and assigns roles as you specified.

Configure common access card authentication with LDAP

Configure CAC authentication with LDAP to allow users to log in directly without providing a separate username and password for the device.

If your organization uses Common Access Cards (CACs), you can configure LDAP authentication to authenticate Firewall Management Center users who log in to the web interface. With CAC authentication, users have the option to log in directly without providing a separate username and password for the device.

The system identifies CAC-authenticated users by their electronic data interchange personal identifier (EDIPI) numbers.

After 24 hours of inactivity, the device deletes CAC-authenticated users from the Users tab. The system re-adds these users after each login. Reconfigure any manual user role changes after users are re-added.


Caution


Assign a default access role with the least privileges required when you configure CAC authentication with LDAP. When a user first logs in to the system with their CAC credentials, their account will be assigned this default access role.

If you do not follow the principles of least privilege while assigning the default access role, users may be assigned an unintended privilege level on subsequent logins. This could result in the users having privileges beyond their required access role.

If a user who logged in with the default access role needs a temporary privilege elevation, an administrator can assign a higher access role. The system revokes this privilege after 24 hours of inactivity, returning the user to their default access role.

If a user requires a permanent access role reassignment to a higher privilege level, such as System Admin, use the Group Controlled Access Roles method to grant admin access. With this method, the assigned access role remains active for more than 24 hours, and users get the correct privileges based on group assignment. For more information on configuring Group Controlled Access Roles, refer to the Add an LDAP External Authentication Object for Management Center section.


Before you begin

You must have a valid user certificate present in your browser (in this case, a certificate passed to your browser via your CAC) to enable user certificates as part of the CAC configuration process. After you configure CAC authentication and authorization, users on your network must maintain the CAC connection for the duration of their browsing session. If you remove or replace a CAC during a session, your web browser ends the session and logs you out.

Follow these steps to configure Common Access Card authentication with LDAP:

Procedure


Step 1

Insert a CAC as your organization directs.

Step 2

Direct your browser to https://ipaddress_or_hostname/, where ipaddress or hostname corresponds to your device.

Step 3

If prompted, enter the PIN for the CAC you inserted.

Step 4

If prompted, choose the appropriate certificate from the drop-down list.

Step 5

On the Login page, in the Username and Password fields, log in as a user with Administrator privileges. You cannot yet log in using your CAC credentials. Choose System (system gear icon) > Users > External Authentication.

Step 6

Create an LDAP authentication object exclusively for CAC. Refer to the procedure in Add an LDAP external authentication object for the Firewall Management Center. You must configure these items:

  • CAC check box.

  • Under LDAP-Specific Parameters, click Show Advanced Options, and then enter the User Name Template.

  • Under Attribute Mapping, enter the UI Access Attribute.

Click Save.

Step 7

Enable external authentication and CAC authentication as described in Enable external authentication for users on the Firewall Management Center. Choose System (system gear icon) > Configuration, and click HTTPS Certificate.

Step 8

Import an HTTPS server certificate if needed. Refer to the procedure outlined in Importing HTTPS Server Certificates.

The same certificate authority (CA) must issue the HTTPS server certificate and the user certificates on the CACs you plan to use.

Step 9

Under HTTPS Client Certificate Settings, choose Enable Client Certificates. For more information, refer to Requiring Valid HTTPS Client Certificates. Log in to the device according to Log into the Secure Firewall Management Center with CAC credentials.


Users can now log in to the device using their CAC credentials without providing a separate username and password.

SAML single sign-on

SAML single sign-on is a centralized authentication system that

  • enables a central identity provider (IdP) to provide authentication and authorization for users logging into the Firewall Management Center and other applications within an organization,

  • allows applications configured to participate in the SSO arrangement to function as federated service provider applications, and

  • permits SSO users to log in once to gain access to all service provider applications that are members of the same federation.

SAML Single Sign-On features

A SAML Single Sign-On (SSO) feature is an authentication and authorization mechanism that

  • redirects users to an identity provider for authentication instead of entering credentials on the management center login page

  • uses the browser as an intermediary for communication between the management center and the identity provider, and

  • does not require a direct network connection between the management center and the identity provider.

SAML SSO reference information

You can use any provider that supports the Security Assertion Markup Language (SAML) 2.0 standard for authentication and authorization with the management center. In a multi-tenant management center, you can assign SAML users to specific subdomains. You can only configure this at the global domain level.

You can configure these SSO providers in the management center web interface:

  • Okta

  • OneLogin

  • Azure

  • PingID's PingOne for Customers cloud solution

  • Other


Note


If your identity provider requires the service provider’s signature on authentication requests, SSO fails because the management center cannot sign SAML authentication requests.


Note


The Cisco Secure Sign On SSO product does not recognize the Firewall Management Center as a pre-integrated service provider.


SAML single sign-on example

A user clicks the SSO link on the management center login page, is redirected to the identity provider for authentication, and upon successful authentication, is redirected back to the management center web interface and logged in.

SAML single sign-on counter-example

If the identity provider requires a signed authentication request and the management center cannot provide it, SSO fails and users cannot log in using SAML single sign-on.

SAML single sign-on analogy

Using SAML single sign-on is like using a passport to access multiple countries. The identity provider acts as the passport authority, so you do not have to present separate credentials.

Guidelines for SSO configuration on Firewall Management Center

Restrictions for SSO provider configuration

The Firewall Management Center can support SSO with only one SSO provider at a time. You cannot configure the Firewall Management Center to use multiple SSO providers, such as both Okta and OneLogin, simultaneously.

SSO configuration in high availability deployments

Firewall Management CenterFirewall Management Centers in a high availability configuration can support SSO, but you must address several considerations.

  • SSO configuration does not synchronize between members of a high availability pair. Configure SSO separately for each member.

  • Both Firewall Management Centers in a high availability pair must use the same IdP for SSO. Configure a service provider application at the IdP for each Firewall Management Center configured for SSO.

  • Before a user can use SSO to access the secondary Firewall Management Center for the first time, the user must first use SSO to log into the primary Firewall Management Center at least once.

  • When configuring SSO for Firewall Management Centers in a high availability pair:

    • If you configure SSO on the primary Firewall Management Center, you do not need to configure SSO on the secondary Firewall Management Center.

    • If you configure SSO on the secondary Firewall Management Center, you are required to configure SSO on the primary Firewall Management Center as well. SSO users must log into the primary Firewall Management Center at least once before logging into the secondary Firewall Management Center.

SSO configuration in multi-tenancy environments

In a Firewall Management Center that uses multi-tenancy, the SSO configuration can be applied only at the global domain level. That configuration applies to the global domain and all subdomains.

SSO configuration permissions and limitations

  • Only users with the Admin role authenticated internally or by LDAP or RADIUS can configure SSO.

  • The Firewall Management Center does not support SSO initiated from the IdP.

  • The Firewall Management Center does not support logging in with CAC credentials for SSO accounts.

  • Do not configure SSO in deployments using CC mode.

  • View SSO activity in the Firewall Management Center audit log. The Subsystem field shows whether an activity was Login or Logout.

SSO user accounts

An SSO user account is an identity management entity that

  • has its username and password established at the identity provider (IdP)

  • does not appear on the Firewall Management Center web interface Users page until the first login, and

  • can have certain account characteristics configured from the management center web interface.

Account configuration options

You can configure users and groups directly in the identity provider, or import them from user management applications such as Active Directory, RADIUS, or LDAP.

This documentation explains how to configure the Firewall Management Center to work with the IdP to support SSO. It assumes that IdP users and groups are already established. To configure an IdP to support users and groups from other user management applications, consult the IdP vendor documentation.

Most account characteristics for SSO users, including the user name and password, are established at the IdP.

SSO accounts do not appear on the Firewall Management Center web interface Users page until those accounts log in the first time.


Note


The system requires that user names for SSO accounts as well as the NameID attribute the IdP sends to the Firewall Management Center during the SAML login process must be both be valid email addresses. Many IdP's automatically use the username of the user trying to logon as the NameID attribute, but you should confirm this is the case for your IdP. Keep this in mind when configuring a service provider application at your IdP and creating IdP user accounts that are to be granted SSO access to the Firewall Management Center.


This account characteristic for SSO users can be configured from the Firewall Management Center web interface under System (system gear icon) > Users and click the Edit User:

  • Real Name

  • Exempt from Browser Session Timeout

SSO user account example

For example, an SSO user account is created at the IdP and appears in the management center web interface only after the user logs in for the first time. The Real Name and Exempt from Browser Session Timeout options can be configured in the Edit User dialog.

Non-SSO user account

A local user account created directly in the management center web interface is not an SSO user account and does not rely on the IdP for establishment.

User role mappings for SSO users

A user role mapping is an access control configuration that

  • associates an IdP role with one or more Firewall Management Center roles, allowing access to one or more domains using the Group Member Attribute Value

  • coordinates configuration settings between the Firewall Management Center and the SSO IdP application, and

  • assigns user roles to users or groups defined at the IdP application, based on role attribute values and expressions.

Role attribute configuration for SSO user mappings

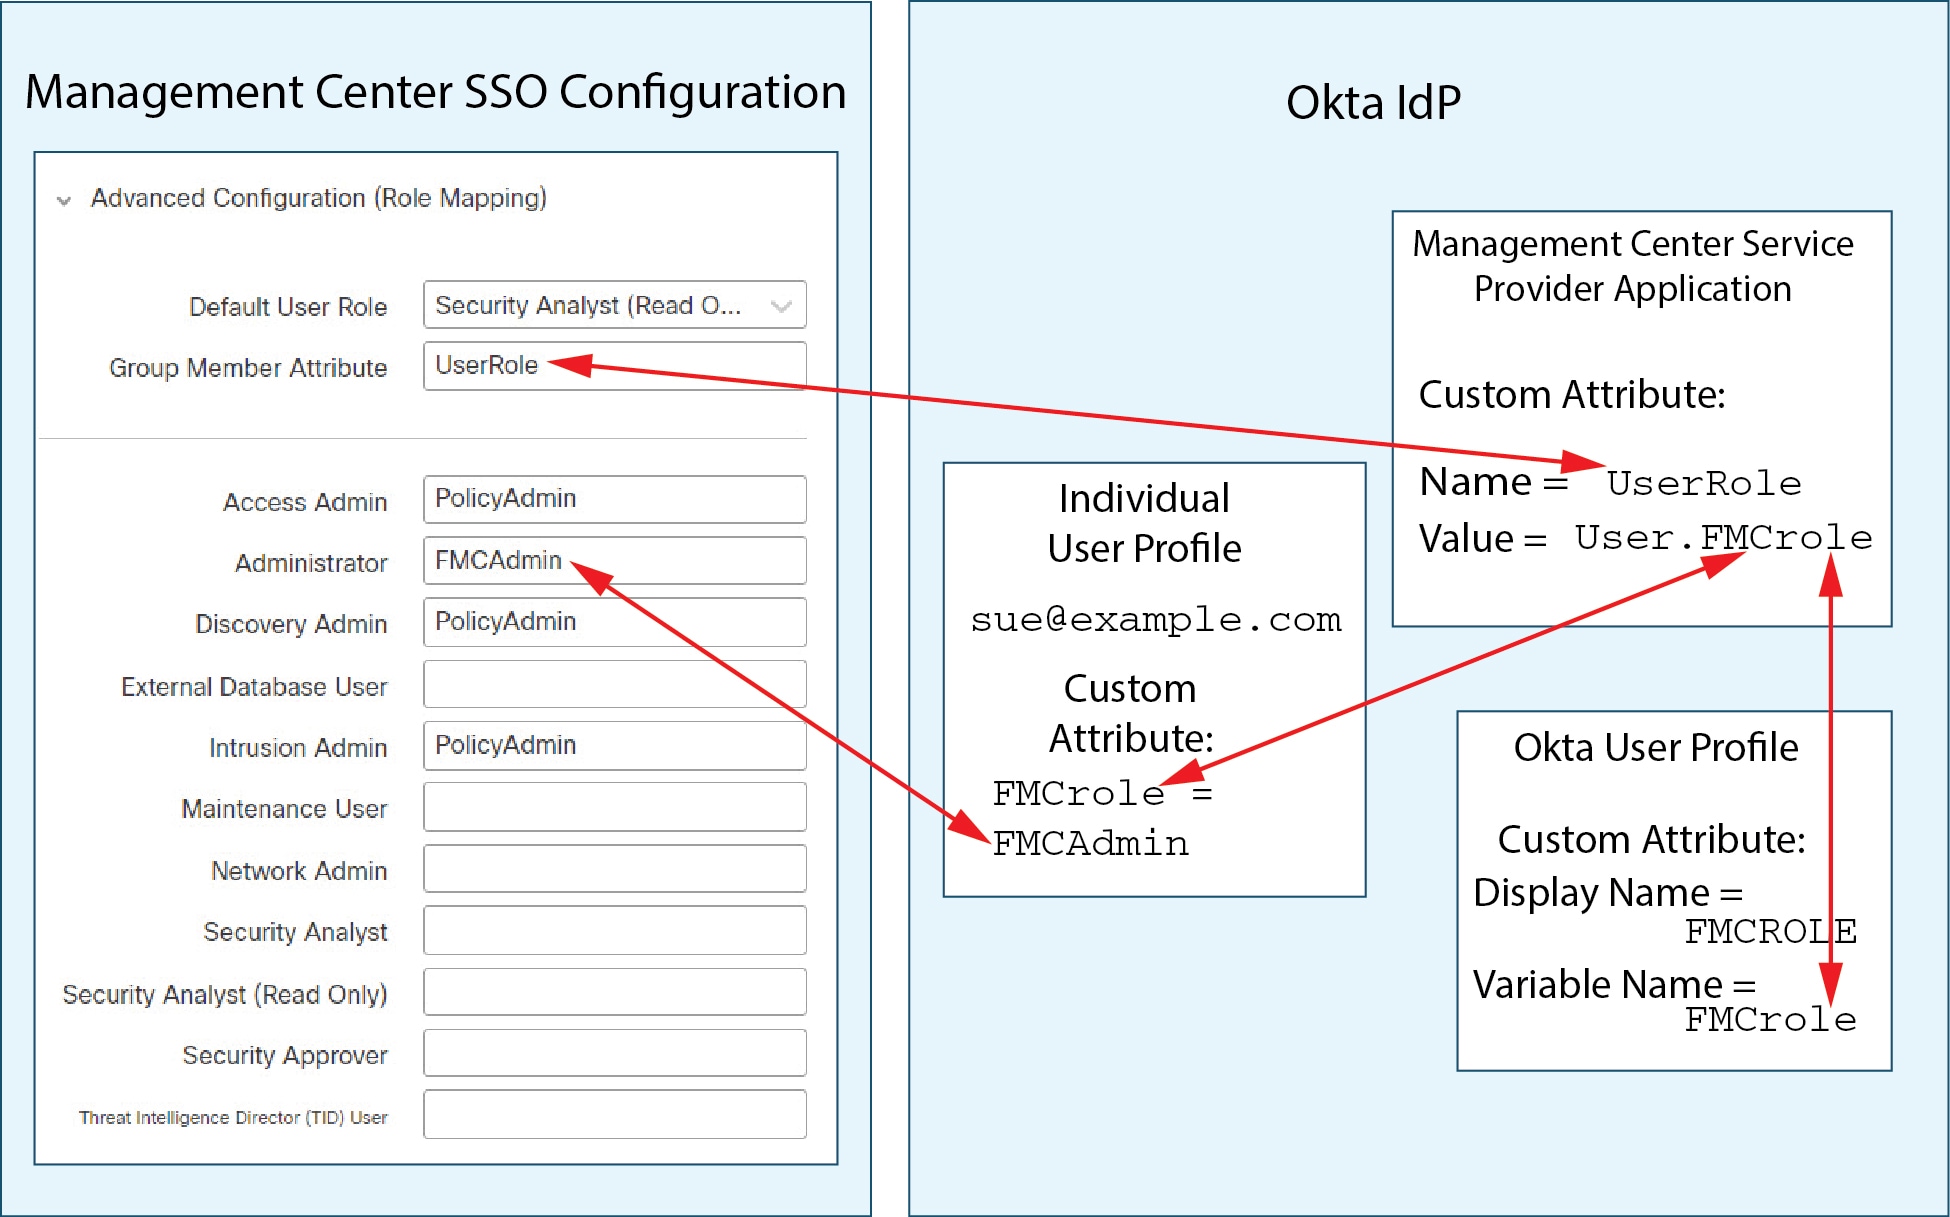
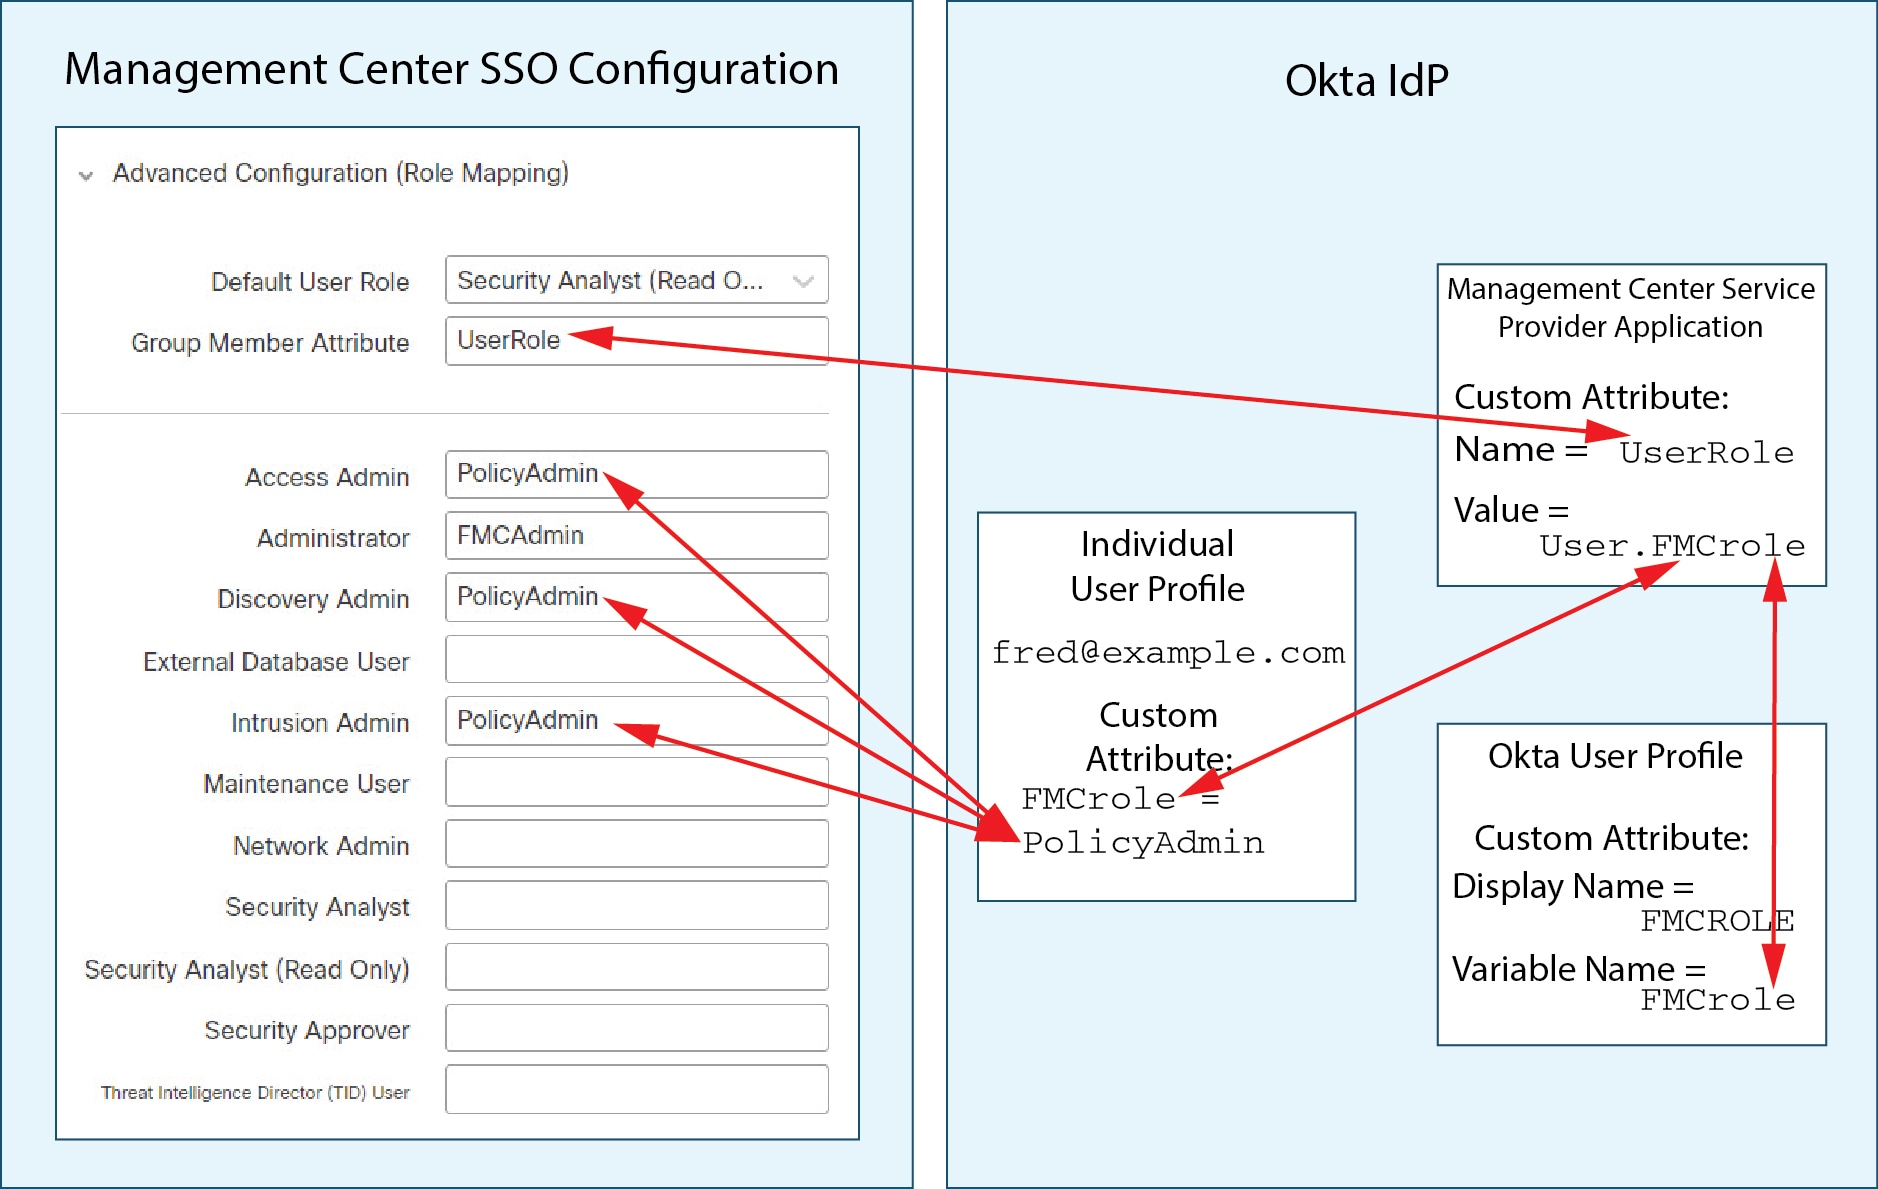
In user role mapping, the IdP sets a role attribute for the Firewall Management Center service provider application. Each user or group with access to that Firewall Management Center is configured with a string or expression for the role attribute. Attribute value requirements depend on the IdP you use.

At the Firewall Management Center, the name of the role attribute and the list of expressions assigned to Firewall Management Center user roles are part of the SSO configuration. When a user logs in to the Firewall Management Center using SSO, the Firewall Management Center compares the value of the user's role attribute or the group's attribute (depending on configuration) to the expressions for each Firewall Management Center user role. If the values match, you receive all roles that correspond to the matching expressions.


Note


You can configure Firewall Management Center roles to be mapped based on individual user permissions or based on group permissions, but a single Firewall Management Center application cannot support role mapping for both groups and individual users.


Default role assignment for SSO users

By default, all users who are given SSO access to a Firewall Management Center are assigned the Security Analyst (Read Only) role. You can change this default, as well as override it for specific SSO users or groups using user role mapping.

Enable SSO at the Firewall Management Center

Enable single sign-on (SSO) at the Firewall Management Center to allow users to authenticate through an external SSO provider.

Perform this task after configuring a service provider application for your SSO provider and assigning users or groups to it. This process is intended for organizations that want centralized authentication and improved access management.

Before you begin

In the SAML SSO management application, configure a service provider application for the Firewall Management Center and assign users or groups to it.

Follow these steps to enable SSO at the Firewall Management Center:

Procedure


Step 1

Choose System (system gear icon) > Users > Single Sign-On.

Step 2

Click the Single Sign-On (SSO) Configuration slider to enable SSO.

Step 3

Click the Configure SSO button.

Step 4

At the Select Firewall Management Center SAML Provider dialog box, click the radio button for the SSO IdP of your choice and click Next.


After completing these steps, SSO is enabled at the Firewall Management Center. Users can authenticate using the configured SSO provider, streamlining access and improving security.

What to do next

Proceed with the instructions appropriate to your choice of SSO provider:

Configure Single Sign-On with Okta

See the following tasks to configure SSO using Okta:

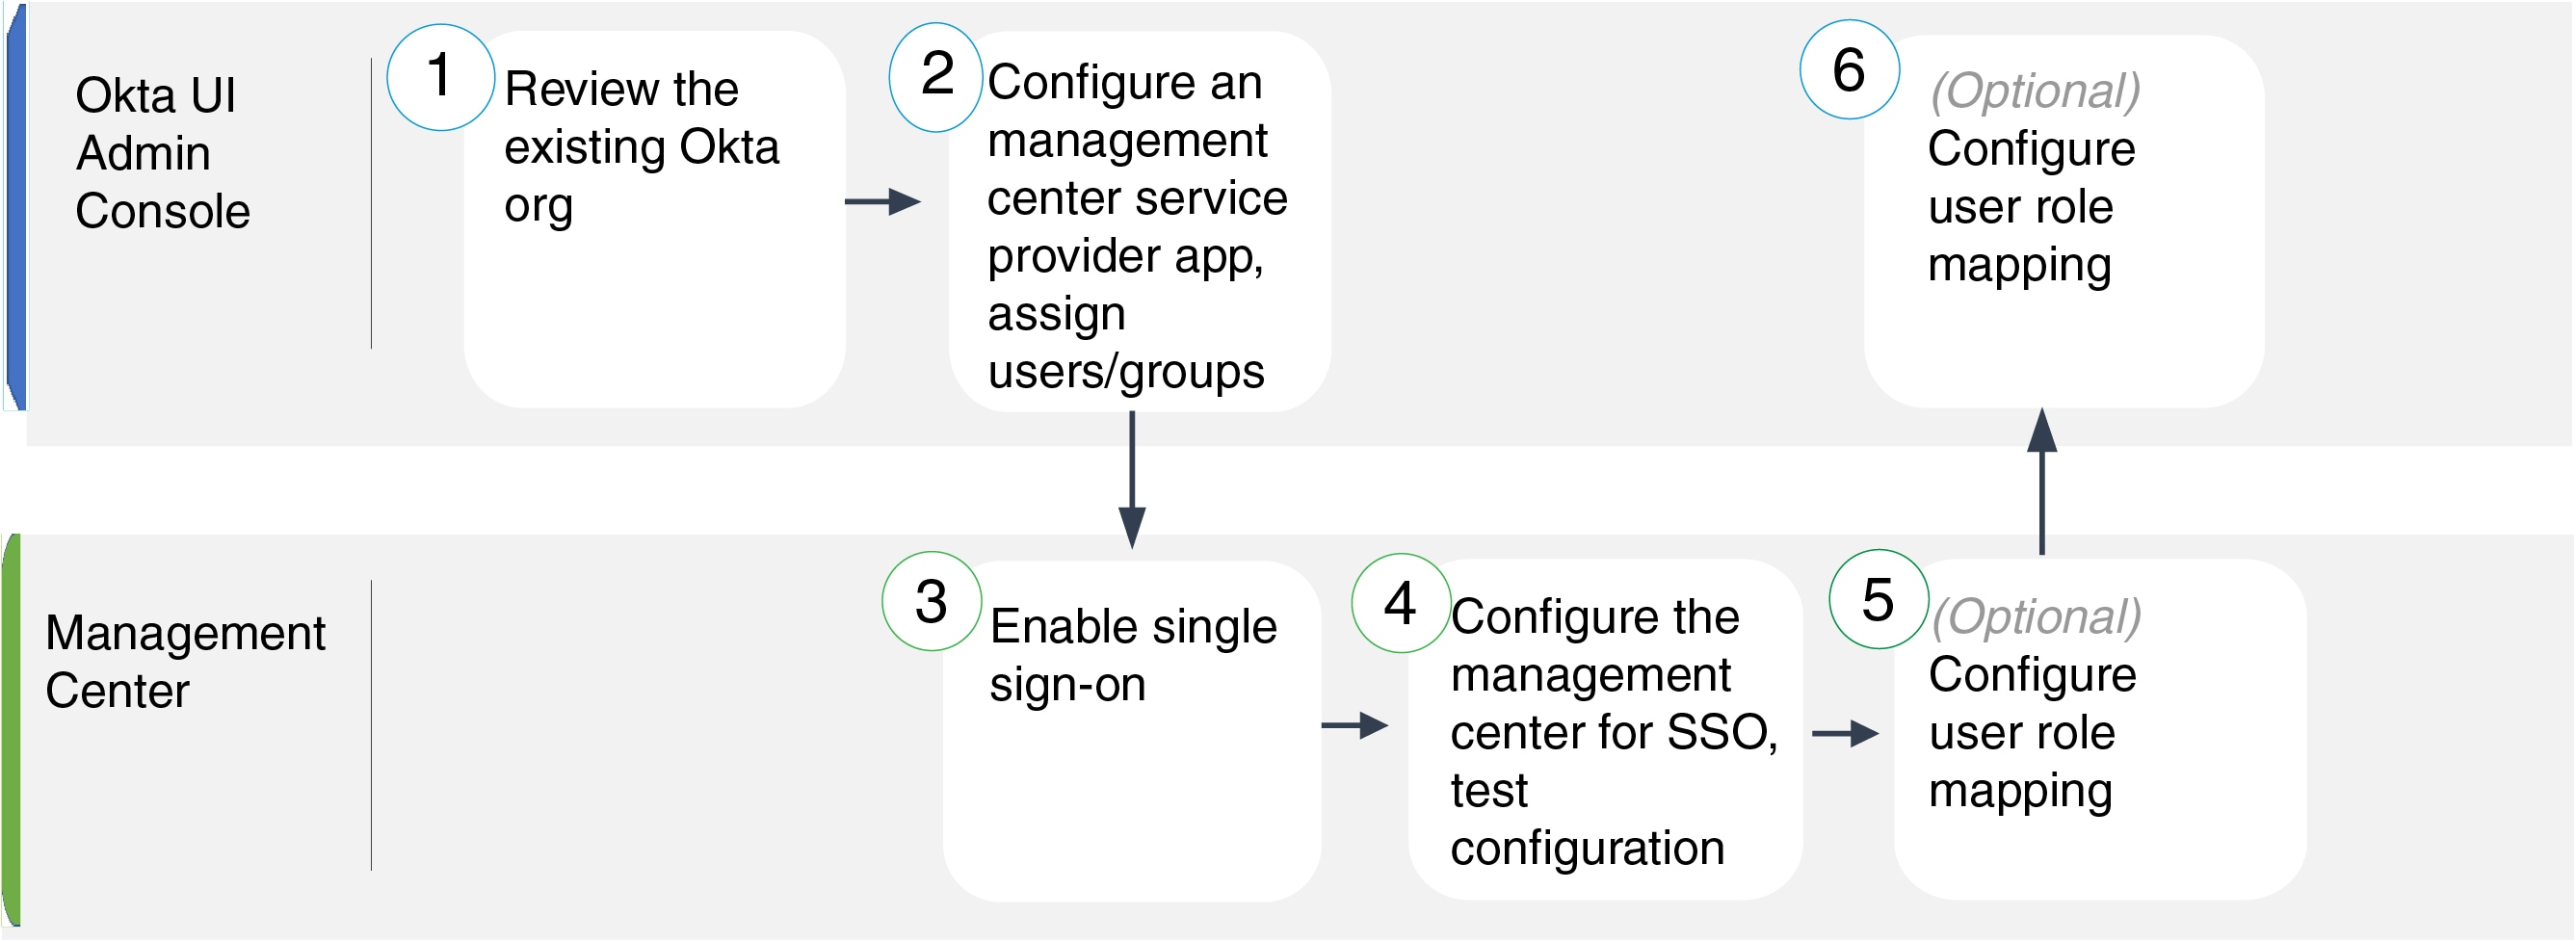
Okta UI Admin Console

Review the Okta Org

Okta UI Admin Console

Configure the Firewall Management Center service provider application for Okta

Firewall Management Center

Enable SSO at the Firewall Management Center

Firewall Management Center

Configure the Firewall Management Center for Okta SSO

Firewall Management Center

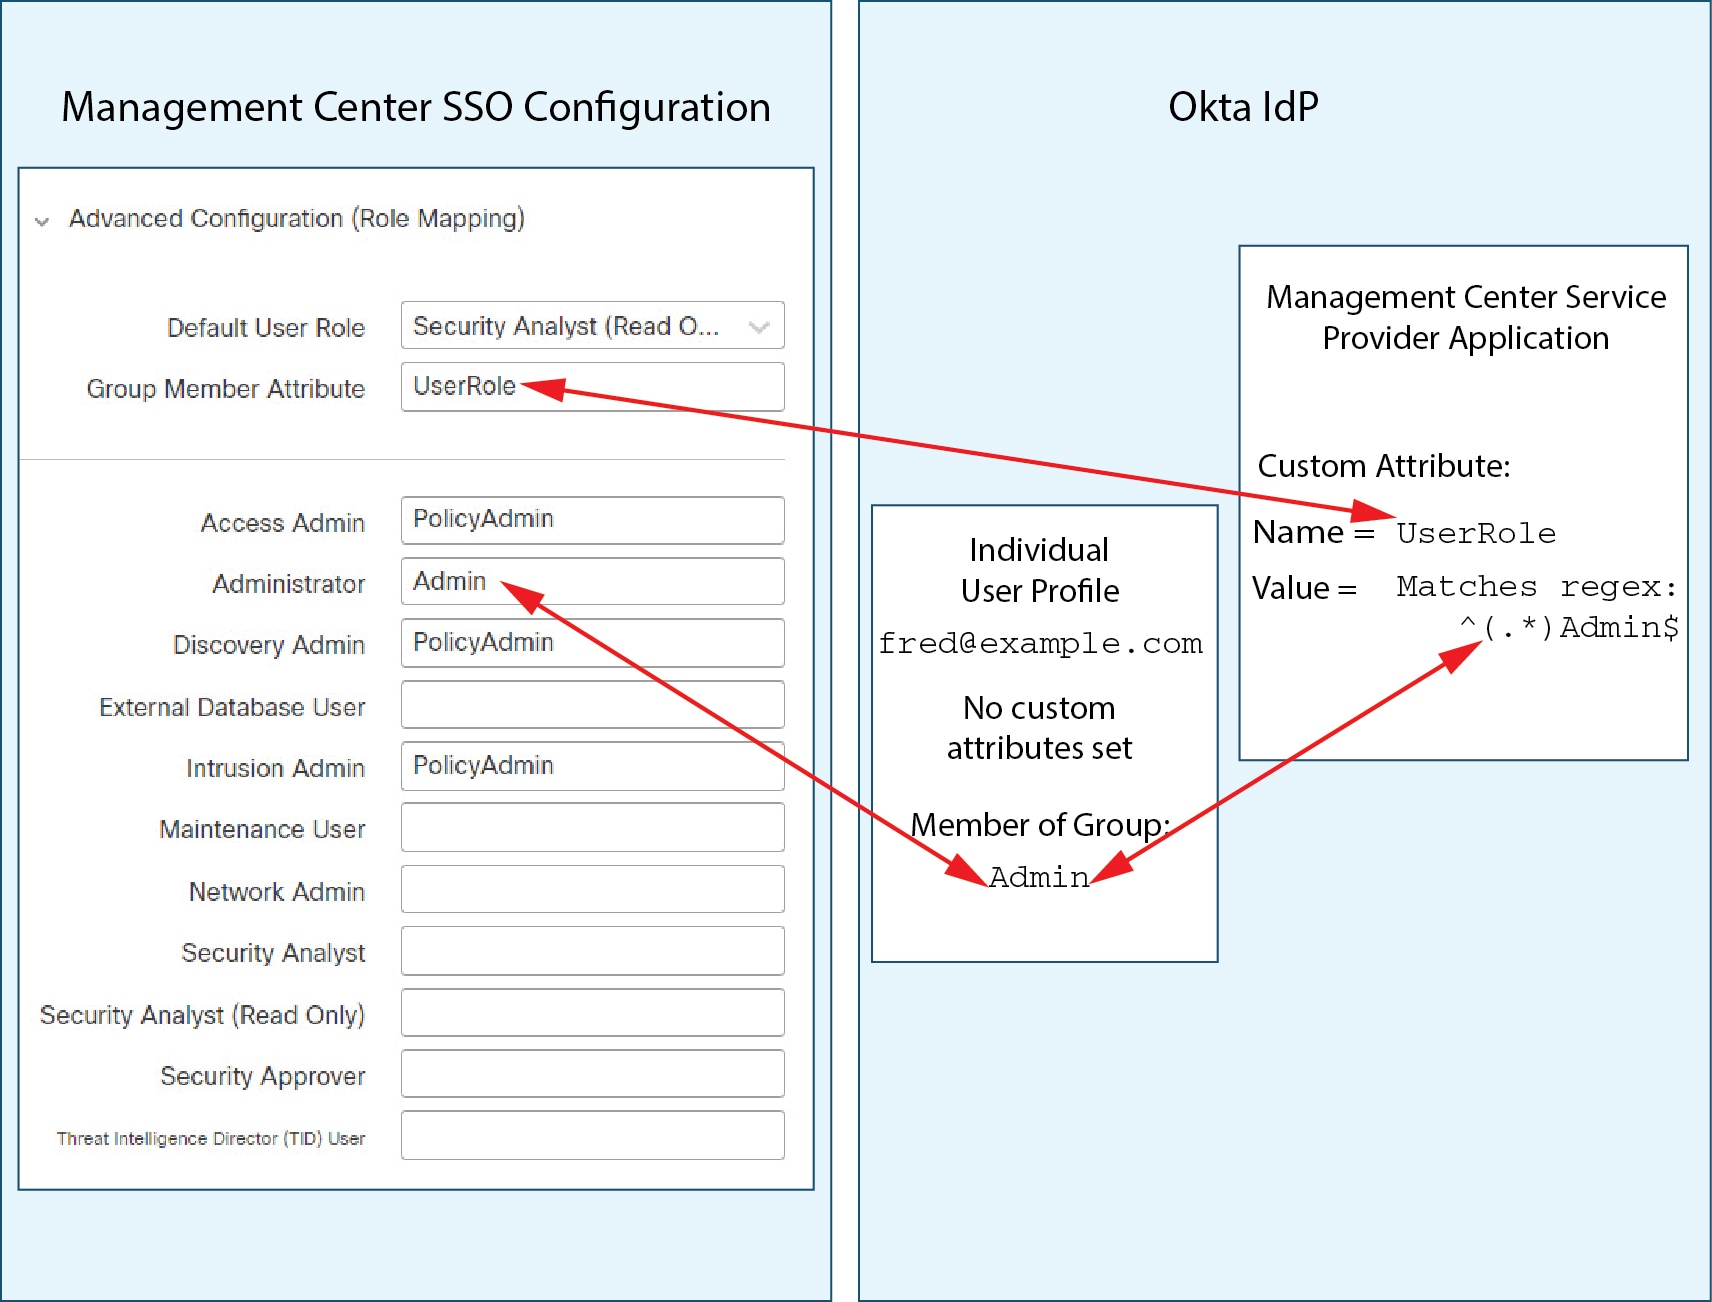
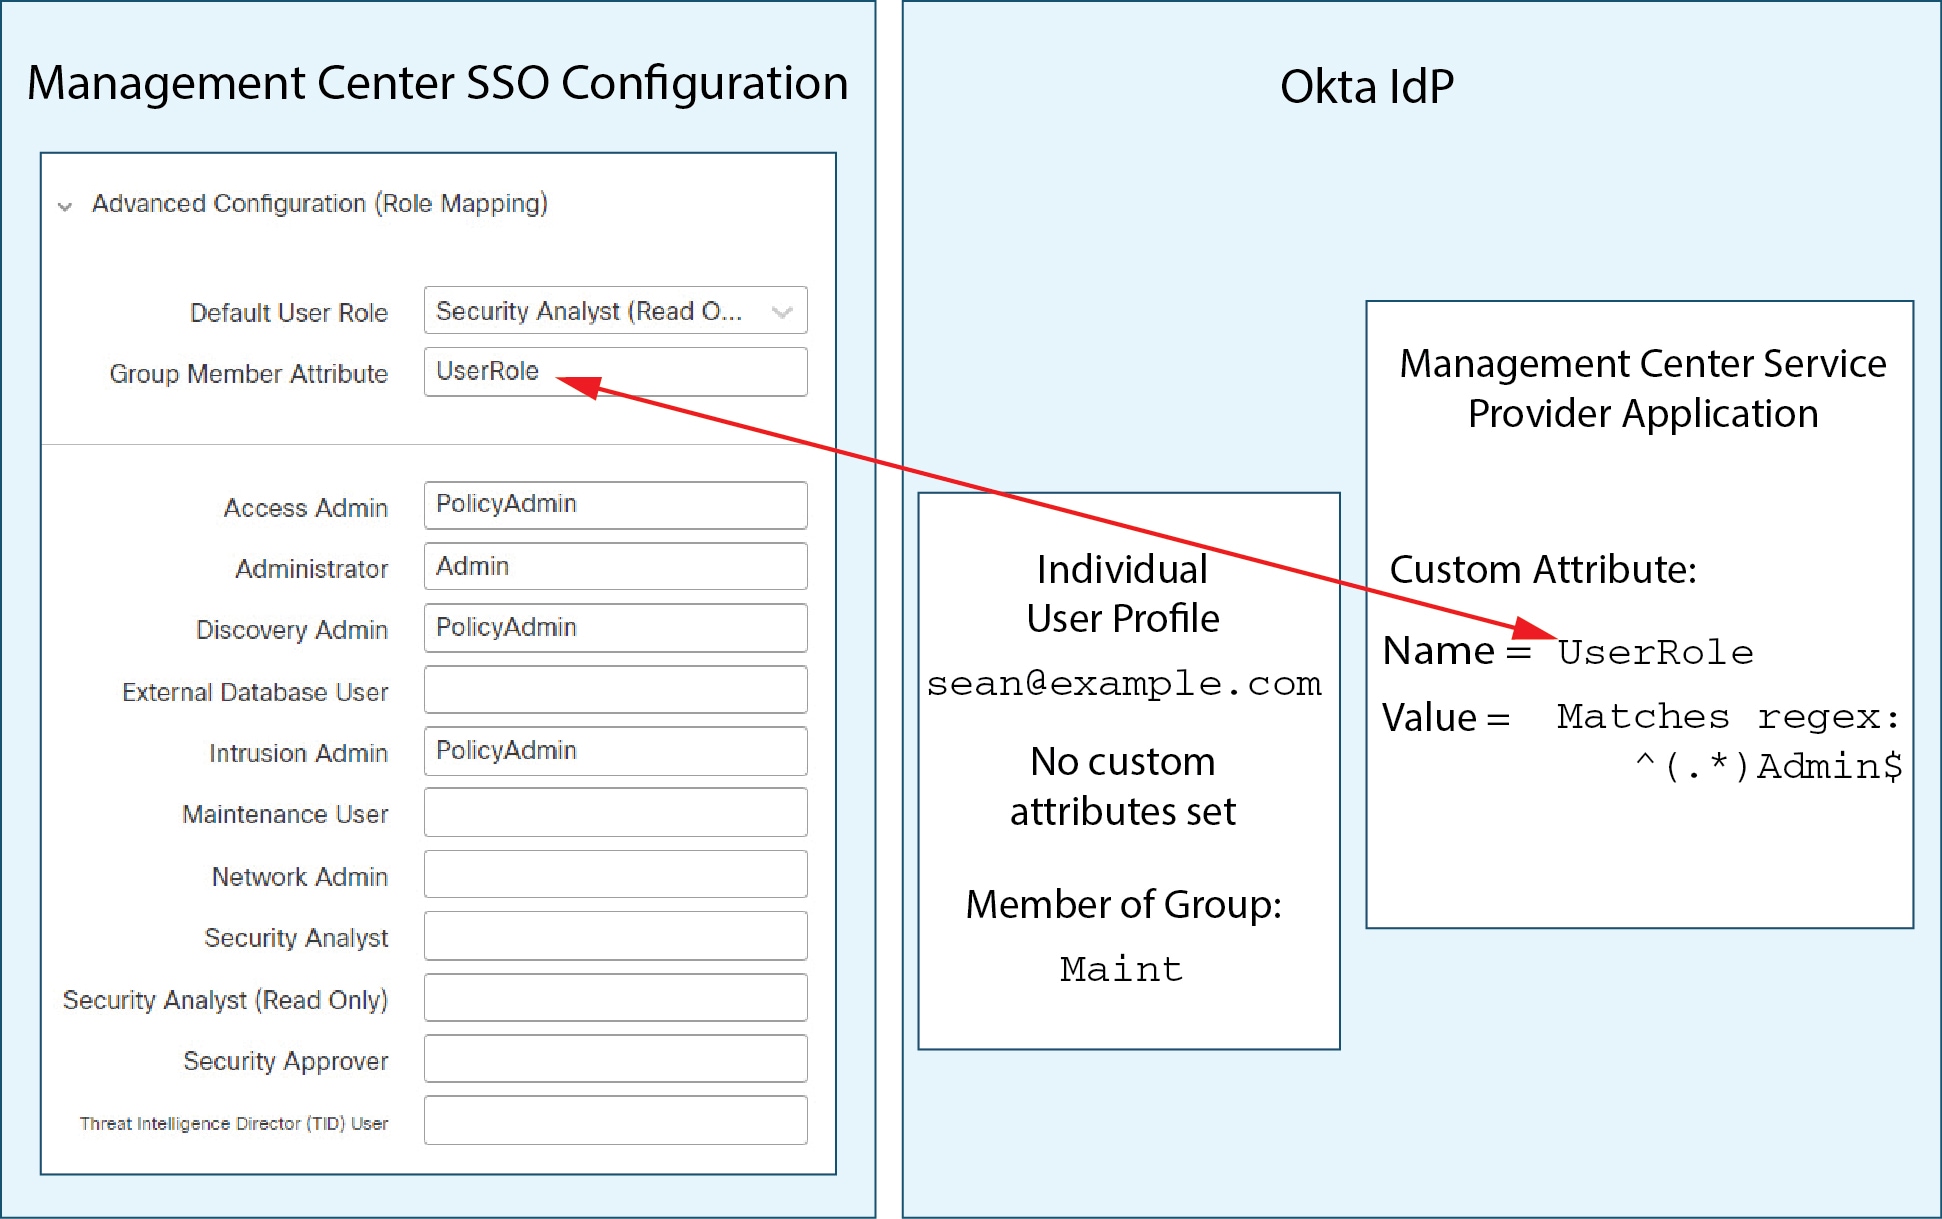
Configure User Role Mapping for Okta in the Firewall Management Center

Okta UI Admin Console

Okta IdP user role mappings

Review the Okta Org

In Okta, the entity that encompasses all the federated devices and applications that a user can access with the same SSO account is called an org. Before adding the Firewall Management Center to an Okta org, be familiar with its configuration; consider the following questions:

  • How many users will have access to the Firewall Management Center?

  • Are users within the Okta org members of groups?

  • Are user and group definitions native to Okta or imported from a user management application such as Active Directory, RADIUS, or LDAP?

  • Do you need to add more users or groups to the Okta org to support SSO on the Firewall Management Center?

  • What kind of user role assignments do you want to make? (If you choose not to assign user roles, the Firewall Management Center automatically assigns a configurable default user role to all SSO users.)

  • How must users and groups within the Okta org be organized to support the required user role mapping?

Keep in mind that you can configure Firewall Management Center roles to be mapped based on individual user permissions or based on group permissions, but a single Firewall Management Center application cannot support role mapping for both groups and individual users.

This documentation assumes you are already familiar with the Okta Classic UI Admin Console, and have an account that can perform configuration functions requiring Super Admin permissions. If you need more information, see Okta's documentation available online.

Configure the Firewall Management Center service provider application for Okta

Configure the Firewall Management Center service provider application in Okta to enable SAML-based single sign-on (SSO) for users and groups. This task allows you to integrate Okta with your Firewall Management Center for centralized authentication and access management.

Use these instructions at the Okta Classic UI Admin Console to create a Firewall Management Center service provider application within Okta and assign users or groups to that application. You should be familiar with SAML SSO concepts and the Okta admin console. This documentation does not describe all the Okta functions you need to establish a fully functional SSO org. For example, to create users and groups or to import user and group definitions from another user management application, refer to the Okta documentation.


Note


If you plan to assign user groups to the Firewall Management Center application, do not also assign users within those groups as individuals.

Note


The Firewall Management Center cannot support role mapping using multiple SSO attributes. You must select either user role mapping or group role mapping and configure a single attribute to convey user role information from OneLogin to the Firewall Management Center.

Assign users or groups to the application as appropriate for your organization.

Before you begin

  • Familiarize yourself with the SSO federation and its user and groups; refer to Review the Okta Org.

  • Create user accounts and groups, or both, in your Okta org if necessary.


    Note


    The system requires that user names for SSO accounts as well as the NameID attribute the IdP sends to the Firewall Management Center during the SAML login process must be both be valid email addresses. Many IdP's automatically use the username of the user trying to logon as the NameID attribute, but you should confirm this is the case for your IdP. Keep this in mind when configuring a service provider application at your IdP and creating IdP user accounts that are to be granted SSO access to the Firewall Management Center.


  • Confirm the login URL for the target Firewall Management Center (https://ipaddress_or_hostname).


    Note


    If your Firewall Management Center web interface can be reached with multiple URLs (for instance, a fully-qualified domain name as well as an IP address), SSO users must consistently access the Firewall Management Center using the login URL that you configure in this task.


Configure the Firewall Management Center service provider application for Okta by completing these steps:

Procedure

Step 1

From the Okta Classic UI Admin Console, create a service provider application for the Firewall Management Center. Configure the Firewall Management Center application with these selections:

  • Select Web for the Platform.

  • Select SAML 2.0 for the Sign on method.

  • Provide a Single sign on URL.

    This is the Firewall Management Center URL to which the browser sends information on behalf of the IdP.

    Append the string SAML/acs to the Firewall Management Center login URL. For example, use https://ExampleFMC/SAML/acs.

  • Enable Use this for Recipient URL and Destination URL.

  • Enter an Audience URI (SP Entity ID).

    This is a globally unique name for the service provider (the Firewall Management Center), often formatted as a URL.

    Append the string /SAML/metadata to the Firewall Management Center login URL. For example, use https://ExampleFMC/SAML/metadata.

  • For Name ID Format choose Unspecified.

Step 2

(Optional if you are assigning groups to the application.) Assign individual Okta users to the Firewall Management Center application. (If you plan to assign groups to the Firewall Management Center application, do not assign users that are members of those groups as individuals.)

Step 3

(Optional if you are assigning individual users to the application.) Assign Okta groups to the Firewall Management Center application.

Step 4

(Optional) To make SSO setup at the Firewall Management Center easier, you can download the SAML XML metadata file for the Firewall Management Center service provider application from Okta to your local computer.


After completing this task, your Firewall Management Center will be integrated with Okta for SAML SSO, allowing assigned users and groups to authenticate using Okta credentials.

What to do next

Enable single sign-on; refer to Enable SSO at the Firewall Management Center.

Configure the Firewall Management Center for Okta SSO

Configure Okta SSO on the Firewall Management Center to allow users to authenticate using Okta credentials. This integration centralizes authentication and enhances security for your organization.

Use these instructions at the Firewall Management Center web interface.

This task is relevant when you want to enable single sign-on for users accessing the management center through Okta.

Before you begin

Before you begin, ensure you have completed the required setup in Okta and enabled single sign-on on the management center.

Follow these steps to configure Okta SSO on the management center:

Procedure

Step 1

(This step continues directly from Enable SSO at the Firewall Management Center.) At the Configure Okta Metadata dialog box, you have two choices:

  • To enter the SSO configuration information manually:

    1. Click the Manual Configuration radio button.

    2. Enter the values from the Okta SSO Service Provider application. Retrieve the values from the Okta Classic UI Admin Console.

      • Identity Provider Single Sign-On (SSO) URL

      • Identity Provider Issuer

      • X.509 Certificate

  • If you have saved the XML metadata file generated by Okta on your local computer, (step 4 in Configure the Firewall Management Center service provider application for Okta), upload the file to the Firewall Management Center.

    1. Click the Upload XML File radio button.

    2. Follow the on-screen instructions to navigate to and choose the XML metadata file on your local computer.

Step 2

Click Next.

Step 3

At the Verify Metadata dialog, review the configuration parameters and click Save.

Step 4

Click Test Configuration. If an error message appears, review the SSO configuration for the Firewall Management Center and the Okta service provider application configuration. Correct any errors, and try again.

Step 5

When a message confirms a successful configuration test, click Apply.


After completing these steps, Okta SSO is enabled on the management center. Users can now authenticate using their Okta credentials.

What to do next

You may optionally configure user role mapping for SSO users; see Configure User Role Mapping for Okta in the Firewall Management Center. If you choose not to configure role mapping, all SSO users who log into the Firewall Management Center are assigned the user role set in step 4 of Configure User Role Mapping for Okta in the Firewall Management Center.

Configure User Role Mapping for Okta in the Firewall Management Center

The fields to configure for user role mapping in the Firewall Management Center web interface are the same regardless of your choice of SSO provider. However, the values you configure must take into account how the SAML SSO provider you use implements user role mapping.

Before you begin
Procedure

Step 1

Choose System (system gear icon) > Users > Single Sign-On.

Step 2

Expand Advanced Configuration (Role Mapping).

Step 3

From the Default User Role drop-down list, choose a default Firewall Management Center user role to assign users.

Step 4

In the Group Member Attribute field, enter an attribute configured in Okta for Firewall Management Center user role mapping for users or groups. (See Step 1 of Configure a User Attribute for Role Mapping at the Okta IdP or Step 1 of Configure a Group Attribute for Role Mapping at the Okta IdP.)

Step 5

Next to each Firewall Management Center user role you wish to assign to SSO users, enter a regular expression. (The Firewall Management Center uses a restricted version of Google's RE2 regular expression standard supported by Golang and Perl.) The Firewall Management Center compares these values against the user role mapping attribute value the IdP sends to the Firewall Management Center with SSO user information. The Firewall Management Center grants users a union of all the roles for which a match is found.

Step 6

Click Test Configuration. If the system displays an error message, review the SSO configuration for the Firewall Management Center as well as the identity service provider application configuration, correct any errors, and try again.

Step 7

When the system reports a successful configuration test, click Apply.


What to do next

Configure user role mapping at the service provider application; see Okta IdP user role mappings.

Okta IdP user role mappings

An Okta IdP user role mapping is an SSO configuration method that

  • assigns user roles based on individual user or group permissions in the Okta Classic UI Admin Console

  • compares user or group attribute values from Okta with regular expressions assigned to each Firewall Management Center user role, and

  • grants all matching roles to the user, or a default role if no match is found.

User role mapping configuration details

You can configure SSO user role mapping at the Okta Classic UI Admin Console based on individual user permissions or group permissions.

You can set up this mapping in two ways.

When an SSO user logs in to the Firewall Management Center, Okta presents a user or group role attribute value configured at the Okta IdP, to the Firewall Management Center. The Firewall Management Center compares that attribute value with the regular expressions assigned to each Firewall Management Center user role in the SSO configuration, and grants the user all the roles for which a match is found.. If no match is found, the Firewall Management Center grants the user a configurable default user role. The expression you assign to each Firewall Management Center user role must comply with the restricted version of Google's RE2 regular expression standard supported by Golang and Perl. The Firewall Management Center treats the attribute value received from Okta as a regular expression using that same standard for purposes of comparison with the Firewall Management Center user role expressions.


Note


A single Firewall Management Center cannot support role mapping for both groups and individual users; you must choose one mapping method for the Firewall Management Center service provider application and use it consistently. Furthermore, the Firewall Management Center can support group role mapping using only one group attribute statement per Firewall Management Center service provider application configured in Okta. Generally group-based role mapping is more efficient for a Firewall Management Center with many users. You should take into account user and group definitions established throughout your Okta org.


Configure a User Attribute for Role Mapping at the Okta IdP

Use these instructions at the Okta Classic UI Admin Console to add a custom role mapping attribute to the Okta default user profile.

Okta service provider applications may use one of two types of user profiles:

  • Okta user profiles, which can be extended with any custom attribute.

  • App user profiles, which can be extended only with attributes from a predefined list that Okta generates by querying a third-party application or directory (such as Active directory, LDAP, or Radius) for supported attributes.

You may use either type of user profile in your Okta org; consult Okta documentation for information on how to configure them. Whichever type of user profile you use, to support user role mapping with the Firewall Management Center you must configure a custom attribute in the profile to convey each user's role mapping expression to the Firewall Management Center.

This documentation describes role mapping using Okta user profiles; mapping with App profiles requires familiarity with the third-party user management application in use at your organization to set up custom attributes. See the Okta documentation for details.

Before you begin
Procedure

Step 1

Add a new attribute to the default Okta user profile:

  • For Data type choose string.

  • Provide the Variable name the Okta IdP will send to the Firewall Management Center, containing an expression to match for user role mapping. This variable name must match the string you entered at the Firewall Management Center SSO configuration for Group Member Attribute. (See Step 5 in Configure User Role Mapping for Okta in the Firewall Management Center.)

Step 2

For each user assigned to the Firewall Management Center service provider application using this profile, assign a value to the user role attribute you have just created.

Use an expression to represent the role or roles the Firewall Management Center will assign to the user. The Firewall Management Center compares this string against the expressions you assigned to each Firewall Management Center user role in Step 6 of Configure User Role Mapping for Okta in the Firewall Management Center. (For purposes of comparison with the Firewall Management Center user role expressions, the Firewall Management Center treats the attribute value received from Okta as an expression complying with the restricted version of Google's RE2 regular expression standard supported by Golang and Perl.)

Configure a Group Attribute for Role Mapping at the Okta IdP

Use these instructions at the Okta Admin Console to add a custom role mapping group attribute to the Firewall Management Center service provider application. The Firewall Management Center can support group role mapping using only one group attribute statement per Okta Firewall Management Center service provider application.

Okta service provider applications may use one of two types of groups:

  • Okta groups, which can be extended with any custom attribute.

  • Application groups, which can be extended only with attributes from a predefined list that Okta generates by querying a third-party application or directory (such as Active directory, LDAP, or Radius) for supported attributes.

You may use either type of group in your Okta org; consult Okta documentation for information on how to configure them. Whichever type of group you use, to support user role mapping with the Firewall Management Center you must configure a custom attribute for the group to convey its role mapping expression to the Firewall Management Center.

This documentation describes role mapping using Okta groups; mapping with application groups requires familiarity with the third-party user management application in use at your organization to set up custom attributes. See the Okta documentation for details.

Before you begin
Procedure

Create a new SAML group attribute for the Firewall Management Center service provider application:

  • For Name, use the same string you entered at the Firewall Management Center SSO configuration for Group Member Attribute. (See Step 4 in Configure User Role Mapping for Okta in the Firewall Management Center.)

  • For Filter, specify an expression to represent the role or roles the Firewall Management Center will assign to the members of the group. Okta compares this value against the names of the groups of which a user is a member, and sends the Firewall Management Center the group names that match. The Firewall Management Center in turn compares those group names against the regular expressions you assigned to each Firewall Management Center user role in Step 5 of Configure User Role Mapping for Okta in the Firewall Management Center.


Okta User Role Mapping Examples

As the following examples demonstrate, the SSO configurations at the Firewall Management Center to support user role mapping are the same for both individual users and for groups. The difference lies in the settings at the Firewall Management Center service provider application in Okta.


Note


You can configure Firewall Management Center roles to be mapped based on individual user permissions or based on group permissions, but a single Firewall Management Center application cannot support role mapping for both groups and individual users. Furthermore, the Firewall Management Center can support group role mapping using only one group attribute statement per Firewall Management Center service provider application configured in Okta.
Okta Role Mapping Example for Individual User Accounts

In role mapping for individual users, the Okta Firewall Management Center service application has a custom attribute whose name matches the name of the Group Member Attribute on the Firewall Management Center. (In this example, UserRole). The user profile in Okta also has a custom attribute (in this example, a variable named FMCrole.) The definition for the application custom attribute UserRole establishes that when Okta passes user role mapping information to the Firewall Management Center, it will use the custom attribute value assigned for the user in question.

The following diagrams illustrate how the relevant fields and values in the Firewall Management Center and Okta configurations correspond to each other in user role mapping for individual accounts. Each diagram uses the same SSO configurations at the Firewall Management Center and at the Okta UI Admin Console, but the configuration for each user at the Okta UI Admin Console differs to assign each user different roles at the Firewall Management Center.

  • In this diagram sue@example.com uses the FMCrole value FMCAdmin and the Firewall Management Center assigns her the Administrator role.

  • In this diagram fred@example.com uses the FMCrole value PolicyAdmin, and the Firewall Management Center assigns him the roles Access Admin, Discovery Admin, and Intrusion Admin.

  • Other users assigned to the Okta service application for this Firewall Management Center are assigned the default user role Security Analyst (Read Only) for one of the following reasons:

    • They have no value assigned to the FMCrole variable in their Okta user profile.

    • The value assigned to the FMCrole variable in their Okta user profile does not match any expression configured for a user role in the SSO configuration at the Firewall Management Center.

Okta Role Mapping Example for Groups

In role mapping for groups, the Okta Firewall Management Center service application has a custom group attribute whose name matches the name of the Group Member Attribute on the Firewall Management Center (in this example, UserRole). When Okta processes a request for Firewall Management Center SSO login, it compares the user's group membership against the expression assigned to the Firewall Management Center service application group attribute (in this case ^(.*)Admin$ ). Okta sends to the Firewall Management Center the user's group membership(s) that match the group attribute. The Firewall Management Center compares the group names it receives against the regular expressions it has configured for each user role, and assigns user roles accordingly.

The following diagrams illustrate how the relevant fields and values in the Firewall Management Center and Okta configurations correspond to each other in user role mapping for groups. Each diagram uses the same SSO configurations at the Firewall Management Center and at the Okta UI Admin Console, but the configuration for each user at the Okta UI Admin Console differs to assign each user different roles at the Firewall Management Center.

  • In this diagram fred@example.com is a member of the Okta IdP group Admin, which matches the expression ^(.*)Admin$. Okta sends the Firewall Management Center Fred's Admin group membership, and the Firewall Management Center assigns him the Administrator role.

  • In this diagram sue@example.com is a member of the Okta IdP group PolicyAdmin, which matches the expression ^(.*)Admin$. Okta sends the Firewall Management Center Sue's PolicyAdmin group membership, and the Firewall Management Center assigns her the roles Access Admin, Discovery Admin, and Intrusion Admin.

    Sue is also a member of the Okta group Maint, but because this group name does not match the expression assigned to the group membership attribute in the Okta Firewall Management Center service application, Okta does not send information about Sue's Maint group membership to the Firewall Management Center, and her membership in the Maint group plays no part in the roles the Firewall Management Center assigns to her.

  • In this diagram sean@example.com is a member of the Okta IdP group Maint. This group name does not match the expression ^(.*)Admin$, so, when sean@example.com logs into the Firewall Management Center, Okta does not send information about Sean's Maint group membership to the Firewall Management Center and Sean is assigned the default user role (Security Analyst (Read Only)) rather than the Maintenance User role.

These diagrams illustrate the importance of advance planning when establishing a role mapping strategy. In this example, any Okta user with access to this Firewall Management Center who is a member of only the Maint group can be assigned only the default user role. The Firewall Management Center supports using only one custom group attribute in its Okta Service Application configuration. The expression you assign to that attribute and the group names you establish to match against it must be carefully crafted. You can add more flexibility to role mapping by using regular expressions in the user role assignment strings in the Firewall Management Center SSO configuration. (The expression you assign to each Firewall Management Center user role must comply with the restricted version of Google's RE2 regular expression standard supported by Golang and Perl.)

Configure Single Sign-On with OneLogin

See the following tasks to configure SSO using OneLogin:

Firewall Management Center

Review the OneLogin Subdomain

Firewall Management Center

Configure a Firewall Management Center service provider application for OneLogin

OneLogin Admin Portal

Enable SSO at the Firewall Management Center

OneLogin Admin Portal

Configure the Firewall Management Center for OneLogin SSO

OneLogin Admin Portal

Configure User Role Mapping for OneLogin in the Firewall Management Center

Firewall Management Center

Configure User Role Mapping at the OneLogin IdP

Review the OneLogin Subdomain

In OneLogin, the entity that encompasses all the federated devices and applications that a user can access with the same SSO account is called a subdomain. Before adding the Firewall Management Center to a OneLogin subdomain, be familiar with its configuration; consider the following questions:
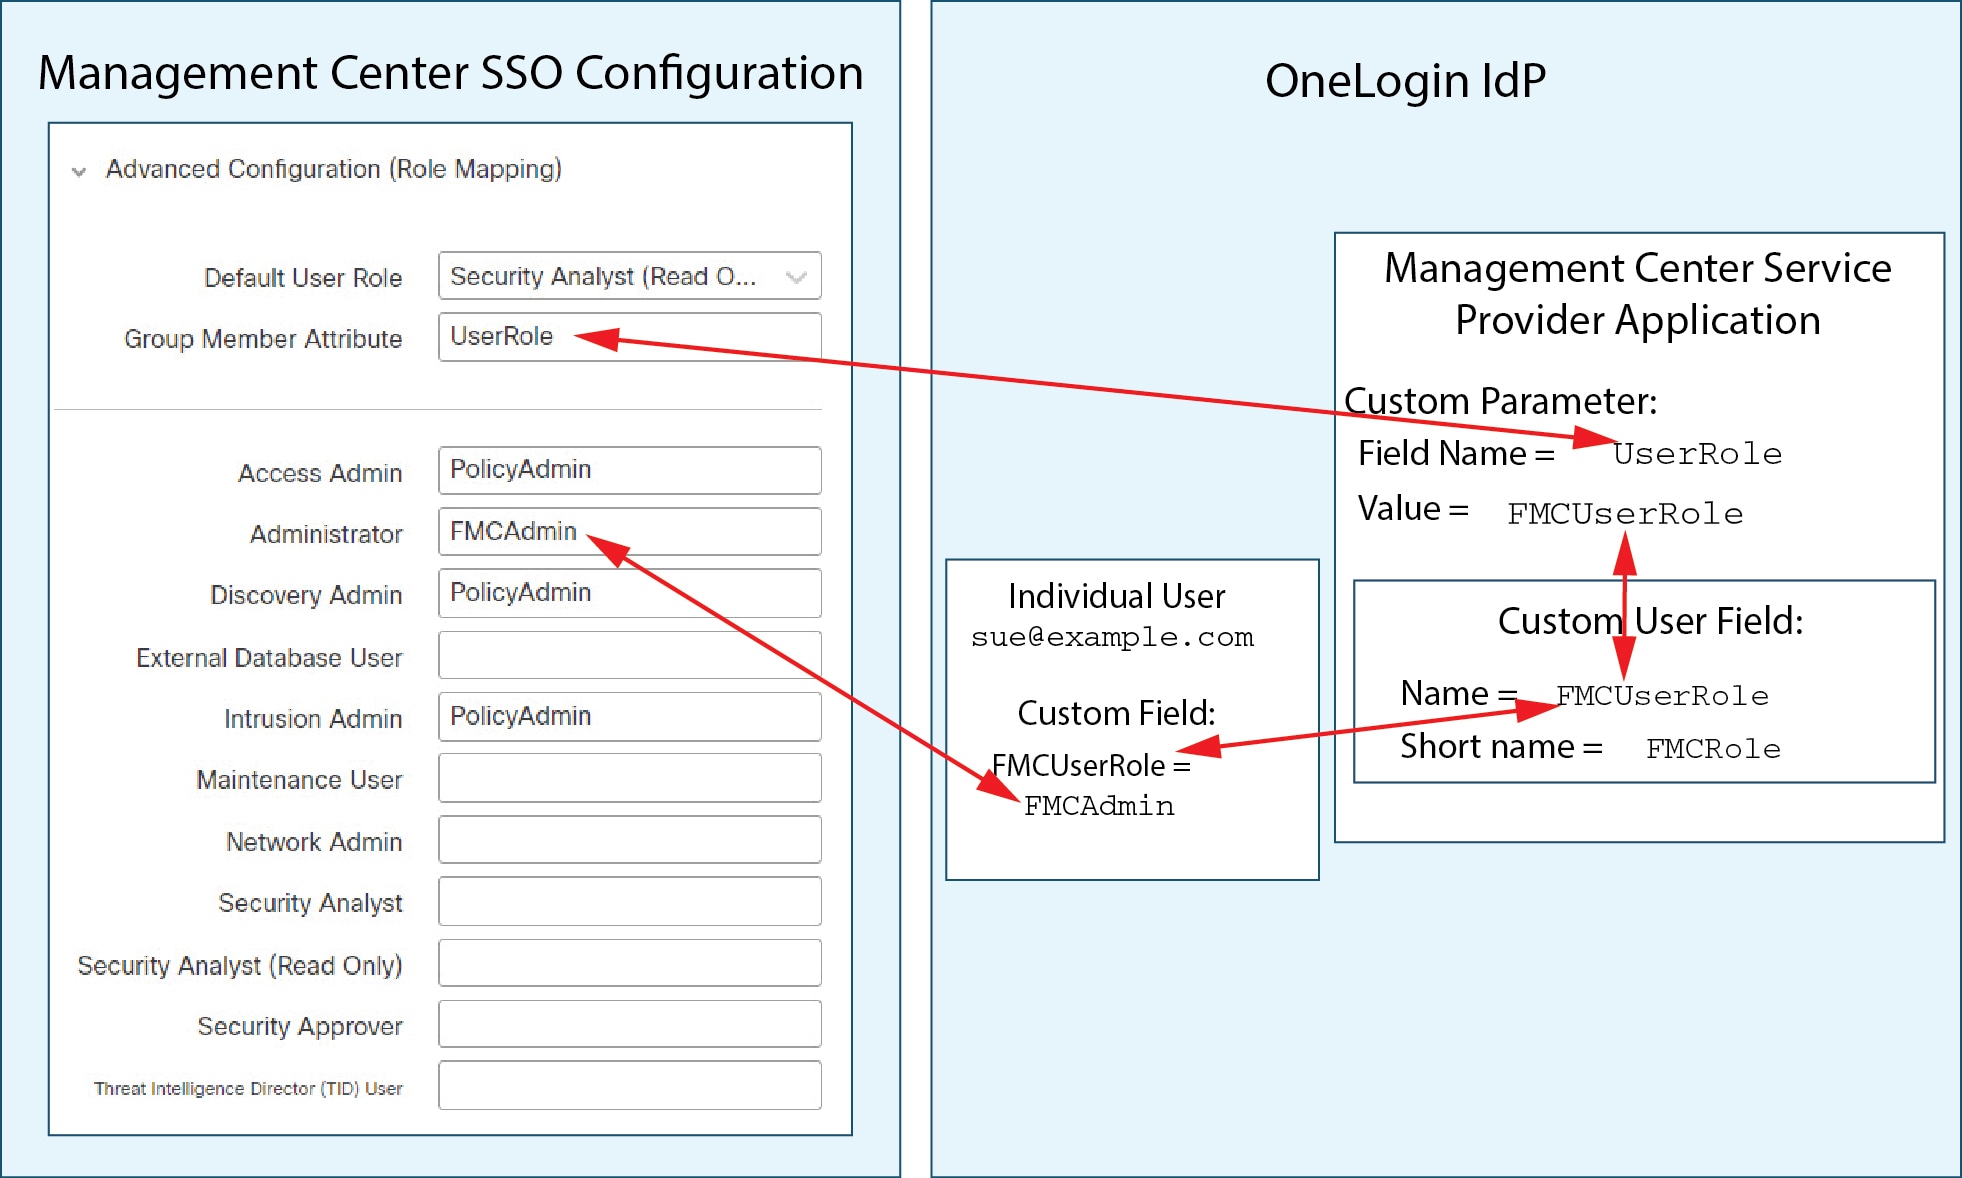
  • How many users will have access to the Firewall Management Center?

  • Are users within the OneLogin subdomain members of groups?

  • Are users and groups from a third-party directory such as Active Directory, Google Apps, or LDAP synchronized with the OneLogin subdomain?

  • Do you need to add more users or groups to the OneLogin subdomain to support SSO on the Firewall Management Center?

  • What kind of Firewall Management Center user role assignments do you want to make? (If you choose not to assign user roles, the Firewall Management Center automatically assigns a configurable default user role to all SSO users.)

  • How must users and groups within the OneLogin subdomain be organized to support the required user role mapping?

Keep in mind that you can configure Firewall Management Center roles to be mapped based on individual users or based on groups, but a single Firewall Management Center application cannot support role mapping for both groups and individual users.

This documentation assumes you are already familiar with the OneLogin Admin Portal, and have an account with Super User privilege. To configure user role mapping, you will also need a subscription to the OneLogin Unlimited plan, which supports Custom User Fields. If you need more information, see the OneLogin documentation available online.

Configure a Firewall Management Center service provider application for OneLogin

This task guides you to configure a Firewall Management Center service provider application in OneLogin, enabling SAML SSO integration for your organization. Establish secure SSO access for users through OneLogin.

Use these instructions at the OneLogin Admin Portal to create a Firewall Management Center service provider application within OneLogin and assign users or groups to that application. You should be familiar with SAML SSO concepts and the OneLogin Admin Portal. This documentation does not describe all the OneLogin functions required to establish a fully functional SSO organization. For example, refer to the OneLogin documentation to learn how to create users and groups, or to import user and group definitions from another user management application.

  • If you plan to assign user groups to the Firewall Management Center application, do not also assign users within those groups as individuals.

  • The Firewall Management Center cannot support role mapping using multiple SSO attributes; you must select either user role mapping or group role mapping and configure a single attribute to convey user role information from OneLogin to the Firewall Management Center.

Before you begin

  • Familiarize yourself with the OneLogin subdomain and its users and groups; refer to Review the OneLogin Subdomain.

  • Create user accounts in your OneLogin subdomain if necessary.


    Note


    The system requires that user names for SSO accounts as well as the NameID attribute the IdP sends to the Firewall Management Center during the SAML login process must be both be valid email addresses. Many IdP's automatically use the username of the user trying to logon as the NameID attribute, but you should confirm this is the case for your IdP. Keep this in mind when configuring a service provider application at your IdP and creating IdP user accounts that are to be granted SSO access to the Firewall Management Center.


  • Confirm the login URL for the target Firewall Management Center (for example, https://ipaddress_or_hostname/).


    Note


    If your Firewall Management Centerweb interface can be reached with multiple URLs, such as a fully qualified domain name or an IP address, SSO users must consistently access the Firewall Management Center using the login URL that you configure in this task.


Follow these steps to configure a Firewall Management Center service provider application for OneLogin:

Procedure

Step 1

Create the Firewall Management Center service provider application using the SAML Test Connector (Advanced) as its basis.

Step 2

Configure the application with these settings:

  • For the Audience (Entity ID), append the string /SAML/metadata to the Firewall Management Center login URL. For example: https://ExampleFMC/SAML/metadata.

  • For Recipient, append the string /SAML/ACS to the Firewall Management Center login URL. For example: https://ExampleFMC/SAML/ACS.

  • For ACS (Consumer) URL Validator, enter an expression that OneLogin uses to confirm it is using the correct Firewall Management Center URL. You can create a simple validator by using the ACS URL and altering it as follows:

    • Append a ^ to the beginning of the ACS URL.

    • Append a $ to the end of the ACS URL.

    • Insert a \ preceding every / and ? within the ACS URL.

For example, for the ACS URL https://ExampleFMC/SAML/ACS, an appropriate URL validator would be ^https:\/\/ExampleFMC\/SAML\/ACS$.

  • For ACS (Consumer) URL, append the string /SAML/ACS to the Firewall Management Center login URL. For example: https://ExampleFMC/SAML/ACS.

  • For Login URL, append the string /SAML/ACS to the Firewall Management Center login URL. For example: https://ExampleFMC/SAML/ACS.

  • For the SAML Initiator, choose Service Provider.

Step 3

Assign OneLogin users to the Firewall Management Center service provider application.

Step 4

(Optional) To make SSO setup at the Firewall Management Center easier, you can download the SAML XML metadata for the Firewall Management Center service provider application from OneLogin to your local computer.


After completing this task, your Firewall Management Center will be integrated with OneLogin for SAML-based SSO, allowing assigned users to authenticate securely using their OneLogin credentials.

What to do next

Enable single sign-on; refer to Enable SSO at the Firewall Management Center.

Configure the Firewall Management Center for OneLogin SSO

Configure the Firewall Management Center for OneLogin SSO to integrate single sign-on authentication, allowing users to access the system securely using their OneLogin credentials.

Use these instructions at the Firewall Management Center web interface.

This task is relevant when you want to enable SSO for your organization using OneLogin as the identity provider for the Firewall Management Center. Ensure you have administrative access to both the OneLogin Admin Portal and the Firewall Management Center.

Before you begin

Follow these steps to configure the Firewall Management Center for OneLogin SSO:

Procedure

Step 1

(This step continues directly from Enable SSO at the Firewall Management Center.) At the Configure OneLogin Metadata dialog, you have two choices:

  • To enter the SSO configuration information manually:

    1. Click the Manual Configuration radio button.

    2. Enter these SSO configuration values from the OneLogin service provide application:

      • Identity Provider Single Sign-On URL: Enter the SAML 2.0 Endpoint (HTTP) from OneLogin.

      • Identity Provider Issuer: Enter the Issuer URL from OneLogin.

      • X.509 Certificate: Enter the X.509 Certificate from OneLogin.

  • If you have saved the XML metadata file generated by OneLogin to your local computer (step 4 in Configure a Firewall Management Center service provider application for OneLogin), upload the file to the Firewall Management Center:

    1. Click the Upload XML File radio button.

    2. Follow the on-screen instructions to navigate to and choose the XML metadata file on your local computer.

Step 2

Click Next.

Step 3

At the Verify Metadata dialog, review the configuration parameters and click Save.

Step 4

Click Test Configuration. If the system displays an error message, review the SSO configuration for the Firewall Management Center and the OneLogin service provider application configuration. Correct any errors, then try again.

Step 5

When the system reports a successful configuration test, click Apply.


After completing this task, the Firewall Management Center is integrated with OneLogin SSO. Users can authenticate using their OneLogin credentials for secure access.

What to do next

You may optionally configure user role mapping for SSO users; refer to Configure User Role Mapping for OneLogin in the Firewall Management Center. If you choose not to configure role mapping, all SSO users who log in to the Firewall Management Center are assigned the user role during user role mapping configuration (step 4 of Configure User Role Mapping for OneLogin in the Firewall Management Center).

Configure User Role Mapping for OneLogin in the Firewall Management Center

The fields to configure for user role mapping at the Firewall Management Center web interface are the same regardless of your choice of SSO provider. But the values you configure must take into account how the SAML SSO provider you use implements user role mapping.

Before you begin
Procedure

Step 1

Choose System (system gear icon) > Users > Single Sign-On.

Step 2

Expand Advanced Configuration (Role Mapping).

Step 3

From the Default User Role drop-down list, choose a default Firewall Management Center user role to assign users.

Step 4

In the Group Member Attribute field, enter an attribute configured in OneLogin for Firewall Management Center user role mapping for users or groups. See Step 1 of Configure User Role Mapping for Individual Users at the OneLogin IdP or Step 1 of Configure User Role Mapping for Groups at the OneLogin IdP.

Step 5

Next to each Firewall Management Center user roll you wish to assign to SSO users, enter a regular expression. The Firewall Management Center compares these values against the user role mapping attribute the IdP sends to the Firewall Management Center with SSO user information. The Firewall Management Center grants users a union of all the roles for which a match is found.

Step 6

Click Test Configuration. If the system displays an error message, review the SSO configuration for the Firewall Management Center as well as the identity service provider application configuration, correct any errors, and try again.

Step 7

When the system reports a successful configuration test, click Apply.


What to do next

Configure user role mapping at the service provider application; see Configure User Role Mapping at the OneLogin IdP.

Configure User Role Mapping at the OneLogin IdP

You can configure SSO user role mapping at the Onelogin Admin portal based on individual permissions or based on group permissions.

When an SSO user logs into the Firewall Management Center, OneLogin presents to the Firewall Management Center a user or group role attribute value that gets its value from a custom user field configured at the OneLogin IdP. The Firewall Management Center compares that attribute value against the regular expressions assigned to each Firewall Management Center user role in the SSO configuration, and grants the user all the roles for which a match is found.. . (If no match is found, the Firewall Management Center grants the user a configurable default user role.) The expression you assign to each Firewall Management Center user role must comply with the restricted version of Google's RE2 regular expression standard supported by Golang and Perl. The Firewall Management Center treats the attribute value received from Okta as a regular expression using that same standard for purposes of comparison with the Firewall Management Center user role expressions.


Note


A single Firewall Management Center cannot support role mapping for both groups and individual users; you must choose one mapping method for the Firewall Management Center service provider application and use it consistently. The Firewall Management Center can support role mapping using only one custom user field configured in OneLogin. Generally group-based role mapping is more efficient for a Firewall Management Center with many users. You should take into account user and group definitions established throughout your OneLogin subdomain.
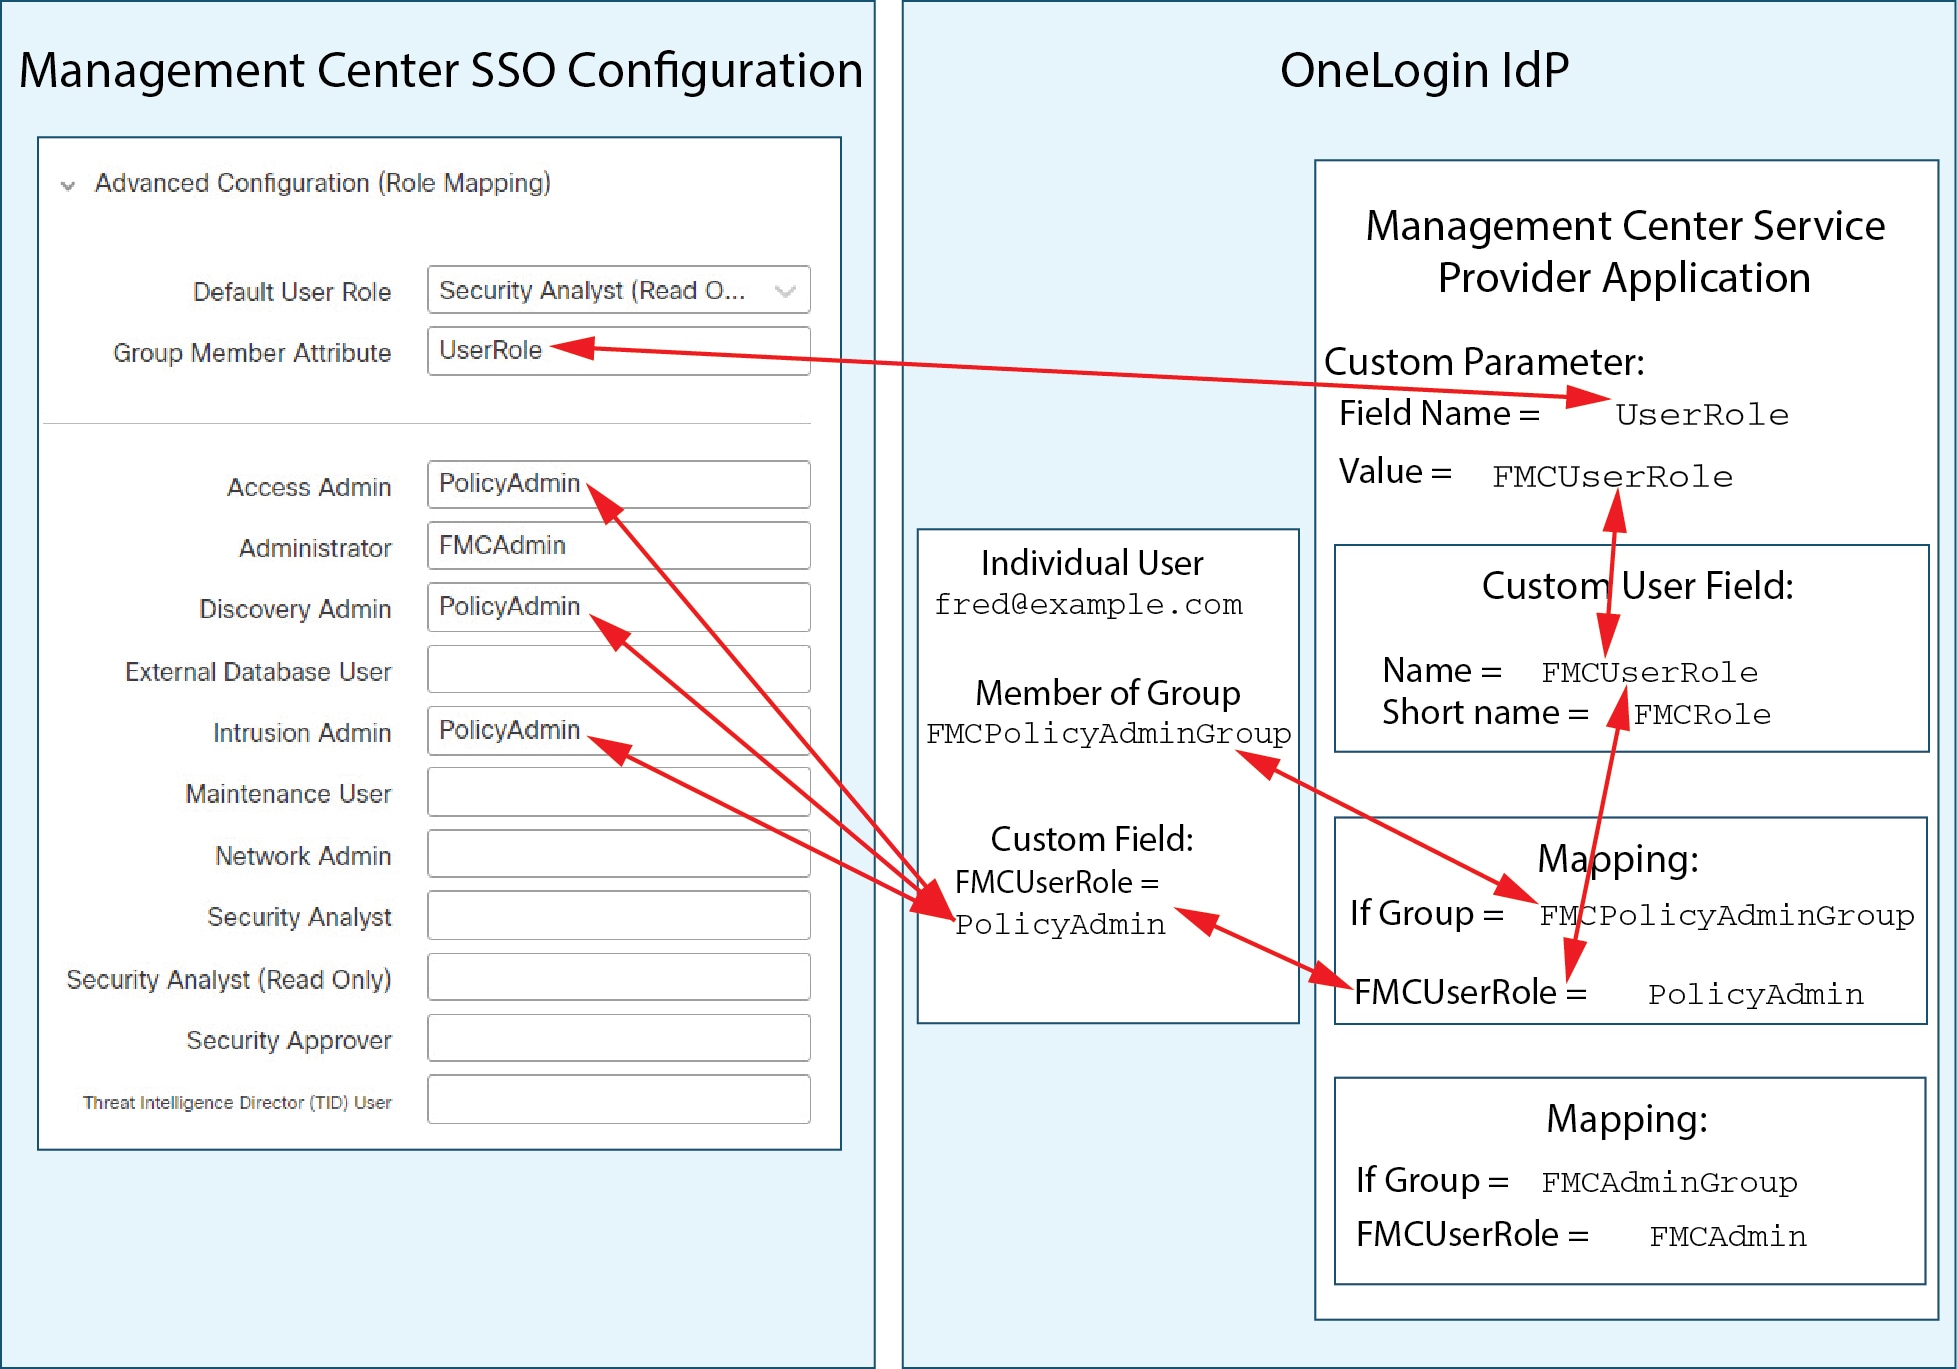

Configure User Role Mapping for Individual Users at the OneLogin IdP

Use the OneLogin Admin Portal to create a custom parameter for the Firewall Management Center service provider application and a custom user field. These provide the means for OneLogin to pass user role information to the Firewall Management Center during the SSO login process.

Before you begin
Procedure

Step 1

Create a custom parameter for the Firewall Management Center service provider application.

  • For the Field Name, use the same name you used for the Group Member Attribute in the Firewall Management Center SSO configuration. (See Step 4 in Configure User Role Mapping for OneLogin in the Firewall Management Center.)

  • For the Value, provide a mnemonic name such as FMCUserRole. This must match the name of the customer user field you will configure in Step 2 of this procedure.

Step 2

Create a custom user field to contain user role information for each OneLogin user with access the Firewall Management Center.

  • For the field Name, provide a mnemonic name such as FMCUserRole. This must match the value provided for the application custom parameter described in Step 1 of this procedure.

  • For the Short name, provide an abbreviated alternate name for the field. (This is used for OneLogin programmatic interfaces.)

Step 3

For each user with access to the Firewall Management Center service provider application, assign a value to the custom user field you created in Step 2 of this procedure.

When a user logs into the Firewall Management Center using SSO, the value you assign to this field for that user is the value the Firewall Management Center compares against the expressions you assigned to Firewall Management Center user roles in the SSO configuration. (See Step 5 in Configure User Role Mapping for OneLogin in the Firewall Management Center.)


What to do next
  • Test your role mapping scheme by logging into the Firewall Management Center using SSO from various accounts and confirming that users are assigned Firewall Management Center user roles as you expect.

Configure User Role Mapping for Groups at the OneLogin IdP

Use the OneLogin Admin Portal to create a custom parameter for the Firewall Management Center service provider application and a custom user field. Assign OneLogin users to groups. Then create one or more mappings between the custom user field and the user group so OneLogin assigns a value to the custom user field based on the user's group membership. These provide the means for OneLogin to pass group-based user role information to the Firewall Management Center during the SSO login process.

OneLogin service provider applications may use one of two types of groups:

  • Groups native to OneLogin.

  • Groups synchronized from third-party applications such as Active Directory, Google Apps, or LDAP.

You may user either type of group for Firewall Management Center group role mapping. This documentation describes role mapping using OneLogin groups; using third-party application groups requires familiarity with the third-party user management application in use at your organization. See the OneLogin documentation for details.

Before you begin
Procedure

Step 1

Create a custom parameter for the Firewall Management Center service provider application.

  • For the Field Name, use the same name you used for the Group Member Attribute in the Firewall Management Center SSO configuration. (See Step 4 in Configure User Role Mapping for OneLogin in the Firewall Management Center.)

  • For the Value, provide a mnemonic name such as FMCUserRole. This must match the name of the customer user field you will configure in Step 2 of this procedure.

Step 2

Create a custom user field to contain user role information for each OneLogin user with access the Firewall Management Center.

  • For the field Name, provide a mnemonic name such as FMCUserRole. This must match the value provided for the application custom parameter described in Step 1 of this procedure.

  • For the Short name, provide an abbreviated alternate name for the field. (This is used for OneLogin programmatic interfaces.)

Step 3

Create one or more user field mappings to assign group-based values to the custom user field you created in Step 2 of this procedure. Create as many mappings as you need to assign the correct Firewall Management Center user role to each OneLogin user group.

  • Create one or more Conditions for the mapping, comparing the user Group field against group names.

  • If you create multiple Conditions, choose whether a user's group must match any or all of the conditions for the mapping to take place.

  • Create an Action for the mapping, to assign a value to the custom user field you created in Step 2 of this procedure. Provide the field Name, and the string that OneLogin assigns to this custom user field for all users that meet the Conditions you specified.

    The Firewall Management Center compares this string against the expressions you assign to each Firewall Management Center user role in Step 5 of Configure User Role Mapping for OneLogin in the Firewall Management Center.

  • Reapply All Mappings when you have completed your changes.


What to do next
  • Test your role mapping scheme by logging into the Firewall Management Center using SSO from various accounts and confirming that users are assigned Firewall Management Center user roles as you expect.

OneLogin User Role Mapping Examples

As the following examples demonstrate, the SSO configurations at the Firewall Management Center to support user role mapping are the same for both individual users and for groups. The difference lies in the settings at the Firewall Management Center service provider application in OneLogin.


Note


A single Firewall Management Center cannot support role mapping for both groups and individual users; you must choose one mapping method for the Firewall Management Center service provider application and use it consistently. The Firewall Management Center can support role mapping using only one custom user field configured in OneLogin. Generally group-based role mapping is more efficient for a Firewall Management Center with many users. You should take into account user and group definitions established throughout your OneLogin subdomain.
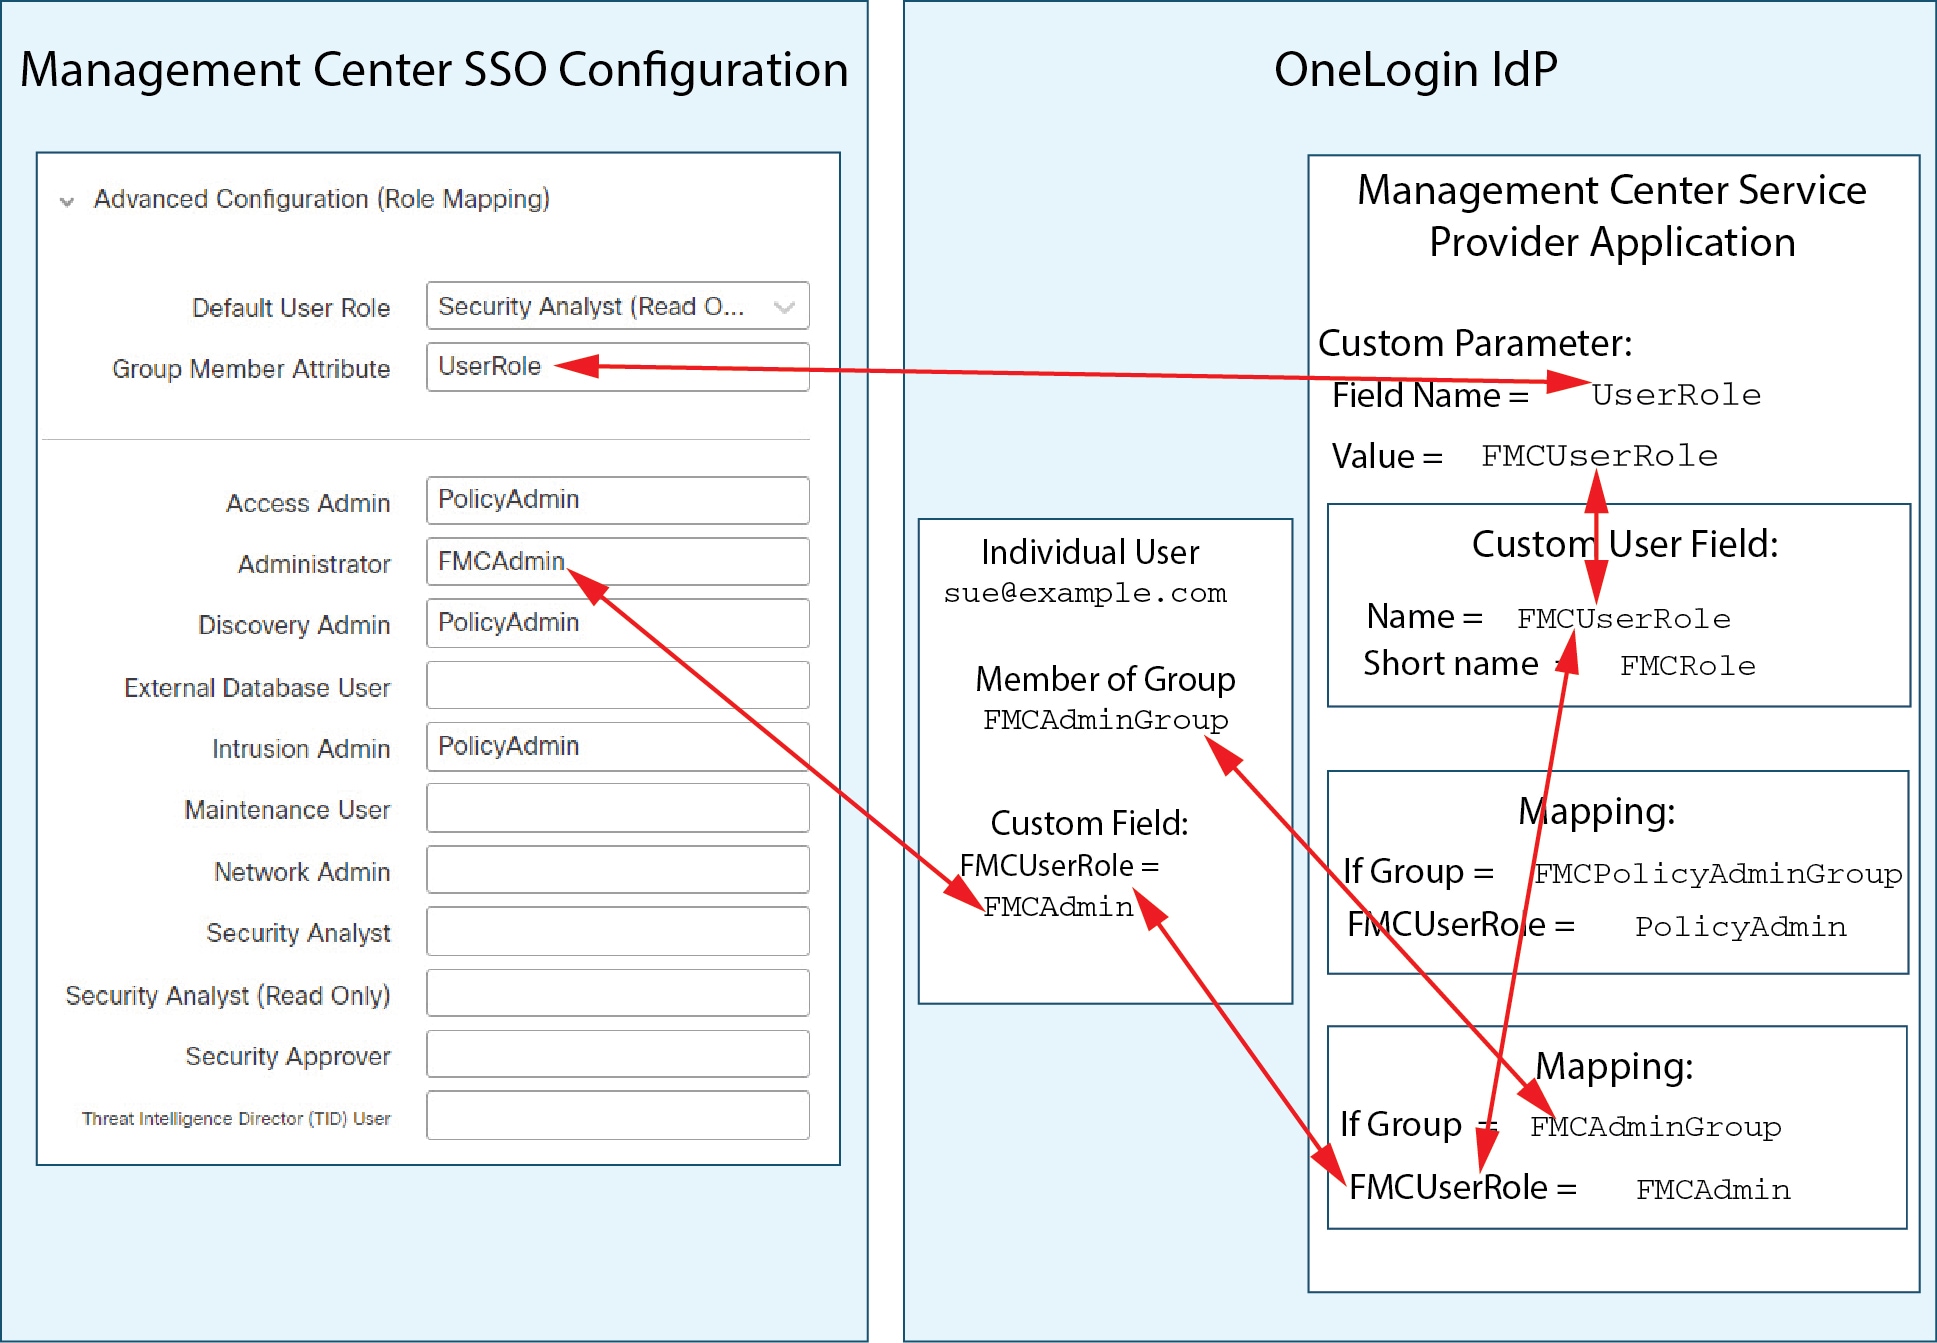

OneLogin Role Mapping Example for Individual User Accounts

In role mapping for individual users, the OneLogin Firewall Management Center service application has a custom parameter whose name matches the name of the Group Member attribute on the Firewall Management Center (in this example, UserRole). OneLogin also has a custom user field defined (in this example, FMCUserRole). The definition for the application custom parameter UserRole establishes that when OneLogin passes user role mapping information to the Firewall Management Center, it will use the value of the custom user field FMCUserRole for the user in question.

The following diagrams illustrate how the relevant fields and values in the Firewall Management Center and OneLogin configurations correspond to each other in user role mapping for individual accounts. Each diagram uses the same SSO configurations at the Firewall Management Center and at the OneLogin Admin portal, but the configuration for each user at the OneLogin Admin portal differs to assign each user different roles at the Firewall Management Center.

  • In this diagram fred@example.com uses the FMCUserRole value PolicyAdmin and the Firewall Management Center assigns him the roles Access Admin, Discovery Admin, and Intrusion Admin.

  • In this diagram sue@example.com uses the FMCUserRole value FMCAdmin, and the Firewall Management Center assigns her the Administrator role.

  • Other users assigned to the OneLogin service application for this Firewall Management Center are assigned the default user role Security Analyst (Read Only) for one of the following reasons:

    • They have no value assigned to the FMCUserRole custom user field.

    • The value assigned to the FMCUserRole custom user field does not match any expression configured for a user role in the SSO configuration at the Firewall Management Center.

OneLogin Role Mapping Example for Groups

In role mapping for groups, the OneLogin Firewall Management Center service application has a has a custom parameter whose name matches the name of the Group Member attribute on the Firewall Management Center (in this example, UserRole). OneLogin also has a custom user field defined (in this example, FMCUserRole). The definition for the application custom parameter UserRole establishes that when OneLogin passes user role mapping information to the Firewall Management Center, it will use the value of the custom user field FMCUserRole for the user in question. To support user group mapping, you must establish a mapping within OneLogin to assign a value for each user's FMCUserRole field based on that user's OneLogin group membership.

The following diagrams illustrate how the relevant fields and values in the Firewall Management Center and OneLogin configurations correspond to each other in user role mapping for groups. Each diagram uses the same SSO configurations at the Firewall Management Center and at the OneLogin Admin portal, but the configuration for each user at the OneLogin Admin portal differs to assign each user different roles at the Firewall Management Center.

  • In this diagram fred@example.com is a member of the OneLogin IdP group FMCPolicyAdminGroup. A OneLogin mapping assigns the value PolicyAdmin to the custom user field FMCUserRole for members of the FMCPolicyAdminGroup. The Firewall Management Center assigns Fred and other members of the FMCPolicyAdminGroup the roles Access Admin, Discovery Admin, and Intrusion Admin.

  • In this diagram sue@example.com is a member of the OneLogin IdP group FMCAdminGroup. A OneLogin mapping assigns the value FMCAdmin to the custom user field FMCUserRole for members of the FMCAdminGroup. The Firewall Management Center assigns Sue and other members of the FMCAdminGroup the Administrator role.

  • In this diagram sean@example.com is a member of the Idp group FMCMaintGroup. There is no OneLogin mapping associated with this group, so OneLogin does not assign a value to the custom user field FMCUserRole for Sean. The Firewall Management Center assigns Sean the default user role (Security Analyst (Read Only)) rather than the Maintenance User role.

Configure SSO with Azure AD

This reference provides the sequence of tasks required to configure Single Sign-On (SSO) for your Cisco environment using Azure Active Directory (Azure AD).

The diagram illustrates the step-by-step process for configuring Single Sign-On (SSO) with Azure Active Directory, highlighting key tasks and interactions within the Azure AD Portal.

Step

Location

Task

The Azure AD Portal interface displays the steps required to configure Single Sign-On (SSO) settings, including user authentication and application integration options.

Azure AD Portal

Azure tenants

The Azure AD Portal interface displays options for configuring single sign-on settings, including application management and user authentication methods.

Azure AD Portal

Configure the Firewall Management Center service provider application for Azure

The Azure AD portal interface displays options for configuring single sign-on settings, including application registration and authentication methods.

Firewall Management Center

Enable SSO at the Firewall Management Center

The diagram illustrates the process of configuring single sign-on with Azure Active Directory, highlighting key components such as user authentication, application access, and security protocols involved in the setup.

Firewall Management Center

Configure the Firewall Management Center for Azure SSO

The diagram illustrates the process of configuring Single Sign-On (SSO) with Azure Active Directory, highlighting key steps and components involved in the setup.

Firewall Management Center

Configure user role mapping for Azure in the Firewall Management Center

The Azure AD Portal interface displays options for configuring single sign-on settings, including application registration and authentication methods.

Azure AD Portal

Azure IdP user role mappings

Azure tenants

An Azure tenant is a cloud-based identity and access management entity that

  • encompasses all federated devices a user can access with the same SSO account

  • organizes users and groups within Azure Active Directory, and

  • supports integration with applications such as the Firewall Management Center.

Azure tenant organization considerations

Consider these questions before adding the Firewall Management Center to an Azure tenant:

  • How many users will have access to the Firewall Management Center?

  • Are users within the Azure tenant members of groups?

  • Are users and groups from another directory product?

  • Do you need to add more users or groups to the Azure tenant to support SSO on the Firewall Management Center?

  • What kind of Firewall Management Center user role assignments do you want to make? If you choose not to assign user roles, the Firewall Management Center automatically assigns a configurable default user role to all SSO users.

  • How must users and groups within the Azure tenant be organized to support the required user role mapping?

  • You can configure Firewall Management Center roles to be mapped based on individual users or based on groups, but a single Firewall Management Center application cannot support role mapping for both groups and individual users.

Before you begin, ensure you are familiar with the Azure Active Directory Portal and that you have an account with application admin privileges for the Azure AD tenant. The Firewall Management Center supports Azure SSO only with tenant-specific single sign-on and single sign-out endpoints. Ensure you have an Azure AD Premium P1 or higher license and Global Administrator permissions. For more information, refer to Azure documentation.

Configure the Firewall Management Center service provider application for Azure

This task enables you to configure a Firewall Management Center service provider application in Azure Active Directory for SAML-based single sign-on (SSO).

Use the Azure Active Directory Portal to create a Firewall Management Center service provider application within your Azure Active Directory tenant and establish basic configuration settings.

  • If you plan to assign user groups to the Firewall Management Center application, do not also assign users within those groups as individuals.

  • The Firewall Management Center cannot support role mapping using multiple SSO attributes. You must select either user role mapping or group role mapping. Then, configure a single attribute to convey user role information from OneLogin to the Firewall Management Center.

Before you begin

  • Familiarize yourself with your Azure tenant and its users and groups; refer to Azure tenants.

  • Create user accounts or groups, or both, in your Azure tenant if necessary.


    Note


    The system requires that user names for SSO accounts as well as the NameID attribute the IdP sends to the Firewall Management Center during the SAML login process must be both be valid email addresses. Many IdP's automatically use the username of the user trying to logon as the NameID attribute, but you should confirm this is the case for your IdP. Keep this in mind when configuring a service provider application at your IdP and creating IdP user accounts that are to be granted SSO access to the Firewall Management Center.


  • Confirm the login URL for the target Firewall Management Center (https://ipaddress_or_hostname).


    Note


    If your Firewall Management Center web interface can be reached with multiple URLs (for example, a fully-qualified domain name as well as an IP address), SSO users must consistently access the Firewall Management Center using the login URL that you configure in this task.

Follow these steps to configure the Firewall Management Center service provider application for Azure.

Procedure

Step 1

Create the Firewall Management Center service provider application using the Azure AD SAML Toolkit as its basis.

Step 2

Configure the application with these settings for Basic SAML Configuration:

  • For the Identifier (Entity ID) append the string /SAML/metadata to the Firewall Management Center login URL. For example: https://ExampleFMC/SAML/metadata.

  • For the Reply URL (Assertion Consumer Service URL) append the string /SAML/acs to the Firewall Management Center login URL. For example: https://ExampleFMC/SAML/acs.

  • For the Sign on URL append the string /SAML/acs to the Firewall Management Center login URL. For example: https://ExampleFMC/SAML/acs.

Step 3

Edit the Unique User Identifier Name (Name ID) claim for the application to force the username for sign-on at the Firewall Management Center to be the email address associated with the user account:

  • For Source, choose Attribute.

  • For Source attribute, choose user.mail.

Step 4

Generate a certificate to secure SSO on the Firewall Management Center. Use these options for the certificate:

  • Select Sign SAML Response and Assertion for the Signing Option.

  • Select SHA-256 for the Signing Algorithm.

Step 5

Download the Base-64 version of the certificate to your local computer. You will need it when you configure Azure SSO at the Firewall Management Center web interface.

Step 6

In the SAML-based Sign-on information for the application, note these values:

  • Login URL

  • Azure AD Identifier

Use these values when you configure Azure SSO at the Firewall Management Center web interface.

Step 7

(Optional) To make SSO setup at the Firewall Management Center easier, you can download the SAML XML metadata file for the Firewall Management Center service provider application (called the Federation Metadata XML in the Azure Portal) to your local computer.

Step 8

Assign existing Azure users and groups to the Firewall Management Center service application.

  • If you plan to assign user groups to the Firewall Management Center Application, do not also assign users within those groups as individuals.

  • If you plan to configure user role mapping, you can configure roles to be mapped based on individual user permissions or based on group permissions, but a single Firewall Management Center application cannot support role mapping for both groups and individual users.


After you complete this task, your Azure AD tenant has a configured service provider application for your Firewall Management Center, which enables SAML-based SSO integration and secure authentication for assigned users and groups.

Configure the Firewall Management Center for Azure SSO

Configure the Firewall Management Center for Azure SSO to integrate with Azure Active Directory and enable single sign-on authentication for users.

Use these instructions at the Firewall Management Center web interface. Perform this configuration when you want to enable SSO for your management center using Azure AD as the identity provider. This is typically done by administrators responsible for secure access management.

Before you begin

Follow these steps to configure the Firewall Management Center for Azure SSO:

Procedure

Step 1

This step continues directly from Enable SSO at the Firewall Management Center. At theConfigure Azure Metadata dialog, you have two choices:

Step 2

Click Next.

Step 3

At the Verify Metadata dialog, review the configuration parameters and click Save.

Step 4

Click Test Configuration. If the system displays an error message, review the SSO configuration for the Firewall Management Center and the Azure service provider application. Correct any errors and try again.

Step 5

Click Apply after the system reports a successful configuration test.


After completing these steps, the Firewall Management Center is configured for Azure SSO. Users can now authenticate using their Azure AD credentials for secure access.

What to do next

You may optionally configure role mapping for SSO users; refer to Configure user role mapping for Azure in the Firewall Management Center. If you do not configure role mapping, all SSO users who log in to the Firewall Management Center receive the default user role specified in step 4 of Configure user role mapping for Azure in the Firewall Management Center.

Configure user role mapping for Azure in the Firewall Management Center

Configure user role mapping for Azure in the management center to assign roles to users authenticated through SSO. This configuration enables granular access control based on Azure user or group attributes. You can map Azure users and groups to management center roles to ensure secure access management

The fields to configure for user role mapping at the Firewall Management Center web interface are the same regardless of your choice of SSO provider. However, the values you configure must consider the implementation of user role mapping by your SAML SSO provider.

This task is relevant when integrating Azure SSO with the management center to ensure users are assigned the correct roles based on their Azure attributes. Apply this configuration when onboarding new Azure SSO users or updating role assignments.

Before you begin

Follow these steps to configure user role mapping for Azure in the management center:

Procedure

Step 1

Choose System (system gear icon) > Users > Single Sign-On.

Step 2

Expand Advanced Configuration (Role Mapping).

Step 3

From the Default User Role drop-down list, choose a default Firewall Management Center user role to assign users.

Step 4

In the Group Member Attribute field, enter an attribute configured in Azure for Firewall Management Center user role mapping for users or groups. Refer to step 1 of Configure User Role Mapping for Individual Users at the Azure IdP or step 1 of Configure User Role Mapping for Groups at the Azure IdP.

Step 5

Next to each Firewall Management Center user role you want to assign to SSO users, enter a regular expression. The Firewall Management Center compares these values against the user role mapping attribute the IdP sends to the Firewall Management Center with SSO user information. The Firewall Management Center grants users a union of all the roles for which a match is found.

Step 6

Click Test Configuration. If the system displays an error message, review the SSO configuration for the Firewall Management Center as well as the identity service provider application configuration, correct any errors, and try again.

Step 7

When the system reports a successful configuration test, click Apply.


After completing this task, Azure SSO users are mapped to the appropriate management center roles based on their Azure attributes, ensuring correct access permissions are applied automatically.

What to do next

Configure user role mapping at the service provider application; refer to Azure IdP user role mappings.

Azure IdP user role mappings

An Azure IdP user role mapping is a configuration method that assigns user or group role attribute values from application roles in the Azure AD portal. This mapping also determines user access by comparing attribute values with regular expressions assigned to each Firewall Management Center user role in the SSO configuration.

User role mapping configuration options

You can configure SSO user role mapping at the Azure AD portal based on individual user permissions or group permissions.

Choose one of these mapping methods:

During SSO login, Azure presents a user or group role attribute value from an application role configured at the Azure AD portal to the Firewall Management Center. The Firewall Management Center compares that attribute value with the regular expressions assigned to each Firewall Management Center user role in the SSO configuration and grants the user all the roles for which a match is found. If no match is found, the Firewall Management Center grants the user a configurable default user role. The regular expression assigned to each Firewall Management Center user role must comply with the restricted version of Google's RE2 standard, which is supported by Golang and Perl. The Firewall Management Center treats the attribute value received from Okta as a regular expression using that standard when comparing it against Firewall Management Center user role expressions.


Note


A single Firewall Management Center cannot support role mapping for both groups and individual users; you must choose one mapping method for the Firewall Management Center service provider application and use it consistently. The Firewall Management Center can support role mapping using one claim configured in Azure. Generally, group-based role mapping is more efficient for a Firewall Management Center that has many users. Consider user and group definitions established in your Azure tenant when making this decision.


Configure User Role Mapping for Individual Users at the Azure IdP

To establish role mapping for individual users of the Firewall Management Center service application in Azure, use the Azure AD Portal to add a claim to the application, add roles to the application's registration manifest, and assign roles to users.

Before you begin
Procedure

Step 1

Add a user claim to the SSO configuration for the Firewall Management Center service application with the following characteristics:

Step 2

Edit the manifest for the Firewall Management Center service application (in JSON format) and add application roles to represent Firewall Management Center user roles you wish to assign to SSO users. The simplest approach is to copy an existing application role definition and change the following properties:

  • displayName: The name for the role that will appear in the AD Azure Portal.

  • description: A brief description of the role.

  • Id: An alphanumeric string that must be unique among ID properties within the manifest.

  • value: A string to represent one or more Firewall Management Center user roles. (Note: Azure does not permit spaces in this string.)

Step 3

For each user assigned to the Firewall Management Center Service application, assign one of the application roles you have added to the manifest for that application. When a user logs in to the Firewall Management Center using SSO, the application role you assign to that user is the value Azure sends to the Firewall Management Center in the claim for the service application. The Firewall Management Center compares the claim against the expressions you assigned to Firewall Management Center user roles in the SSO configuration (See Step 6 of Configure user role mapping for Azure in the Firewall Management Center.), and assigns the user all the Firewall Management Center user roles for which there is a match.


What to do next
  • Test your role mapping scheme by logging into the Firewall Management Center using SSO from various accounts and confirming that users are assigned Firewall Management Center user roles as you expect.

Configure User Role Mapping for Groups at the Azure IdP

To establish role mapping for user groups for the Firewall Management Center service application in Azure, use the Azure AD Portal to add a claim to the application, add roles to the application's registration manifest, and assign roles to groups.

Before you begin
Procedure

Step 1

Add a user claim to the SSO configuration for the Firewall Management Center service application with the following characteristics:

Step 2

Edit the manifest for the Firewall Management Center service application (in JSON format) and add application roles to represent Firewall Management Center user roles you wish to assign to SSO users. The simplest approach is to copy an existing application role definition and change the following properties:

  • displayName: The name for the role that will appear in the Ad Azure Portal.

  • description: A brief description of the role.

  • Id: An alphanumeric string that must be unique among id properties within the manifest.

  • value: A string to represent one or more Firewall Management Center user roles. (Azure does not permit spaces in this string.)

Step 3

For each group assigned to the Firewall Management Center Service application, assign one of the application roles you have added to the manifest for that application. When a user logs in to the Firewall Management Center using SSO, the application role you assign to that user's group is the value Azure sends to the Firewall Management Center in the claim for the service application. The Firewall Management Center compares the claim against the expressions you assigned to Firewall Management Center user roles in the SSO configuration (see Step 6 of Configure user role mapping for Azure in the Firewall Management Center), and assigns the user all the Firewall Management Center user roles for which there is a match.


What to do next

Test your role mapping scheme by logging into the Firewall Management Center using SSO from various accounts and confirming that users are assigned Firewall Management Center user roles as you expect.

Azure User Role Mapping Examples

As the following examples demonstrate, the SSO configurations at the Firewall Management Center to support user role mapping are the same for both individual users and for groups. The difference lies in the settings at the Firewall Management Center service provider application in Azure.


Note


You can configure Firewall Management Center roles to be mapped based on individual permissions or based on group permissions, but a single Firewall Management Center application cannot support role mapping for both groups and individual users. The Firewall Management Center can support role mapping using only one claim configured in Azure.


Azure Role Mapping Example for Individual User Accounts

In role mapping for individual users, the Azure Firewall Management Center service application has custom roles defined within its manifest. (In this case, FMCAdmin and PolicyAdmin.) These roles can be assigned to users; Azure stores role assignments for each user in that user's assignedroles attribute. The application also has a custom user claim defined, and this claim is configured to get its value from the assigned user role for a user logging into the Firewall Management Center using SSO. Azure passes the claim value to the Firewall Management Center during the SSO login process, and the Firewall Management Center compares the claim value against strings assigned to each Firewall Management Center user role in the Firewall Management Center SSO configuration.

The following diagrams illustrate how the relevant fields and values in the Firewall Management Center and Azure configurations correspond to each other in user role mapping for individual accounts. Each diagram uses the same SSO configurations at the Firewall Management Center and at the Azure AD portal, but the configuration for each user at the Azure AD portal differs to assign each user different roles at the Firewall Management Center.

  • In this diagram sue@ example.com uses the assignedroles attribute value FMCAdmin, and the Firewall Management Center assigns her the Firewall Management Center Administrator role.

  • In this diagram fred @ example .com uses the assignedroles attribute value PolicyAdmin, and the Firewall Management Center assigns him the roles Access Admin, Discovery Admin, and Intrusion Admin.

  • Other users assigned to the Azure service application for this Firewall Management Center are assigned the default user role Security Analyst (Read Only) for one of the following reasons:

    • They have no value assigned to their assignedroles attribute.

    • The value assigned to their assignedroles attribute does not match any expression configured for a user role in the SSO configuration at the Firewall Management Center.

Azure role mapping examples for groups

An Azure role mapping example for groups is a user access configuration that

  • assigns custom roles defined in the Azure Firewall Management Center service application to groups

  • passes role assignments for each group to group members' assigned roles attribute, and

  • uses a custom user claim to map the assigned user role during SSO login, enabling the Firewall Management Center to compare claim values against configured user roles.

Role mapping process in Azure and Firewall Management Center

Describes how fields and values in the Firewall Management Center and Azure configurations correspond in user role mapping for groups.

Each diagram uses the same SSO configurations at the Firewall Management Center and Azure AD portal. However, user configurations at the Azure AD portal differ, which results in different roles being assigned at the Firewall Management Center.

  • In this diagram, sue@example.com is a member of the groups FMCAccessAdmins and FMCDiscoveryAdmins. She inherits the custom roles AccessAdmin and DiscoveryAdmin. When Sue logs into the Firewall Management Center using SSO, the Firewall Management Center assigns her the roles Access Admin and Discovery Admin.

    Figure 9. Role mapping for sue@example.com
    Sue@example.com is a member of the FMCAccessAdmins and FMCDiscoveryAdmins groups, inheriting the custom roles AccessAdmin and DiscoveryAdmin, which are assigned upon her SSO login.
  • In this diagram, fred@example.com is a member of the FMCAdmins group, from which he inherits the custom role FMCAdmin. When Fred logs into the Firewall Management Center using SSO, the Firewall Management Center assigns him the Administrator role.

    Figure 10. Role mapping for fred@example.com
    Fred@example.com inherits the custom role FMCAdmin from the FMCAdmins group, which assigns him the Administrator role upon logging in using SSO.
  • In this diagram, sean@example.com is a member of the FMCMaintUsers group, but because no custom role has been assigned to FMCMaintUsers within the Azure Firewall Management Center service provider application, Sean has no roles assigned to him. When he logs into the Firewall Management Center using SSO, the Firewall Management Center assigns him the default role Security Analyst (Read Only).

    Figure 11. Role mapping for sean@example.com
    Role mapping for sean@example.com illustrates how users inherit custom roles from their group memberships during SSO login.
Azure role mapping user scenarios

Examples include users who inherit custom roles from their group memberships and are assigned those roles during SSO login, as illustrated in the diagrams for sue@example.com, fred@example.com, and sean@example.com.

Configure Single Sign-On with PingID

See the following tasks to configure SSO using PingID's PingOne for Customers product:

PingOne for Customers Administrator's Console

Review the PingID PingOne for Customers Environment.

PingOne for Customers Administrator's Console

Configure a service provider application for PingID PingOne for Customers.

Firewall Management Center

Enable SSO at the Firewall Management Center.

Firewall Management Center

Configure the Firewall Management Center for SSO with the PingID PingOne for Customers.

Review the PingID PingOne for Customers Environment

PingOne for Customers is PingID's cloud-hosted identity-as-a-service (IDaaS) product. In PingOne for Customers, the entity that encompasses all the federated devices that a user can access with the same SSO account is called an environment. Before adding the Firewall Management Center to a PingOne environment, be familiar with its organization; consider the following questions:

  • How many users will have access to the Firewall Management Center?

  • Do you need to add more users to support SSO access to the Firewall Management Center?

This documentation assumes you are already familiar with the PingOne for Customers Administrator Console and have an account with the Organization Admin role.

Configure a service provider application for PingID PingOne for Customers

Configure a service provider application for PingID PingOne for Customers to establish SAML-based single sign-on (SSO) integration with the Secure Firewall Management Center. This task enables secure authentication and centralized user access management for your environment.

Use the PingOne for Customers Administrator Console to create a Firewall Management Center service provider application within your PingOne for Customers environment and establish basic configuration settings. This documentation does not describe all functions required to configure an SSO environment. To create users, refer to the PingOne for Customers documentation.

Before you begin

  • Familiarize yourself with your PingOne for Customers environment and its users.

  • Create additional users if necessary.


    Note


    The system requires that user names for SSO accounts as well as the NameID attribute the IdP sends to the Firewall Management Center during the SAML login process must be both be valid email addresses. Many IdP's automatically use the username of the user trying to logon as the NameID attribute, but you should confirm this is the case for your IdP. Keep this in mind when configuring a service provider application at your IdP and creating IdP user accounts that are to be granted SSO access to the Firewall Management Center.


  • Confirm the login URL for the target Firewall Management Center (https://ipaddress_or_hostname)


    Note


    If your Firewall Management Center web interface can be reached with multiple URLs (for instance, a fully-qualified domain name as well as an IP address), SSO users must consistently access the Firewall Management Center using the login URL that you configure in this task.


Follow these steps to configure a service provider application for PingID PingOne for Customers:

Procedure

Step 1

Use the PingOne for Customer Administrator Console to create the application in your environment using these settings:

  • Choose the Web App APPLICATION type.

  • Choose the SAML connection type.

Step 2

Configure the application with these settings for the SAML Connection:

  • For the ACS URL, append /sam/ACS to the Firewall Management Center login URL. For example: https://ExampleFMC/SAML/ACS.

  • For the Signing Certificate, choose Sign Assertion & Response.

  • For the Signing Algorithm, choose RSA_SHA256.

  • For the Entity ID, append /SAML/metadata to the Firewall Management Center login URL. For example: https://ExampleFMC/SAML/metadata.

  • For the SLO Binding, select HTTP POST.

  • For the Assertion Validity Duration, enter 300.

Step 3

In the SAMLConnection information for the application, note these values:

  • Single Sign-On Service

  • Issuer ID

You will need these values when you configure SSO using PingID's PingOne for Customers product at the Firewall Management Center web interface.

Step 4

For SAML ATTRIBUTES, make these selections for a single required attribute:

  • PINGONE USER ATTRIBUTE: Email Address

  • APPLICATION ATTRIBUTE: saml_subject

Step 5

Download the signing certificate in X509 PEM (.crt) format and save it to your local computer.

Step 6

(Optional) to make SSO setup at the Firewall Management Center easier, you can download the SAML XML metadata file for the Firewall Management Center service provider application to your local computer.

Step 7

Enable the application.


After you finish this task, your PingOne for Customers environment will have a configured service provider application for the Firewall Management Center, enabling SAML-based SSO integration.

What to do next

Enable single sign-on. Refer to Enable SSO at the Firewall Management Center.

Configure the Firewall Management Center for SSO with the PingID PingOne for Customers

Configure the Firewall Management Center to integrate with PingID PingOne for Customers for single sign-on (SSO) authentication. This task establishes SSO connectivity and user role mapping between your system and PingID PingOne for Customers.

Use this task when you need to enable SSO for your Firewall Management Center using PingID PingOne for Customers as the identity provider.

This configuration is relevant for organizations seeking centralized authentication and streamlined user access management. Ensure you have administrative access to both the Firewall Management Center

and the PingOne for Customers Administrator Console.

Before you begin

Follow these steps to configure SSO integration between the Firewall Management Center and PingID PingOne for Customers:

Procedure

Step 1

(This step continues directly from Enable SSO at the Firewall Management Center.) At the Configure PingID Metadata dialog, you have two choices:

Click Next.

Step 2

At the Verify Metadata dialog, review the configuration parameters and click Save.

Step 3

Expand Advanced Configuration (Role Mapping).

Step 4

From the Default User Role drop-down list, choose a default Firewall Management Center user role to assign users.

Step 5

In the Group Member Attribute field, enter an attribute configured in PingID PingOne for Firewall Management Center user role mapping for users or groups.

Step 6

Next to each Firewall Management Center user role you wish to assign to SSO users, enter a regular expression. The Firewall Management Center compares these values against the user role mapping attribute the IdP sends to the Firewall Management Center with SSO user information. The Firewall Management Center grants users a union of all the roles for which a match is found.

Step 7

Click Test Configuration. If the System displays an error message, review the SSO configuration for the Firewall Management Center as well as the PingOne for Customers service provider application, correct any errors, and try again.

Step 8

When the system reports a successful configuration test, click Apply.


After completing this task, the Firewall Management Center will be integrated with PingID PingOne for Customers for SSO. Users will be able to authenticate using their PingID credentials and be assigned roles based on your configuration.

Configure Single Sign-On with Any SAML 2.0-Compliant SSO Provider

The Firewall Management Center supports single sign-on with any SSO identity provider (IdP) compliant with the SAML 2.0 SSO protocol. Generic instructions to use a wide range of SSO providers must address the tasks to be performed at a high level; establishing SSO using a provider not specifically addressed in this documentation requires that you be proficient with the IdP of your choice. These tasks help you determine the steps to configure the Firewall Management Center for single sign-on using any SAML 2.0-compliant SSO provider:

IdP Administration Application

Familiarize Yourself with the SSO Identity Provider and the SSO Federation.

IdP Administration Application

Configure Firewall Management Center service provider application for any SAML 2.0-compliant SSO provider.

Firewall Management Center

Enable SSO at the Firewall Management Center.

Firewall Management Center

Configure the Firewall Management Center for SSO using any SAML 2.0-compliant SSO provider.

Firewall Management Center

Configure User Role Mapping in the Firewall Management Center for SAML 2.0-Compliant SSO Providers.

IdP Administration Application

Configure Firewall Management Center User Role Mapping at the IdP for SAML 2.0-Compliant SSO Providers.

Familiarize Yourself with the SSO Identity Provider and the SSO Federation

Read the IdP vendor documentation with the following considerations in mind:

  • Does the SSO provider require that users subscribe to or register with any services before using the IdP?

  • What terminology does the SSO provider use for common SSO concepts? For instance, to refer to a group of federated service provider applications, Okta uses "org" where Azure uses "tenant."

  • Does the SSO provider support SSO exclusively, or a suite of functions—for instance, multifactor authentication or domain management? (This can affect configuration of some elements shared between features—especially users and groups.)

  • What permissions does an IdP user account need to configure SSO?

  • What configurations does the SSO provider require you to establish for a service provider application? For instance, Okta automatically generates an X509 Certificate to secure its communications with the Firewall Management Center, while Azure requires that you generate that certificate using the Azure portal interface.

  • How are users and groups created and configured? How are users assigned to groups? How are users and groups granted access to service provider applications?

  • Does the SSO provider require that at least one user be assigned to a service provider application before the SSO connection can be tested?

  • Does the SSO provider support user groups? How are user and group attributes configured? How can you map attributes to Firewall Management Center user roles in the SSO configuration?

  • Do you need to add more users or groups to the federation to support SSO on the Firewall Management Center?

  • Are users within the federation members of groups?

  • Are user and group definition native to the IdP or imported from a user management application such as Active Directory, RADIUS, or LDAP?

  • What kind of user role assignments do you want to make? (If you choose not to assign user roles, the Firewall Management Center automatically assigns the user a configurable default user role to all SSO users.)

  • How must users and groups within the federation be organized to support your plan for user role mapping?

Configure Firewall Management Center service provider application for any SAML 2.0-compliant SSO provider

This task enables you to configure a service provider application at your identity provider (IDP) for SAML 2.0 SSO integration with the Firewall Management Center.

  • Establish secure SSO authentication for users and groups.

  • Ensure the IDP and service provider exchange the required SAML attributes and certificates.

Generally, SSO providers require you to configure a service provider application at the IDP for each federated application. All IdPs that support SAML 2.0 SSO need the same configuration information for service provider applications. Some IdPs automatically generate some configuration settings for you, while others require you to configure all settings yourself.

  • If you plan to assign user groups to the Firewall Management Center application, do not also assign users within those groups as individuals.

  • The Firewall Management Center cannot support role mapping using multiple SSO attributes. You must select either user role mapping or group role mapping, and configure a single attribute to convey user role information from the IDP to the Firewall Management Center.

Before you begin

  • Familiarize yourself with the SSO federation, its users, and its groups. Refer to Familiarize Yourself with the SSO Identity Provider and the SSO Federation.

  • Confirm your IDP account has the necessary permissions to perform this task.

  • Create user accounts or groups, or both, in your SSO federation if necessary.


    Note


    The system requires that user names for SSO accounts as well as the NameID attribute the IdP sends to the Firewall Management Center during the SAML login process must be both be valid email addresses. Many IdP's automatically use the username of the user trying to logon as the NameID attribute, but you should confirm this is the case for your IdP. Keep this in mind when configuring a service provider application at your IdP and creating IdP user accounts that are to be granted SSO access to the Firewall Management Center.


  • Confirm the login URL for the target Firewall Management Center (for example, https://ipaddress_or_hostname)


    Note


    If your Firewall Management Center web interface can be reached with multiple URLs (for example, a fully qualified domain name as well as an IP address), SSO users must consistently access the Firewall Management Center using the login URL that you configure in this task.


Follow these steps to configure a service provider application for SAML 2.0 SSO integration:

Procedure

Step 1

Create a new service provider application at the IDP.

Step 2

Configure values required by the IDP. Be sure to include the fields listed below, required to support SAML 2.0 SSO functionality with the Firewall Management Center. (Because different SSO service providers use different terminology for SAML concepts, this list provides alternate names for these fields to help you find the right settings in the IDP application.):

  • Service Provider Entity ID, Service Provider Identifier, Audience URI: A globally unique name for the service provider (the Firewall Management Center), formatted as a URL. To create this, append the string /SAML/metadata to the Firewall Management Center login URL, such as https://ExampleFMC/SAML/metadata.

  • Single Sign on URL, Recipient URL, Assertion Consumer Service URL: The service provider (Firewall Management Center) address to which the browser sends information on behalf of the IDP. To create this, append the string SAML/acs to the Firewall Management Center login URL, such as https://ExampleFMC/SAML/acs.

  • X.509 Certificate: Certificate to secure communications between the Firewall Management Center and the IDP. Some IdPs may automatically generate the certificate, and some may require that you explicitly generate it using the IDP interface.

Step 3

(Optional if you are assigning groups to the application) Assign individual users to the Firewall Management Center application. (If you plan to assign groups to the Firewall Management Center application, do not assign members of those groups as individuals.)

Step 4

(Optional if you are assigning individual users to the application.) Assign user groups to the Firewall Management Center application.

Step 5

(Optional) Some IdPs provide the ability to generate a SAML XML metadata file containing the information you have configured in this task formatted to comply with SAML 2.0 standards. If your IDP provides this ability, you can download the file to your local computer to ease the SSO configuration process at the Firewall Management Center.


After completing this task, your SAML 2.0-compliant SSO provider will be able to authenticate users or groups for access to the Firewall Management Center using single sign-on. The IDP and service provider will exchange the required SAML attributes and certificates for secure authentication.

What to do next

Enable single sign-on. Refer to Enable SSO at the Firewall Management Center.

Configure the Firewall Management Center for SSO using any SAML 2.0-compliant SSO provider

Configure the Firewall Management Center to use single sign-on (SSO) with any SAML 2.0-compliant SSO provider. This task allows you to centralize authentication and streamline user access. This configuration helps integrate your security management with your organization's identity provider (IdP).

Use these instructions at the Firewall Management Center web interface. To configure the Firewall Management Center for SSO using any SAML 2.0-compliant SSO provider, you need information from the IdP.

This task is relevant when you want to enable SSO for centralized user authentication and access control. Ensure you have access to the IdP and the necessary SSO configuration details before starting.

Before you begin

  • Review the organization of your SSO federation, and its users and groups.

  • Configure a Firewall Management Center service provider application at the IdP; see Configure the Firewall Management Center for SSO using any SAML 2.0-compliant SSO provider.

  • Gather the following SSO configuration information for the service provider application from the IdP. Because different SSO service providers use different terminology for SAML concepts, this list provides alternate names for these fields to help you find the right values in the IdP application:

    • Identity Provider Single Sign-On URL, Login URL: The IdP URL where the browser sends information on behalf of the Firewall Management Center.

    • Identity Provider Issuer, Identity Provider Issuer URL, Issuer URL: A globally unique name for the IdP, often formatted as a URL.

    • An X.509 digital certificate to secure communications between the Firewall Management Center and the IdP.

  • Enable single sign-on; see Enable SSO at the Firewall Management Center.

Follow these steps to configure the Firewall Management Center for SSO using any SAML 2.0-compliant SSO provider:

Procedure

Step 1

(This step continues directly from Enable SSO at the Firewall Management Center.) At the Configure SAML Metadata dialog, you have two choices:

  • To enter the SSO configuration information manually:

    1. Click the Manual Configuration radio button.

    2. Enter the following values previously obtained from the SSO Service Provider application:

      • Identity Provider Single Sign-On URL

      • Identity Provider Issuer

      • X.509 Certificate

  • If you saved the XML metadata file generated at the IdP (Step 5 in Configure Firewall Management Center service provider application for any SAML 2.0-compliant SSO provider), you can upload the file to the Firewall Management Center:

    1. Click the Upload XML File radio button.

    2. Follow the on-screen instructions to navigate to and choose the XML metadata file on your local computer.

Step 2

Click Next.

Step 3

At the Verify Metadata dialog, review the configuration parameters and click Save.

Step 4

Click Test Configuration. If the system displays an error message, review the SSO configuration for the Firewall Management Center as well as the service provider application configuration at the IdP, correct any errors, and try again.

Step 5

When the system reports a successful configuration test, click Apply.


After completing this task, the Firewall Management Center is configured for SSO using your SAML 2.0-compliant SSO provider. Users can now authenticate using their IdP credentials.

What to do next

You may optionally configure user role mapping for SSO users; see Configure User Role Mapping in the Firewall Management Center for SAML 2.0-Compliant SSO Providers. If you choose not to configure role mapping, by default all SSO users that log into the Firewall Management Center are assigned the default user role you configure in Step 4 of Configure User Role Mapping in the Firewall Management Center for SAML 2.0-Compliant SSO Providers.

Configure User Role Mapping in the Firewall Management Center for SAML 2.0-Compliant SSO Providers

To implement SAML SSO user role mapping you must establish coordinating configurations at the IdP and at the Firewall Management Center.

  • At the IdP, establish user or group attributes to convey user role information and assign values to them; the IdP sends these to the Firewall Management Center once it has authenticated and authorized an SSO user.

  • At the Firewall Management Center, associate values with each of the Firewall Management Center user roles you want to assign to users.

When the IdP sends the user or group attribute associated with an authorized user, the Firewall Management Center, the Firewall Management Center compares the attribute value with the values associated with each Firewall Management Center user role, assigns the user all the roles that match, . The Firewall Management Center performs this comparison by treating both values as regular expressions that comply with the restricted version of Google's RE2 regular expression standard supported by Golang and Perl.

The fields to configure for user role mapping at the Firewall Management Center web interface are the same regardless of your choice of SSO provider. But the values you configure must take into account how the SAML SSO provider you use implements user role mapping. Your IdP may enforce syntactical limitations on user or group attributes; if so, you must devise a user role mapping scheme using role names and regular expressions compatible with those requirements.

Before you begin
Procedure

Step 1

Choose System (system gear icon) > Users > Single Sign-On.

Step 2

Expand Advanced Configuration (Role Mapping).

Step 3

Select a Firewall Management Center user role to assign users as a default value from the Default User Role drop-down.

Step 4

Enter a Group Member Attribute. This string must match an attribute name configured at the IdP Firewall Management Center service provider application for user role mapping using either users or groups. (See Step 1 of Configure Firewall Management Center User Role Mapping at the IdP for SAML 2.0-Compliant SSO Providers.)

Step 5

Next to each Firewall Management Center user roll you wish to assign to SSO users, enter a regular expression. The Firewall Management Center compares these values against the user role mapping attribute the IdP sends to the Firewall Management Center with SSO user information. The Firewall Management Center grants users a union of all the roles for which a match is found.

Step 6

Click Test Configuration. If the system displays an error message, review the SSO configuration for the Firewall Management Center as well as the identity service provider application configuration, correct any errors, and try again.

Step 7

When the system reports a successful configuration test, click Apply.


What to do next

Configure user role mapping at the service provider application; see Configure Firewall Management Center User Role Mapping at the IdP for SAML 2.0-Compliant SSO Providers.

Configure Firewall Management Center User Role Mapping at the IdP for SAML 2.0-Compliant SSO Providers

The detailed steps for configuring user role mapping are different for each IdP. You must determine how to create a custom user or group attribute for the service provider application, and assign values to the attribute for each user or group at the IdP to convey user or group privileges to the Firewall Management Center. Keep in mind the following:

  • If your IdP imports user or group profiles from a third-party user management application (such as Active directory, LDAP, or Radius), this may affect how you can use attributes for role mapping.

  • Take into account user and group role definitions throughout your SSO federation.

  • The Firewall Management Center cannot support role mapping using multiple SSO attributes; you must select either user role mapping or group role mapping and configure a single attribute to convey user role information from the IdP to the Firewall Management Center.

  • Group role mapping is generally more efficient for a Firewall Management Center with many users.

  • If you assign user groups to Firewall Management Center applications, do not also assign users within those groups as individuals.

  • For the purpose of determining a match with Firewall Management Center user roles, the Firewall Management Center treats user and group role attribute values received from the IdP as regular expressions complying with the restricted version of Google's RE2 regular expression standard supported by Golang and Perl. Your IdP may enforce certain syntactical limitations on user or group attributes. if so, you must devise a user role mapping scheme using role names and regular expressions compatible with those requirements.

Before you begin
Procedure

Step 1

At the IdP, create or designate an attribute to be sent to the Firewall Management Center to contain role mapping information for each user sign-in. This may be a user attribute, a group attribute, or a different attribute that obtains its value from a source such as user or group definitions maintained by the IdP or a third party user management application.

Step 2

Configure how the attribute gets its value. Coordinate the possible values with the values associated with the user roles in the Firewall Management Center SSO configuration.


Custom user roles for the web interface

A custom user role is a user access configuration that

  • assigns specific permissions to each user account

  • enables management of user roles for web interface access, and

  • allows configuration of custom roles beyond default user roles.

Web interface user role reference information

Each user account must be defined with a user role. For default user roles, refer to User roles.

Create Custom User Roles

Custom user roles can have any set of menu-based and system permissions, and may be completely original, copied from a predefined or another custom user role, or imported from another Firewall Management Center.


Note


(Requires Version 7.4.1+) Although you can enable access to content updates without product upgrades, we recommend against the reverse: product without content. That is, if you enable Product Upgrades in a custom user role, also enable Content Updates. Otherwise, you could have trouble manually uploading upgrade packages and upgrading older ASA FirePOWER and NGIPSv devices.


Procedure


Step 1

Choose System (system gear icon) > Users.

Step 2

Click User Roles.

Step 3

Add a new user role with one of the following methods:

  • Click Create User Role.

  • Click the Copy (copy icon) next to the user role you want to copy.

  • Import a custom user role from another Firewall Management Center:

    1. On the other Firewall Management Center, click the Export(export icon) to save the role to your computer.

    2. On the new Firewall Management Center, choose System (system gear icon) > Tools > Import/Export.

    3. Click Upload Package, then follow the instructions to import the saved user role to the new Firewall Management Center.

Step 4

Enter a Name for the new user role. User role names are case sensitive.

Step 5

(Optional) Add a Description. Limit the description length to 128 characters.

Step 6

Choose Menu-Based Permissions for the new role.

When you choose a permission, all of its children are chosen, and the multi-value permissions use the first value. If you clear a high-level permission, all of its children are cleared also. If you choose a permission but not its children, it appears in italic text.

Copying a predefined user role to use as the base for your custom role preselects the permissions associated with that predefined role.

You can apply restrictive searches to a custom user role. These searches constrain the data a user can see in the tables on the pages available under the Analysis menu. You can configure a restrictive search by first creating a private saved search and selecting it from the Restrictive Search drop-down menu under the appropriate menu-based permission.

Step 7

(Optional) Check the External Database Access (Read Only) check box to set database access permissions for the new role.

This option provides read-only access to the database using an application that supports JDBC SSL connections. For the third-party application to authenticate to the Firewall Management Center, you must enable database access in the system settings.

Step 8

(Optional) To set escalation permissions for the new user role, see Enable user role escalation.

Step 9

Click Save.

The custom role is saved. If the system determines it is a read-only role, it labels the role with '(Read Only)'. This is relevant when configuring the number of concurrent sessions for read-only vs read-write users. You cannot make a role read-only by adding '(Read Only)' to the role name. For more information on concurrent session limits, see User Configuration.

Example

You can create custom user roles for access control-related features to designate whether users can view and modify access control and associated policies.

The following table shows how to differentiate between network administrators, who should be able to configure all aspects of access control policies except the intrusion configuration, and intrusion administrators, who should be able to configure intrusion-related features only. The Modify Threat Configuration permission allows the selection of intrusion policy, variable set, and file policy in a rule, the configuration of the advanced options for network analysis and intrusion policies, the configuration of the Security Intelligence policy for the access control policy, and intrusion actions in the policy default action. The Modify Remaining Access Control Policy Configuration permission covers all other aspects of the policy and rules, including creating and deleting them. In this example, Policy Approvers can view (but not modify) access control and intrusion policies. They can also deploy configuration changes to devices.

Table 2. Sample Access Control Custom Roles

Menu-Based Permission

Example Roles

Access Control Editor

Intrusion & Network Analysis Editor

Policy Approver

Access Control

yes

yes

yes

Access Control Policy

yes

yes

yes

Modify Access Control Policy

no

yes

no

Modify Threat Configuration

no

yes

no

Modify Remaining Access Control Policy Configuration

yes

no

no

Intrusion Policy

no

yes

yes

Modify Intrusion Policy

no

yes

no

Deploy Configuration to Devices

no

no

yes

Deactivate User Roles

Deactivating a role removes that role and all associated permissions from any user who is assigned that role. You cannot delete predefined user roles, but you can deactivate them.

In a multidomain deployment, the system displays custom user roles created in the current domain, which you can edit. It also displays custom user roles created in ancestor domains, which you cannot edit. To view and edit custom user roles in a lower domain, switch to that domain.

Procedure


Step 1

Choose System (system gear icon) > Users.

Step 2

Click User Roles.

Step 3

Click the slider next to the user role you want to activate or deactivate.

If the controls are dimmed, the configuration belongs to an ancestor domain, or you do not have permission to modify the configuration.

If you deactivate, then reactivate, a role with Lights-Out Management while a user with that role is logged in, or restore a user or user role from a backup during that user’s login session, that user must log back into the web interface to regain access to IPMItool commands.


Enable user role escalation

Enable user role escalation to allow custom user roles to temporarily gain the privileges of another targeted user role, in addition to their base role. This feature helps substitute one user for another during an absence or track advanced privilege usage.

  • This feature is not supported for default user roles.

You can configure user role escalation so that users can use their own passwords or the password of another user that you specify. Managing a single escalation password for all applicable users is also possible.

  • For example, a user with limited privileges can escalate to the Administrator role to perform administrative actions.

Before you begin

No explicit prerequisites are required for this task.

Follow these steps to enable user role escalation:

Procedure


Step 1

Set the escalation target role. Only one user role at a time can be the escalation target role.

Step 2

Configure a custom user role for escalation.

Step 3

(For the logged in user) Escalate your user role.


After completing these steps, custom user roles can temporarily gain the privileges of a targeted user role, allowing for flexible privilege management and tracking of advanced user privileges.

Set the escalation target role

Set a user role as the escalation target role to allow custom roles to escalate permissions during login sessions.

  • Configure a predefined or custom user role to act as the escalation target.

  • Enable system-wide escalation for user roles as needed.

You can assign any user role, predefined or custom, to act as the system-wide escalation target role.

This role is used when a custom role escalates, if permitted. Only one user role at a time can be the escalation target role. Each escalation lasts for the duration of a login session and is recorded in the audit log.

  • Escalation is effective for the current login session and tracked in the audit log.

Before you begin

No explicit prerequisites are required for this task.

  • Ensure you have access to the Secure Firewall Management Center and appropriate permissions to configure user roles.

Follow these steps to set the escalation target role:

Procedure

Step 1

Choose System (system gear icon) > Users.

Step 2

Click User Roles.

Step 3

Click Configure Permission Escalation.

Step 4

Choose a user role from the Escalation Target drop-down list.

Step 5

Click OK to save your changes.

Changing the escalation target role is effective immediately. Users in escalated sessions now have the permissions of the new escalation target.


After completing this task, the selected user role becomes the escalation target. Users in escalated sessions will have the permissions of the new escalation target role, and all escalations are logged in the audit log.

What to do next

No post-requisites are required for this task.

  • Review the audit log to verify escalation events as needed.

Configure a custom user role for escalation

Configure a custom user role to enable escalation, so users can perform privileged actions when required.

  • Allow users to escalate privileges using a designated password.

  • Support efficient management of escalating users and passwords.

Users must belong to a custom user role with escalation enabled to perform privileged actions. This procedure describes how to enable escalation for a custom user role.

Consider your organization's needs when configuring the escalation password. You may choose another user whose password serves as the escalation password. Changing or deactivating that user affects all escalating users who require that password. Using an externally-authenticated user allows centralized management.

  • Deactivating the user whose password is used for escalation makes escalation impossible for users with the role that requires it.

  • This feature can be used to quickly remove escalation powers if necessary.

Before you begin

Set a target user role according to Set the escalation target role.

  • Ensure you have access to create or modify custom user roles.

Follow these steps to configure a custom user role for escalation:

Procedure

Step 1

Begin configuring your custom user role as described in Create Custom User Roles.

Step 2

In System Permissions, choose the Set this role to escalate to: Maintenance User check box.

The current escalation target role is listed beside the check box.

Step 3

Choose the password that this role uses to escalate. You have two options:

  • Choose Authenticate with the assigned user’s password if you want users with this role to use their own passwords when they escalate.
  • Choose Authenticate with the specified user’s password and enter that username if you want users with this role to use the password of another user.

    Note


    When authenticating with another user’s password, you can enter any username, even that of a deactivated or nonexistent user. Deactivating the user whose password is used for escalation makes escalation impossible for users with the role that requires it. You can use this feature to quickly remove escalation powers if necessary.

Step 4

Click Save.


After completing this task, users in the custom role will be able to escalate privileges as configured. Escalation is managed according to the password option you selected.

What to do next

Review user access and escalation settings to ensure compliance with organizational policies.

  • Monitor changes to escalation passwords and user roles regularly.

Escalate your user role

Escalate your user role to gain the permissions of a target role in addition to your current role. This is useful when you need temporary access to additional features or administrative capabilities.

When a user has an assigned custom user role with permission to escalate, that user can escalate to the target role’s permissions at any time. Note that escalation has no effect on user preferences.

Before you begin

Your user role must have escalation permissions enabled by your administrator.

Follow these steps to escalate your user role:

Procedure

Step 1

From the drop-down list under your user name, choose Escalate Permissions.

If you do not see this option, your administrator did not enable escalation for your user role.

Step 2

Enter the authentication password.

Step 3

Click Escalate. You now have all permissions of the escalation target role in addition to your current role.

Escalation lasts for the remainder of your login session. To return to the privileges of your base role only, you must log out, then begin a new session.


After completing these steps, you will have the permissions of the escalation target role for the duration of your login session. Logging out will return you to your base role privileges.

Troubleshoot LDAP authentication connections

This reference explains how to troubleshoot LDAP authentication connection issues, identify common failure causes, and apply solutions to restore communication between Cisco devices and LDAP servers.

Configure User Preferences

Depending on your user role, you can specify certain preferences for your user account.

In a multidomain deployment, user preferences apply to all domains where your account has access. When specifying home page and dashboard preferences, keep in mind that certain pages and dashboard widgets are constrained by domain.
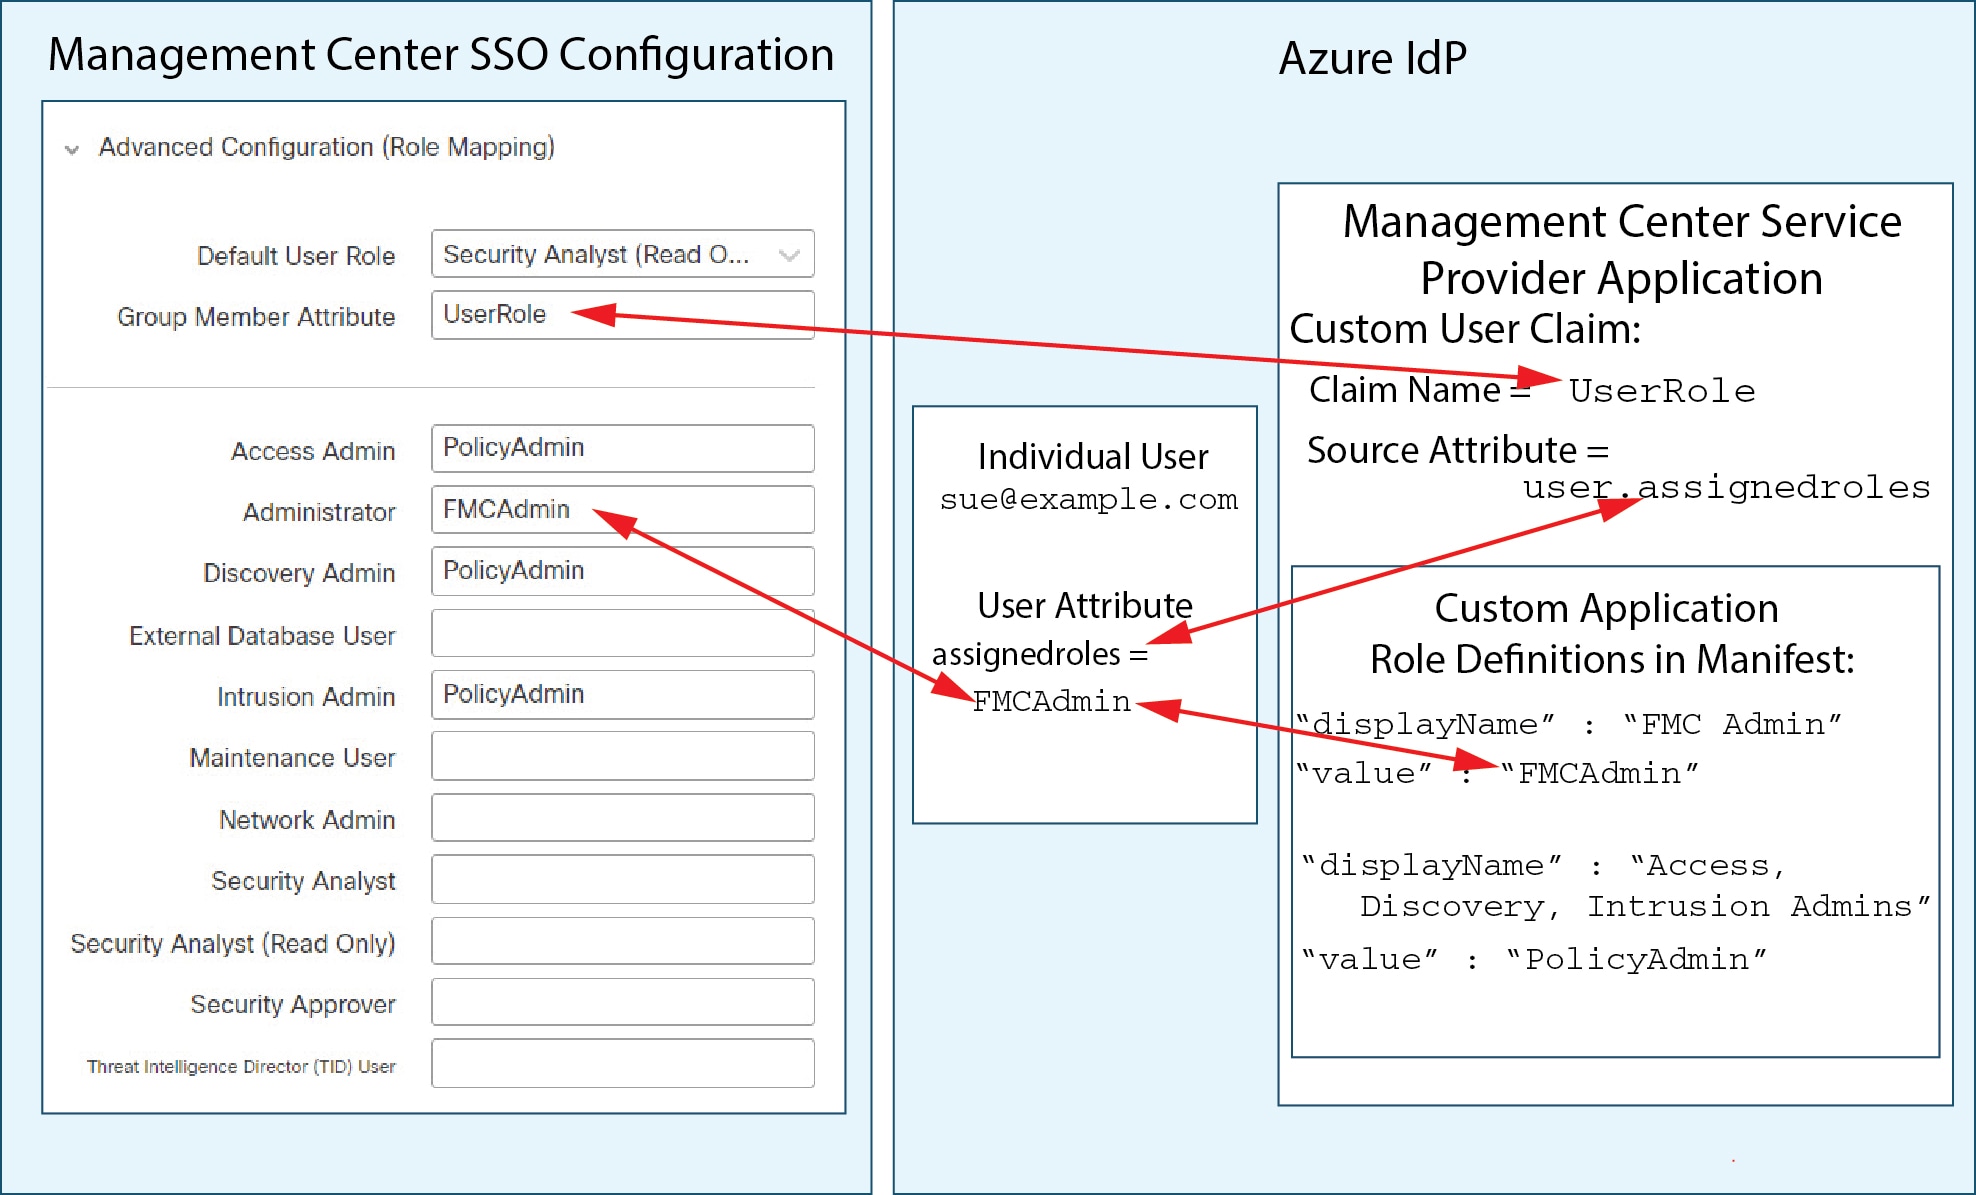
Change your password

All user accounts are protected with a password. You can change your password at any time, and depending on the settings for your user account, you may have to change your password periodically.

When password strength checking is enabled, passwords must comply with the strong password requirements described in Guidelines and limitations for user accounts for Firewall Management Center.

If you are an LDAP or a RADIUS user, you cannot change your password through the web interface. Ensure you are not an LDAP or RADIUS user if you intend to change your password through the web interface.

Before you begin

Follow these steps to change your password:

Procedure


Step 1

From the drop-down list under your user name, choose User Preferences.

Step 2

Click Change Password.

Step 3

Optionally, check the Show password check box. This action displays the password while you use the dialog.

Step 4

Enter your Current Password.

Step 5

You have two options:

  • Enter your new password for New Password and Confirm Password.
  • Click Generate Password to let the system create a compliant password for you. Generated passwords are non-mnemonic. Record your password carefully if you select this option.

Step 6

Click Apply.


Your password is updated, and you can use the new password to access your account. If password requirements are not met, the system prompts you to enter a compliant password.

What to do next

Log in with your new password to verify the change was successful.

Change an expired password

Change your password when it has expired to regain access to your account and maintain security compliance.

Depending on the settings for your user account, your password may expire. The password expiration period is set when your account is created. If your password has expired, the Password Expiration Warning page appears.

Before you begin

Follow these steps to change an expired password:

Procedure


On the Password Expiration Warning page, you have two choices:


After completing this task, your password is updated and you regain access to your account. If you choose to skip, you may be prompted again until you change your password.

Change the web interface appearance

Change the web interface appearance by choosing from available themes or enable new design options for the light theme variant.

You can change the way the web interface appears. Theme options and design toggles may vary based on your system version and available features.

Before you begin

Follow these steps to change the web interface appearance:

Procedure


From the drop-down list under your user name, choose a theme:

  • Light

  • Dusk

  • Classic (the look and feel before Version 6.6)


The web interface appearance changes according to your selected theme or design preference, providing a personalized and comfortable user experience.

Specify your home page

You can set a custom home page within the web interface for your appliance. This helps personalize your experience and improve workflow efficiency..

You can specify the page within the web interface to use as your home page for the appliance. The default home page is the default dashboard (Overview > Dashboards heading > Dashboard), except for user accounts with no dashboard access, such as External Database users. (Refer to Specify your default dashboard to set the default dashboard.)

In a multidomain deployment, the home page selection applies to all domains accessible to your user account. Certain pages are only available in the Global domain.
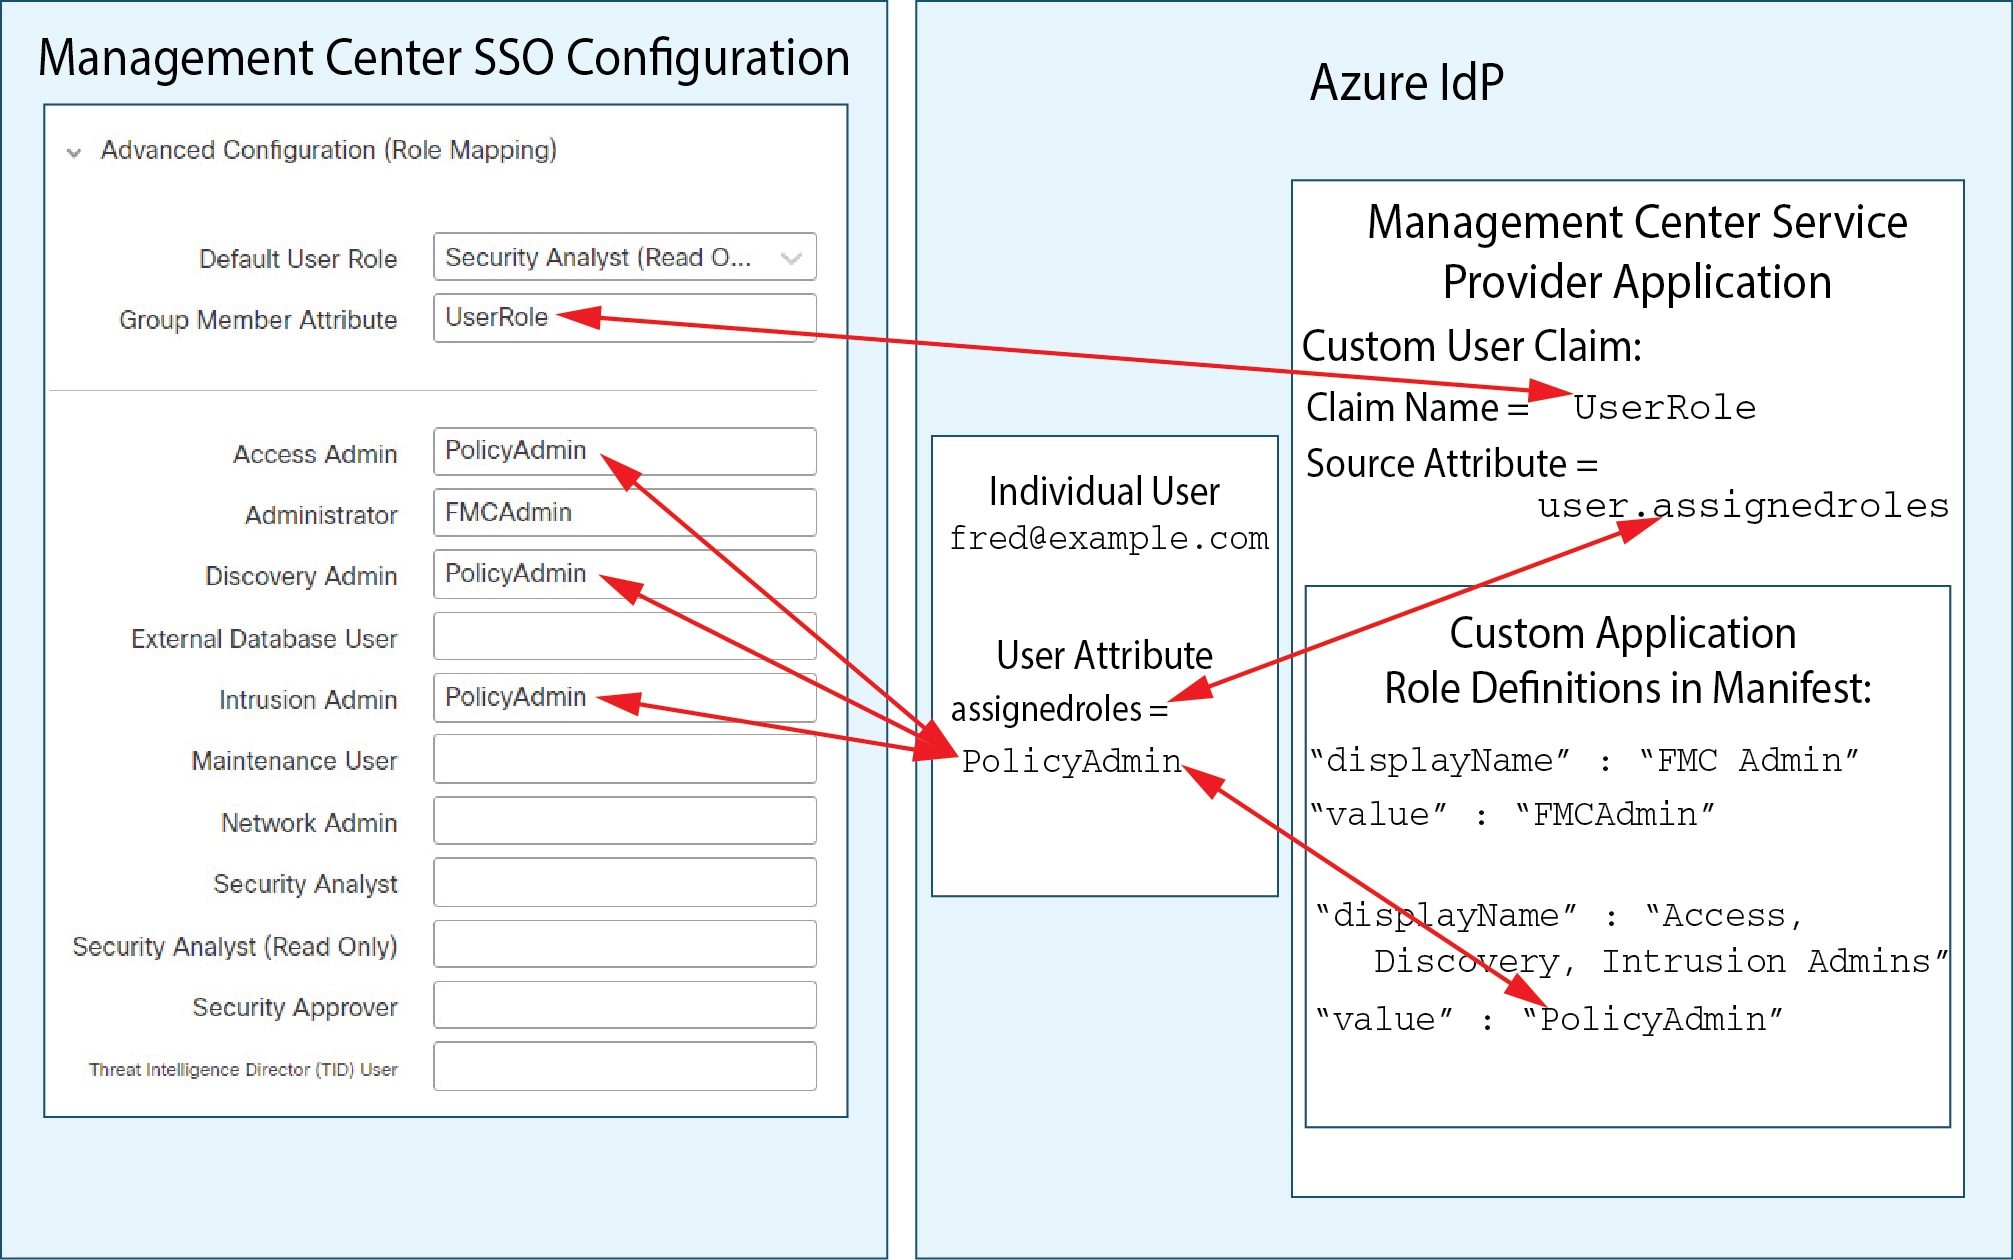
Procedure


Step 1

From the drop-down list under your user name, choose User Preferences.

Step 2

Click Home Page.

Step 3

Choose the page you want to use as your home page from the drop-down list.

The options in the drop-down list are based on the access privileges for your user account. For more information, refer to User roles.

Step 4

Click Save.


Your selected page becomes the new home page and will be displayed when you log in to the appliance web interface.

Configure event view settings

Configure event view settings to customize how events are displayed and managed on the Firewall Management Center.

Use the Event View Settings page to configure characteristics of event views on the Firewall Management Center. Some configurations are available only for specific user roles. If you have the External Database User role, you can view event view settings, but changing those settings does not affect system behavior.

Procedure


Step 1

From the drop-down list under your user name, choose User Preferences .

Step 2

Click Event View Settings.

Step 3

In the Event Preferences section, configure the basic characteristics of event views ; refer to Configure event view preferences.

Step 4

In the File Preferences section, configure file download preferences ; refer to Configure file download preferences.

Step 5

In the Default Time Windows section, configure the default time window or windows ; refer to Default time windows.

Step 6

In the Default Workflow sections, configure default workflows ; refer to Default workflows.

Step 7

Click Save.


The system saves your event view settings and uses them to display and manage events according to your preferences.

Configure event view preferences

Use the Event Preferences section of the Event View Settings page to configure basic characteristics of event views. This section is available for all user roles. However, it has no significance for users who cannot view events.

The Event Preferences section contains these fields.

  • The Confirm “All” Actions field controls whether the appliance requires you to confirm actions that affect all events in an event view.

    If this setting is enabled and you click Delete All in an event view, you must confirm deletion of all the events that meet the current constraints. This confirmation includes events not shown on the current page. The appliance then deletes the events from the database.

  • The Resolve IP Addresses field allows the appliance, whenever possible, to display host names instead of IP addresses in event views.

    An event view may display slowly if it contains many IP addresses and this option is enabled. To enable this setting, use the management interfaces configuration to establish a DNS server in the system settings.

  • The Expand Packet View field allows you to configure how the packet view for intrusion events appears. By default, the appliance displays a collapsed version of the packet view.

    • None: collapse all subsections of the Packet Information section of the packet view

    • Packet Text: expand only the Packet Text subsection

    • Packet Bytes: expand only the Packet Bytes subsection

    • All: expand all sections

  • You can manually expand the sections in the packet view to see detailed information about a captured packet.

  • The Rows Per Page field controls how many rows of events per page you want to appear in drill-down pages and table views.

  • The Refresh Interval field sets the refresh interval for event views in minutes. Entering 0 disables the refresh option. This interval does not apply to dashboards.
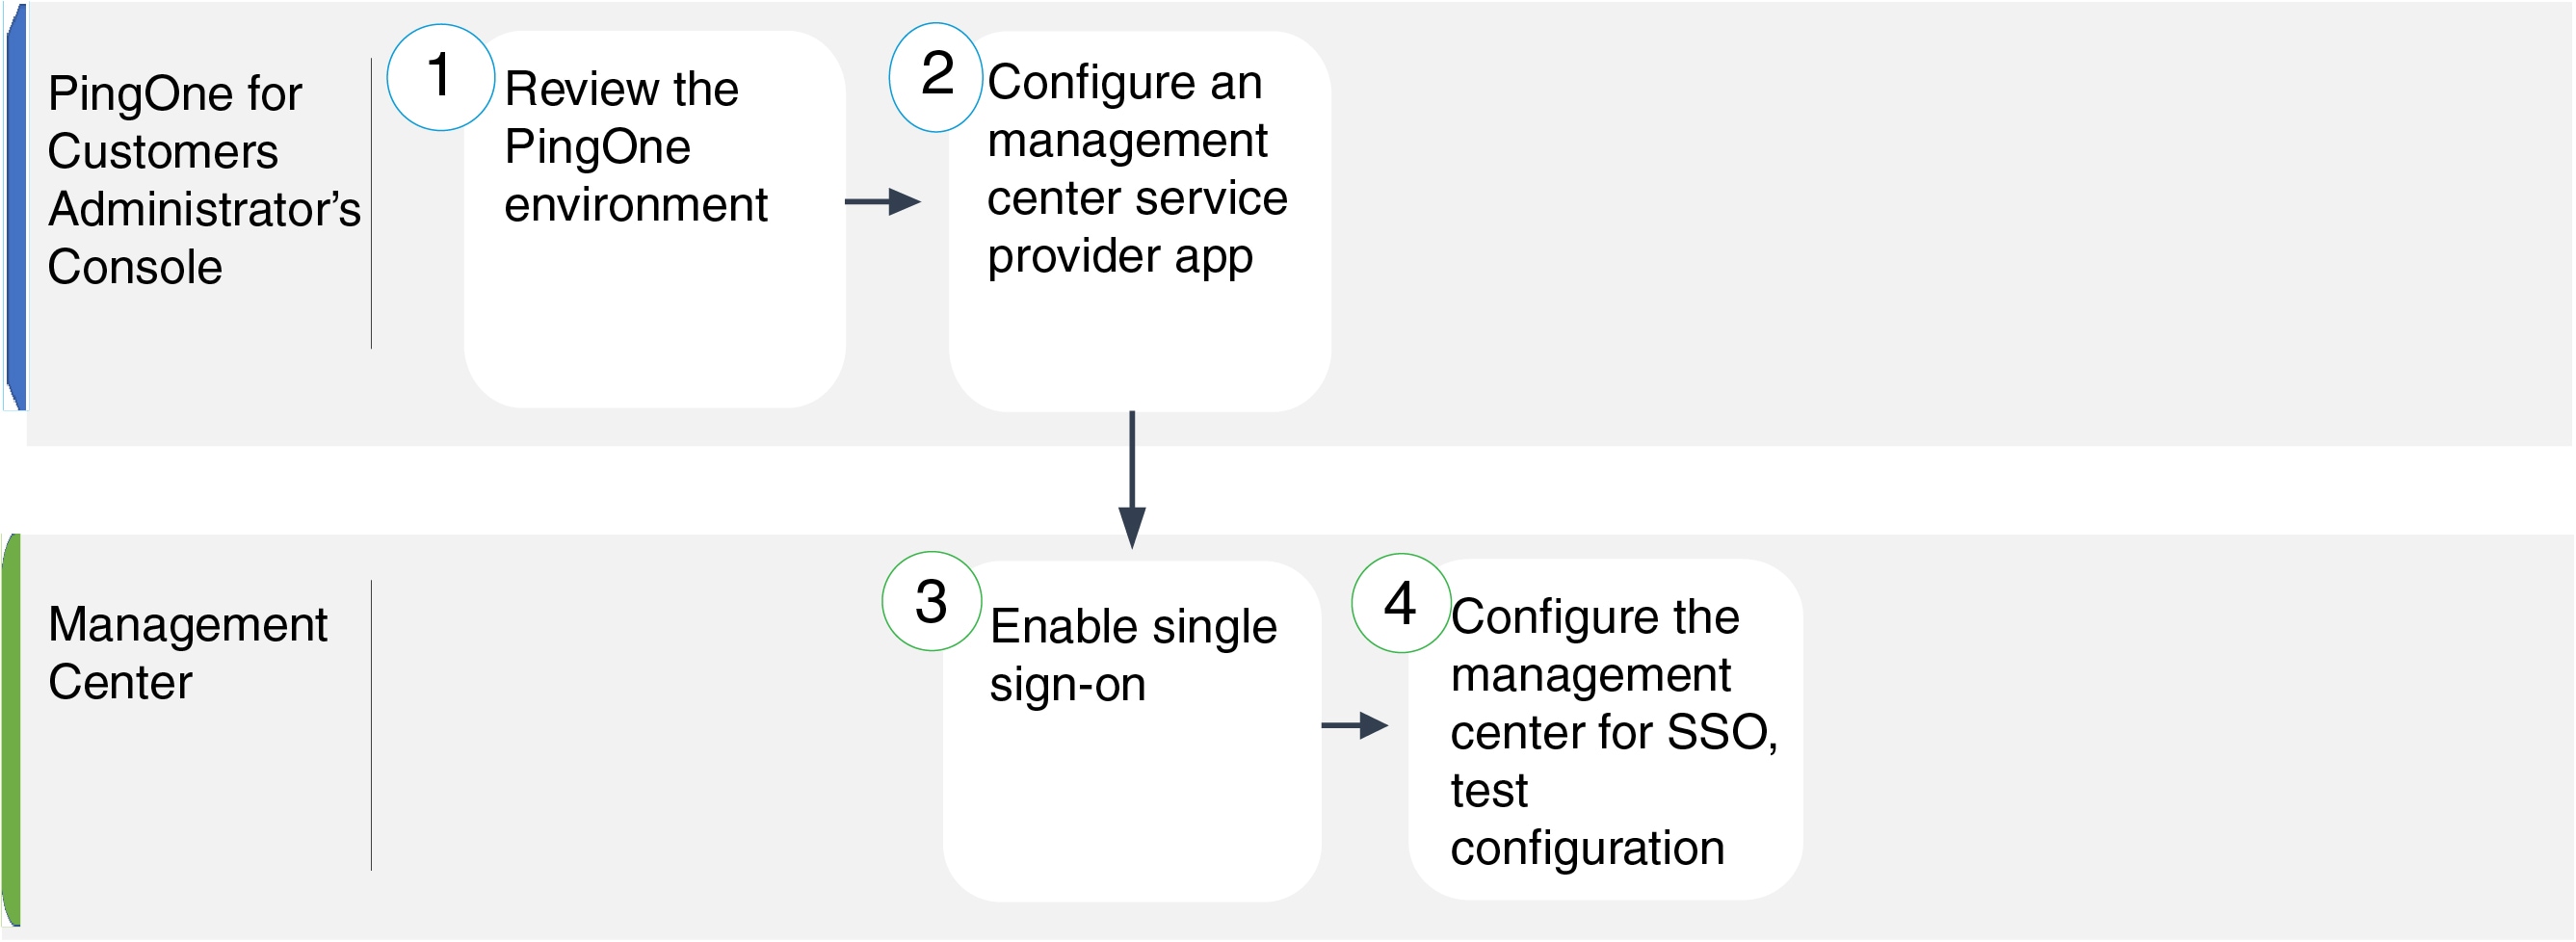
  • The Statistics Refresh Interval controls the refresh interval for event summary pages such as the Intrusion Event Statistics and Discovery Statistics pages. Entering 0 disables the refresh option. Note that this interval does not apply to dashboards.

  • The Deactivate Rules field controls which links appear on the packet view of intrusion events generated by standard text rules:

    • All Policies: a single link that deactivates the standard text rule in all the locally defined custom intrusion policies

    • Current Policy: a single link that deactivates the standard text rule in only the currently deployed intrusion policy. Note that you cannot deactivate rules in the default policies.

    • Ask: links for each of these options

  • To view these links on the packet view, your user account must have either Administrator or Intrusion Admin access.

Configure file download preferences

Use the File Preferences section of the Event View Settings page to configure basic characteristics of local file downloads. This section is only available to users with the Administrator, Security Analyst, or Security Analyst (Read Only) user roles.

If your appliance does not support downloading captured files, these options are disabled.

These fields appear in the File Preferences section:

  • The Confirm ‘Download File’ Actions check box determines whether a File Download pop-up window appears when you download a file. The pop-up displays a warning and prompts you to continue or cancel.


    Caution


    Cisco recommends that you avoid downloading malware because it can cause harmful effects. Always use caution when downloading files. Files may contain malware, so secure your download destination by taking precautions before downloading files.


    You can disable this option whenever you download a file.

  • When you download a captured file, the system creates a password-protected .zip archive containing the file. The Zip File Password field defines the password you want to use to restrict access to the .zip file.

    If you leave this field blank, the system creates archive files without passwords.

  • The Show Zip File Password check box toggles displaying plain text or obfuscated characters in the Zip File Password field. When this field is cleared, the Zip File Password displays obfuscated characters.

Default time windows

A default time window is a time constraint setting that

  • controls the default behavior of event views by limiting events to a specified time range

  • allows users to manually change the time window for individual event views during event analysis, and

  • resets to the defaults configured on the Event View Settings page at the start of each session.

User access and event types for default time windows

User-role access to the Default Time Windows section varies:

  • Administrators and Maintenance Users can access the full section.

  • Security Analysts and Security Analysts (Read Only) can access all options except Audit Log Time Window.

  • Access Admins, Discovery Admins, External Database Users, Intrusion Admins, Network Admins, and Security Approvers can access only the Events Time Window option.

Time window settings are valid only for the current session. When you log out and log back in, time windows reset to the defaults configured on the Event View Settings page.

There are three types of events for which you can set the default time window:

  • The Events Time Window sets a single default time window for most events that can be constrained by time.

  • The Audit Log Time Window sets the default time window for the audit log.

  • The Health Monitoring Time Window sets the default time window for health events.

You can set time windows only for the event types your user account can access. All user types can set event time windows. Administrators, Maintenance Users, and Security Analysts can set health monitoring time windows. Administrators and Maintenance Users can set audit log time windows.

Time window settings do not affect event views that display hosts, host attributes, applications, clients, vulnerabilities, user identity, or compliance allow list violations.

Configuration options for time windows:

You can use Multiple time windows, one for each event type, or a Single time window that applies to all events. If you use a single time window, the settings for the three types of time window disappear, and a new Global Time Window setting appears.

There are three types of time window:

  • static, which displays all the events generated from a specific start time to a specific end time.

  • expanding, which displays all the events generated from a specific start time to the present; as time moves forward, the time window expands and new events are added to the event view.

  • sliding, which displays all the events generated from a specific start time (for example, one day ago) to the present; as time moves forward, the time window “slides” so that you see only the events for the range you configured (in this example, for the last day).

The maximum time range for all time windows is from midnight on January 1, 1970 (UTC) to 3:14:07 AM on January 19, 2038 (UTC).

Time window settings options in the Time Window Settings drop-down list:

  • The Show the Last - Sliding option allows you to configure a sliding default time window of the length you specify.

    The appliance displays all the events generated from a specific start time (for example, 1 hour ago) to the present. When you change event views, the time window updates, so you always see events from the last hour.

  • The Show the Last - Static/Expanding option allows you to configure either a static or expanding default time window of the length you specify.

    For static time windows, enable the Use End Time check box. The appliance displays all the events generated from a specific start time (for example, 1 hour ago) to the time when you first viewed the events. As you change event views, the time window stays fixed so that you see only the events that occurred during the static time window.

    For expanding time windows, disable the Use End Time check box. The appliance displays all the events generated from a specific start time (for example, 1 hour ago) to the present. When you change event views, the time window expands to the present time.

  • The Current Day - Static/Expanding option allows you to configure either a static or expanding default time window for the current day. The current day begins at midnight, based on the time zone setting for your current session.

    For static time windows, enable the Use End Time check box. The appliance displays all the events generated from midnight to the time you first viewed the events. As you change event views, the time window stays fixed, so you see only the events that occurred during the static time window.

    For expanding time windows, disable the Use End Time check box. The appliance displays all the events generated from midnight to the present. As you change event views, the time window expands to the present time. If your analysis continues for over 24 hours before you log out, this time window can extend beyond 24 hours.

  • The Current Week - Static/Expanding option allows you to configure either a static or expanding default time window for the current week. The current week starts at midnight on the previous Sunday, based on your session’s time zone setting.

    For static time windows, enable the Use End Time check box. The appliance displays all the events generated from midnight to the time when you first viewed the events. As you change event views, the time window stays fixed so that you see only the events that occurred during the static time window.

    For expanding time windows, disable the Use End Time check box. You see all events generated from midnight Sunday to the present. When you change event views, the time window expands to the current time. If you analyze events for more than one week before logging out, this time window can extend beyond one week.

Default time window configuration example

For example, an administrator can configure a sliding time window to display events from the last hour, or set a static time window for the current day to review events that occurred during a specific period.

Non-constrained event views

Event views that display hosts, host attributes, applications, clients, vulnerabilities, user identity, or compliance allow list violations are not affected by time window settings.

Time window analogy

A default time window is like a filter that limits the events you see to a specific period, similar to viewing only the most recent messages in an email inbox.

Default workflows

A default workflow is a predefined workflow that

  • is configured by the appliance for each event type

  • determines which workflow is displayed when viewing events of a specific type, and

  • can be changed based on user role permissions.

Default workflow configuration and behavior

The appliance provides a default workflow for each event type. This workflow defines how event data is presented to you.

  • Each event type has at least one predefined workflow.

  • For intrusion events, you see the Events by Priority and Classification workflow by default.

  • When you view intrusion events, the appliance automatically displays the default workflow.

You can change the default workflow for each event type. However, your user role determines whether you can configure these defaults. If you are an intrusion event analyst, you cannot set default discovery event workflows.

Default workflow example

For example, as a Security Analyst, you can choose among ten different intrusion event workflows, each presenting intrusion event data differently. The appliance displays the Events by Priority and Classification workflow by default when you view intrusion events.

Set your default time zone

Set your default time zone so that all times shown in the web interface for your user account reflect your local time preferences. This helps you view scheduled tasks and dashboards in your preferred time zone.

This setting determines the times displayed in the web interface for your user account, such as for task scheduling and dashboard viewing. It does not change the system time, affect other users, or modify data stored in the system, which generally uses UTC.

  • The Time Zone function in User Preferences assumes that the system clock is set to UTC. Do not change the system time. Changing the system time from UTC is not supported and will require reimaging the device to recover from an unsupported state.

  • This feature does not affect the time zone used for time-based policy application. Set the time zone for a device in Devices > Platform Settings.

Before you begin

Follow these steps to set your default time zone:

Procedure


Step 1

From the drop-down list under your user name, choose User Preferences.

Step 2

Click the TIME Zone drop-down list.

Step 3

Choose the continent or country and the state name that corresponds with the time zone you want to use.


After completing these steps, your user account will display times in the web interface according to your selected time zone. System time and other users are not affected.

Specify your default dashboard

Configure your default dashboard to personalize your workspace and enable quicker access to the most relevant widgets and data for your role.

The default dashboard appears when you choose Overview > Dashboards heading > Dashboard. Unless changed, the default dashboard for all users is the Summary dashboard.

In a multidomain deployment, the default dashboard you select applies to every domain your account can access. If your account frequently accesses multiple domains, note that some dashboard widgets are only available in specific domains.

Before you begin

Your user role must be Administrator, Maintenance, or Security Analyst to change the default dashboard. Ensure you have access to the User Preferences menu.

Follow these steps to specify your default dashboard:

Procedure


Step 1

From the drop-down list under your user name, choose User Preferences.

Step 2

Click Dashboard Settings.

Step 3

Choose the dashboard you want to use as your default from the drop-down list.

Step 4

Click Save.


Your selected dashboard appears by default when you access the system and displays your preferred widgets and information.

Configure How-To settings

Configure the How To widget to enable guided walkthroughs for tasks in Secure Firewall Management Center. The widget helps users complete tasks efficiently by providing step-by-step instructions on various UI screens.

The How To widget provides walkthroughs to help you navigate and complete tasks on the Firewall Management Center. Walkthroughs guide you through each step, regardless of the UI screens involved. The How To widget is enabled by default.

For a list of feature walkthroughs supported in the Firewall Management Center, refer to Feature Walkthroughs Supported in Secure Firewall Management Center.

  • Walkthroughs are generally available for all UI pages and are not specific to user roles. However, some menu items may not be visible if user privileges restrict access. Walkthroughs will not execute on those pages.

  • This feature is not available in the Classic theme.

Before you begin

Follow these steps to configure How-To settings:

Procedure


Step 1

From the drop-down list under your user name, choose User Preferences.

Step 2

Click the How-To Settings tab.

Step 3

Check the Enable How-Tos check box to enable How-Tos.

Step 4

Click Save.


After completing these steps, the How To widget will be configured and enabled, allowing users to access guided walkthroughs for supported tasks in the Secure Firewall Management Center.

What to do next

To open the How To widget, choose Help (help icon) > On-screen Assistance > How-Tos. You can search for How To walkthroughs to find tasks relevant to your needs. For more information, refer to Search for how to walkthroughs.

History for Firewall Management Center user accounts

This reference lists the history of features, enhancements, and changes for Firewall Management Center user accounts, including version numbers and details for each update.

This table lists features, enhancements, and changes for user accounts.

Feature

Minimum Firewall Management Center

Minimum Firewall Threat Defense

Details

Granular permissions for modifying access control policies and rules

7.4.0

Any

You can define custom user roles to differentiate the intrusion configuration in access control policies and rules from the rest of the access control policy and rules. With these permissions, your network administration team and your intrusion administration teams can have distinct responsibilities.

When defining user roles, you can select the Policies > Access Control > Access Control Policy > Modify Access Control Policy > Modify Threat Configuration option to allow the selection of intrusion policy, variable set, and file policy in a rule. You can also configure the advanced options for Network Analysis and Intrusion Policies, configure the Security Intelligence policy for the access control policy, and set intrusion actions in the policy default action. You can use the Modify Remaining Access Control Policy Configuration to control the ability to edit all other aspects of the policy. Predefined user roles that include the Modify Access Control Policy permission continue to support all sub-permissions. To apply granular permissions, create your own custom roles.

Added new field for assigning Shell user name template

7.0.0

Any

The Shell User Name Template field provides a template for CLI access attributes for LDAP external authentication. This field uniquely identifies LDAP CLI users.

New or modified screens:

System > Users > External Authentication.

Added support for Single Sign-On with any SAML 2.0–compliant SSO provider

6.7.0

Any

Added the ability to support Single Sign-On for external users configured at any third-party SAML 2.0-compliant identity provider (IdP). This allows mapping user or group roles from the IdP to Firewall Management Center user roles.

Only users with the Admin role authenticated internally or by LDAP or RADIUS can configure SSO.

New or modified screens:

System > Users > Single Sign-On.

Themes for the web interface

6.6.0

Any

You can choose the look and feel of the web interface. You can choose the Light, Dusk, or Classic theme for the web interface.

New or modified screens:

User name > User Preference > General > UI Theme.

Added a new field for name in user accounts

6.6.0

Any

You can use the new field to identify the user or department responsible for an internal user account.

New or modified screens:

System > Users > Users > Real Name field.
Cisco Security Manager Single Sign-on no longer supported 6.5.0

Any

Single Sign-on between the Firewall Management Center and Cisco Security Manager is no longer supported as of Firepower 6.5.

New or modified screens:

System > Users > CSM Single Sign-on.

Enhanced password security

6.5.0

Any

New requirements for strong passwords now appear in a single place in this chapter and are cross-referenced from other chapters.

The change password interface includes new fields: Show Password and Generate Password.

New or modified screens:

User name > User Preferences > General > Change password.