Walkthroughs Supported in Secure Firewall Management Center

The walkthroughs guide you to perform the steps required to achieve a task by taking you through each step, one after the other, to complete the task. To view the walkthroughs, on the management center menu bar, choose Help > How-Tos. You can use the global search feature of the management center to quickly find walkthroughs of your interest. Search for the walkthrough title or terms in the walkthrough title for better search results. 
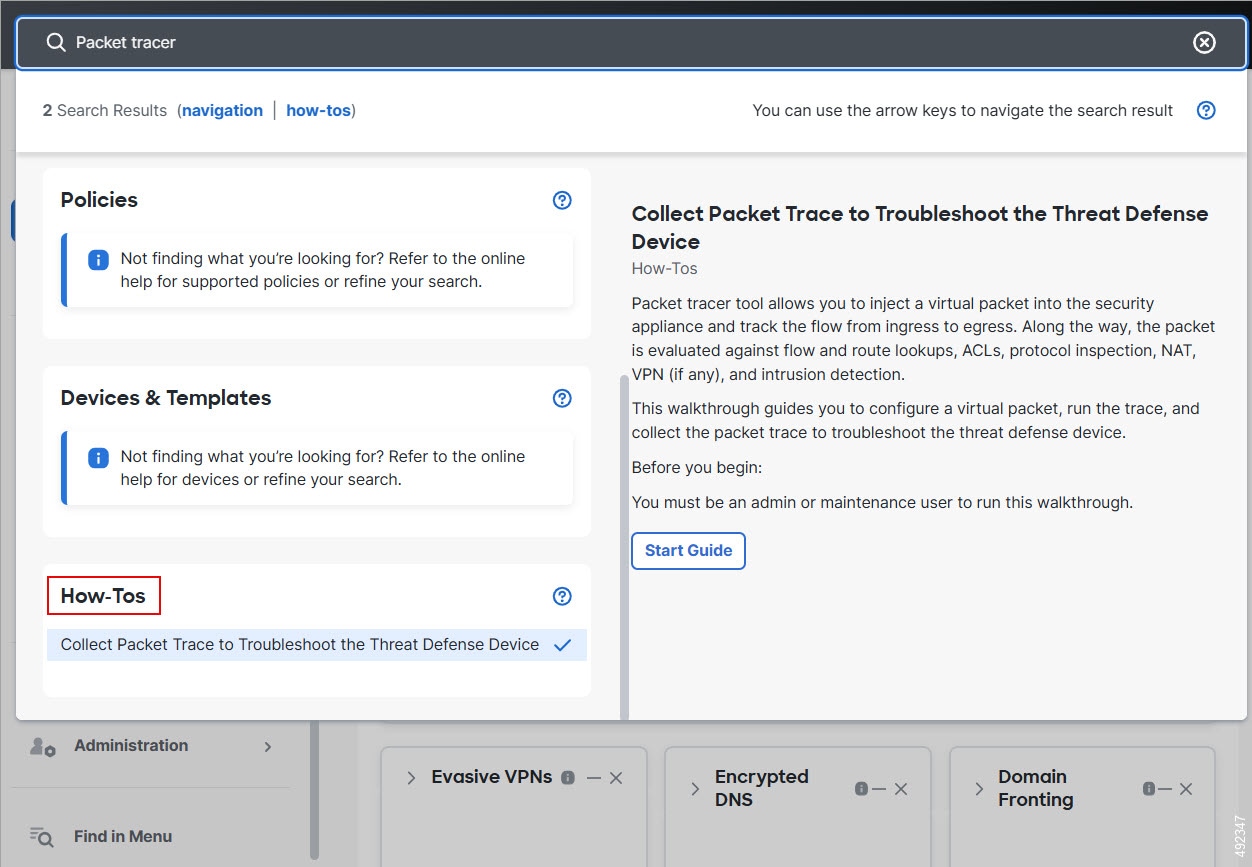
For more information about searching and finding walkthroughs of your interest in the management center, see Search for How To Walkthroughs.

The following is the list of feature walkthroughs supported in the management center:

Version

Use case

Walkthrough Title

7.4.1 and later

Configure SD-WAN capabilities

  • Configure Direct Internet Access with Path Optimization for Applications

  • Secure Branch-to-Hub Communication Using Dynamic Virtual Tunnel Interface

Manage your chassis
  • Register a Chassis with the Management Center

  • Create a Chassis Platform Settings Policy

  • Add a Secure Firewall Threat Defense Instance in the Chassis

Configure External Authentication

7.4.0 and later

Configure a Site-to-Site VPN Topology with Dynamic VTI

  • Create a Route-Based Site-To-Site VPN with Dynamic VTI

  • Create a Virtual Router

  • Assign Interfaces to the Virtual Router

  • Configure a BGP Routing Policy for a Site-to-Site VPN with Dynamic VTI

  • Add an Access Control Rule to Allow VTI Traffic

Loopback Support for BGP Routing

  • Create a Loopback Interface

  • Configure Loopback Interface as Source for the BGP Neighbor

Snort 3 IPS – A Feature Walkthrough

  • View the Base Policy Layer

  • Customize the Base Policy Using Rule Overrides

  • Customize the Base Policy Using Group Overrides and Recommendations

  • View the Summary Layer

Working with Snort 3

Convert all Snort 2 Custom Rules to Snort 3

7.3.0 and later

Configuring VPN

  • Renew a Certificate Using Manual Re-Enrollment

  • Renew a Certificate Using Self-Signed, SCEP, or EST Enrollment

  • Configure LDAP Attribute Map for Remote Access VPN

  • Add SAML Single Sign-On Server Object

  • Configure Dynamic Access Policy for Remote Access VPN

Configure Dynamic Access Policy for Remote Access VPN

  • Create a Dynamic Access Policy

  • Create a Dynamic Access Policy Record

  • Associate Dynamic Access Policy with Remote Access VPN

Configure Decryption Policies

  • Create a Decryption Policy and Decrypt–Resign Rules

  • Create a Decryption Policy and Decrypt–Known Key Rules

Troubleshoot Your Device

  • Collect packet capture for Threat Defense device

  • Collect Packet Trace to Troubleshoot Threat Defense Device

7.2.0 and later

The New Access Control Policy UI–A Feature Walkthrough

  • Accessing the New AC Policy UI

  • The New AC Policy UI–Rules Table

  • The New AC Policy UI–Rule Creation

  • The New AC Policy UI–Rule Editing

Working with Snort 3

  • Convert Devices from Snort 2 to Snort 3

  • Edit the Default Discovery Rule to Identify the Hosts in the Network

  • Configure Secure Firewall Recommended Rules

  • Synchronize the Snort 2 Rules Changes with Snort 3

Configure User Identity–Dynamic Objects

  • Configure Dynamic Objects

  • Configure an Access Control Policy Rule for a Dynamic Object

Create and Install an Identity Certificate on Device for Remote Access VPN Configuration

  • PKCS12 Cert Enrollment Object

  • Manual Cert Enrollment Object

  • Self-signed Cert Enrollment Object

  • SCEP Cert Enrollment Object

  • Install Manual Certificate

  • Install PKCS12, SCEP, or Self-Signed Certificate

  • Configure Remote Access VPN

7.1.0 and later

Working with Snort 3

  • Create a Snort 3 Intrusion Policy

  • Enable or Disable Snort 3 on an Individual Device

  • Create a Snort 3 Network Analysis Policy

  • View the Network Analysis Policy Mapping

Create and Manage a Cluster

  • Create a Cluster

  • Modify an Existing Cluster

  • Add Nodes to an Existing Cluster

  • Remove a Data Node from a Cluster

  • Break a Cluster

  • Delete a Cluster

  • Break a Node from Clustering

  • Delete a Data Node from Clustering

Change the Management Center Access Interface from Management to Data

  • Initiate the Interface Migration from Management to Data Interface

  • Enable Management Center Access on an Interface

  • Configure Dynamic DNS

  • Deploy Configuration Changes

  • Update the Hostname or IP Address in the Management Center

  • Confirm the Management Connection Status

Change the Management Center Access Interface from Data to Management

  • Initiate the Interface Migration from Data to Management Interface

  • Deploy Configuration Changes

  • Update the Hostname or IP Address in FMC

  • Check the Management Connection Status

Upgrade Secure Firewall Threat Defense

  • 7.0.0

  • 7.1.0

Enabling the SecureX Ribbon

7.0.0 and later

Add a Device to Management Center Using Remote Branch Deployment

  • Set up a Device and Discover it in the Management Center using Remote Branch Deployment

  • Verify the Remote Branch Deployment Configuration Details

6.7.0 and later

Set Up Your Device

  • Register the Management Center with Cisco Smart Account

  • Set up a Device and add it to Management Center

  • Configure Date and Time

  • Configure Interface Settings

  • Create an access control policy

  • Configure Static Routing

  • Add an Access Control Rule–A Feature Walkthrough

  • Create a NAT Policy–A Feature Walkthrough

  • Create a high availability (HA) pair

Configure network discovery policies

  • Customize your Network Discovery Policy

  • Enable Indications of Compromise Rules in the Network Discovery Policy

  • View Network Maps To Evaluate the Efficacy of Your Network Discovery Policy

Create a Decryption Policy With One or More Do Not Decrypt Rules (formerly known as Create an SSL Do Not Decrypt Policy)

  • Create a decryption policy

  • Create Do Not Decrypt rule

  • Associate the Decryption Policy With an Access Control Policy

  • Add an Access Control Rule for a Decryption Policy

Create a Decryption Policy With One or More Decrypt–Resign Rules (formerly known as Create an SSL Decrypt–Resign Policy)

  • Create an Internal Certificate Authority Object

  • Create a Decryption Policy With One or More Decrypt–Resign Rules

  • Associate the Decryption Policy With an Access Control Policy

  • Add an Access Control Rule for a Decryption Policy

Create a Decryption Policy With One or More Decrypt–Known Key Rules (formerly known as Create an SSL Decrypt–Known Key Policy)

  • Create an Internal Certificate Object

  • Create a Decryption Policy With One or More Decrypt–Known Key Rules

  • Associate the Decryption Policy With an Access Control Policy

  • Add an Access Control Rule for a Decryption Policy

Create a Decryption Policy With One or More Block Rules (formerly known as Create an SSL Decrypt–Known Key Policy)

  • Create a Decryption Policy

  • Create One or More Block or Block With Reset Rules

  • Associate the Decryption Policy With an Access Control Policy

  • Add an Access Control Rule for a Decryption Policy

Create Intrusion Policies

  • Create a Snort 2 Intrusion Policy

  • Associate an Intrusion Policy With an Access Control Rule

Create File (Malware) Policies

  • Create a File-Based Control Policy Using Advanced Malware Protection (AMP)

  • Associate a File (Malware) Policy to an Access Control Policy

Create an Identity Policy Using the ISE/ISE-PIC Identity Source

  • Create an Identity Realm and Directories

  • Create an Identity Realm Sequence

  • Create an Internal Certificate Object

  • Create a Trusted Certificate Authority Object

  • Create the ISE/ISE-PIC Identity Source

  • Create an Identity Policy

  • Create an Identity Rule

  • Associate the Identity Policy With an Access Control Policy

  • Add an Access Control Rule for an Identity Policy

Create an Identity Policy Using the TS Agent Identity Source

  • Create an Identity Realm and Directories

  • Create an Identity Realm Sequence

  • Create the TS Agent User and Role

  • Create an Identity Policy

  • Create an Identity Rule

  • Associate the Identity Policy With an Access Control Policy

  • Add an Access Control Rule for an Identity Policy

Configure and Customize Site-to-Site VPN

  • Configure a Policy-Based Site-to-Site VPN

  • Customize IKE Options for an Existing Site-to-Site VPN Deployment

  • Customize IPsec Options for an Existing Site-to-Site VPN Deployment

  • Customize Advanced Settings for an Existing Site-to-Site VPN Deployment

Certificate Authentication for Remote Access (RA) VPN

  • Creating a Certificate Map for Certificate Authentication in RA VPN

  • Associating a Certificate Map to a Connection Profile

Configuring Traffic Filtering for Remote Access (RA) VPN Connections

  • Creating an Extended Access List for Filtering Traffic on an RA VPN Connection

  • Adding an Extended Access List to a Group Policy for Filtering Traffic on an RA VPN Connection

Configure a VTI tunnel

  • Create a Route-based VPN (VTI)

  • Configure a Static Route for VTI

  • Configure BGP Routing for VTI

  • Configure an Access Control Rule To Allow Encrypted Traffic Over VTI

Configure Virtual Routing for Secure Firewall Threat Defense

  • Create a Virtual Router

  • Assign Interfaces to Virtual Routers

  • Configure Routing Policy

  • Configure NAT for a Virtual Router

  • Provide Internet Access with Overlapping Address Spaces

  • Configure SSL Cipher Suites

  • Switch to Classic or Dusk Theme