Introduction to Secure Connectors
A secure connector is a connector instance that runs in your network or supported cloud environment and provides a secure communication path between Security Cloud Control Firewall Management and managed resources. Secure connectors help Security Cloud Control Firewall Management manage devices that are not directly reachable from the internet and support event forwarding for logging and analytics workflows.
Use the Secure Connectors page to view, deploy, and manage connector instances for your tenant.
Secure connector types
The Secure Connectors page can include these connector types.
-
Secure Device Connector (SDC): Provides a secure communication path between Security Cloud Control Firewall Management and supported managed devices.
-
Secure Event Connectors (SEC): Receives events from supported devices and forwards the events to the Cisco cloud for logging and analytics.
About Secure Device Connector
A Secure Device Connector (SDC) is an intelligent proxy that lets Cisco devices communicate with Security Cloud Control Firewall Management when the devices are not directly reachable from the internet. When you onboard a device by using device credentials, you can deploy an SDC in your network to proxy communication between the device and Security Cloud Control Firewall Management.If the device is directly reachable from the internet, you can allow direct communication through the device's outside interface instead of using an SDC. The SDC performs these functions:
-
Monitors Security Cloud Control Firewall Management for commands and messages for your managed devices.
-
Executes commands on behalf of Security Cloud Control Firewall Management.
-
Relays messages to your managed devices.
-
Returns device responses.
Communication between the SDC and Security Cloud Control Firewall Management uses HTTPS with TLS 1.3 and AES-128-GCM. Credentials for onboarded devices and services are encrypted from the browser to the SDC and are encrypted at rest by using AES-128-GCM. Only the SDC has access to those credentials.
A user with the Super Administrator role is required to create a Secure Device Connector or a Secure Event Connector (SEC).
You can onboard these devices to Secure Device Connector through an SDC:
-
Secure Firewall ASA
-
On-Premises Firewall Management Center using credentials method
-
Meraki MX devices
-
Generic SSH devices
-
Cisco IOS devices
Secure Firewall Threat Defense devices that are managed by Cloud-Delivered Firewall Management Center do not require an SDC and do not support onboarding through proxies. Ensure that these devices have proper DNS settings and outbound internet connectivity so they can connect to Cloud-Delivered Firewall Management Center.
See Allow inbound access for direct cloud connectivity for information explaining how to allow communication between an SDC and Security Cloud Control.
For more information, refer to Deploy a VM for Running the Secure Device Connector and Secure Event Connector.
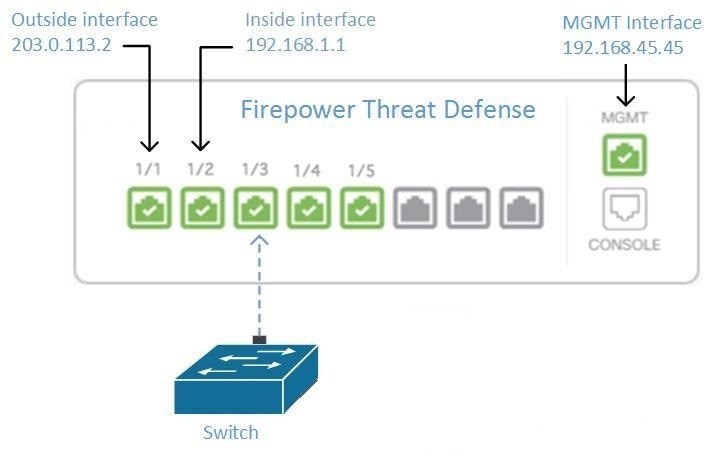
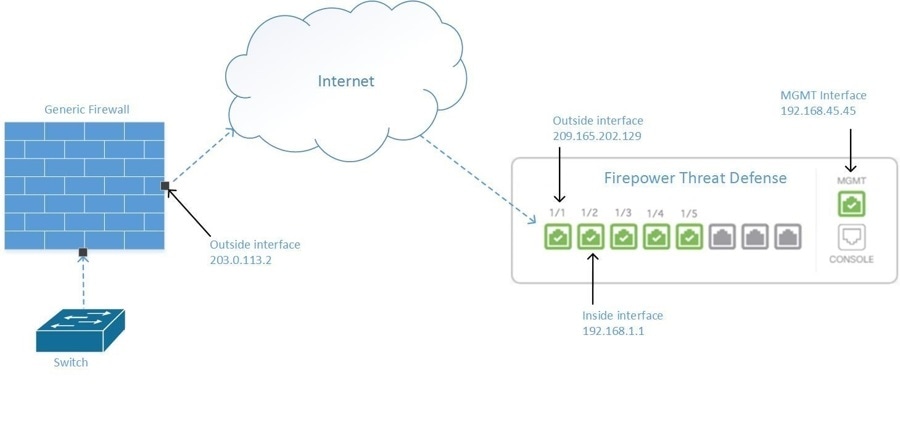
Plan device connectivity
Security Cloud Control Firewall Management connects to managed devices either through the cloud connector or through an SDC.
|
Connection method |
Use when |
Required network access |
|---|---|---|
|
Direct cloud connector |
The device is directly reachable from the internet. |
Allow inbound access from the Security Cloud Control Firewall Management IP addresses for your cloud region on port 443, or on the port that you use for device management. |
| SDC |
The device is not directly reachable from the internet, or the source explicitly requires an on-premises SDC. |
Allow full inbound access from the SDC host on port 443, or on the port that you use for device management. Ensure that the SDC VM can reach the device management interface. |
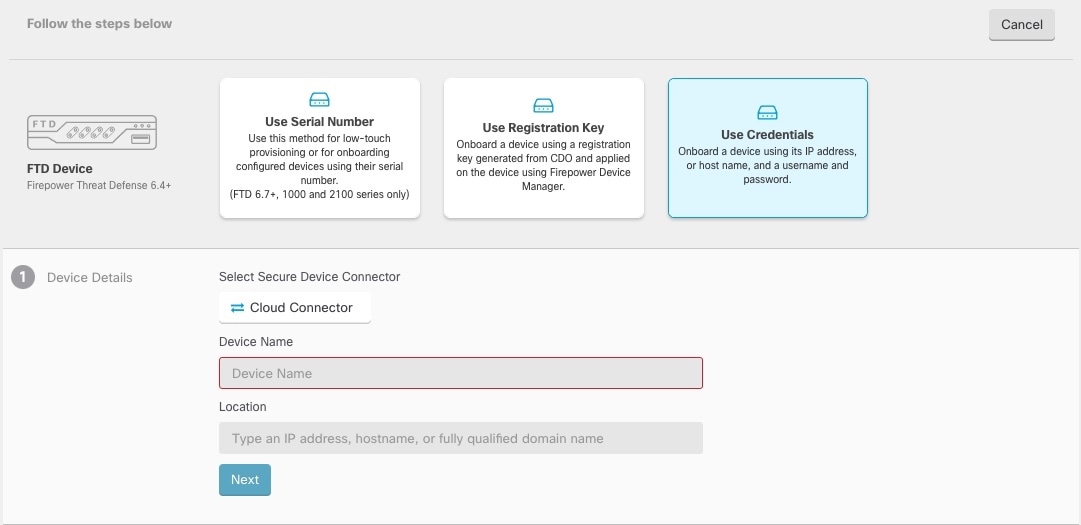
An FDM-managed device can be onboarded to Security Cloud Control Firewall Management by using device credentials, a registration key, or its serial number whether it is directly accessible from the internet. If the device does not have direct internet access, but it resides on a network that does, the Security Services Exchange connector that is delivered as part of the device can reach the Security Services Exchange cloud and allow the FDM-managed device to be onboarded.
The source explicitly states that you need an on-premises SDC to onboard the following:
-
An ASA device that is not accessible from the cloud
-
An FDM-managed device that is not accessible from the cloud when you use the credentials onboarding method
-
A Cisco IOS device
-
A device with SSH access.
All other devices and services do not require an on-premises SDC because Security Cloud Control Firewall Management connects by using its cloud connector.
Allow inbound access for direct cloud connectivity
Security Cloud Control connects to the devices that it manages through the cloud connector or through an (SDC).
When you connect Security Cloud Control Firewall Management directly to a device through the cloud connector, allow inbound access on port 443, or on the port that you have configured for device management, from the IP addresses for your region.
|
Region |
URL |
Allow inbound access from |
|---|---|---|
|
Asia-Pacific-Japan (APJ) |
54.199.195.111, 52.199.243.0 |
|
|
Australia (AUS) |
13.55.73.159, 13.238.226.118 |
|
|
Europe, Middle East, and Africa (EMEA) |
35.157.12.126, 35.157.12.15 |
|
|
India (IN) |
35.154.115.175 13.201.213.99 |
|
|
United States (US) |
52.34.234.2 52.36.70.147 |
Plan SDC capacity and host requirements
Each Security Cloud Control Firewall Management organization can have an unlimited number of SDCs. An SDC belongs to one organization only and is not shared across organizations.For deployment planning, one SDC is expected to support approximately 500 devices. Actual capacity depends on the features enabled on those devices and the size of their configuration files.
Deploying more than one SDC lets you:
-
Scale device management without performance degradation.
-
Place SDCs in isolated network segments while keeping the devices in the same Security Cloud Control Firewall Management organization.
-
Run multiple SDCs on one host by following the bootstrap procedure for each additional SDC.
The first SDC name includes the tenant name and the number 1. Each additional SDC is numbered in sequence.
Deploy a VM for Running the Secure Device Connector and Secure Event Connector
When using device credentials to connect Security Cloud Control to a device, it is a best practice to download and deploy an SDC in your network to manage the communication between Security Cloud Control and the device. Typically, these devices are nonperimeter based and do not have a public IP address, or have an open port to the outside interface.
The SDC monitors Security Cloud Control for commands that need to be executed on your managed devices, and messages that need to be sent to your managed devices. The SDC executes the commands on behalf of Security Cloud Control, sends messages to Security Cloud Control on behalf of the managed devices, and returns replies from the managed devices to Security Cloud Control.
The number of devices a single SDC can manage depends on the features that are implemented on those devices and the size of their configuration files. To plan your deployment, however, we expect one SDC to support approximately 500 devices. For more information, see Using Multiple SDCs on a Single Security Cloud Control Tenant.
This procedure describes how to install an SDC in your network, using Security Cloud Control's VM image. This is the recommended and most reliable way to create an SDC.
Before you begin
-
Security Cloud Control requires strict certificate checking and does not support Web or Content Proxy inspection between the Secure Device Connector (SDC) and the internet. If using a proxy server, disable inspection for traffic between the SDC and Security Cloud Control.
-
The SDC must have full outbound access to the internet on TCP port 443, or the port you have configured for device management.
-
The devices that are managed by Security Cloud Control must allow inbound traffic from the SDC VM’s IP address.
-
Review Connect Allow inbound access for direct cloud connectivity to the Secure Device Connector to ensure proper network access.
-
If you are using a proxy on your network, ensure that you have all the required details before running the host setup command. Most of the issues are related to incorrect proxy configurations. Important details are:
-
The IP/hostname of your proxy.
-
Whether or not your proxy intercepts traffic and reencrypts it using its own cert. This detail is the cause of most of the complications with the SDC VM setup.
-
If your proxy does intercept traffic, have the root certificate ready when configuring the VM. You can paste it in when prompted so that the host and the SDC know to trust the certificates generated by your proxy.
-
If your proxy does not intercept traffic, then nothing else is required here.
-
-
The following items are most likely the same for proxied HTTP and HTTPS connections. However, if you use a different proxy for each protocol, you would need all of the following for each:
-
The IP address of your proxy
-
The port your proxy uses
-
Whether your proxy requires that the connection to the proxy itself be over HTTPS (typically not the case). For example, if the address of your proxy is listed as https://proxy.corp.com:80 then you would answer yes. If the listed address is http://proxy.corp.com:80 then you would answer no. Note that both URLs use port 80, but the protocol is different.
-
The authentication details of your proxy including:
-
Whether your proxy requires auth (most do not)
-
If yes, then you’ll need the username and password available when you configure the host.
-
-
-
Supported Installations
-
Security Cloud Control supports installing its SDC VM OVF image using the vSphere web client or the ESXi web client.
-
Security Cloud Control does not support installing the SDC VM OVF image using the vSphere desktop client.
-
Security Cloud Control supports installing the SDC on your own Ubuntu instance. Versions 20LTS - 24LTS are currently supported.
-
ESXi 5.1 hypervisor.
System Requirements
-
System requirements for a VM with one SDC:
-
2 vCPUs
-
2 GB of memory
-
64 GB of disk space
-
-
Each SDC you add to your host requires an additional 1 vCPU and 1 GB of RAM.
-
System requirements for a VM with one SEC (a component that is used in Cisco Security Analytics and Logging):
-
4 vCPUs minimum
-
8 GB of memory
-
-
Each SEC you add to the host requires doubling its resources, therefore, these are the requirements for a VMware ESXi host with one SDC and one SEC:
-
6 vCPUs
-
10 GB memory
-
64 GB of disk space
-
Prepare for Installation
-
To configure networking manually on the host, gather the following information:
-
The static IP address that you want to use for your VM
-
The passwords to use for the
cdouser (or whichever user has sudo access) and the sdc user (the user under which Docker runs) -
The IP address of the DNS server your organization uses
-
The gateway IP address of the network the SDC address is on
-
The FQDN or IP address of your time/NTP server
-
-
The SDC virtual machine is configured to install security patches regularly and to do this, opening port 80 outbound is required.
If your network is using allow/deny lists for outbound connections, you need to allow connections to ubuntu.com so those security updates can be applied.

Note
Ubuntu secures its updates with checksums and only uses HTTP, not HTTPS. To pull security updates, you must allow HTTP connections to ubuntu.com.
Deploy the VM
There are two options for deploying the VM used to run the SDC and SEC.
-
Follow the steps below to download the VMware image provided by Security Cloud Control.
-
To deploy Ubuntu 20, 22, or 24 yourself. If deploying your own Ubuntu instance, you may skip the following section and proceed to the Configure the VM section.
Procedure
-
From the Security Cloud Control Home page, click Firewall.
-
In the left pane, click .
-
Select the Secure Connectors tab on the Services page, click the blue plus button, and select Secure Device Connector.
-
Click Download the SDC VM image. This opens in a new tab.
-
Extract all the files from the .zip file. They look similar to these:
-
CDO-SDC-VM-ddd50fa.ovf
-
CDO-SDC-VM-ddd50fa.mf
-
CDO-SDC-VM-ddd50fa-disk1.vmdk
-
-
Log in to your VMware server as an administrator using the vSphere Web Client.
Note
Do not use the ESXi Web Client.
Deploy the Secure Device Connector virtual machine from the OVF template by following the prompts.
-
When the setup is complete, power on the SDC VM.
-
Open the console for your new SDC VM.
-
Log in with the
cdousername. The default password isadm123.
Configure the VM
Now you are able to bring up the console for the VM image you deployed (or SSH into it if you rolled your own and enabled SSH), you should run the configuration script to get your host ready to run the SDC or SEC Docker container(s).
-
If you downloaded the Security Cloud Control-provided VM, the CLI is already installed, and you can proceed to step 2. If you have deployed your own VM, SSH into it and run the command to install the CLI:
curl -O https://s3.us-west-2.amazonaws.com/download.defenseorchestrator.com/sdc-cli/sdc-cli-package-latest.tgz && tar -xvf sdc-cli-package-latest.tgz && chmod +x ./install.sh && ./install.sh -
Start the host configuration by running the command:
sudo sdc host configure -
When prompted for the password, enter adm123 for the Security Cloud Control-provided VM or whatever admin password you chose for your own VM.
-
Follow the prompts to configure the
sdcuser. -
When prompted for the networking configuration, choose one of the following:
-
Manually configure this host with a static IP: If you want to specify the IP, gateway, DNS server, and so on, for this host and write it to the system config on the VM.
-
DHCP: If you have a DHCP server assigning static IPs to your VMs.
-
Static IP is already configured and I don't want to change my networking now.
-
-
When prompted, answer the questions about your proxy configuration. Review the detailed list at the top of this topic for all the prerequisites and potential proxy configuration options.
-
If you have configured a proxy, you will be prompted to reboot the VM for all the proxy settings to take effect. If you did not, you will not be prompted to reboot and you can move on to step 8.
-
Set a custom internet access test URL. You only need to do this if you deny all outbound connections by default. If you do, then specify a publicly accessible web url such at https://google.com that is on your allow list.
-
Install the latest security patches, some requires os tools and Docker server.
-
When prompted, indicate whether you want to have the script harden your SSH configuration.
If using our VM, proceed. If you are using your own VM and configuring SSH yourself, you may want to skip this step to avoid changing your current configuration.
-
When prompted to enable automatic updates for the SDC or SEC and the CLI itself, it is recommended that you do this to stay up to date with bug fixes, patches, and new features. If your policies prevent you from allowing automatic updates, see Update your Secure Device Connector.
Deploy a Secure Device Connector On Your VM
When using device credentials to connect Security Cloud Control to a device, it is a best practice to download and deploy a Secure Device Connector (SDC) in your network to manage the communication between Security Cloud Control and the device. Typically, these devices are non-perimeter based, do not have a public IP address, or have an open port to the outside interface. Adaptive Security Appliances (ASAs), FDM-managed devices, and Firepower Management Centers (FMCs) devices can all be onboarded to Security Cloud Control using device credentials.
The SDC monitors Security Cloud Control for commands that need to be executed on your managed devices, and messages that need to be sent to your managed devices. The SDC executes the commands on behalf of Security Cloud Control, sends messages to Security Cloud Control on behalf of the managed devices, and returns replies from the managed devices to Security Cloud Control.
The number of devices a single SDC can manage depends on the features implemented on those devices and the size of their configuration files. For the purposes of planning your deployment, however, we expect one SDC to support approximately 500 devices. See Use multiple Secure Device Connectors on one organization for more information.
This procedure describes how to install an SDC in your network by using your own virtual machine image.
Note |
The preferred, easiest, and most reliable way to install an SDC is to download Security Cloud Control's SDC OVA image and install it. |
Before you begin
-
Security Cloud Control requires strict certificate checking and does not support a Web/Content Proxy between the SDC and the Internet.
-
The SDC must have full outbound access to the Internecdot on TCP port 443 in order for it to communicate with Security Cloud Control.
-
Devices that reach Security Cloud Control through the SDC must allow inbound access from the SDC on port 443.
-
Review Connect to Security Cloud Control using Secure Device Connector for networking guidelines.
-
VMware ESXi host installed with vCenter web client or ESXi web client.
Note
We do not support installation using the vSphere desktop client.
-
ESXi 5.1 hypervisor.
-
Ubuntu 22.04 and Ubuntu 24.04 operating system.
-
System requirements for a VM with only an SDC:
-
VMware ESXi host needs 2 CPUs.
-
VMware ESXi host needs a minimum of 2 GB of memory.
-
VMware ESXi requires 64 GB disk space to support the virtual machine depending on your provisioning choice. This value assumes you are using Logical Volume Management (LVM) with the partition so you can expand required disk space as needed.
-
-
System requirements for a VM with an SDC and a single Secure Event Connector (SEC) for your tenant. (The SEC is a component used in Cisco Security Analytics and Logging).
Each SEC you add to the VMware ESXi host requires an additional 4 CPUs and an additional 8 GB of memory.
Therefore, these are the requirements for a VMware ESXi host with one SDC and one SEC:
-
VMware ESXi host needs 6 CPU.
-
VMware ESXi host needs a minimum of 10 GB of memory.
-
VMware ESXi requires 64 GB disk space to support the virtual machine depending on your provisioning choice.
-
-
After you have updated the CPU and memory on the VM, power on the VM and ensure that the Secure Connectors page indicates that the SDC is in the "Active" state.
-
Users performing this procedure should be comfortable working in a Linux environment and using the vi visual editor for editing files.
-
If you are installing your on-premise SDC on a CentOS virtual machine, we recommend you install Yum security patches on a regular basis. Depending on your Yum configuration, to acquire Yum updates, you may need to open outbound access on port 80 as well as 443. You will also need to configure yum-cron or crontab to schedule the updates. Work with your security-operations team to determine if any security policies need to change to allow you to get the Yum updates.
Note |
Before you get started: Do not copy and paste the commands in the procedure into your terminal window, type them instead. Some commands include an "n-dash" and in the cut and paste process, these commands can be applied as an "m-dash" and that may cause the command to fail. |
Procedure
|
Step 1 |
Log on to the Security Cloud Control tenant you are creating the SDC for. |
||
|
Step 2 |
From the Security Cloud Control Home page, click Firewall. |
||
|
Step 3 |
In the left pane, click . |
||
|
Step 4 |
On the Services page, select the Secure Connectors tab, click the blue plus button, and select Secure Device Connector. |
||
|
Step 5 |
Copy the bootstrap data in step 2 on the window to a notepad. |
||
|
Step 6 |
Install a CentOS 7 virtual machine with at least the following RAM and disk space allotted to the SDC:
|
||
|
Step 7 |
Once installed, configure basic networking such as specifying the IP address for the SDC, the subnet mask, and gateway. |
||
|
Step 8 |
Configure a DNS (Domain Name Server) server. |
||
|
Step 9 |
Configure a NTP (Network Time Protocol) server. |
||
|
Step 10 |
Install an SSH server on CentOS for easy interaction with SDC's CLI. |
||
|
Step 11 |
Run a Yum update and then install the packages: open-vm-tools, nettools, and bind-utils |
||
|
Step 12 |
Install the AWS CLI package; see https://docs.aws.amazon.com/cli/latest/userguide/awscli-install-linux.html.
|
||
|
Step 13 |
Install the Docker CE packages; see https://docs.docker.com/install/linux/docker-ce/centos/#install-docker-ce
|
||
|
Step 14 |
Start the Docker service and enable it to start on boot: |
||
|
Step 15 |
Create two users: |
||
|
Step 16 |
Set a password for the |
||
|
Step 17 |
Add the |
||
|
Step 18 |
When Docker is installed, there is a user group created. Depending on the version of CentOS/Docker, this may be called either "docker" or "dockerroot". Check the /etc/group file to see which group was created, and then add the sdc user to this group. |
||
|
Step 19 |
If the /etc/docker/daemon.json file does not exist, create it, and populate with the contents below. Once created, restart the docker daemon.
|
||
|
Step 20 |
If you are currently using a vSphere console session, switch over to SSH and log in with the |
||
|
Step 21 |
Change directories to /usr/local/CDO. |
||
|
Step 22 |
Create a new file called |
||
|
Step 23 |
The bootstrap data comes encoded in base64. Decode it and export it to a file
called Run the cat command to view the decoded data. The command and decoded data should look similar to this: |
||
|
Step 24 |
Run the following command to export the sections of the decoded bootstrap data to environment variables. |
||
|
Step 25 |
Download the bootstrap bundle from Security Cloud Control. |
||
|
Step 26 |
Extract the SDC tarball, and run the The SDC should now show "Active" in Security Cloud Control. |
What to do next
-
Return to Install a Secure Event Connector on an SDC Virtual Machine if you are installing a Secure Event Connector.
-
Return to Install Multiple SECs for your tenant, if you are installing your second or more Secure Event Connectors on your tenant.
Bootstrap a Secure Device Connector on the Deployed Host
Procedure
|
Step 1 |
From the Security Cloud Control Home page, click Firewall. |
|
Step 2 |
In the left pane, click . |
|
Step 3 |
On the Services page, select the Secure Connectors tab, click the + icon, and select Secure Device Connector. |
|
Step 4 |
Copy the bootstrap data in step 2 on the window to a notepad. |
|
Step 5 |
SSH into your VM using the admin user, typically |
|
Step 6 |
Switch to the |
|
Step 7 |
Bootstrap your new SDC using the command: |
|
Step 8 |
Select the version of the SDC you want to use. We have three options for the SDC version:
|
|
Step 9 |
The CLI pulls the container image and starts the SDC and you can validate that your SDC is active and operational on the user interface, and also on the host by running: |
Deploy a Secure Device Connector to vSphere Using Terraform
Before you begin
This procedure details how you can use the Security Cloud Control SDC Terraform module for vSphere in conjunction with the Security Cloud Control Terraform Provider to deploy an SDC to your vSphere. Ensure you review the following prerequisites before attempting to perform this task procedure:
-
You have vSphere datacenter version 7 and above
-
You have an admin account on the datacenter with permissions to do the following:
-
Create VMs
-
Create folders
-
Create content libraries
-
Upload files to content libraries
-
-
Terraform knowledge
Procedure
|
Step 1 |
Create an API-only user in Security Cloud Control and copy the API token. To know how to create an API-only user, see Create API Only Users. |
|
Step 2 |
Configure the Security Cloud Control Terraform provider in your Terraform repository by following the instructions in Security Cloud Control Terraform Provider. Example: |
|
Step 3 |
Write Terraform code to create a Example:The |
|
Step 4 |
Write Terraform code to create the SDC in vSphere using Security Cloud Control_sdc Terraform module. Example:Note that the VM created has two users—a |
|
Step 5 |
Plan and apply your Terraform using See the Security Cloud Control Automation Repository in the CiscoDevNet for a complete example. |
If your SDC stays in the onboarding state, connect to the vSphere VM using remote console, log in as the cdo user, and execute the following command:
sdc host statusDepending on the readout, you may need to manually run:
sdc host configureNote |
The Security Cloud Control Terraform modules are published as Open Source Software under the Apache 2.0 license. You can file issues on GitHub if you require support. |
Deploy a Secure Device Connector on an AWS VPC Using a Terraform Module
Before you begin
Review these prerequisites before attempting to deploy an SDC on your AWS VPC:
-
Security Cloud Control requires strict certificate checking and does not support Web/Content Proxy inspection between the SDC and the Internet. If using a proxy server, disable inspection for traffic between the Secure Device Connector (SDC) andSecurity Cloud Control.
-
See Connect Security Cloud Control to the Secure Device Connector to ensure proper network access.
-
You require an AWS account, an AWS VPC with at least one subnet, and an AWS Route53-hosted zone.
-
Ensure you have the Security Cloud Control bootstrap data, your AWS VPC ID, and its subnet ID handy.
-
Ensure that the private subnet to which you deploy the SDC has a NAT gateway attached.
-
Open traffic on the port on which your firewall management HTTP interface is running, from your firewalls to the Elastic IP attached to the NAT gateway.
Procedure
|
Step 1 |
Add the following lines of code in your Terraform file; make sure you manually enter inputs for variables: See the Secure Device Connector Terraform module for a list of input variables and descriptions. |
|
Step 2 |
Register You can use the |
What to do next
For any troubleshooting of your SDC, you need to connect to the SDC instance using AWS SSM. See AWS Systems Manager Session Manager to know more about how to connect to your instance. Note that the ports to connect to the SDC instance using SSH are not exposed because of security reasons.
Note |
The Security Cloud Control Terraform modules are published as Open Source Software under the Apache 2.0 license. You can file issues on GitHub if you require support. |
Migrate an On-Premises Secure Device Connector and Secure Event Connector from a CentOS 7 Virtual Machine to an Ubuntu Virtual Machine
Security Cloud Control's on-premises Secure Device Connector (SDC) has been installed on CentOS 7 virtual machines up to this point. Since CentOS 7 is now end-of-life and has been deprecated by Security Cloud Control, we have created this migration process to help you migrate all SDCs from CentOS 7 to an Ubuntu virtual machine.
Before You Migrate
-
The SDC must have full outbound access to the internet on TCP port 443.
-
The Ubuntu virtual machine running the SDC must have network access to the management interfaces of the devices it communicates with, such as ASAs and Cisco IOS devices.
-
Any networking rules created for the IP address or FQDN of the old SDC VM to reach your devices should be recreated with the IP address or FQDN of the new SDC VM.
-
The migration will take 10 to 15 minutes. During this time, your device will continue to enforce security policy and route network traffic, but you will not be able to communicate with it through the SDC.
Prerequisites
Deploy a new host by following the instructions on Deploy a VM for Running the Secure Device Connector and Secure Event Connector.
Host Configuration
Follow this procedure if you are migrating the SDC and/or SEC:
-
Download the new VM image here.
-
Unzip the CDO-SDC_VM.zip file. You should see three VM files named similarly to the following:
-
CDO-SDC-VM-708cd33-2024-05-30-2031-disk1.vmdk
-
CDO-SDC-VM-708cd33-2024-05-30-2031.mf
-
CDO-SDC-VM-708cd33-2024-05-30-2031.ovf
-
-
Deploy the VM you just downloaded.
-
Note the static IP address or FQDN you assigned to the new VM.
-
Using SSH, log in to the new VM as the
cdouser. -
At the prompt, enter the command:
sudo sdc host configureNote
-
Follow the prompts in the migration script closely. The script is well-documented and will guide you through the migration process, explaining each step.
-
At the end of the migration script, you will receive a message indicating that your SDC has been migrated to the new VM. The SDC will retain its name after the migration.
-
SDC Migration
Procedure:
-
Using SSH, log in to the old (CentOS) SDC as the
cdouser. -
Install the CLI using the command:
curl -O https://s3.us-west-2.amazonaws.com/download.defenseorchestrator.com/sdc-cli/sdc-cli-package-latest.tgz && tar -xvf sdc-cli-package-latest.tgz && chmod +x ./install.sh && ./install.sh -
Run the following command and follow the prompts:
sudo sdc migrate now
Verification:
-
Log in to your Security Cloud Control tenant.
-
Select the SDC you migrated, and in the Actions pane, click Request Heartbeat.
Note |
Ensure that the SDC is in the Active state. |
SEC Migration
Procedure:
-
Using SSH, log in to the old (CentOS) SDC as the
cdouser. -
Install the CLI using the command:
curl -O https://s3.us-west-2.amazonaws.com/download.defenseorchestrator.com/sdc-cli/sdc-cli-package-latest.tgz && tar -xvf sdc-cli-package-latest.tgz && chmod +x ./install.sh && ./install.sh -
Run the following command and follow the prompts:
sudo sdc eventing migrate -
You can configure your devices to point to the new IP address of the SEC or you can shut down the old host and assign the new host the same IP address that the old host had so that the devices do not need to be updated.
Verification:
For information on the state of the SEC, see Use Health Check to Learn the State of your Secure Event Connector.
Additional Instructions
Do Not Restart Your Old SDC
After the migration is complete, do not restart your old SDC on the original virtual machine.
Revert Failed Migration
If the migration fails for any reason, or the result is not what you are expecting and you want to revert to the old SDC, follow the instructions below:
-
Log in to the new VM and switch to the SDC user.
-
Ensure the SDC is not currently running on the new VM using the command:
docker ps -
If the SDC is running, run the command:
sdc stop -
Confirm that the SDC has stopped running by executing
docker psagain. -
Log in to the old VM and run the command:
sdc migrate revert -
When the old SDC is active and visible in the UI, return to the new VM and execute the command:
sdc delete <your-tenant-name-here> -
Refresh the browser completely, click on the SDC, and verify that the IP of the old host appears in the sidebar.
If the new IP still appears despite following these steps, request a new health check, refresh the browser, and check again.
-
To revert the SEC migration,run the command: sdc eventing revert
Change the IP Address of a Secure Device Connector
Before you begin
-
You must be an admin to perform this task.
-
The SDC must have full outbound access to the Internet on TCP port 443, or the port you have configured for device management.
Note |
You will not be required to re-onboard any devices to Security Cloud Control after changing the SDC's IP address. |
Procedure
|
Step 1 |
Create an SSH connection to your SDC or open your virtual machine's console, and log in as the CDO user. |
||
|
Step 2 |
To view your SDC VM's network interface configuration information before changing the IP address, use the command: |
||
|
Step 3 |
To change the IP address of the interface, re-initiate the host configuration using the command: |
||
|
Step 4 |
Enter your password at the prompt. |
||
|
Step 5 |
The configure script will then ask you about your networking configuration, write the new config file with the new IP and apply that configuration.
|
||
|
Step 6 |
Create an SSH connection using the new IP address you assigned to your SDC and log in. |
||
|
Step 7 |
Your SDC should start automatically, but if it does not, run the following commands:
|
||
|
Step 8 |
You can also check your SDC's connectivity through the Security Cloud Control user interface. To do that, open the Security Cloud Control application and navigate to page. |
||
|
Step 9 |
Refresh the page once and select the secure connector whose IP address you changed. |
||
|
Step 10 |
On the Actions pane, click Request Heartbeat. You should see the Heartbeat requested successfully message, and the Last Heartbeat should display the current date and time. |
Move an ASA from one Secure Device Connector to Another
Security Cloud Control Firewall Management supports the use of more than one SDC per tenant. You can move a managed ASA from one SDC to another using this procedure:
Procedure
|
Step 1 |
In the left pane, click . |
||
|
Step 2 |
Click the ASA tab. |
||
|
Step 3 |
Select the ASA or ASAs you want to move to a different SDC. |
||
|
Step 4 |
In the Device Actions pane, click Update Credentials. |
||
|
Step 5 |
Click the Secure Device Connector button and select the SDC you want to move the device to. |
||
|
Step 6 |
Enter the administrator username and password Security Cloud Control uses to log into the device and click Update. Unless they were changed, the administrator username and password are the same credentials you used to onboard the ASA. You do not have to deploy these changes to the device.
|
Rename a Secure Device Connector
Procedure
|
Step 1 |
In the left pane, choose . |
|
Step 2 |
Select the SDC you want to rename. |
|
Step 3 |
In the Details pane, click the edit icon |
|
Step 4 |
Rename the SDC. |
 next to the name of the SDC.
This new name will appear wherever the SDC name appears in the Security Cloud Control interface including the Secure Device Connectors filter of the Security Devices pane.
Update a Secure Device Connector manually
Use this task as a troubleshooting tool. The source says that the SDC is usually updated automatically and that you should not need to perform a manual update unless errors occur.
Procedure
|
Step 1 |
Connect to your SDC. You can connect using SSH or use the console view in your Hypervisor. |
||
|
Step 2 |
Log in to the SDC as the admin user, typically cdo. |
||
|
Step 3 |
Switch to the SDC user to update the SDC docker container: |
||
|
Step 4 |
Upgrade the SDC:
|
Use multiple Secure Device Connectors on one organization
You can install an unlimited number of SDCs on a tenant. Multiple SDCs let you manage more devices and place connectors in different network segments while keeping those devices in the same Security Cloud Control Firewall Management tenant.The procedure for deploying a second or later SDC is the same as the procedure for the first SDC.The first SDC name includes the tenant name and the number `1`. Each additional SDC is numbered in order.
-
The procedure for deploying a second or subsequent SDC is the same for deploying your first SDC.
-
The initial SDC for your tenant incorporates the name of your tenant and the number 1. Each additional SDC is numbered in order.
Find devices that sse the same Secure Device Connector
Follow this procedure to find devices that connect through the same SDC:
Procedure
|
Step 1 |
In the left pane, . |
|
Step 2 |
Click the Devices tab to locate the device. |
|
Step 3 |
Click the appropriate device type tab. |
|
Step 4 |
If there is any filter criteria already specified, click the clear button at the top of the Security Devices page to show all the devices and services you manage with Security Cloud Control. |
|
Step 5 |
Click the filter button |
|
Step 6 |
In the Secure Device Connectors section of the filter, check the name of the SDC(s) you're interested in. The Security Devices page displays only the devices that connect to Security Cloud Control through the SDC you checked in the filter. |
|
Step 7 |
(Optional) Check additional filters in the filter menu to refine your search further. |
|
Step 8 |
(Optional) When you're done, click the clear button at the top of the Security Devices page to show all devices and services you manage with Security Cloud Control. |
 to expand the
 Remove a Secure Device Connector
Deleting an SDC is not reversible. After you remove it, you cannot manage the devices that were connected to that SDC until you install a new SDC and reconnect the devices. Reconnecting devices can require you to enter administrator credentials again.
Before you remove an SDC, move the connected devices to another SDC or remove them from Security Cloud Control Firewall Management.
Procedure
|
Step 1 |
Remove any devices connected to the SDC you want to delete.
|
||
|
Step 2 |
From the Security Cloud Control Home page, click Firewall. |
||
|
Step 3 |
In the left pane, click . |
||
|
Step 4 |
On the Services page with the Secure Connectors tab selected, click the blue plus button and select Secure Device Connector. |
||
|
Step 5 |
In the Secure Connectors table, select the SDC you want to remove. Its device count should now be zero. |
||
|
Step 6 |
In the Actions pane, click
Because you currently have onboarded devices, removing the SDC will require you to reconnect those devices and provide credentials again after setting up a new SDC.
|
||
|
Step 7 |
In the confirmation dialog box, if you wish to proceed, enter your SDC's name as it is stated in the warning message. |
||
|
Step 8 |
Click OK to confirm the SDC removal. |
 Remove. You receive this warning:
Open Source and Third-Party License in SDC
================================================================================
* amqplib *
amqplib copyright (c) 2013, 2014
Michael Bridgen <mikeb@squaremobius.net>
This package, "amqplib", is licensed under the MIT License. A copy maybe found in the file LICENSE-MIT in this directory, or downloaded from
http://opensource.org/licenses/MIT
================================================================================
* async *
Copyright (c) 2010-2016 Caolan McMahon
Permission is hereby granted, free of charge, to any person obtaining a copyof this software and associated documentation files (the "Software"), to dealin the Software without restriction, including without limitation the rightsto use, copy, modify, merge, publish, distribute, sublicense, and/or sellcopies of the Software, and to permit persons to whom the Software isfurnished to do so, subject to the following conditions:
The above copyright notice and this permission notice shall be included inall copies or substantial portions of the Software.
THE SOFTWARE IS PROVIDED "AS IS", WITHOUT WARRANTY OF ANY KIND, EXPRESS ORIMPLIED, INCLUDING BUT NOT LIMITED TO THE WARRANTIES OF MERCHANTABILITY,FITNESS FOR A PARTICULAR PURPOSE AND NONINFRINGEMENT. IN NO EVENT SHALL THEAUTHORS OR COPYRIGHT HOLDERS BE LIABLE FOR ANY CLAIM, DAMAGES OR OTHERLIABILITY, WHETHER IN AN ACTION OF CONTRACT, TORT OR OTHERWISE, ARISING FROM,OUT OF OR IN CONNECTION WITH THE SOFTWARE OR THE USE OR OTHER DEALINGS INTHE SOFTWARE.
================================================================================
* bluebird *
The MIT License (MIT)
Copyright (c) 2013-2015 Petka Antonov
Permission is hereby granted, free of charge, to any person obtaining a copyof this software and associated documentation files (the "Software"), to dealin the Software without restriction, including without limitation the rightsto use, copy, modify, merge, publish, distribute, sublicense, and/or sellcopies of the Software, and to permit persons to whom the Software isfurnished to do so, subject to the following conditions:
The above copyright notice and this permission notice shall be included inall copies or substantial portions of the Software.
THE SOFTWARE IS PROVIDED "AS IS", WITHOUT WARRANTY OF ANY KIND, EXPRESS ORIMPLIED, INCLUDING BUT NOT LIMITED TO THE WARRANTIES OF MERCHANTABILITY,FITNESS FOR A PARTICULAR PURPOSE AND NONINFRINGEMENT. IN NO EVENT SHALL THEAUTHORS OR COPYRIGHT HOLDERS BE LIABLE FOR ANY CLAIM, DAMAGES OR OTHERLIABILITY, WHETHER IN AN ACTION OF CONTRACT, TORT OR OTHERWISE, ARISING FROM,OUT OF OR IN CONNECTION WITH THE SOFTWARE OR THE USE OR OTHER DEALINGS INTHE SOFTWARE.
================================================================================
* cheerio *
Copyright (c) 2012 Matt Mueller <mattmuelle@gmail.com>
Permission is hereby granted, free of charge, to any person obtaining a copyof this software and associated documentation files (the 'Software'), to dealin the Software without restriction, including without limitation the rightsto use, copy, modify, merge, publish, distribute, sublicense, and/or sellcopies of the Software, and to permit persons to whom the Software isfurnished to do so, subject to the following conditions:
The above copyright notice and this permission notice shall be included inall copies or substantial portions of the Software.
THE SOFTWARE IS PROVIDED 'AS IS', WITHOUT WARRANTY OF ANY KIND, EXPRESS ORIMPLIED, INCLUDING BUT NOT LIMITED TO THE WARRANTIES OF MERCHANTABILITY,FITNESS FOR A PARTICULAR PURPOSE AND NONINFRINGEMENT. IN NO EVENT SHALL THEAUTHORS OR COPYRIGHT HOLDERS BE LIABLE FOR ANY CLAIM, DAMAGES OR OTHERLIABILITY, WHETHER IN AN ACTION OF CONTRACT, TORT OR OTHERWISE, ARISING FROM,OUT OF OR IN CONNECTION WITH THE SOFTWARE OR THE USE OR OTHER DEALINGS INTHE SOFTWARE.
================================================================================
* command-line-args *
The MIT License (MIT)
Copyright (c) 2015 Lloyd Brookes <75pound@gmail.com>
Permission is hereby granted, free of charge, to any person obtaining a copyof this software and associated documentation files (the "Software"), to dealin the Software without restriction, including without limitation the rightsto use, copy, modify, merge, publish, distribute, sublicense, and/or sellcopies of the Software, and to permit persons to whom the Software isfurnished to do so, subject to the following conditions:
The above copyright notice and this permission notice shall be included in allcopies or substantial portions of the Software.
THE SOFTWARE IS PROVIDED "AS IS", WITHOUT WARRANTY OF ANY KIND, EXPRESS ORIMPLIED, INCLUDING BUT NOT LIMITED TO THE WARRANTIES OF MERCHANTABILITY,FITNESS FOR A PARTICULAR PURPOSE AND NONINFRINGEMENT. IN NO EVENT SHALL THEAUTHORS OR COPYRIGHT HOLDERS BE LIABLE FOR ANY CLAIM, DAMAGES OR OTHERLIABILITY, WHETHER IN AN ACTION OF CONTRACT, TORT OR OTHERWISE, ARISING FROM,OUT OF OR IN CONNECTION WITH THE SOFTWARE OR THE USE OR OTHER DEALINGS INTHE SOFTWARE.
================================================================================
* ip *
This software is licensed under the MIT License.
Copyright Fedor Indutny, 2012.
Permission is hereby granted, free of charge, to any person obtaining a copyof this software and associated documentation files (the "Software"), to dealin the Software without restriction, including without limitation the rightsto use, copy, modify, merge, publish, distribute, sublicense, and/or sellcopies of the Software, and to permit persons to whom the Software isfurnished to do so, subject to the following conditions:
The above copyright notice and this permission notice shall be included in allcopies or substantial portions of the Software.
THE SOFTWARE IS PROVIDED "AS IS", WITHOUT WARRANTY OF ANY KIND, EXPRESS ORIMPLIED, INCLUDING BUT NOT LIMITED TO THE WARRANTIES OF MERCHANTABILITY,FITNESS FOR A PARTICULAR PURPOSE AND NONINFRINGEMENT. IN NO EVENT SHALL THEAUTHORS OR COPYRIGHT HOLDERS BE LIABLE FOR ANY CLAIM, DAMAGES OR OTHERLIABILITY, WHETHER IN AN ACTION OF CONTRACT, TORT OR OTHERWISE, ARISING FROM,OUT OF OR IN CONNECTION WITH THE SOFTWARE OR THE USE OR OTHER DEALINGS INTHE SOFTWARE.
================================================================================
* json-buffer *
Copyright (c) 2013 Dominic Tarr
Permission is hereby granted, free of charge,to any person obtaining a copy of this software andassociated documentation files (the "Software"), todeal in the Software without restriction, includingwithout limitation the rights to use, copy, modify,merge, publish, distribute, sublicense, and/or sellcopies of the Software, and to permit persons to whomthe Software is furnished to do so,subject to the following conditions:
The above copyright notice and this permission noticeshall be included in all copies or substantial portions of the Software.
THE SOFTWARE IS PROVIDED "AS IS", WITHOUT WARRANTY OF ANY KIND,EXPRESS OR IMPLIED, INCLUDING BUT NOT LIMITED TO THE WARRANTIESOF MERCHANTABILITY, FITNESS FOR A PARTICULAR PURPOSE AND NONINFRINGEMENT.IN NO EVENT SHALL THE AUTHORS OR COPYRIGHT HOLDERS BE LIABLE FORANY CLAIM, DAMAGES OR OTHER LIABILITY, WHETHER IN AN ACTION OF CONTRACT,TORT OR OTHERWISE, ARISING FROM, OUT OF OR IN CONNECTION WITH THESOFTWARE OR THE USE OR OTHER DEALINGS IN THE SOFTWARE.
================================================================================
* json-stable-stringify *
This software is released under the MIT license:
Permission is hereby granted, free of charge, to any person obtaining a copy ofthis software and associated documentation files (the "Software"), to deal inthe Software without restriction, including without limitation the rights touse, copy, modify, merge, publish, distribute, sublicense, and/or sell copies ofthe Software, and to permit persons to whom the Software is furnished to do so,subject to the following conditions:
The above copyright notice and this permission notice shall be included in allcopies or substantial portions of the Software.
THE SOFTWARE IS PROVIDED "AS IS", WITHOUT WARRANTY OF ANY KIND, EXPRESS ORIMPLIED, INCLUDING BUT NOT LIMITED TO THE WARRANTIES OF MERCHANTABILITY, FITNESSFOR A PARTICULAR PURPOSE AND NONINFRINGEMENT. IN NO EVENT SHALL THE AUTHORS ORCOPYRIGHT HOLDERS BE LIABLE FOR ANY CLAIM, DAMAGES OR OTHER LIABILITY, WHETHERIN AN ACTION OF CONTRACT, TORT OR OTHERWISE, ARISING FROM, OUT OF OR INCONNECTION WITH THE SOFTWARE OR THE USE OR OTHER DEALINGS IN THE SOFTWARE.
================================================================================
* json-stringify-safe *
The ISC License
Copyright (c) Isaac Z. Schlueter and Contributors
Permission to use, copy, modify, and/or distribute this software for anypurpose with or without fee is hereby granted, provided that the abovecopyright notice and this permission notice appear in all copies.
THE SOFTWARE IS PROVIDED "AS IS" AND THE AUTHOR DISCLAIMS ALL WARRANTIESWITH REGARD TO THIS SOFTWARE INCLUDING ALL IMPLIED WARRANTIES OFMERCHANTABILITY AND FITNESS. IN NO EVENT SHALL THE AUTHOR BE LIABLE FORANY SPECIAL, DIRECT, INDIRECT, OR CONSEQUENTIAL DAMAGES OR ANY DAMAGESWHATSOEVER RESULTING FROM LOSS OF USE, DATA OR PROFITS, WHETHER IN ANACTION OF CONTRACT, NEGLIGENCE OR OTHER TORTIOUS ACTION, ARISING OUT OF ORIN CONNECTION WITH THE USE OR PERFORMANCE OF THIS SOFTWARE.
================================================================================
* lodash *
Copyright JS Foundation and other contributors <https://js.foundation/>
Based on Underscore.js, copyright Jeremy Ashkenas,
DocumentCloud and Investigative Reporters & Editors<http://underscorejs.org/>
This software consists of voluntary contributions made by manyindividuals. For exact contribution history, see the revision historyavailable at https://github.com/lodash/lodash
The following license applies to all parts of this software except as
documented below:
====
Permission is hereby granted, free of charge, to any person obtaininga copy of this software and associated documentation files (the"Software"), to deal in the Software without restriction, includingwithout limitation the rights to use, copy, modify, merge, publish,distribute, sublicense, and/or sell copies of the Software, and topermit persons to whom the Software is furnished to do so, subject tothe following conditions:
The above copyright notice and this permission notice shall beincluded in all copies or substantial portions of the Software.
THE SOFTWARE IS PROVIDED "AS IS", WITHOUT WARRANTY OF ANY KIND,EXPRESS OR IMPLIED, INCLUDING BUT NOT LIMITED TO THE WARRANTIES OFMERCHANTABILITY, FITNESS FOR A PARTICULAR PURPOSE ANDNONINFRINGEMENT. IN NO EVENT SHALL THE AUTHORS OR COPYRIGHT HOLDERS BELIABLE FOR ANY CLAIM, DAMAGES OR OTHER LIABILITY, WHETHER IN AN ACTIONOF CONTRACT, TORT OR OTHERWISE, ARISING FROM, OUT OF OR IN CONNECTIONWITH THE SOFTWARE OR THE USE OR OTHER DEALINGS IN THE SOFTWARE.
====
Copyright and related rights for sample code are waived via CC0. Samplecode is defined as all source code displayed within the prose of thedocumentation.
CC0: http://creativecommons.org/publicdomain/zero/1.0/
====
Files located in the node_modules and vendor directories are externallymaintained libraries used by this software which have their ownlicenses; we recommend you read them, as their terms may differ from theterms above.
================================================================================
* log4js *
Copyright 2015 Gareth Jones (with contributions from many other people)
Licensed under the Apache License, Version 2.0 (the "License"); you may not use this file except in compliance with the License. You may obtain a copy of the License at
http://www.apache.org/licenses/LICENSE-2.0
Unless required by applicable law or agreed to in writing, software distributed under the License is distributed on an "AS IS" BASIS, WITHOUT WARRANTIES OR CONDITIONS OF ANY KIND, either express or implied. See the License for the specific language governing permissions andlimitations under the License.
================================================================================
* mkdirp *
Copyright 2010 James Halliday (mail@substack.net)
This project is free software released under the MIT/X11 license:
Permission is hereby granted, free of charge, to any person obtaining a copyof this software and associated documentation files (the "Software"), to dealin the Software without restriction, including without limitation the rightsto use, copy, modify, merge, publish, distribute, sublicense, and/or sellcopies of the Software, and to permit persons to whom the Software isfurnished to do so, subject to the following conditions:
The above copyright notice and this permission notice shall be included inall copies or substantial portions of the Software.
THE SOFTWARE IS PROVIDED "AS IS", WITHOUT WARRANTY OF ANY KIND, EXPRESS ORIMPLIED, INCLUDING BUT NOT LIMITED TO THE WARRANTIES OF MERCHANTABILITY,FITNESS FOR A PARTICULAR PURPOSE AND NONINFRINGEMENT. IN NO EVENT SHALL THEAUTHORS OR COPYRIGHT HOLDERS BE LIABLE FOR ANY CLAIM, DAMAGES OR OTHERLIABILITY, WHETHER IN AN ACTION OF CONTRACT, TORT OR OTHERWISE, ARISING FROM,OUT OF OR IN CONNECTION WITH THE SOFTWARE OR THE USE OR OTHER DEALINGS INTHE SOFTWARE.
================================================================================
* node-forge *
New BSD License (3-clause)
Copyright (c) 2010, Digital Bazaar, Inc.
All rights reserved.
Redistribution and use in source and binary forms, with or withoutmodification, are permitted provided that the following conditions are met:
* Redistributions of source code must retain the above copyrightnotice, this list of conditions and the following disclaimer.
* Redistributions in binary form must reproduce the above copyrightnotice, this list of conditions and the following disclaimer in thedocumentation and/or other materials provided with the distribution.
* Neither the name of Digital Bazaar, Inc. nor thenames of its contributors may be used to endorse or promote productsderived from this software without specific prior written permission.
THIS SOFTWARE IS PROVIDED BY THE COPYRIGHT HOLDERS AND CONTRIBUTORS "AS IS" ANDANY EXPRESS OR IMPLIED WARRANTIES, INCLUDING, BUT NOT LIMITED TO, THE IMPLIEDWARRANTIES OF MERCHANTABILITY AND FITNESS FOR A PARTICULAR PURPOSE AREDISCLAIMED. IN NO EVENT SHALL DIGITAL BAZAAR BE LIABLE FOR ANYDIRECT, INDIRECT, INCIDENTAL, SPECIAL, EXEMPLARY, OR CONSEQUENTIAL DAMAGES(INCLUDING, BUT NOT LIMITED TO, PROCUREMENT OF SUBSTITUTE GOODS OR SERVICES;LOSS OF USE, DATA, OR PROFITS; OR BUSINESS INTERRUPTION) HOWEVER CAUSED ANDON ANY THEORY OF LIABILITY, WHETHER IN CONTRACT, STRICT LIABILITY, OR TORT(INCLUDING NEGLIGENCE OR OTHERWISE) ARISING IN ANY WAY OUT OF THE USE OF THISSOFTWARE, EVEN IF ADVISED OF THE POSSIBILITY OF SUCH DAMAGE.
================================================================================
* request *
Apache License
Version 2.0, January 2004
http://www.apache.org/licenses/
TERMS AND CONDITIONS FOR USE, REPRODUCTION, AND DISTRIBUTION
1. Definitions.
"License" shall mean the terms and conditions for use, reproduction, and distribution as defined by Sections 1 through 9 of this document.
"Licensor" shall mean the copyright owner or entity authorized by the copyright owner that is granting the License.
"Legal Entity" shall mean the union of the acting entity and all other entities that control, are controlled by, or are under common control with that entity. For the purposes of this definition, "control" means (i) the power, direct or indirect, to cause the direction or management of such entity, whether by contract or otherwise, or (ii) ownership of fifty percent (50%) or more of the outstanding shares, or (iii) beneficial ownership of such entity.
"You" (or "Your") shall mean an individual or Legal Entity exercising permissions granted by this License.
"Source" form shall mean the preferred form for making modifications, including but not limited to software source code, documentation source, and configuration files.
"Object" form shall mean any form resulting from mechanical transformation or translation of a Source form, including but not limited to compiled object code, generated documentation, and conversions to other media types.
"Work" shall mean the work of authorship, whether in Source or Object form, made available under the License, as indicated by a copyright notice that is included in or attached to the work (an example is provided in the Appendix below).
"Derivative Works" shall mean any work, whether in Source or Object form, that is based on (or derived from) the Work and for which the editorial revisions, annotations, elaborations, or other modifications represent, as a whole, an original work of authorship. For the purposes of this License, Derivative Works shall not include works that remain separable from, or merely link (or bind by name) to the interfaces of, the Work and Derivative Works thereof.
"Contribution" shall mean any work of authorship, including the original version of the Work and any modifications or additions to that Work or Derivative Works thereof, that is intentionally submitted to Licensor for inclusion in the Work by the copyright owner or by an individual or Legal Entity authorized to submit on behalf of the copyright owner. For the purposes of this definition, "submitted" means any form of electronic, verbal, or written communication sent to the Licensor or its representatives, including but not limited to communication on electronic mailing lists, source code control systems, and issue tracking systems that are managed by, or on behalf of, the Licensor for the purpose of discussing and improving the Work, but excluding communication that is conspicuously marked or otherwise designated in writing by the copyright owner as "Not a Contribution."
"Contributor" shall mean Licensor and any individual or Legal Entity on behalf of whom a Contribution has been received by Licensor and subsequently incorporated within the Work.
2. Grant of Copyright License. Subject to the terms and conditions of this License, each Contributor hereby grants to You a perpetual, worldwide, non-exclusive, no-charge, royalty-free, irrevocable copyright license to reproduce, prepare Derivative Works of, publicly display, publicly perform, sublicense, and distribute the Work and such Derivative Works in Source or Object form.
3. Grant of Patent License. Subject to the terms and conditions of this License, each Contributor hereby grants to You a perpetual, worldwide, non-exclusive, no-charge, royalty-free, irrevocable (except as stated in this section) patent license to make, have made, use, offer to sell, sell, import, and otherwise transfer the Work, where such license applies only to those patent claims licensable by such Contributor that are necessarily infringed by their Contribution(s) alone or by combination of their Contribution(s) with the Work to which such Contribution(s) was submitted. If You institute patent litigation against any entity (including a cross-claim or counterclaim in a lawsuit) alleging that the Work or a Contribution incorporated within the Work constitutes direct or contributory patent infringement, then any patent licenses granted to You under this License for that Work shall terminate as of the date such litigation is filed.
4. Redistribution. You may reproduce and distribute copies of the Work or Derivative Works thereof in any medium, with or without modifications, and in Source or Object form, provided that You meet the following conditions:
You must give any other recipients of the Work or Derivative Works a copy of this License; and
You must cause any modified files to carry prominent notices stating that You changed the files; and
You must retain, in the Source form of any Derivative Works that You distribute, all copyright, patent, trademark, and attribution notices from the Source form of the Work, excluding those notices that do not pertain to any part of the Derivative Works; and
If the Work includes a "NOTICE" text file as part of its distribution, then any Derivative Works that You distribute must include a readable copy of the attribution notices contained within such NOTICE file, excluding those notices that do not pertain to any part of the Derivative Works, in at least one of the following places: within a NOTICE text file distributed as part of the Derivative Works; within the Source form or documentation, if provided along with the Derivative Works; or, within a display generated by the Derivative Works, if and wherever such third-party notices normally appear. The contents of the NOTICE file are for informational purposes only and do not modify the License. You may add Your own attribution notices within Derivative Works that You distribute, alongside or as an addendum to the NOTICE text from the Work, provided that such additional attribution notices cannot be construed as modifying the License. You may add Your own copyright statement to Your modifications and may provide additional or different license terms and conditions for use, reproduction, or distribution of Your modifications, or for any such Derivative Works as a whole, provided Your use, reproduction, and distribution of the Work otherwise complies with the conditions stated in this License.
5. Submission of Contributions. Unless You explicitly state otherwise, any Contribution intentionally submitted for inclusion in the Work by You to the Licensor shall be under the terms and conditions of this License, without any additional terms or conditions. Notwithstanding the above, nothing herein shall supersede or modify the terms of any separate license agreement you may have executed with Licensor regarding such Contributions.
6. Trademarks. This License does not grant permission to use the trade names, trademarks, service marks, or product names of the Licensor, except as required for reasonable and customary use in describing the origin of the Work and reproducing the content of the NOTICE file.
7. Disclaimer of Warranty. Unless required by applicable law or agreed to in writing, Licensor provides the Work (and each Contributor provides its Contributions) on an "AS IS" BASIS, WITHOUT WARRANTIES OR CONDITIONS OF ANY KIND, either express or implied, including, without limitation, any warranties or conditions of TITLE, NON-INFRINGEMENT, MERCHANTABILITY, or FITNESS FOR A PARTICULAR PURPOSE. You are solely responsible for determining the appropriateness of using or redistributing the Work and assume any risks associated with Your exercise of permissions under this License.
8. Limitation of Liability. In no event and under no legal theory, whether in tort (including negligence), contract, or otherwise, unless required by applicable law (such as deliberate and grossly negligent acts) or agreed to in writing, shall any Contributor be liable to You for damages, including any direct, indirect, special, incidental, or consequential damages of any character arising as a result of this License or out of the use or inability to use the Work (including but not limited to damages for loss of goodwill, work stoppage, computer failure or malfunction, or any and all other commercial damages or losses), even if such Contributor has been advised of the possibility of such damages.
9. Accepting Warranty or Additional Liability. While redistributing the Work or Derivative Works thereof, You may choose to offer, and charge a fee for, acceptance of support, warranty, indemnity, or other liability obligations and/or rights consistent with this License. However, in accepting such obligations, You may act only on Your own behalf and on Your sole responsibility, not on behalf of any other Contributor, and only if You agree to indemnify, defend, and hold each Contributor harmless for any liability incurred by, or claims asserted against, such Contributor by reason of your accepting any such warranty or additional liability.
END OF TERMS AND CONDITIONS
================================================================================
* rimraf *
The ISC License
Copyright (c) Isaac Z. Schlueter and Contributors
Permission to use, copy, modify, and/or distribute this software for anypurpose with or without fee is hereby granted, provided that the abovecopyright notice and this permission notice appear in all copies.
THE SOFTWARE IS PROVIDED "AS IS" AND THE AUTHOR DISCLAIMS ALL WARRANTIESWITH REGARD TO THIS SOFTWARE INCLUDING ALL IMPLIED WARRANTIES OFMERCHANTABILITY AND FITNESS. IN NO EVENT SHALL THE AUTHOR BE LIABLE FORANY SPECIAL, DIRECT, INDIRECT, OR CONSEQUENTIAL DAMAGES OR ANY DAMAGESWHATSOEVER RESULTING FROM LOSS OF USE, DATA OR PROFITS, WHETHER IN ANACTION OF CONTRACT, NEGLIGENCE OR OTHER TORTIOUS ACTION, ARISING OUT OF ORIN CONNECTION WITH THE USE OR PERFORMANCE OF THIS SOFTWARE.
================================================================================
* uuid *
Copyright (c) 2010-2012 Robert Kieffer
MIT License - http://opensource.org/licenses/mit-license.php
================================================================================
* validator *
Copyright (c) 2016 Chris O'Hara <cohara87@gmail.com>
Permission is hereby granted, free of charge, to any person obtaininga copy of this software and associated documentation files (the"Software"), to deal in the Software without restriction, includingwithout limitation the rights to use, copy, modify, merge, publish,distribute, sublicense, and/or sell copies of the Software, and topermit persons to whom the Software is furnished to do so, subject tothe following conditions:
The above copyright notice and this permission notice shall beincluded in all copies or substantial portions of the Software.
THE SOFTWARE IS PROVIDED "AS IS", WITHOUT WARRANTY OF ANY KIND,EXPRESS OR IMPLIED, INCLUDING BUT NOT LIMITED TO THE WARRANTIES OFMERCHANTABILITY, FITNESS FOR A PARTICULAR PURPOSE ANDNONINFRINGEMENT. IN NO EVENT SHALL THE AUTHORS OR COPYRIGHT HOLDERS BELIABLE FOR ANY CLAIM, DAMAGES OR OTHER LIABILITY, WHETHER IN AN ACTIONOF CONTRACT, TORT OR OTHERWISE, ARISING FROM, OUT OF OR IN CONNECTIONWITH THE SOFTWARE OR THE USE OR OTHER DEALINGS IN THE SOFTWARE.
================================================================================
* when *
Open Source Initiative OSI - The MIT License
http://www.opensource.org/licenses/mit-license.php
Copyright (c) 2011 Brian Cavalier
Permission is hereby granted, free of charge, to any person obtaininga copy of this software and associated documentation files (the"Software"), to deal in the Software without restriction, includingwithout limitation the rights to use, copy, modify, merge, publish,distribute, sublicense, and/or sell copies of the Software, and topermit persons to whom the Software is furnished to do so, subject tothe following conditions:
The above copyright notice and this permission notice shall beincluded in all copies or substantial portions of the Software.
THE SOFTWARE IS PROVIDED "AS IS", WITHOUT WARRANTY OF ANY KIND,EXPRESS OR IMPLIED, INCLUDING BUT NOT LIMITED TO THE WARRANTIES OFMERCHANTABILITY, FITNESS FOR A PARTICULAR PURPOSE ANDNONINFRINGEMENT. IN NO EVENT SHALL THE AUTHORS OR COPYRIGHT HOLDERS BELIABLE FOR ANY CLAIM, DAMAGES OR OTHER LIABILITY, WHETHER IN AN ACTIONOF CONTRACT, TORT OR OTHERWISE, ARISING FROM, OUT OF OR IN CONNECTIONWITH THE SOFTWARE OR THE USE OR OTHER DEALINGS IN THE SOFTWARE.================================================================================
 to Onboard a device.


 to copy the registration key.

 . The button changes to read, "Download Backup Image."


 Feedback