NCS 1001 Application Hosting

Application hosting

Application Hosting is the infra IOS-XR that allows you to

  • run third-party applications on the NCS 1001 devices, and

  • use third-party applications to extend device capabilities to complement IOS-XR features.

The Docker daemon is packaged with IOS-XR software on the base Linux OS. This provides native support for running applications inside docker containers on IOS-XR. Docker is the preferred way to run TPAs on IOS-XR.

App Manager

The App Manager is the infra on IOS-XR tasked with the responsibility of managing the life cycle of all container apps (third part and Cisco internal) and process scripts. App Manager runs natively on the host as an IOS-XR process. App Manager leverages the functionalities of docker, systemd and RPM for managing the lifecycle of third-party applications.

Restriction in docker container application hosting

MPLS packets are not supported on Linux interfaces.

Docker Container Application Hosting Architecture

This section describes the docker container application hosting architecture.

Figure 1. Docker on IOS XR

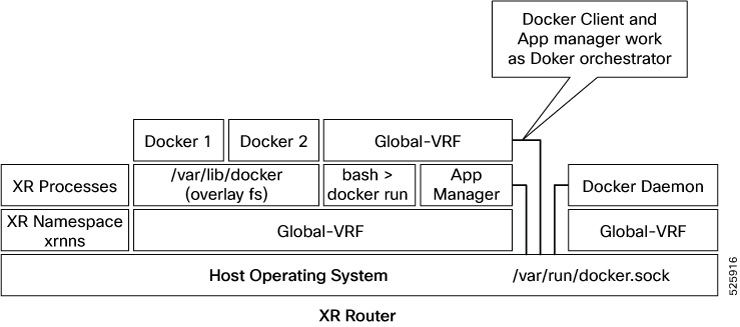
The App manager internally uses docker client, which interacts with TPAs (docker 1 and docker 2) by using the docker commands. The docker client sends the docker commands to docker daemon, which, then, executes the commands. The docker daemon uses the docker.sock Unix socket to communicate with the dockers.

When the docker run command is executed, a docker container is created and started from the docker image. Docker containers can be either in global-vrf namespace.

The docker utilizes overlayfs under the /var/lib/docker folder for managing the directories.

To host an application in docker containers, see Hosting an Application in Docker Containers.

Guidelines and Limitations

  • For docker run options --mount and --volume, use the host paths.

    • "/var/run/netns"

    • "/var/lib/docker"

    • "/misc/disk1"

    • "/disk0"

    • "/misc/config/grpc"

    • "/etc"

    • "/dev/net/tun"

    • "/var/xr/config/grpc"

    • "/opt/owner"

  • The maximum allowed size for shm-size option is 64 Mb.

TP Application Resource Configuration

IOS XR is equipped with inherent safeguards to prevent third party applications from interfering with its role as a Network OS.

  • Although IOS XR doesn't impose a limit on the number of TPAs that can run concurrently, it does impose constraints on the resources allocated to the Docker daemon, based on the following parameters:

    • CPU: By default, ¼ of the CPU per core available in the platform.

      You can hard limit the default CPU usage in the range between 25-75% of the total system CPU using the appmgr resources containers limit cpu value command. This configuration restricts the TPAs from using more CPU than the set hard limit value irrespective of the CPU usage by other XR processes.

      This example provides the CPU hard limit configuration.

      RP/0/RSP0/CPU0:ios(config)#appmgr resources containers limit cpu ?
        <25-75>  In Percentage
      RP/0/RSP0/CPU0:ios(config)#appmgr resources containers limit cpu 25
      
    • RAM: By default, 1 GB of memory is available.

      You can hard limit the default memory usage in the range between 1-25% of the overall system memory using the appmgr resources containers limit memory value command. This configuration restricts the TPAs from using more memory than the set hard limit value.

      This example provides the memory hard limit configuration.

      RP/0/RSP0/CPU0:ios(config)#appmgr resources containers limit memory ?
        <1-25>  In Percentage
      RP/0/RSP0/CPU0:ios(config)#appmgr resources containers limit memory 20
      
    • Disk space is restricted by the partition size, which varies by platform and can be checked by executing "run df -h" and examining the size of the /misc/app_host or /var/lib/docker mounts.

  • All traffic to and from the application is monitored by the XR control protection, LPTS.

  • Signed Applications are supported on IOS XR. Users have the option to sign their own applications by onboarding an Owner Certificate (OC) through Ownership Voucher-based workflows as described in RFC 8366. Once an Owner Certificate is onboarded, users can sign applications with GPG keys based on the Owner Certificate, which can then be authenticated during the application installation process on the router.

The table below shows the various functions performed by appmgr.

Package Manager

Lifecyle Manager

Monitoring and Debugging

  • Handles installation of docker images packaged as RPMs.

  • Syncs the required state to standby to restart apps in cases of switchover, etc

  • Handles application start/stop/kill operations.

  • Handles automatic application reload on:

    • Router reboot

    • Container crash

    • Switchover

  • Logging, stats, application health check.

  • Forwards docker deamon logs to XR syslog.

  • Allows to execute into docker shell of running application.

TP App Bring-up

This section provides the information, how to bring-up the TP container app. This can be done by following below mentioned four ways.

  • App Config

  • UM Model

  • Native Yang Model

  • gNOI Containerz

Bring up TPAs using application configuration

Follow these steps to configure the docker run time options.

Procedure

Step 1

Configure the docker run time option.

Use --pids-limit to limit the number of process IDs using appmgr.

Example:

This example shows the configuration of the docker run time option --pids-limit to limit the number of process IDs using appmgr.

RP/0/RP0/CPU0:ios#appmgr application alpine_app activate type docker source alpine docker-run-opts "-it –pids-limit 90" docker-run-cmd "sh"

The number of process IDs is limited to 90.

Step 2

Verify the docker run time option configuration.

Use the show running-config appmgr command to verify the run time option.

Example:

This example shows how to verify the docker run time option configuration.

RP/0/RP0/CPU0:ios#show running-config appmgr
Thu Mar 23 08:22:47.014 UTC
appmgr
 application alpine_app
  activate type docker source alpine docker-run-opts "-it –pids-limit 90" docker-run-cmd "sh"
 !
!

Bring up TPAs using UM model

Follow these steps to configure the docker run time options.

Procedure

Configure the docker run time option.

Use --pids-limit to limit the number of process IDs using Netconf.

Example:

This example shows the configuration of the docker run time option --pids-limit to limit the number of process IDs using Netconf.

<rpc xmlns="urn:ietf:params:xml:ns:netconf:base:1.0" message-id="101">
  <edit-config>
    <target>
      <candidate/>
    </target>
    <config>
      <appmgr xmlns=http://cisco.com/ns/yang/Cisco-IOS-XR-um-appmgr-cfg>                     
        <applications>
          <application>
            <application-name>alpine_app</application-name>
            <activate>
              <type>docker</type>
                  <source-name>alpine</source-name>
                  <docker-run-cmd>/bin/sh</docker-run-cmd>
                  <docker-run-opts>-it --pids-limit=90</docker-run-opts>
            </activate>
          </application>
        </applications>
      </appmgr>
    </config>
  </edit-config>

The number of process IDs is limited to 90.


Bring up TPAs using Native model

This example shows the configuration of the docker run time option --pids-limit to limit the number of process IDs using Native YANG model.

<rpc xmlns="urn:ietf:params:xml:ns:netconf:base:1.0" message-id="101">
  <edit-config>
    <target>
      <candidate/>
    </target>
    <config>
      <appmgr xmlns=http://cisco.com/ns/yang/Cisco-IOS-XR-appmgr-cfg>                     
        <applications>
          <application>
            <application-name>alpine_app</application-name>
            <activate>
              <type>docker</type>
               <source-name>alpine</source-name>
               <docker-run-cmd>/bin/sh</docker-run-cmd>
               <docker-run-opts>-it --pids-limit=90</docker-run-opts>
            </activate>
          </application>
        </applications>
      </appmgr>
    </config>
  </edit-config>
Bringup TPAs using gNOI Containerz

The Containerz - gNOI Container Service on NCS 1001 device is a workflow to onboard and manage third-party applications using gNOI RPCs.

For more information, see gNOI Containerz.

Docker Run Options Using Application Manager

With this feature, runtime options for docker containerized applications on IOS-XR can be configured during launch using the appmgr activate " command. AppMgr, which oversees docker containerized applications, ensures that these runtime options can effectively override default configurations, covering aspects like CPU, security, and health checks during the container launch.

This feature introduces multiple runtime options that allow users to customize different parameters of docker containers. The configuration of these runtime options is flexible, as users can use either command or Netconf for the configuration process. Regardless of the chosen method, runtime options must be added to docker-run-opts as needed.

Table 1.

Docker Run Option

Description

--cpus

Number of CPUs

--cpuset-cpus

CPUs in which to allow execution (0-3, 0,1)

--cap-drop

Drop Linux capabilities

--user, -u

Sets the username or UID

--group-add

Add additional groups to run

--health-cmd

Run to check health

--health-interval

Time between running the check

--health-retries

Consecutive failures needed to report unhealthy

--health-start-period

Start period for the container to initialize before starting health-retries countdown

--health-timeout

Maximum time to allow one check to run

--no-healthcheck

Disable any container-specified HEALTHCHECK

--add-host

Add a custom host-to-IP mapping (host:ip)

--dns

Set custom DNS servers

--dns-opt

Set DNS options

--dns-search

Set custom DNS search domains

--domainname

Container NIS domain name

--oom-score-adj

Tune host's OOM preferences (-1000 to 1000)

--shm-size

Option to set the size of /dev/shm

--init

Run an init inside the container that forwards signals and reaps processes

--label, -l

Set meta data on a container

--label-file

Read in a line delimited file of labels

--pids-limit

Tune container pids limit (set -1 for unlimited)

--work-dir

Working directory inside the container

--ulimit

Ulimit options

--read-only

Mount the container's root filesystem as read only

--volumes-from

Mount volumes from the specified container(s)

--stop-signal

Signal to stop the container

--stop-timeout

Timeout (in seconds) to stop a container

--cap-addNET_RAW

Enable NET_RAW capabilities

--publish

Publish a container's port(s) to the host

--entrypoint

Overwrite the default ENTRYPOINT of the image

--expose

Expose a port or a range of ports

--link

Add link to another container

--env

Set environment variables

--env-file

Read in a file of environment variables

--network

Connect a container to a network

--hostname

Container host name

--interactive

Keep STDIN open even if not attached

--tty

Allocate a pseudo-TTY

--publish-all

Publish all exposed ports to random ports

--volume

Bind mount a volume

--mount

Attach a filesystem mount to the container

--restart

Restart policy to apply when a container exits

--cap-add

Add Linux capabilities

--log-driver

Logging driver for the container

--log-opt

Log driver options

--detach

Run container in background and print container ID

--memory

Memory limit

--memory-reservation

Memory soft limit

--cpu-shares

CPU shares (relative weight)

--sysctl

Sysctl options

Third party RPMs installation using App Manager install UI

This section describes how to install third party RPMs using App Manager install UI at runtime while the router is running.

Limitation and guidelines for third party RPMs

These are the limitations and guidelines for the TP RPMs.

  • RPM must not have “scriptlets”. Scriptlets allow packages to run code on installation and removal.

  • RPM must not be already installed via XR Install UI.

  • RPM must not be already installed via App manager UI.

  • TP RPMs must install files only to the /var/lib/docker/appmgr/ filesystem location.

  • RPM Signature verification is not enforced by App Manager Install UI. It supports unsigned TP RPMs.

Install third party RPMs using App Manager install UI

Use this task to install third party RPMs using App Manager install UI.

Procedure


Step 1

Create an RPM containing the application (in the form of a docker container image).

Step 2

Use App manager RPM build tool to generate TP RPMs. See https://github.com/ios-xr/xr-appmgr-build/blob/main/README.md.

Step 3

Install the TP RPM using the App Manager Install UI command.

Example:

RP/0/RP0/CPU0:ios# appmgr package install rpm /harddisk\:/alpine-0.1.0-XR_7.3.1.x86_64.rpm

Uninstall third party RPMs using App Manager install UI

Use this task to uninstall third party RPMs using App Manager install UI.

Uninstallation of TP RPM can be performed using two ways.


Attention


App manager uninstall CLI uninstalls the TP RPM at runtime while NCS 1001 is running.


Procedure


Step 1

Uninstall using source name.

Example:

RP/0/RP0/CPU0:ios# appmgr package uninstall source alpine

Step 2

Uninstall using package name.

Example:

RP/0/RP0/CPU0:ios# appmgr package uninstall package alpine-0.1.0-XR_7.3.1.x86_64

Supported commands on application manager

This section describes the operations and the IOS XR commands that are supported on the application manager:

Action commands

App Manager action commands are used to start, stop, kill and exec shell commands inside running container.

Table 2. Action commands

Command name

Commands

Purpose

Application start

appmgr application start name <name>

Starts a stopped container or application.

Application stop

appmgr application stop name <name>

Stops a stopped running container or application.

Application kill

appmgr application kill name <name>

Kills a running container or application.

Application copy

appmgr application copy <storage-path>

Copy data between host and container.

Appliction exec

appmgr application exec <name> docker-exec-cmd <cmd>

Executes command inside TP container application (docker only).

Examples

Here are examples for the app manager action commands. For more information on the commands, see Command Reference Guide for NCS 1001.

Action CLI (Start): This starts a stopped container

RP/0/RP0/CPU0:ios# appmgr application start name alpine_app 

Action CLI (Stop): This stops a running container

RP/0/RP0/CPU0:ios# appmgr application stop name alpine_app 

Action CLI (Kill): This forcefully kills a running container

RP/0/RP0/CPU0:ios# appmgr application kill name alpine_app 

Action CLI (Copy): Copy data between host and container

RP/0/RP0/CPU0:ios# appmgr application copy harddisk:/data.txt alpine_app:/ 

Action CLI (Exec): Execute command inside TP container app

RP/0/RP0/CPU0:ios# appmgr application exec name txt alpine_app docker-exec-cmd “ls -ltr”

Show commands

App Manager show commands shows the application or container info.

Table 3. show commands

Command name

Commands

Purpose

Source table modification

show appmgr source-table

Lists all third-party applications onboarded via (XR Infra / Appmgr CLI / Containerz).

Application table modification

show appmgr application-table

Lists all third-party applications managed via (Config / Containerz) workflow in a tabular view.

Application source name

show appmgr source name <name>

Shows the source name.

Application package install

show appmgr packages installed

Lists all the application manager RPM packages installed.

Appliction exec

show appmgr application name <name> info[ detail| summary]

Shows application information at desired verbosity.

Application logs

show appmgr application name <name> logs

Shows application logs.

Application stats

show appmgr application name name stats

Shows application statistics.

Application process script table

show appmgr process-script-table

Shows summary status of all registered process-scripts.

Examples

This section shows the example outputs for the show appmgr commands. For more information on the show appmgr commands, see the Command Reference guide for the NCS 1001.

The example output shows the onboarded TP applications.

RP/0/RP0/CPU0:ios# show appmgr source-table 
Sno Name               File                               Installed By                            
--- ----------------- -------------------- -----------------------------------
1   alpine                 alpine.tar.gz                containerz            
2   hello-world        hello-world.tar.gz       app_manager  
3   bonnet               bonnet.tar.gz              xr_install

The example output shows the Workflow column that specifies how to manage the TP applications.

RP/0/RP0/CPU0:ios#show appmgr application-table 
Name          Type    Config State  Status                  Workflow       
------------- ------ ------------ ------------- ---------------------------------
alp-cz-app    Docker  Activated    Up 2 minutes     containerz
bnt-cfg-app  Docker  Activated    Up 1 minutes     config

The example output shows the details of the swan application. The Status value under Vrf Relay: <name> indicates the running status of the relay agent. If it reports an Exited state or a Restarting state, use the relay agent logs for troubleshooting.

RP/0/RP0/CPU0:ios#show appmgr application name swan info detail 
Mon Nov 23 21:22:47.240 UTC 
Application: swan 
  Type: Docker 
  Source: swanagent 
  Config State: Activated 
  Docker Information: 
    Container ID: cd27988cd5b066d6272085e5e3ff675c94a64cb4ad06f90c2d89453a8ec4af34 
    Container name: swan 
    Labels: 
    Image: swanagent:latest 
    Command: "./agentxr" 
    Created at: 2020-11-23 21:22:39 +0000 UTC 
    Running for: 8 seconds ago 
    Status: Up Less than a second 
    Size: 0B (virtual 82.9MB) 
    Ports: 
    Mounts: /var/opt/cisco/iosxr/appmgr/config/docker/swanagent,/var/run/netns 
    Networks: host 
    LocalVolumes: 0 
    Vrf Relays: 
      Vrf Relay: vrf_relay.swan.70ec1f59336271ab 
        Source VRF: vrf-mgmt 
        Source Port: 8000 
        Destination VRF: vrf-default 
        Destination Port: 10000 
        IP Address Range: 172.16.0.0/12 
        Status: Up 10 seconds 
      Vrf Relay: vrf_relay.swan.5c7373d41d0ec84f 
        Source VRF: vrf-mgmt 
        Source Port: 8001 
        Destination VRF: vrf-default 
        Destination Port: 10001 
        IP Address Range: 172.16.0.0/12 
        Status: Up 11 seconds

Top Use Cases for Application Hosting

Some of the top use cases for application hosting are:

  • Measure Network Performance: An application can be hosted to measure the bandwidth, throughput and latency of the network and monitor the performance. An example of such an application is the iPerf tool.

  • Automate Server Management: An application can be hosted to automate the server functions like upgrading software, allocation of resources, creating user accounts, and so on. Examples of such an application are the Chef and Puppet configuration management tools.

Manually deploy and activate third party script

NCS 1001 provides CLI commands to perform configurations and operations on the optical devices. If you want to automate the NCS 1001 node operations, you can run third party scripts through App manager. See Automatically deploy and activate third party script.

Follow these steps to deploy and activate third party script manually.

Procedure


Step 1

Use the show script status command to check the list of the OPS scripts that are in-built in XR.

Example:

This command lists the status of xr_script_scheduler script. Ready status in the output means that the script checksum is verified and is ready to run.

RP/0/RP0/CPU0:ios#show script status        
Tue Oct 24 18:03:09.220 UTC
======================================================================================================
 Name                            | Type   | Status           | Last Action | Action Time               
------------------------------------------------------------------------------------------------------
 show_interfaces_counters_ecn.py | exec   | Ready            | NEW         | Tue Oct 24 07:10:36 2025  
 xr_data_collector.py            | exec   | Ready            | NEW         | Tue Oct 24 07:10:36 2025  
 xr_script_scheduler.py          | process| Ready            | NEW         | Tue Oct 24 07:10:36 2025  
======================================================================================================
RP/0/RP0/CPU0:ios#

Step 2

Use the appmgr to run the XR scheduler script.

XR scheduler script contains the necessary

Example:

RP/0/RP0/CPU0:ios#configure
RP/0/RP0/CPU0:ios(config)#appmgr
RP/0/RP0/CPU0:ios(config-appmgr)#process-script xr_script_scheduler
RP/0/RP0/CPU0:ios(config-process-script)#executable xr_script_scheduler.py
RP/0/RP0/CPU0:ios(config-process-script)#commit

Step 3

Check for available process scripts in app manager.

Example:

This output highlights the xr_script_scheduler.py process script that is not activated.
RP/0/RP0/CPU0:ios#show appmgr process-script-table
Wed Oct 22 09:45:02.795 UTC
Name                 Executable            Activated  Status    Restart Policy    Config Pending
-------------------- -------------------- ----------- --------- ---------------- ----------------
xr_script_scheduler  xr_script_scheduler.py     No     Not Started   Always                  No

Step 4

Activate the available process script.

You can start executing a process script only after it is activated.

Example:

RP/0/RP0/CPU0:ios#appmgr process-script activate name xr_script_scheduler
Wed Oct 22 09:45:41.035 UTC

(Optional) Verify the status of the process script. This example shows the process script xr_script_scheduler is Activated.

RP/0/RP0/CPU0:ios#show appmgr process-script-table
Wed Oct 22 09:45:47.275 UTC
Name                 Executable            Activated  Status    Restart Policy    Config Pending
-------------------- -------------------- ----------- --------- ---------------- ----------------
xr_script_scheduler  xr_script_scheduler.py     Yes     Not Started   Always                  No

Step 5

Use the appmgr process-script start command to start the available process script.

Example:

xr_script_scheduler is the only available process script.

This command starts the process script xr_script_scheduler.

RP/0/RP0/CPU0:ios#appmgr process-script start name xr_script_scheduler
Wed Oct 22 09:46:08.273 UTC

(Optional) Verify the status of the process script after activation. This example shows the process script xr_script_scheduler is Activated and Started.

RP/0/RP0/CPU0:ios#show appmgr process-script-table
Wed Oct 22 09:46:24.679 UTC
Name                 Executable            Activated  Status    Restart Policy    Config Pending
-------------------- -------------------- ----------- --------- ---------------- ----------------
xr_script_scheduler  xr_script_scheduler.py       Yes     Started   Always                  No

Step 6

Verify the scheduler script is running.

  1. Run the show script execution command to verify the functioning of the debug and monitoring scripts.

    Example:

    This command displays a list of OPS scripts currently running.

    RP/0/RP0/CPU0:ios# show script execution 
    Tue Oct 24 19:41:15.882 UTC
    ====================================================================================================================
     Req. ID   | Name (type)                               | Start                    | Duration   | Return | Status   
    --------------------------------------------------------------------------------------------------------------------
     1698176223| xr_script_scheduler.py (process)          | Tue Oct 24 19:37:02 2025 | 253.32s    | None   | Started  
    ====================================================================================================================
    RP/0/RP0/CPU0:ios#
  2. Use the show script execution details command to verify if the scheduler script is running.

    Example:

    This command displays a list of OPS scripts currently running. If the scheduler script is correctly configured and activated, the scheduler script execution detail appears in the output.

    RP/0/RP0/CPU0:ios#show script execution details 
    Tue Oct 25 18:01:56.590 UTC
    ====================================================================================================================
     Req. ID   | Name (type)                               | Start                    | Duration   | Return | Status   
    --------------------------------------------------------------------------------------------------------------------
     1698170509| xr_script_scheduler.py (process)          | Tue Oct 25 18:01:49 2023 | 7.68s      | None   | Started  
    --------------------------------------------------------------------------------------------------------------------
     Execution Details:
     ------------------
     Script Name  : xr_script_scheduler.py
     Version      : 25.3.1.14Iv1.0.0
     Log location : /harddisk:/mirror/script-mgmt/logs/xr_script_scheduler.py_process_xr_script_scheduler
     Arguments    : 
     Run Options  : Logging level - INFO, Max. Runtime - 0s, Mode - Background
     Events:
     -------
     1.   Event        : New
          Time         : Tue Oct 25 18:01:49 2025
          Time Elapsed : 0.00s Seconds
          Description  : Started by Appmgr
     2.   Event        : Started
          Time         : Tue Oct 25 18:01:49 2025
          Time Elapsed : 0.11s Seconds
          Description  : Script execution started. PID (15985)
    ====================================================================================================================
    RP/0/RP0/CPU0:ios#

Step 7

Copy the third party RPM files to the NCS 1001 node.

  1. Use any of the file transfer mechanisms to copy third-party RPM.

    Example:

    This example shows copying the RPM to the harddisk of the NCS 1001 node using scp.

    RP/0/RP0/CPU0:ios#scp user@171.xx.xxx.xxx:/users/user/rpm-factory/RPMS/x86_64/nms-1.1-25.3.1.x86_64.rpm /harddisk:
    Tue Oct 24 18:02:42.400 UTC 
    <snip>
    Password:
    nms-1.1-24.1.1.x86_64.rpm                                           100% 9664   881.5KB/s   00:00    
    RP/0/RP0/CPU0:ios#
    
  2. (Optional) Verify the RPM files using dir <filepath> .

    Example:

    RP/0/RP0/CPU0:ios#dir harddisk:/nms-1.1-24.1.1.x86_64.rpm
    Wed Oct  24 19:53:54.041 UTC
    

Step 8

Install the third party RPM files to use the required debug and monitoring python scripts.

The third party RPM files have the customized scripts to be executed. The third-party RPM contains two types of files:

Example:

This is an example xr_script_scheduler.json file. Customize this file as per your requirements.

[
    {
        "name": "__template_entry__.py",
        "description": ["**This is a template entry for documentation purpose. This entry will be ignored**",
                        "name : Name of the python script to be executed",
                        "       [string][mandatory]",
                        "description:  Description of the script",
                        "              [string or list of strings][optional: default empty string]",
                        "cmd_line_parameters: Script command line parameters" ,
                        "                     [list of strings][optional: default Null][Example: ",
                        "env_variables: Enviromental variables to be set in script run shell",
                        "               [list of key value pairs][optional: default Null][Example: [['INT_NAME': 'hu0/1/0/1']]",
                        "run_policy: Script restart policy when script exits",
                        "            [string: one of always/once/stop][optional: default 'always']",
                        "            always: restart the script every time it exits",
                        "            once:  do not restart the script if it exits",
                        "            stop:  stop an existing script run "
                        ],
        "cmd_line_parameters": [],
        "env_variables": [],
        "run_policy": "always"
    },
    {
        "name": "monitor_int_rx_cntr.py",
        "description": "Monitoring mgmt interface for Rx threshold of 100 ",
        "cmd_line_parameters": ["MgmtEth0/RP0/CPU0/0", "200", "-log", "debug"],
        "env_variables": [["INT_NAME", "FourHundredGigE0/9/0/0"], ["INT_NAME2", "FourHundredGigE0/10/0/0"]],
        "run_policy": "always"
    },
    {
        "name": "monitor_int_rx_cntr.py",
        "description": "Monitoring Fo0/0/0/0 interface for Rx threshold of 1000000 ",
        "cmd_line_parameters": ["FourHundredGigE0/0/0/0", "1000000"],
        "run_policy": "once"
    },
    {
        "name": "monitor_int_rx_cntr2.py",
        "description": "Monitoring Fo0/0/0/1 interface for Rx threshold of 5000000 ",
        "cmd_line_parameters": ["FourHundredGigE0/0/0/1", "5000000"],
        "run_policy": "always"
    },
    {
        "name": "monitor_int_rx_cntr2.py",
        "description": "Monitoring Fo0/0/0/2 interface for Rx threshold of 5000000 ",
        "cmd_line_parameters": ["FourHundredGigE0/0/0/2", "8000000"],
        "run_policy": "stop"
    }
]

Example:

Use the appmgr package install rpm <full RPM file path> command to install the third-party RPMs.
RP/0/RP0/CPU0:ios#appmgr package install rpm /harddisk:/nms-1.1-25.3.1.x86_64.rpm
Tue Oct 24 18:03:26.685 UTC
RP/0/RP0/CPU0:ios#
RP/0/RP0/CPU0:ios#show appmgr packages installed 
Tue Oct 24 19:42:07.967 UTC
Sno Package                                                     
--- ------------------------------------------------------------
1   nms-1.1-25.3.1.x86_64                                       
RP/0/RP0/CPU0:ios#

After the scripts and the run parameters file become ready, build the RPM and configure the RPM to install files at <default exr appmgr rpm install path>/ops-script-repo/exec/<rpm name>/. RPM build tool for TPA is available at RPM Build Tool.

Note


Install the scripts in directories named after the RPM for smoother execution.

Step 9

Use the show script status command to verify that the scripts and the run parameter files contained in the RPM are all installed successfully and added to the script management repository.

Example:

This output shows the status that two scripts (monitor_int_xr_cntr.py and monitor_int_rx_cntr2.py) and a run parameter file (xr_script_scheduler.json) file were installed in the third-party RPM named “nms”.

RP/0/RP0/CPU0:ios#show script status                                                                                      
Tue Oct 24 19:41:10.696 UTC
======================================================================================================
 Name                            | Type   | Status           | Last Action | Action Time               
------------------------------------------------------------------------------------------------------
 nms/monitor_int_rx_cntr.py      | exec   | Ready            | NEW         | Tue Oct 24 19:38:41 2023  
 nms/monitor_int_rx_cntr2.py     | exec   | Ready            | NEW         | Tue Oct 24 19:38:41 2023  
 nms/xr_script_scheduler.json    | exec   | Ready            | NEW         | Tue Oct 24 19:38:41 2023  
 show_interfaces_counters_ecn.py | exec   | Ready            | NEW         | Tue Oct 24 19:33:52 2023  
 xr_data_collector.py            | exec   | Ready            | NEW         | Tue Oct 24 19:33:52 2023  
 xr_script_scheduler.py          | process| Ready            | NEW         | Tue Oct 24 19:33:52 2023  
======================================================================================================
RP/0/RP0/CPU0:ios#

After the scripts are installed, the scheduler script starts reading the run parameter JSON file and executes the required debug and monitoring scripts.

The logs generated by the scripts are available in the directory /harddisk\:/mirror/script-mgmt/logs/.

Step 10

Verify that the debug and monitoring scripts are running.

Example:

Use the show script execution command to verify that the scripts are running.

RP/0/RP0/CPU0:ios#show script execution 
Tue Oct 24 19:41:15.882 UTC
====================================================================================================================
 Req. ID   | Name (type)                               | Start                    | Duration   | Return | Status   
--------------------------------------------------------------------------------------------------------------------
 1698176223| xr_script_scheduler.py (process)          | Tue Oct 24 19:37:02 2023 | 253.32s    | None   | Started  
 1698176224| nms/monitor_int_rx_cntr.py (exec)         | Tue Oct 24 19:38:43 2023 | 152.46s    | None   | Started  
 1698176225| nms/monitor_int_rx_cntr.py (exec)         | Tue Oct 24 19:38:44 2023 | 152.03s    | None   | Started  
 1698176226| nms/monitor_int_rx_cntr2.py (exec)        | Tue Oct 24 19:38:44 2023 | 151.63s    | None   | Started  
====================================================================================================================
RP/0/RP0/CPU0:ios#

(Optional) Use the show script execution[ namescript-namedetail [output][error]]

Step 11

Verify all the active packages are installed.

Example:

RP/0/RP0/CPU0:ios#show install active summary
Fri Nov 14 12:52:39.322 IST
Label : 25.3.1.31I-iso

    Active Packages: 2
        ncs1001-xr-25.4.1.31I version=25.4.1.31I [Boot image]
        ncs1001-cosm-1.0.0.0-r253131I

Step 12

(Optional) Use the appmgr process-script stop command to stop the process script.

Example:

This command stops the execution of the process script xr_script_scheduler.
RP/0/RP0/CPU0:ios#appmgr process-script stop name xr_script_scheduler
Wed Oct 22 09:46:35.110 UTC

(Optional) Verify the status of the process script after stopping it. This example shows the process script xr_script_scheduler is Activated and Stopped.

RP/0/RP0/CPU0:ios#show appmgr process-script-table
Wed Oct 22 09:46:41.245 UT
Name                 Executable            Activated  Status    Restart Policy    Config Pending
-------------------- -------------------- ----------- --------- ---------------- ----------------
xr_script_scheduler  xr_script_scheduler.py       Yes     Stopped   Always                  No

Automated Deployment of Third Party Python Scripts

Efficient network automation is pivotal in handling extensive cloud-computing networks. The Cisco IOS XR infrastructure plays a crucial role by enabling automation through the initiation of API calls and execution of scripts. Traditionally, an external controller is used for this purpose, utilizing interfaces like NETCONF, SNMP, and SSH to communicate with NCS 1001.

This feature streamlines the operational structure by executing automation scripts directly on the router, thus eliminating the need for an external controller. It allows scripts to leverage Python libraries and access underlying router information. This approach not only accelerates the execution of various types of scripts but also enhances reliability by removing dependencies on the speed and network reachability of an external controller.

The third party script is automatically executed by the xr_script_scheduler.py script upon the installation of third-party RPMs. App manager configuration is required to activate the xr_script_scheduler.py script and run the third party scripts after installation.


Note


If you use the autorun configuration, the xr_script_scheduler.py script activates automatically.


Automatically deploy and activate third party script

NCS 1001 provides CLI commands to perform configurations and operations on the optical devices. If you want to automate the NCS 1001 node operations, you can run third party scripts through App manager.

Follow these steps to deploy and activate third party script.

Procedure


Step 1

Use the show script status command to check the list of the OPS scripts that are in-built in XR.

Example:

This command lists the status of xr_script_scheduler script. Ready status in the output means that the script checksum is verified and is ready to run.

RP/0/RP0/CPU0:ios#show script status        
Tue Oct 24 18:03:09.220 UTC
======================================================================================================
 Name                            | Type   | Status           | Last Action | Action Time               
------------------------------------------------------------------------------------------------------
 show_interfaces_counters_ecn.py | exec   | Ready            | NEW         | Tue Oct 24 07:10:36 2025  
 xr_data_collector.py            | exec   | Ready            | NEW         | Tue Oct 24 07:10:36 2025  
 xr_script_scheduler.py          | process| Ready            | NEW         | Tue Oct 24 07:10:36 2025  
======================================================================================================
RP/0/RP0/CPU0:ios#

Step 2

Use the appmgr to automatically run the XR scheduler script.

Activate the scheduler script automatically using the "autorun" option with the configuration.

Example:

RP/0/RP0/CPU0:ios#configure
RP/0/RP0/CPU0:ios(config)#appmgr
RP/0/RP0/CPU0:ios(config-appmgr)#process-script xr_script_scheduler
RP/0/RP0/CPU0:ios(config-process-script)#executable xr_script_scheduler.py
RP/0/RP0/CPU0:ios(config-process-script)#autorun
RP/0/RP0/CPU0:ios(config-process-script)#commit

The 'autorun' configuration has been added to enable automatic activation of the process script. If you prefer manual activation/deactivation using CLI, skip the 'autorun' configuration line. See Manually deploy and activate third party script.

Step 3

Verify the scheduler script is running.

  1. Run the show script execution command to verify the functioning of the debug and monitoring scripts.

    Example:

    This command displays a list of OPS scripts currently running.

    RP/0/RP0/CPU0:ios# show script execution 
    Tue Oct 24 19:41:15.882 UTC
    ====================================================================================================================
     Req. ID   | Name (type)                               | Start                    | Duration   | Return | Status   
    --------------------------------------------------------------------------------------------------------------------
     1698176223| xr_script_scheduler.py (process)          | Tue Oct 24 19:37:02 2025 | 253.32s    | None   | Started  
     ====================================================================================================================
    RP/0/RP0/CPU0:ios#
  2. Use the show script execution details command to verify if the scheduler script is running.

    Example:

    This command displays a list of OPS scripts currently running. If the scheduler script is correctly configured and activated, the scheduler script execution detail appears in the output.

    RP/0/RP0/CPU0:ios#show script execution details 
    Tue Oct 25 18:01:56.590 UTC
    ====================================================================================================================
     Req. ID   | Name (type)                               | Start                    | Duration   | Return | Status   
    --------------------------------------------------------------------------------------------------------------------
     1698170509| xr_script_scheduler.py (process)          | Tue Oct 25 18:01:49 2023 | 7.68s      | None   | Started  
    --------------------------------------------------------------------------------------------------------------------
     Execution Details:
     ------------------
     Script Name  : xr_script_scheduler.py
     Version      : 25.3.1.14Iv1.0.0
     Log location : /harddisk:/mirror/script-mgmt/logs/xr_script_scheduler.py_process_xr_script_scheduler
     Arguments    : 
     Run Options  : Logging level - INFO, Max. Runtime - 0s, Mode - Background
     Events:
     -------
     1.   Event        : New
          Time         : Tue Oct 25 18:01:49 2025
          Time Elapsed : 0.00s Seconds
          Description  : Started by Appmgr
     2.   Event        : Started
          Time         : Tue Oct 25 18:01:49 2025
          Time Elapsed : 0.11s Seconds
          Description  : Script execution started. PID (15985)
    ====================================================================================================================
    RP/0/RP0/CPU0:ios#

Step 4

Copy the third party RPM files to the NCS 1001 node.

  1. Use any of the file transfer mechanisms to copy third-party RPM.

    Example:

    This example shows copying the RPM to the harddisk of the NCS 1001 node using scp.

    RP/0/RP0/CPU0:ios#scp user@171.xx.xxx.xxx:/users/user/rpm-factory/RPMS/x86_64/nms-1.1-25.3.1.x86_64.rpm /harddisk:
    Tue Oct 24 18:02:42.400 UTC 
    <snip>
    Password:
    nms-1.1-24.1.1.x86_64.rpm                                           100% 9664   881.5KB/s   00:00    
    RP/0/RP0/CPU0:ios#
    
  2. (Optional) Verify the RPM files using dir <filepath> .

    Example:

    RP/0/RP0/CPU0:ios#dir harddisk:/nms-1.1-24.1.1.x86_64.rpm
    Wed Oct  24 19:53:54.041 UTC
    

Step 5

Install the third party RPM files to use the required debug and monitoring python scripts.

The third party RPM files have the customized scripts to be executed. The third-party RPM contains two types of files:

Example:

This is an example xr_script_scheduler.json file. Customize this file as per your requirements.

[
    {
        "name": "__template_entry__.py",
        "description": ["**This is a template entry for documentation purpose. This entry will be ignored**",
                        "name : Name of the python script to be executed",
                        "       [string][mandatory]",
                        "description:  Description of the script",
                        "              [string or list of strings][optional: default empty string]",
                        "cmd_line_parameters: Script command line parameters" ,
                        "                     [list of strings][optional: default Null][Example: ",
                        "env_variables: Enviromental variables to be set in script run shell",
                        "               [list of key value pairs][optional: default Null][Example: [['INT_NAME': 'hu0/1/0/1']]",
                        "run_policy: Script restart policy when script exits",
                        "            [string: one of always/once/stop][optional: default 'always']",
                        "            always: restart the script every time it exits",
                        "            once:  do not restart the script if it exits",
                        "            stop:  stop an existing script run "
                        ],
        "cmd_line_parameters": [],
        "env_variables": [],
        "run_policy": "always"
    },
    {
        "name": "monitor_int_rx_cntr.py",
        "description": "Monitoring mgmt interface for Rx threshold of 100 ",
        "cmd_line_parameters": ["MgmtEth0/RP0/CPU0/0", "200", "-log", "debug"],
        "env_variables": [["INT_NAME", "FourHundredGigE0/9/0/0"], ["INT_NAME2", "FourHundredGigE0/10/0/0"]],
        "run_policy": "always"
    },
    {
        "name": "monitor_int_rx_cntr.py",
        "description": "Monitoring Fo0/0/0/0 interface for Rx threshold of 1000000 ",
        "cmd_line_parameters": ["FourHundredGigE0/0/0/0", "1000000"],
        "run_policy": "once"
    },
    {
        "name": "monitor_int_rx_cntr2.py",
        "description": "Monitoring Fo0/0/0/1 interface for Rx threshold of 5000000 ",
        "cmd_line_parameters": ["FourHundredGigE0/0/0/1", "5000000"],
        "run_policy": "always"
    },
    {
        "name": "monitor_int_rx_cntr2.py",
        "description": "Monitoring Fo0/0/0/2 interface for Rx threshold of 5000000 ",
        "cmd_line_parameters": ["FourHundredGigE0/0/0/2", "8000000"],
        "run_policy": "stop"
    }
]

Example:

Use the appmgr package install rpm <full RPM file path> command to install the third-party RPMs.
RP/0/RP0/CPU0:ios#appmgr package install rpm /harddisk:/nms-1.1-25.3.1.x86_64.rpm
Tue Oct 24 18:03:26.685 UTC
RP/0/RP0/CPU0:ios#
RP/0/RP0/CPU0:ios#show appmgr packages installed 
Tue Oct 24 19:42:07.967 UTC
Sno Package                                                     
--- ------------------------------------------------------------
1   nms-1.1-25.3.1.x86_64                                       
RP/0/RP0/CPU0:ios#

After the scripts and the run parameters file become ready, build the RPM and configure the RPM to install files at <default exr appmgr rpm install path>/ops-script-repo/exec/<rpm name>/. RPM build tool for TPA is available at RPM Build Tool.

Note


Install the scripts in directories named after the RPM for smoother execution.

Step 6

Use the show script status command to verify that the scripts and the run parameter files contained in the RPM are all installed successfully and added to the script management repository.

Example:

This output shows the status that two scripts (monitor_int_xr_cntr.py and monitor_int_rx_cntr2.py) and a run parameter file (xr_script_scheduler.json) file were installed in the third-party RPM named “nms”.

RP/0/RP0/CPU0:ios#show script status                                                                                      
Tue Oct 24 19:41:10.696 UTC
======================================================================================================
 Name                            | Type   | Status           | Last Action | Action Time               
------------------------------------------------------------------------------------------------------
 nms/monitor_int_rx_cntr.py      | exec   | Ready            | NEW         | Tue Oct 24 19:38:41 2023  
 nms/monitor_int_rx_cntr2.py     | exec   | Ready            | NEW         | Tue Oct 24 19:38:41 2023  
 nms/xr_script_scheduler.json    | exec   | Ready            | NEW         | Tue Oct 24 19:38:41 2023  
 show_interfaces_counters_ecn.py | exec   | Ready            | NEW         | Tue Oct 24 19:33:52 2023  
 xr_data_collector.py            | exec   | Ready            | NEW         | Tue Oct 24 19:33:52 2023  
 xr_script_scheduler.py          | process| Ready            | NEW         | Tue Oct 24 19:33:52 2023  
======================================================================================================
RP/0/RP0/CPU0:ios#

After the scripts are installed, the scheduler script starts reading the run parameter JSON file and executes the required debug and monitoring scripts.

The logs generated by the scripts are available in the directory /harddisk\:/mirror/script-mgmt/logs/.

Step 7

Verify that the debug and monitoring scripts are running.

Example:

Use the show script execution command to verify that the scripts are running.

RP/0/RP0/CPU0:ios#show script execution 
Tue Oct 24 19:41:15.882 UTC
====================================================================================================================
 Req. ID   | Name (type)                               | Start                    | Duration   | Return | Status   
--------------------------------------------------------------------------------------------------------------------
 1698176223| xr_script_scheduler.py (process)          | Tue Oct 24 19:37:02 2023 | 253.32s    | None   | Started  
 1698176224| nms/monitor_int_rx_cntr.py (exec)         | Tue Oct 24 19:38:43 2023 | 152.46s    | None   | Started  
 1698176225| nms/monitor_int_rx_cntr.py (exec)         | Tue Oct 24 19:38:44 2023 | 152.03s    | None   | Started  
 1698176226| nms/monitor_int_rx_cntr2.py (exec)        | Tue Oct 24 19:38:44 2023 | 151.63s    | None   | Started  
====================================================================================================================
RP/0/RP0/CPU0:ios#

(Optional) Use the show script execution[ namescript-namedetail [output][error]]