Configure OTDR Module

OTDR

The Optical Time Domain Reflectometer (OTDR) is a Cisco NCS 1001 line card that measures optical fiber characteristics between optical nodes.

The line card contains two bidirectional OTDRs and two filters that combine C-band, optical supervisory channel (OSC), and OTDR signals. Each internal OTDR can measure both transmit (TX) and receive (RX) fibers by using an internal optical switch.

The OTDR line card connects to the OSC port on the optical amplifier. Measurement data is stored in an .SOR file and can be exported from Cisco NCS 1001 by using SCP, TFTP, or SFTP.

The OTDR line card:

  • provides information about insertion loss and reflection points on the optical fiber,

  • inspects the transmission fiber,

  • identifies discontinuities or defects on the fiber,

  • measures the distance and magnitude of insertion loss and reflection loss events, and

  • improves scan performance through scan parameters that match the fiber plant, such as span length, reflection contribution, and major events.

OTDR card front view
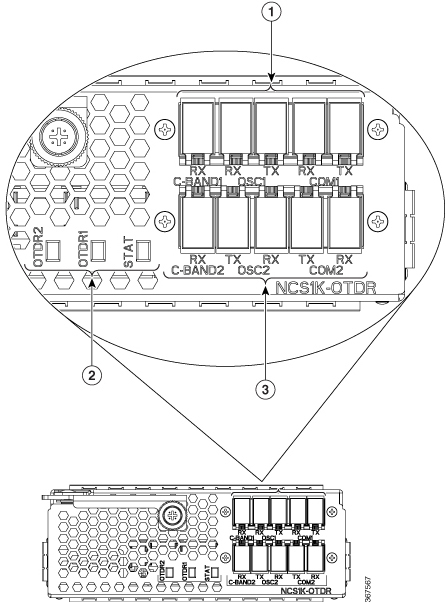
Figure 1. Front view of OTDR card
Table 1. OTDR front-panel callouts

Callout

Description

1

OTDR1 interface

2

LED status

3

OTDR2 interface

Logical ports

The OTDR card associates physical ports with these logical OTS controller ports.

Table 2. OTDR physical ports and associated logical ports

OTDR port

Logical port

C-Band-1 RX

controller OTS 0/slot/0/0

COM1 (RX, TX)

controller OTS 0/slot/0/1

OSC1 (RX, TX)

controller OTS 0/slot/0/2

C-Band-2 RX

controller OTS 0/slot/0/3

COM2 (RX, TX)

controller OTS 0/slot/0/4

OSC2 (RX, TX)

controller OTS 0/slot/0/5

For command output that displays these logical ports and photodiode power levels, see view the logical ports and photodiode power levels.

OTDR modes

OTDR supports automatic and expert modes.

Table 3. OTDR modes

Mode

Description

Automatic

Uses automated training and measurement phases. Training measures optical return loss (ORL) and prepares the internal OTDR measurement parameters before the measurement starts.

Expert

Requires the user to configure the OTDR scan parameters. The mode does not run a training phase and does not automatically adjust the scan parameters.

OTDR limitations

  • When Cisco NCS 1001 uses the OTDR line card, the OSC channel uses 1610 nm and OTDR uses 1518 nm.

  • OTDR supports up to 20 dB span loss or 100 km fiber length.

  • Do not start OTDR measurements simultaneously from two different nodes because the results and graph are not valid.

  • OTDR measurement during an OTDR-HIGH-REFLECTION alarm, with reflections approximately greater than -25 dB, can provide low event accuracy.

  • OTDR graphs can be truncated for fiber spools from 1.00 km to 1.05 km, 25.0 km to 25.6 km, or 80.0 km to 83.9 km.

  • OTDR supports up to -14 dB reflection. The OTDR-HIGH-REFLECTION alarm is raised when R(dB) - 2*NL(dB) is greater than -20 dB, where R is reflectivity and NL is loss.

LOS-P alarm handling


Note


When an EDFA module is connected to the OTDR module without an OSC channel between them, an LOS-P alarm is raised on OTS 0/x/0/2 of the EDFA module. Configure the OTS controller under maintenance or shut down the EDFA receive direction on port 0/x/0/2 to suppress the alarm and resume normal OTDR operation.


Example: Configure the OTS controller under maintenance.


RP/0/RP0/CPU0:ios#configure
RP/0/RP0/CPU0:ios(config)#controller ots 0/3/0/2
RP/0/RP0/CPU0:ios(config-ots)#sec-admin-state maintenance
RP/0/RP0/CPU0:ios(config-ots)#commit

Example: Shut down the EDFA port in the receive direction.


RP/0/RP0/CPU0:ios#configure
RP/0/RP0/CPU0:ios(config)#controller ots 0/3/0/2
RP/0/RP0/CPU0:ios(config-ots)#rx-enable 0
RP/0/RP0/CPU0:ios(config-ots)#commit
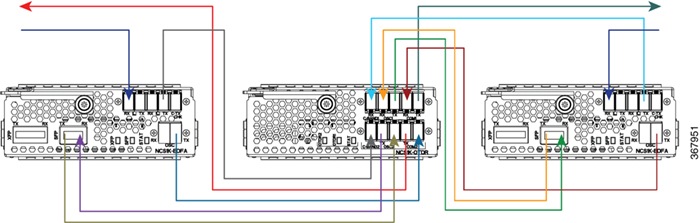
Cable a terminal node for OTDR

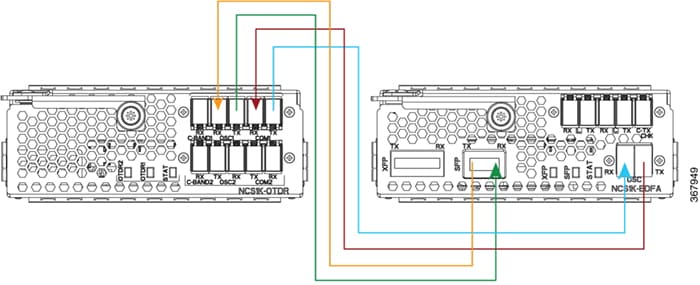
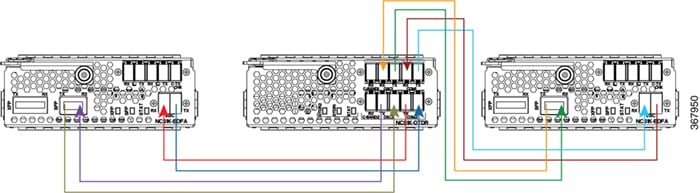
Connect the OTDR and EDFA ports in the correct order for port 1. If needed, repeat the sequence for the second OTDR port.

In a terminal-node configuration, both the EDFA and OTDR line cards are installed in the same Cisco NCS 1001 system. The OTDR filter combines the EDFA OSC SFP signal with the OTDR signal. It then feeds the combined signal into the EDFA OSC input.

Procedure


Step 1

Connect an LC/LC fiber from the OTDR COM TX port to the EDFA OSC RX port.

Step 2

Connect an LC/LC fiber from the EDFA OSC TX port to the OTDR COM RX port.

Step 3

Connect an LC/LC fiber from the OTDR OSC TX port to the pluggable RX port inserted into the EDFA.

Step 4

Connect an LC/LC fiber from the pluggable TX port inserted into the EDFA to the OTDR OSC RX port.

The port 1 terminal-node cabling path is complete. If you need to connect a second OTDR port, repeat the sequence.

Figure 2. Cabling for terminal configuration with one EDFA module
Figure 3. Cabling for terminal configuration with two EDFA modules

The terminal node cabling supports OTDR measurement through the EDFA OSC path.

Cable an ILA node for OTDR

Connect OTDR port 1 to the EDFA in slot 1 and OTDR port 2 to the EDFA in slot 3.

In an Intermediate Line Amplifier (ILA) node, one OTDR card supports both ILA directions. Two EDFA cards and one OTDR line card are installed in the same Cisco NCS 1001 system.

Procedure


Step 1

Cable OTDR port 1 to the EDFA in slot 1.

  1. Connect an LC/LC fiber from OTDR port 1 COM TX to the fiber span Line TX that faces EDFA slot 1.

  2. Connect an LC/LC fiber from EDFA slot 1 COM TX to C-band 1 RX.

  3. Connect an LC/LC fiber from OTDR OSC TX port 1 to the OSC pluggable RX port inserted into EDFA slot 1.

  4. Connect an LC/LC fiber from the OSC pluggable TX port inserted into EDFA slot 1 to OTDR OSC RX port 1.

  5. Connect an LC/LC fiber from EDFA slot 1 OSC TX to OTDR COM RX port 1.

Step 2

Cable OTDR port 2 to the EDFA in slot 3.

  1. Connect an LC/LC fiber from OTDR port 2 COM TX to the fiber span Line TX that faces EDFA slot 3.

  2. Connect an LC/LC fiber from EDFA slot 3 COM TX to C-band 2 RX.

  3. Connect an LC/LC fiber from OTDR OSC TX port 2 to the OSC pluggable RX port inserted into EDFA slot 3.

  4. Connect an LC/LC fiber from the OSC pluggable TX port inserted into EDFA slot 3 to OTDR OSC RX port 2.

  5. Connect an LC/LC fiber from EDFA slot 3 OSC TX to OTDR COM RX port 2.

Figure 4. Cabling for ILA configuration
Cabling for ILA configuration

The OTDR card is connected to both ILA directions.

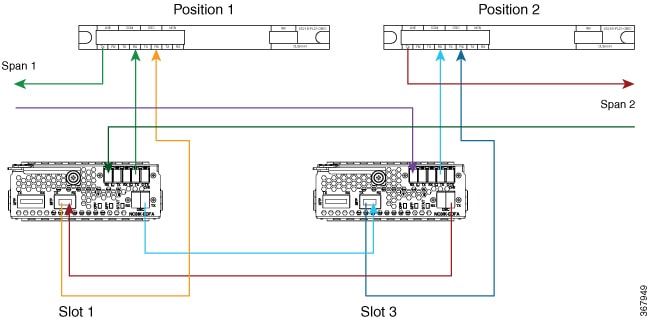
Cable an ILA node with 15216-FLD-OSC for OTDR

Connect the span, EDFA, OSC pluggable, and 15216-FLD-OSC ports sequentially.

The NCS1K-OTDR module replaces the need for the 15216-FLD-OSC module in the recommended ILA configuration.

Procedure


Step 1

Connect the EDFA slot 1 line and COM paths.

  1. Connect an LC/LC fiber from RX-span 2 to the LINE RX port of EDFA slot 1.

  2. Connect an LC/LC fiber from the COM TX port of EDFA slot 1 to the COM RX port of 15216-FLD-OSC position 1.

  3. Connect an LC/LC fiber from TX-span 1 to the LINE TX port of 15216-FLD-OSC position 1.

Step 2

Connect the EDFA slot 1 OSC path.

  1. Connect an LC/LC fiber from the OSC pluggable TX port inserted into EDFA slot 1 to the OSC RX port of 15216-FLD-OSC position 1.

  2. Connect an LC/LC fiber from the OSC TX port of EDFA slot 1 to the OSC pluggable RX port inserted into EDFA slot 3.

Step 3

Connect the EDFA slot 3 OSC path.

  1. Connect an LC/LC fiber from the OSC TX port of EDFA slot 3 to the OSC pluggable RX port inserted into EDFA slot 1.

  2. Connect an LC/LC fiber from the OSC pluggable TX port inserted into EDFA slot 3 to the OSC RX port of 15216-FLD-OSC position 2.

Step 4

Connect the EDFA slot 3 line and COM paths.

  1. Connect an LC/LC fiber from RX-span 1 to the LINE RX port of EDFA slot 3.

  2. Connect an LC/LC fiber from the COM TX port of EDFA slot 3 to the COM RX port of 15216-FLD-OSC position 2.

  3. Connect an LC/LC fiber from TX-span 2 to the LINE TX port of 15216-FLD-OSC position 2.

Figure 5. Cabling for ILA configuration with 15216-FLD-OSC

The ILA node cabling through the 15216-FLD-OSC module is complete.

Clear the card configurations

Clear the previous optical module configuration to prevent the replacement OTDR module from inheriting configuration from the old card.

Before installing a new, different type of optical module, clear the configurations of the old module. A Cisco NCS 1001 slot configuration can include card configuration, OTS controller configuration, and optics controller configuration for EDFA cards.

Follow these steps to clear the card configurations:

Procedure


Step 1

Clear the configuration in the previous card.

no hw-module location 0/RP0/CPU0 slot slot-number

Step 2

Clear the configuration for each OTS controller.

no controller ots rack/slot/instance/port

Step 3

If the previous card was an EDFA card, clear each optics controller configuration.

no controller optics rack/slot/instance/port


After clearing the old card configuration, the slot is ready for the replacement OTDR module.

Configure OTDR

Configure OTDR parameters when the default values must be changed for the fiber span.

When the OTDR card is inserted, it has default optical parameters for both the ports and both the TX and RX directions.

Procedure


Step 1

Enter configuration mode.

Example:

configure

Step 2

Use the hw-module location command to enter OTDR slot configuration mode.

Example:

hw-module location 0/RP0/CPU0 slot 2

Step 3

Configure the OTDR parameters for the required port and direction.

Configure only the parameter values that must differ from the default values.

See OTDR configuration parameters for the parameter descriptions, ranges, and defaults.

Example:


otdr port 1 direction tx total-loss 200
otdr port 1 direction tx back-scattering -820
otdr port 1 direction tx refractive-index 1498962
otdr port 1 direction tx mode-expert pulse-width 1000
otdr port 1 direction tx mode-expert measure-time 180
otdr port 1 direction tx mode-expert capture-length 80
otdr port 1 direction tx mode-expert capture-offset 0
otdr port 1 direction tx mode-expert fiber-resolution 25
otdr port 1 direction tx mode-expert loss-relative-threshold 20
otdr port 1 direction tx mode-expert reflection-relative-threshold 20
otdr port 1 direction rx total-loss 200
otdr port 1 direction rx mode-expert pulse-width 1000
otdr port 1 direction rx mode-expert measure-time 180
otdr port 1 direction rx mode-expert capture-length 80
otdr port 1 direction rx mode-expert capture-offset 0
otdr port 1 direction rx mode-expert fiber-resolution 25
otdr port 1 direction rx mode-expert loss-relative-threshold 20
otdr port 1 direction rx mode-expert reflection-relative-threshold 20
otdr port 1 orl-abs-threshold 280
otdr port 1 loss-abs-threshold 15
otdr port 1 reflection-abs-threshold -300
commit
end

Step 4

Commit the configuration and exit configuration mode.

Example:


commit
end

The OTDR parameters are configured for the selected port and direction.

OTDR configuration parameters

Use these values when configuring OTDR optical parameters for the selected port and direction.

Table 4. OTDR configuration parameters

Parameter

Description

Range

Default

total-loss (in 0.1 dB)

Loss from the near-end OTDR port to the far-end OTDR port, including span loss and additional EDFA filter loss.

0 to 500

200

back-scattering

Backscattering value in the TX direction.

-100.0 to 0.0

-82.0

refractive-index

Refractive index value in the TX direction.

1.000000 to 2.000000

1.498962

mode-expert pulse-width (ns)

Pulse duration during the measurement.

8 to 100000

1000

mode-expert measure-time (sec)

Time required to perform a complete optical scan.

1 to 360

180

mode-expert capture-length (km)

Distance of the measurement endpoint.

1 to 150

80

mode-expert capture-offset (km)

Start point of the measurement.

0 to 150

0

mode-expert fiber-resolution (m)

Distance between measurement steps.

0 to 100

25

orl-abs-threshold (in 0.1 dB)

Threshold to compare with the ORL measurement returned by the OTDR run.

140 to 400

280

loss-abs-threshold (in 0.1 dB)

Threshold to compare with loss events returned by the OTDR run.

1 to 300

15

reflection-abs-threshold (in 0.1 dB)

Threshold to compare with reflection events returned by the OTDR run.

-500 to 0

-300

loss-sensitivity (in 0.1 dB)

Limit under which the loss is not considered a real loss.

4 to 50

6

reflection-sensitivity (in 0.1 dB)

Limit under which the reflection is not considered a real reflection.

-400 to -140

-300

loss-relative-threshold (in 0.1 dB)

Threshold to compare the OTDR loss value plus the relative loss threshold with the baseline value.

1 to 300

2

reflection-relative-threshold (in 0.1 dB)

Threshold to compare the OTDR reflection value plus the relative reflection threshold with the baseline value.

1 to 300

2


Note


From Release 7.5.1, the plus sign labels in positive range values are removed in the Cisco NCS 1001 CLI help description.


Note


For back-scattering and refractive-index, Cisco NCS 1001 accepts any value within the defined range. Set the actual value based on the fiber characteristics and optimal values for the specific fiber type in your network.


Display OTDR measurement status

Display OTDR measurement status to confirm whether automatic or expert scans are running, completed, aborted, or unknown.

The command displays a table with status for all the OTDR ports and directions.

Procedure


Use the show hw-module command to display OTDR status for the slot.

Example:

show hw-module slot 2 otdr status
 Automatic Mode 

Wed Oct 16 09:06:46.148 CEST
  Port | Rx/Tx |  Date/Time|     Training |   OTDR Measurement| Next scan (min)
-------+-------+---------------------+--------------------+----------------------+-
   1   |   Tx  |           |     UNKNOWN  |       UNKNOWN     |       0
   1   |   Rx  |           |     UNKNOWN  |       UNKNOWN     |       0
   2   |   Tx  |           |     UNKNOWN  |       UNKNOWN     |       0
   2   |   Rx  |           |     UNKNOWN  |       UNKNOWN     |       0

The next scan is related to the periodic scan. When the periodic scan is not set, the next scan value is 0.
 Expert Mode 
 
Port | Rx/Tx |      Date/Time        |     Training       |   OTDR Measurement
––--------+-------+---------------------+--------------------+-------------------

   1   |   Tx  |   20180503-181159   |     UNKNOWN         | PROGRESS    10%  

   1   |   Rx  |                     |     UNKNOWN         |       UNKNOWN  

   2   |   Tx  |                     |     UNKNOWN         |       UNKNOWN  

   2   |   Rx  |                     |     UNKNOWN         |       UNKNOWN 

If periodic scan is not set, the next-scan value is 0.


Configure OTDR in automatic mode

Configure automatic mode to have OTDR prepare measurement parameters and run scans through automated training and measurement phases.

Automatic mode provides default values for scan parameters. Adjust values only if the fiber span requires a different measurement behavior.

Procedure


Step 1

Enter configuration mode.

Example:

configure

Step 2

Use the hw-module location command to enter OTDR automatic mode configuration for the slot, port, and direction.

Example:

hw-module location 0/RP0/CPU0 slot 3 otdr port 1 direction tx scan auto

Step 3

Configure automatic mode parameters.

See OTDR automatic-mode parameters for parameter descriptions, ranges, and defaults.

Example:


loss-sensitivity 5
loss-relative-threshold 10
reflection-sensitivity -300
reflection-relative-threshold 5
total-loss 300
periodic-scan minutes 40

Step 4

Commit the configuration and exit configuration mode.

Example:

commit
end

OTDR automatic mode is configured for the selected port and direction.

OTDR automatic mode parameters

Use these values when configuring OTDR in automatic mode.

Table 5. OTDR automatic mode parameters

Parameter

Description

Range

Default

loss-sensitivity (in 0.1 dB)

Limit under which the loss is not considered a real loss.

4 to 50

6

loss-relative-threshold (in 0.1 dB)

Threshold to compare the OTDR loss value plus the relative loss threshold with the baseline value.

1 to 300

2

reflection-sensitivity (in 0.1 dB)

Limit under which the reflection is not considered a real reflection.

-400 to -140

-300

reflection-relative-threshold (in 0.1 dB)

Threshold to compare the OTDR reflection value plus the relative reflection threshold with the baseline value.

1 to 300

2

total-loss (in 0.1 dB)

Loss from the near-end OTDR port to the far-end OTDR port, including span loss and additional EDFA filter loss.

1 to 500

200

periodic scan (minutes)

Automatically starts OTDR scans and repeats the scan after the periodic scan time elapses.

30 to 600000

30


Note


From Release 7.5.1, the plus sign labels in positive range values are removed in the Cisco NCS 1001 CLI help description.


Start OTDR measurement in automatic mode

Start automatic measurement after the OTDR automatic mode parameters are configured.

The scan continues in the background after the command starts the action.

Procedure


Use the hw-module command to start the OTDR automatic mode scan.

hw-module slot slot-number otdr port port-number direction direction scan auto

Example:

hw-module slot 3 otdr port 1 direction tx scan auto

The system displays the message "Otdr action will continue in the background."


What to do next

To see the measurement status, use the show hw-module slot slot-number otdr status command.

OTDR measurement in automatic mode based on events

OTDR automatic measurement can start on both TX and RX directions between two nodes when specific network events occur.

  • An automatic scan starts when a loss of signal (LOS) alarm is raised or cleared on the line port of an EDFA, such as controller OTS 0/x/0/1. If an automatic scan is already running, a new LOS state change aborts the current scan and starts a new one.

  • An automatic scan also starts when the difference between the current span-loss value and the previous span-loss sample exceeds the configured span-loss delta value.

    hw-module location 0/RP0/CPU0 slot <n> ampli span-loss span-loss-delta 20

Supported deployment scenarios

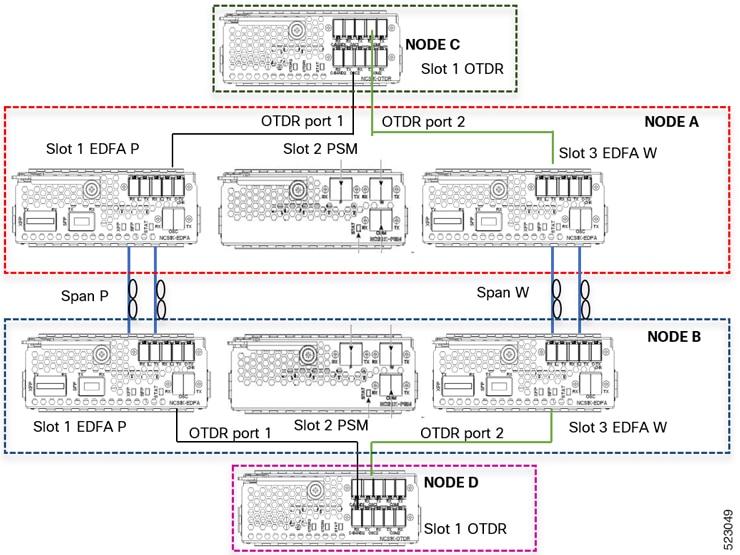
OTDR modules can be deployed in four different scenarios:

  • Node A connects to Node B, and each node has its own OTDR module.

  • Node A connects to Node B, and a single OTDR module is installed in either Node A or Node B.

  • Node A connects to Node B, and a single OTDR module is installed in a different Node C.

  • Node A connects to Node B, and OTDR modules are installed in different Nodes C and D.


Note


Nodes A and B can be terminal nodes or ILA nodes.


Configure OTDR autoscan for scenario 1

Configure the remote node and OTDR autoscan commands for the selected event-based automatic scan scenario.

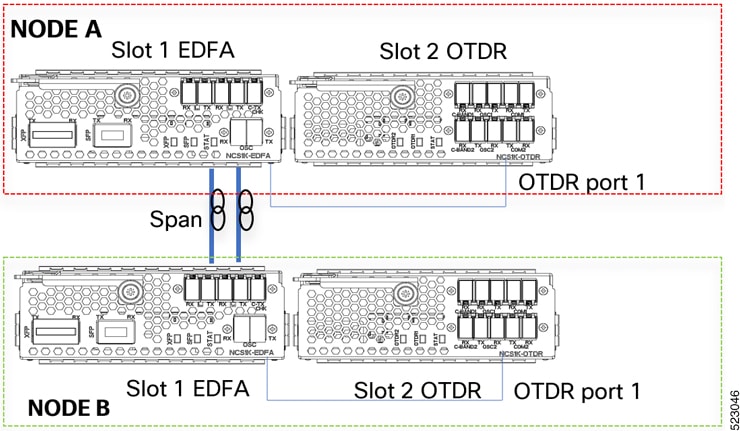
In scenario 1, OTDR modules are installed in both nodes. Each OTDR connects to its local EDFA, and both EDFAs face the same fiber span.

Figure 6. Scenario 1 EDFA remote node configuration

Procedure


Step 1

Configure the remote node feature for each EDFA module on Node A and Node B.

Example:


Node A:
hw-module location 0/RP0/CPU0 slot 1 ampli remote-node local-ipv4 <IP Node A> remote-ipv4 <IP Node B> remote-slot-id 1

Node B:
hw-module location 0/RP0/CPU0 slot 1 ampli remote-node local-ipv4 <IP Node B> remote-ipv4 <IP Node A> remote-slot-id 1

Step 2

Configure OTDR autoscan for each EDFA module on Node A and Node B.

Example:

Node A:
hw-module location 0/RP0/CPU0 slot 1 ampli otdr-autoscan otdr-module-ipv4-addr <IP Node A> otdr-slot-id 2 otdr-port-id 1 ampli-far-end-ipv4-addr <IP Node B> ampli-far-end-slot-id 1 scan-type AUTO

Node B:
hw-module location 0/RP0/CPU0 slot 1 ampli otdr-autoscan otdr-module-ipv4-addr <IP Node B> otdr-slot-id 2 otdr-port-id 1 ampli-far-end-ipv4-addr <IP Node A> ampli-far-end-slot-id 1 scan-type AUTO

Step 3

Configure the remote node OTDR autoscan for each OTDR module on Node A and Node B.

Example:

Node A:
hw-module location 0/RP0/CPU0 slot 2 otdr port 1 otdr-autoscan otdr-module-ipv4-addr <IP Node A> ampli-far-end-ipv4-addr <IP Node A> ampli-far-end-slot-id 1 scan-type AUTO

Node B:
hw-module location 0/RP0/CPU0 slot 2 otdr port 1 otdr-autoscan otdr-module-ipv4-addr <IP Node B> ampli-far-end-ipv4-addr <IP Node B> ampli-far-end-slot-id 1 scan-type AUTO

The event-based OTDR automatic scan configuration is ready for the selected scenario.

Configure OTDR autoscan for scenario 2

Configure the remote node and OTDR autoscan commands for the selected event-based automatic scan scenario.

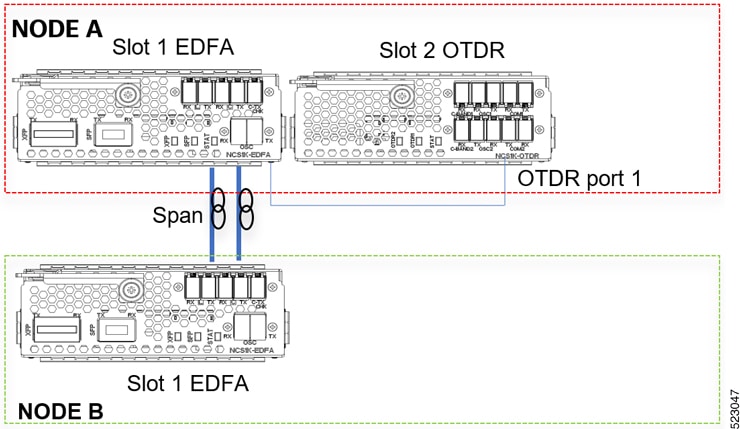
In scenario 2, one OTDR module is installed in Node A or Node B. The OTDR connects to only one EDFA that faces the fiber span.

Figure 7. Scenario 2 EDFA remote node configuration

Procedure


Step 1

Configure the remote node feature for each EDFA module on Node A and Node B.

Example:

Node A:
hw-module location 0/RP0/CPU0 slot 1 ampli remote-node local-ipv4 <IP Node A> remote-ipv4 <IP Node B> remote-slot-id 1

Node B:
hw-module location 0/RP0/CPU0 slot 1 ampli remote-node local-ipv4 <IP Node B> remote-ipv4 <IP Node A> remote-slot-id 1

Step 2

Configure OTDR autoscanfor the EDFA connected to the single OTDR module in the same node.

Example:

Node A:
hw-module location 0/RP0/CPU0 slot 1 ampli otdr-autoscan otdr-module-ipv4-addr <IP Node A> otdr-slot-id 2 otdr-port-id 1 ampli-far-end-ipv4-addr <IP Node A> ampli-far-end-slot-id 1 scan-type AUTO

Step 3

Configure OTDR autoscan on the single OTDR module.

Example:

Node A:
hw-module location 0/RP0/CPU0 slot 2 otdr port 1 otdr-autoscan otdr-module-ipv4-addr <IP Node A> ampli-far-end-ipv4-addr <IP Node A> ampli-far-end-slot-id 1 scan-type AUTO

Note


Both the EDFA and OTDR configurations share the same IP address as there is only one OTDR module connected to single EDFA in the same node.


The event-based OTDR automatic scan configuration is ready for the selected scenario.

Configure OTDR autoscan for scenario 3

Configure the remote node and OTDR autoscan commands for the selected event-based automatic scan scenario.

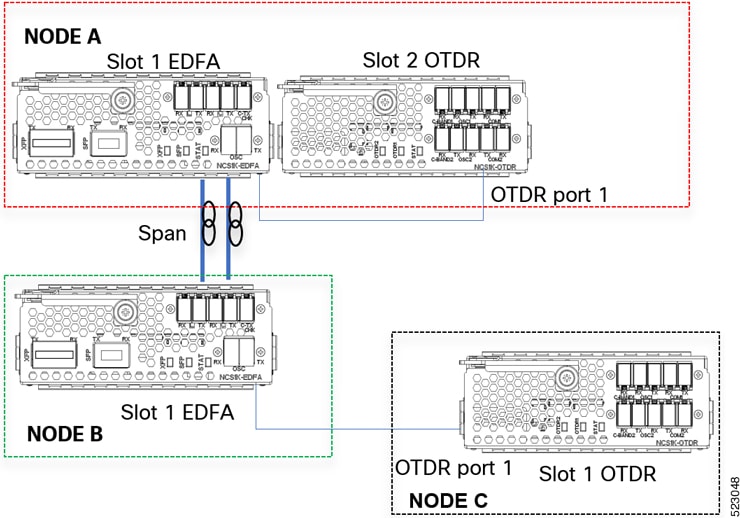
In scenario 3, a single OTDR module is installed in Node C and connects to the EDFA in Node B.

Figure 8. Scenario 3 EDFA remote node configuration

Procedure


Step 1

Configure the remote node feature for each EDFA module on Node A and Node B.

Example:


Node A:
hw-module location 0/RP0/CPU0 slot 1 ampli remote-node local-ipv4 <IP Node A> remote-ipv4 <IP Node B> remote-slot-id 1

Node B:
hw-module location 0/RP0/CPU0 slot 1 ampli remote-node local-ipv4 <IP Node B> remote-ipv4 <IP Node A> remote-slot-id 1

Step 2

Configure OTDR autoscan for each EDFA module on Node A and Node B.

Example:

Node A:
hw-module location 0/RP0/CPU0 slot 1 ampli otdr-autoscan otdr-module-ipv4-addr <IP Node A> otdr-slot-id 2 otdr-port-id 12 ampli-far-end-ipv4-addr <IP Node B> ampli-far-end-slot-id 1 scan-type AUTO

Node B:
hw-module location 0/RP0/CPU0 slot 1 ampli otdr-autoscan otdr-module-ipv4-addr <IP Node C> otdr-slot-id 1 otdr-port-id 12 ampli-far-end-ipv4-addr <IP Node A> ampli-far-end-slot-id 1 scan-type AUTO

Step 3

Configure OTDR autoscan for each OTDR module on Node A and Node C.

Example:

Node A:
hw-module location 0/RP0/CPU0 slot 2 otdr port 1 otdr-autoscan otdr-module-ipv4-addr <IP Node A> ampli-far-end-ipv4-addr <IP Node A> ampli-far-end-slot-id 1 scan-type AUTO

Node C:
hw-module location 0/RP0/CPU0 slot 1 otdr port 1 otdr-autoscan otdr-module-ipv4-addr <IP Node C> ampli-far-end-ipv4-addr <IP Node B> ampli-far-end-slot-id 1 scan-type AUTO

The event-based OTDR automatic scan configuration is ready for the selected scenario.

Configure OTDR autoscan for scenario 4

Configure the remote node and OTDR autoscan commands for the selected event-based automatic scan scenario.

In scenario 4, OTDR modules are installed in Nodes C and D. Each OTDR node connects to its section-protection EDFA node.

Figure 9. Scenario 4 EDFA remote node configuration

Procedure


Step 1

Configure the EDFA remote node feature for each EDFA module on Node A and Node B.

Example:

Node A:
hw-module location 0/RP0/CPU0 slot 1 ampli remote-node local-ipv4 <IP Node A> remote-ipv4 <IP Node B> remote-slot-id 1
hw-module location 0/RP0/CPU0 slot 3 ampli remote-node local-ipv4 <IP Node A> remote-ipv4 <IP Node B> remote-slot-id 3

Node B:
hw-module location 0/RP0/CPU0 slot 1 ampli remote-node local-ipv4 <IP Node B> remote-ipv4 <IP Node A> remote-slot-id 1
hw-module location 0/RP0/CPU0 slot 3 ampli remote-node local-ipv4 <IP Node B> remote-ipv4 <IP Node A> remote-slot-id 3

Step 2

Configure OTDR autoscan for each EDFA module on Node A and Node B.

Example:

Node A:
hw-module location 0/RP0/CPU0 slot 1 ampli otdr-autoscan otdr-module-ipv4-addr <IP Node C> otdr-slot-id 1 otdr-port-id 1 ampli-far-end-ipv4-addr <IP Node B> ampli-far-end-slot-id 1 scan-type AUTO
hw-module location 0/RP0/CPU0 slot 3 ampli otdr-autoscan otdr-module-ipv4-addr <IP Node C> otdr-slot-id 1 otdr-port-id 2 ampli-far-end-ipv4-addr <IP Node B> ampli-far-end-slot-id 3 scan-type AUTO

Node B:
hw-module location 0/RP0/CPU0 slot 1 ampli otdr-autoscan otdr-module-ipv4-addr <IP Node D> otdr-slot-id 1 otdr-port-id 1 ampli-far-end-ipv4-addr <IP Node A> ampli-far-end-slot-id 1 scan-type AUTO
hw-module location 0/RP0/CPU0 slot 3 ampli otdr-autoscan otdr-module-ipv4-addr <IP Node D> otdr-slot-id 1 otdr-port-id 2 ampli-far-end-ipv4-addr <IP Node A> ampli-far-end-slot-id 3 scan-type AUTO

Step 3

Configure OTDR autoscan for each OTDR module on Node C and Node D.

Example:

Node C:
hw-module location 0/RP0/CPU0 slot 1 otdr port 1 otdr-autoscan otdr-module-ipv4-addr <IP Node C> ampli-far-end-ipv4-addr <IP Node A> ampli-far-end-slot-id 1 scan-type AUTO
hw-module location 0/RP0/CPU0 slot 1 otdr port 2 otdr-autoscan otdr-module-ipv4-addr <IP Node C> ampli-far-end-ipv4-addr <IP Node A> ampli-far-end-slot-id 3 scan-type AUTO

Node D:
hw-module location 0/RP0/CPU0 slot 1 otdr port 1 otdr-autoscan otdr-module-ipv4-addr <IP Node D> ampli-far-end-ipv4-addr <IP Node B> ampli-far-end-slot-id 1 scan-type AUTO
hw-module location 0/RP0/CPU0 slot 1 otdr port 2 otdr-autoscan otdr-module-ipv4-addr <IP Node D> ampli-far-end-ipv4-addr <IP Node B> ampli-far-end-slot-id 3 scan-type AUTO

The event-based OTDR automatic scan configuration is ready for the selected scenario.

Configure OTDR in automatic mode based on events

Configure the EDFA module and OTDR module autoscan parameters on both the near-end and far-end nodes.

The sample assumes that both the EDFA and OTDR modules are present on the same node.

Procedure


Step 1

Configure the EDFA module for OTDR autoscan.

Example:

configure
hw-module location 0/RP0/CPU0 slot 3 ampli
otdr-autoscan
otdr-module-ipv4-addr 192.0.2.1
otdr-slot-id 2
otdr-port-id 1
ampli-far-end-ipv4-addr 198.51.100.10
ampli-far-end-slot-id 3
scan-type auto
commit
end

Example:

configure
hw-module location 0/RP0/CPU0 slot 3 ampli
otdr-autoscan
otdr-module-ipv6-addr 2001:DB8:4491:2000::229:144
otdr-slot-id 2
otdr-port-id 1
ampli-far-end-ipv6-addr 2001:DB8:4491:2000::228:145
ampli-far-end-slot-id 3
scan-type auto
commit
end

Step 2

Configure the OTDR module for OTDR autoscan.

Example:

configure
hw-module location 0/RP0/CPU0 slot 2 otdr port 1
otdr-autoscan
otdr-module-ipv4-addr 192.0.2.1
ampli-far-end-ipv4-addr 198.51.100.10
ampli-far-end-slot-id 3
scan-type auto
commit
end

Example:

configure
hw-module location 0/RP0/CPU0 slot 2 otdr port 1
otdr-autoscan
otdr-module-ipv6-addr 2001:DB8:4491:2000::229:144
ampli-far-end-ipv6-addr 2001:DB8:4491:2000::228:145
ampli-far-end-slot-id 3
scan-type auto
commit
end

The sample EDFA and OTDR autoscan command sequence is complete.

IPv6 support for OTDR auto scan

Starting with Release 7.10.1, you can use IPv6 addresses to perform OTDR automatic scans between Cisco NCS 1001 nodes that support IPv6 and have IPv6 addresses configured on their management interfaces.

Feature History

Table 6. Feature history

Feature name

Release information

Description

IPv6 support for OTDR auto scan

Cisco IOS XR Release 7.10.1

OTDR auto scan can be enabled on Cisco NCS 1001 nodes configured with IPv6 addresses, which lets OTDR auto scan work on IPv4 and IPv6 nodes.

To configure OTDR auto scan using IPv6 addresses, replace local-ipv4 and remote-ipv4 with local-ipv6 and remote-ipv6 . Also, update the corresponding IPv4 address variables with IPv6 address variables in the relevant commands in the section OTDR measurement in automatic mode based on events.


Note


Configure OTDR auto scan with either IPv4 or IPv6 addresses. Do not use both address types at the same time in the configuration.


Limitation

OTDR measurement with IPv6 is not supported on OSC management interfaces. Even when OSPFv3 is used, neighbor discovery returns the IPv4 router ID instead of the IPv6 router ID. As a result, IPv6 addressing is difficult to resolve automatically.

Configure OTDR in expert mode

Configure expert mode when you must control capture length, offset, resolution, sensitivity, measurement time, pulse width, span length, and relative thresholds.

Expert mode does not run a training phase and does not automatically adjust scan parameters.

Procedure


Step 1

Enter configuration mode.

Example:

configure

Step 2

Use the hw-module command to enter OTDR expert mode configuration for the slot, port, and direction.

hw-module location 0/RP0/CPU0 slot slot-number otdr port port-number direction direction mode-expert

Example:


hw-module location 0/RP0/CPU0 slot 2 otdr port 1 direction tx mode-expert

Step 3

Configure the expert mode scan parameters.

For parameter descriptions, ranges, and defaults, see OTDR expert-mode parameters.

Example:


pulse-width 10
span-length 1
measure-time 180
capture-length 1
capture-offset 0 
fiber-resolution 4
loss-sensitivity 4
reflection-sensitivity -300
loss-relative-threshold 20
reflection-relative-threshold 20

Step 4

Commit the configuration and exit configuration mode.

Example:


commit
end

OTDR expert mode is configured for the selected port and direction.

OTDR expert mode parameters

Use these values when configuring OTDR expert mode.

Table 7. OTDR expert mode parameters

Parameter

Description

Range

Default

capture-length (km)

Distance of the measurement endpoint.

1 to 150

100

capture-offset (km)

Start point of the measurement.

0 to 150

0

fiber-resolution (m)

Distance between measurement steps.

0 to 100

25

loss-sensitivity (in 0.1 dB)

Limit under which the loss is not considered a real loss.

4 to 50

6

measure-time (sec)

Time required to perform the complete optical scan.

1 to 360

180

pulse-width (ns)

Pulse duration during the measurement.

8 to 100,000

1000

reflection-sensitivity (in 0.1 dB)

Limit under which the reflection is not considered a real reflection.

-400 to -140

-300

span-length (km)

Length of span.

1 to 150

100

loss-relative-threshold (in 0.1 dB)

Threshold to compare the OTDR loss value plus the relative loss threshold with the baseline value.

1 to 300

2

reflection-relative-threshold (in 0.1 dB)

Threshold to compare the OTDR reflection value plus the relative reflection threshold with the baseline value.

1 to 300

2


Note


From Release 7.5.1, the plus sign labels in positive range values are removed in the Cisco NCS 1001 CLI help description.


Start OTDR measurement in expert mode

Start expert measurement after OTDR parameters are configured in expert mode.

The scan continues in the background after the command starts the action.

Procedure


Start the OTDR expert mode scan.

hw-module slot slot-number otdr port port-number direction direction scan expert

Example:

hw-module slot 3 otdr port 1 direction tx scan expert

The system displays the message "Otdr action will continue in the background."


What to do next

To see the measurement status, use the show hw-module slot slot-number otdr status command.

Display the OTDR measurement list

Review the list to identify available OTDR measurements prior to retrieving a specific scan output by position number.

The command lists saved OTDR measurements along with the SOR filename associated with each measurement.

Procedure


Step 1

Use the show hw-module command to display the list of OTDR measurements.

show hw-module slot slot-number otdr scan

Example:

show hw-module slot 3 otdr scan

  # | otdr# | Rx/Tx | Mode | Date/Time       | SOR filename
----+-------+-------+------+-----------------+----------------------------------------
  0 |   1   |  Tx   | AUTO | 20180504-092810 | ncs1001_slot3_otdr1_TX.20180504-092810.sor
  1 |   1   |  Tx   | AUTO | 20180504-114239 | ncs1001_slot3_otdr1_TX.20180504-114239.sor

Example:

Table 8. OTDR measurement list fields

Field

Description

#

Number of OTDR measurements

otdr#

Port where the OTDR measurement was performed

Rx/Tx

Direction of OTDR measurement

Mode

Type of scan, automatic or expert

Date/Time

Date and time of OTDR measurement

SOR filename

Name of the file that contains measurement data

Step 2

Use the show hw-module command to display scan data for a measurement position.

show hw-module slot slot-number otdr scan position-number

Example:

show hw-module slot 3 otdr scan 0

Measurement on: 20180504-151351
OTDR device number: 1
Scan direction: Tx
Scan mode: Auto
Directory location: /harddisk:/otdr
File name: ncs1001_slot3_otdr1_TX.20180504-151351.sor
Total ORL: 29.86 dB
Distance (estimate): 38.996 km
Total number of event detected: 3

Event# | TYPE         | LOCATION(km) | ACCURACY(m) | MAGNITUDE(dB) | TH-CROSSING
-------+--------------+--------------+-------------+---------------+------------
   0   | LOSS         |    0.000     |    5.62     |    -1.09      | NO
   1   | LOSS         |   23.840     |  114.06     |    -0.44      | NO
   2   | END OF FIBER |   38.996     |  249.00     |               | NO

Example:

Table 9. OTDR scan detail fields

Field

Description

OTDR device number

Port number

Scan direction

Direction of scan

Scan mode

Mode of scan, automatic or expert

Directory location

Location where the SOR file is stored

File name

Name of the SOR file

Total ORL

Optical return loss in dB

Distance (estimate)

Distance in km

Total number of event detected

Events detected during the OTDR measurement

Event#

Event number

TYPE

Event type, such as LOSS or END OF FIBER

LOCATION(km)

Location of the event in the span

ACCURACY(m)

Accuracy of the event location in the span

MAGNITUDE(dB)

Loss magnitude of the event

TH-CROSSING

loss-abs-threshold value


The command output shows the stored OTDR measurements for the selected scan details.

Stop OTDR measurement

Stop an OTDR measurement when the current scan must be canceled.

The same abort command applies to automatic and expert modes.

Procedure


Step 1

Stop the OTDR scan for the selected slot and port.

hw-module slot slot-number otdr port port-number scan abort

Example:

hw-module slot 3 otdr port 1 scan abort

Step 2

Use the show hw-module command to display OTDR status to verify the abort state.

Example:

show hw-module slot 3 otdr status

Port | Rx/Tx | Date/Time       | Training | OTDR Measurement | Next scan (min)
-----+-------+-----------------+----------+------------------+----------------
  1  |  Tx   | 20190927-102727 | ABORTED  | UNKNOWN          | 0

Example:

show hw-module slot 3 otdr status

Port | Rx/Tx | Date/Time       | Training | OTDR Measurement
-----+-------+-----------------+----------+-----------------
  1  |  Tx   | 20180503-181159 | UNKNOWN  | ABORTED

The selected OTDR measurement is stopped.

Display OTDR photodiode power levels

Display OTS controller summaries when you must view OTDR photodiode power levels and logical port associations.

Procedure


Use the show controllers ots command to display the OTDR OTS controller summary.

show controllers ots rack/slot/instance/port summary

Example:

RP/0/RP0/CPU0:IOS#show controllers ots 0/2/0/* summary
Tue Jan 23 13:49:41.604 CET

Port       Type  Status  TX Power  TX Total Power  RX Power  RX Total Power
Ots0_2_0_0 Com   N/A     -40.00    Unavailable     -40.00    Unavailable
Ots0_2_0_1 Com   N/A       0.60    Unavailable     -16.60    Unavailable
Ots0_2_0_2 Osc   N/A     -17.60    Unavailable       1.30    Unavailable
Ots0_2_0_3 Com   N/A     -40.00    Unavailable     -40.00    Unavailable
Ots0_2_0_4 Com   N/A       0.20    Unavailable     -22.20    Unavailable
Ots0_2_0_5 Osc   N/A     -23.60    Unavailable       1.30    Unavailable

The output displays photodiode power values and logical ports for the OTDR module.

What to do next


Note


Parameters such as Status, RX Total Power, TX Total Power, RX Attenuation, TX Attenuation, Amplifier Gain, and Amplifier Tilt values on the corresponding OTS controller are not available for the OTDR card.


OTDR machine learning events

Use this reference to identify the OTDR machine learning feature changes and the event types that can appear in scan output.

Table 10. Feature history

Feature name

Release information

Description

OTDR machine learning model

Cisco IOS XR Release 7.3.2

The OTDR machine learning model is updated to Version 4 to improve event recognition performance.

Table 11. Feature history

Feature name

Release

Description

OTDR machine learning

Cisco IOS XR Release 7.3.1

Machine learning can be enabled on the OTDR card. If enabled, the OTDR measurement provides additional event information about the fiber.

When the machine learning parameter is set to one, the scan output can display these event types:

Table 12. Machine learning event types

Event

Description

FIBER TERMINATED

The fiber is correctly plugged in to the far-end node.

OPEN CONNECTOR

The fiber is not correctly plugged in to the far-end node.

FACE PLATE

The beginning of the fiber.

PASS THROUGH

The connection between two fibers.

Enable machine learning on the OTDR card

Enable ML for the selected OTDR slot, port, and direction in configuration mode.

When ML is enabled, OTDR scan output includes additional event classifications for the fiber span.

Procedure


Use the hw-module location command to enable ML on the selected OTDR card, port, and direction.

hw-module location location slot slot-number otdr port port-number direction direction ml-enabled 1

Example:


hw-module location 0/RP0/CPU0 slot 1 otdr port 1 direction tx ml-enabled 1

Machine learning is enabled for the selected OTDR card, port, and direction.

View scan output with machine learning enabled

View scan output by position number after ML is enabled on the OTDR card.

The ML graph analysis section in the command output shows additional event classifications.

Procedure


Step 1

Use the show hw-module command to display the scan output for position 0.

Example:


RP/0/RP0/CPU0:156-ML#show hw-module slot 1 otdr scan 0
Measurement on: 20200916-171424
OTDR device number: 1
Scan direction: Tx
Scan mode: Auto
Directory location: /harddisk:/otdr
File name: 156-ML_ncs1001_slot1_otdr1_TX.20200916-171424.sor
Total ORL: 31.37 dB
Distance (estimate): 61.275 km
High Reflection Location: 0.00 km
Total number of event detected: 2

ML graph analysis:
Total number of event detected: 3
Event# | TYPE           | LOCATION(km)
-------+----------------+-------------
   A   | FACE PLATE     | 0.001
   B   | PASS THROUGH   | 11.876
   C   | OPEN CONNECTOR | 61.285

The OPEN CONNECTOR event type in the output indicates that the fiber span is not connected to a far-end node.

Step 2

Use the show hw-module command to display the scan output for another measurement position.

Example:

RP/0/RP0/CPU0:156-ML#show hw-module slot 1 otdr scan 6
Measurement on: 20200917-140822
OTDR device number: 1
Scan direction: Tx
Scan mode: Auto
Directory location: /harddisk:/otdr
File name: 156-ML_ncs1001_slot1_otdr1_TX.20200917-140822.sor
Total ORL: 31.29 dB
Distance (estimate): 61.279 km
High Reflection Location: 0.00 km
Total number of event detected: 1

ML graph analysis:
Total number of event detected: 3
Event# | TYPE             | LOCATION(km)
-------+------------------+-------------
   A   | FACE PLATE       | 0.001
   B   | PASS THROUGH     | 11.876
   C   | FIBER TERMINATED | 61.622

The FIBER TERMINATED event type in the output indicates that the fiber span is properly connected to a far-end node.