Manage Your Sites with Cisco Optical Site Manager

Use this chapter to prepare, install, and activate Cisco Optical Site Manager, then onboard managed devices.

Cisco Optical Site Manager

Cisco Optical Site Manager is a software application that aggregates NCS 1000 optical devices at a site, abstracts the site topology for controller or web UI access, and supports software-defined turn-up, operations, and maintenance.

Cisco Optical Site Manager runs on NCS 1000 controller cards. It can operate as a standalone local craft interface, integrate with Cisco Optical Network Controller, or provide an open NETCONF/YANG northbound interface for third-party controllers.

Cisco Optical Site Manager allows you to:

  • Aggregate site-level optical devices under a single management view.

  • View site topology, inventory, alarms, performance monitoring data, and mechanical layouts for chassis, cards, and passive devices.

  • Use operations, administration, and maintenance functions such as connection verification, loopbacks, PRBS, OTDR, and threshold crossing alerts.

  • Configure cards and modules for site-level operations.

  • Manage NCS 1000 device topologies for standalone and high availability deployments.

Cisco Optical Network Controller can consume the site-level data streamed by Cisco Optical Site Manager and use it for network-level provisioning, monitoring, troubleshooting, topology views, and analytics.

For details about Cisco Optical Site Manager, see Cisco Optical Site Manager Data Sheet.

Supported configurations

Cisco Optical Site Manager can manage the these NCS 1000 configurations in standalone or high availability deployments.

Supported host configurations include:

  • NCS1010 OLT host managing NCS1010, NCS1014, NCS1004, NCS 1001 in a terminal SA configuration.

    • 2-degree pass through NCS1010 (Novara) site in HA configuration

    • NCS1010 ILA and support for greenfield configuration

  • NCS1014 host managing NCS1014, NCS1004, and NCS1001.

  • NCS1004 host managing NCS1004 and NCS1001 (from NCS 1000 R25.4.1).

  • NCS1001 host managing NCS1001 (from 25.4.1, up to two devices).

  • Choose the supported deployment configurations based on your network requirements.

    For more information about HA deployment models, see Deployment models for HA in Cisco Optical Site Manager.

Cisco Optical Site Manager installation workflow

This workflow helps you install and configure Cisco Optical Site Manager. You will set up Cisco Optical Site Manager, configure it for standalone or high availability (HA) operation, manage interfaces, and activate the application as needed.

Before you begin

Verify that the installation requirements are met before proceeding. For details, see Cisco Optical Site Manager installation prerequisites for NCS 1000 devices.

Perform these tasks to install and configure Cisco Optical Site Manager on NCS 1010.

Procedure


Step 1

Install Cisco Optical Site Manager on NCS 1010. For more details, see Install Cisco Optical Site Manager on NCS 1010 or Install Cisco Optical Site Manager on NCS 1001 or NCS 1004.

Step 2

Configure Cisco Optical Site Manager in standalone or high availability mode. For more details, see Configure Cisco Optical Site Manager on NCS 1000.

Step 3

Activate Cisco Optical Site Manager. For more details, see Activate Cisco Optical Site Manager.


Enable NETCONF over SSH for secure host device communication

Enable NETCONF over SSH so that Cisco Optical Site Manager can connect to host devices for configuration and monitoring. Enable NETCONF on each Cisco Optical Site Manager host device.

Before you begin

Follow these steps to enable NETCONF:

Procedure


Step 1

Enter the configuration mode using the configure terminal command.

Example:

RP/0/RP0/CPU0:ios#configure terminal

Step 2

Enable NETCONF-YANG agent over SSH connection using the netconf-yang agent ssh command.

Example:

RP/0/RSP0/CPU0:ios(config)# netconf-yang agent ssh

Step 3

Configure the device to use SSH protocol v2 using the ssh server v2 command.

Note


Only SSH version 2 is supported.

Example:

RP/0/RP0/CPU0:ios(config)# ssh server v2

Step 4

Set the rate limit for incoming SSH connection requests to 600 per minute using the ssh server rate-limit rate-limit command.

Example:

RP/0/RP0/CPU0:ios(config)# ssh server rate-limit 600

Step 5

Set the SSH session limit to 110 using the ssh server session-limit session-limit command.

Example:

RP/0/RP0/CPU0:ios(config)# ssh server session-limit 110

Step 6

Enable SSH server access in the default VRF using the ssh server vrf vrf-name command.

Example:

RP/0/RP0/CPU0:ios(config)# ssh server vrf default

Step 7

Enable NETCONF over SSH in the default VRF using the ssh server netconf vrf vrf-name command.

Example:

RP/0/RP0/CPU0:ios(config)# ssh server netconf vrf default

Step 8

Enable NETCONF protocol over SSH connection using the ssh server netconf command.

Example:

RP/0/RP0/CPU0:ios(config)# ssh server netconf

Step 9

Commit the changes using the commit command.


After you enable NETCONF, Cisco Optical Site Manager can establish a secure communication with the device using the NETCONF protocol over SSH.

This example describes the commands to enable NETCONF over SSH:

RP/0/RP0/CPU0:ios# configure terminal
                RP/0/RSP0/CPU0:ios(config)# netconf-yang agent ssh
                RP/0/RP0/CPU0:ios(config)# ssh server v2
                RP/0/RP0/CPU0:ios(config)# ssh server rate-limit 600
                RP/0/RP0/CPU0:ios(config)# ssh server session-limit 110
                RP/0/RP0/CPU0:ios(config)# ssh server vrf default
                RP/0/RP0/CPU0:ios(config)# ssh server netconf vrf default
                RP/0/RP0/CPU0:ios(config)# ssh server netconf

What to do next

Configure static route on peer devices

Install Cisco Optical Site Manager on NCS 1010

Cisco Optical Site Manager can be installed on NCS 1010 in these two ways:

  1. As part of a Golden ISO (GISO) image where the Cisco Optical Site Manager package is already bundled with Cisco IOS XR image.

  2. On NCS 1010 where Cisco IOS XR is already installed, you can install Cisco Optical Site Manager as an optional software component.

In the second scenario, you must manually install the Cisco Optical Site Manager software using the provided .rpm files. You can download the Cisco Optical Site Manager software image from the Software Download page.

Before you begin

Download the NCS1010/NCS1020 and NCS1014 IOS XR Software optional-rpms optional package from Software Download page.

Follow these steps to install Cisco Optical Site Manager:

Procedure


Step 1

Copy all the .rpm files in the cosm folder of the downloaded package to the device storage.

RP/0/RP0/CPU0:vmxCisco_T1#mkdir /misc/disk1/cosm
RP/0/RP0/CPU0:vmxCisco_T1# scp user@[RPM_SERVER]:/nobackup/ncs1010_image/*.rpm    /misc/disk1/cosm
Password: ********

Step 2

Add the Cisco Optical Site Manager package source folder to the Cisco IOS XR software management system in synchronous mode using the install package add source file: rpm-folder synchronous command.

Example:

RP/0/RP0/CPU0:ios#install package add source file:/harddisk:/cosm/ synchronous
Install add operation 2.1.1 has started

Installation in synchronous mode is optional and runs in the foreground and waits for the operation to complete before returning control to the user.

Step 3

Install the Cisco Optical Site Manager RPM in synchronous mode using the install package add package-name synchronous command.

Example:

RP/0/RSP0/CPU0:ios#install package add xr-cosm synchronous

Step 4

Apply the latest changes in synchronous mode on the NCS 1000 device using the install apply restart synchronous command.

Example:

RP/0/RP0/CPU0:ios#install apply restart synchronous
The latest changes are applied to all processes, including the impacted processes.

Step 5

Commit the changes using the install commit synchronous command.

Example:

RP/0/RP0/CPU0:ios#install commit synchronous

Step 6

Verify that Cisco Optical Site Manager rpm is installed using the show install active | include xr-cosm command.

Example:

RP/0/RP0/CPU0:ios#show install active | include xr-cosm
Fri Nov 14 11:07:17.877 UTC
xr-cosm                                                           25.1.1v1.0.2-1

Cisco Optical Site Manager is installed on the device.

This example describe the commands to install Cisco Optical Site Manager:

RP/0/RP0/CPU0:ios#install package add source file:/harddisk:/cosm/ synchronous
RP/0/RSP0/CPU0:ios#install package add xr-cosm synchronous
RP/0/RP0/CPU0:ios#install apply restart synchronous
RP/0/RP0/CPU0:ios#install commit synchronous
RP/0/RP0/CPU0:ios#sh install active | include xr-cosm
Fri Nov 14 11:07:17.877 UTC
xr-cosm                                                           25.1.1v1.0.2-1

What to do next

Configure Cisco Optical Site Manager in Standalone or High Availability mode.

Configure Cisco Optical Site Manager in standalone mode for NCS 1010

Cisco Optical Site Manager can be configured in standalone mode on a single NCS 1010 controller card.

The configuration involves setting up Cisco Optical Site Manager interfaces, defining management interface parameters, and establishing user credentials for access.

Before you begin

Verify that these configurations are enabled before configuring Cisco Optical Site Manager in standalone mode on NCS 1010:

Follow these steps to configure Cisco Optical Site Manager in standalone mode:

Procedure


Step 1

Enter into the IOS XR and COSM configuration mode using the configure terminal and cosm commands.

Example:

RP/0/RP0/CPU0:ios#configure terminal
RP/0/RSP0/CPU0:ios(config)# cosm

Step 2

Configure the interface of the device running the Cisco Optical Site Manager by using mgmt-interface-name MgmtEth R/S/I/P command.

Example:

RP/0/RP0/CPU0:ios(config-cosm)# mgmt-interface-name Loopback1

This is the interface used to reach Cisco Optical Site Manager. This interface can be a physical interface or a loopback interface. For a standalone Cisco Optical Site Manager deployment, use the same interface for device onboarding.

Step 3

Configure the username using the user-name user name command.

Example:

RP/0/RP0/CPU0:ios(config-cosm)# user-name cisco

Note


The username must match the username of the host device.

Step 4

Configure the password using the user-password password command.

Example:

RP/0/RP0/CPU0:ios(config-cosm)# user-password ***

Note


The Cisco Optical Site Manager username and password can be the same as, or different from, the XR host device credentials. These credentials are saved in the Cisco Optical Site Manager application database and are not displayed in the XR show running-config output.

Step 5

Commit the changes and exit the configuration modes using the commit and end commands.

Example:

RP/0/RP0/CPU0:ios(config-cosm) commit
RP/0/RP0/CPU0:ios(config-cosm) end

Step 6

Verify the configuration using the show running-config cosm command.

Example:

This example shows the standalone Cisco Optical Site Manager configuration.
RP/0/RP0/CPU0:ios#show running-config cosm
Fri Oct 18 12:53:47.056 UTC
cosm
 mgmt-interface-name Loopback1
!

The configured user-name and user-password are not displayed in the output of the show running-config cosm command.


Cisco Optical Site Manager is configured in the standalone mode.

What to do next

Enable or disable Cisco Optical Site Manager north-bound interfaces

High availability for NCS 1000

Cisco Optical Site Manager High Availability (HA) provides continuous management and operational resilience for Cisco optical devices. By deploying two instances, one as Active and the other as Standby, HA ensures that device management remains uninterrupted even if one instance fails.

How does Cisco Optical Site Manager high availability ensure operational continuity?

Cisco Optical Site Manager High Availability (HA) provides a robust solution for managing device operations by utilizing dual application instances and specialized network interfaces.

The main features of Cisco Optical Site Manager high availability include:

  • Two devices must be able to communicate with each other, allowing their respective Cisco Optical Site Manager instances to coordinate application roles (active or standby) and manage operations.

  • Each device requires a Cisco Optical Site Manager management interface configured with the same IP address, starting in a shutdown state. This interface automatically transitions between UP and DOWN states based on whether the device is active or standby.

  • A dedicated Cisco Optical Site Manager redundancy interface is used to establish the high availability communication channel and typically serves as the device’s management interface.

  • When in the active role, Cisco Optical Site Manager binds the HA server to the redundancy interface’s IP address on port 5454.

  • When in the Standby role, Cisco Optical Site Manager connects to the peer’s redundancy interface IP address on port 5454 to communicate with the active instance.

HA roles and interfaces

  • Active role: manages all device operations and binds the HA server to its redundancy interface and port.

  • Standby role: monitors the active instance and connects to the peer’s redundancy IP and port. It is ready to take over if needed.

  • Redundancy interface: network interface used solely for HA communication between Cisco Optical Site Manager instances.

  • Management interface: interface with the same IP address on both devices, managed automatically depending on the instance role.


Note


High availability is not supported on NCS 1004 and NCS 1001.


Configure Cisco Optical Site Manager in high availability on NCS 1000

Configure High Availability (HA) on Cisco Optical Site Manager is to enable fast recovery from faults in the optical transport network and to maintain service continuity by switching to standby components when active ones fail.

Cisco Optical Site Manager HA configuration requires these interfaces configured.

  • cosm mgmt-interface-name: This interface must be configured with same IP address on both Cisco Optical Site Manager active and standby devices. This interface must be configured in a shutdown state and will automatically transition between UP and DOWN states based on the role (Active or Stand-By) assigned by the application.

  • cosm redundancy interface-name: This interface must be configured with the redundancy interface and is used to establish the high availability communication channel and is typically the interface used for device management.

  • redundancy gateway-ip: Specifies the gateway IP address (for example, 10.0.2.1) used by Cisco Optical Site Manager to reach peer devices or for routing HA traffic in environments where a direct path to the peer is not available.

Before you begin

Verify that Cisco Optical Site Manager rpm is installed. For more details, see Install Cisco Optical Site Manager on NCS 1010.

Follow these steps to configure Cisco Optical Site Manager in HA mode on a NCS 1010 or NCS 1014 device:

Procedure

Step 1

Enter into the IOS XR and Cisco Optical Site Manager configuration modes.

Example:
RP/0/RP0/CPU0:ios#configure terminal
RP/0/RSP0/CPU0:ios(config)# cosm

Step 2

Configure the gateway IP address.

Example:
RP/0/RP0/CPU0:ios(config-cosm)# redundancy gateway-ip 192.168.22.1

Step 3

Configure the peer IP address.

This is the IP address of the peer device running the Cisco Optical Site Manager HA instance.

Example:
RP/0/RP0/CPU0:ios(config-cosm)# redundancy peer-ip 192.168.22.2

For releases 24.x.x and 25.x.x, verify that the redundancy interface-name IP address and the redundancy peer-ip address are not substrings of each other. For example, configuring 10.0.1.1 as the redundancy interface-name and 10.0.1.10 or 10.0.1.101 as the redundancy peer-ip (or vice-versa) causes Cisco Optical Site Manager HA to fail during startup.

Step 4

Configure the HA interface name.

This is the interface of the device running the Cisco Optical Site Manager HA instance, which is used for all HA traffic.

Example:
RP/0/RP0/CPU0:ios(config-cosm)# redundancy interface-name MgmtEth 0/RP0/CPU0/2

Step 5

Commit the changes and exit all configuration modes.

Example:
RP/0/RP0/CPU0:ios(config-cosm)# commit
RP/0/RP0/CPU0:ios(config-cosm)# end

Step 6

Perform the steps 1 to 6 on the second Cisco Optical Site Manager host device.

Step 7

Verify the HA configuration on both host devices.

Example:
RP/0/RP0/CPU0:ios#show cosm status 
Fri Nov 14 10:26:44.215 UTC
COSM state: CLIENT_REGISTERED
AppMgr app state: UNKNOWN
AppMgr container state: UNKNOWN
Container status: Not present
Last error: 'Appmgr' detected the 'warning' condition 'Application not found'
Role: UNKNOWN

You can view the active and standby application status in the Device Software section of the Software Manager menu.


Note


If the HA node is on loopback, the MAC address of the HA device is displayed as N/A in the Devices section of the Device Configuration page.


This example explains how to configure Cisco Optical Site Manager HA on a NCS 1010 or NCS 1014 device.

RP/0/RP0/CPU0:ios#configure terminal
RP/0/RSP0/CPU0:ios(config)# cosm
RP/0/RP0/CPU0:ios(config-cosm)# redundancy gateway-ip 10.0.2.1
RP/0/RP0/CPU0:ios(config-cosm)# redundancy peer-ip 10.0.1.12
RP/0/RP0/CPU0:ios(config-cosm)# redundancy interface-name MgmtEth 0/RP0/CPU0/2
RP/0/RP0/CPU0:ios(config-cosm)# commit
RP/0/RP0/CPU0:ios(config-cosm)# end
RP/0/RP0/CPU0:ios#show cosm status 
Fri Nov 14 10:26:44.215 UTC
COSM state: CLIENT_REGISTERED
AppMgr app state: UNKNOWN
AppMgr container state: UNKNOWN
Container status: Not present
Last error: 'Appmgr' detected the 'warning' condition 'Application not found'
Role: UNKNOWN

What to do next

Enable or disable Cisco Optical Site Manager north-bound interfaces
HA commands for Cisco Optical Site Manager
These commands are used to configure HA in Cisco Optical Site Manager on a NCS 1000 device.
Command Description
configure Enters global configuration mode.
cosm user-name <username>

Configures Cisco Optical Site Manager application username.

cosm user-password <password>

Configures Cisco Optical Site Manager application password.

cosm mgmt-interface-name <type> <number>

Configures the Cisco Optical Site Manager management interface. All Cisco Optical Site Manager NBI services (web UI, NETCONF, RESTCONF) are available on this interface.

cosm redundancy interface-name <type> <number>

Configures Cisco Optical Site Manager high availability interface. The interface is used to communicate with the peer device.

cosm redundancy peer-ip <IP-address>

Configures the IP address of the peer device, where other Cisco Optical Site Manager is running.

cosm redundancy gateway-ip <IP-address>

Configures the IP address of a target device that is always reachable by both devices hosting Cisco Optical Site Manager in high availability. Configuring the same gateway IP on both devices is strongly recommended.

Cisco Optical Site Manager uses this target device to perform checks in certain high availability scenarios. The target device must be different from the cosm redundancy peer-ip. The target device may be the subnet gateway, the multilayer switch connecting the two devices, or another suitable device.

commit

Commits the changes.

end

Exits the global configuration mode.

Activate Cisco Optical Site Manager

After configuration is complete, activate Cisco Optical Site Manager to enable the application.

After configuring Cisco Optical Site Manager in standalone or high availability mode, including setting management interfaces, user credentials, and optional features like auto-onboarding, the application remains inactive until explicitly activated.

Cisco Optical Site Manager activation takes about 11 minutes on the NCS 1001 and about eight minutes on the NCS 1004 to initialize.


Important


The configuration of interfaces used by Cisco Optical Site Manager should not be changed after activation.


Before you begin

  • Before activating Cisco Optical Site Manager in HA mode, verify that these parameter values are same on both host devices, if configured.

    • netconf (optional)

    • restconf (optional)

    • webui (optional)

    • user-name

    • user-password

    • All the Cisco NCS 1000 devices on the network are reachable from the device hosting Cisco Optical Site Manager.

    • SSH is configured on all the devices.

    • Netconf-Yang agent is configured to use SSH for communication.

    • The SSH rate limit is set to 600.

    • Before Release 24.3.1, use the MgmtEth0/RP0/CPU0/1 interface for auto-onboarding of subtended devices. The interface uses IP addresses 192.168.1.1/30 and 192.168.1.2/30. From Release 26.1.1, this requirement does not apply.

    • Before Release 26.1.1, ensure that static routes are added on devices that belong to different subnets or configired as peer devices. For more details, see Configure static routes on peer devices.

Follow these steps to activate Cisco Optical Site Manager.

Procedure


Step 1

Activate Cisco Optical Site Manager using the cosm activate command.

Example:

RP/0/RP0/CPU0:ios# cosm activate

Step 2

Verify the status of the application using the show cosm status command.

It may take a few minutes to activate Cisco Optical Site Manager.

  • After activating, wait for few minutes before logging in to the Cisco Optical Site Manager GUI.

  • Upon successful activation, the application transitions to an active state. Status commands display APP_ACTIVATED and ACTIVATED states.

This example shows the status of Cisco Optical Site Manager configured in standalone mode.

RP/0/RP0/CPU0:OLT-2#show cosm status
Fri Oct 18 13:06:09.862 UTC
COSM state: APP_ACTIVATED
AppMgr app state: ACTIVATED
AppMgr container state: RUNNING
Container status: Up 3 weeks
Last error: No error
COSM version: 24.3.1.D0186

This example shows the status of Active instance of the Cisco Optical Site Manager configured in HA mode.

RP/0/RP0/CPU0:HAN-1#show cosm status 
Thu Oct 30 10:21:25.374 UTC
COSM state: APP_ACTIVATED
AppMgr app state: ACTIVATED
AppMgr container state: RUNNING
Container status: Up 2 days
Last error: No error
COSM version: 25.1.1.R0366
Redundancy role: ACTIVE (connected standby 2.2.2.2-COSM)

This example shows the status of Standby instance of the Cisco Optical Site Manager configured in HA mode.

RP/0/RP0/CPU0:HAN-2#show cosm status 
Thu Oct 30 10:23:01.366 UTC
COSM state: APP_ACTIVATED
AppMgr app state: ACTIVATED
AppMgr container state: RUNNING
Container status: Up 2 days
Last error: No error
COSM version: 25.1.1.R0366
Redundancy role: STANDBY (connected active 1.1.1.1-COSM)

What to do next

Onboarding models for Cisco Optical Site Manager

Cisco Optical Site Manager supports two onboarding models that determine where device configuration originates.

  • Configure the complete data path, including circuits, in Cisco IOS XR, and then onboard the device to Cisco Optical Site Manager.

  • Perform day-0 configuration and prerequisites on NCS1010, and then push data path configuration from Cisco Optical Site Manager using Cisco Optical Network Planner initial installation parameters.

Import a Cisco Optical Network Planner configuration file

Use this task to import a Cisco Optical Network Planner NETCONF file (.xml) into Cisco Optical Site Manager to configure device parameters automatically.

If you have a NETCONF file (.xml) exported from Cisco Optical Network Planner (Cisco ONP), you can import it to Cisco Optical Site Manager. This file includes:

  • Node, shelf, card type, and port information, including wavelength

  • Pluggable Port Module (PPM), OTN, and FEC parameters

  • Degree, IPC, and link-related information

  • Fiber attributes and other network parameters

Figure 1. Upload Configuration

Before you begin

Ensure that:
  • The NETCONF file (.xml) contains these parameters available on Cisco Optical Site Manager:

    • device name

    • uid

    • rack id

    • chassis/passive unit id

  • Ensure the Cisco Optical Site Manager site name (in the CONP XML file or any other location) does not contain the string IP. If this string appears in the site name, network discovery in Cisco Optical Network Controller does not work correctly.

  • Cisco Optical Site Manager is newly activated with no devices added to it.

  • The Cisco Optical Network Planner configuration file does not include any Optical Cross-Connects.

  • Log into Cisco Optical Site Manager.

Procedure


Step 1

Click Optical Setup in the left panel.

Step 2

Click the Node Setup tab.

Step 3

In the Upload Configuration section, click Select a configuration file.

  1. Navigate to the location where the NETCONF file (.xml) is present and select it.

  2. Click Yes.

  3. Click Upload.

    A confirmation message appears after the upload is complete.

Step 4

Verify these configuration before adding a device:

  1. Click Optical Setup.

  2. In the Optical Configuration and ANS Parameters tabs, verify the successful configuration of CONP XML data onto the device.


Prerequisites for devices managed by Cisco Optical Site Manager

Verify these prerequisites are met:

  • Device reachability from the Cisco Optical Site Manager host device Cisco IOS XR Linux shell.

  • SSH server is configured. Example settings include ssh server rate-limit 600, ssh server session-limit 110, ssh server v2, ssh server vrf default, and ssh server netconf vrf default.

  • NETCONF YANG agent is configured with SSH enabled, for example netconf-yang agent and ssh.

  • The device node types must match TXP, OLT or ILA.

  • Confirm that the physical cabling on the device matches the Cisco Optical Site Manager Node Functional View.

  • Verify that the rack positioning, degree, IPC and NFV views are aligned with the designed network of Cisco Optical Network Planner.

Synchronize devices in Cisco Optical Site Manager

Synchronization is essential for the effective management of devices by Cisco Optical Site Manager, ensuring accurate status, timely alarms, and proper operational visibility.

Complete this task after importing the Cisco Optical Network Planner XML.

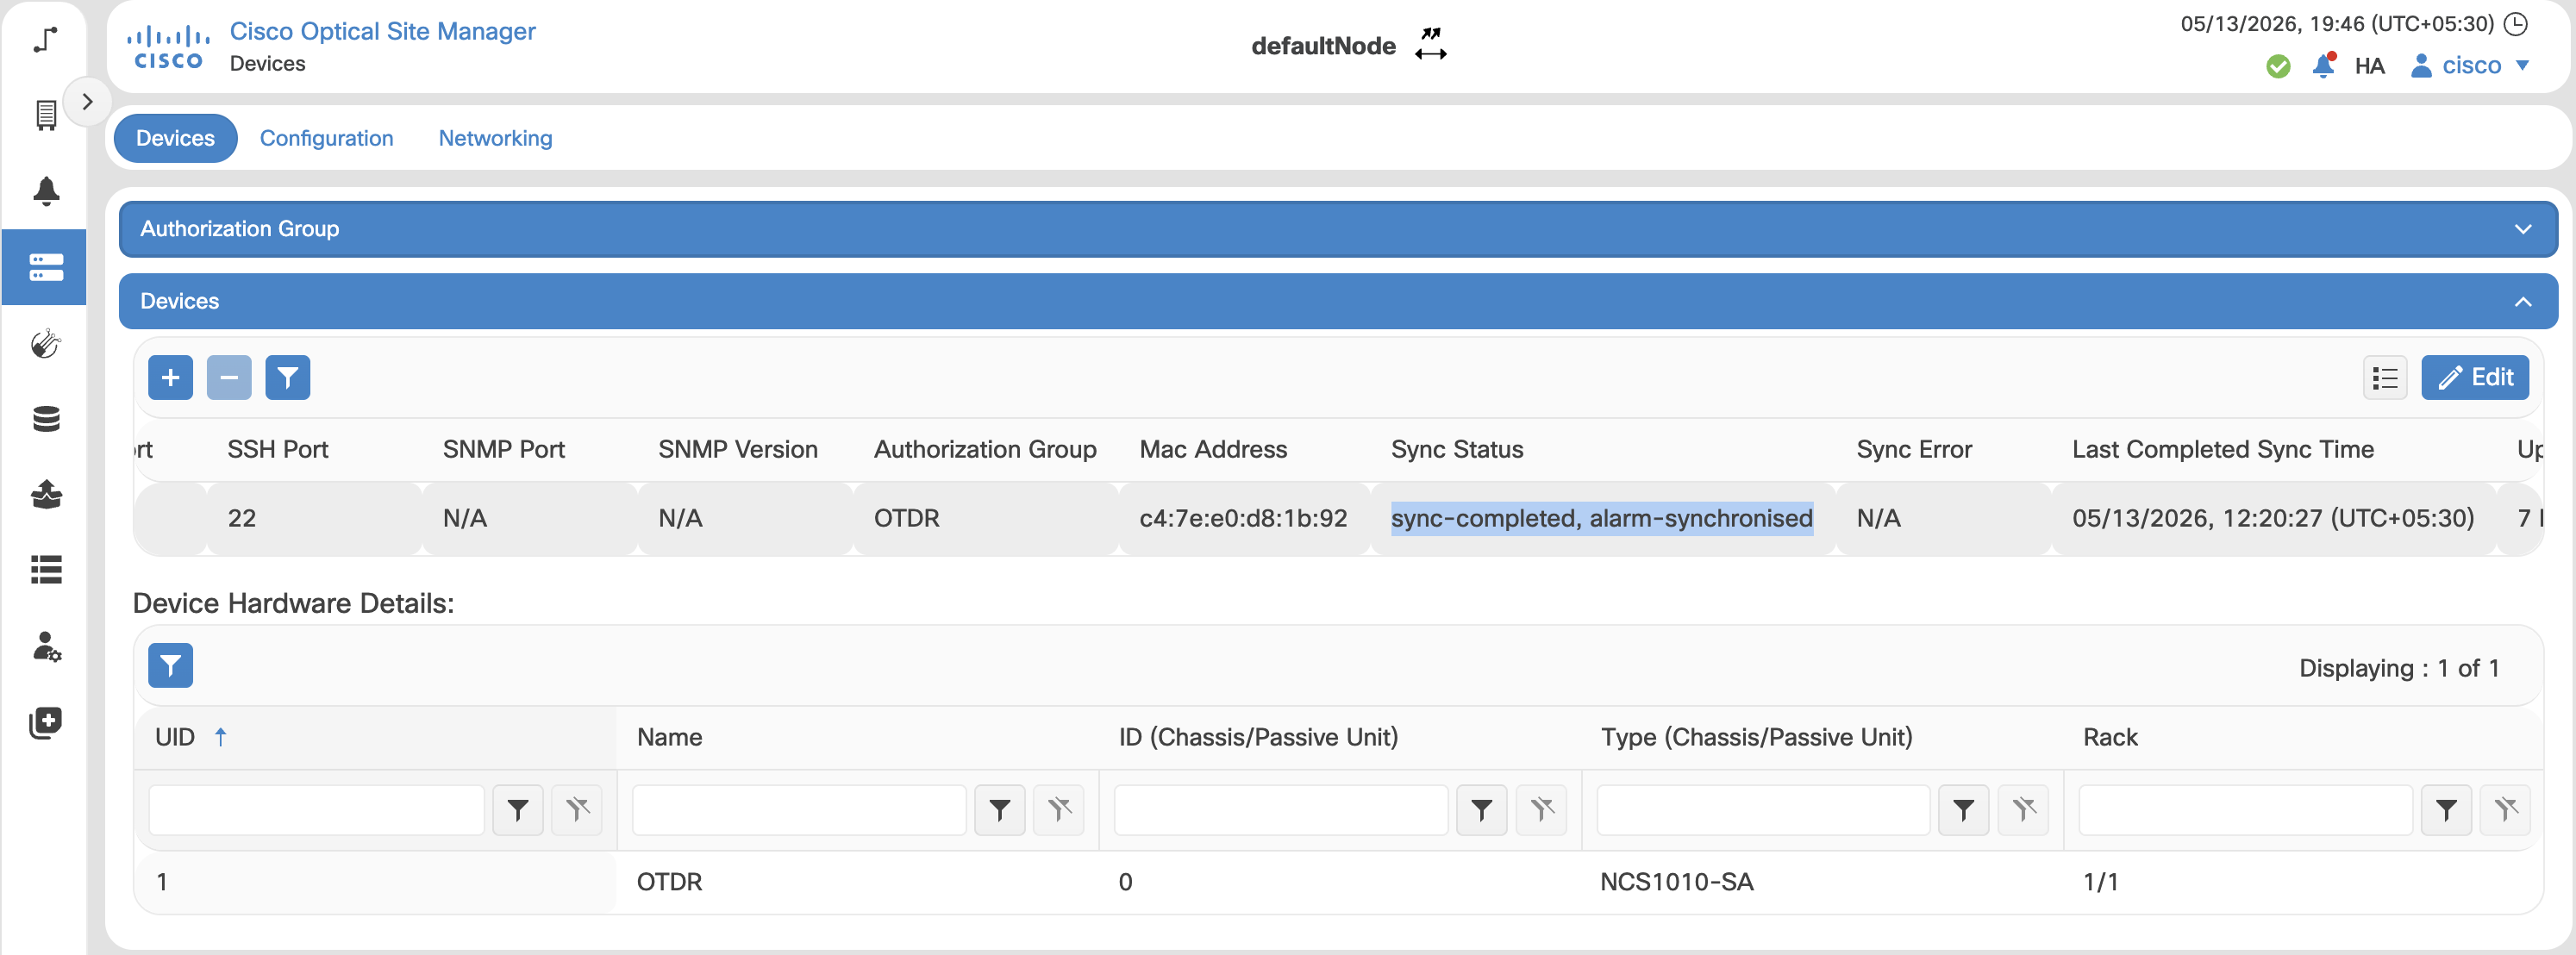
Figure 2. Synchronize devices

Before you begin

  • Edit one device at a time and wait for synchronization to complete before updating the next device.

  • Devices are onboarded and reachable from the Cisco Optical Site Manager host.

Follow these steps to synchronize devices.

Procedure


Step 1

Click Devices in the left panel.

The Device Configuration page appears.

Step 2

In the Devices area, click Authorization Group to expand it.

Step 3

Click Add Auth Group.

Step 4

Enter a name in Authorization Group Name and the device credentials in the Remote Name and Remote Password fields.

Step 5

Click Add.

The new authorization group is added to the table.

Note


If the devices to be managed do not share same credentials, you must create additional authorization groups to match each unique credential set. This ensures that Cisco Optical Site Manager can authenticate and manage each device securely according to its configuration.

Step 6

Expand the Devices section, then click Edit.

Step 7

Update these fields of the device to be managed by Cisco Optical Site Manager.

  • IP Address

  • Authorization Group

  • Device (XR) Netconf Port (default 830)

  • Device (XR) SSH Port (default 22)

Note

 
  • Keep the Cisco Optical Site Manager NETCONF port and the device XR NETCONF port at their default values. If either port is required to be changed, ensure that the Cisco Optical Site Manager NETCONF port and the device XR NETCONF port use different values.

Wait for sync status to complete for all the devices

Step 8

Wait until the Sync Status of all the devices is sync-completed, alarm-synchronized state.

Step 9

Verify physical connectivity to confirm that all cabling is correct and to prevent installation errors.

For details about connection verification, see Connection verification.


Devices are synchronized and ready for operational monitoring.

TACACS+ authentication

Use the Cisco Optical Site Manager configuration guide to configure TACACS authentication.

For details about TACACS authentication, see TACACS+ authentication.

Smart Licensing

Smart Licensing is a cloud-based, software license management solution that enables you to automate time-consuming, manual licensing tasks. The solution allows you to easily track the status of your license and software usage trends.

Cisco Optical Site Manager Smart Licensing is honor based, and license utilization is based on the number of active line cards managed by Cisco Optical Site Manager.

Supported Smart Licensing modes include:

  • Smart Transport: Enables Cisco devices to send license usage information directly to Cisco Smart Software Manager (CSSM) over the internet.

  • CSLU: Enables Cisco devices to send license usage information through Cisco Smart Licensing Utility (CSLU) without direct connectivity to CSSM.

  • Offline: Enables Cisco devices to manage license usage locally without connectivity to CSSM.

For details about Smart Licensing, see Smart licensing for Cisco Optical Site Manager.

Cisco Optical Site Manager software maintenance update

Use a Cisco Optical Site Manager software maintenance update (SMU) to update the Cisco Optical Site Manager application with the fixes and enhancements included in the SMU package. The Cisco Optical Site Manager image is bundled as an IOS XR RPM. Therefore, any Cisco Optical Site Manager SMU is delivered as an IOS XR SMU.

Before you install a Cisco Optical Site Manager SMU, review these points:

  • The Cisco Optical Site Manager base installation must already be available on the host device.

  • In a high availability deployment, install the SMU on the standby instance before installing it on the active instance.

  • The SMU installation reloads the controller of the host device, which can interrupt Cisco Optical Site Manager access during the update.

For installing the Cisco Optical Site Manager SMU, see Cisco IOS XR SMU installation procedures.

Troubleshooting

Cisco Optical Site Manager diagnostics offer robust tools for troubleshooting issues by collecting and organizing operational data from your managed devices.

You can choose the applicable log types and devices and download the collected data as a ZIP file. Key features and capabilities include:

  • Customizable Log Selection: You can choose specific log types and devices to tailor the diagnostic data to your troubleshooting needs.

  • Download Option: All selected logs can be downloaded as a ZIP archive, simplifying data sharing.

  • Collected Data Types:

    • Alarms

    • Audit logs

    • Operational conditions

    • Device inventory

    • Device diagnostics

For more details about Cisco Optical Site Manager diagnostics, see Diagnostics.

Outcome

After completing this chapter, the node or Cisco Optical Site Manager is ready for Cisco Optical Network Controller onboarding. The Cisco Optical Site Manager instance IP addresses and credentials are available for Cisco Optical Network Controller onboarding and management.