Implementing Trustworthy Systems

This chapter describes the key components that form the trustworthy security system in Cisco 8000 Series Routers.

Need for Trustworthy Systems

Global service providers, enterprises, and government networks rely on the unimpeded operation of complex computing and communications networks. The integrity of the data and IT infrastructure is foundational to maintaining the security of these networks and user trust. With the evolution to anywhere, anytime access to personal data, users expect the same level of access and security on every network. The threat landscape is also changing, with adversaries becoming more aggressive. Protecting networks from attacks by malevolent actors and from counterfeit and tampered products becomes even more crucial.

Routers are the critical components of the network infrastructure and must be able to protect the network and report on system integrity. A “trustworthy solution” is one that does what it is expected to do in a verifiable way. Building trustworthy solutions requires that security is a primary design consideration. Routers that constitute trustworthy systems are a function of security, and trust is about preventing as well as knowing whether systems have been tampered with.

In trustworthy systems, trust starts at the lowest levels of hardware and is carried through the boot process, into the operating system (OS) kernel, and finally into runtime in the OS.

The main components of implementing a trustworthy system are:

  • Enabling trust in hardware with Hardware root-of-trust and secure JTAG

  • Enabling trust in software with secure boot and secure iPXE

  • Enabling and maintaining trust at steady state with Security-Enhanced Linux (SELinux), Secure install, and SSD Encryption

Figure 1. Ecosystem of Trustworthy Systems

Trustworthy systems must have methods to securely measure hardware, firmware, and software components and to securely attest to these secure measurements.

For information on key concepts used in this chapter, see the Understanding Key Concepts in Security.

Enable Trust in Hardware

Trust in the hardware in enabled through:

Enable Trust in Hardware

The first component in implementing a trustworthy system is to enable trust in hardware.

Because software alone can’t prove a system's integrity, truly establishing trust must also be done in the hardware using a hardware-anchored root of trust. Without a hardware root of trust, no amount of software signatures or secure software development can protect the underlying system from becoming compromised. To be effective, this root of trust must be based on an immutable hardware component that establishes a chain of trust at boot-time. Each piece of code in the boot process measures and checks the signature of the next stage of the boot process before the software boots.

A hardware-anchored root of trust is achieved through:

  • Anti-counterfeit chip: All modules that include a CPU, as well as the chassis, are fitted with an anti-counterfeit chip, which supports co-signed secure boot, secure storage, and boot-integrity-visibility. The chip ensures that the device's software and hardware are authentic and haven’t been tampered with or modified in any way. It also helps to prevent unauthorized access to the device's sensitive data by enforcing strong authentication and access control policies.

  • Secure Unique Device Identifier (SUDI): The X.509 SUDI certificate installed at manufacturing provides a unique device identifier. SUDI helps to enable anti-counterfeit checks along with authentication and remote provisioning. The SUDI is generated using a combination of the device's unique hardware identifier (such as its serial number or MAC address) and a private key that is securely stored within the device. This ensures that each SUDI is unique and cannot be easily duplicated or forged. When a device attempts to connect to a network, the network uses the SUDI to authenticate the device, and ensure that it’s authorized to connect. This helps to prevent unauthorized access to the network and ensures that only trusted devices are allowed to connect.

  • Secure JTAG: The secure JTAG interface is used for debugging and downloading firmware. This interface with asymmetric-key based authentication and verification protocols prevents attackers from modifying firmware or stealing confidential information. Secure JTAG typically involves a combination of hardware and software-based security measures. For example, it may include the use of encryption and authentication protocols to secure communications between the JTAG interface and the debugging tool. It may also involve the use of access control policies and permissions to restrict access to the JTAG interface to authorized users only.


Note


Hardware-anchored root of trust is enabled by default on Cisco 8000 Series routers.


Verification

You can verify if trust is enabled in the hardware by executing the following command:
Router#show platform security integrity hardware
Wed Apr 17 11:19:03.202 UTC

+--------------------------------------+
   Node location: node0_RP0_CPU0
+--------------------------------------+
TPM Name: node0_RP0_CPU0_aikido
Uptime: 52050
Known-good-digests:
Index   value
  0     hh4jzFBlxSGHZ4hKqnC2FEjqHg4tpx/chZ7YcTwLCco=
observed-digests:
Index   value
  0     hh4jzFBlxSGHZ4hKqnC2FEjqHg4tpx/chZ7YcTwLCco=
PCRs:
Index   value
  15    Dl1BGskyzeJ1LNYKuZK8Qqllwkth0ru+0xWydL9YMdc=

Hardware Integrity Check Using Chip Guard Functionality

The chip guard feature helps detect if attackers have replaced a Cisco router’s Application Specific Integrated Circuit (ASIC) chip or CPU chip with a counterfeit one when the device is in the manufacturing supply chain. The ASIC performs critical functions, such as scanning an egress queue for error causes and a CPU runs the operating system. If these chips are counterfeited, the performance, reliability, and security of the router is compromised. During the hardware integrity check, at the time of device boot, if the chip guard feature identifies a counterfeit ASIC or CPU, it halts the secure boot process and displays a warning to inform that the supply chain integrity has been compromised.

Why do We Need Chip Guard

The increased hardware supply chain attacks compromise physical components, where attackers replace the ASIC or CPU on a router with malware-infested chips. Once the ASIC or CPU is replaced, the integrity of the hardware is compromised. Counterfeit chips in a router may have hidden functionalities to create a larger security vulnerability. Cisco’s chip guard feature detects counterfeit chips before the router is deployed in the network.

Stages of Chip Guard Implementation

The table shows the various stages through which chip guard is implemented on the router.

Stage

Process/Action

Result

1. Router Manufacturing

SHA 256 hashes of the electronic chip IDs of both the CPU and ASIC are programmed in the TAm chip and stored in a database known as Imprint DB.

The Imprint DB inside the TAm chip contains the SHA 256 hashes, which cannot be modified during the router’s lifetime.

2. Router Deployed in the Field and Powered Up

During the secure boot process, the chip guard feature recomputes the SHA 256 hashes of the electronic chip IDs of both the CPU and ASIC and creates a database known as Observed DB.

The Observed DB values are stored inside the TAm chip.

3. Comparison of Imprint DB and Observed DB

DBs match

The router continues to boot. Depending on the capability of the underlying router, the chip guard feature validates either the CPU, ASIC, or both.

DBs do not match

The router notifies that either the CPU or ASIC is counterfeit, and the secure boot process halts. A message is displayed on the console about the chip guard validation failure.

Action to be Taken on Hardware Validation Failure

If you receive a chip guard warning about integrity check failure, you must create a service request on the Products Returns & Replacement (RMA) website.

Attestation

Attestation enables external verifiers to check the integrity of the software running on the host. Implementing this feature on Cisco hardware helps you validate the trustworthiness of the hardware and software of network devices.

Once a router is up and running, you can send a request to an external verifier. The external verifier requests an attestation quote from the router. The TAm chip can output the PCR quote and audit log, and it signs the quote using an attestation private key for that specific router and responds to the verifier. The verifier uses Cisco-provided KGV hashes and the Attestation Public Certificate to verify the attested PCR quotes and audit logs. This verification is protected against repeat attacks using a nonce. Besides this, the verification ensures that the attestation is specific to a particular router by using attestation key pairs. These attestation key pairs are unique to each router. This ensures that attackers do not tamper with the router hardware, boot keys, boot configuration, and running software.

Proof of hardware integrity is recorded in the TAm as part of Chip Guard. This proof is made available through the following command:


Note


The same data is also available through NETCONF for a remote attestation server: Cisco-IOS-XR-remote-attestation-act.yang.


RP/0/RP0/CPU0:NCS-540-C-LNT#show platform security attest pcr 0 trustpoint ciscoaik nonce 4567 location 0/RP0/CPU0
Thu Apr 11 05:44:10.808 UTC
Nonce: 4567

+--------------------------------------+
   Node location: node0_RP0_CPU0
+--------------------------------------+
Uptime: 1198700
pcr-quote: /1RDR4AYACCkyXSBYFKZw5Nurif7DYQRMrBTg6q91heoKFZW0kp0FQACRWcAAAAABX5fDQAAA97/////AQAAACQAAAALAAAAAQALAwEAAAAgrE798LlOkKp1kryIv50kG0/V461IQutuSVgCUwjG8q4=
pcr-quote-signature: mC8oPWYzgSTge31DLXCs/Ez7BRKsZyDVb4auuhJagWHa3aHSa9eMf34Y/FMuTitjeAhcs---<truncated>---dJYpsPKMGkcro1IquTnaD1gKIH+Gh4QBewdNky3Igiw==
pcr-index       pcr-value
  0             sL3H+Em2xzxXrNUoDF+kC47IXxN4V/d/7hYUXApXNoY=

See the System Security Command Reference guide for more commands.

Enable Trust in Software

The second component in implementing a trustworthy system is to enable trust in software.

In Cisco IOS XR7, trust in the software is enabled through:

  • Secure Boot

  • Secure iPXE

Secure Boot

Table 1. Feature History Table

Feature Name

Release Information

Feature Description

Secure Boot Status

Release 25.4.1

Introduced in this release on: Fixed Systems (8010 [ASIC: A100])(select variants only*)

*This feature is supported on:

  • 8011-12G12X4Y-A

  • 8011-12G12X4Y-D

Secure Boot Status

Release 25.1.1

Introduced in this release on: Fixed Systems (8700 [ASIC: K100], 8010 [ASIC: A100])(select variants only*)

*This feature is supported on:

  • 8712-MOD-M

  • 8011-4G24Y4H-I

Secure Boot Status

Release 24.4.1

Introduced in this release on: Fixed Systems (8200 [ASIC: P100], 8700 [ASIC: P100])(select variants only*); Modular Systems (8800 [LC ASIC: P100])(select variants only*)

*This feature is supported on:

  • 8212-48FH-M

  • 8711-32FH-M

  • 88-LC1-36EH

  • 88-LC1-12TH24FH-E

  • 88-LC1-52Y8H-EM

Secure Boot Status

Release 7.8.1

You can now verify whether the router is securely booted up with an authentic Cisco software image. We have introduced a show command to verify the secure boot status of the router. If the software image was tampered with, then the secure boot fails, and the router does not boot up. Before this release, there was no provision on the router to verify the secure boot status.

The feature introduces these:

Cisco Secure Boot helps to ensure that the code that executes as part of the software image boot up on Cisco routers is authentic and unmodified. Cisco IOS XR7 platforms support the hardware-anchored secure boot which is based on the standard Unified Extensible Firmware Interface (UEFI). This UEFI-based secure boot protects the microloader (the first piece of code that boots) in tamper-resistant hardware, establishing a root of trust that helps prevent Cisco network devices from executing tainted network software.

Figure 2. Secure Boot

The intent of Secure Boot is to have a trust anchor module (TAm) in hardware that verifies the bootloader code. A fundamental feature of secure boot is the barrier it provides that makes it that it is extremely difficult or nearly impossible to bypass these hardware protections.

Secure boot ensures that the bootloader code is a genuine, unmodified Cisco piece of code and that code is capable of verifying the next piece of code that is loaded onto the system. It is enabled by default.

When secure boot authenticates the software as genuine Cisco in a Cisco device with the TAm, the operating system then queries the TAm to verify whether the hardware is authentic. It verifies by cryptographically checking the TAm for a secure unique device identifier (SUDI) that comes only from Cisco.

The SUDI is permanently programmed into the TAm and logged by Cisco during Cisco’s closed, secured, and audited manufacturing processes.

Booting the System with Trusted Software

In Cisco IOS XR7, the router supports the UEFI-based secure boot with Cisco-signed boot artifact verification. The following takes place:

Step 1: At bootup, the system verifies every artifact using the keys in the TAm.

Step 2: The following packages are verified and executed:

  • Bootloader (Grand Unified Bootloader (GRUB), GRUB configuration, Preboot eXecution Environment (PXE), netboot)

  • Initial RAM disk (Initrd)

  • Kernel (operating system)

Step 3: Kernel is launched.

Step 4: Init process is launched.

Step 5: All Cisco IOS XR RPMs are installed with signature verification.

Step 6: All required services are launched.

Secure iPXE – Secure Boot Over the Network

The iPXE server is an HTTP server discovered using DHCP that acts as an image repository server. Before downloading the image from the server, the Cisco router must authenticate the iPXE server.


Note


A secure iPXE server must support HTTPS with self-signed certificates.


The Cisco router uses certificate-based authentication to authenticate the iPXE server. The router:

  • Downloads the iPXE self-signed certificates

  • Uses the Simple Certificate Enrollment Protocol (SCEP)

  • Acquires the root certificate chain and checks if it’s self-signed

The root certificate chain is used to authenticate the iPXE server. After successful authentication, a secure HTTPS channel is established between the Cisco router and the iPXE server. Bootstrapper protocol (Bootp), ISO, binaries, and scripts can now be downloaded on this secure channel.

Verify Secure Boot Status

Verify Secure Boot Status

Use the show platform security integrity log secure-boot status command to verify the secure boot status of the router. If the router boots up securely, then the show command output displays the status as Enabled. If the router does not support this secure boot verification functionality, then the status is displayed as Not Supported.


Router#show  platform security integrity log secure-boot status 
Wed Aug 10 15:39:17.871 UTC

+--------------------------------------+
   Node location: node0_RP0_CPU0  
+--------------------------------------+
Secure Boot Status: Enabled
Router#

If the software image was tampered, then the secure boot fails and the router does not come up. The system displays corresponding error logs at various stages of boot up process. For example,


Bad signature file...
/initrd.img verification using Pkcs7 signature failed.
error: Security Violation: /initrd.img failed to load.
System halting...

Establish and Maintain Trust at Steady State

The third component in implementing a trustworthy system is to maintain trust in the steady or runtime state.

Attackers are seeking long-term compromise of systems and using effective techniques to compromise and persist within critical infrastructure devices. Hence, it is critical to establish and maintain trust within the network infrastructure devices at all points during the system runtime.

In Cisco IOS XR7, trust is established and maintained in a steady state through:

  • SELinux

    • SELinux Policy

    • SeLinux Mode

  • Secure Install

    • RPM Signing and Validation

    • Third-Party RPMs

  • SSD Encryption

SELinux

Security-Enhanced Linux (SELinux) is a Linux kernel security module that provides a mechanism for supporting access control security policies, including mandatory access controls (MAC).

A kernel integrating SELinux enforces MAC policies that confine user programs and system servers to the minimum amount of privileges they require to do their jobs. This reduces or eliminates the ability of these programs and daemons to cause harm when compromised (for example, through buffer overflows or misconfigurations). This confinement mechanism operates independently of the traditional Linux access control mechanisms. SELinux has no concept of a "root" super-user and does not share the well-known shortcomings of the traditional Linux security mechanisms (such as a dependence on setuid/setgid binaries).

On Cisco IOS XR7 software, only Targeted SELinux policies are used, so that only third-party applications are affected by the policies; all Cisco IOS XR programs can run with full root permission.

With Targeted SELinux, using targeted policies, processes that are targeted run in a confined domain. For example, the httpd process runs in the httpd_t domain. If a confined process is compromised by an attacker, depending on the SELinux policy configuration, the attacker's access to resources and the possible damage that can result is limited.


Note


Processes running in unconfined domains fall back to using discretionary access control (DAC) rules.


DAC is a type of access control defined as a means of restricting access to objects based on the identity of the subjects or the groups (or both) to which they belong.

SELinux Policy

Each Linux user is mapped to an SELinux user through an SELinux policy. This allows Linux users to inherit the restrictions placed on SELinux users.

If an unconfined Linux user executes an application, which an SELinux policy defines as an application that can transition from the unconfined_t domain to its own confined domain, the unconfined Linux user is subject to the restrictions of that confined domain. The security benefit is that, even though a Linux user is running in unconfined mode, the application remains confined. Therefore, the exploitation of a flaw in the application is limited by the policy.

A confined Linux user is restricted by a confined user domain against the unconfined_t domain. The SELinux policy can also define a transition from a confined user domain to its own target confined domain. In such a case, confined Linux users are subject to the restrictions of that target confined domain.

SELinux Mode

There are three SELinux modes:

  • Enforcing: When SELinux is running in enforcing mode, it enforces the SELinux policy and denies access based on SELinux policy rules.

  • Permissive: In permissive mode, the SELinux does not enforce policy, but logs any denials. Permissive mode is used for debugging and policy development. This is the default mode.

  • Disabled: In disabled mode, no SELinux policy is loaded. The mode may be changed in the boot loader, SELinux config, or at runtime with setenforce .

Role of the SELinux Policy in Boot Process

SELinux plays an important role during system startup. Because all processes must be labeled with their proper domain, the init process performs essential actions early in the boot process that synchronize labeling and policy enforcement.

Secure Install

The Cisco IOS XR software is shipped as RPMs. Each RPM consists of one or more processes, libraries, and other files. An RPM represents a collection of software that performs a similar functionality; for example, packages of BGP, OSPF, as well as the Cisco IOS XR Infra libraries and processes.

RPMs can also be installed into the base Linux system outside the Cisco IOS XR domain; however, those RPMs must also be appropriately signed.

All RPMs shipped from Cisco are secured using digitally signed Cisco private keys.

There are three types of packages that can be installed:

  • Packages shipped by Cisco (open source or proprietary)

  • Customer packages that replace Cisco provided packages

  • Customer packages that do not replace Cisco provided packages

RPM Signing and Validation

Table 2. Feature History Table

Feature Name

Release Information

Feature Description

RPM Signing and Validation

Release 25.4.1

Introduced in this release on: Fixed Systems (8010 [ASIC: A100])(select variants only*)

*This feature is supported on:

  • 8011-12G12X4Y-A

  • 8011-12G12X4Y-D

RPMs are signed using Cisco keys during the build process.

The install component of the Cisco IOS XR automatically performs various actions on the RPMs, such as verification, activation, deactivation, and removal. Many of these actions invoke the underlying DNF installer. During each of these actions, the DNF installer verifies the signature of the RPM to ensure that it operates on a legitimate package.

Cisco RPMs are signed using GPG keys. The RPM format has an area dedicated to hold the signature of the header and payload and these are verified and validated via DNF package managers.

Third-Party RPMs

The XR Install enforces signature validation using the ‘gpgcheck’ option of DNF. Thus, any Third-Party RPM packages installation fails if done through the XR Install (which uses the DNF).

SSD Encryption

Table 3. Feature History Table

Feature Name

Release Information

Feature Description

SSD Encryption for Addiitonal PIDs

Release 25.1.1

Introduced in this release on: Fixed Systems (8700 [ASIC: K100], 8010 [ASIC: A100])(select variants only*)

*This feature is supported on:

  • 8712-MOD-M

  • 8011-4G24Y4H-I

SSD Encryption for Addiitonal PIDs

Release 24.4.1

Introduced in this release on: Fixed Systems (8200 [ASIC: P100], 8700 [ASIC: P100])(select variants only*); Modular Systems (8800 [LC ASIC: P100])(select variants only*)

*This feature is supported on:

  • 8212-48FH-M

  • 8711-32FH-M

  • 88-LC1-36EH

  • 88-LC1-12TH24FH-E

  • 88-LC1-52Y8H-EM

Solid State Drive (SSD) Encryption

Release 7.3.1

This feature enables trust and security in the system’s steady state by encrypting data at the disk level. The encrypted data can be accessed only with a specific key stored in the TAm.

Customers are concerned about the security of sensitive data present on persistent storage media. User passwords are limited in their capability to protect data against attackers who can bypass the software systems and directly access the storage media.

In this case, only encryption can guarantee data confidentiality.

Cisco IOS XR Software introduces SSD encryption that allows encrypting data at the disk level. SSD encryption also ensures that the encrypted data is specific to a system and is accessible only with a specific key to decrypt them.

Data that can be encrypted is sensitive information such as, topology data, configuration data, and so on.

Encryption is an automatic process and can be achieved through the following:

  • DM-Crypt

  • CPU with AES-NI support

  • CryptSetup

DM-Crypt

DM-Crypt is a Linux kernel module that provides disk encryption. The module takes advantage of the Linux kernel’s device-mapper (DM) infrastructure. The DM provides a way to create virtual layers of block devices.

DM-crypt is a device-mapper target and provides transparent encryption of block devices using the kernel crypto API. Data written to the block device is encrypted; whereas, data to be read is decrypted. See the following figure.

Figure 3. DM-Crypt Encryption

AES-NI Support

Intel's Advanced Encryption Standard New Instructions (AES-NI) is a hardware-assisted engine that enables high-speed hardware encryption and decryption. This process leaves the CPU free to do other tasks.

When the input-output operations are started, the read-write requests that are directed at the encrypted block device are passed to the DM-Crypt. DM-Crypt then sends multiple cryptographic requests to the Cryptographic Framework. The crypto framework is designed to take advantage of off-chip hardware accelerators and provides software implementations when accelerators are not available. See the following image.

Figure 4. AES-NI Support

CryptSetup

DM-Crypt relies on user space tools, such as cryptsetup to set up cryptographic volumes. Cryptsetup is a command-line-interface (CLI) tool that interacts with DM-Crypt for creating, accessing, and managing encrypted devices.

Encrypted Logical Volume

An encrypted logical volume (LV) can be created during software installation

You can activate or deactivate the encrypted disk partition on demand. In addition to being activated, all sensitive files are also migrated from the unencrypted disk partition to the encrypted disk partition. The encrypted files can be migrated back during deactivation.

You can activate the data encryption by using the disk-encryption activate location command. A sample output is as follows:

Router#disk-encryption activate location 0/RP0/CPU0 
Tue Apr 16 14:35:00.939 UTC

Preparing system for backup. This may take a few minutes especially for large configurations.
	Status report: node0_RP0_CPU0: START TO BACKUP 
Router#	Status report: node0_RP0_CPU0: BACKUP HAS COMPLETED SUCCESSFULLY 
[Done]

The encrypted logical volume capacity is 150MB of disk space and is available as /var/xr/enc for applications to access.


Note


Although applications can choose to use this space for storage, that data is not be part of the data migration if the software image is downgraded to a version that does not support encryption.


SSD Binding

When encryption is activated on a system, each card generates a random encryption key and stores it in its own secure storage—the Trust Anchor module (TAm). During successive reboots, the encryption key is read from the TAm and applied to unlock the encrypted device. Since each card stores its encryption key locally on the TAm, an SSD that is removed from one card and inserted into another cannot be unlocked by the key stored on that card, thereby making the SSD unusable.

If encryption is activated, the encrypted LV can only be unlocked by using the key stored in the TAm. So, if an encrypted SSD is removed and moved to another line card, the SSD cannot be unlocked. In other words, when you activate encryption, the SSD is bound to the card it is inserted in.

Data Zeroization

Zeroization refers to the process of deleting sensitive data from a cryptographic module.


Note


In case of a Return Material Authorization (RMA), you must factory reset the data.


You can perform zeroization by using the factory reset location command from the XR prompt.


Caution


Running this command while encryption is activated, deletes the master encryption key from the TAm and renders the motherboard unusable after the subsequent reload.


Runtime Defences (RTD)

Run Time Defenses (RTD) are a collection of tools used at runtime to mitigate common security vulnerabilities. RTD is classified into three groups:

Address Space Layout Randomization (ASLR)

ASLR is a technique that stops an attacker from getting access to a vulnerable program function, by preventing the attacker from finding out the memory address of the program function within the running process. To make this possible, ASLR randomly distributes the fundamental parts of the process (like the executable base, stack pointers, libraries, etc.) within the memory address space assigned to it by the operating system. Hence, attackers will never know the exact memory address of the program function and will be unable to exploit it. If they try to exploit by brute force, the process will crash.

Kernel Address Space Layout Randomization (KASLR)

Kernel Address Space Layout Randomization (KASLR) is a technique which is very similar to ASLR but it is applicable at the Linux kernel level. KASLR protects the Linux kernel by randomizing the fundamental parts of the kernel process within the kernel memory when the system boots. This stops an attacker from getting a pointer to the kernel memory distribution table in order to exploit it.

Built-in Object Size Checker (BOSC)

BOSC is a limited buffer overflow protection mechanism provided by the compiler. BOSC helps in avoiding buffer-overflow related security vulnerabilities on common SafeC library functions such as, strcpy_s and memcpy_s.

Executable Space Protection (XSpace)

XSpace mitigates malicious code injection attacks by protecting the data and code portions of the program memory. The basic approach of such attacks is to overflow a buffer in the program stack and cause the transfer of control to injected code. Once in the injected code, the application behaves in an unexpected manner.

X-space ensures that the area of the memory where the authentic code exists is write-protected and the area of memory where the data is present is execution-protected. Illegal execution-attempts in the data-portion or write-attempts in the code-portion results in the application crashing.


Note


The XSpace functionality should not disabled at any time.


RTD Monitor

The RTD Monitor monitors all RTD functionalities on the router.

Boot Integrity and Trust Visibility

The secure boot first stage is rooted in the chip and all subsequent boot stages are anchored to the first successful boot. The system is, therefore, capable of measuring the integrity of the boot chain. The hash of each software boot image is recorded before it is launched. These integrity records are protected by the TAm. The boot chain integrity measurements are logged and these measurements are extended into the TAm.

Use the Router#show platform security attest pcr 15 trustpoint ciscoaik nonce 4567 command to view the boot integrity and boot-chain measurements. Given below is a sample output:
RP/0/RP0/CPU0:ios# show platform security attest PCR 15 trustpoint CiscoAIK nonce 4567 location 0/RP0/CPU0

Sun Jun 21 03:07:18.394 UTC
Nonce: 4567

+--------------------------------------+
   Node location: node0_RP0_CPU0  
+--------------------------------------+
Uptime: 495270
pcr-quote: /1RDR4AYACCBG/wltf4TEwfdUjtjun7S3rXC90eAb0G0ytrYRv3ExwACRWcAAAAAAD8hUwAAAEf/////
AQAAACQAAAALAAAAAQALAwCAAAAgae1J8QIYe06nS2RUx0JYeoG8tM3bqeVdpW7CObwBt+g=
pcr-quote-signature: 
EZbzSUge89jSjH8ZqTgKJrZJBopEbd818C+h1Ec780qi7Li1WfCZQPIP6KCDV6HsRCVzLoFijgmlMLoZE2rakQq+/
1TgZOWSLjMY7RbjSFr8z/zbpVI+YLnOG+wytVYWuY33uKHBn/
YWokHwo+qVf7u9aLGhnrXKvRUaFknBiZtQGiyAdis6GbPTToqn0WSN1y6DPh4UHZj1vLVwJsI48mbQUrAyCZrz/
XBHLM38tVJjqSrC0jw/6LF2DDoT5ks0VUFT7sqbysw4F56y+z/IlDBrrRW3GFOY46MOxDxLwSl1/
n6zdoVjiKKeqKOnmhpBh72bJQAdeu/GVOYTrOSy4Q==
pcr-index       pcr-value
  15    oYk8yqrzudIpGB4H++SaV0wMv6ugDSUIuUfeSqbJvbY=

RP/0/RP0/CPU0:ios# show platform security integrity hardware digest-algorithm SHA1 trustpoint CiscoAIK nonce 4567 location 0/RP0/CPU0

Sun Jun 21 03:09:14.594 UTC
Nonce: 4567

+--------------------------------------+
   Node location: node0_RP0_CPU0  
+--------------------------------------+
TPM Name: node0_RP0_CPU0_aikido
Uptime: 495385
Known-good-digests: 
Index   value
  0     3TDUS9iUDCFX3VkICcOnySOQTPA=
observed-digests: 
Index   value
  0     3TDUS9iUDCFX3VkICcOnySOQTPA=
PCRs:
Index   value
  15    1Y3uKqNv1UJQUNZQxmZkiuG4blk=

RP/0/RP0/CPU0:ios# show platform security integrity hardware digest-algorithm SHA256 trustpoint CiscoAIK nonce 4567 location 0/RP0/CPU0

Sun Jun 21 03:09:31.110 UTC
Nonce: 4567

+--------------------------------------+
   Node location: node0_RP0_CPU0  
+--------------------------------------+
TPM Name: node0_RP0_CPU0_aikido
Uptime: 495401
Known-good-digests: 
Index   value
  0     3TDUS9iUDCFX3VkICcOnySOQTPA=
observed-digests: 
Index   value
  0     3TDUS9iUDCFX3VkICcOnySOQTPA=
PCRs:
Index   value
  15    1Y3uKqNv1UJQUNZQxmZkiuG4blk=

RP/0/RP0/CPU0:ios# show platform security integrity hardware digest-algorithm SHA256 trustpoint CiscoAIK nonce 4567 location 0/RP0/CPU0

Sun Jun 21 03:09:43.782 UTC
Nonce: 4567

+--------------------------------------+
   Node location: node0_RP0_CPU0  
+--------------------------------------+
TPM Name: node0_RP0_CPU0_aikido
Uptime: 495414
Known-good-digests: 
Index   value
  0     y3n/SsvyNb8g3o7FFRGCZwfbs8EGxvMZg/PeN0NA71k=
observed-digests: 
Index   value
  0     y3n/SsvyNb8g3o7FFRGCZwfbs8EGxvMZg/PeN0NA71k=
PCRs:
Index   value
  15    oYk8yqrzudIpGB4H++SaV0wMv6ugDSUIuUfeSqbJvbY=
Cisco AIK Certificate used for signing PCR
pcr-quote: /1RDR4AYACCBG/wltf4TEwfdUjtjun7S3rXC90eAb0G0ytrYRv3ExwACRWcAAAAAAD8hywAAAEf////
/AQAAACQAAAALAAAAAQALAwCAAAAgae1J8QIYe06nS2RUx0JYeoG8tM3bqeVdpW7CObwBt+g=
pcr-quote-signature: qyKbK7ndJbrgxeVnOodLWQzT7++NzrxJ9ERRvJzvTe4+8r6p0HGSepHUhZHzYkXw4DbniHAK0Cs3dwg/
hGKGe4M8Lz+/k682yIjaFYYip0DHMaV2ny/lT7RSqM/6u3j/JZrZv39MaeHa3MyjjonzRf9oe7EBSFAKsa/D54eTR0eFtaxFy/
XdtM0VVQe2JRdoBVxnIBLGiVmGRlVVlmHvwwgX1lAN6e3/soC1Vk3I5gjLldPHUYuJ/
7PTGyAwZsbdeigx8d4ViUUUjSMzK7JISwXa8k4GiPQVLBHtqqR+RA9scmMZTbKLsG3luIWKQeyCtXMYE1VOeW8WQlAvioMICw==
RP/0/RP0/CPU0:ios#show platform security integrity hardware digest-algorith$
Sun Jun 21 03:09:56.794 UTC
Nonce: 4567

+--------------------------------------+
   Node location: node0_RP0_CPU0  
+--------------------------------------+
TPM Name: node0_RP0_CPU0_aikido
Uptime: 495427
Known-good-digests: 
Index   value
  0     3TDUS9iUDCFX3VkICcOnySOQTPA=
observed-digests: 
Index   value
  0     3TDUS9iUDCFX3VkICcOnySOQTPA=
PCRs:
Index   value
  15    1Y3uKqNv1UJQUNZQxmZkiuG4blk=

RP/0/RP0/CPU0:ios#

You can also use Cisco-IOS-XR-remote-attestation-act.yang to fetch the boot integrity over the NETCONF protocol.

The command displays both, the integrity log values and the assurance that these values have not been tampered. These measurements include the following parameters:

  • Micro loader hash

  • Boot loader hash

  • Image signing and management key hashes

  • Operating system image hash

platform-pid string Platform ID
Event log [key: event_number]: Ordered list of TCG described event log
                               that extended the PCRs in the order they
                               were logged
    +-- event_number   uint32 Unique event number of this even
    +-- event_type     uint32 log event type
    +-- PCR_index      uint16 PCR index that this event extended
    +-- digest         hex-string The hash of the event data
    +-- event_size     uint32 Size of the event data
    +-- event_data     uint8[] event data, size determined by event_size
PCR [index] - List of relevant PCR contents
    +-- index    uint16 PCR register number
    +-- value   uint8[] 32 bytes - PCR register content
PCR Quote binary TPM 2.0 PCR Quote
PCR Quote Signature binary Signature of the PCR quote using TAM-held ECC  or RSA restricted key with the optional nonce if supplied

Note


  • Platform Configuration Register (PCR) 0-9 are used for secure boot.

  • Signature version designates the format of the signed data.

  • The signature digest is SHA256.

  • The signing key is in a Trusted Computing Group (TCG) compliant format.


Note


Use the show platform security tam command to view the TAm device details. The following example shows a truncated output of the command:

Router#show platform security tam all location all
Mon Apr 15 14:42:34.649 UTC
---------------------------------------------
Node - node0_RP0_CPU0
---------------------------------------------
Device Type            -     AIKIDO Extended
Device PID             -     N540X-12Z16G-SYS-A
Device Serial Number   -     FOC2333NJ0J
Device Firmware Version-     0x24.000b
Server Version         -     3
Server Package Version -     9.4.1
Client Package Version -     9.4.1

Sudi Root Cert:
---------------------------------------------
Certificate:
    Data:
        Version: 3 (0x2)
        Serial Number:
            01:9a:33:58:78:ce:16:c1:c1
        Signature Algorithm: sha256WithRSAEncryption
        Issuer: O=Cisco, CN=Cisco Root CA 2099
        Validity
            Not Before: Aug  9 20:58:28 2016 GMT
            Not After : Aug  9 20:58:28 2099 GMT
        Subject: O=Cisco, CN=Cisco Root CA 2099
        Subject Public Key Info:
            Public Key Algorithm: rsaEncryption
                RSA Public-Key: (2048 bit)
                Modulus:
                    00:d3:b6:e3:35:7e:0d:3e:f4:67:e5:8a:4e:1a:c6:
        Exponent: 65537 (0x10001)
        X509v3 extensions:
            X509v3 Key Usage: critical
                Certificate Sign, CRL Sign
            X509v3 Basic Constraints: critical
                CA:TRUE
            X509v3 Subject Key Identifier:
                38:95:57:0F:34:23:4E:F3:A1:26:20:BA:14:91:C7:41:88:1D:A3:5B
    Signature Algorithm: sha256WithRSAEncryption
         8d:e2:99:a3:ee:31:77:4e:53:16:da:bd:f6:72:a7:58:0d:09:
         
Sudi Sub CA Cert:
---------------------------------------------
Certificate:
    Data:
        Version: 3 (0x2)
        Serial Number:
            0a:64:75:52:4c:d8:61:7c:62
        Signature Algorithm: sha256WithRSAEncryption
        Issuer: O=Cisco, CN=Cisco Root CA 2099
        Validity
            Not Before: Aug 11 20:28:08 2016 GMT
            Not After : Aug  9 20:58:27 2099 GMT
        Subject: CN=High Assurance SUDI CA, O=Cisco
        Subject Public Key Info:
            Public Key Algorithm: rsaEncryption
                RSA Public-Key: (2048 bit)
                Modulus:
                    00:bd:dc:de:49:67:43:23:a9:51:64:36:11:bc:0e:
                    
                Exponent: 65537 (0x10001)
        X509v3 extensions:
            X509v3 Key Usage: critical
                Certificate Sign, CRL Sign
            X509v3 Basic Constraints: critical
                CA:TRUE, pathlen:0
            Authority Information Access:
                CA Issuers - URI:https://www.cisco.com/security/pki/certs/crca2099.cer
                OCSP - URI:http://pkicvs.cisco.com/pki/ocsp

            X509v3 Authority Key Identifier:
                keyid:38:95:57:0F:34:23:4E:F3:A1:26:20:BA:14:91:C7:41:88:1D:A3:5B

            X509v3 Certificate Policies:
                Policy: 1.3.6.1.4.1.9.21.1.30.0
                  CPS: http://www.cisco.com/security/pki/policies/

            X509v3 CRL Distribution Points:

                Full Name:
                  URI:http://www.cisco.com/security/pki/crl/crca2099.crl

            X509v3 Subject Key Identifier:
                EA:6B:A3:B9:C1:13:97:7E:1B:FB:3A:8D:68:60:07:39:5F:87:48:FA
    Signature Algorithm: sha256WithRSAEncryption
         5c:a9:81:0e:80:01:e1:19:62:a7:77:03:3d:d3:55:d7:d8:49:
        
Sudi Cert:
---------------------------------------------
Certificate:
    Data:
        Version: 3 (0x2)
        Serial Number: 29200071 (0x1bd8ec7)
        Signature Algorithm: sha256WithRSAEncryption
        Issuer: CN=High Assurance SUDI CA, O=Cisco
        Validity
            Not Before: Sep  5 03:39:36 2019 GMT
            Not After : Aug  9 20:58:26 2099 GMT
        Subject: serialNumber=PID:N540X-12Z16G-SYS-A SN:FOC2333NJ0J, O=Cisco, OU=ACT-2 Lite SUDI, CN=Cisco NCS 540 System with 12x10G+4x1G Cu+12x1G AC Chassis
        Subject Public Key Info:
            Public Key Algorithm: rsaEncryption
                RSA Public-Key: (2048 bit)
                Modulus:
                    00:ca:2a:8a:b4:87:8b:43:68:17:d3:b2:43:44:ca:
                    
                Exponent: 65537 (0x10001)
        X509v3 extensions:
            X509v3 Key Usage: critical
                Digital Signature, Non Repudiation, Key Encipherment
            X509v3 Basic Constraints: critical
                CA:FALSE
            X509v3 Subject Alternative Name:
                0...N.
+..........@917C927B4B340B908703945A7A0A6D14D0207ADB2FB622DFA8C83538FD7E63B5.
B..+.........5.3ChipID=QvZQd9q9psveoAz6QJQeNAAAAAAAAAAAAAAAAAAAAAA=
    Signature Algorithm: sha256WithRSAEncryption
         5b:67:da:2e:e5:d4:07:f2:ff:9c:17:c9:54:78:8b:da:16:df:

The boot integrity verification is automatic and the BIOS reports the values to the PCR. The boot integrity verification process consists of the following steps:

  1. Report Boot 0 version and look up the expected integrity value for this platform and version.

  2. Report bootloader version and look up the expected integrity value for this platform and version.

  3. Report OS version and look up the expected integrity value for this platform and version.

  4. Using the integrity values obtained from steps 1-3, compute the expected PCR 0 and PCR 8 values

  5. Compare the expected PCR values against the actual PCR values.

  6. Verify the nonced signature to ensure the liveliness of the response data (this assumes unique nonced are being passed). Note that this signature verification must be performed only with the platform identity verified using SUDI.

  7. (Optional) Verify the software image (IOS XR) version is with what is expected to be installed on this platform.

A failure of any of the above steps indicates either a compromised system or an incomplete integrity value database.

Secure gRPC

gRPC (gRPC Remote Procedure Calls) is an open source remote procedure call (RPC) system that provides features such as, authentication, bidirectional streaming and flow control, blocking or nonblocking bindings, and cancellation and timeouts. For more information, see https://opensource.google.com/projects/grpc.

TLS (Transport Layer Security) is a cryptographic protocol that provides end-to-end communications security over networks. It prevents eavesdropping, tampering, and message forgery.

In Cisco IOS XR7, by default, TLS is enabled in gRPC to provide a secure connection between the client and server.


Note


Although TLS provides secure communication between servers and clients, TLS version 1.0 may pose a security threat. You can now disable TLS version 1.0 using the grpc tlsv1-disable command.


Integrity Measurement Architecture (IMA)

The goals of the Linux kernel integrity subsystem are to:

  • detect whether files are accidentally or maliciously altered, both remotely and locally

  • measure the file by calculating the hash of the file content

  • appraise a file's measurement against a known good value stored as an extended attribute

  • enforce local file integrity

There are three components in the Linux kernel integrity subsystem:

  • IMA Measurement

  • IMA Appraisal

  • IMA Audit


Note


These goals are complementary to the Mandatory Access Control (MAC) protections provided by SElinux.


IMA Measurement

IMA maintains a runtime measurement list and—because it is also anchored in the hardware Trusted Anchor module (TAm)—an aggregate integrity value over this list. The benefit of anchoring the aggregate integrity value in the TAm is that the measurement list cannot be compromised by any software attack without being detectable. As a result, on a trusted boot system, IMA-measurement can be used to attest to the system's runtime integrity.

For more information about IMA, download the IMA whitepaper, An Overview of The Linux Integrity Subsystem.

IMA Signatures

The IMA appraisal provides local integrity, validation, and enforcement of the measurement against a known good value stored as an extended attribute—security.ima. The method for validating file data integrity is based on a digital signature, which in addition to providing file data integrity also provides authenticity. Each file (RPM) shipped in the image is signed by Cisco during the build and packaging process and validated at runtime using the IMA public certificate stored in the TAm.

All RPMs contain Cisco IMA signatures of the files packaged in the RPM, which are embedded in the RPM header. The IMA signature of the individual file is stored in its extended attribute during RPM installation. This protects against modification of the Cisco RPMs.

The IMA signature format used for IMA can have multiple lines and every line has comma-separated fields. Each line entry will have the filename, hash, and signature as illustrated below.

  • File – Filename with the full path of the file hashed and signed

  • Hash – SHA256 hash of the file

  • Signature – RSA2048 key-based signature

How Trustworthiness is Implemented

The following sequence of events takes place automatically when the Cisco routers that support the IOS XR7 operating system are powered up:

  1. At power UP, the micro-loader in the chip verifies the digital signature of BIOS using the keys stored in the Trusted Anchor module (TAm). The BIOS signature verification is logged and the measurement is extended into a PCR.

  2. The BIOS then verifies the signature of the boot-loader using keys stored in TAm. The boot-loader signature verification is logged and the measurement is extended into the PCR.

  3. If the validation is successful, the BIOS launches the bootloader. The bootloader uses the keys loaded by the BIOS to verify the sanctity of the kernel, initial RAM disk (initrd) file system, and grub-config file. Each verification operation is logged, and the PCR in TAm is extended.

  4. The initrd is loaded to create the initial file system.

  5. The kernel is launched and the kernel keyrings are populated with the appropriate keys from the TAm.

  6. The init process is launched. Whenever an executable or a shared library is invoked, the IMA kernel hook validates the signature using the certificates in IMA keyring, which is then used to validate the signature attached to the file.

  7. The Cisco IOS XR7 RPM is installed with the signed verification. The results of RPM verification are logged.

  8. Cisco IOS XR7 processes are launched with IMA measurement.

  9. TAm services are launched.

  10. Cisco IOS XR7 application runs the initial admin user configuration and stores the credentials into TAm secure storage.

    Manual provisioning of user credentials is now complete.

The Cisco routers perform the above steps, which is a holistic approach to integrate trust. Trust begins in hardware, next the system verifies the trustworthiness of the network operating system, after bootup, the system maintains trust at runtime, last, the system visualizes and reports on trust. You can verify the boot status by executing the following command:

Router#show platform security integrity log secure-boot
Fri Apr 12 17:13:43.867 UTC

+--------------------------------------+
   Node location: node0_RP0_CPU0  
+--------------------------------------+
Secure Boot Status: Enabled

Understanding Key Concepts in Security

Attestation

Attestation is a mechanism used to attest the software’s integrity. The verifier trusts that the attested data is accurate because it is signed by a TPM whose key is certified by the CA.

Attestation Identity Key

An Attestation Identity Key (AIK) is a restricted key that is used for signing attestation requests.
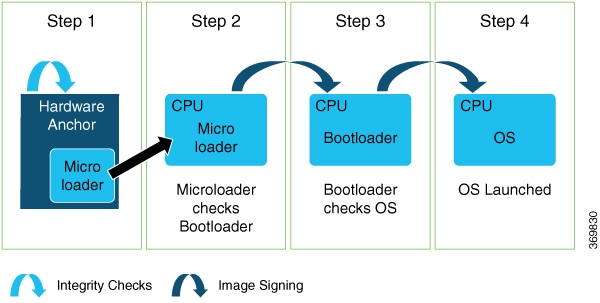
Bootloader

The bootloader is a piece of code that runs before any operating system begins to run. Bootloaders contain several ways to boot the OS kernel and also contain commands for debugging and modifying the kernel environment.

Certificates and Keys in TAm

All database keys are signed by the KEK. Any update to the keys requires the KEK or PK to sign in, using time-based authentic variables. Some of the keys on the database are:

  • Image signing certificate: This is the X.509 certificate corresponding to the public key and is used for validating the signature of grub, initrd, kernel, and kernel modules.

  • IOS-XR Key: A public key certificate signed by the KEK. This key is common to all Cisco 8000 Series routers and is used to sign GRUB, initrd, kernel and kernel modules.

  • RPM key: Used for signing RPMs.

  • IMA public key certificate: Used for Integrity Measurement Architecture (IMA), and used to validate the IMA signature of the files.

  • BIOS or Firmware Capsule Update key: Used to sign the outer capsule for BIOS or firmware updates. It is the same as the secure boot key.

  • Platform key (PK) and Key Enrollment Key (KEK): These are public keys and certificates used to manage other keys in the TAM.

  • LDWM Key: In the Cisco IOS XR7, the LDWM key is stored in the hardware trust anchor module and is used for validating the BIOS.

Golden ISO (GISO)

A GISO image includes a base binary artifact (an ISO) for the Linux distribution that is used on the server fleet, packages, and configuration files that can be used as a base across all servers.

The GISO image for Cisco IOS XR7 software contains the IOS XR RPMs, third-party RPMs, ztp.ini, and secure ZTP certificates .

GRand Unified Bootloader (GRUB)

GNU GRUB (or just GRUB) is a boot loader package that loads the kernel and supports multiple operating systems on a device. It is the first software that starts at a system boot.

Hash Function

A hash function is any function that is used to map data of arbitrary size onto data of a fixed size.

Initramfs

Initramfs, a complete set of directories on a normal root filesystem, is bundled into a single cpio archive and compressed with one of the several compression algorithms. At boot time, the boot loader loads the kernel and the initramfs image into memory and starts the kernel.

initrd

initial RAM disk is an initial root file system that is mounted before the real root file system is made available. The initrd is bound to the kernel and loaded as part of the kernel boot procedure.
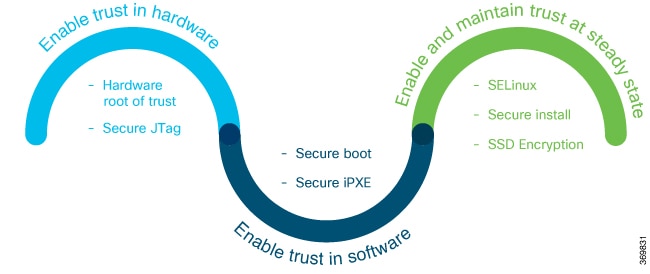
JTAG

JTAG is a common hardware interface that provides a system with a way to communicate directly with the chips on a board. JTAG is used for debugging, programming, and testing on embedded devices.

Nonce Value

A nonce value is an arbitrary number that can be used only once in a cryptographic communication. It is a random or pseudo-random number that is issued in an authentication protocol to ensure that the old communications are not reused in replay attacks.

Platform Configuration Register (PCR)

A PCR is a shielded register or memory region large enough to hold the contents of a hash operation. A PCR is initialized to a well-known value at power-up, and typically cannot be reset.

PCR Extend

The only way to change the value held in a PCR is to perform an “extend” operation, which is defined as:
PCR[x]new = hash ( PCR[x]old || hash ( measurement value ) )

Trust Anchor module (TAm)

The Cisco Trust Anchor module (TAm) helps verify that Cisco hardware is authentic and provides additional security services.

Trusted Platform Module (TPM)

A Trusted Platform Module (TPM) is a specialized chip on an endpoint device that stores RSA encryption keys specific to the host system for hardware authentication. This key pair is generated by the TPM based on the Endorsement Key and an owner-specified password.

Root of Trust for Storage

TPM 2.0-compliant Platform Configuration Registers (PCRs) form the Root of Trust for Storage.

TCG-compliant Trusted Platform Module

A TCG-compliant TPM is a hardware security feature that

  • adheres to Trusted Computing Group (TCG) specifications,

  • utilizes strong cryptographic algorithms such as ECC P384 algorithm for secure identification and attestation, and

  • protects device boot integrity and secure communication through hardware-backed security features.

These hardware-backed security features enable the creation of IDevID (Initial Device Identifier) and Initial Attestation Keys (IAK), supporting compliance with modern security standards such as TLS 1.3. They also provide resilient fallback mechanisms, including AIKIDO-based keys, when ECC is not provisioned in the TPM or when TPM hardware is unavailable. Attestation capabilities are enhanced through new PCR 0–8 measurements. TPM support now includes SHA-384 bank of PCRs for measured boot, further strengthening trust in the early boot stages.

IDevID is a factory-installed digital certificate that uniquely and securely identifies a device, typically using its public key and manufacturer-signed credentials. It is used to authenticate devices when they first connect to a network, ensuring only genuine, trusted hardware is allowed access. This mechanism is commonly applied in secure onboarding, supply chain security, and zero-touch provisioning scenarios.

Table 4. Feature History Table

Feature Name

Release Information

Feature Description

TCG-compliant Trusted Platform Module

Release 25.4.1

Introduced in this release on: Modular Systems (8800 [LC ASIC: Q100, Q200, P100])*

Upgrade your device security and cryptographic identity by adopting a TCG-compliant TPM with support for the ECC P384 algorithm and SHA-384 hashing. This enables advanced features such as TLS 1.3 for critical functions like gRPC, using IDevID for authentication. The TPM further enhances device attestation through new PCR 0–8 measurements within a dedicated SHA-384 PCR bank, establishing a hardware-rooted chain of trust from the earliest boot stages. Additionally, a robust AIKIDO fallback mechanism ensures continuous secure operation, even in the event of failures.

CLI:

*This feature is only supported on Cisco 8800-RP2-S hardware variants.

Starting Cisco IOS XR Software Release these features are migrated to TPM:

  • gRPC Extensible Manageability Services Deamon (EMSD)

  • Attestation APP

  • EnrollZ/AttestZ

Guidelines for TCG-compliant Trusted Platform Module

Follow these guidelines to ensure secure and reliable use of TCG-compliant Trusted Platform Module feature.

  • This feature is only supported on Cisco 8000 Series RP2-S variants.

  • TPM enablement occurs automatically on supported Cisco 8000 Series RP2-S hardware variants, and there are no manual steps required to activate the core TPM functionality.

  • This feature remains permanently enabled and cannot be disabled on future RP2-S hardware that supports TPM.

  • The system gracefully falls back to the AIKIDO module if the TCG-compliant IDevID is not present on Generic TPM, maintaining the operation of critical features such as AttestZ, and EnrollZ.

  • BIOS and PCR measurements follow TCG 2.0 specifications to meet industry-standard trusted computing requirements.

  • Applications including EMSD, EnrollZ, and AttestZ are configured to automatically use TPM ECC-based keys and certificates whenever the TPM is available.

  • The implementation adheres to Cisco's Security Development Lifecycle (CSDL) standards, encompassing threat modeling, secure coding practices, static analysis, and vulnerability testing.

  • For measurement and PCR extension within the TPM, the SHA-384 algorithm is used through the dedicated SHA-384 PCR bank.

  • Review error messages during TPM usage:

    Table 5. Error Messages during TPM

    Error Messages

    Reason

    No TCG ECC IDevID certificate

    The certificate is not provisioned.

    No TCG ECC IDevID certificate chain

    The certificate chain is missing.

    No TCG ECC HW CAPABILITY

    The TPM lacks ECC capability.

    If the TPM is not available, verify that all features fall back and use the SUDI/AIK keys from TAM.

Benefits of TCG-compliant Trusted Platform Module

TCG-compliant Trusted Platform Module provide several benefits for device identity and attestation.

  • When you migrate from RSA to TCG-compliant ECC P384 alogorithm with TPM, you improve protection against cryptographic attacks and tampering. This process significantly strengthens device security.

  • Using TCG-compliant ECC P384 algorithm for device identity helps you create robust and unique cryptographic identification. Detailed PCR measurements improve attestation, ensuring trusted onboarding and secure operations.

  • You can use ECC keys from TPM to adopt TLS 1.3 for security features such as EMSD, and gRPC. TLS 1.3 provides advanced security and faster communications.

  • If the TPM is unavailable, the system utilizes AIKIDO to maintain operation and ensure service continuity for security-critical functions. However, if TAM supports only RSA-based keys, the device can negotiate only TLS 1.2.

  • Use new show commands to inspect the TPMs state, PCR values, attestation data, and certificate chains. These actions enhance security transparency for your audit and troubleshooting procedures.

Verify TCG-compliant Trusted Platform Module protocols

Ensure that the Trusted Platform Module (TPM) is enabled and functioning as expected on your device.

Procedure


Step 1

Display TPM security information.

Example:

Router#show platform security tpm info all location 0/RP0/CPU0 
---------------------------------------------
Node - 0/RP0/CPU0
---------------------------------------------
Device Type            -     TPM
Device PID             -     8800-RP2-S
Device Serial Number   -     FOC2845N1BJ
Device Firmware Version-     0x01.0200
Server Version         -     3
Server Package Version -     13.1.1
Client Package Version -     13.1.1

HA Sudi Root Cert: 
---------------------------------------------
Certificate:
    Data:
        Version: 3 (0x2)
        Serial Number: 3 (0x3)
        Signature Algorithm: ecdsa-with-SHA384
        Issuer: O=Cisco, CN=Cisco ECC Root CA
        Validity
            Not Before: Apr  4 08:15:44 2013 GMT
            Not After : Sep  7 16:24:07 2099 GMT
        Subject: O=Cisco, CN=Cisco ECC Root CA
        Subject Public Key Info:
            Public Key Algorithm: id-ecPublicKey
                Public-Key: (384 bit)
                pub:
                    04:7e:c0:c3:bc:d8:1b:c6:f3:67:91:4d:d6:78:8c:
                    e6:b5:75:39:04:7f:2f:fe:60:d0:ac:77:2a:d3:6d:
                    02:41:45:54:67:b0:58:b7:19:bf:cc:bd:4b:36:5c:
                    7b:5b:83:38:ec:a6:d7:4d:30:26:61:b3:4b:8b:ab:
                    5e:0e:15:26:3b:4c:88:ab:02:70:c9:22:37:02:50:
                    75:c0:d5:d4:48:34:c7:bf:58:53:fe:ae:cb:8f:73:
                    20:f5:06:5b:12:87:ca
                ASN1 OID: secp384r1
                NIST CURVE: P-384
        X509v3 extensions:
            X509v3 Key Usage: critical
                Certificate Sign, CRL Sign
            X509v3 Basic Constraints: critical
                CA:TRUE
            X509v3 Subject Key Identifier: 
                A4:45:B6:2F:A3:31:B1:76:15:B0:0A:18:33:CA:F6:AD:4F:3D:28:04
    Signature Algorithm: ecdsa-with-SHA384
    Signature Value:
        30:65:02:31:00:f0:9b:71:dc:7b:40:56:9f:ff:61:a9:3a:ba:
        6d:f1:19:10:44:4f:88:f9:80:ff:a5:86:6f:13:89:c8:19:75:
        39:9e:0e:b6:e8:85:bb:9f:06:0d:07:31:11:ba:80:57:2b:02:
        30:08:b9:e0:52:29:8f:89:14:84:28:c7:27:80:1d:98:73:ea:
        97:2c:6b:31:e3:84:b7:ac:48:b1:d6:54:d5:49:35:54:ca:66:
        27:8f:7a:f6:e2:b1:1e:38:ab:8a:a5:f3:86

The command output is truncated.

Step 2

View the TPM integrity boot log.

Example:

Router#show platform security tpm integrity log boot location 0/rp0/CPU0  

+--------------------------------------+
   Node location: node0_RP0_CPU0  
+--------------------------------------+
Uptime: 504480
Event Number: 1
Event Type: 03
PCR Index: 0
Event Digest Hash Algorithm: SHA1
Event Digest: AAAAAAAAAAAAAAAAAAAAAAAAAAA=
Event Data: U3BlYyBJRCBFdmVudDAzAAAAAAAAAgACAgAAAAsAIAAMADAAAA==
Event Number: 2
Event Type: 80000008
PCR Index: 0
Event Digest Hash Algorithm: SHA256
Event Digest: 8emdTrXnHLbHk7wXjWIMkF3/rKTUx7aJ7bFbqw5IEv4=
Event Digest Hash Algorithm: SHA384
Event Digest: 6OuqsUTGphX/NRZc82MBOefq1uLmac7i+kCjzmF5emFth2Fvd8NIAY4JruOOQMLM
Event Data: MrVWeEdXauXu7dTksv0FWh/3qy9lCrxrKWRy/2iR+xc=
Event Number: 3
Event Type: 80000008
PCR Index: 0
Event Digest Hash Algorithm: SHA256
Event Digest: mlrPXdkLmp++U11lPwBJZpnJ/qjOpVTxQljh8548Qxs=
Event Digest Hash Algorithm: SHA384
Event Digest: ioW380j8Ujk+EbQCX2Rz3OpJrjkh0ICSOCaJcm6cPdp0m05yma6tAqOk9FXCH145
Event Data: AEtoSI8ICqnAz53G1/XMD4qHH1qkuXmEAhLEUpw5ON4=
Event Number: 4
Event Type: 08

The command output is truncated.

Step 3

Check TPM status and take necessary actions.

Table 6. TPM verification decisions and actions

If...

Then...

TPM is shown as enabled and active

no further action is required.

TPM is not present or status is not enabled

initiate TPM troubleshooting procedures.

Digest algorithm output is not SHA384 as expected

verify configuration and consult security policies.

Integrity log shows unexpected entries

investigate potential security incidents.

Step 4

Display Platform Configuration Register (PCR) information.

Example:

Router#show platform security tpm pcr 0,1,2,3,4,5,6,7 location 0/rp0/CPU0 nonce 1234
Nonce: 1234

+--------------------------------------+
   Node location: node0_RP0_CPU0  
+--------------------------------------+
Uptime: 503962
pcr-quote: /1RDR4AYADIADENTQTaEYQEDiVbaJXvPhpXBefn8qtyVzMDcNyy+DCWEosmT7gTVQ1fm43uUBdC7hAACEjQAAAAADl3r1QAAANcAAAAAAQABAgAAAAAAAAAAAQAMA/8AAAAwXLu43F9C/nZ7JJxgGADn03XT51lcy7lG6vX83w5MFvE5vu6Un+gHJXB7g89RtR+j
pcr-quote-signature: MGUCMEyTgef326UvqM09y3YRhtjGY5fNUV1g+wIgvAOcNYanTcRnK6Z4FqxiIJFUJ5wfZQIxAPJXXhkYpE/OsiUVvN6/Eyn4jnUScaG9a+6ei31V3s3mUZqCVx9/wmojxBUKN8rWPQ==
pcr-index       pcr-value
  0     jkkHIFe0ce11YQouajSuN0jharqmSlK8dIr4j9TxXDb0PNVE9DjqO8vAh4tqHrl2
  1     wqoQkOVvOepm0+UwHGMmZwOYQl+B1R3TAaCnM3N5spA47EMWEI8cJDv77BvU02Ep
  2     UYkjsPlV0I2gd8lqq6Uiud7O3mHFmc6mxBiJz76krk1QUp2W/k0a/a+2Xn+VvyPE
  3     UYkjsPlV0I2gd8lqq6Uiud7O3mHFmc6mxBiJz76krk1QUp2W/k0a/a+2Xn+VvyPE
  4     lPFWW2vHNA6NX8Iv0J8wWWaT3rAXnNZeRKLtc7LAoEjjNNgX7IxPdyn6WjKBkVP1
  5     TLhFkU36DYM3c75lQ6xSF3C60ebOb4fFGpbaDUuO796OhhJ8dCM69rwNeGxGvGhO
  6     UYkjsPlV0I2gd8lqq6Uiud7O3mHFmc6mxBiJz76krk1QUp2W/k0a/a+2Xn+VvyPE
  7     OoL7f6vUtdwPenkABQg01O0wmynHogAEhtV/YkxizN4Po0CZrfkQfXJf9P6C6h+Y

The PCR bank is based on SHA384.

Confirm PCR values reflect expected integrity measurements.

Step 5

Display the TPM Cisco IdevID certificate.

Example:

Router#show platform security tpm attest certificate CiscoECCSUDI location
+--------------------------------------+
   Node location: node0_RP0_CPU0  
+--------------------------------------+
Certificate name: Cisco ECC SUDI Root
-----BEGIN CERTIFICATE-----
MIIByDCCAU6gAwIBAgIBAzAKBggqhkjOPQQDAzAsMQ4wDAYDVQQKEwVDaXNjbzEa
MBgGA1UEAxMRQ2lzY28gRUNDIFJvb3QgQ0EwIBcNMTMwNDA0MDgxNTQ0WhgPMjA5
OTA5MDcxNjI0MDdaMCwxDjAMBgNVBAoTBUNpc2NvMRowGAYDVQQDExFDaXNjbyBF
Q0MgUm9vdCBDQTB2MBAGByqGSM49AgEGBSuBBAAiA2IABH7Aw7zYG8bzZ5FN1niM
5rV1OQR/L/5g0Kx3KtNtAkFFVGewWLcZv8y9SzZce1uDOOym100wJmGzS4urXg4V
JjtMiKsCcMkiNwJQdcDV1Eg0x79YU/6uy49zIPUGWxKHyqNCMEAwDgYDVR0PAQH/
BAQDAgEGMA8GA1UdEwEB/wQFMAMBAf8wHQYDVR0OBBYEFKRFti+jMbF2FbAKGDPK
9q1PPSgEMAoGCCqGSM49BAMDA2gAMGUCMQDwm3Hce0BWn/9hqTq6bfEZEERPiPmA
/6WGbxOJyBl1OZ4OtuiFu58GDQcxEbqAVysCMAi54FIpj4kUhCjHJ4AdmHPqlyxr
MeOEt6xIsdZU1Uk1VMpmJ4969uKxHjiriqXzhg==
-----END CERTIFICATE-----
-----------------Truncated for brevity-----------------

Validate certificate information as required.

Step 6

Display TPM ECC-sudi certs information.

Example:

Router#show  platform security tpm attest certificate CiscoECCSUDI location 0/rp0/CPU0 nonce 1234 
+--------------------------------------+
   Node location: node0_RP0_CPU0  
+--------------------------------------+
Nonce: 1234
Certificate name: Cisco ECC SUDI Root
-----BEGIN CERTIFICATE-----
MIIByDCCAU6gAwIBAgIBAzAKBggqhkjOPQQDAzAsMQ4wDAYDVQQKEwVDaXNjbzEa
MBgGA1UEAxMRQ2lzY28gRUNDIFJvb3QgQ0EwIBcNMTMwNDA0MDgxNTQ0WhgPMjA5
OTA5MDcxNjI0MDdaMCwxDjAMBgNVBAoTBUNpc2NvMRowGAYDVQQDExFDaXNjbyBF
Q0MgUm9vdCBDQTB2MBAGByqGSM49AgEGBSuBBAAiA2IABH7Aw7zYG8bzZ5FN1niM
5rV1OQR/L/5g0Kx3KtNtAkFFVGewWLcZv8y9SzZce1uDOOym100wJmGzS4urXg4V
JjtMiKsCcMkiNwJQdcDV1Eg0x79YU/6uy49zIPUGWxKHyqNCMEAwDgYDVR0PAQH/
BAQDAgEGMA8GA1UdEwEB/wQFMAMBAf8wHQYDVR0OBBYEFKRFti+jMbF2FbAKGDPK
9q1PPSgEMAoGCCqGSM49BAMDA2gAMGUCMQDwm3Hce0BWn/9hqTq6bfEZEERPiPmA
/6WGbxOJyBl1OZ4OtuiFu58GDQcxEbqAVysCMAi54FIpj4kUhCjHJ4AdmHPqlyxr
MeOEt6xIsdZU1Uk1VMpmJ4969uKxHjiriqXzhg==
-----END CERTIFICATE-----

Certificate name: Cisco ECC SUDI CA
-----BEGIN CERTIFICATE-----
MIIDETCCApagAwIBAgIBBTAKBggqhkjOPQQDAzAsMQ4wDAYDVQQKEwVDaXNjbzEa
MBgGA1UEAxMRQ2lzY28gRUNDIFJvb3QgQ0EwIBcNMTMwNDA0MDgyNjEzWhgPMjA5
OTA5MDcxNjI0MDZaMCsxDjAMBgNVBAoTBUNpc2NvMRkwFwYDVQQDExBBQ1QyIEVD
QyBTVURJIENBMHYwEAYHKoZIzj0CAQYFK4EEACIDYgAEjGHc+nnSMQr4zuARzDxH
F6TDi97f7eGqSdDK5misVpoBP0Nwwcmazs+GTiT+Us52/BKuo4JlaZ74cnlzzBIn
kPwtuag2bXSCeYVJhcB3sVuVvYiSKVEi1OIgx85dtXdwo4IBiTCCAYUwDgYDVR0P
AQH/BAQDAgEGMBIGA1UdEwEB/wQIMAYBAf8CAQAwfQYIKwYBBQUHAQEEcTBvMD8G
CCsGAQUFBzAChjNodHRwOi8vd3d3LmNpc2NvLmNvbS9zZWN1cml0eS9wa2kvY2Vy
dHMvZWNjcm9vdC5jZXIwLAYIKwYBBQUHMAGGIGh0dHA6Ly9wa2ljdnMuY2lzY28u
Y29tL3BraS9vY3NwMB8GA1UdIwQYMBaAFKRFti+jMbF2FbAKGDPK9q1PPSgEMFwG
A1UdIARVMFMwUQYKKwYBBAEJFQETADBDMEEGCCsGAQUFBwIBFjVodHRwOi8vd3d3
LmNpc2NvLmNvbS9zZWN1cml0eS9wa2kvcG9saWNpZXMvaW5kZXguaHRtbDBCBgNV
HR8EOzA5MDegNaAzhjFodHRwOi8vd3d3LmNpc2NvLmNvbS9zZWN1cml0eS9wa2kv
Y3JsL2VjY3Jvb3QuY3JsMB0GA1UdDgQWBBSWhzrYiYGRQRUzv+A0jyCPwrvDljAK
BggqhkjOPQQDAwNpADBmAjEAzye9v1h5m/1bAUSU0MQwShDDCRJHXsc+1TtbqOJR
1cZMmhsIzNNy/AskkBoIgNNtAjEAk3DAKxkBx3DYyZS4Uz3B50MpbrZwpxPTUCqW
m7qExCM7m1FjIg98ltfdltPHgqP/
-----END CERTIFICATE-----

Certificate name: Cisco ECC SUDI
-----BEGIN CERTIFICATE-----
MIIDYDCCAuagAwIBAgIKB3VSGUcUMEFBaTAKBggqhkjOPQQDAzArMQ4wDAYDVQQK
EwVDaXNjbzEZMBcGA1UEAxMQQUNUMiBFQ0MgU1VESSBDQTAgFw0yNTA1MjMxNjMy
MjJaGA8yMDk5MDkwNzE2MjQwNVowgaAxJjAkBgNVBAUTHVBJRDo4ODAwLVJQMi1T
IFNOOkZPQzI4NDVOMUJKMQ4wDAYDVQQKEwVDaXNjbzERMA8GA1UECxMIVFBNIFNV
REkxUzBRBgNVBAMTSkNpc2NvIDg4MDAgUm91dGUgUHJvY2Vzc29yIDIgKHNaVFAg
ZGVmYXVsdCkgTUFDOmM0YWI0ZGZmODNjMC0wMDA4ODAwLVJQMi1TMHYwEAYHKoZI
zj0CAQYFK4EEACIDYgAEDXJ5EgjisuoVF9OmqmdPkdSDhm48bwqcsnv4Yb+LTHDE
s84Mdj44a1VIKUEZyVaMemNCu/IdO7TgNcLoizCulb4BxiVIulv4oeL2kh23SxK1
BfW5I5FoxkLz4QGr9fTxo4IBWzCCAVcwDgYDVR0PAQH/BAQDAgXgMAwGA1UdEwEB
/wQCMAAwHwYDVR0jBBgwFoAUloc62ImBkUEVM7/gNI8gj8K7w5YwHQYDVR0gBBYw
FDAIBgZngQULAQEwCAYGZ4EFCwECMIHXBgNVHREEgc8wgcygcQYIKwYBBQUHCASg
ZTBjBgVngQUBAgRaNTM1NDREMjA6NTNkZWM1MmE0YjgwYTczYzViOWJjMDY5ZWM0
MDc5MTZiZjNiMzM4MDoxNmI5ZjllYTIxMTQxZmY4NWMwMjAzY2ZhODEwYzg5NzEw
YjRiOWQ0oFcGCCsGAQUFBwgDoEswSQxAODc5ZWYwMjUxNTlkYTVlMzUzZWEyZTNi
MDhjZGM0MjAzZDUyNzAxNTJjMThlYmRlYjA4Yjc5MzMxYTA3ODQ0ZAYFZ4EFDAEw
HQYDVR0OBBYEFEUV02BniQxfiRTdQVzgfjZh0aD/MAoGCCqGSM49BAMDA2gAMGUC
MQC23df2vMVL9J20W22NzeeBJvU2+awcI10kfcZYSr+SLA+BTHU/iLyUIatZpqcv
Y7UCMA3xchuT66IPNfkrjZoPSQARUP0376dirxOiFSwcedUGVDxzMxObGb3Lh68H
hpBtQA==
-----END CERTIFICATE-----

Review details for completeness and correctness.

Step 7

Display the TPM IAK certificate.

Example:

Router#show  platform security tpm attest certificate CiscoECCIAK location 0/rp0/CPU0 nonce 1234 
+--------------------------------------+
   Node location: node0_RP0_CPU0  
+--------------------------------------+
Nonce: 1234
Certificate name: Cisco ECC IAK Root
-----BEGIN CERTIFICATE-----
MIIByDCCAU6gAwIBAgIBAzAKBggqhkjOPQQDAzAsMQ4wDAYDVQQKEwVDaXNjbzEa
MBgGA1UEAxMRQ2lzY28gRUNDIFJvb3QgQ0EwIBcNMTMwNDA0MDgxNTQ0WhgPMjA5
OTA5MDcxNjI0MDdaMCwxDjAMBgNVBAoTBUNpc2NvMRowGAYDVQQDExFDaXNjbyBF
Q0MgUm9vdCBDQTB2MBAGByqGSM49AgEGBSuBBAAiA2IABH7Aw7zYG8bzZ5FN1niM
5rV1OQR/L/5g0Kx3KtNtAkFFVGewWLcZv8y9SzZce1uDOOym100wJmGzS4urXg4V
JjtMiKsCcMkiNwJQdcDV1Eg0x79YU/6uy49zIPUGWxKHyqNCMEAwDgYDVR0PAQH/
BAQDAgEGMA8GA1UdEwEB/wQFMAMBAf8wHQYDVR0OBBYEFKRFti+jMbF2FbAKGDPK
9q1PPSgEMAoGCCqGSM49BAMDA2gAMGUCMQDwm3Hce0BWn/9hqTq6bfEZEERPiPmA
/6WGbxOJyBl1OZ4OtuiFu58GDQcxEbqAVysCMAi54FIpj4kUhCjHJ4AdmHPqlyxr
MeOEt6xIsdZU1Uk1VMpmJ4969uKxHjiriqXzhg==
-----END CERTIFICATE-----

Certificate name: Cisco ECC IAK CA
-----BEGIN CERTIFICATE-----
MIIDIzCCAqmgAwIBAgIJBEje0ku4AXhYMAoGCCqGSM49BAMDMCwxDjAMBgNVBAoT
BUNpc2NvMRowGAYDVQQDExFDaXNjbyBFQ0MgUm9vdCBDQTAgFw0yNDAxMTAxOTM3
NDdaGA8yMDk5MDExMDE5Mzc0N1owQTEOMAwGA1UEChMFQ2lzY28xDjAMBgNVBAsT
BVJvYnVyMR8wHQYDVQQDExZFQyBQMzg0IEF0dGVzdGF0aW9uIENBMHYwEAYHKoZI
zj0CAQYFK4EEACIDYgAEOyud77njuBar/GPcZtH7TIai4XAY7B6hftiadq3oj7+e
xGeAqes3K3IMVE17TNDkTLVTNoqIKTV50g6noezuXsOD/9zEwll2fsbzuzt1KFVr
bop5Pyq7HK5PI+dmRFjgo4IBfjCCAXowDgYDVR0PAQH/BAQDAgEGMBIGA1UdEwEB
/wQIMAYBAf8CAQAwfQYIKwYBBQUHAQEEcTBvMD8GCCsGAQUFBzAChjNodHRwOi8v
d3d3LmNpc2NvLmNvbS9zZWN1cml0eS9wa2kvY2VydHMvZWNjcm9vdC5jZXIwLAYI
KwYBBQUHMAGGIGh0dHA6Ly9wa2ljdnMuY2lzY28uY29tL3BraS9vY3NwMB8GA1Ud
IwQYMBaAFKRFti+jMbF2FbAKGDPK9q1PPSgEMFEGA1UdIARKMEgwRgYJKwYBBAEJ
FQFVMDkwNwYIKwYBBQUHAgEWK2h0dHA6Ly93d3cuY2lzY28uY29tL3NlY3VyaXR5
L3BraS9wb2xpY2llcy8wQgYDVR0fBDswOTA3oDWgM4YxaHR0cDovL3d3dy5jaXNj
by5jb20vc2VjdXJpdHkvcGtpL2NybC9lY2Nyb290LmNybDAdBgNVHQ4EFgQUQuOx
5As0KbV+3dYMwPGomM/QrKEwCgYIKoZIzj0EAwMDaAAwZQIwWlteUTHSxAe6d3Gp
T9E1HZGX+oAQSijo/dPWSkhdbchO+Fe6M9bzjb+gvaUt/EBDAjEAoDLC0H4/JW3i
6jElqnEYqD6GWiiQALvz0Zop6JI897nD/WJvsjnPGgMfxtNDfq3H
-----END CERTIFICATE-----

Certificate name: Cisco ECC IAK
-----BEGIN CERTIFICATE-----
MIIDdzCCAvygAwIBAgIKBWSFFBERQYNRaTAKBggqhkjOPQQDAzBBMQ4wDAYDVQQK
EwVDaXNjbzEOMAwGA1UECxMFUm9idXIxHzAdBgNVBAMTFkVDIFAzODQgQXR0ZXN0
YXRpb24gQ0EwIBcNMjUwNTIzMTYzMjIyWhgPMjA5OTAxMTAxOTM3NDZaMIGgMSYw
JAYDVQQFEx1QSUQ6ODgwMC1SUDItUyBTTjpGT0MyODQ1TjFCSjEOMAwGA1UEChMF
Q2lzY28xETAPBgNVBAsTCFRQTSBTVURJMVMwUQYDVQQDE0pDaXNjbyA4ODAwIFJv
dXRlIFByb2Nlc3NvciAyIChzWlRQIGRlZmF1bHQpIE1BQzpjNGFiNGRmZjgzYzAt
MDAwODgwMC1SUDItUzB2MBAGByqGSM49AgEGBSuBBAAiA2IABInu07M6N/F10hLw
A4KsafCGzqkeft/5nR3awykGZfzRvOAZC3U6mnXniJezgVoEATTnGFO6sQZZSMFO
xrBDdLmNkMlY7Neq/8pC/rqDoFGJi+oD4jOSdTD+Lgj+3XfRi6OCAVswggFXMA4G
A1UdDwEB/wQEAwIF4DAMBgNVHRMBAf8EAjAAMB8GA1UdIwQYMBaAFELjseQLNCm1
ft3WDMDxqJjP0KyhMB0GA1UdIAQWMBQwCAYGZ4EFCwEBMAgGBmeBBQsBAzCB1wYD
VR0RBIHPMIHMoHEGCCsGAQUFBwgEoGUwYwYFZ4EFAQIEWjUzNTQ0RDIwOjUzZGVj
NTJhNGI4MGE3M2M1YjliYzA2OWVjNDA3OTE2YmYzYjMzODA6MTZiOWY5ZWEyMTE0
MWZmODVjMDIwM2NmYTgxMGM4OTcxMGI0YjlkNKBXBggrBgEFBQcIA6BLMEkMQDg3
OWVmMDI1MTU5ZGE1ZTM1M2VhMmUzYjA4Y2RjNDIwM2Q1MjcwMTUyYzE4ZWJkZWIw
OGI3OTMzMWEwNzg0NGQGBWeBBQwBMB0GA1UdDgQWBBT4wBA1PZL4Nz6AtQ4p/tXV
ZM5MHTAKBggqhkjOPQQDAwNpADBmAjEAlvOCAK8orDACly8G67vmtkPpt3tNL47F
1p6OoHNh0DSn7CNhbonVuslq8cRpZTVbAjEA/YC0I0EGTxRkVquPYtByiJVXHLOX
pUDdcb4/1BilpLgq3Ypaec4lF2v0wqPNZvw3
-----END CERTIFICATE-----

You have successfully verified whether TPM is enabled and correctly configured on the device.