Information About Header Compression
Header Compression Defined
Header compression is a mechanism that compresses the IP header in a data packet before the packet is transmitted. Header compression reduces network overhead and speeds up the transmission of Real-Time Transport Protocol (RTP) and Transmission Control Protocol (TCP) packets. Header compression also reduces the amount of bandwidth consumed when the RTP or TCP packets are transmitted.
Types of Header Compression
Cisco provides the following two types of header compression:
-
RTP header compression (used for RTP packets)
-
TCP header compression (used for TCP packets)
Both RTP header compression and TCP header compression treat packets in a similar fashion, as described in the sections that follow.
 Note |
RTP and TCP header compression are typically configured on a per-interface (or subinterface ) basis. However, you can choose to configure either RTP header compression or TCP header compression on a per-class basis using the Modular Quality of Service (QoS) Command-Line Interface (CLI) (MQC). More information about class-based RTP and TCP header compression is provided later in this module. |
RTP Functionality and Header Compression
RTP provides end-to-end network transport functions for applications that support audio, video, or simulation data over unicast or multicast services.
RTP provides support for real-time conferencing of groups of any size within the Internet. This support includes source identification support for gateways such as audio and video bridges, and support for multicast-to-unicast translators. RTP provides QoS feedback from receivers to the multicast group and support for the synchronization of different media streams.
RTP includes a data portion and a header portion. The data portion of RTP is a thin protocol that provides support for the real-time properties of applications, such as continuous media, including timing reconstruction, loss detection, and content identification. The header portion of RTP is considerably larger than the data portion. The header portion consists of the IP segment, the User Datagram Protocol (UDP) segment, and the RTP segment. Given the size of the IP/UDP/RTP segment combinations, it is inefficient to send the IP/UDP/RTP header without compressing it.
To avoid the unnecessary consumption of available bandwidth, RTP header compression is used on a link-by-link basis.
How RTP Header Compression Works
RTP header compression compresses the RTP header (that is, the combined IP, UDP, and RTP segments) in an RTP packet. the figure below illustrates this process and shows how RTP header compression treats incoming packets.
In this example, packets arrive at an interface and the packets are classified. After the packets are classified, they are queued for transmission according to the configured queuing mechanism.
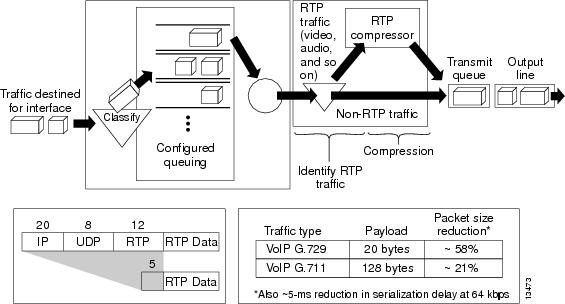
For most audio applications, the RTP packet typically has a 20- to 128-byte payload.
RTP header compression identifies the RTP traffic and then compresses the IP header portion of the RTP packet. The IP header portion consists of an IP segment, a UDP segment, and an RTP segment. In the figure above, the minimal 20 bytes of the IP segment, combined with the 8 bytes of the UDP segment, and the 12 bytes of the RTP segment, create a 40-byte IP/UDP/RTP header. In the figure above, the RTP header portion is compressed from 40 bytes to approximately 5 bytes.
Note |
RTP header compression is supported on serial interfaces using Frame Relay, HDLC, or PPP encapsulation. It is also supported over ISDN interfaces. |
Why Use RTP Header Compression
RTP header compression accrues major gains in terms of packet compression because although several fields in the header change in every packet, the difference from packet to packet is often constant, and therefore the second-order difference is zero. The decompressor can reconstruct the original header without any loss of information.
RTP header compression also reduces overhead for multimedia RTP traffic. The reduction in overhead for multimedia RTP traffic results in a corresponding reduction in delay; RTP header compression is especially beneficial when the RTP payload size is small, for example, for compressed audio payloads of 20 to 50 bytes.
Use RTP header compression on any WAN interface where you are concerned about bandwidth and where there is a high portion of RTP traffic. RTP header compression can be used for media-on-demand and interactive services such as Internet telephony. RTP header compression provides support for real-time conferencing of groups of any size within the Internet. This support includes source identification support for gateways such as audio and video bridges, and support for multicast-to-unicast translators. RTP header compression can benefit both telephony voice and multicast backbone (MBONE) applications running over slow links.
Note |
Using RTP header compression on any high-speed interfaces--that is, anything over T1 speed--is not recommended. Any bandwidth savings achieved with RTP header compression may be offset by an increase in CPU utilization on the router. |
 Feedback