Job Management

The section contains the following topics:

About Jobs and the Job Center

Any tasks or actions carried out by Cisco Business Dashboard are referred to as Jobs and are tracked in the Job Center. Jobs include both user-initiated jobs and jobs initiated automatically by the system.

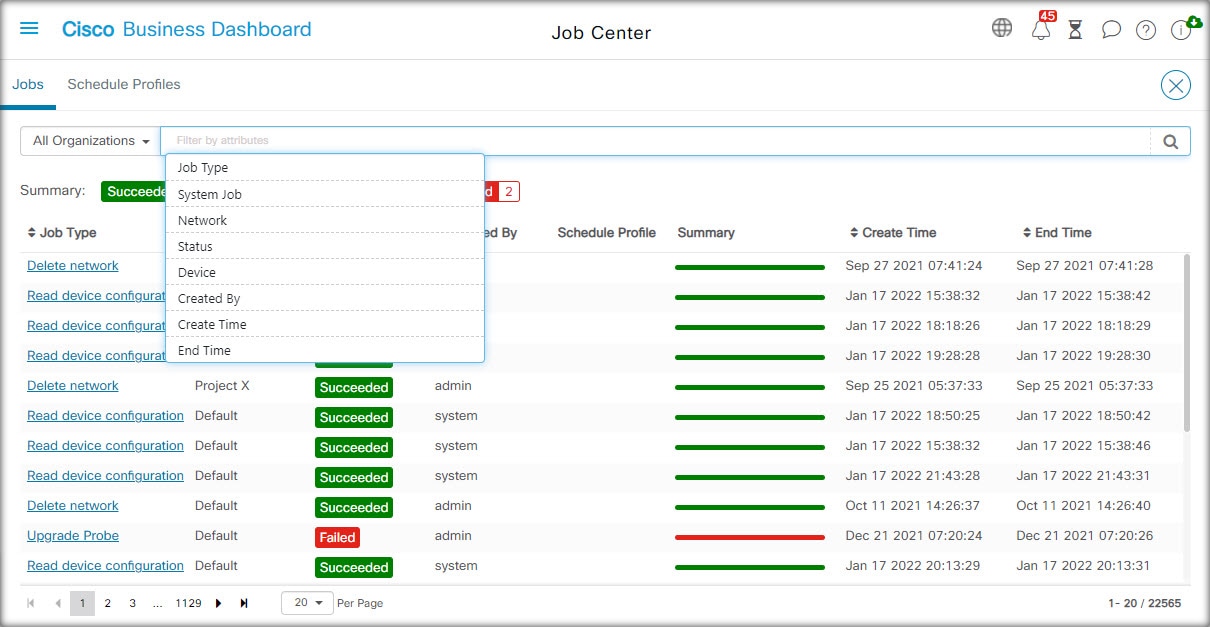
The Job Center lists all jobs that are currently executing or have occurred in the past on the Jobs tab, including details such as the type of job, affected devices, and the current status or whether the job completed successfully.

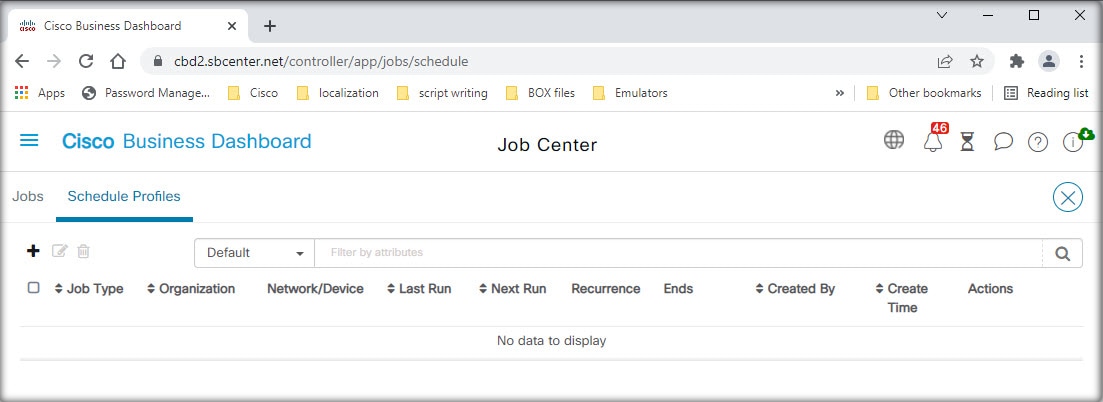
In addition to showing currently executing and historical jobs, the Job Center has a second tab for Schedule Profiles. A Schedule Profile represents a job that is yet to occur because it has been scheduled for a later date. Schedule Profiles include tasks that will run only once, as well as tasks that have been defined to run periodically.

Viewing and Filtering Jobs and Schedule Profiles

To view currently active jobs, historical jobs, and schedule profiles for jobs yet to be executed, follow the steps below.

Procedure


Step 1

In the Home window, click the Job Center icon on the top right corner of the global tool bar.

The number badge on the icon specifies the total number of currently executing jobs.


Currently active and historical jobs are listed on the Jobs tab in the Job Center, while schedule profiles may be found on the Schedule Profiles tab. Information such as the Job Type, who it was created by and when, and status information are all displayed. You may click on the Job Type parameter for a specific job or schedule profile to display more detailed information

Step 2

The Filter box limits the jobs or profiles displayed in the table. By default, all jobs and profiles will be listed. To change an existing filter, double-click on that filter to change the setting. To add a new filter, click on the Filter by attributes label and select a filter from the drop-down list. The following filters are available:

Table 1. Available Filters

Filter

Description

Job Type

Select the type of job or profile to display from the drop-down list provided.

System Job

Use the checkbox to control whether only jobs initiated by the system are displayed, or only jobs initiated by a user. This filter is only available on the Jobs tab.

Status

Select a status value from the drop-down list to limit the display to only jobs in that state. This filter is only available on the Jobs tab.

Device

Limit the display to only jobs or profiles that affect the selected device.

Created by

Enter text in the field provided when this filter is selected. Jobs or profiles created by users matching the text entered will be displayed.

Create Time

Use the controls provided in this filter to specify a time interval. Jobs or profiles created during this interval will be displayed.

End Time

Use the controls provided in this filter to specify a time interval. Jobs that complete execution during this interval will be displayed. This filter is only available on the Jobs tab.

Recurrence

Select one of the supported frequencies from the drop-down list. Profiles that are set to recur with that frequency will be displayed. This filter is only available on the Schedule Profiles tab.

Network

Limit the display to only profiles that affect the selected network.

Next Run

Use the controls provided in this filter to specify a time interval. Profiles that will next execute during this interval will be displayed. This filter is only available on the Schedule Profiles tab.


Managing Schedule Profiles

The Schedule Profiles tab does not just allow you to view the profiles that have been defined. You can also create new profiles and edit or delete existing profiles. You can also search for all the jobs that have been created by a profile.

To create a new schedule profile, follow the steps below.


  1. In the Home window, click the Job Center icon

    on the top right corner of the global tool bar. Select Schedule Profiles.
  2. Click the ✚ (plus) icon at the top left of the table.

  3. In the Job Detail section of the displayed form, select a job type, organization, and target devices or networks. Note that selected job types may not be applied to a network.

  4. In the Schedule section of the form, select a recurrence and specify a start time for the job. For recurring jobs, also specify when the job should end.

    A job can also be scheduled to occur in the next change window or in each change window. The timing of the job is controlled by the change window settings applied at either the network or organization level. For more details on change windows, see Managing Change Windows.

  5. Depending on the job type selected, additional information may be required. If so, additional fields will be displayed underneath the Schedule section of the form. Complete these fields as required.

  6. When you are satisfied with the configuration, click Save.

    To exit without creating a profile, click Cancel.

To edit an existing schedule profile, follow the steps below.

  1. In the Home window, click the Job Center icon on the top right corner of the global tool bar. Select the Schedule Profiles tab.

  2. Identify the profile you need to edit. You can use the filters described above to help you identify the right profile.

  3. Look in the Actions column at the far right of table. Click the edit icon.

  4. Update the profile using the form that is provided. Note that you cannot change the job type of a profile.

  5. When you are satisfied with your changes, click Save. To discard any changes, click Cancel.

To remove an existing schedule profile, follow the steps below.

  1. In the Home window, click the Job Center icon on the top right corner of the global tool bar. Select the Schedule Profiles tab.

  2. Identify the profile you want to remove. You can use the filters described above to help you identify the right profile.

  3. Click the delete icon in the Actions column to remove the profile.

To see all the jobs associated with a schedule profile, follow the steps below.

  1. In the Home window, click the Job Center icon on the top right corner of the global tool bar. Select the Schedule Profiles tab.

  2. Identify the profile you want to search for associated jobs. You can use the filters described above to help you identify the right profile.

  3. Click the View Jobs icon in the Actions column. The view switches to the Jobs tab with the displayed filtered to show only jobs that are associated with this profile.

Managing Change Windows

Change windows are periods of time that may be used to perform actions that may disrupt the network without impacting users. A change window is generally defined to occur outside working hours on a weekend or during the night but can be set to any time that suits the requirements of the organization. A change window is a recurring interval and is set by default in Cisco Business Dashboard to occur every week on Sunday between 2:00 am and 3:00 am.

Change windows are defined at the organization level but can be overwritten at the network level if required. To modify the change window for an organization, follow the steps below.

  1. Navigate to Administration>Organizations.

  2. Select the radio button for the organization to be modified and click the edit icon.

  3. Click the edit icon next to the Change Window Summary parameter. A pop-up window opens allowing you to change the frequency that the change window occurs and the day and time the widow should start. By selecting the appropriate Timezone, you are able to specify the start time as a local time for the organization which reduces the potential for error. When your updates are complete, click Save to close the pop-up.

  4. You should also set the duration of the change window. A change window may be specified in minutes or hours and must be at least 30 minutes long.

  5. When you are satisfied with your changes, click Save. To discard any changes, click Cancel.

To set a change window for a particular network that is different to the change window for the organization, follow the steps below.

  1. Navigate to the Network page.

  2. Select the checkbox for the network to be modified and click Settings in the Network Info panel that appears.

  3. Click the edit icon located at the top left next to the name of the network.

  4. Under the Change Window heading, uncheck the Use Organization Change Window checkbox

  5. Click the edit icon next to the Change Window Summary parameter. A pop-up window opens allowing you to change the frequency that the change window occurs and the day and time the window should start. By selecting the appropriate timezone, you are able to specify the start time as a local time for the organization which reduces the potential for error. When your updates are complete, click Save to close the pop-up.

  6. You should also set the duration of the change window. A change window may be specified in minutes or hours and must be at least 30 minutes long.

  7. When you are satisfied with your changes, click OK. To discard any changes, click Cancel.

To configure a network to use the organization change window, follow the steps below.

  1. Navigate to the Network page.

  2. Select the checkbox for the network to be modified and click the Settings button in the Network Info panel that appears.

  3. Click the edit icon located at the top left next to the name of the network.

  4. Under the Change Window heading, check the Use Organization Change Window checkbox.

  5. When you are satisfied with your changes, click OK. To discard any changes, click Cancel.