At the time of installation, Cisco Business Dashboard will generate a self-signed certificate to secure web and other communication with the server. You may choose to replace
this certificate with one signed by a trusted certificate authority (CA).
There are several ways this can be done:
-
Cisco Business Dashboard supports automatically issuing and renewing certificates from the Let's Encrypt certificate authority.
-
You may provide a certificate signing request (CSR) to your preferred certificate authority for signing. Cisco Business Dashboard
will generate the CSR for you.
-
You may choose to have the certificate authority generate a certificate and the corresponding private key independently from
the Dashboard. If so, you should combine the certificate chain and private key into a PKCS#12 format file prior to uploading
to the dashboard.
After updating the certificate, Cisco Business Dashboard will automatically push the updated certificate to all connected
devices and Probes, ensuring seamless connectivity without interruption.
For more details on each of these options, and instructions for viewing the current certificate and regenerating a self-signed
certificate, see the sections below.
Automatically Install a Certificate from Let's Encrypt
From release 2.2.1, Cisco Business Dashboard can automatically obtain and renew a domain-validated certificate from the Let’s Encrypt Certificate Authority (https://letsencrypt.org) and in release 2.5.0, these certificates can be managed through the Administration page.

Important
|
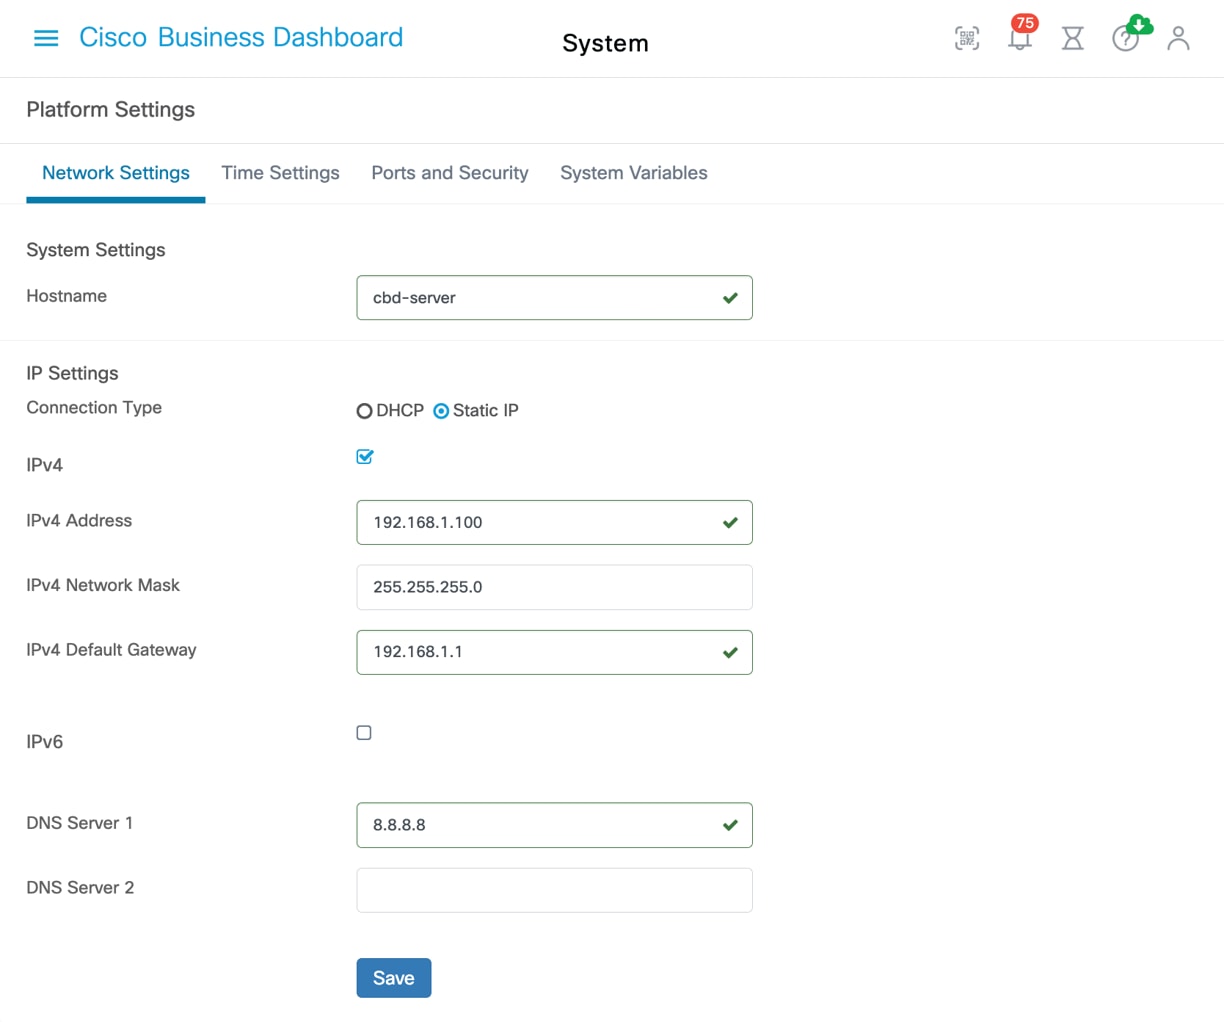
You must have a fully qualified domain name registered and a DNS record that points to the public IP address. Refer to Managing Platform Settings for more information.
|
To install a Let’s Encrypt certificate using the administration GUI, do the following:
-
Navigate to System> Certificate and select the Update Certificate tab.
-
Select the Let’s Encrypt Certificate radio button.
-
Check the box to enable the use of a Let’s Encrypt certificate.
-
Enter one or more fully qualified domain names into the fields provided. The names must be defined in the domain name system
(DNS) and resolve to the address of the Cisco Business Dashboard server.
-
Provide an email address to be used for urgent renewal and security notices.
-
Review the Let’s Encrypt Subscriber Agreement using the link provided and then check the box to accept the agreement.
-
Optionally check the box to share the email address with the Electronic Frontier Foundation (https://www.eff.org).
-
Click the Get Certificate button.
The Dashboard will contact the Let’s Encrypt Certificate Authority and obtain a certificate using the HTTP verification method.
The page will update to show the details of the certificate along with the expiry date. The certificate will be automatically
renewed approximately 30 days before expiry.
If you need to update the certificate at any point, follow these steps:
-
Navigate to System>Certificate and select the Update Certificate tab.
-
Select the Let’s Encrypt Certificate radio button.
-
Use the check-boxes and the fields provided to update the name(s) to be applied to the certificate.
Or you can update the contact details at the bottom of the screen.
-
Click the Get Certificate button.
You can also force the certificate to be regenerated before the normal renewal time by leaving the fields on the page unchanged
and clicking the Force Renewal button.
To install a Let’s Encrypt certificate using the command line, do the following:
-
Log on to the host operating system using SSH or via the console.
-
Execute the cisco-business-dashboard letsencrypt command and specify one or more fully qualified hostnames using the -d option. (For example, cisco-business-dashboard letsencrypt -d dashboard.example.com -d pnpserver.example.com.) All names listed in the command must resolve to the IP address of the dashboard server.
-
Follow the prompts to have a certificate issued and applied to the dashboard application. The certificate will be automatically
renewed by the dashboard as it approaches expiry.
Note
|
The Let’s Encrypt service will need to connect to the dashboard web server to verify ownership of the hostname(s). To allow this, the dashboard
web server must be accessible from the Internet. See Managing Platform Settings for details on how to restrict access to the dashboard application to only authorized IP addresses.
|
Generate a Certificate Signing Request (CSR)
-
Navigate to System>Certificate and select the CSR tab.
-
Enter appropriate values into the fields provided in the form that is displayed. These values will be used to construct the
CSR, and will be contained in the signed certificate you receive from the CA.
-
Click Create and the CSR will be automatically downloaded to your PC. Alternatively, you can download the CSR at a later date by clicking
Download next to the CSR label.
-
If necessary, you can modify the CSR by returning to step 2.
Upload a New Certificate
To upload a new certificate using the administration GUI, follow the steps below.
-
Navigate to System>Certificate and select the Update Certificate tab.
-
Select Upload Cert radio button. The file containing the certificate can be dropped on the target area, or you may click the target area to
browse the file system. The file should be in PEM format.
You may also upload a certificate with the associated private key in PKCS#12 format by selecting the Upload PKCS12 option instead. The password to unlock the file should be specified in the field provided.
-
Click Upload to upload the file and replace the current certificate.
To upload a new certificate using the command line, do the following:
-
Copy the certificate and private key files to the Cisco Business Dashboard file system using SCP or similar. Ensure access
to these files is restricted to authorized personnel only as the private key is sensitive information.
-
Log on to the operating system using the console or SSH.
-
Apply the certificate to the dashboard application using the command: cisco-business-dashboard importcert -t pem -k <private key file> -c <certificate file>. The certificate and private key will be loaded into the dashboard application and replace the current certificate. For more
information on this command and its options, enter cisco-business-dashboard importcert -h.
Note
|
Some browsers may generate certificate warnings for certificates that have been signed by a well-known certificate authority,
while other browsers accept the certificate without any warning. Network Plug and Play clients may also fail to accept the
certificate. This is because the certificate authority has signed the certificate with an intermediate certificate that is
not included in the browser or PnP client's trusted authorities store. In these circumstances, the certificate authority provides
a bundle of certificates that must be concatenated with the server certificate before uploading to the Dashboard.
During upload, the dashboard will remove any duplicates or unnecessary certificates from the chain and attempt to assemble
it in the correct order. Select the Current Certificate tab after upload to confirm that the certificate chain is complete
and correctly formatted.
|
Regenerate the Self-Signed Certificate
To regenerate the self-signed certificate, follow the steps below.
-
Navigate to System>Certificate and select the Update Certificate tab.
-
Click Renew Self-Signed Cert. Enter appropriate values into the fields provided in the form that is displayed. These values will be used to construct
the certificate.
-
Click Save.
View the Current Certificate
To view the current certificate, follow the steps below.
-
Navigate to System>Certificate and select the Current Certificate tab.
-
Each certificate in the chain of trust for the dashboard is listed in the table at the top of the screen, along with its type,
subject and expiry date. For a dashboard with a self-signed certificate, there will be only one entry in the table, while
a dashboard using a CA-signed certificate may have several entries.
-
Click on a row of the table to display the details of the corresponding certificate in the box below.
-
You may use the icons in the Actions column to down the root certificate in the chain or copy it to the clipboard. The root
certificate may be required when configuring devices to connect to the dashboard when the certificate is self-signed or signed
by a private CA.
Downloading the Current Certificate Chain
To download a copy of the current certificate chain, follow the steps below.
-
Navigate to System>Certificate and select the Current Certificate tab.
-
Click the Download Certificate Chain button at the bottom of the page. The certificate chain will be downloaded in PEM format by your browser.
Automatically Install a Certificate from Let's Encrypt
From release 2.2.1, Cisco Business Dashboard can automatically obtain and renew a domain-validated certificate from the Let’s Encrypt Certificate Authority (https://letsencrypt.org) and in release 2.5.0, these certificates can be managed through the Administration page.
Important
|
You must have a fully qualified domain name registered and a DNS record that points to the public IP address. Refer to Managing Platform Settings for more information.
|
To install a Let’s Encrypt certificate using the administration GUI, do the following:
-
Navigate to System> Certificate and select the Update Certificate tab.
-
Select the Let’s Encrypt Certificate radio button.
-
Check the box to enable the use of a Let’s Encrypt certificate.
-
Enter one or more fully qualified domain names into the fields provided. The names must be defined in the domain name system
(DNS) and resolve to the address of the Cisco Business Dashboard server.
-
Provide an email address to be used for urgent renewal and security notices.
-
Review the Let’s Encrypt Subscriber Agreement using the link provided and then check the box to accept the agreement.
-
Optionally check the box to share the email address with the Electronic Frontier Foundation (https://www.eff.org).
-
Click the Get Certificate button.
The Dashboard will contact the Let’s Encrypt Certificate Authority and obtain a certificate using the HTTP verification method.
The page will update to show the details of the certificate along with the expiry date. The certificate will be automatically
renewed approximately 30 days before expiry.
If you need to update the certificate at any point, follow these steps:
-
Navigate to System>Certificate and select the Update Certificate tab.
-
Select the Let’s Encrypt Certificate radio button.
-
Use the check-boxes and the fields provided to update the name(s) to be applied to the certificate.
Or you can update the contact details at the bottom of the screen.
-
Click the Get Certificate button.
You can also force the certificate to be regenerated before the normal renewal time by leaving the fields on the page unchanged
and clicking the Force Renewal button.
To install a Let’s Encrypt certificate using the command line, do the following:
-
Log on to the host operating system using SSH or via the console.
-
Execute the cisco-business-dashboard letsencrypt command and specify one or more fully qualified hostnames using the -d option. (For example, cisco-business-dashboard letsencrypt -d dashboard.example.com -d pnpserver.example.com.) All names listed in the command must resolve to the IP address of the dashboard server.
-
Follow the prompts to have a certificate issued and applied to the dashboard application. The certificate will be automatically
renewed by the dashboard as it approaches expiry.
Note
|
The Let’s Encrypt service will need to connect to the dashboard web server to verify ownership of the hostname(s). To allow this, the dashboard
web server must be accessible from the Internet. See Managing Platform Settings for details on how to restrict access to the dashboard application to only authorized IP addresses.
|
 Feedback