KVM Installation

This chapter explains the required network configuration and the steps to install Crosswork Workflow Manager Solutions in a KVM environment.

Configure network bridges or SRIOV

Crosswork requires a 10G interface for all the data layer communications to operate at a scale. You can choose any networking configuration that provides 10G throughput.


Note


For KVM deployment, configure either network bridges or SRIOV, but not both.


For detailed instructions, see these topics:

Configure network bridges

A network bridge, such as Linux bridge and Open vSwitch (OVS), acts like a virtual network switch, allowing multiple network interfaces to communicate as if they are on the same physical network.

Follow these steps to configure network bridges.

Procedure


Step 1

Create a new network connection of type "bridge" with the interface name intMgmt and assign it the connection name intMgmt.

nmcli connection add type bridge ifname intMgmt con-name intMgmt

Step 2

Add a new bridge-slave connection, associating the physical network interface <interface1> with the previously created bridge intMgmt.

nmcli connection add type bridge-slave ifname <interface1> controller intMgmt

Example:

nmcli con add type bridge-slave ifname <hostmgmtIntf> master intMgmt con-name intMgmt-slave-<hostmgmtIntf>

Step 3

Assign IP address to the bridge.

nmcli connection modify intMgmt ipv4.addresses <IPv4-address>/<subnet-mask>

Example:

nmcli con modify intMgmt ipv4.addresses <hostmgmtIp/mask> ipv4.gateway 
<mgmtgw> ipv4.dns <dnsIp> ipv4.method manual ipv4.route-metric 50

Step 4

Bring up the intMgmt network connection.

nmcli connection up intMgmt

Example:

nmcli con up intMgmt
nmcli con up intMgmt-slave-<hostmgmtIntf>

Step 5

Create another network bridge connection with the interface name intData and assign it the connection name intData.

nmcli connection add type bridge ifname intData con-name intData

Example:

nmcli con add type bridge ifname intData con-name intData

Step 6

Add a bridge-slave connection, associating the physical network interface <interface2> with the previously created bridge intData.

nmcli connection add type bridge-slave ifname <interface2> controller intData

Example:

nmcli con add type bridge-slave ifname <hostdataIntf> master intData con-name intData-slave-<hostdataIntf>

Step 7

Assign IP address to intData.

nmcli connection modify intData ipv4.addresses <IPv4-address>/<subnet-mask>

Example:

nmcli con modify intData ipv4.addresses <hostdataIp/mask> ipv4.method manual ipv4.gateway <datagw> ipv4.route-metric 90

Step 8

Bring up the intData network connection.

nmcli connection up intData

Example:

nmcli con up intData
nmcli con up intData-slave-<hostdataIntf>

Both network bridges, intMgmt and intData, are configured and active, enabling communication across associated network interfaces as if connected to the same physical network.

Configure SRIOV

SRIOV allows you to share a single physical network interface among multiple VMs by creating multiple Virtual Functions (VFs).

Follow these steps to configure SRIOV.

Procedure


Step 1

Open the rc.local file in the vi editor.

vi /etc/rc.d/rc.local

Step 2

Set the number of VFs for the network interfaces according to your requirement. In a Cisco Crosswork Planning single VM installation, you need a minimum of two network interfaces: one for management and one for data. By default, two VFs are configured for each interface. You can configure additional VFs for future scalability needs.

For example, to set the number of VFs to 2 for each <interface1> and <interface2>, use these commands. In this example, <interface1> refers to the management interface and <interface2> refers to the data interface.

echo 2 > /sys/class/net/<interface1>/device/sriov_numvfs
echo 2 > /sys/class/net/<interface2>/device/sriov_numvfs

Step 3

Change the permissions of the rc.local file to make it executable.

chmod +x /etc/rc.d/rc.local

Step 4

If any of the interfaces are configured for VLAN, assign VLAN IDs to the interfaces.

ip link set <interface1> vf 0 vlan <vlanid>
ip link set <interface2> vf 1 vlan <vlanid>

Step 5

Save the changes and reboot the system.

Step 6

List all the PCI devices for all the virtual functions in a tree format. This is useful for verifying the setup and ensuring that the VFs are correctly recognized by the KVM hypervisor.

virsh nodedev-list --tree

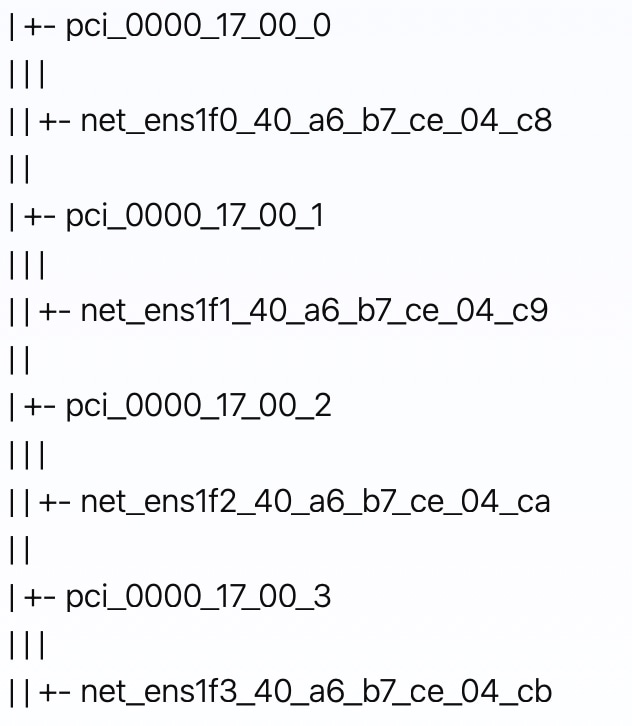
In this procedure, since we set the number of VFs as 2 in Step 2, two VFs for each management interface and data interface are created. As a result, a total of four PCI devices are generated: two for management and two for data.

This PCI device information is used during the installation process with SRIOV (Step 4 of ).


Install Crosswork on KVM

Follow these steps to deploy Crosswork on a single VM on KVM RHEL.


Note


The time taken to create the VM can vary based on the size of your deployment profile and the performance characteristics of your hardware.


Before you begin

Ensure that:


Attention


The download file names given in this topic are subject to change. You can always find the latest versions by pointing your browser to https://software.cisco.com/download/home and searching for Crosswork Network Controller > All Release.


Procedure


Step 1

Prepare a config IOS file ovf-env.xml) to use when installing the Crosswork VM.

Use the following example template to prepare the ovf-env.xml file:

<Environment
     xmlns="http://schemas.dmtf.org/ovf/environment/1"
     xmlns:xsi="http://www.w3.org/2001/XMLSchema-instance"
     xmlns:oe="http://schemas.dmtf.org/ovf/environment/1"
     xmlns:ve="http://www.vmware.com/schema/ovfenv"
     oe:id=""
   <PlatformSection>
      <Kind>KVM</Kind>
      <Version>7.2.0</Version>
      <Vendor>KVM</Vendor>
      <Locale>en</Locale>
   </PlatformSection>
    <PropertySection>
         <Property oe:key="CWPassword" oe:value="**********"/>
         <Property oe:key="CWUsername" oe:value="cw-admin"/>
         <Property oe:key="ClusterCaKey" oe:value=""/>
         <Property oe:key="ClusterCaPubKey" oe:value=""/>
         <Property oe:key="CwInstaller" oe:value="False"/>
         <Property oe:key="DNSv4" oe:value="171.70.168.183"/>
         <Property oe:key="DNSv6" oe:value="::0"/>
         <Property oe:key="DataIPv4Address" oe:value="192.168.5.48"/>
         <Property oe:key="DataIPv4Gateway" oe:value="192.168.5.1"/>
         <Property oe:key="DataIPv4Netmask" oe:value="255.255.255.0"/>
         <Property oe:key="DataIPv6Address" oe:value="::0"/>
         <Property oe:key="DataIPv6Gateway" oe:value="::1"/>
         <Property oe:key="DataIPv6Netmask" oe:value="64"/>
         <Property oe:key="DataPeerIPs" oe:value=""/>
         <Property oe:key="DataVIP" oe:value="192.168.5.51"/>
         <Property oe:key="DataVIPName" oe:value=""/>
         <Property oe:key="Deployment" oe:value="cw_ipv4"/>
         <Property oe:key="Disclaimer" oe:value="Cisco Crosswork"/>
         <Property oe:key="Domain" oe:value="cisco.com"/>
         <Property oe:key="EnableSkipAutoInstallFeature" oe:value="True"/>
         <Property oe:key="EnforcePodReservations" oe:value="True"/>
         <Property oe:key="IgnoreDiagnosticsCheckFailure" oe:value="True"/> 
         <Property oe:key="InitMasterCount" oe:value="1"/>
         <Property oe:key="InitNodeCount" oe:value="1"/>
         <Property oe:key="IsSeed" oe:value="True"/>
         <Property oe:key="K8Orch" oe:value=""/>
         <Property oe:key="K8sPodNetworkV4" oe:value="10.244.0.0"/>
         <Property oe:key="K8sServiceNetworkV4" oe:value="10.96.0.0"/>
         <Property oe:key="ManagementIPv4Address" oe:value="10.19.70.148"/>
         <Property oe:key="ManagementIPv4Gateway" oe:value="10.19.70.1"/>
         <Property oe:key="ManagementIPv4Netmask" oe:value="255.255.255.0"/>
         <Property oe:key="ManagementIPv6Address" oe:value="::0"/>
         <Property oe:key="ManagementIPv6Gateway" oe:value="::1"/>
         <Property oe:key="ManagementIPv6Netmask" oe:value="112"/>
         <Property oe:key="ManagementVIP" oe:value="10.19.70.151"/>
         <Property oe:key="ManagementVIPName" oe:value=""/>
         <Property oe:key="ManagerPeerIPs" oe:value=""/>
         <Property oe:key="NTP" oe:value="ntp.esl.cisco.com"/>
         <Property oe:key="Timezone" oe:value="US/Pacific"/>
         <Property oe:key="VMLocation" oe:value="default"/>
         <Property oe:key="VMType" oe:value="Hybrid"/>
         <Property oe:key="bckup_min_percent" oe:value="35"/>
         <Property oe:key="corefs" oe:value="18"/>
         <Property oe:key="ddatafs" oe:value="485"/>
         <Property oe:key="logfs" oe:value="20"/>
         <Property oe:key="ramdisk" oe:value="0"/>
         <Property oe:key="ssd" oe:value="15"/>
         <Property oe:key="VMSize" oe:value="XLarge"/>
         <Property oe:key="ThinProvisioned" oe:value="False"/>
         <Property oe:key="UseNonDefaultCalicoBgpPort" oe:value="False"/>
         <Property oe:key="bootOptions.efiSecureBootEnabled" oe:value="True"/>
   </PropertySection>
</Environment>

Step 2

Update the ovf-env.xml file you created using the parameter values you gathered for your KVM deployment (see General parameters).

$ cat ovf-env.xml

Step 3

Generate the ISO file.

$ mkisofs -R -relaxed-filenames -joliet-long -iso-level 3 -l -o cnc1.iso ovf-env.xml

Note


In the above command, cnc1 is the host name of the Cisco Crosswork VM.

Step 4

From https://software.cisco.com/download/home, download the latest version of the Cisco Crosswork platform qcow2.tar.gz file to a storage location on your KVM host: CW-CWM-Solutions-workflowmanager-2.1.0-14-SVM-7.2.0-45-qcow2.signed.bin.

Step 5

Extract the tar.gz file using the following command:

tar -xvf cnc-workflowmanager-single-node-deployment-7.2.0-45-qcow2.tar.gz

This command creates three qcow2 files:

  • cnc-workflowmanager-single-node-deployment-7.2.0-45_dockerfs.qcow2

  • cnc-workflowmanager-single-node-deployment-7.2.0-45_extrafs.qcow2

  • cnc-workflowmanager-single-node-deployment-7.2.0-45_rootfs.qcow2

Step 6

Navigate to the required installation folder and create three disks.

cd cnc1/
qemu-img create -f qcow2 disk3 20G
qemu-img create -f qcow2 disk4 485G
qemu-img create -f qcow2 disk6 15G
ls -1
cw_dockerfs.qcow2
cw_extrafs.qcow2
cw_rootfs.qcow2
disk3
disk4
disk6

Step 7

Install the Crosswork VM using either network bridge or SRIOV.

In these examples, cnc1 is the host name of the Crosswork VM.

  • Using network bridge:

    virt-install --boot uefi --boot hd,cdrom --connect qemu:///system --virt-type kvm --name cnc1 --ram 98304 --vcpus 12 --os-type linux --disk path=cnc-workflowmanager-single-node-deployment-7.2.0-45_rootfs.qcow2,format=qcow2,bus=scsi --disk path=cnc-workflowmanager-single-node-deployment-7.2.0-45_dockerfs.qcow2,format=qcow2,bus=scsi --disk path=disk3,format=qcow2,bus=scsi --disk path=disk4,format=qcow2,bus=scsi --disk path=cnc-workflowmanager-single-node-deployment-7.2.0-45_extrafs.qcow2,format=qcow2,bus=scsi --disk path=disk6,format=qcow2,bus=scsi --disk=cnckvm.iso,device=cdrom,bus=scsi --import --network bridge=intMgmt,model=virtio --network bridge=intData,model=virtio --noautoconsole --os-variant ubuntu22.04 --graphics vnc,listen=0.0.0.0
  • Using SRIOV:

    virt-install --boot uefi --boot hd,cdrom --connect qemu:///system --virt-type kvm --name cnc1 --ram 98304 --vcpus 12 --cpu host-passthrough --disk path=cw_rootfs.qcow2,format=qcow2,bus=scsi --disk path=cw_dockerfs.qcow2,format=qcow2,bus=scsi --disk path=disk3,format=qcow2,bus=scsi --disk path=disk4,format=qcow2,bus=scsi --disk path=cw_extrafs.qcow2,format=qcow2,bus=scsi --disk path=disk6,format=qcow2,bus=scsi --disk=cnc1.iso,device=cdrom,bus=scsi --import --network none --host-device=pci_0000_01_10_0 --host-device=pci_0000_01_10_0 --os-variant ubuntu-lts-latest &
    

Step 8

To track creation of the VM and success of the installation, follow the steps in Monitor Crosswork Server Activation.